Magento 2 Credit systems (Adobe Commerce) or the Buyer Credit module, the store admin can assign credit amounts to a customer and customer groups.
In-store currency can be useful for payment and allows an easy checkout with the amount.
So customers can use the assigned credit amount for purchasing the store products.
From the backend, the admin can view all the transactions done by the customer via the credit system.
Watch the below video tutorial to understand the Magento 2 Customer Credit Systems system extension workflow:
Features of Customer Credit System
- Admin can assign credits to a customer group.
- The admin can assign credits to individual/specific customers.
- Customers can see their assigned credits in the customer dashboard.
- Customer can send a credit request to the admin.
- A customer can buy the product by using their assigned credits.
- Customer can pay for the credits using an online/offline payment method.
- Admin can view all the transactions done by the customer via the credit system.
- A customer can see the entire transaction history in a customer account.
- The admin can pay credit from the admin panel to the respective customer.
- Admin can select the offline payment mode for paying credit to the customer.
- Approve or disapprove done by admin for the credit request sent by the customer.
- The admin can create individual credit amounts using a CSV/XLS file.
- Admin can import credit updates from a CSV/XLS file.
- Customers can use the credit amount partially to make payments.
- Admin can refund the amount in the credit wallet.
- hyva storefront compatible
- Magento 2 credit extension is compatible with GraphQL as well.
- Admin can refund the full amount in the credit wallet with the configuration setting.
Installation
Customers will get a zip folder and they have to extract the contents of this zip folder on their system.
The extracted folder has an src folder, inside the src folder you have the app folder.
You need to transfer this app folder into the Magento2 root directory on the server as shown below.

After the successful installation, you have to run these commands in the Magento 2 root directory.
composer require phpoffice/phpspreadsheet
php bin/magento setup:upgrade
php bin/magento setup:di:compile
php bin/magento setup:static-content:deploy
php bin/magento indexer:reindex
php bin/magento cache:flush
Multilingual Support
For multilingual support, the admin will navigate through Store->Configuration->General ->Locale Options.
And select the locale as German (the language into which the admin wants to translate his store content).

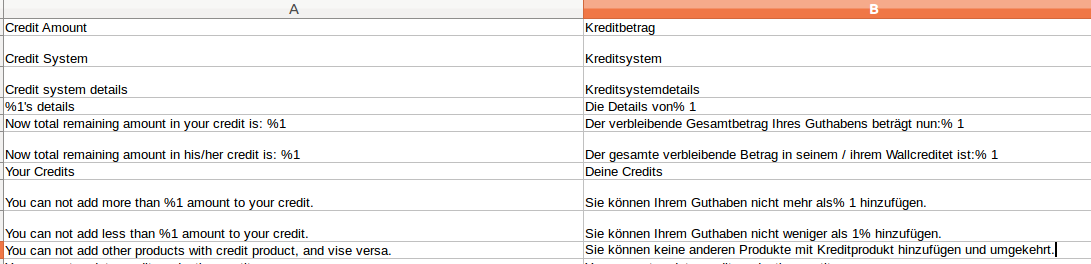
Module Translation
If you want to translate the Buyer Credit module language from English to German then follow the path src/app/code/Webkul/CustomerCreditSystem/i18n in their unzipped
Magento2_customer_credit_system folder. Then you will get a CSV file with the name “en_US.csv”.
Now, rename that CSV on your region code and language code “de_DE.csv” and translate all right-side content in your language.
After editing the CSV, save it and then upload it where you have installed Magento 2 on the server.
Buyer Credit module will get translated into your desired Language. It also supports RTL and LTR languages.
Customer Credit System Module Configuration
After the Buyer Credit module installation the admin will find the configuration settings panel by navigating through
Stores->Configuration->Webkul> Customer Credit System as per the below snapshot –

Customer Credit Group –
Assign Credit to Customer Group – Here, the admin can assign credit amounts to the customer groups.
The admin needs to select a customer group and enter the credit amount which the admin wants to assign to the customer group.
Admin can add more rows by clicking on the “Add” button. And admin can also delete the row by clicking on the delete sign in the ” Action ” column.
Pay Credit by Admin –
Select Payment Method – Here, the admin can select the offline payment method to pay creditors from the admin panel on behalf of the customer.
Refund Credit at the Time of Credit Memo –
Refund full amount to credit wallet – If yes then the whole refund amount will be credited to the customer’s credit wallet. If not then a partial amount will be credited.

Here, the admin can select the various credit system emails.
After that, the admin will have to configure the Webkul credit system by navigating through
Store> Configuration> Sales> Payment Methods> Webkul Credit System as per the below snapshot –

Enable This Payment Method –
From here, the admin can enable/ disable this payment method.
Payment Method Title –
Admin can set the payment method title which will be visible on the frontend.
Payment from Applicable Countries –
The admin can select the option ” Specific Countries” or ” All Allowed Countries”.
Payment from Specific Countries –
If the admin can select the ” Specific Countries” option then the admin can select countries from where the admin wants to accept the payment.
Remember- Here the Payment Specific country is for the billing address not for the shipping address.
Allowed Payment Methods on Checkout When Credit Product is in Cart –
With this option, set as ‘Yes’, the admin can set the credit system as the payment method on checkout when the credit product is in the cart.
However, if the option is set as ‘No’ then at the time of adding a credit product to the cart the customer in the front end
Will receive a message- “There is no payment method active in the admin account“.
Select Payment Methods on Checkout
The admin can set the payment method on checkout by selecting the option “Allow All” or “Allow Specific” which will be shown on the front end.
Allowed Payment Methods to Add Amount in Credit –
Here, the admin can select the payment methods for the customer to repay the used credit amount.
Sort Order –
Admin can set the order of the payment method to display on the front end.
Credit Details-
At the admin panel, the admin can view all credit details of the customers in the Credit Management as per the below snapshot –

In Credit Details, the admin can view the Customer Name, Customer Email, Total Amount,
Remaining Amount, Customer’s Amount, Used Amount, and Action as per the below snapshot –
Customer Amount – The additional amount than the credit limit that is added to the customer’s credit wallet. (eg – by a refund)

The admin will have three options Transactions Details, Pay Credit, and Credit Amount Request. When the admin clicks on the Select drop-down option under the Action column.
Details –
Then the admin can able to view all customer details like – Reference (transaction ID), Amount, Transaction Type
Transaction Status (pending or approved ), Transaction Date, and Base Amount (calculate according to base currency) as per the below snapshot –
Note – Transaction status changes from pending to approved when the invoice will be generated for the order. If the invoice generates then the status will be visible as “Approved”.

Pay Credit –
Here, the admin can pay the credit amount on behalf of the customer, if the customer sends the credit amount through an offline method.
Enter the pay credit amount and click on the “ Save” button and the transaction completes.

Credit Amount Request-
The Admin can approve or disapprove the credit request sent by a customer from the Actions dropdown menu.

Upload Credit Using CSV
This system allows merchants to import credit amount updates from a CSV/XLS file. This is especially useful from the Magento 2 system.
Importing the credit system from a CSV is easy to do. Once the Buyer Credit Module is installed, simply log in to your admin, go to Credit Management ->, and click Upload Credit Using CSV.

Once the above page has loaded choose CSV/XLS file from your system then upload and wait for the total credit to import as per the below snapshot-

This can be useful in situations where we need to process a large volume of credits and bypass the default functionality. Its purpose is to define individual credit amounts to create.
Using the Buyer Credit module you can import data through the CSV file. The merchants can import the Bulk data using a single click.
Use the Execution Log in the Magento backend to identify and fail imports.
When the import is complete, you will see an import summary as per the below snapshot-

A total of four credits are to import here in this screenshot, but when the import is complete, we get a total of two credits imported. As there is no existing data of the customer for a website in the CSV file.
Assign Credit to a Particular Customer
The admin can also assign credit amount to a particular customer by navigating through Customer > All Customer and then clicking on the
Edit option under the Action column for a particular customer as per the below snapshot –

In the customer information, the admin can assign a Credit Limit to the customer in the credit information tab as per the below snapshot.

Admin needs to mark the checkbox to use the particular credit limit.
And uncheck the checkbox to use customer group credit which is set in the module configuration by the admin. Under here,
The admin can view Used Credit, Remaining Credit, and Customer’s Amount.
The admin is also able to see all transaction information for the credit amount that the customer gets like
Transaction ID, Transaction Date, Transaction Type(debit or credit), Transaction Currency, Transaction Amount, and Status.
Note – Assign credit limit change at front-end if we change credit limit from group credit limit to particular credit limit.
For example – 1. Admin assigns a 500 USD credit limit to a group of customers and if the customer uses 20 USD then 480 USD will be the credit balance to that particular customer.
The customer account will get updated at the front end and the display credit balance is 480 USD, the amount to pay is 20 USD and the Credit limit is 500 USD.
2. Admin assigns a 200 USD credit limit to a group of customers and if the customer uses 200 USD then Admin assigns a 150 USD credit limit to that particular customer.
The customer account will be updated at the front end and display the credit balance ( – 50 USD) and the amount to pay is 200 USD.

Customer End – Adobe Commerce Customer Credit System

A customer can send a credit request to the admin and request more credit amounts from the Credit Amount Request option.

The customers can see their credit details through the Credit information option.
The customer can see the credit balance( Remaining credit amount ), the Amount to Pay ( have to pay the admin), and the Credit limit.
Pay Credits – It will be visible only after using the credit amount. From here, the customer can pay the used credit amount to the admin.
Last Transactions – The customer can view all transaction details like – Reference, Transaction Type ( debit/ credit), Amount, Transaction Status, and Transaction Date.
However, in the admin section, the ‘Allow Payment Methods on Checkout When Credit Product is in Cart is set’ as ‘No’.
Then on clicking Pay Credit, the customer will see a warning message as below.

Checkout Page –
The customer can pay for the web store’s products through the Webkul Credit System.
You are also able to view the Total Order Amount, Available Credit, and Remaining Credit on the checkout page.
Credit Wallet Full Payment – When the customer will pay the full amount by the credit wallet.

Credit Wallet Partial Payment-

When customers make partial payments with their wallet and rest payments with any other method to complete the purchase.
Order Management –
Webkul Buyer Credit System debited credit amount will be visible in the order details in the full credit wallet payment case as per the below snapshot –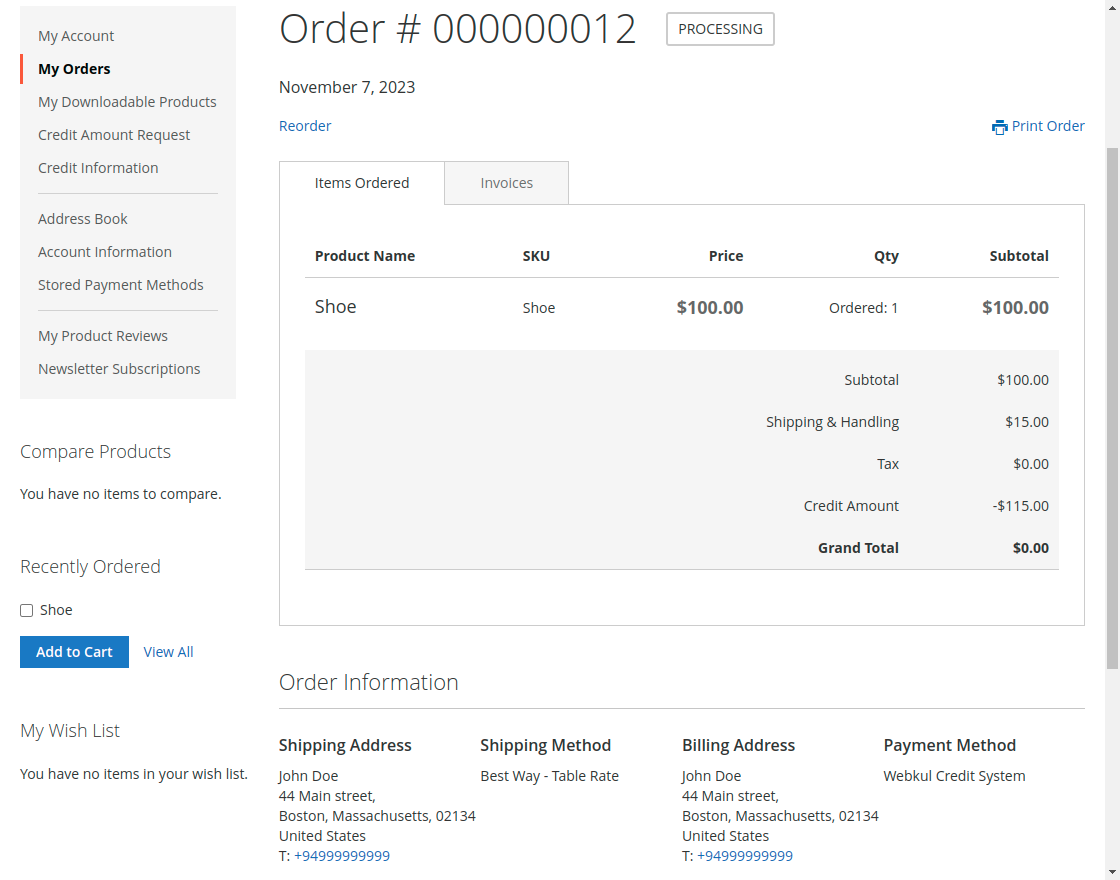
Webkul Credit System payment method + any other payment method in case of remaining additional payment will also be visible in the invoice details as per the below snapshot –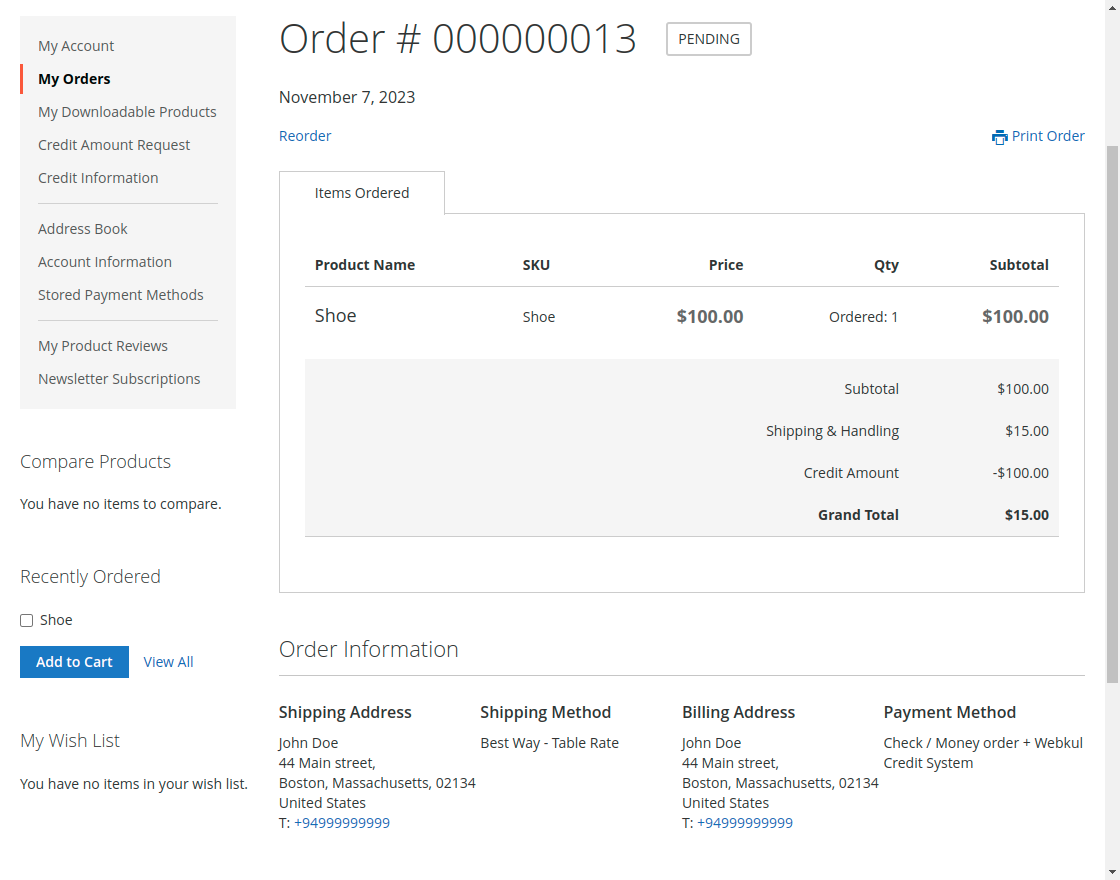
Pay Credit –
Customers will have to pay the credit after using the credit. For this, the customer needs to enter the payment amount and then click on the Pay Credit button.
The credit amount adds to the cart.
Then the customer can pay the credit amount as a default payment process through payment methods allowed by the admin as per the below snapshot –
The customer can not add another product with a credit amount in the Cart as per the below snapshot –

Order Refund
The admin can initiate the partial or full refund from their panel directly to the customer’s wallet by enabling it from the configuration.

The admin can generate credit memos from the order to initiate the refund directly to the credit balance.

That’s all for the Customer Buyer Credit System for Magento2 (Adobe Commerce) still have any issues feel free to add a ticket
And let us know your views to make Magento 2 credit module better at webkul.uvdesk.com. You may also check our quality Magento 2 Extensions.
Current Product Version - 4.0.6
Supported Framework Version - Magento 2.0.x, 2.1.x, 2.2.x,2.3.x, 2.4.x

Be the first to comment.