CS-Cart Mobile App is a flutter-based app for mobile devices that seamlessly integrates with your store. It provides customers with real-time access anytime, anywhere, at their convenience.
Note: Before installing the add-on, extract the downloaded package.
- Install the License Manager add-on first.
- Then install the required add-on.
- Follow the license activation steps to generate your license key.
Check a brief overview of the cs-cart mobile app –
Features of CS-Cart Mobikul Mobile App Builder
- Well integrated with CS-Cart Multi-store.
- Informative and interactive shopping app with fast and intuitive responses
- Supports default CS-Cart shipping methods.
- Supports phone orders, cash on delivery, fax orders, money orders, and personal cheques as payment methods.
- An option of the gift voucher, promotional, and coupon code has been provided.
- A feature of push notifications over the devices has been provided.
- Well configured and easy to use at the admin end.
- Allows to search products via text/image
Features added in CS-Cart Mobikul Mobile App Builder version 7.1
- At first, the functionality of multiple profile creation is available. It can be availed once enabled at the admin end.
- Barcode-based product search for faster item discovery
- The application supports multiple currencies.
- Functionality to support multiple languages.
- In particular, email should be validated when entered by the user.
- Front-end validation on each page should be equivalent to server-end validation. For example, if CS-Cart only allows 5 characters, the app should also validate those 5 characters.
- Each page’s cart total should be updated.
- Augmented Reality feature added.
- Provide a dominant color for all the images.
- In addition Every offline payment method, including checks, bank transfers, and COD, would function in the default application.
- Add featured categories to the mobile app.
- Add CMS pages to the mobile app.
- Set a walk-through for the mobile app.
- Add product and image-based carousels to the mobile app.
- Homepage Configurator option for the mobile app in the admin backend.
- Cache clear option in the admin backend.
- Choose the app Icon and category views from the available ones.
- Choose the app theme as Light or Dark.
- Configure the light and dark theme mode configuration.
- Customer and admin can communicate through messages within the order details.
- A “New” tag will automatically appear on the top corner of newly added products.
- The mobile app wallet offers customers multiple options for online transactions.
- Customers can revisit their last viewed products in the “Recently Viewed” section.
- The admin can manage the number of search results displayed on the search page.
Some More Additional features of CS-Cart Mobikul Mobile App Builder:
- Enable homepage layout customization.
- Allow storefront-specific homepage configurations.
- Support featured categories.
- Configure homepage banners.
- Showcase featured products
- Customize catalog search settings.
- Mark products as new.
- Enable product search by tags.
- Configure theme colors.
- Provide product comparison options.
- Compatible with multiple storefronts.
- Supports video, images and GIF banners on the homepage for engaging storefront promotions.
- Enables customers to save products for later and move them to cart when required.
- Supports video gallery on product pages for an enhanced product viewing experience.
- Supports Deep Linking functionality for seamless navigation to specific app pages.
Benefits of CS-Cart Mobikul Mobile App Builder
- Increases relationships and loyalty by reinforcing the store.
- Benefits sell through exposures across mobile devices.
- Strengthen the connectivity with on-the-go customers.
- Well-supportive in terms of accessibility, immediacy, and reachability.
Credentials for Firebase
In the Firebase section, the admin must create an account to obtain the FCM (Firebase Cloud Messaging) details.

Create an account on Firebase.
- Google FCM Project ID: You will get the Project ID of the Firebase app after creating a new app for the Firebase Cloud Messaging.

Click on the generate new private key button in the service account section to download the JSON file.
Find the Best CS-Cart
Development Company Find out More
Installation
After downloading the CS-Cart Mobikul add-on, you’ll get one zip file, one install and a relevant User Guide manual doc. Read it carefully for proper configuration.
Go to Manage Add-ons, and click on “Manual Installation” as shown below in the snapshot.

Click on “Local” to browse the zip file, and then click on “Upload & Install” as shown below in the snapshot.

Module Configuration | Admin
After installing the add-on, navigate through Add-ons ->Downloaded add-ons-> Mobikul.

Now, tap on the Mobikul Link and navigate to the Settings->General section.
General Section:
Note: Admin can select any storefront according to the configurations.

- Google FCM Project ID: Enter Project ID from the Firebase app.
- Google FCM Private Key: Upload Json file.
- Email: Enter the email address.
- Api Key: Enter the API Key.
- Enable Cache: When enabled, the app clears cached data at set intervals to maintain performance and updated content.
- Cache Time: Enter the time interval (in minutes) after which the app should automatically clear the cache.
Application Section:
Fill in all the required information to continue.

- Display the Play Store link:
If the “Display Play Store Link” option is enabled (visible on the web storefront), and a URL is provided in the Play Store Link field, it will direct users to the respective app on the Play Store.
- Display the App Store link:
When the “Display App Store Link” option is activated (visible on the web storefront), a URL is entered into the App Store Link field. It will result in a redirection to the corresponding app on the App Store.
- Enter the Play Store link.
- Enter the App Store link.
- Set the visibility on the top or bottom of the website as required.
- Display Text:
The entered text will be visible on the front of the Play Store and App Store buttons on the web storefront.
Storefront View:
When customers open the storefront, they will see the app link, allowing them to download the app from the Play Store or App Store.

The web storefront view will closely resemble the images shown, providing customers with a clear preview of the interface.
Payment Methods:
Choose the preferred payment option through which you would like to complete your purchase.

- Select payment methods: The payment methods selected by the admin will be visible on the app end.
Shipping Methods:
Choose the desired shipping option you want to use for delivering orders.

- Select Shipping Methods: Choose the preferred shipping method that you want to use for delivering the products.
App Configuration:
The admin can also manage the category views by selecting – Default Category View and Tab Category View.

- App Icon View – There are five types of launcher icons available.

App Icon General View:
App Icon on Device
The app icon appears on the device home screen with a clean and recognizable design, allowing users to quickly identify and access the application with a single tap.

App Category View :
The admin can also manage the category views by selecting – Default Category View and Tab Category View.

App Theme Mode :
The admin can also make the settings for –
- Light mode Theme Configuration

Here, the admin can set the –
- App Button Color
- App Theme Color
- Button Text Color
- Theme Text Color
Homepage Light Theme
Home Page Overview
The light mode offers a bright and clean interface, perfect for daylight usage. It ensures readability, clarity, and a fresh look while browsing products.

Homepage Dark Theme
Apart from that the admin can make the settings for Dark Mode Theme Configuration.

Here, the admin can set the –
- Theme Text Color
- App Button Color
- App Theme Color
- Button Text Color Homepage Dark Theme
Home Page Overview
The dark mode provides a sleek and comfortable viewing experience in low-light environments. It reduces eye strain and gives the app a modern, stylish appearance.

Catalog search configuration:

Here, the admin can configure the number of search results displayed on the search page when the customer is searching product.
Display tag in search: Admin can enable or disable displaying the tag on the search page.
Number of tags to display in search: Admin can set the count of tag displays that can appear on the search page.
Display product in search: The admin can enable or disable displaying the product on the search page.
Quick & Smart Search
Easily find products using text or image search. Simply type a keyword to locate your desired items instantly.

Product settings :
The admin will navigate to Product > Product Settings > Add-ons > Mobikul.

Here, the admin will set up the product setting for Mobikul:
Set product as new: When a new product is added, a “New” tag will appear in the top corner of the product.
CS-Cart Mobikul Mobile App Builder – Management Options
Navigate to Mobikul and find the options to configure the mobile app here.

The options include –
- Banner
- Featured Category
- Notifications
- Pages
- Augmented Reality
- Walkthrough
- Carousel
- Homepage Configurator
- Clear Cache.
Let’s go through each of the sections one by one:
Banner Section: Mobikul
Tapping on the banner option brings up the complete list of banners if already been created. Otherwise, you will see this section as empty when you come to this section.

To add a new banner, tap the “+ ” icon on the top right-hand corner, this brings up the below section.

- Set the parameters as shown below in the snapshot-
- Enter the name of the banner.
- Set the banner type as Product, Category, External Link, or No Link as required.
The option of selecting the category is available when the banner type is set as “category”.
 The option of entering the external link is available when the banner type is set as “External Link”.
In the case of No Link, only a banner creation option is available.

- Upload the image via the given options.
After selecting the appropriate options, save the banner.
Featured Category: Mobikul
Under this section, you will find all of the created featured categories for the mobile app.

Here, the admin can add a new featured category for the mobile app, edit the already added one, and delete or make the status of the featured category active or disabled as required.

To add a new featured category listing, tap the “+” icon, and that brings up the below section.

Here, enter the –
- Featured Category name.
- Tap the add categories option to add categories as featured.

The admin can also edit the featured category.

Mobikul Notification:
Here, the admin can create three types of Mobikul Notification – product, category and other.

Apart from that, the admin can send the created notifications to the mobile users by selecting and tapping the Send selected button.

To create a notification, tap the “+” button, and that brings up the below section.

Here, the admin will –
- Enter the title of the notification.
- Select the type as Product or category or other.

- Choose the image for the notification.
- Choose the product or category or other as per the selected option “Type”.
- Set the status as Active or Disabled.
- Enter the Content for the notification.
Tap, the Create button to create the notification.
Mobikul Pages:
Here, the admin can create the pages for the mobile app that can be accessed by the users.

Here, to add a new Page or CMS Page tap the “+” button, and that brings up the below section.

Set the parameters as shown below in the snapshot-
- Set the title of the page.
- Choose the position in the mobile app.
- Choose the page.
Lastly, tap the Create button to create the page.
Augmented Reality:
AR enables the customer to make an informed choice by providing them with a realistic view of the product. Here, the admin can see all of the AR products that he has added.

To add an Augmented Reality product the admin will tap the “+” button and the below section appears.
Here, the admin will –
Choose Products: Here the admin needs to select the products for Augmented reality view.
Upload Android 3D model: To upload a media file (image) for Android, use the Android File section. Also, the image is in GLB format.
Upload iOS 3D model: The iOS File section is where media files (images) for iOS (Apple) are uploaded. The image format for iOS is USDZ.
AR Status: Here the admin can enable or disable the AR functionality.
Lastly, tap the Create button.

Customers can visualize products in real-time using augmented reality, helping them make more confident and informed purchase decisions.


Walk Through: Mobikul
Navigate through Mobikul->Walkthrough.
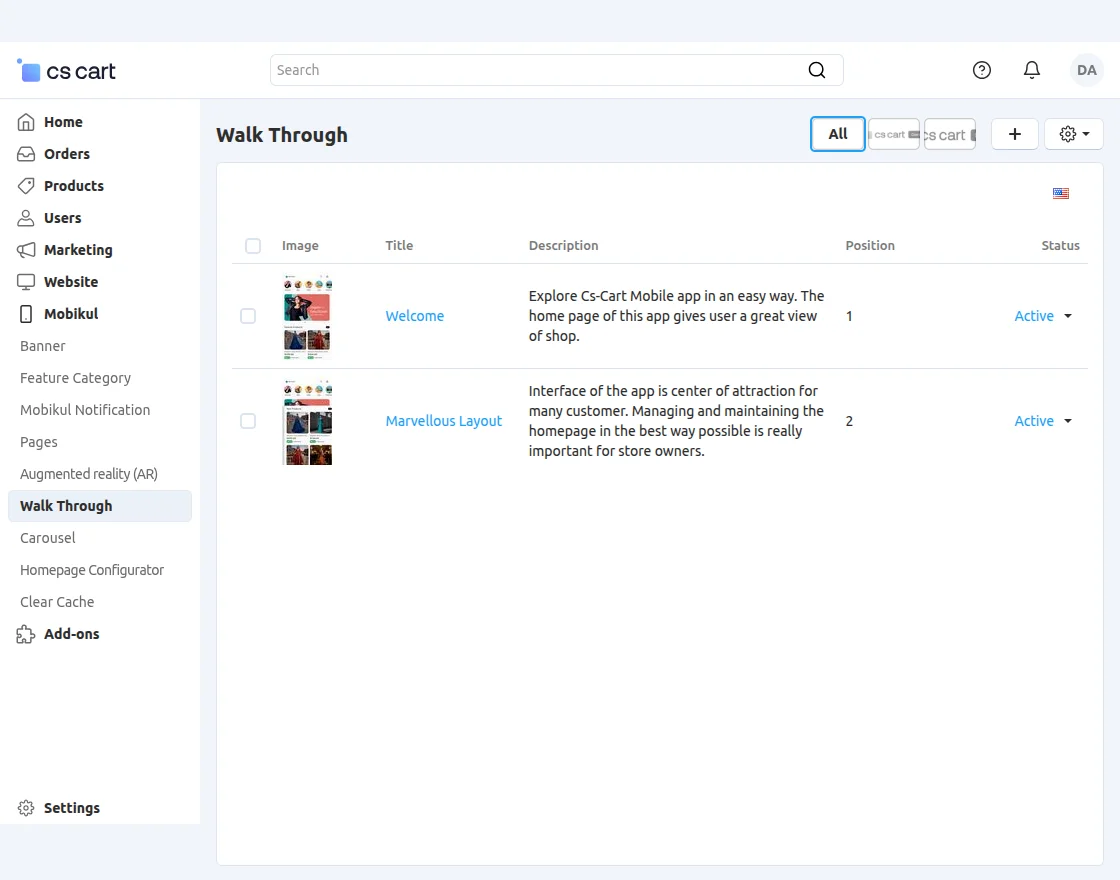
Here, you will find all of the walkthroughs that you have created if any. To add a new walkthrough, tap the “+” button, and that brings up the below section.

Here, the admin will enter the –
- Title of the walk-through.
- Description of the walk-through.
- Set the position on the mobile app.
- Upload the Walk-through image.
- Set the status as enabled or disabled.
Lastly, tap the Create button to create a new walk-through.
The admin can also edit a walkthrough.
This is how the walkthrough will appear on the mobile end


Carousel:
Here, the admin can create multiple carousels using products and images as required.

To create a new carousel, tap the “+” button and the below page appears.

Here, the admin for the new carousel will –
- Enter the title of the carousel.
- Set the position of the same.
- Choose the carouse type as product or image as required.
- If the type is chosen as Product then select the sub-type as – Best, Popular, Newest, Special, Discounted, Feature, Brand, Category products, and after that choose the number of products to display.
- If the type chosen is an image then select the sub-type as – All Parent Categories, Brand, Feature Category, or Banner.
- Set the Status as Active or Disabled.
Lastly, Save the new carousel.
The carousel will be visible in the mobile app as per the snapshot below.


In the case of the type chosen as Product:
Popular Products – This will display products that are currently popular or trending on the app.

Newest Products – Under this section, the app users will be able to purchase the latest products in the store.

Best Products – Under this section, the app users will be able to purchase the best products in the store.

Discounted Products – This category displays products that are currently on sale or being offered at a discount.

Brand Products – The brand products section will help you to search for products by brand.

Special Products – Products which are available with maximum quantity discount on the web store.

Category Products – A category product is a way for a business to group similar products together for customers to find them.

Feature Products – With the Featured Product admin able to highlight a particular product on a web store.

In the case of the type chosen as Image:
Category Carousel – The category carousel typically consists of a row of clickable images or icons, each representing a different category.
Users can swipe through the carousel to see all the available categories and then tap on the one they are interested in to see the products or services in that category.

Slide Banners – These are images or graphics that are displayed on the home screen of the app to highlight specific products, promotions, or events.

Featured Category – The admin can simply add featured categories to display them on the Mobikul application.
The admin can configure the featured category as per the requirement by setting up the featured category information.

Brand Images – These are brand images that are displayed on the home screen of the app.
Users can check the products as per the brand and then tap on the one they are interested in to see the products or services in that brand.

Homepage Configurator:
Navigate through Mobikul->Homepage Configurator.
Here, the admin can change the layout of the different sections of the mobile app home page.

Clear Cache Memory:
CS-Cart caches scripts, styles, templates, and more to boost page loading speed. If your recent changes aren’t visible on the page, try clearing the cache to resolve the issue.
To clear the cache, navigate through Mobikul>>Clear Cache.

App Home Page
Explore a seamless and interactive shopping experience with quick access to products, deals, and features.
Navigate effortlessly through categories, offers, and personalized recommendations.


Notifications:
Customers can access notifications from the top right corner of the home page. In the notification section, they can view messages sent by the admin.
Also, they can view directly the products mentioned in those notifications.
Notifications
Stay updated with real-time alerts for sales, bumper offers, and exclusive promotions, keeping users engaged and informed instantly.

Smart Search Bar:
Customers can search for the product directly from the home page. Thus, the customer can enter a keyword for the product search.
Voice search is also included in this app. So, it means customers can search for any product with the help of a voice.
- Search via Image – Here, the search is done by image. The app learns about the desired product through image detection or text detection. After the machine learns it searches the product in the app.
After scanning, the app identifies objects in the image and presents them for the user to select.


- Text Detection – Here the app user can search the product by allowing the scanning of the text on an object. Currently, text detection works for the English language only.
After scanning the Text, the app identifies Recognized Text and presents them for the user to select.


Finally, the app displays search results related to the scanned Text, helping users quickly find matching items.
Login and SignUp:
The customer will get the login and signup link in the right drawer using the CS-Cart Mobikul Mobile App Builder.
Login / Sign Up
Easily create a new account or log in to access personalized shopping, order history, and a seamless app experience.

Customers can easily sign in using their registered email ID and password.
New users can sign up directly in the app with their email and chosen password to create an account.
For quick account recovery, the Forgot Password option allows users to securely reset their password and regain access effortlessly.
Secure Login & Easy Sign Up
Access your account effortlessly by signing in with your registered email and password, or create a new account directly in the app.
Forgot your password? No worries — securely reset it anytime for quick account recovery.


My Wishlist:
Enables users to view and manage their wishlist from the “My Account” section, making it easy to track saved items for future purchases.


My Orders
Customers can manage orders directly through the app, allowing them to view a complete list of their orders.
They can access detailed information about each order, including product details, and an order summary.


Account Information
The account information of the user can be accessed from the profile section on the homepage. Moreover, the user can change the account information from here.


Product and Category Pages
Categories of the stores can be viewed on the front page using the CS-Cart Mobikul Mobile App Builder. The customers can access it from the left drawer and category slider.
Thus, after clicking on the main category, the sub-categories of that category will appear. After clicking on the sub-categories, the product will appear.


Product View
On the product page, the customer can view product information like description, features, reviews, product price, and product image.


Recently viewed products
Your recently viewed items are tailored to your activity, making your shopping journey more convenient.
Recently viewed products
Quickly revisit the products you’ve browsed, making it easier to compare, review, and pick your favorites without searching again.

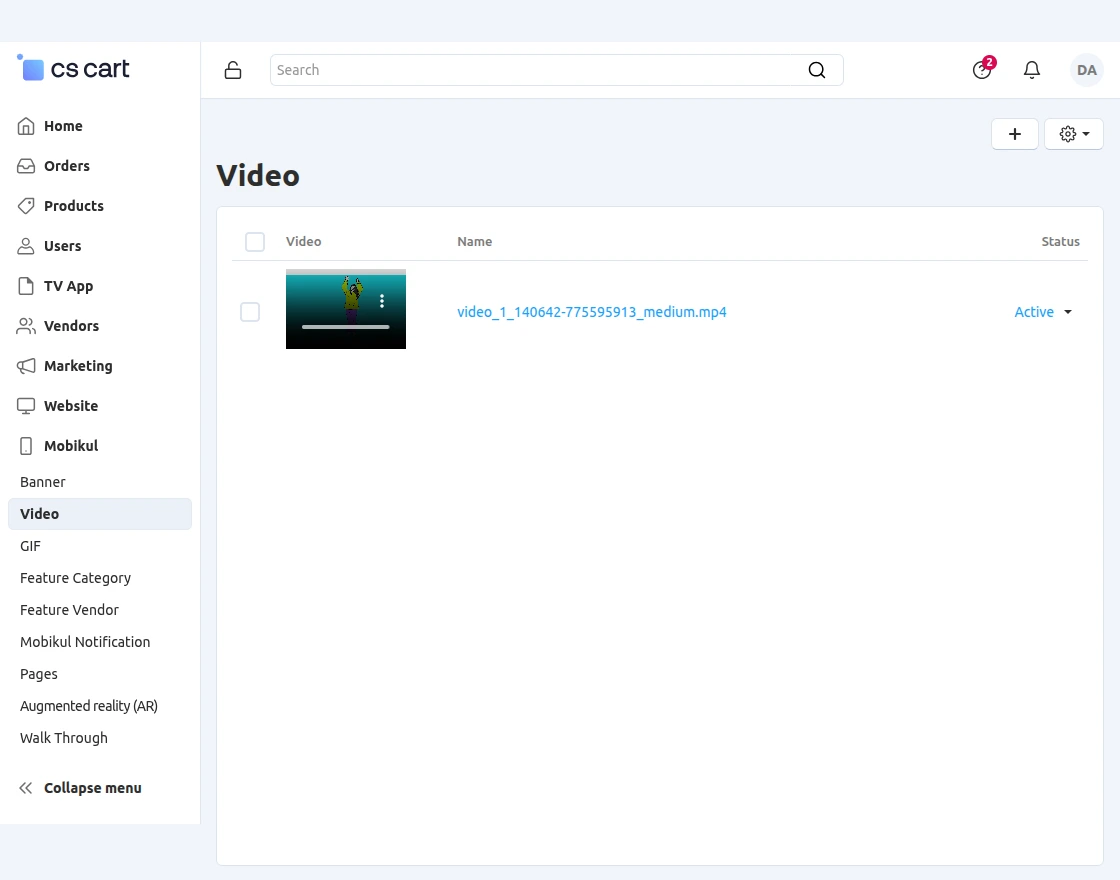
Homepage Videos
The admin can upload videos to the app homepage to showcase promotional campaigns, product highlights, or brand content.
Navigate to Mobikul → Video.
From this section, the admin can add, edit, or delete homepage videos.
Add Homepage Video:
- Title: Enter the video title.
- Upload Video: Upload the video in the supported format.
- Position: Set the display position on the homepage.
- Status: Enable or disable the video.
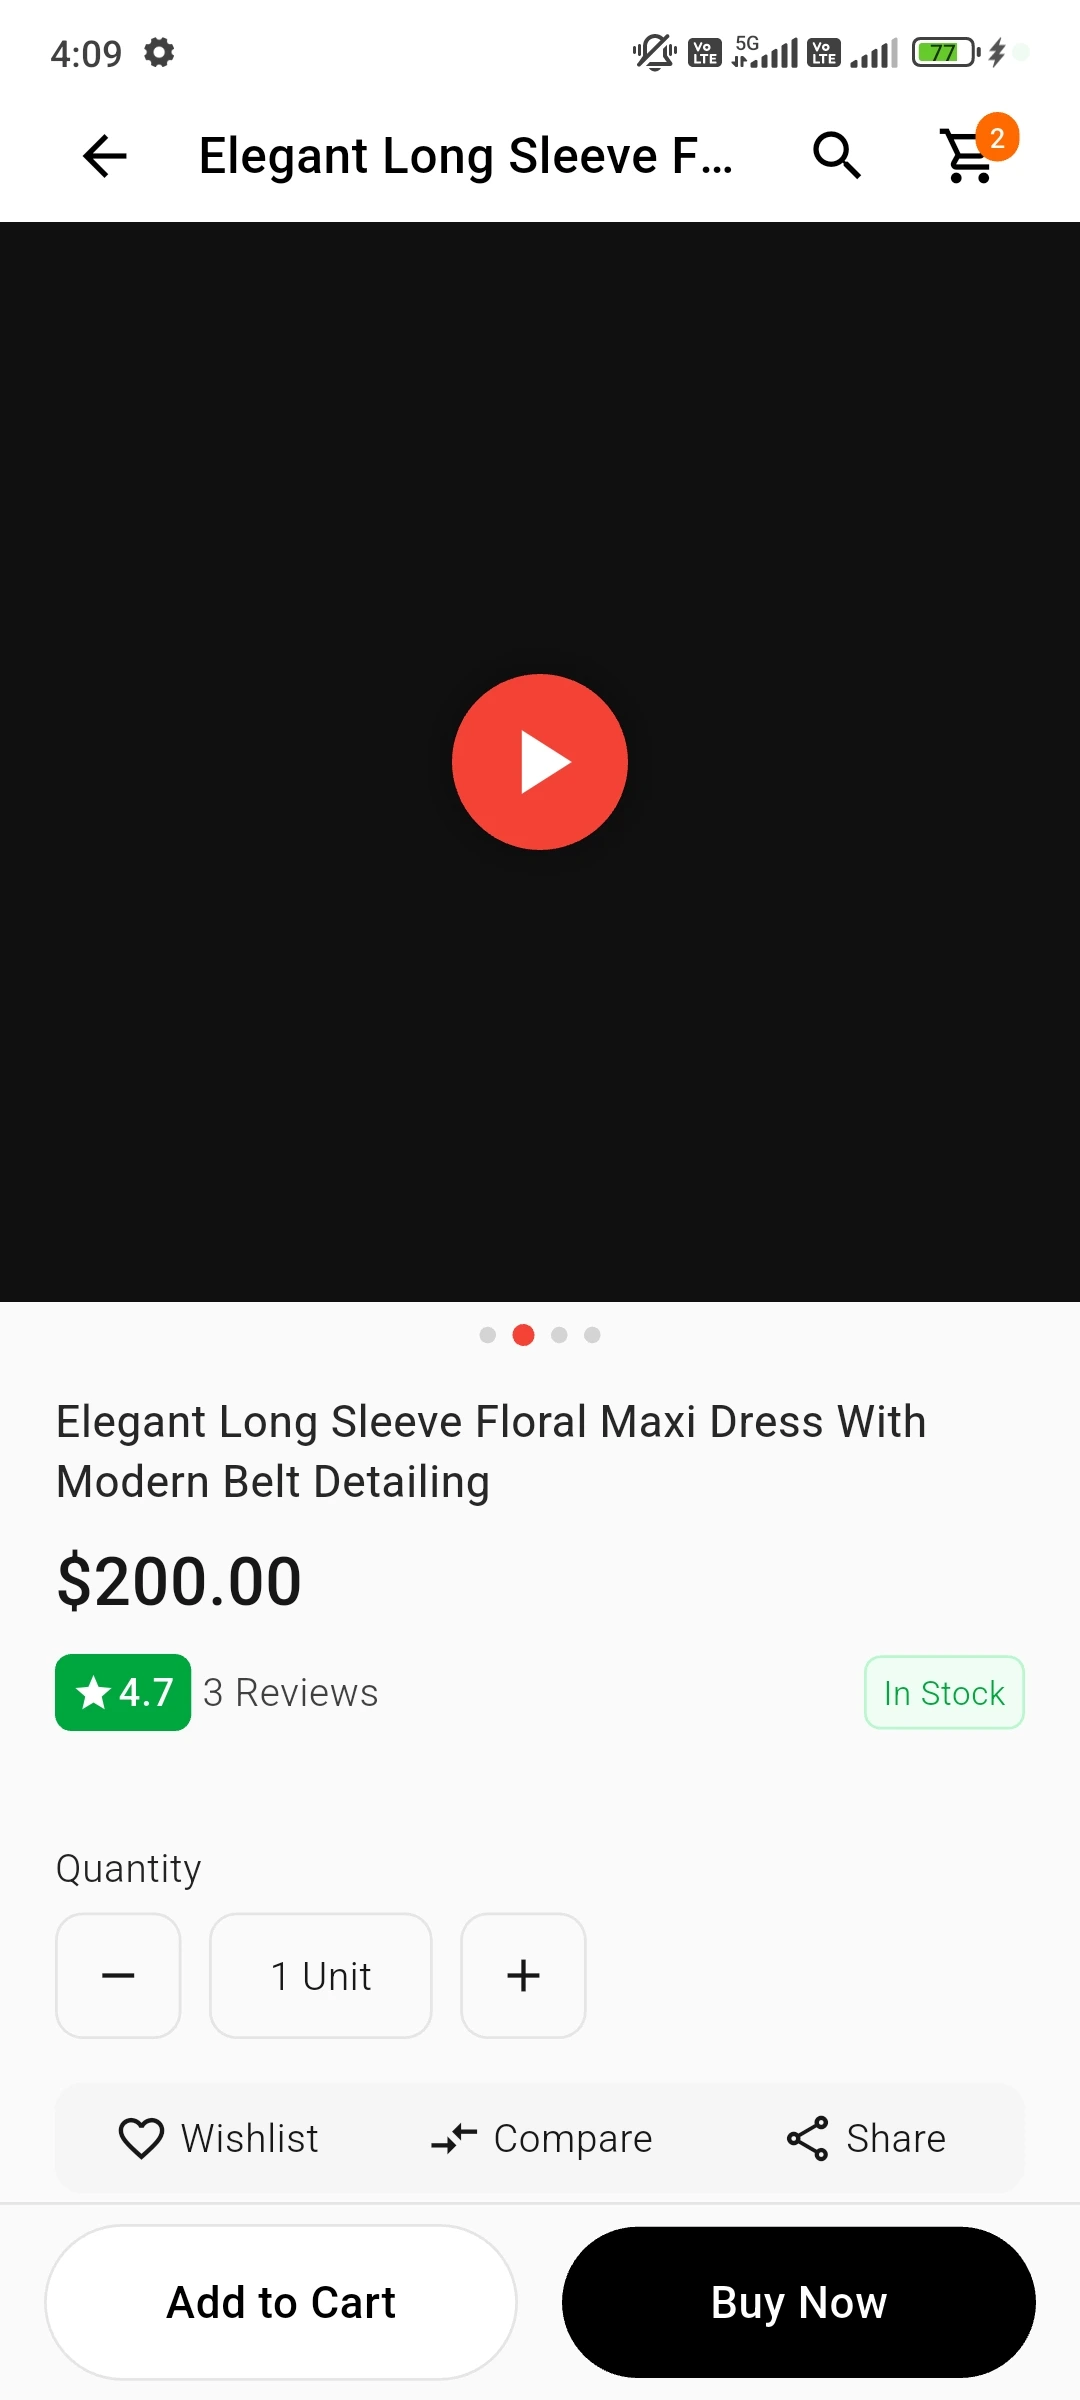
Product Video Support
The admin can now enhance product presentations by uploading videos directly in the product images section.
Customers can view product videos alongside images for a more engaging shopping experience.
Upload Product Video:
Navigate to Products → Product Details → Images to upload a product video.
The admin can:
- Upload product videos along with product images.
- Provide customers with a better product visualization experience.
- Showcase product demonstrations, tutorials, or highlights directly on the product page.
Upload product videos along with product images
The uploaded product video will be displayed on the product detail page in the mobile application, allowing customers to explore products more effectively before making a purchase.
Upload product videos along with product images
The uploaded product video will be displayed on the product detail page in the mobile application, allowing customers to explore products more effectively before making a purchase.
Homepage GIFs
The admin can upload animated GIFs to create dynamic and engaging promotional content on the app homepage.
Navigate to Mobikul → GIF.
From this section, the admin can add, edit, or delete homepage GIFs.
Add Homepage GIF:
- Title: Enter the GIF title.
- Upload GIF: Upload the animated GIF.
- Position: Set the display position on the homepage.
- Status: Enable or disable the GIF.

The uploaded GIF will be displayed on the mobile app homepage according to the configured position and layout.
GIF Upload
Upload animated GIFs to homepage banners for more engaging and dynamic promotions.
GIF Upload
Upload animated GIFs to homepage banners for more engaging and dynamic promotions.
With GIF support, admins can add animated banners and promotional visuals to attract customer attention and improve homepage interactions.
Cart View
Customers can easily add products to their cart and view them directly from the cart page.
They can update quantities, remove items, and apply coupon codes seamlessly, ensuring a smooth and convenient shopping experience.


Easy Checkout Process
Customers can add the product to the cart. After that, CS-Cart Mobikul Mobile App Builder allows customers to go to product checkout.
The customer needs to click on proceed to checkout button.
Thus, it will ask for billing and shipping addresses. After filling these things, have to choose shipping options and billing options


CS-Cart Mobikul Mobile App Builder- Message Communication section
Customers can easily initiate communication directly from the Order Details page by tapping the “Write a Review” Button.
This allows them to send messages to the admin instantly, ensuring quick and seamless communication regarding their orders or any queries.


After that, the admin can check customer messages in the order details in the admin panel.

CS-Cart Mobikul Mobile App Builder : Wallet
Customers can money into their store wallets and use them to purchase products. They can now add money to their wallet, and check out with wallet funds. Also, customers can transfer money to others.
NOTE: To use the wallet system functionalities, you need to purchase our Wallet System add-on.
Admin can set the wallet setting from Add-ons > Downloaded add-ons > Wallet System.
After that, the admin can tap on the Wallet System and navigate to the Settings->General section or other settings.
General Section : Wallet System

Here, admin can :
- Allow cash back in wallet for new user registration: The admin can enable cashback in the wallet for new user registrations, allowing new users to receive a cashback reward.
- Cash back Amount of Wallet when a new User gets registered: The admin can specify the cashback amount for the wallet when a new user registers.
Wallet Recharge Configuration

Here, the admin can set a minimum and maximum recharge amount which can be added to the store wallet.
Wallet Money Transfer

Here, the admin can set a minimum or maximum amount for money transfer from the wallet.
Wallet Refund Configuration :

Here, the admin can set a minimum or maximum amount that can be refunded to the wallet.
Payment Restrictions :
Here, the admin can restrict the payment options for the store wallet.

Reward Points :
Here, the admin enable the Reward Points Status and sets the points for rewards with each of new registration.
- Min Points: Set the minimum points that can be rewarded after new registration.
- Max Points: Set the maximum points that can be rewarded after new registration.
- Commission: Set the commission points for each new registration.

Wallet userGroup :

Note: This UserGroup Access works only for customers, not for vendors and admins.
Send Report Configuration :

Another key point, the admin can set the report that can be shown in the wallet to the customer. It shows both type and Monthly selected in default.
Send Report :
The admin can choose to display wallet reports for a selected period, such as monthly, quarterly, half-yearly, or yearly.

Report Type :
In the type, the admin can select to include credit, debit, or both payment types in the report.

Transfer Wallet to Bank
After that, the admin can set the minimum and maximum amounts that can be transferred from the store wallet to a bank.

The admin can also add a customer by clicking on “Add Customer,”. Thus, it will trigger a pop-up with a list of customers.
The admin can then select the desired customer from the list. As shown in the image below.

After that, the added customer will be visible.
Wallet Overview
Customers can view their wallet balance, track transactions, and manage funds conveniently within the app.

Add Money to Wallet.
Customers can add money from the “Add money” section to their wallet.


Money Transfer Amount
The customer can transfer the amount to another customer using the wallet transfer amount. Also, customers can view transaction details using the Wallet transaction option.


Hence, customers can use the CS-Cart Mobikul Mobile App Builder wallet for online transactions with multiple options.
Support
Hence, that was much about the CS-Cart Mobikul Mobile App Builder. For any query feel free to contact us at https://webkul.uvdesk.com/en/customer/create-ticket/ .
Please expore our Cs – Cart Development Services and quality Cs-Cart Add – ons .
Current Product Version - 7.1
Supported Framework Version - 4.16.x, 4.17.x, 4.18.x

Be the first to comment.