CS-Cart Iyzico Multi-Vendor Payment Gateway impressive add-on effortlessly split payments among different vendors and admin. It will automatically calculate & split the amount from the customer at the time of payment.
Moreover, this is a flawless end-to-end payment solution that integrates a secure and reliable payment gateway with the CS-Cart Multi-Vendor store.
This Turkish payment gateway allows boosting of the site with a complete payment success rate developing transparency of trust and confidence.
Note: Before installing the add-on, extract the downloaded package.
- Install the License Manager add-on first.
- Then install the required add-on.
- Follow the license activation steps to generate your license key.
Check a brief overview of the plugin –
CS-Cart Iyzico Payment Gateway Features
- Well integrated with CS-Cart Multi-Vendor.
- Real-time splitting of payment among vendors.
- Also Safe and secure payment via Iyzico Payment Gateway at the customer end.
- The concept of inline and outside payment forms is provided as per the gateway.
- The feature of BKM Express connectivity at the payment form is available
- In addition, The functionality of 3D secure payment is available.
- Automatic approval of transactions when the order status changes to “Complete“
- Also, Smooth reconciliation to handle risk management system.
- Moreover easy to configure and manage at the admin end.
- Customers can request for return.
- Admin can refund the order amount.
How to Upload and Install Add-on
After downloading the CS-Cart Iyzico Multi-Vendor Payment Gateway, you’ll get a zip file of the addon, install.txt file, and the documentation.
Please read the documentation part carefully and follow it to configure and avail the functionalities of this addon. To upload the addon, Go to the settings icon and click on the Manual installation option to upload and install the zip file.

Browse and upload the zip file as shown below in the snapshot.

Addon Configuration
To configure the payment method, click on the addons and select the Iyzico Marketplace Payment.

It will navigate you to the configuration and settings page. Now click on the settings page where two options are visible, i.e., API credentials and refund settings.
API Credentials

Here, the admin needs to enter the following details.
- Enter the credentials (API key and Secret Key) to configure Iyzico.
- Select the mode of payment.
- Save the settings.

Return Settings

The admin can Choose this option to refund the Platform Fee.
Payment Method Configuration At Admin End
Firstly Go to Administrators -> Payment Methods as shown below.

Click on “+” to create a new method of payment.
For an Inline form view of the payment method please follow the below-mentioned points.
- Enter the name of the payment method.
- Select the processor as “Iyzico Payment Gateway(Marketplace)”.
- Set the template as “cc.tpl”.
- Select the payment category as “credit card”.
- Fill in all the other fields accordingly.

Click on Configure and set the parameters as shown below.
- Set the order status for failed and successful payment transactions.
- Select “Yes” from the drop-down to save the Iyzico response at the admin end.
- Click on the “Create” button to create the payment method.

From the Storefront option admin can select and create the storefront for the payment option or choose all storefront options.

Add storefront:

Once the storefront is created select it for the inline Iyzico payment.
For Outside form view of the payment method follow the below-mentioned points.
- Enter the name of the payment method.
- Select the processor as “Iyzico Payment Gateway(Marketplace)”.
- Set the template as “cc_outside.tpl”.
- Select the payment category as “credit card”.
- Fill in all the other fields accordingly.

Click on Configure and set the parameters as shown below.
- Set the order status for failed and successful payment transactions.
- Select “Yes” from the dropdown to save the Iyzico response at the admin end.
- Finally, Click on the “Create” button to create the payment method.

Configuration And View At Vendor Panel
The vendor needs to enter the bank details and other mandatory details to get the payment in his bank account.
Firstly Go to “Vendors” -> “Vendors” and open the vendor detail page to edit the details.

Secondly, Go to the “Add-ons” tab and fill in all the mandatory details under Iyzico Submerchant.
- Select the Submerchant Type from the 3 available types(individual, Private Company, Limited Company)
- Enter the other mandatory legal information and save.

Note: Please note that the Vendor must add all the Mandatory Legal Details at his end. If the Customer adds multiple products from different vendors to his cart and any one of the vendors has not added the bank and other details, the option to pay via Iyzico will not be available for that customer at the front end.
Frontend View
From here, the customer will be able to see and select the products that the admin and vendors create.

After selecting the product, the customer will move to the add-to-cart page.

Once the customer clicks on add to cart, the product will be added to the cart and now the customer can “Proceed to checkout”.

After clicking on the “Proceed to checkout” button the customer has to enter the shipping details like address, customer name, state, country, email, and contact number.

Now, the buyer has to select the payment option “Iyzico Marketplace (Inline)”.Then the buyer has to enter the card details like card number, Valid date, CVV/CVC and cardholder’s name

After entering all the card details check mark on the selected “Terms and Conditions” and click on “Place Order”

Once click on the Place Order button, the buyer will receive an OTP on the registered contact number and then the buyer has to enter the OTP for placing the order.

After, entering the OTP the order will be placed successfully.

Admin End View
Response from Iyzico will be saved under “Payment information” on the order details page at the backend as shown below.

To view, all the transactions at the store Go to “Vendors” -> “Accounting”

Finally, All the transactions can be viewed here.
Click on “Balance Withdrawals”. A list of all the withdrawals (In Pending Status) can be viewed here. Change the transaction status to Completed or Declined as per requirement.
Check the box provided to notify the vendor of the updated transaction status

In the upgraded version 1.1 of the add-on, the transaction will be Approved/Completed automatically once the order status changes to “Complete“. There will be no need to approve it manually. That’s all about CS-Cart Iyzico Multi-Vendor Payment Gateway.
Order Return and Refund
The customer can request for return after placing the order.

When the customer clicks on the request a replacement or refund option, it will navigate to another page.
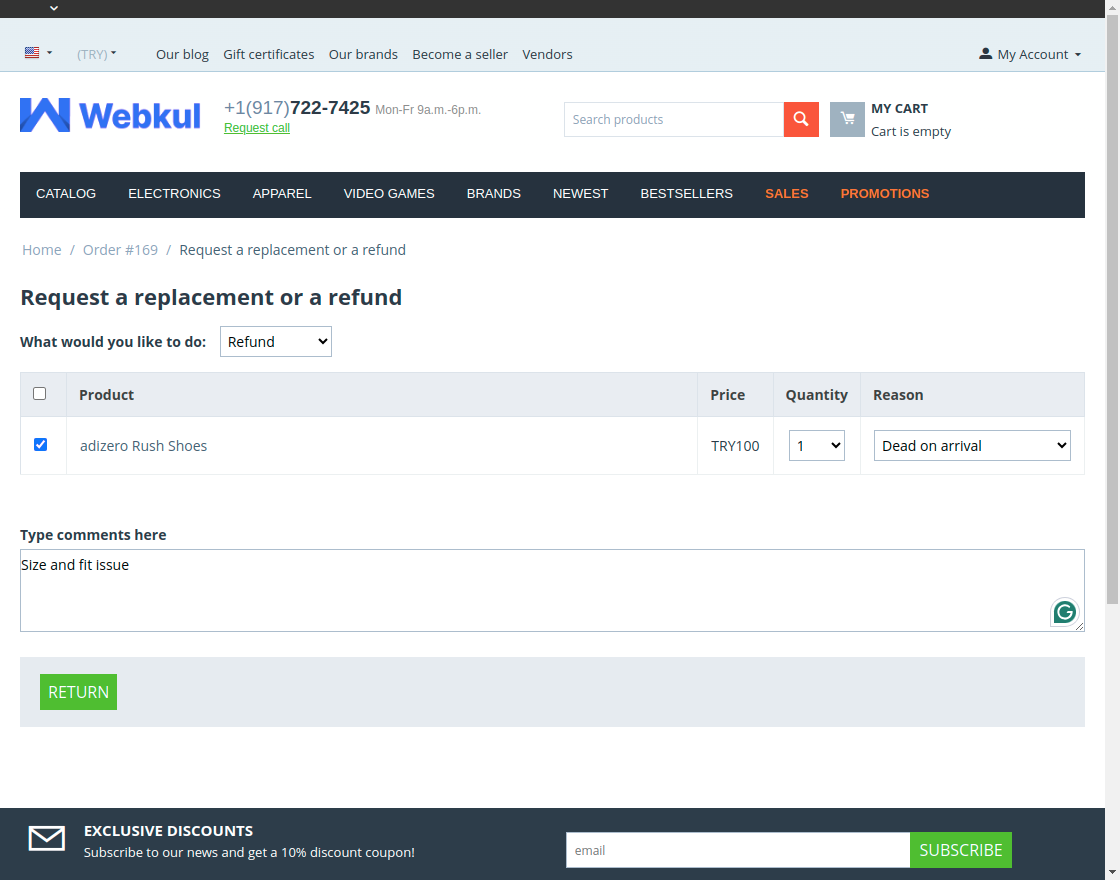
Here the customer can choose from the various reasons for their order return.

Once they place the return request they can see the order return details.

Customers can also see the return request list on their panel.

Order Return Admin End
The admin will get the all return or replacement details in the orders > return request section.

View any return order and approve it from the admin end.
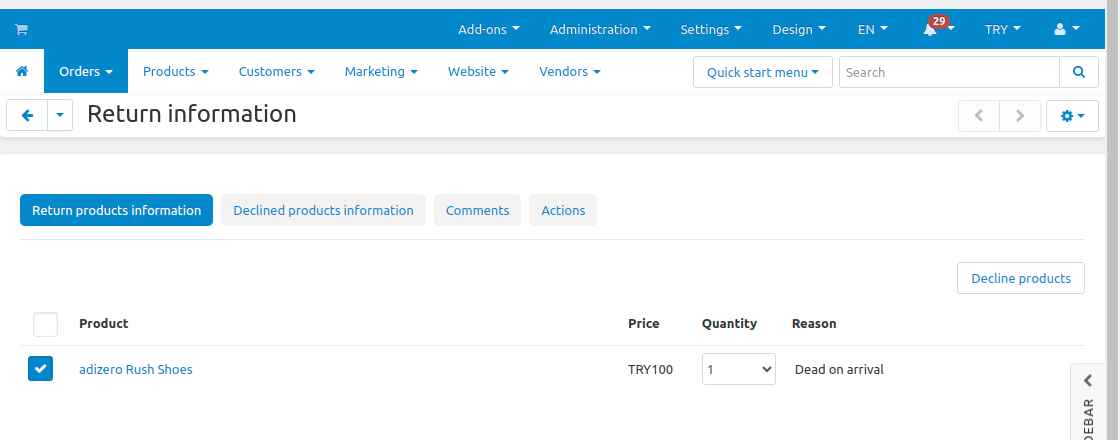
Click on the action button and enable all necessary information.
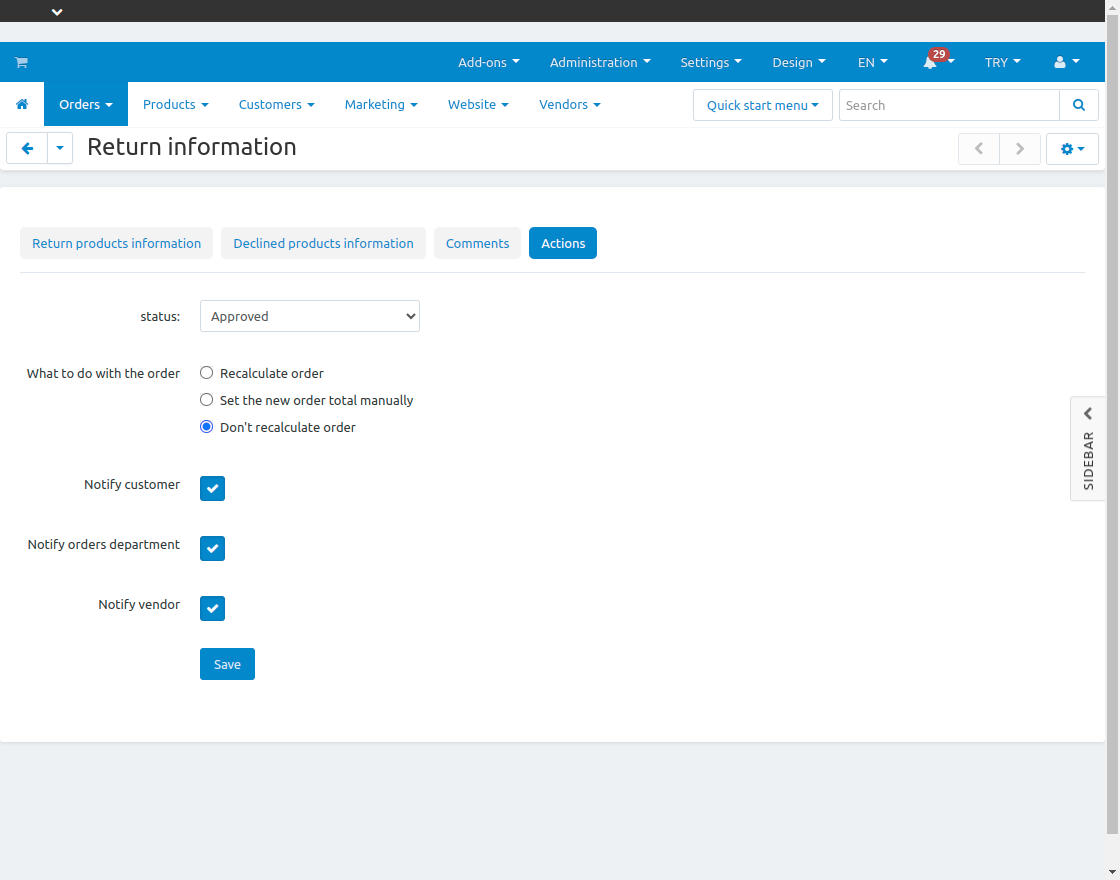
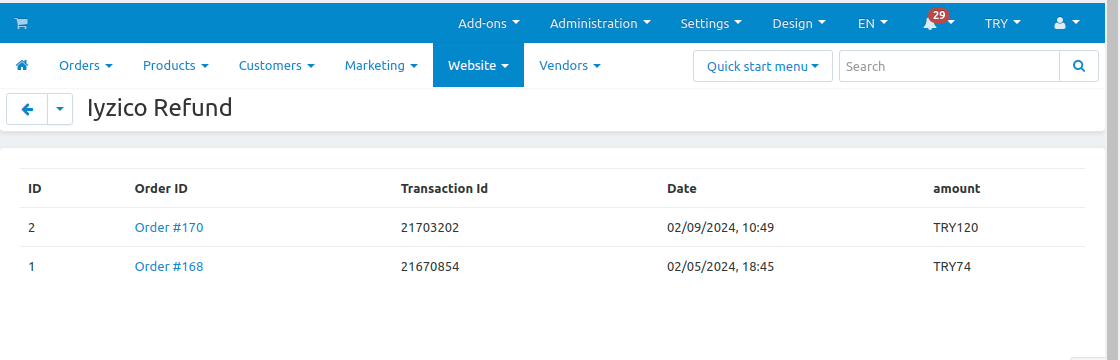
Once the admin approves and initiates the refund from their end they need to navigate through the Website > Iyzico Marketplace Payment option.
Support
Still, have any issues feel free to add a ticket and let us know your views on our Webkul Helpdesk System to make the plugin better Besides this, you can explore our cs-cart Development Services and cs-cart add-ons
Current Product Version - 2.5
Supported Framework Version - 4.18

Be the first to comment.