CS-Cart Google Tag Manager provides a comprehensive tracking solution for CS-Cart and CS-Cart Multi-Vendor stores.
It enables store owners to track customer interactions and e-commerce activities through both client-side and server-side tracking.
The add-on integrates with Google Analytics 4, Google Ads, and Meta to deliver accurate tracking data while supporting automatic event deduplication between browser and server-side events.
It also provides advanced features such as server-side GTM tracking, customer identity matching, GDPR and consent management, automated GTM container generation, Multi-Vendor tracking, and reliable event delivery with automatic retry.
This helps store owners collect and manage valuable customer and conversion data for analytics, advertising, and marketing activities.
Note: Before installing the add-on, extract the downloaded package.
- Install the License Manager add-on first.
- Then install the required add-on.
- Follow the license activation steps to generate your license key.
Features
- Supports client-side and server-side tracking for reliable event collection.
- Tracks customer and e-commerce events across browsing, cart, checkout, and account activities.
- Integrates with Google Analytics 4, Google Ads, and Meta for analytics and advertising tracking.
- Supports consent management and hashed customer identifiers for privacy-aware tracking.
- Generates preconfigured Web and Server GTM container files for simplified setup.
- Supports event deduplication between browser and server-side tracking using event IDs.
- Provides Multi-Vendor tracking with vendor information in tracked product data.
- Queues server-side events and supports automatic delivery and retry mechanisms.
- Allows administrators to customize product identifiers, revenue values, shipping, payment, and event data.
- The add-on supports CS-Cart Ultimate and CS-Cart Multivendor as well.
Installation Procedure
After you download the add-on, you get one zip file and the install.txt file. Please read it carefully and follow it.
Now, navigate to the admin backend panel via Add-ons->Manage add-ons and tap on the cog icon and then tap the Manual installation option.
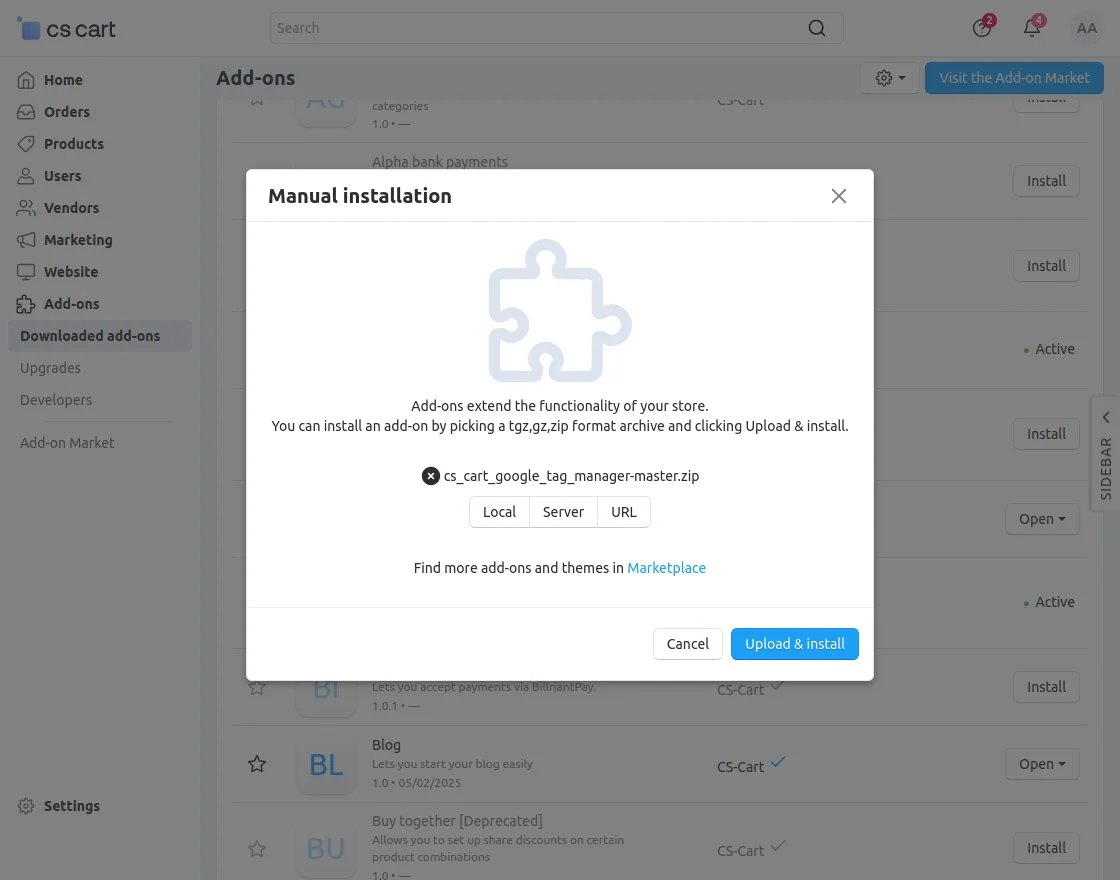
After installation of the add-on, you will find the “Google Tag Manager” in the list of available add-ons.
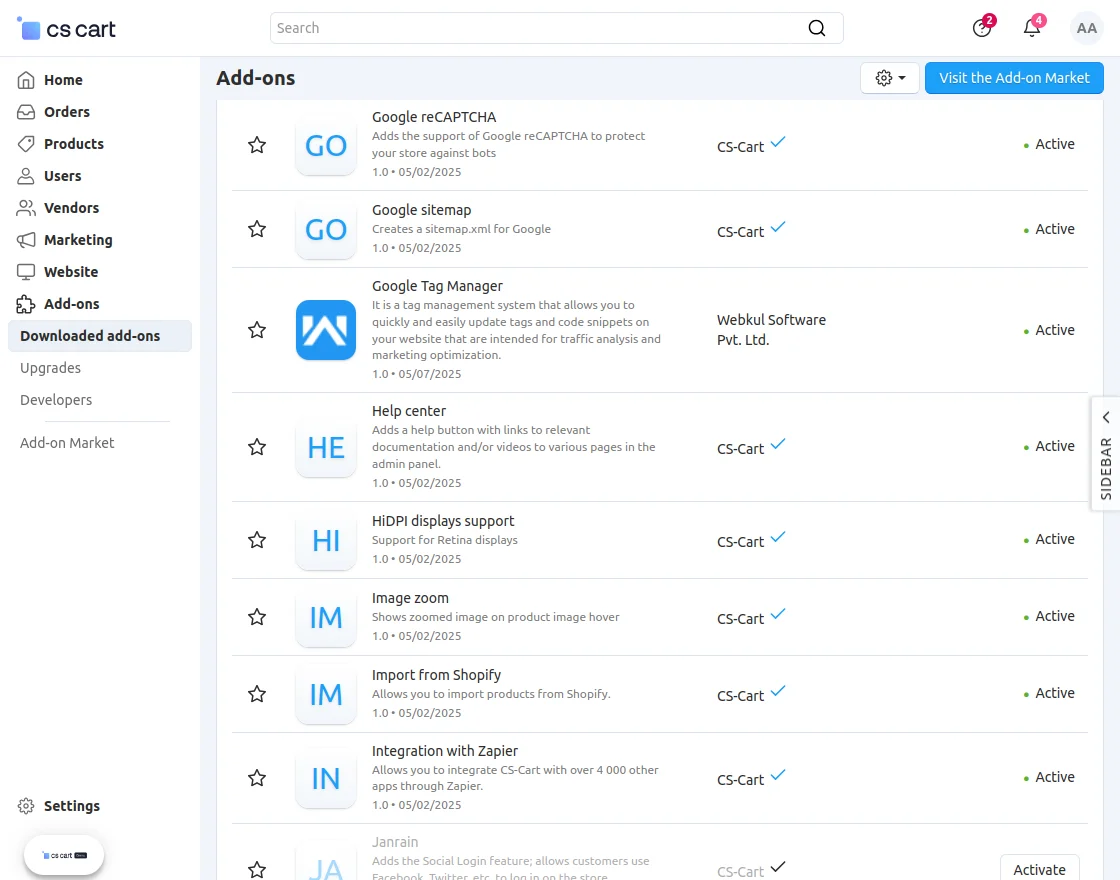
Initial Configuration
After the successful installation of the CS-Cart Google Tag Manager add-on, the admin can configure the plugin’s settings.
Now, navigate to the Add-ons section and tap on the Google Tag Manager add-on. Then go to the settings tab.
General Settings
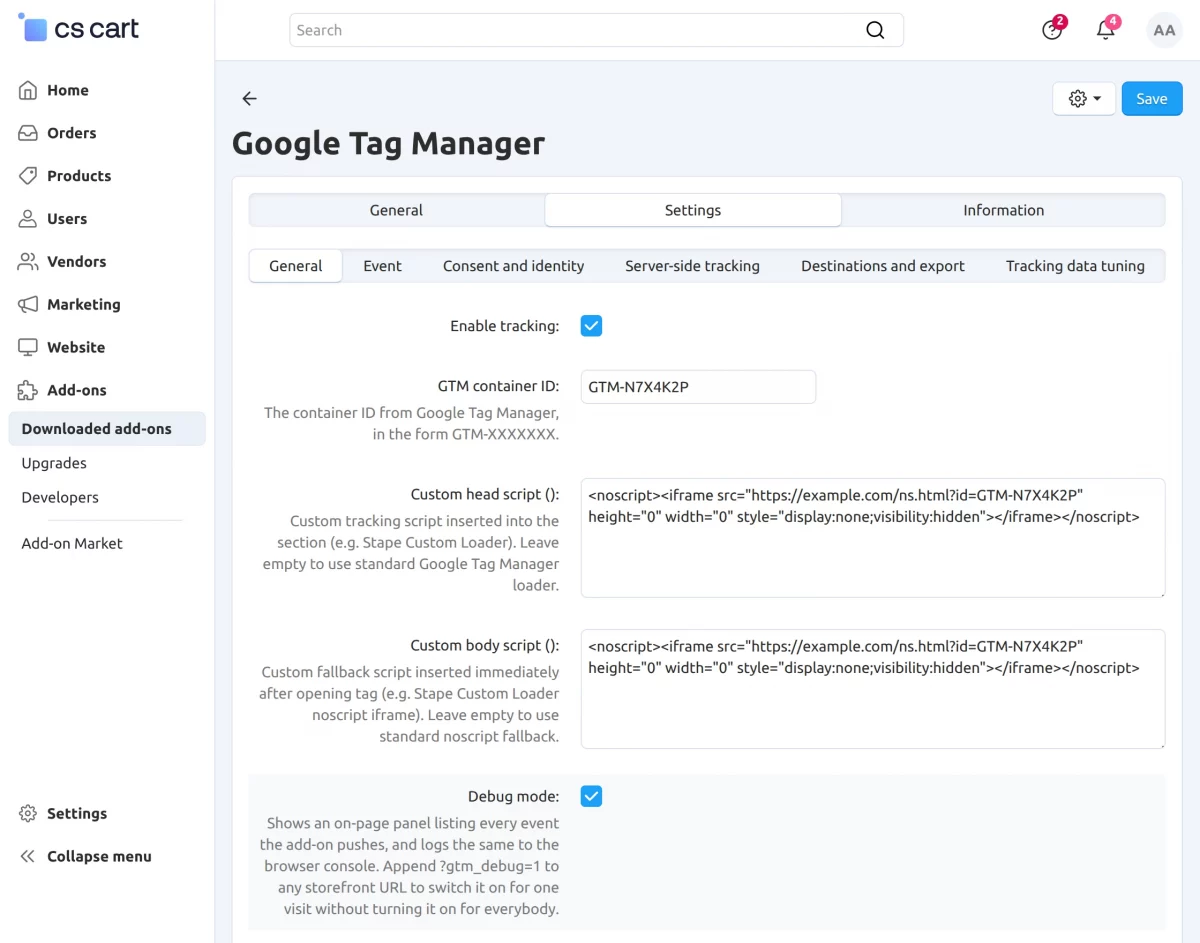
Description:
Configure the basic Google Tag Manager settings and control how tracking scripts are loaded on the storefront.
- Enable Tracking: Enable or disable tracking across the storefront.
- GTM Container ID: Enter the Google Tag Manager container ID in the
GTM-XXXXXXXformat. - Custom Head Script: Add a custom tracking script to the
<head>section of the storefront. - Custom Body Script: Add a custom fallback script immediately after the opening
<body>tag.
Event Settings
Configure and control the e-commerce and customer events that the add-on tracks across the storefront.
Browse
Track customer interactions while browsing products and catalog pages.
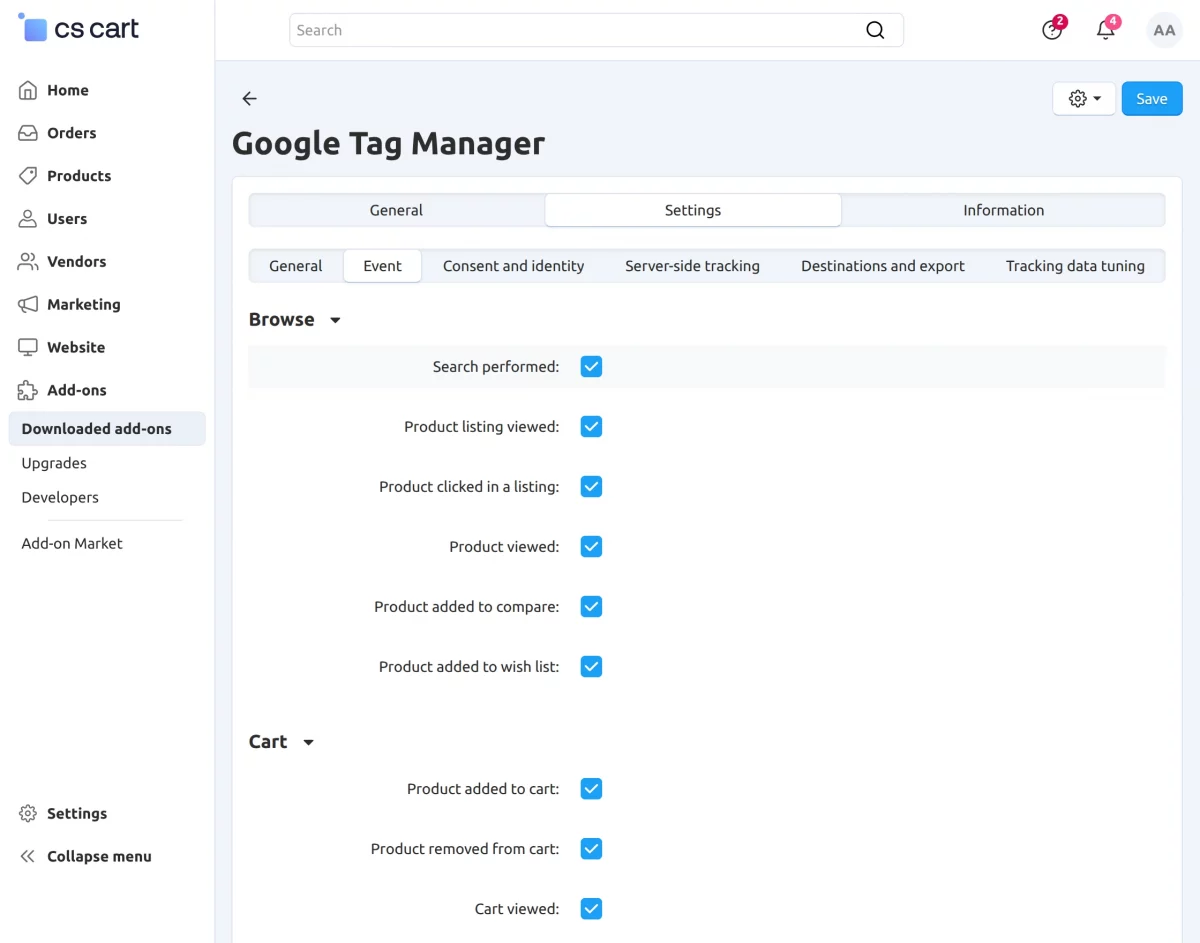
- Search performed: Tracks when a customer performs a product search.
- Product listing viewed: Tracks when a customer views a product listing.
- Product clicked in a listing: Tracks when a customer clicks a product from a listing.
- Product viewed: Tracks when a customer views a product.
- Product added to compare: Tracks when a customer adds a product to the comparison list.
- Product added to wish list: Tracks when a customer adds a product to the wish list.
Cart
Track customer activities related to the shopping cart.
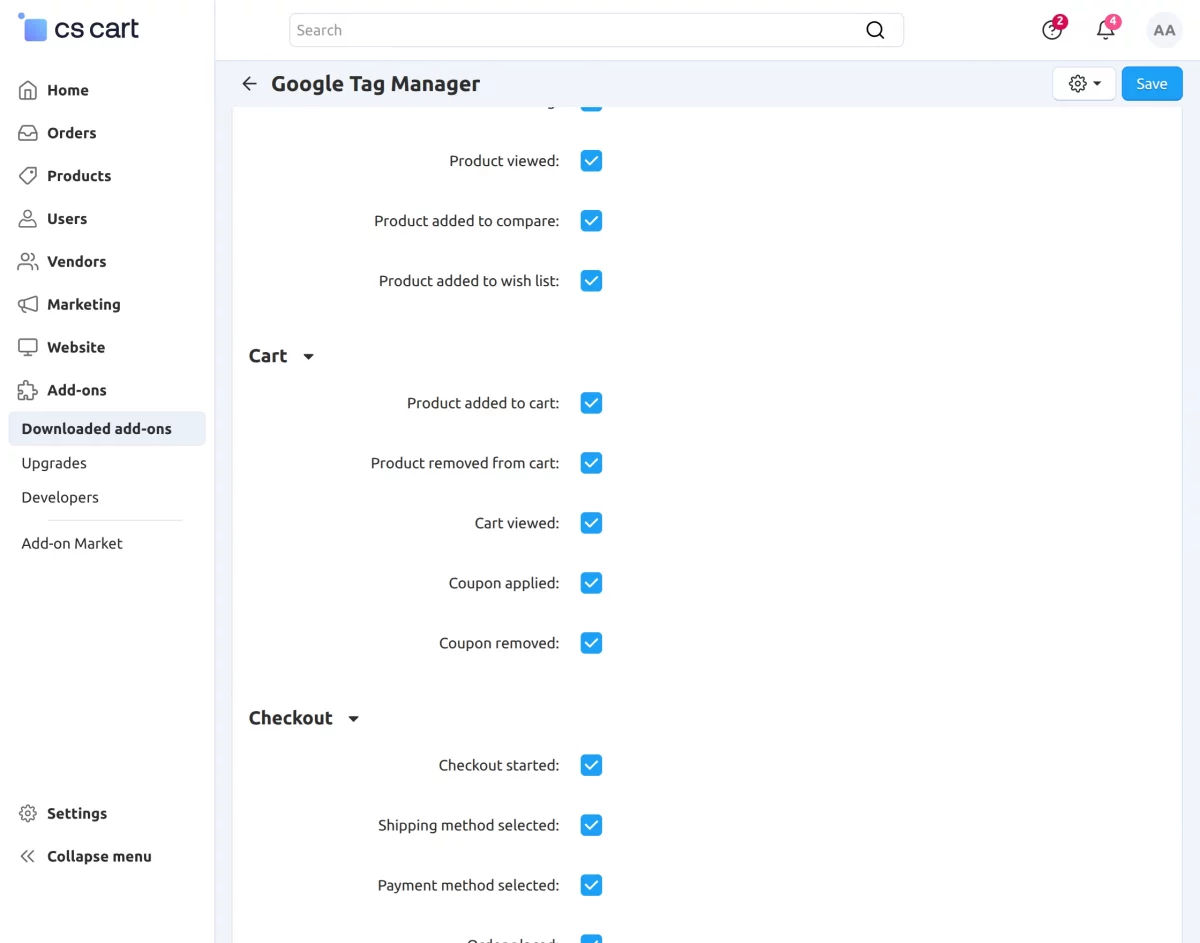
- Product added to cart: Tracks when a customer adds a product to the cart.
- Product removed from cart: Tracks when a customer removes a product from the cart.
- Cart viewed: Tracks when a customer views the shopping cart.
- Coupon applied: Tracks when a customer applies a coupon to the cart.
- Coupon removed: Tracks when a customer removes an applied coupon.
Checkout and Account
Track customer interactions throughout the checkout process.
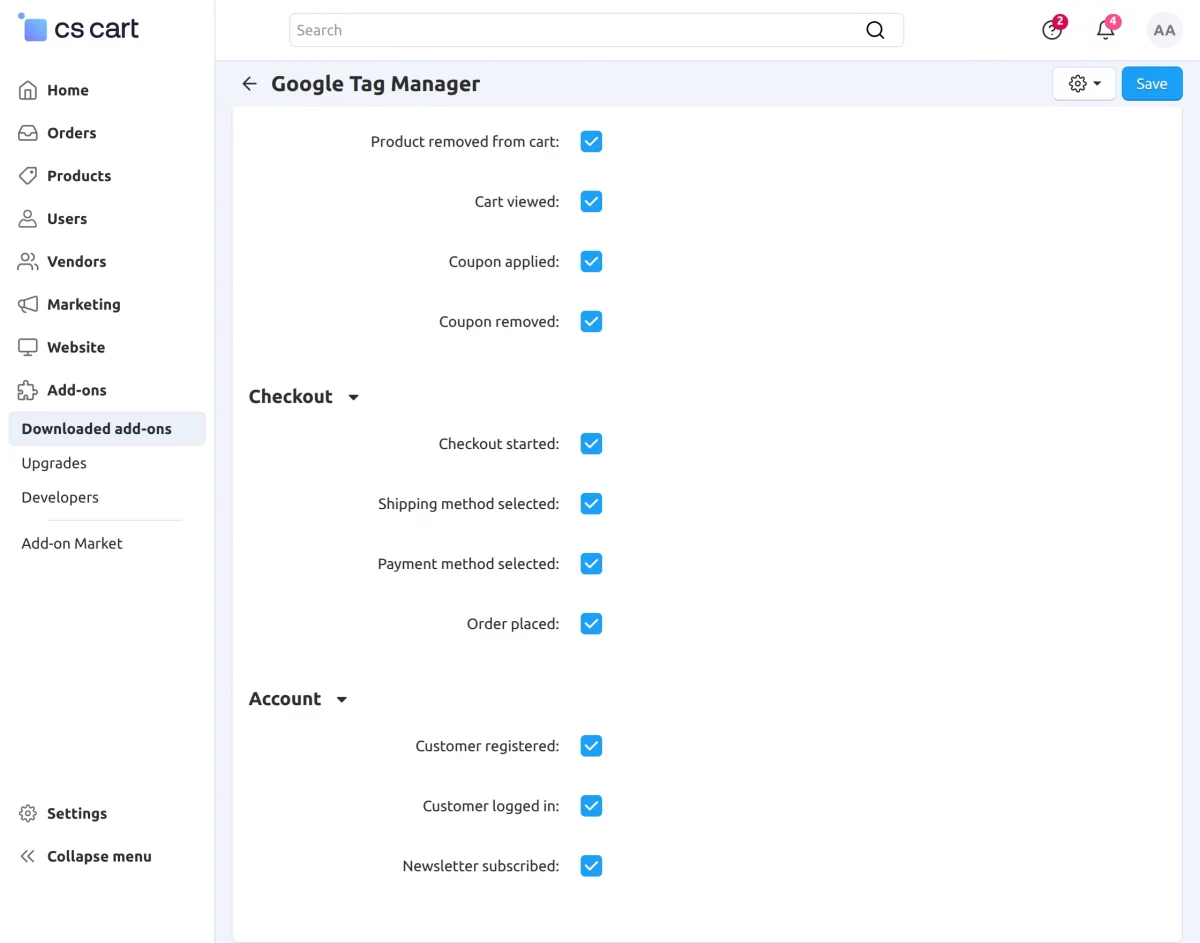
- Checkout started: Tracks when a customer starts the checkout process.
- Shipping method selected: Tracks when a customer selects a shipping method.
- Payment method selected: Tracks when a customer selects a payment method.
- Order placed: Tracks when a customer successfully places an order.
- Customer registered: Tracks when a customer creates an account.
- Customer logged in: Tracks when a customer logs into their account.
- Newsletter subscribed: Tracks when a customer subscribes to the newsletter.
Consent and Identity
Configure shopper consent and customer identity settings to control privacy-compliant event tracking and the use of hashed customer information.
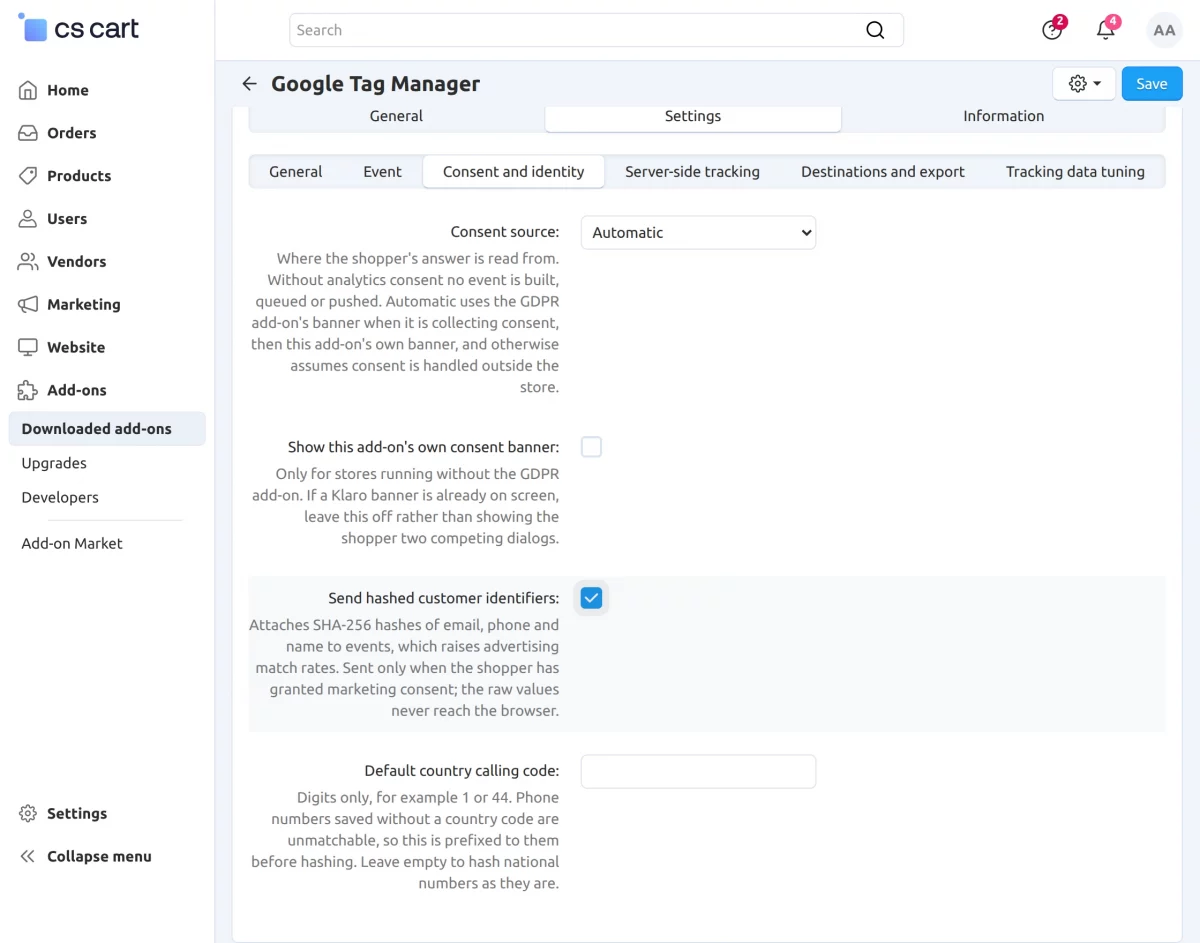
- Consent Source: Select where the shopper’s consent status is obtained, such as the GDPR add-on banner, this add-on’s banner, or an external consent mechanism.
- Show This Add-on’s Own Consent Banner: Enable this option to display the add-on’s consent banner when the store does not use the CS-Cart GDPR add-on.
- Send Hashed Customer Identifiers: Enable this option to send SHA-256 hashed customer information, such as email, phone, and name, with supported events after marketing consent is granted.
- Default Country Calling Code: Enter the default country calling code to normalize phone numbers without a country code before hashing.
Server-Side Tracking
Configure server-side event delivery to reliably send tracked storefront events to your server-side Google Tag Manager container.
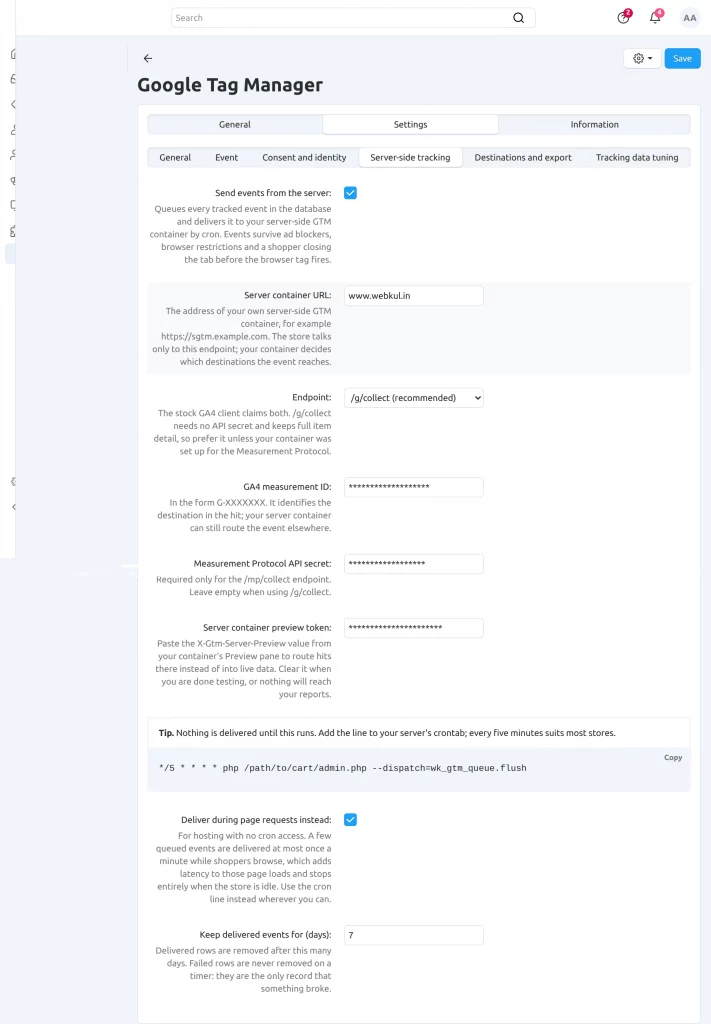
- Send Events from the Server: Enable this option to queue tracked events in the database and deliver them to the server-side GTM container through cron.
- Server Container URL: Enter the URL of your server-side GTM container where the store will send tracked events.
- Endpoint: Select the endpoint used to deliver events to the server-side GTM container:
- `/g/collect (Recommended): Use the standard GA4 collection endpoint without requiring an API secret.
- `/mp/collect (Measurement Protocol): Use the GA4 Measurement Protocol endpoint when the server container is configured for it.
- GA4 Measurement ID: Enter the GA4 Measurement ID in the
G-XXXXXXXformat to identify the destination of the event. - Measurement Protocol API Secret: Enter the API secret required when using the
/mp/collectendpoint. - Server Container Preview Token: Enter the
X-Gtm-Server-Previewvalue from the server container’s Preview mode to route events to the preview environment during testing. - Cron Job: Configure a server cron job to process and deliver queued events automatically.
- Deliver During Page Requests Instead: Enable this option when cron access is unavailable to deliver queued events during storefront requests.
- Keep Delivered Events for (Days): Specify how long successfully delivered event records should remain in the database before automatic removal.
Destinations and Export
Configure advertising destinations and generate preconfigured GTM container files for web and server-side tracking.
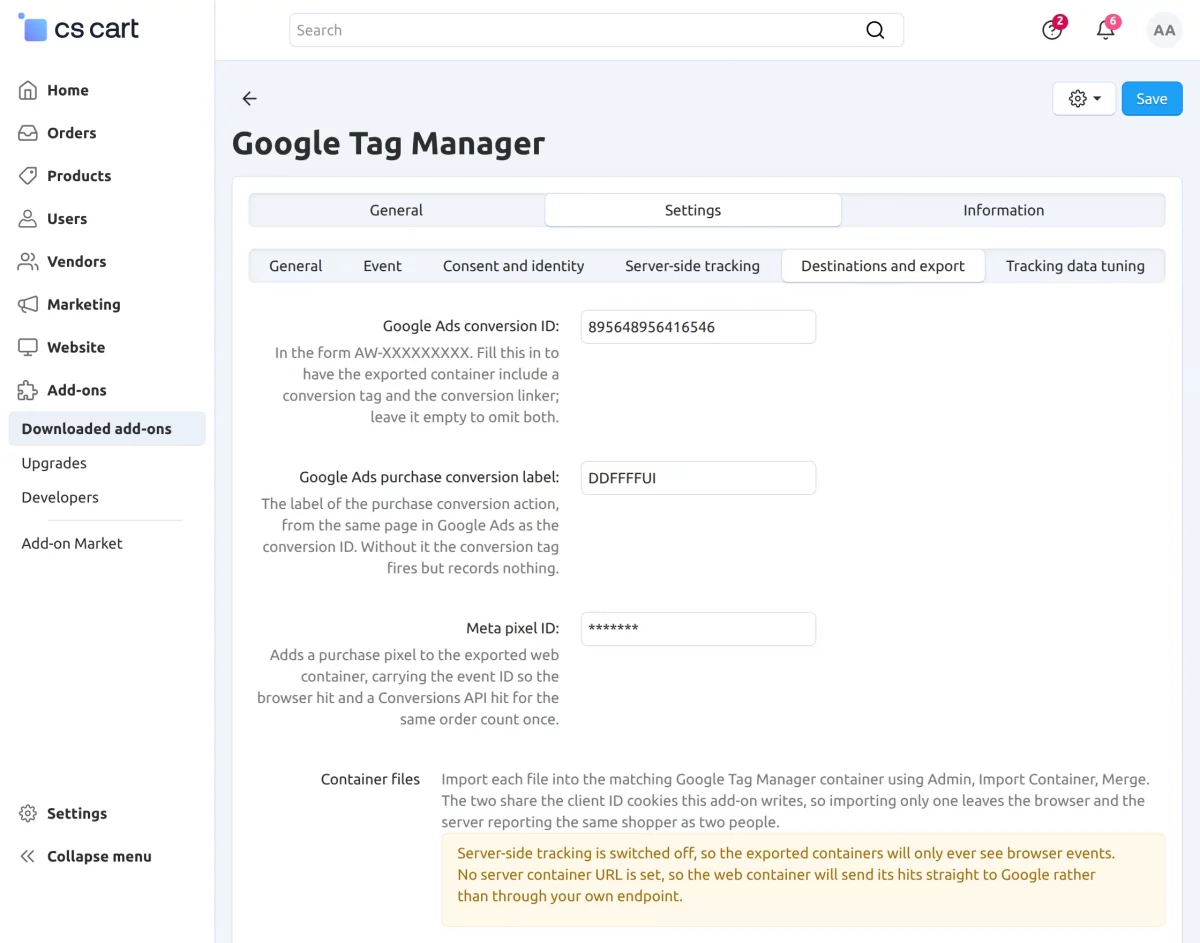
- Google Ads Conversion ID: Enter the Google Ads Conversion ID in the
AW-XXXXXXXXXformat to include the Google Ads conversion tag and conversion linker in the exported web container. - Google Ads Purchase Conversion Label: Enter the purchase conversion label associated with the configured Google Ads conversion action to enable purchase conversion tracking.
- Meta Pixel ID: Enter the Meta Pixel ID to include the purchase pixel in the exported web container with the event ID for browser and Conversions API event deduplication.
Download and import the generated container files into their corresponding Google Tag Manager containers.
- Web Container: Download the preconfigured web GTM container containing the required browser-side tracking configuration.
- Server Container: Download the preconfigured server GTM container for server-side event processing.
- Container Import: Import each file into its matching GTM container using Admin → Import Container → Merge.
- Web and Server Containers: Import both containers together when using server-side tracking to maintain consistent shopper identification and event tracking.
Tracking Data Tuning
Customize the product and order data included in tracking events and control how revenue and vendor information are reported.
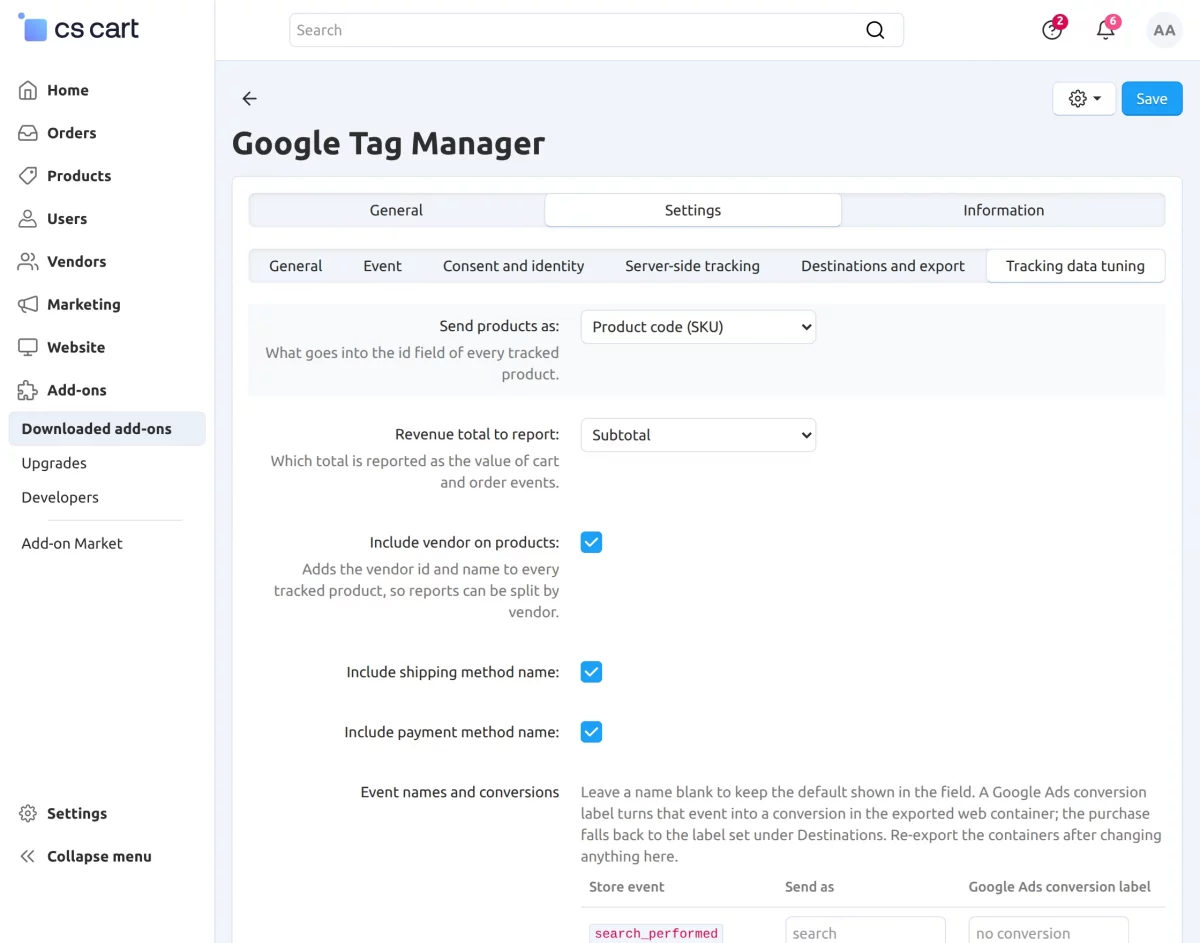
- Send Products As: Select the identifier used in the
idfield for tracked products.- Product Code (SKU): Uses the product’s SKU as the product identifier.
- Numeric Product ID: Uses the CS-Cart product ID as the product identifier.
- Revenue Total to Report: Select the total amount reported as the
valuefor cart and order events.- Subtotal: Reports the order or cart subtotal.
- Grand Total: Reports the complete grand total.
- Grand Total Without Shipping: Reports the grand total excluding shipping charges.
- Include Vendor on Products: Adds the vendor ID and vendor name to tracked products for vendor-level reporting.
- Include Shipping Method Name: Includes the selected shipping method name in the tracking data.
- Include Payment Method Name: Includes the selected payment method name in the tracking data.
- Event Names and Conversions: Configure the event names and conversion mappings used for tracking and reporting.
How to get the Container ID?
ToHow to get the Tracking ID or Measurement ID?
Sign in to Google Analytics to obtain the Measurement Id.

First, enter an account name during account creation.

Under Property creation, enter the property name.
Next, select the required time zone and currency.

Under Business details, select the industry category.
Also select the business size.

Select the relevant topics under Business objectives.

Then accept the Google Analytics Terms of Service.

Choose the platform from which you want to collect data.
For a Bagisto store, choose Web.

Next, go to Admin > Data Streams.
Click the Create stream button.

Open the Web stream details screen.
Copy the G-XXXXXXXXXX Measurement Id.
Finally, paste it into the Bagisto Measurement Id field.

It may take some time for the property to collect data.

How to Get Conversion ID and Label for Google Ads
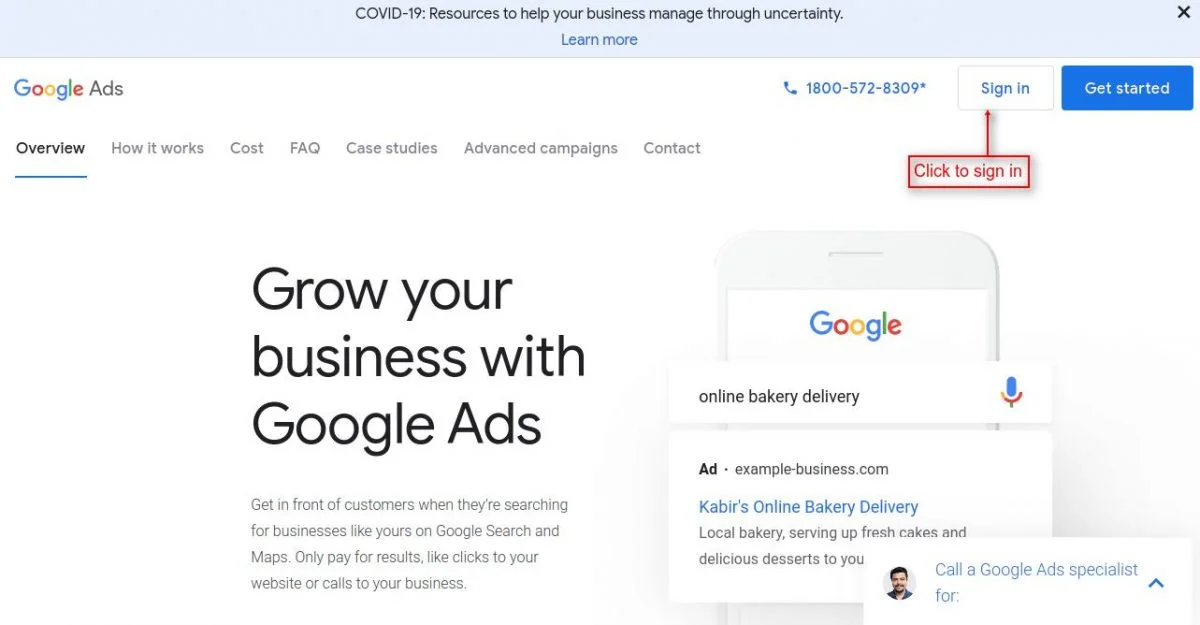
First, sign in to your Google Ads account.
Then go to Goals > Conversions > Summary.
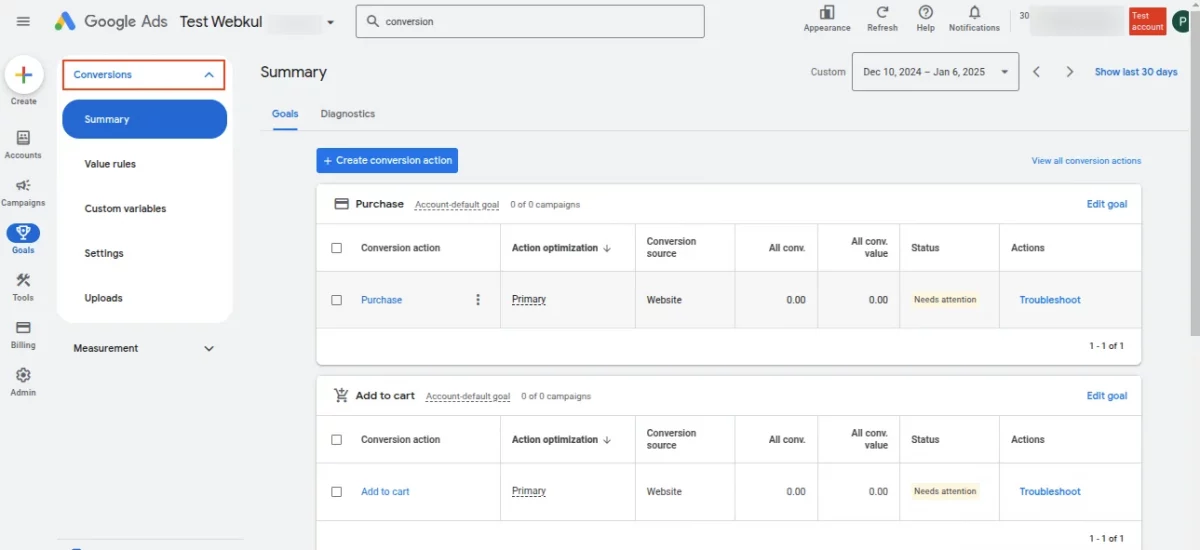
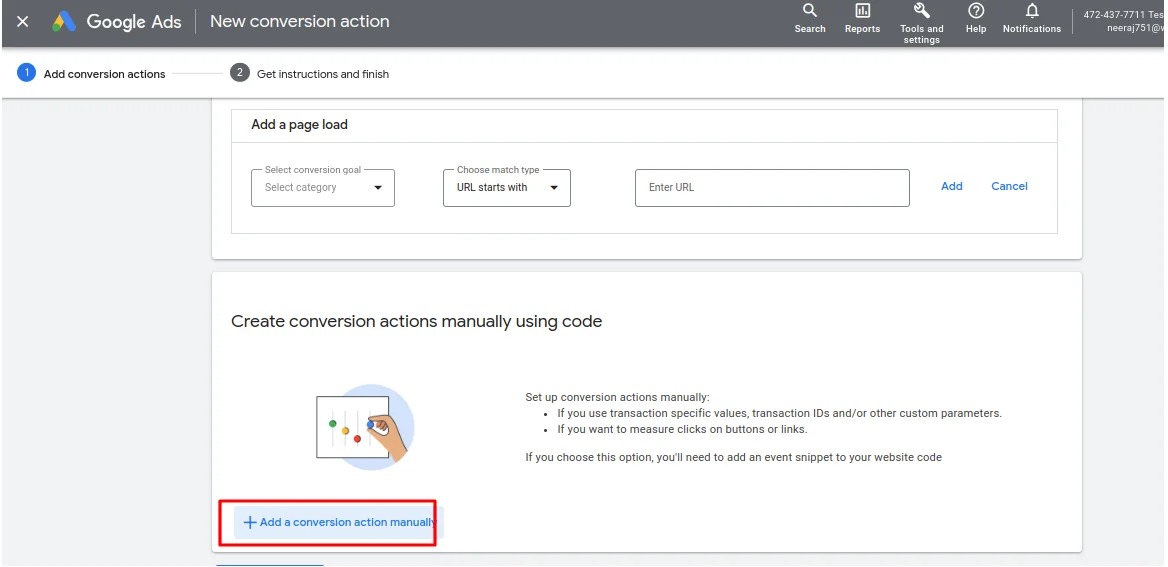
Create the conversion action that you want to use.
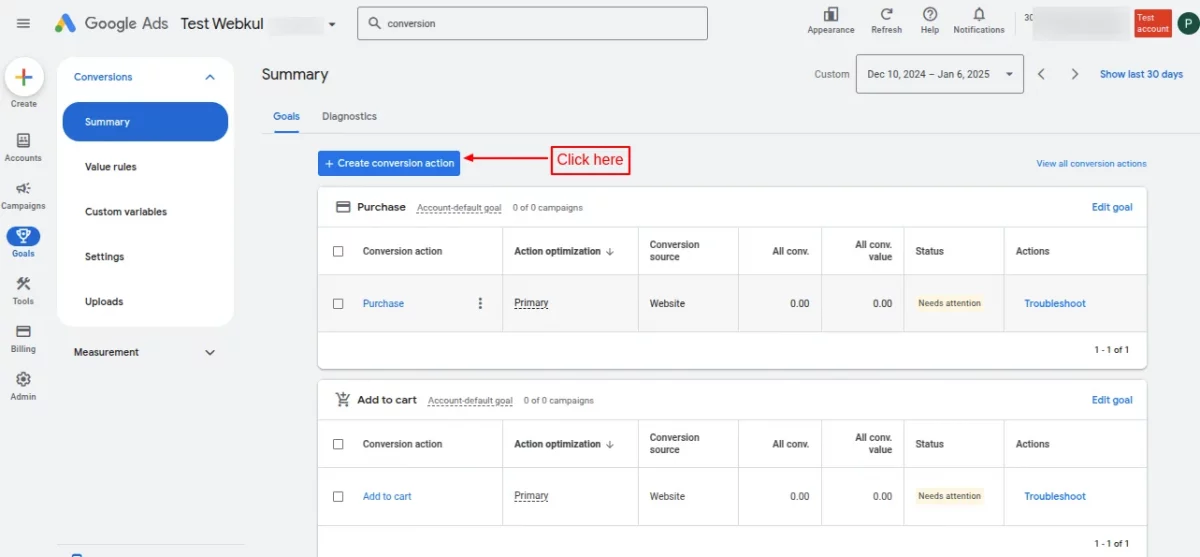
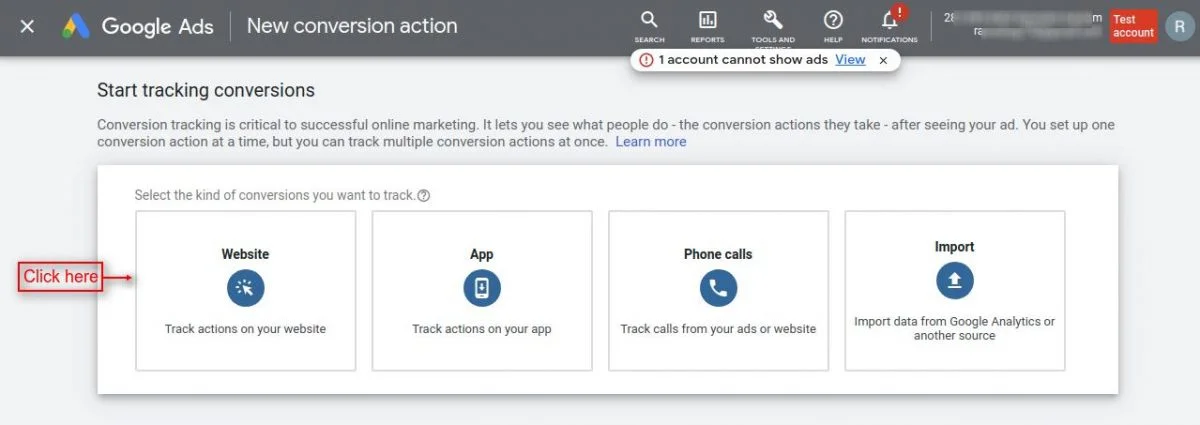
Next, select Website as the conversion source.
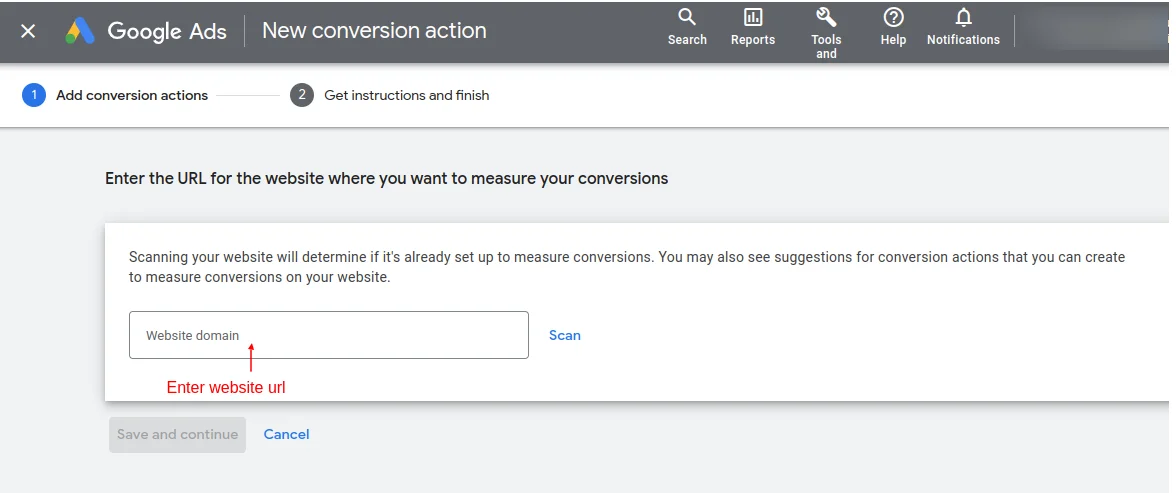
Enter your store URL.
Then create the required conversion action.
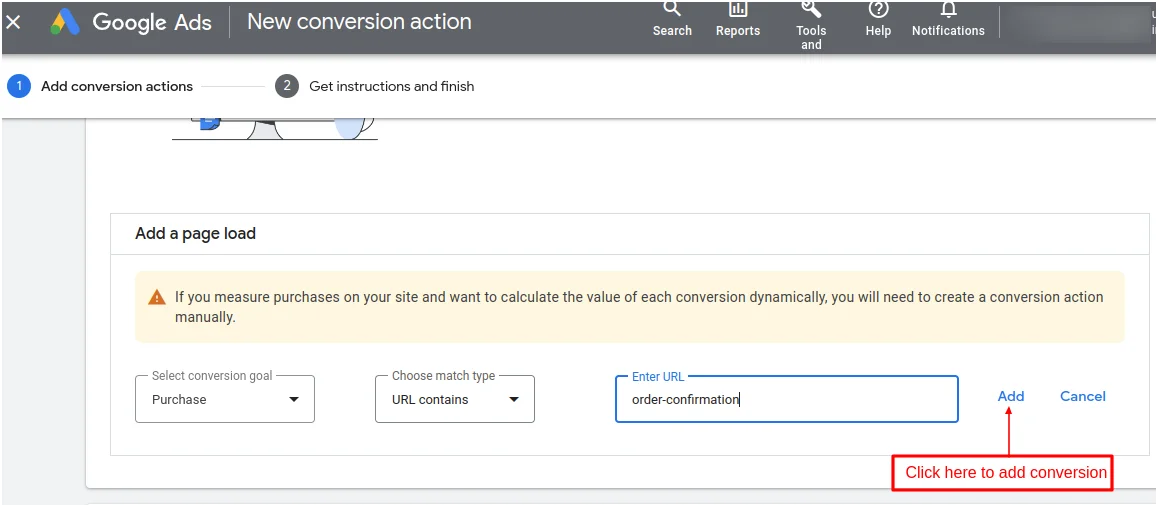
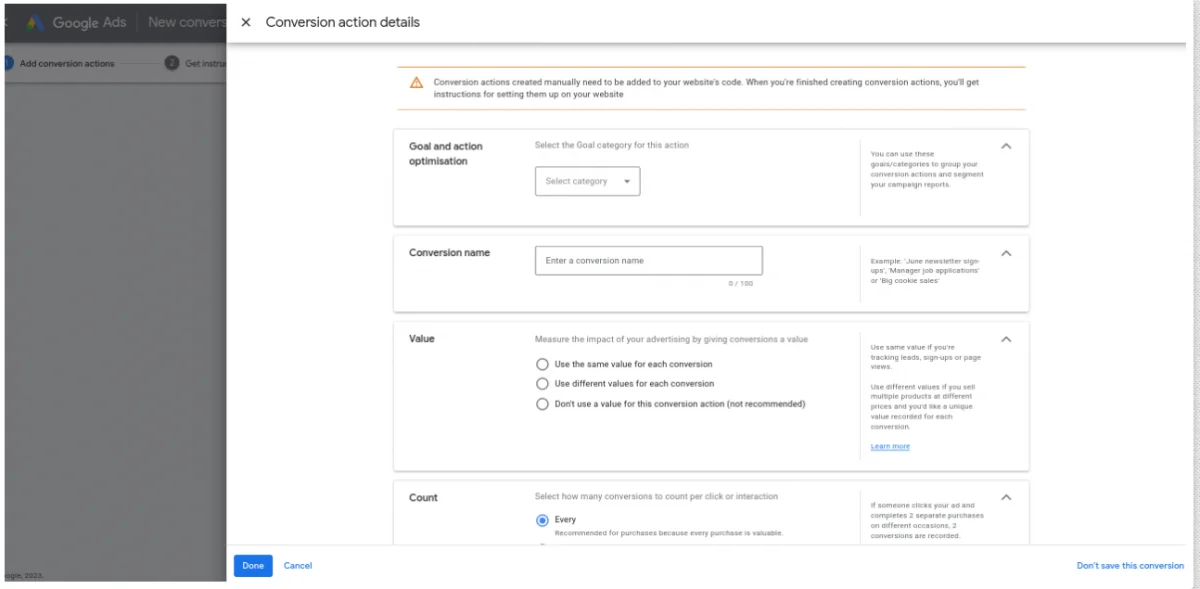
For a manual conversion, select the required events.
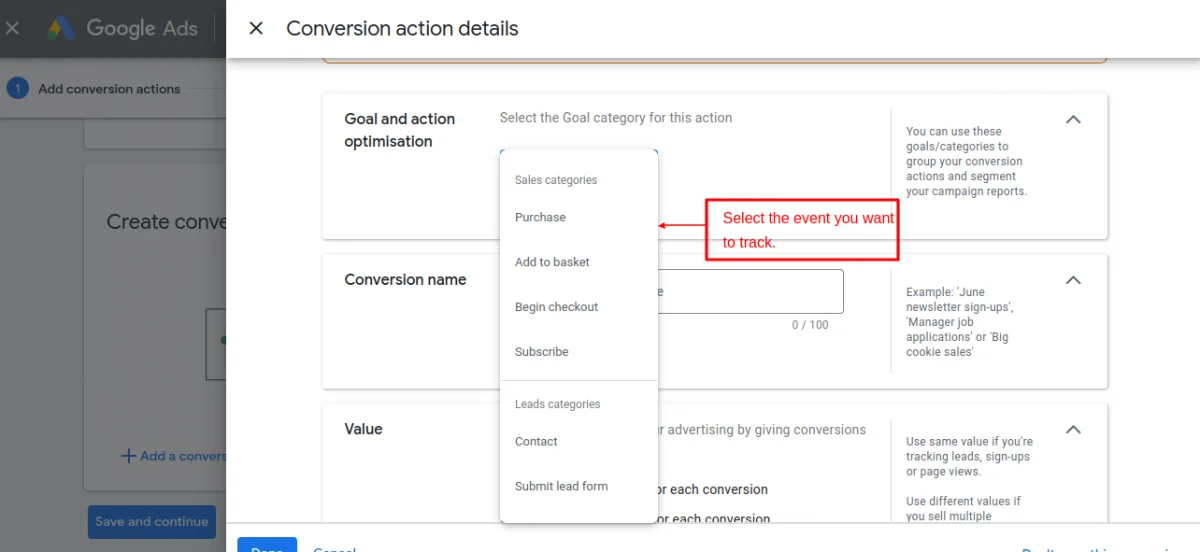
Click Done after selecting the events.
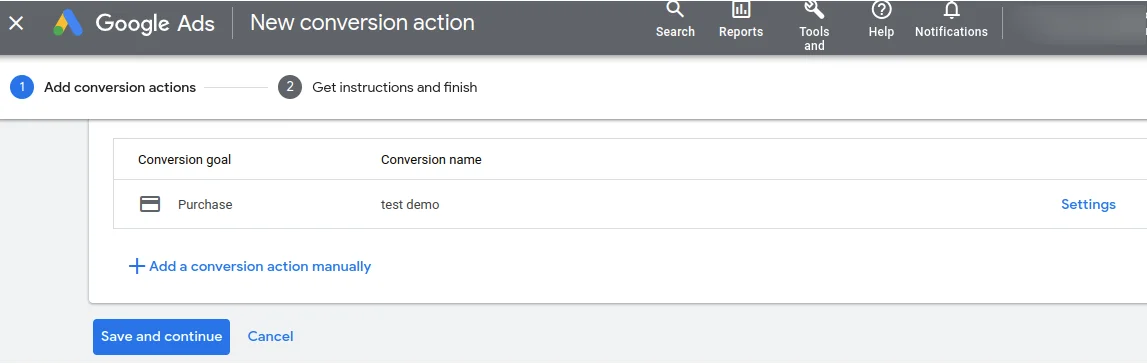
Add additional conversion actions manually if required.
Under Tag setup, choose Use Google Tag Manager.
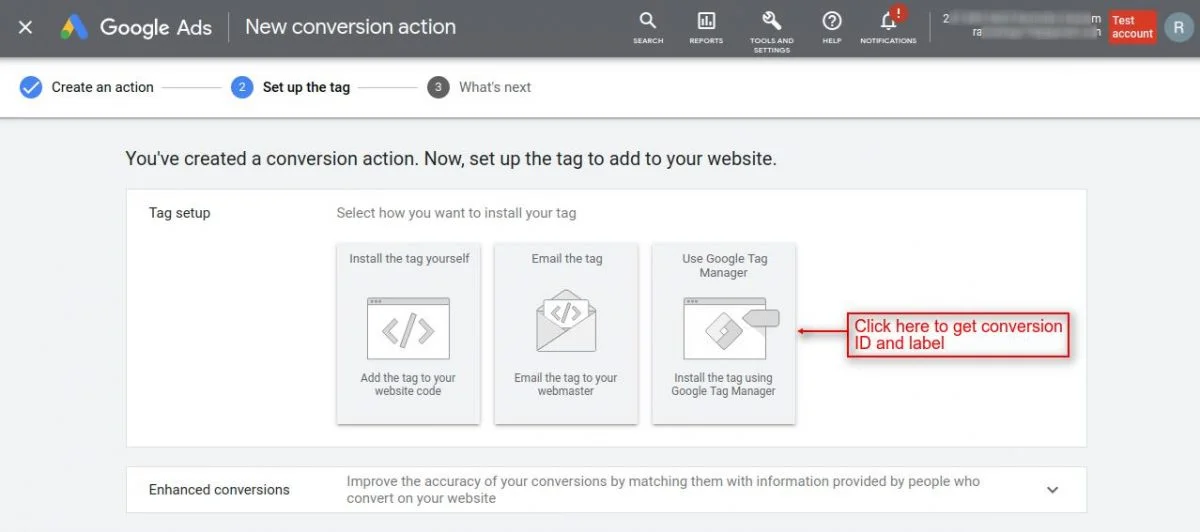
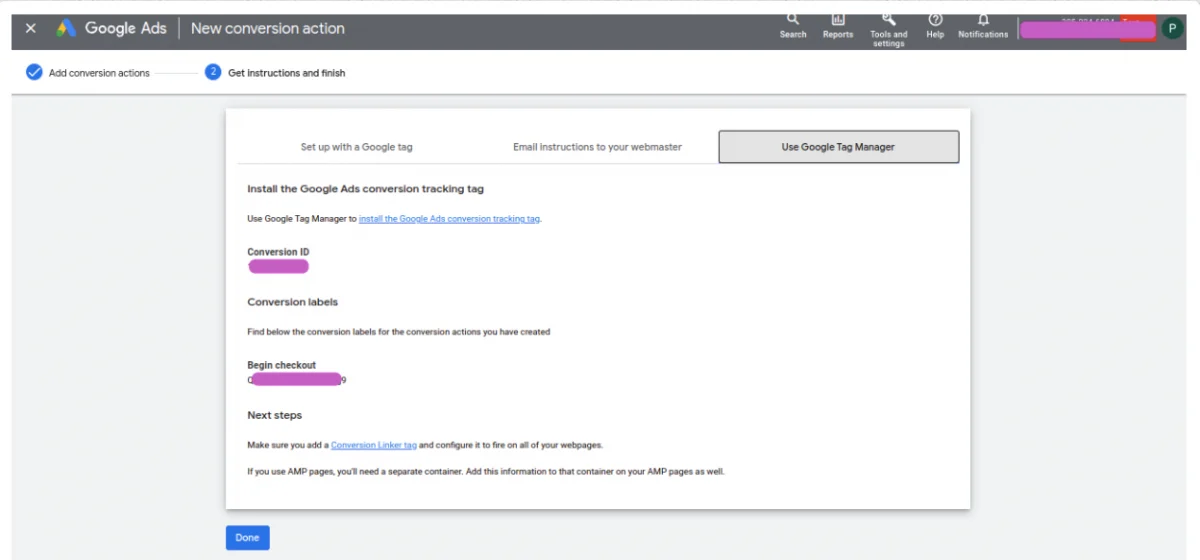
Copy the conversion ID into the Bagisto configuration.
Use the Conversion Id field under Conversion Tracking.
Use the Conversion Code field under Remarketing.
Enter digits only and omit the AW- prefix.
Finally, copy the conversion label into the Conversion Label field.
Deploy Google Analytics And Other 3rd Party Tags With Google Tag Manager
Bagisto Google Tag Manager can deploy GA4 and third-party tags.
The exported container already includes the GA4 configuration tag.
The tag contains your configured Measurement Id.
In addition, the container contains fourteen GA4 event tags.
These tags connect to the storefront events.
Import the file and publish the container version.
Therefore, you do not need to create the GA4 tags manually.
However, you can still add unsupported third-party tags manually.
Examples include advertising pixels and heatmap scripts.
Chat widgets can also run through Tag Manager.
Furthermore, the imported Bagisto triggers can support these tags.
Note: third-party tags require an ID from the relevant platform.
How to Add a Tag of Your Own (Optional)
This section is optional.
GA4 and Google Ads tags already exist in the imported container.
Therefore, follow these steps only for additional tags.
In Google Tag Manager, click Add a new tag.

Enter a name for the tag.
Next, click Tag Configuration to configure it.

Select the required tag type.

Then enter the ID supplied by the third-party platform.
For GA4 events, enter the required event name.

Choose an existing trigger or create a new trigger.
The Bagisto import already contains the supported event triggers.
Note: shared parameters belong on the GA4 configuration tag.
Therefore, GA4 event tags inherit parameters from the configuration tag.
How the Storefront Integration Works
The Bagisto storefront integration uses four main locations.
- Head — loads the Google Tag Manager script.
- The script uses the Tag Manager Public Id.
- Body — contains the Tag Manager noscript iframe.
- The body also receives the relevant data layer push.
- Product page — publishes the product view event.
- Footer — listens for cart and wishlist changes.
The footer component supports events without a page reload.
Meanwhile, the container snippet follows the Google Tag Manager format.
<!– Google Tag Manager –>
<script>(function(w,d,s,l,i){w[l]=w[l]||[];w[l].push({‘gtm.start’:
new Date().getTime(),event:’gtm.js’});var f=d.getElementsByTagName(s)[0],
j=d.createElement(s),dl=l!=’dataLayer’?’&l=’+l:”;j.async=true;j.src=
‘https://www.googletagmanager.com/gtm.js?id=’+i+dl;f.parentNode.insertBefore(j,f);
})(window,document,’script’,’dataLayer’,’GTM-XXXXXXX’);</script>
<!– End Google Tag Manager –>
No tracking script enters the admin panel.
Likewise, the storefront renders nothing when Status is off.
Events View – Google Tag Manager
Bagisto publishes the data layer events on the storefront.
The imported container provides the tags and triggers.
It also provides the variables that read the data.
Before each event, the module clears the previous ecommerce object.
window.dataLayer = window.dataLayer || [];
dataLayer.push({ ecommerce: null });
dataLayer.push({
‘event’: ‘view_item’,
‘ecommerce’: { }
});
The following table lists the events that the module publishes.
| Event | Fires on | Controlled by |
|---|---|---|
| view_item | Product detail page | View Product Event |
| view_item_list | Category and product listing page | View Category Event |
| view_cart | Cart page | View cart Event |
| add_to_cart | Mini-cart update | Add To Cart Event |
| remove_from_cart | Cart item removal | Remove From Cart |
| add_to_wishlist | Wishlist addition | Add To Wishlist Event |
| begin_checkout | One-page checkout | Checkout Begin Event |
| purchase | Order success page | Checkout Success Event |
| add_payment_info | Order success page | Checkout Success Event |
| add_shipping_info | Order success page | Checkout Success Event |
| login | First page after sign-in | Login Event |
| sign_up | Customer account screen | Register Event |
| search | Search results page | Search Event |
| Edit | Customer profile page | Edit Profile |
Support
If you need any technical assistance, please reach us by mail at [email protected].
Also, discover various solutions to add more features and enhance your online store by visiting the WooCommerce plugins page.
Additionally, if you require expert assistance or want to develop custom unique functionality Hire WooCommerce Developers for your project.
Current Product Version - 1.2
Supported Framework Version - 4.16.x - 4.18.x

Be the first to comment.