CS-Cart Marketplace Mangopay Payment Gateway:
This impressive add-on is a flawless end-to-end payment solution which integrates a secure and reliable payment gateway with CS-Cart Multi-Vendor store.
Moreover this add-on allows store admin to receive payment from users via Mangopay Payment Gateway.
It provides the feature of split payment and bank payout generation among multiple vendors.Also it enables the platform to accept multiple currencies.
Features
- Indeed Well integrated with CS-Cart Multi-Vendor.
- Partial and full refund for the order.
- Provides the concept of holding the amount in Escrow Wallet on successful order placement.
- Also allows admin to transfer funds from Escrow Wallet to Vendor’s Mangopay Wallet.
- Functionality to manage bank account details at both vendor and admin end.
- Option to add multiple bank accounts details at both vendor and admin end.
- In addition Functionality to create a bank payout for vendors at admin end.
- Option to select the default bank account for bank payout at both vendor and admin end.
- Besides this the payout page will have pre-filled author id & wallet id of associated wallet. No need to enter the same to generate a payout.
- Functionality to manage KYC details at both vendor and admin end.
- Admin can upload the KYC PDF.
- Also Option to transfer the amount in bulk to multiple vendor’s wallets.
- Functionality to send an email notification to admin and vendor for every Bank Payout.
- Option to delete the transfer and payout logs at admin end.
- Besides this it has User friendly interface to receive online payments.
- Moreover Easy to configure and manage at admin end.
Features Added In Version 2.1
- Supports Payments via various payment gateways which include-
- Bankwire Payment Method
- Sofort Payment Method
- SEPA Payment Method
- Customers can pay in all supported currencies by Mangopay enabled at the store.
- Also, Admin can have a wallet for each supported currency by Mangopay enabled at the store.
- Admin can upload the KYC PDF.
How To Upload and Install
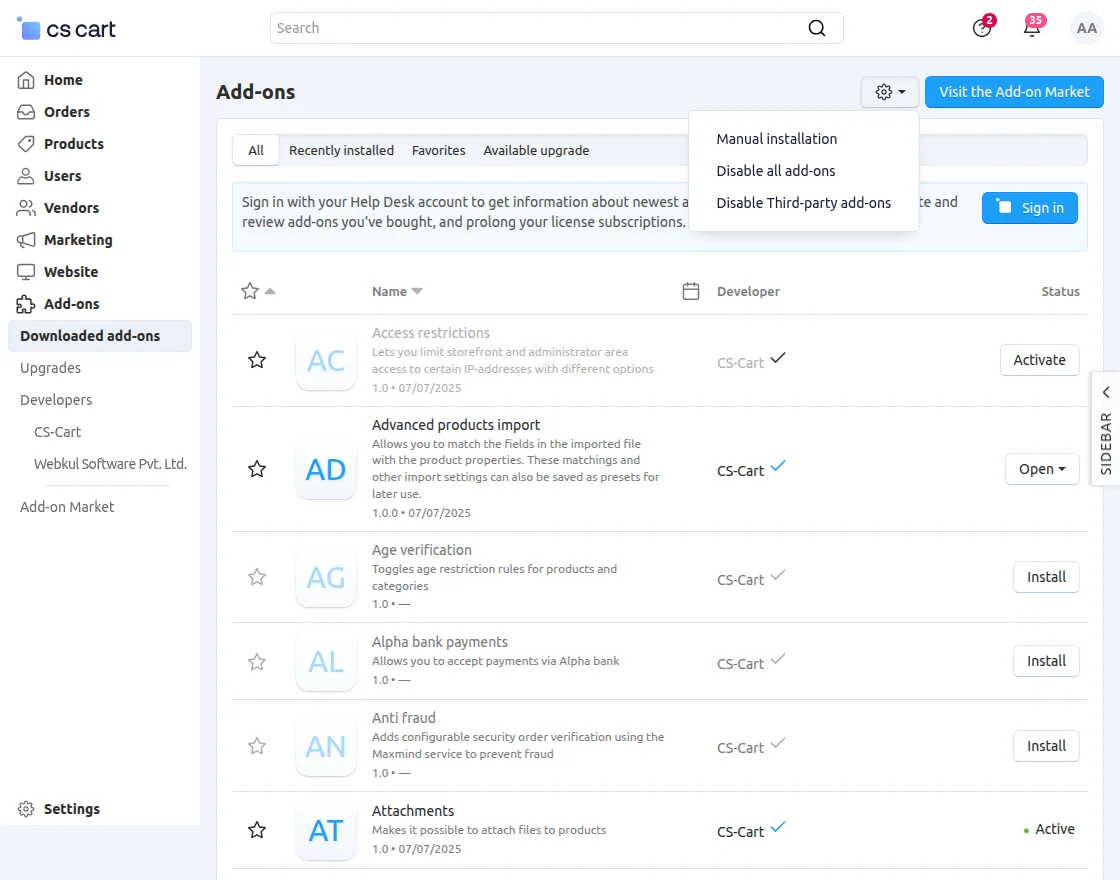
- Go to Manage Add-ons, click on the gear drop-down, and select Manual Installation.
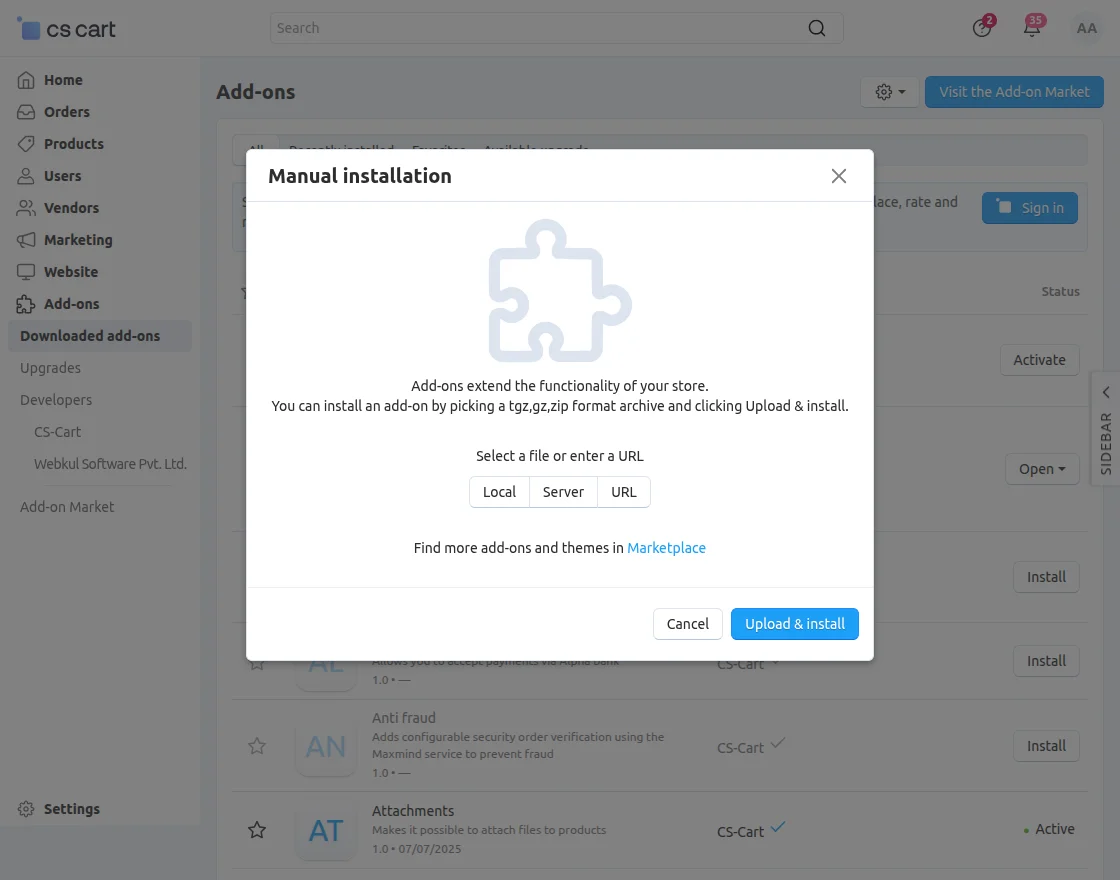
2. Click on Local to select the zip file.
Then click on “Upload & Install” as shown below in the snapshot.
Add-on installed successfully!
Back End View
- Client ID: Enter the Client ID provided by Mangopay during registration.
- Passphrase: Enter the client passphrase received at the time of registration.
- Payment Mode: Select the required environment — Test for testing or Live for production.
- Enable Refund Fine: Enable this option if a refund fine should be applied when processing refunds.
- Cron Password: Enter the password required to secure the automatic vendor transfer cron job.
- Cron Link: Copy the generated cron URL and configure it on your server to enable automatic transfers to vendors.
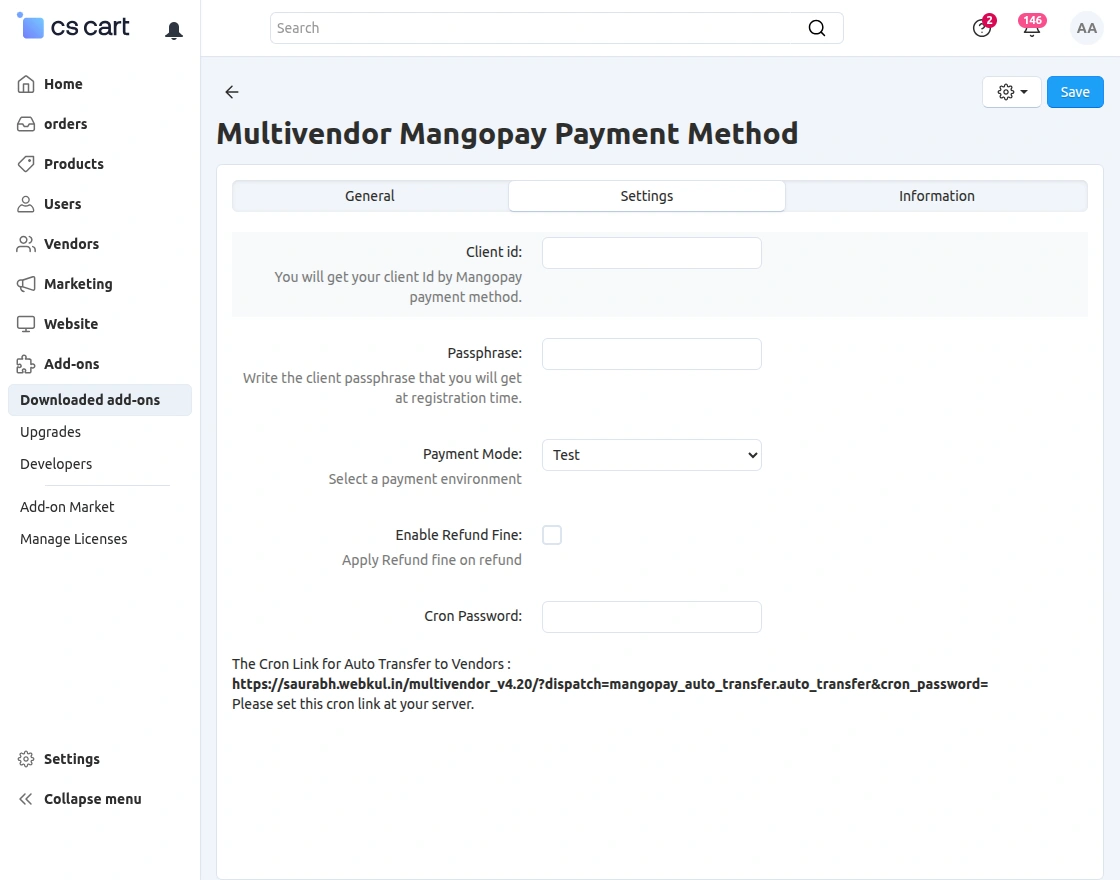
Mangopay User Id and Escrow wallet id is generated itself once you save the settings.
Mangopay Payment Method Configuration
Go to “Administration” tab and click on “Payment methods”.
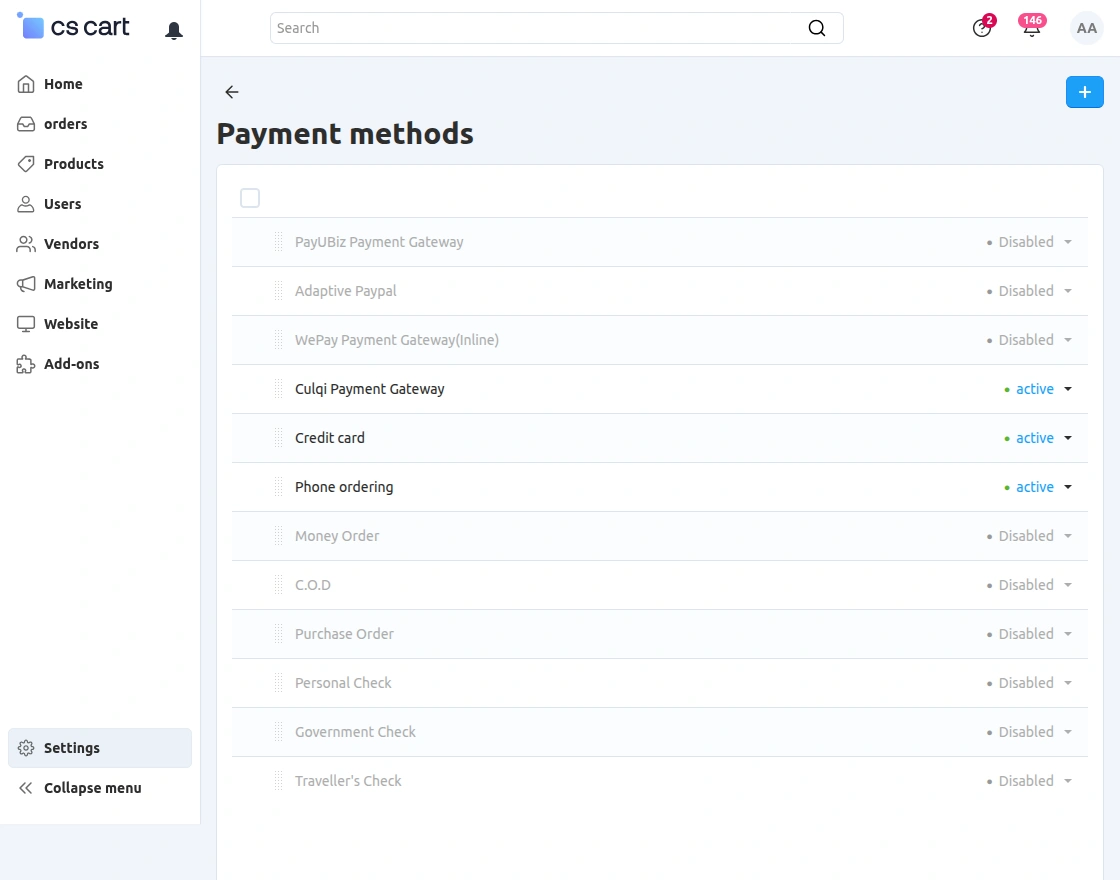
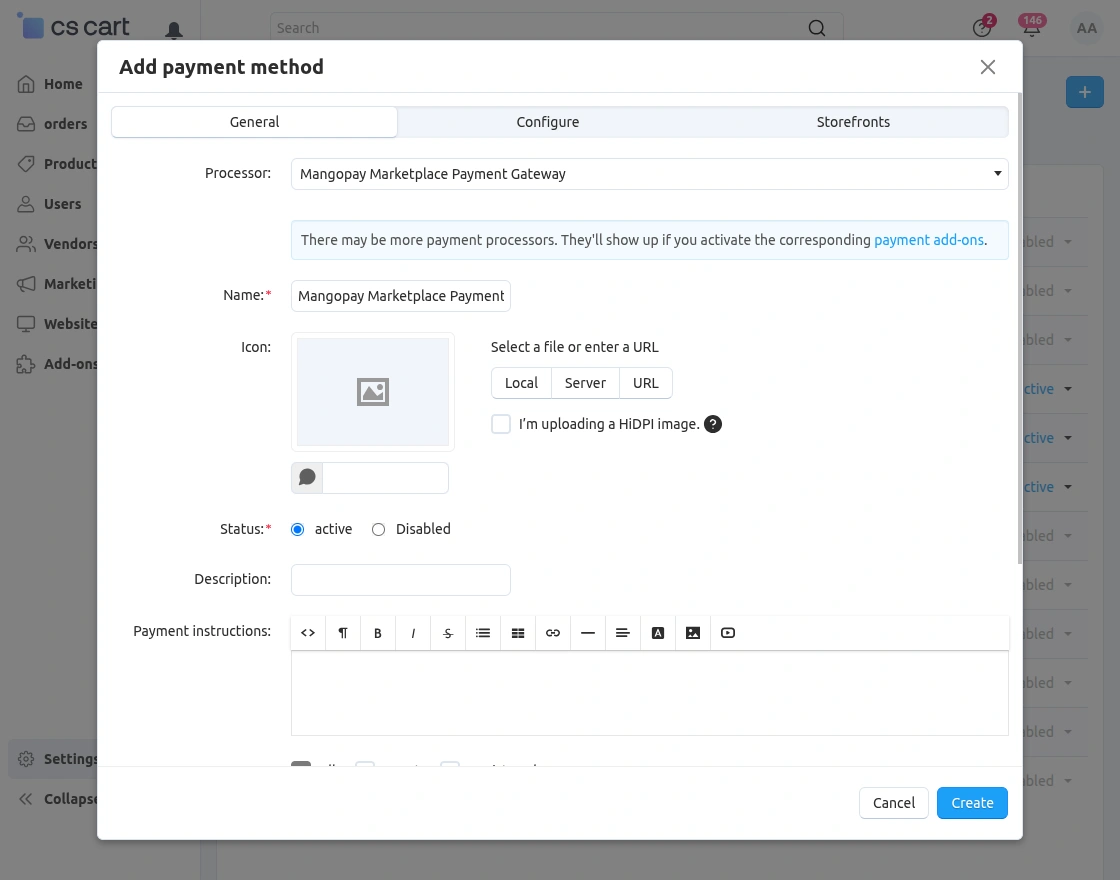
Click on “+” to create a new payment method and set the parameters as shown below in the snapshot.
- Set the name of the payment method.
- For checkout choose the processor as “Mangopay Marketplace Payment Gateway”.
- Select template as “cc_outside.tpl” from the drop-down.
- Select the Payment Category.
- Finally Configure the tabs accordingly as shown below in the snapshot.
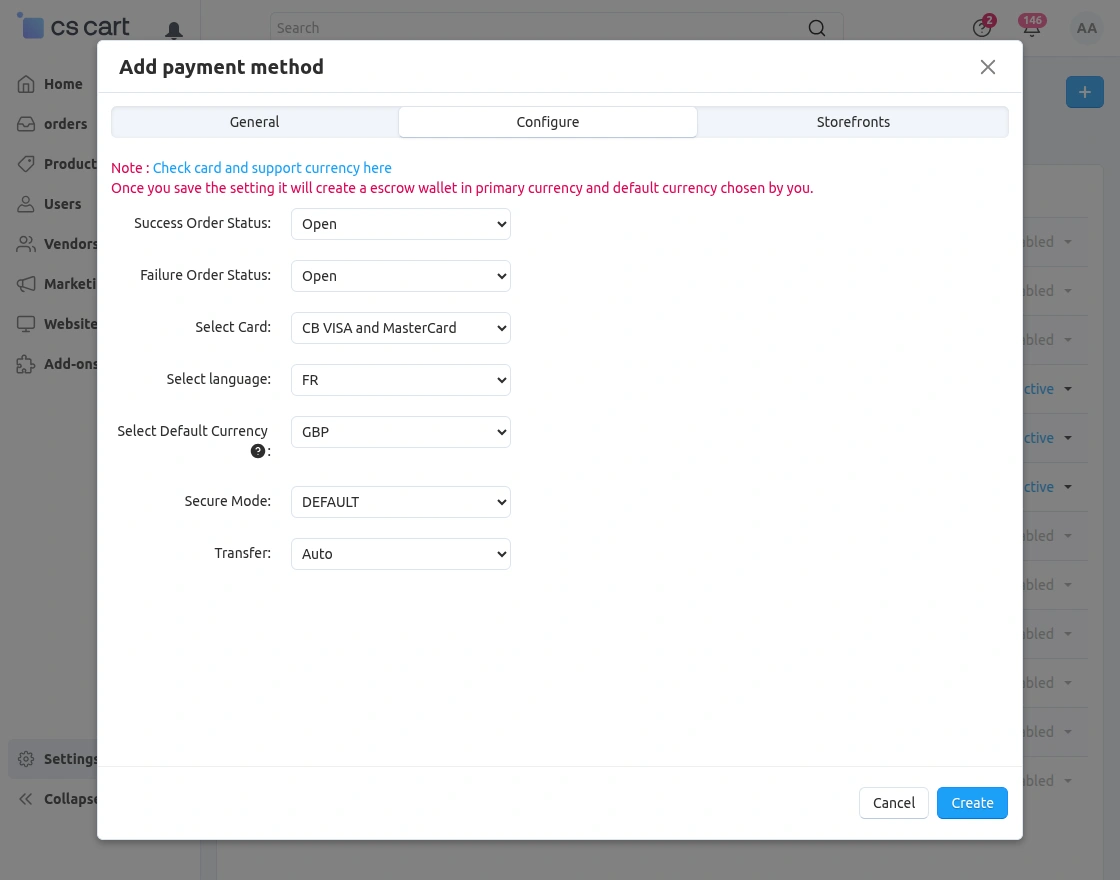
Click on “Configure” and set the parameters as shown below in the snapshot.
- Click on the hyperlink to view the table of supported currencies and cards for Mangopay.
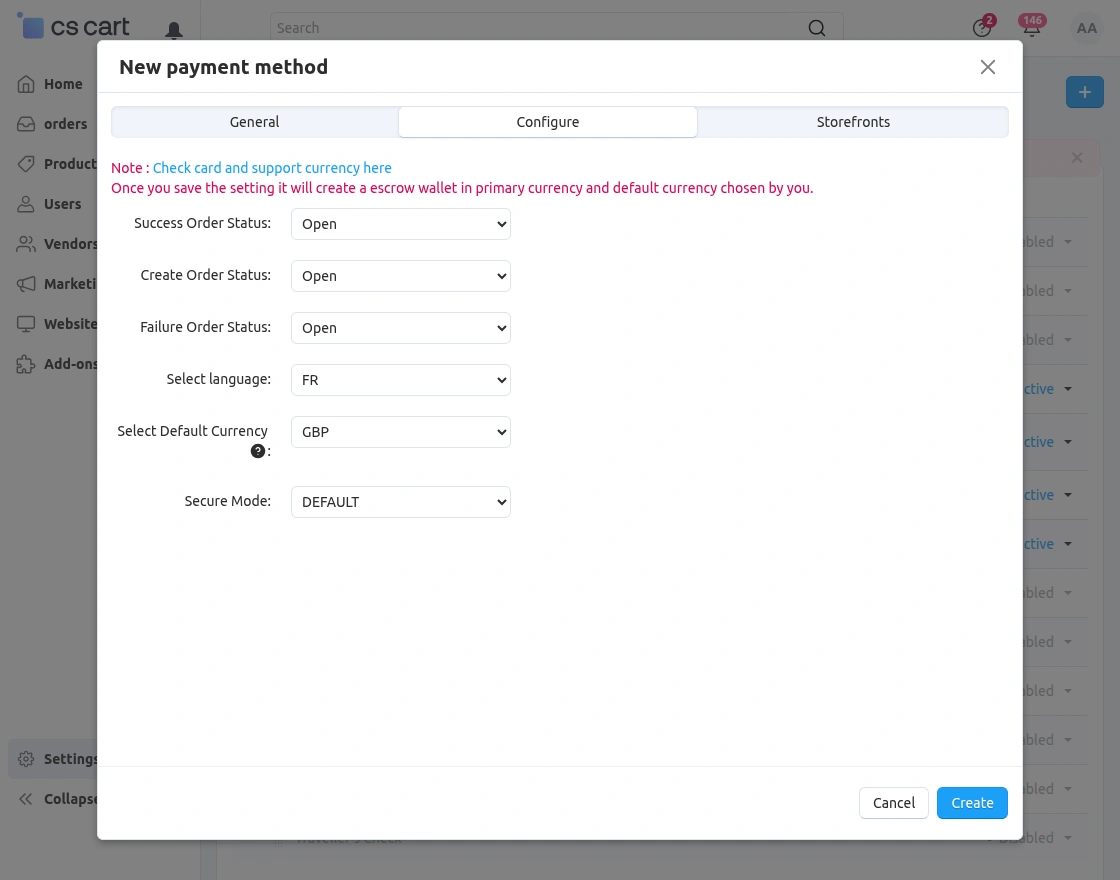
- Set the order status for successful and failed transactions.
- Select the type of card for the customer to pay via Mangopay.
- Set language for frontend panel to pay via Mangopay.
- To activate the 3DSecure for lower amount transactions from the cards which support 3DS after certain limits, please set the Secure mode field as FORCE otherwise keep it DEFAULT.
- Click on “Create” button to add the payment method.
Mangopay BankWire Payment Method Configuration
Firstly Go to “Administration” -> “Payment methods“. Click on “+” to create a new payment method and set the parameters as shown below in the snapshot.
- Set the name of the payment method.
- For checkout choose the processor as “Mangopay Marketplace Bank Wire Payment”.
- Select template as “cod.tpl” from the drop-down.
- Select the Payment Category.
Mangopay SEPA Payment Method Configuration
Go to “Administration” -> “Payment methods“. Click on “+” to create a new payment method and set the parameters as shown below in the snapshot.
- Set the name of the payment method.
- For checkout choose the processor as “Mangopay Marketplace SEPA Payment”.
- Select template as “cc_sepa.tpl” from the drop-down.
- Select the Payment Category.
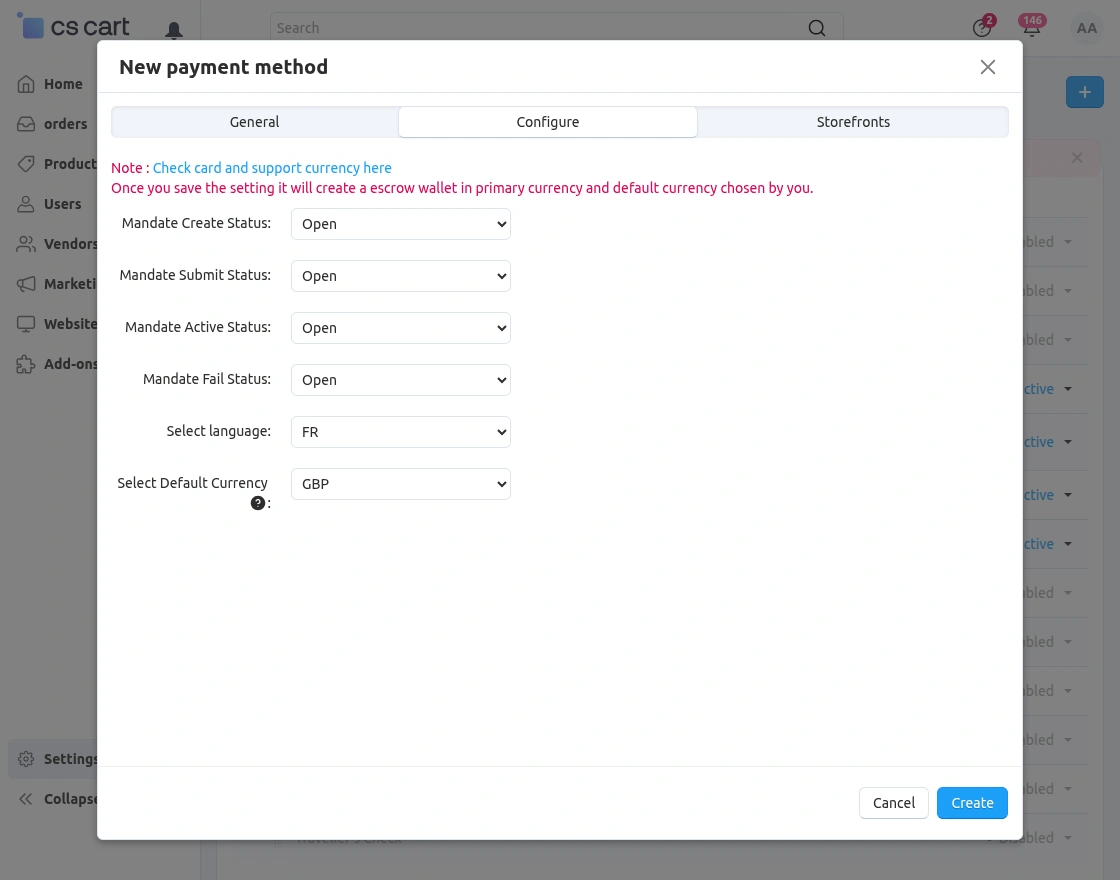
Further, click on “Configure” for SEPA configuration. While paying through SEPA, a mandate is generated after entering the bank details.
Also Customer needs to confirm the mandate.Once he/she agrees with the mandate, the Mandate status will be “Submitted“.
Moreover After the bank verifies the Mandate and everything seem fine at Bank’s end then the mandate status gets “Active“.set the parameters as shown below in the snapshot.
Mangopay Sofort Payment Method Configuration
Firstly Go to “Administration” -> “Payment methods“. Click on “+” to create a new payment method and set the parameters as shown below in the snapshot.
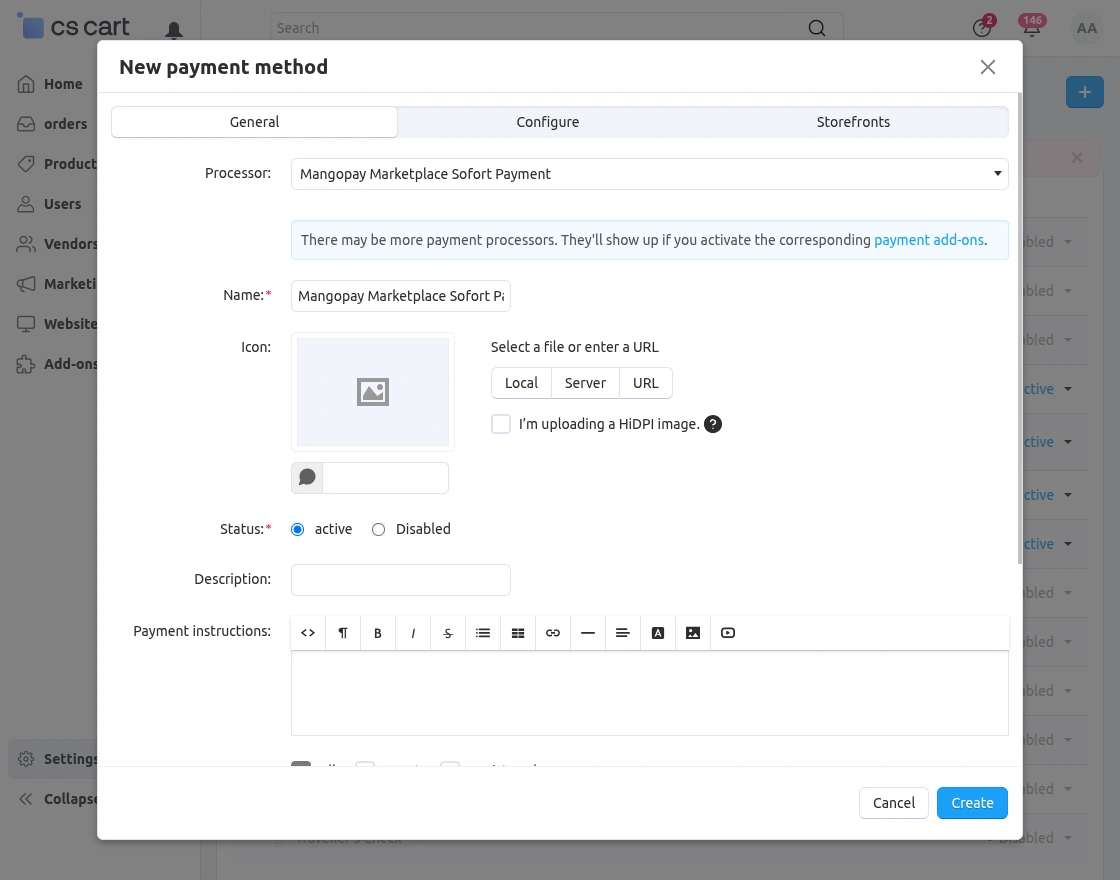
- Set the name of the payment method.
- For checkout choose the processor as “Mangopay Marketplace Sofort Payment”.
- Select template as “cc_outside.tpl” from the drop-down.
- Finally Select the Payment Category.
Configure the tabs accordingly as shown above in the snapshot. Further, click on “Configure” and set the parameters as shown below in the snapshot.
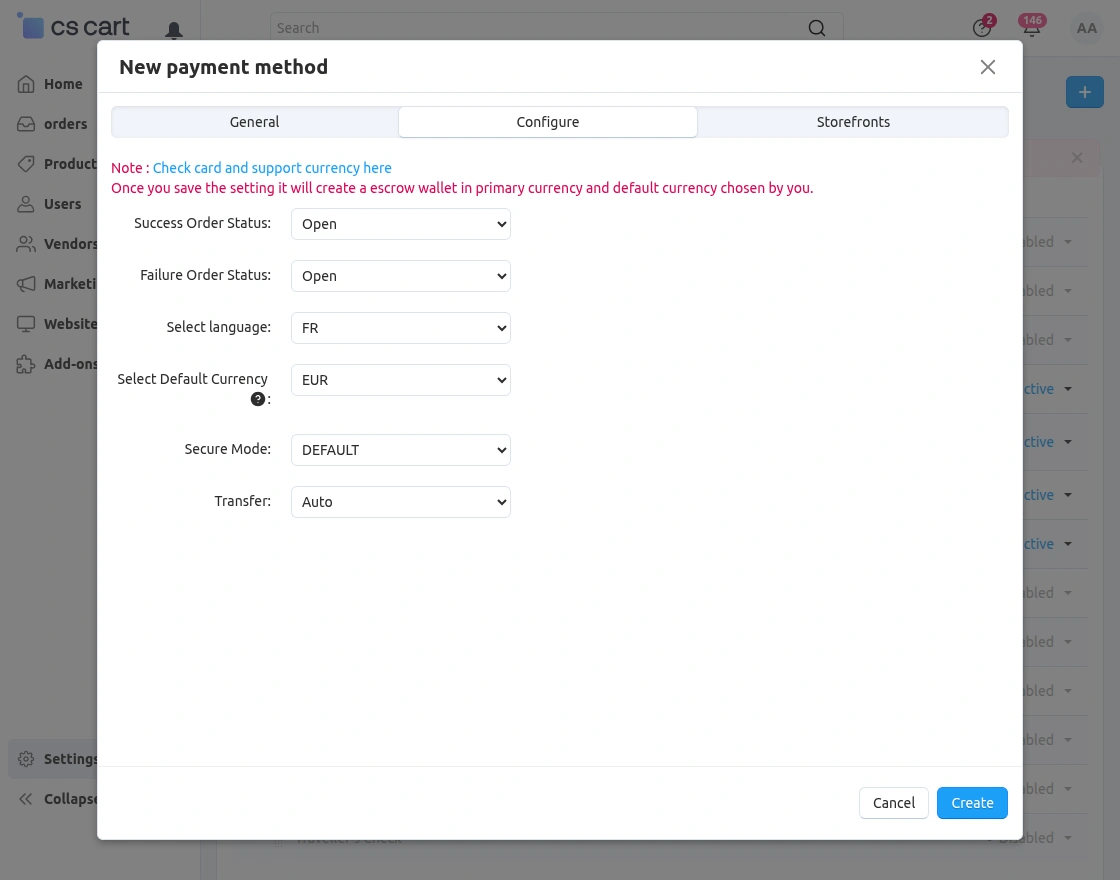
Admin Panel View
Firstly Go to Marketing → Mangopay Marketplace as shown below in the snapshot.
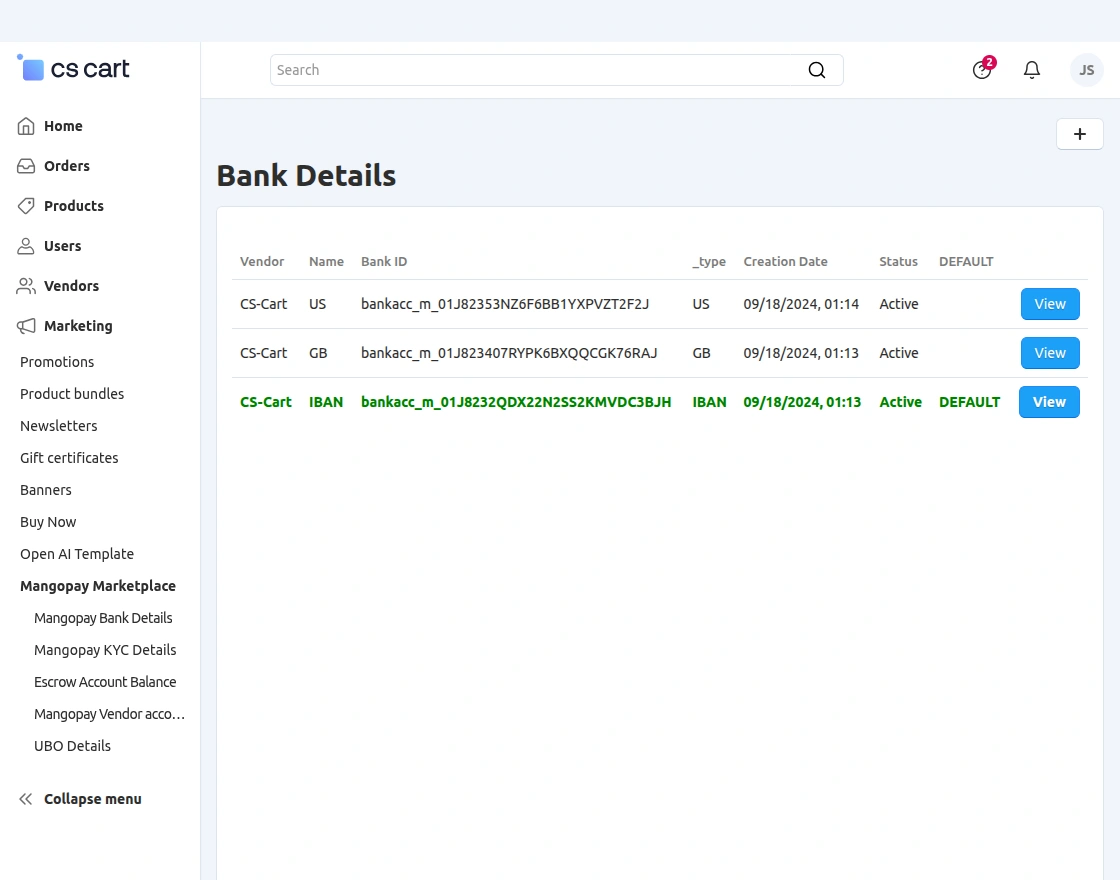
- Click on “Mangopay Bank Details” to manage the bank account details.
- To manage the KYC of the vendor click on “Mangopay KYC Details“. KYCs are necessary in order to fight fraud, money laundering and financing of terrorism.
- Click on “Escrow Account Balance” to manage the Escrow wallet.
- Click on “Mangopay Vendor Account Balance” to view and manage the vendor’s account.

Firstly Go to Marketing → Mangopay Marketplace →Mangopay Bank Details
To view the bank account details of sellers. Click on “+” to add the bank details of the seller as per the below screenshot.
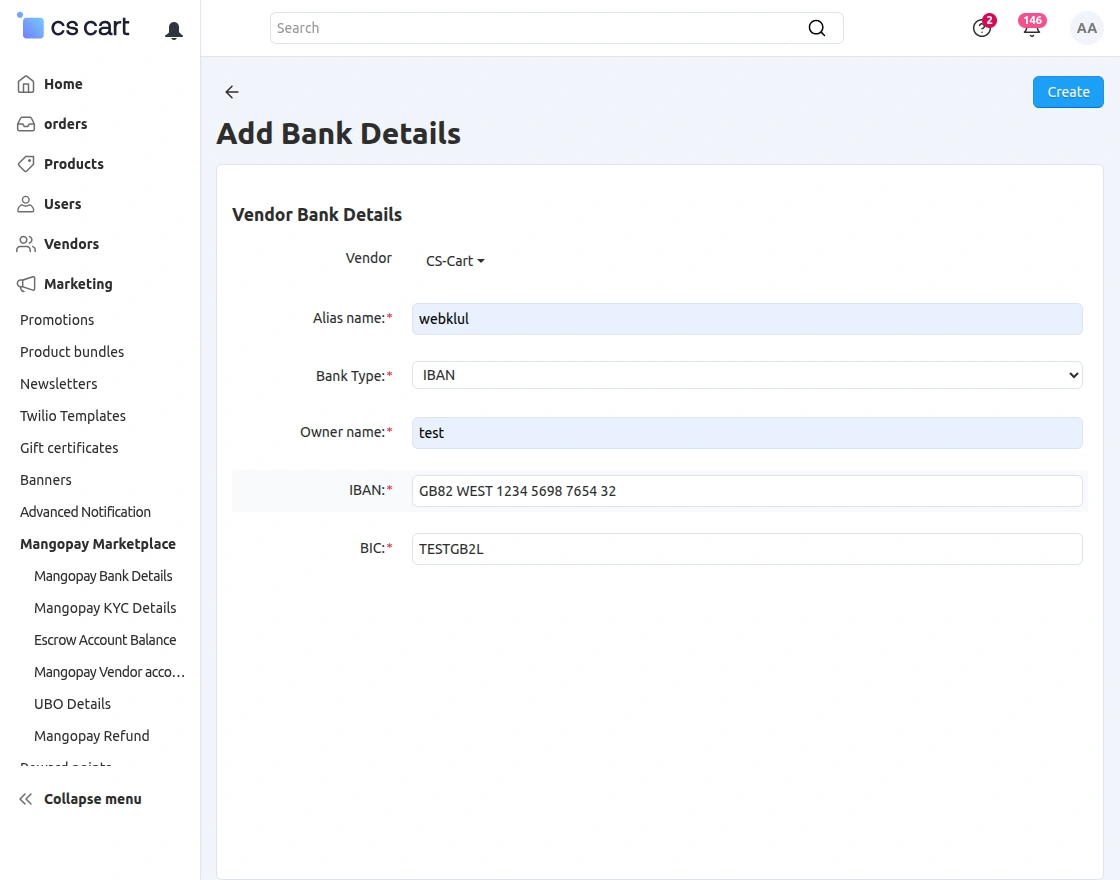
Set the parameters as per the below snapshot.
- Select the vendor to add his bank details.
- Enter the name of the vendor.
- Select the type of bank from the dropdown.
- Finally, fill in the bank account details accordingly.
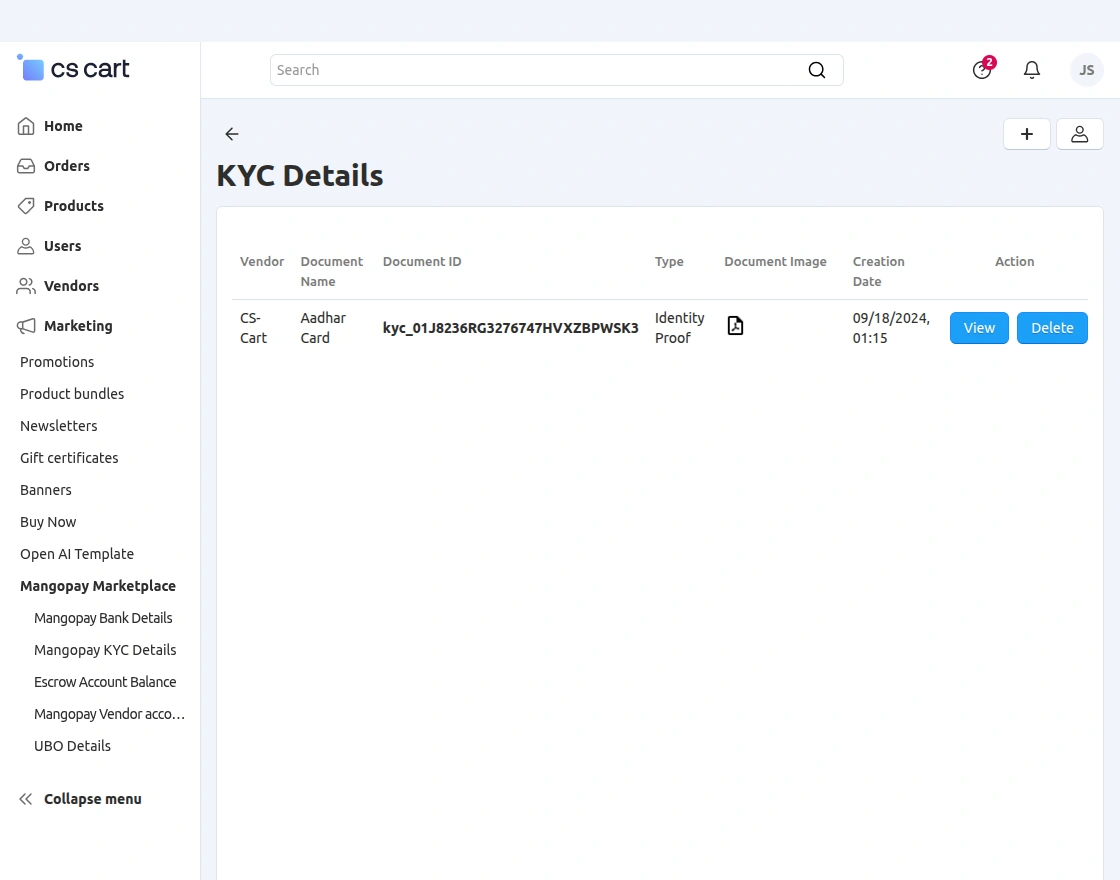
Go to Marketing → Mangopay Marketplace → Mangopay KYC Details to view the KYC details of the seller.
- Click on “+” to add the KYC of the seller.
- Click to update user information as shown in the below snapshot.
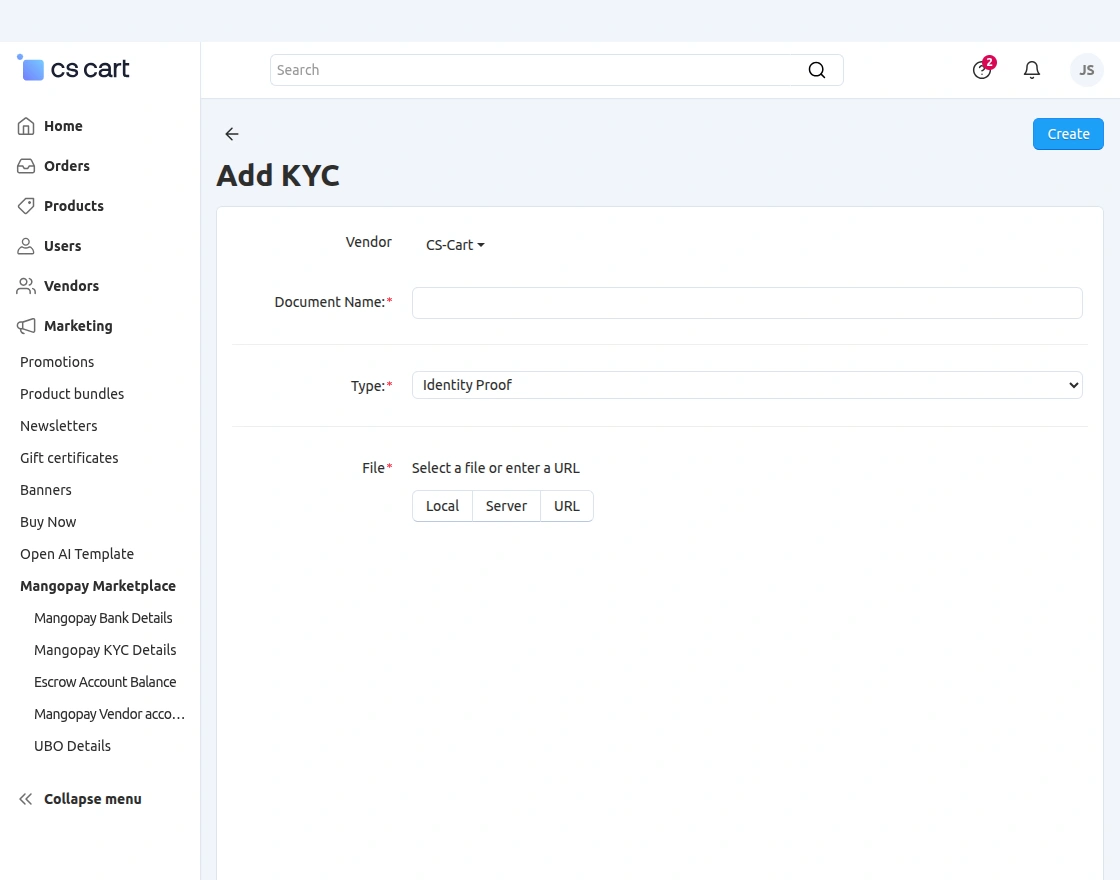
Set the parameters to add KYC as per the below snapshot.
- Select the vendor to submit KYC.
- Enter the name of the document.
- Choose the type of document.
- Upload the document file.
- Admin can also add the PDF file for the KYC.
- Click on Create button to add the KYC.
Once the admin clicks to update user information, he/she is able to view the Escrow Wallet and Commission Wallet balance.
Id, Email, and KYC level will be fetched from Mangopay. Moreover to update the user information please set the parameters as shown in the snapshot.
- Enter the Name and the type of the company.
- Enter the Legal Person’s Details, Headquarters Address, and Legal Representative Address.
- Click on the Save button to save the settings.
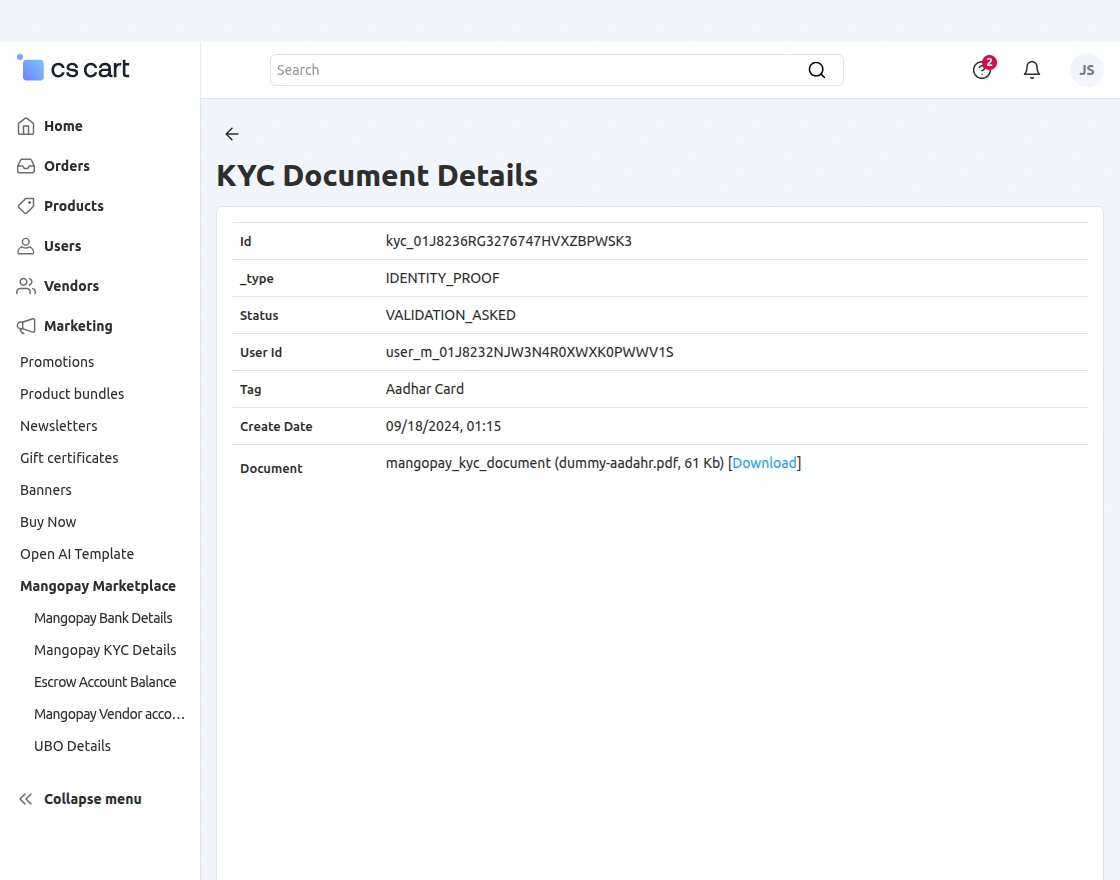
To know more about KYC and compliance please go through the link https://docs.mangopay.com/guide/kyc.
How To Transfer Money To Vendor’s Wallet?
Firstly Go to Marketing → Mangopay Marketplace → Escrow Account Balance.
Escrow account balance details can be viewed here by the store admin. Click on the “Transfer” button to transfer money to the seller’s wallet.
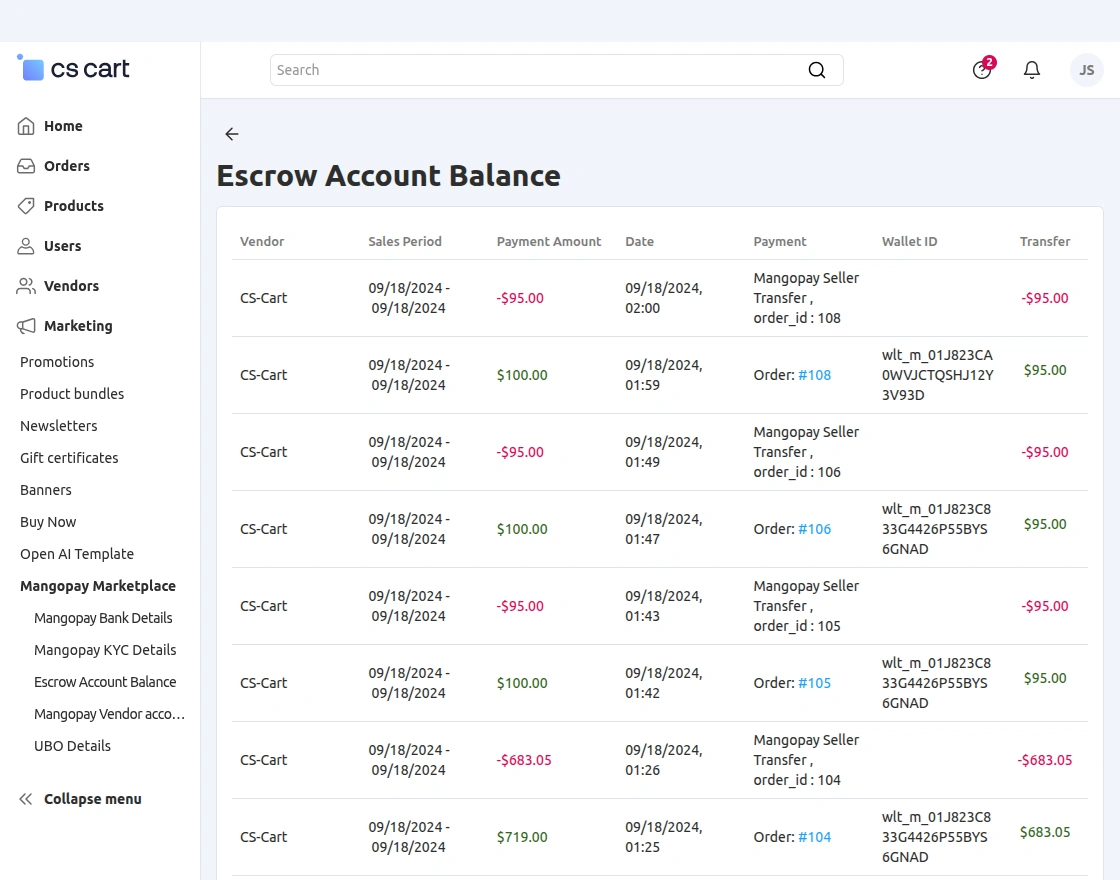
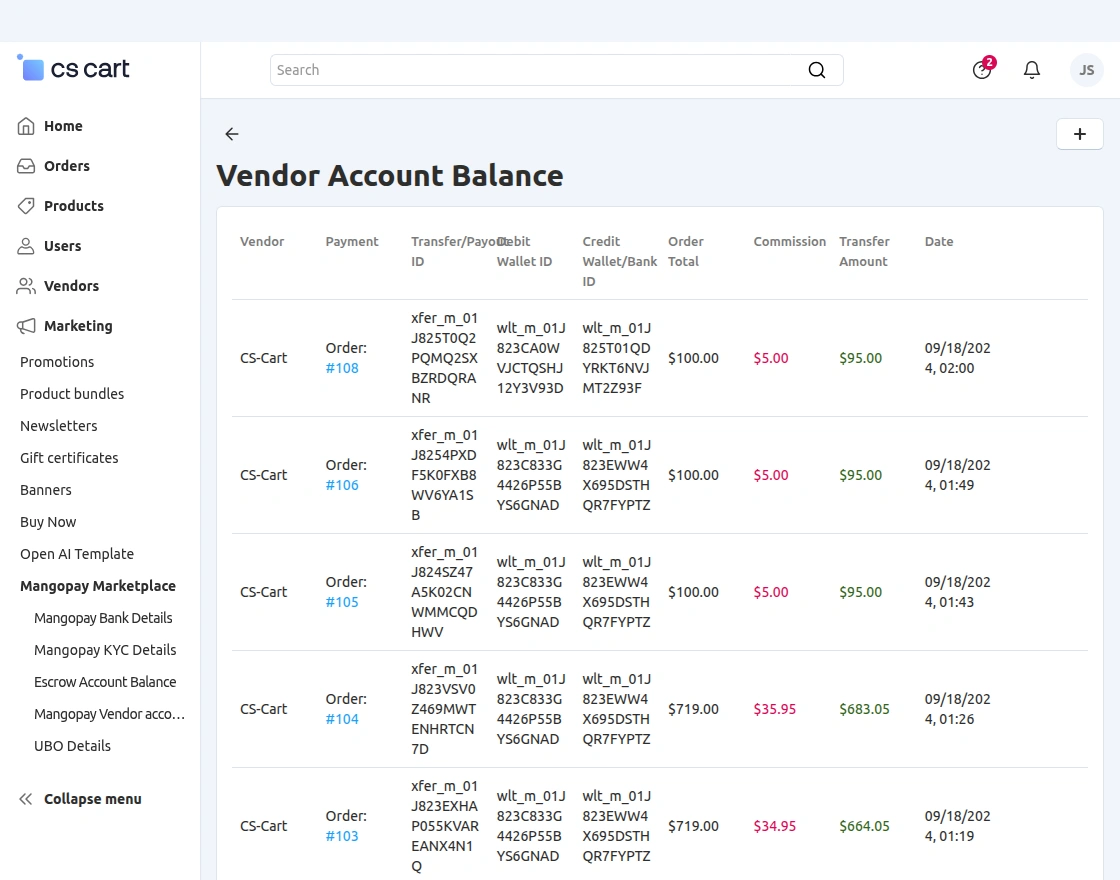
Firstly Go to Marketing → Mangopay Marketplace → Vendor Account Balance.
The vendor’s account balance details can be viewed here. Click on “+” button to create bank payout for the vendor.
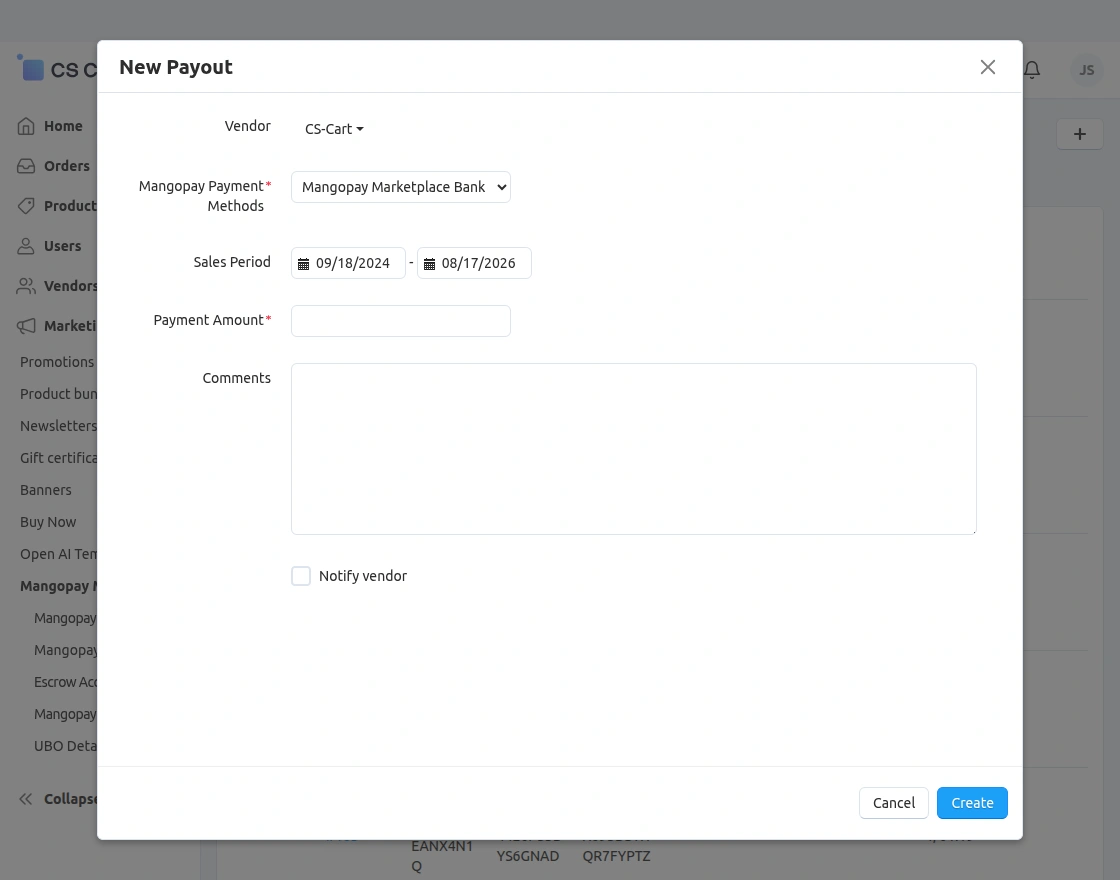
Enter the parameters to generate payout as per the below snapshot
- Firstly Select the vendor for bank payout generation.
- Choose the sales period for bank payout.
- Enter the amount to pay.
- Also, Enter the comments if any.
- Check the box to notify the vendor of the payout.
- Finally, Click on Create button to create the payout.
This way you can transfer the amount to the respective vendor’s bank account.
Vendor panel View
A vendor cant view the Escrow Account Balance as the Escrow wallet is managed by the store admin only. Rest all fields are similar for the vendor. Please go through the snapshot for Vendor Panel View.
Front End View
Mangopay Bank Wire Payment :
Firstly For “Mangopay Bank Wire Payment ” select the option shown below in the snapshot and submit the order.

Finally, The order is placed successfully and the customer will get the wire transfer details to transfer the money in the order details section.
Once the payment from the customer is received, the order will be processed.

Mangopay Card Payment :
For “Mangopay Card Payment ” select the option as shown below in the snapshot. Submit the order.

Enter the card details and click on the “Validate” button to make the transactions.

Mangopay Sofort Payment :
For “Mangopay Sofort Payment ” select the option as shown below in the snapshot. Finally, Submit the order.

You will get redirected to the Sofort payment portal. Choose the country and the bank to continue.

Enter the bank account number and password to continue.
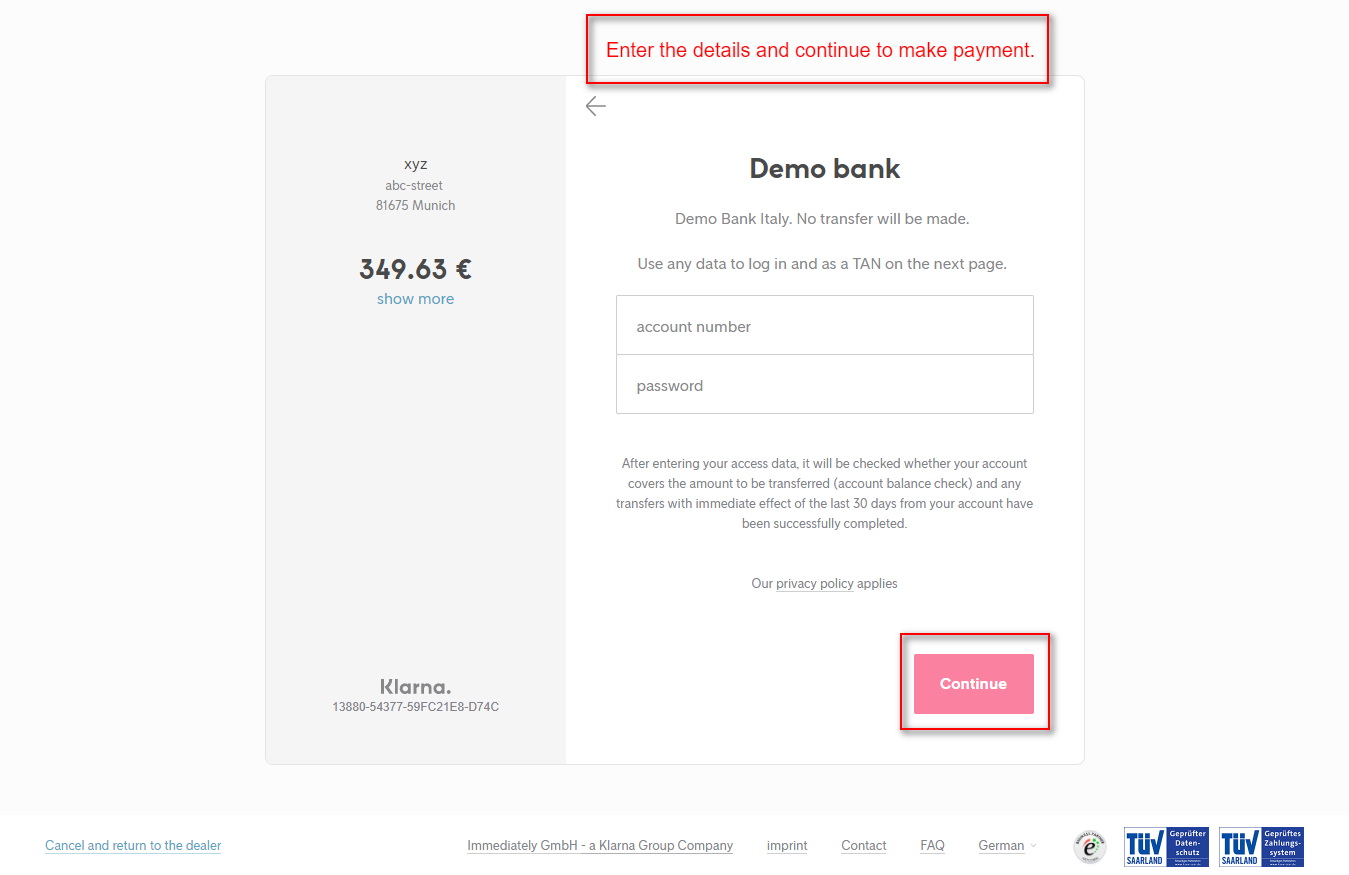
Finally, Confirm the payment transaction to place the order.

Mangopay SEPA Payment :
For “Mangopay SEPA Payment ” select the option as shown below in the snapshot. In addition Enter the bank details or choose the saved details. Submit the order.

A mandate will be generated for the payment via SEPA. Finally Customer needs to go through the mandate & confirm the same.

Finally, After confirmation, the Mandate is submitted at Mangopay Dashboard with the corresponding mandate Id.

After the bank verifies the Mandate and everything seems fine at Bank’s end, the mandate status gets “Active” and the the order will be processed further.
This is how Mangopay works for various payments.
Refund Process – Full & Partial for an Order
After the customer has placed an order the admin can view that particular order in the admin backend panel.
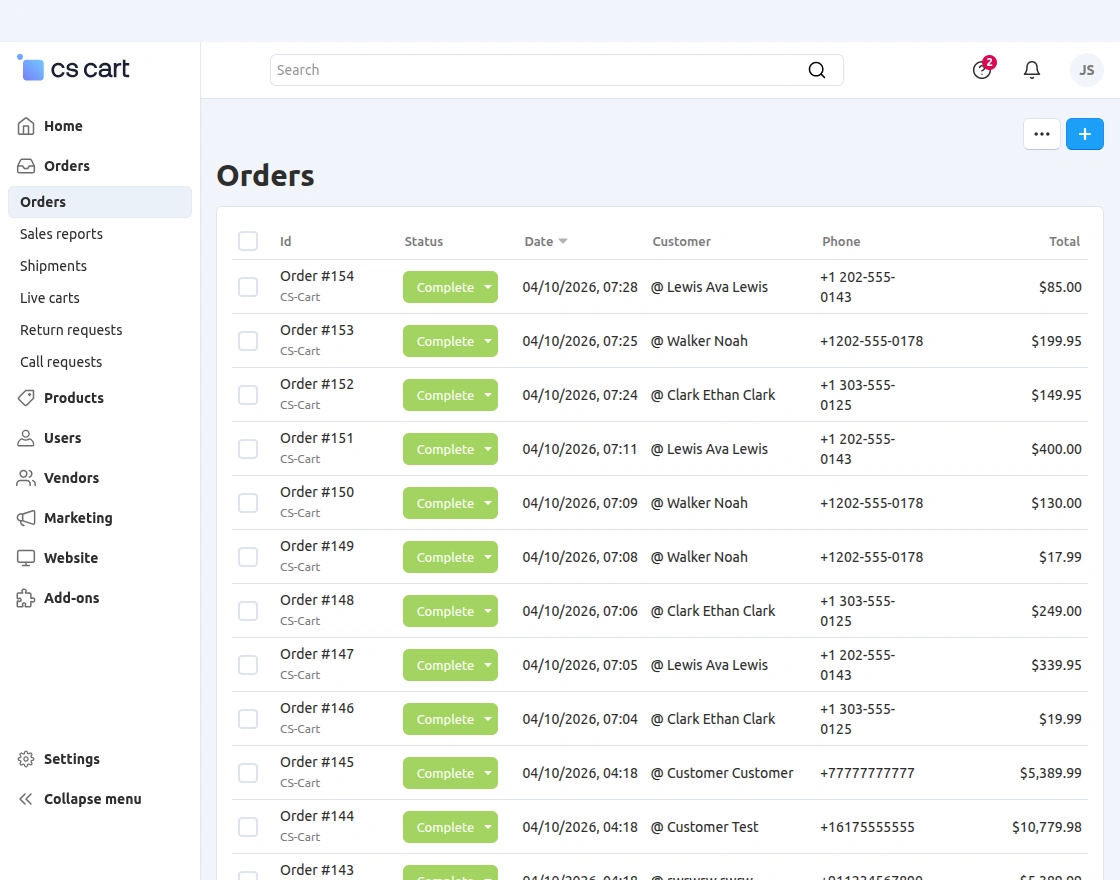
After opening the order the admin can see the refund tab option.
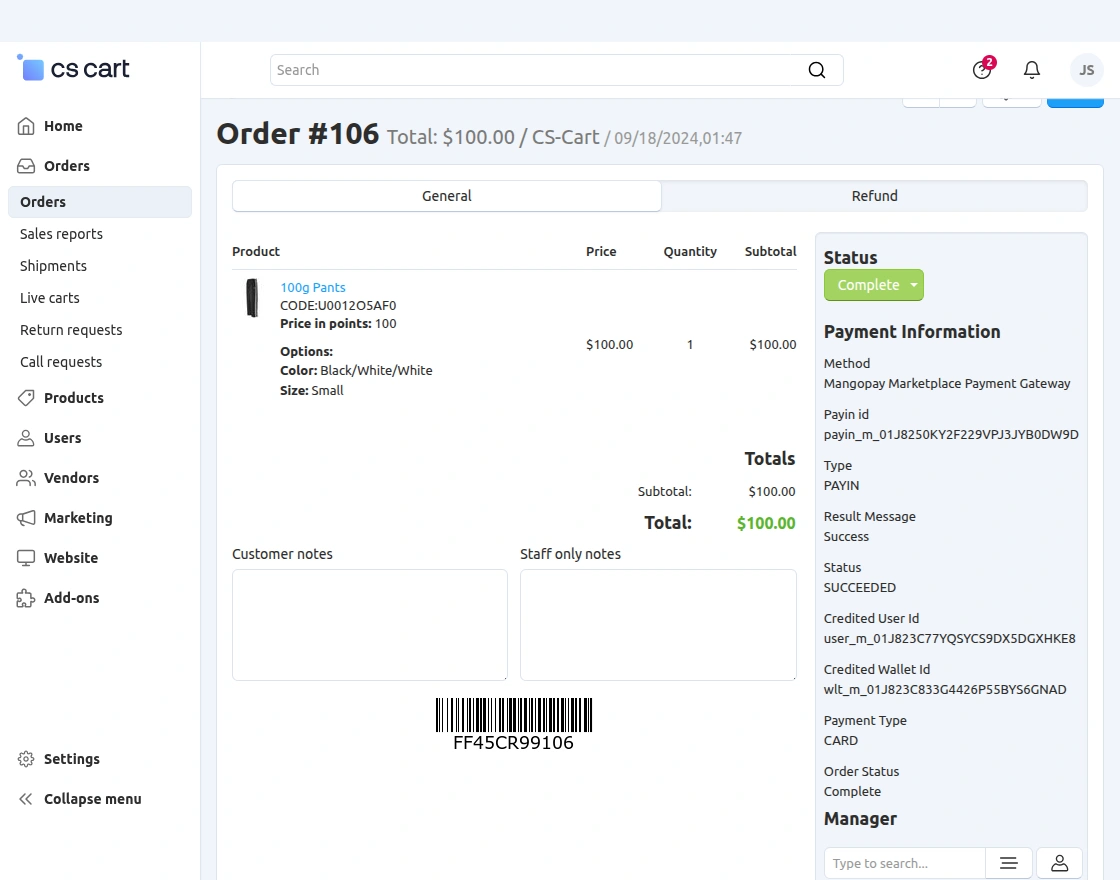
The admin can do a partial refund by selecting the respective product and tapping the Partial Refund button.
This means that if an order is having multiple products the admin can make a refund for some of the products. Apart from that, the admin can also refund the commission for the product.
Apart from that, the admin can do a full refund for the placed order
In this case, if there are multiple products in the order then the admin can make a refund for all of the products within the order by selecting the products and tapping the Full Refund button.
The admin can also make a refund by navigating through Marketing->Mangopay Marketplace -> Mangopay Refund.
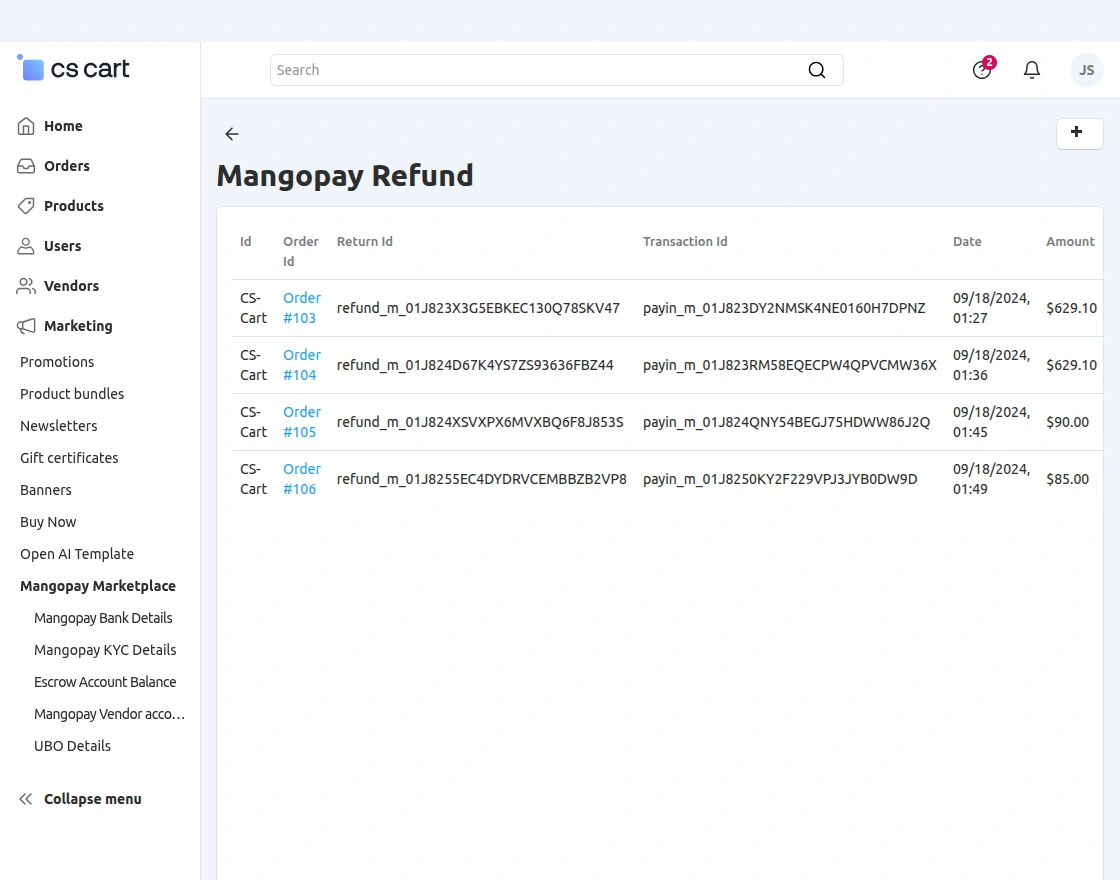
Here, tapping the add button on the top right-hand corner brings up the pop-up where the admin needs to enter the order id for which the refund needs to be made.
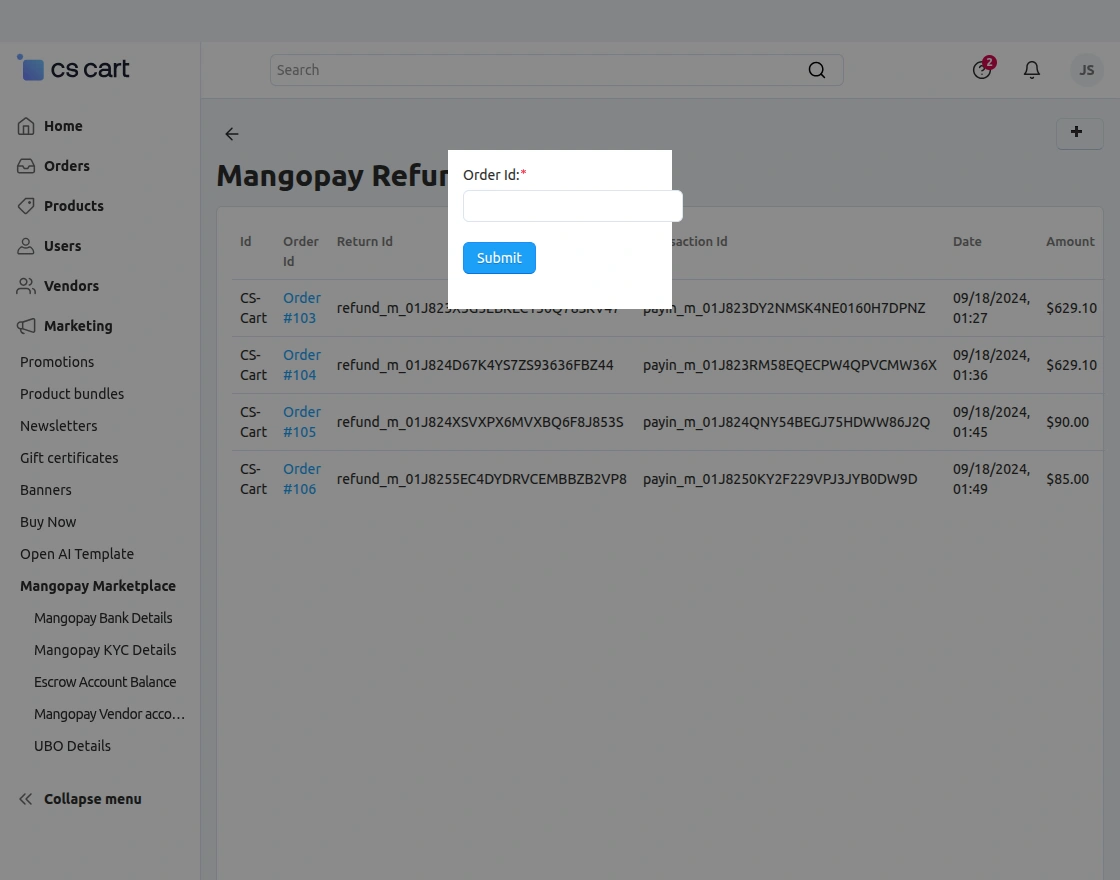
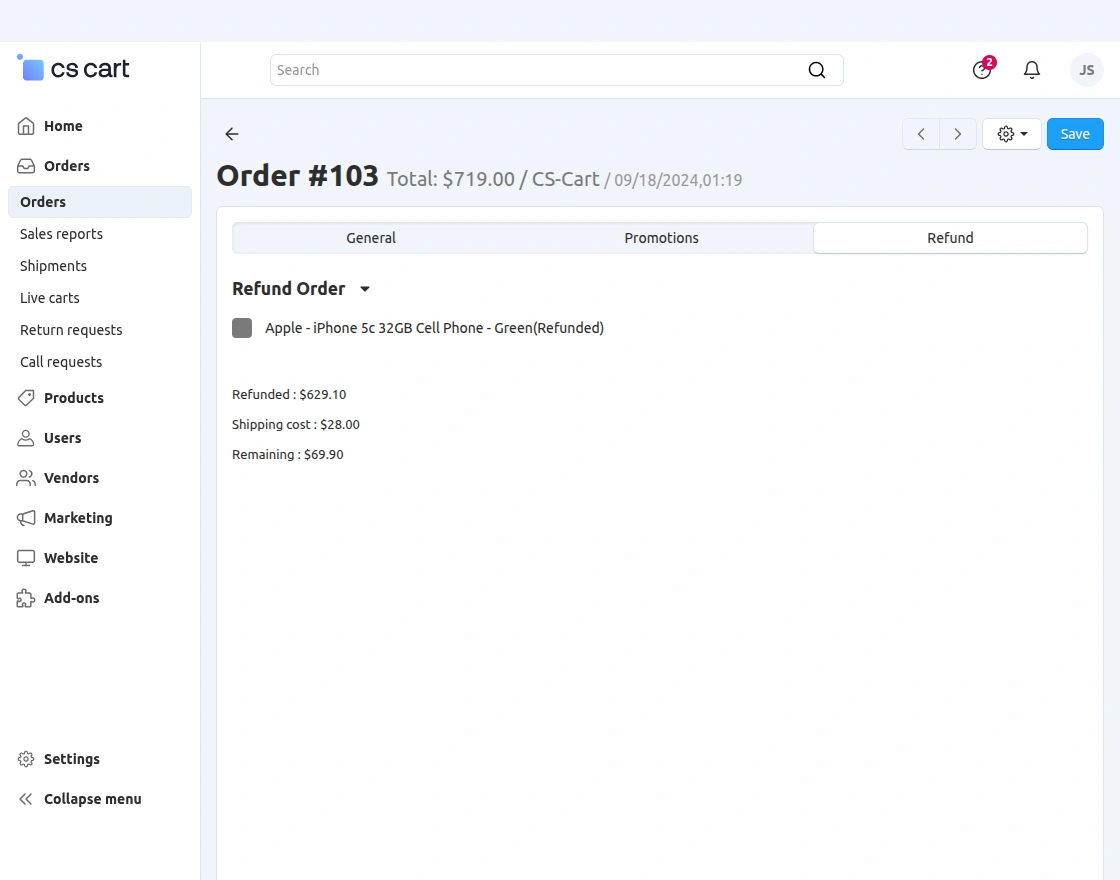
After entering the order id and tapping on the Submit button, this section appears.
Here, if the refund has not been made then the refund can be initiated else already refunded then the same is visible.
Support
Thank you for reading.
That’s all for the CS-Cart Marketplace Mangopay Payment Gateway, Still, Have any issues, feel free to write here Http://Webkul.Uvdesk.Com and let us know your views to make the module better.
Besides this you can explore our cs-cart Development Services and Quality cs-cart add-ons.
Current Product Version - 2.3
Supported Framework Version - 4.18.x - 4.20.x

Be the first to comment.