CS-Cart Instagram Shoppable Feed allows store owners to connect Instagram Business accounts with their CS-Cart store and display Instagram images and videos directly on the storefront.
The add-on allows administrators to import Instagram media, manage and moderate posts, tag products on images and videos, and create shoppable Instagram feeds.
Moreover, customers can interact with Instagram content displayed on the storefront and purchase tagged products directly through the shoppable popup.
The add-on also supports automatic product tagging, carousel posts, local media mirroring, multiple Instagram accounts, Multi-Vendor support, and Instagram feed analytics.
Features of CS-Cart Instagram Shoppable Feed
- Import images and videos from Instagram Business accounts.
- Display Instagram media on different storefront locations.
- Create shoppable Instagram feeds.
- Tag products directly on Instagram images and videos.
- Add multiple products to a single Instagram post.
- Add product hotspots using precise coordinates.
- Add different product tags to individual carousel slides.
- Automatically match products using hashtags and product SKUs.
- Moderate imported Instagram media before displaying them on the storefront.
- Approve, reject, hide, show, and pin Instagram posts.
- Perform bulk actions on Instagram media.
- Mirror Instagram images and videos to local server storage.
- Use a responsive HTML5 video player for locally mirrored videos.
- Create custom Instagram feeds with different layouts.
- Support multiple Instagram accounts and storefronts.
- Support CS-Cart Multi-Vendor.
- Automate Instagram synchronization and token renewal.
- Automate media mirroring and product tagging.
- Collect Instagram feed impressions, clicks, conversions, and attributed revenue.
- Allow customers to view tagged products and add them to the cart directly from Instagram content.
How CS-Cart Instagram Shoppable Feed Works
CS-Cart Instagram Shoppable Feed connects Instagram content with the existing CS-Cart product catalog.
The basic workflow is:
Instagram Business Account → Import Instagram Media → Moderate Media → Tag Products → Create Feed → Display on Storefront → Customer Shops from Media
Once the Instagram Business account is connected, the add-on imports the available Instagram media into the CS-Cart backend.
Administrators can review the imported content, tag products, configure automatic tagging rules, and create custom Instagram feeds.
The configured feed can then be placed on the storefront using the CS-Cart Block Manager.
When a customer clicks an Instagram post, the add-on opens a shoppable popup where the customer can view the post and its tagged products.
How To Upload And Install CS-Cart Instagram Shoppable Feed
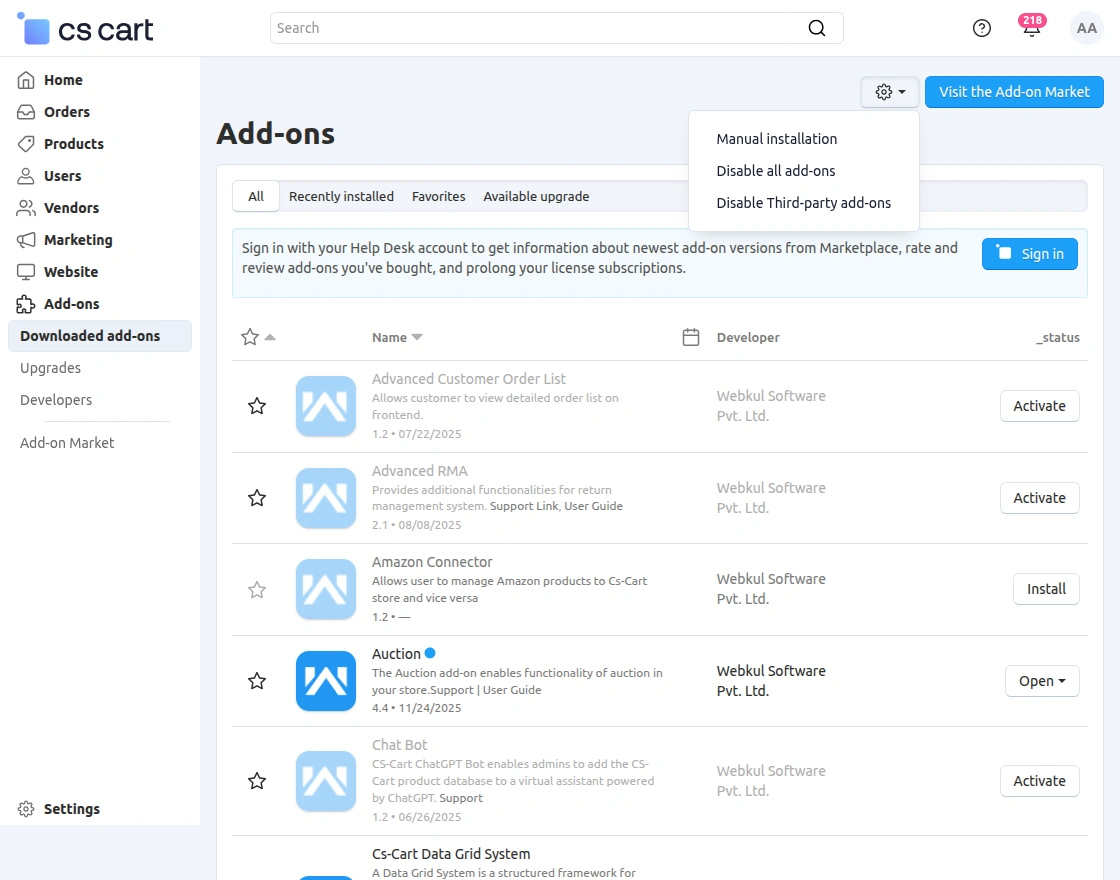
Go to Manage Add-ons, and click on the Settings icon > Manual Installation as shown below in the snapshot.
Click on “Local” to browse the zip file and then click on “Upload & Install” as shown below in snapshot.
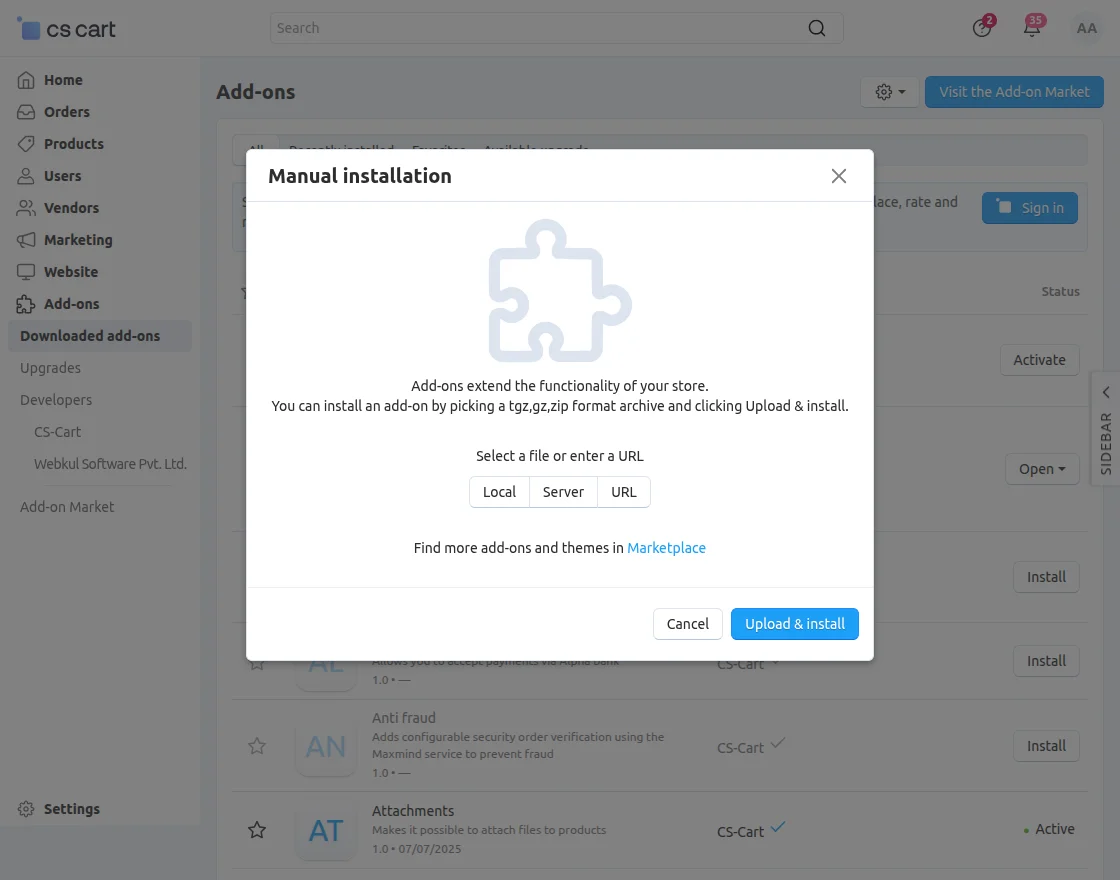
Add-on installed successfully!
Once the addon is installed successfully, we need to configure the settings of the addon.
Configure Instagram Shoppable Feed in CS-Cart
Go to:
CS-Cart Admin Panel → Add-ons → Manage Add-ons → Instagram Shoppable Feed → Settings
The add-on settings contain the following sections:
- General
- Synchronization
- Automatic Product Tagging
General Settings
The General section is used to enable the Instagram feed and configure the Instagram application credentials.
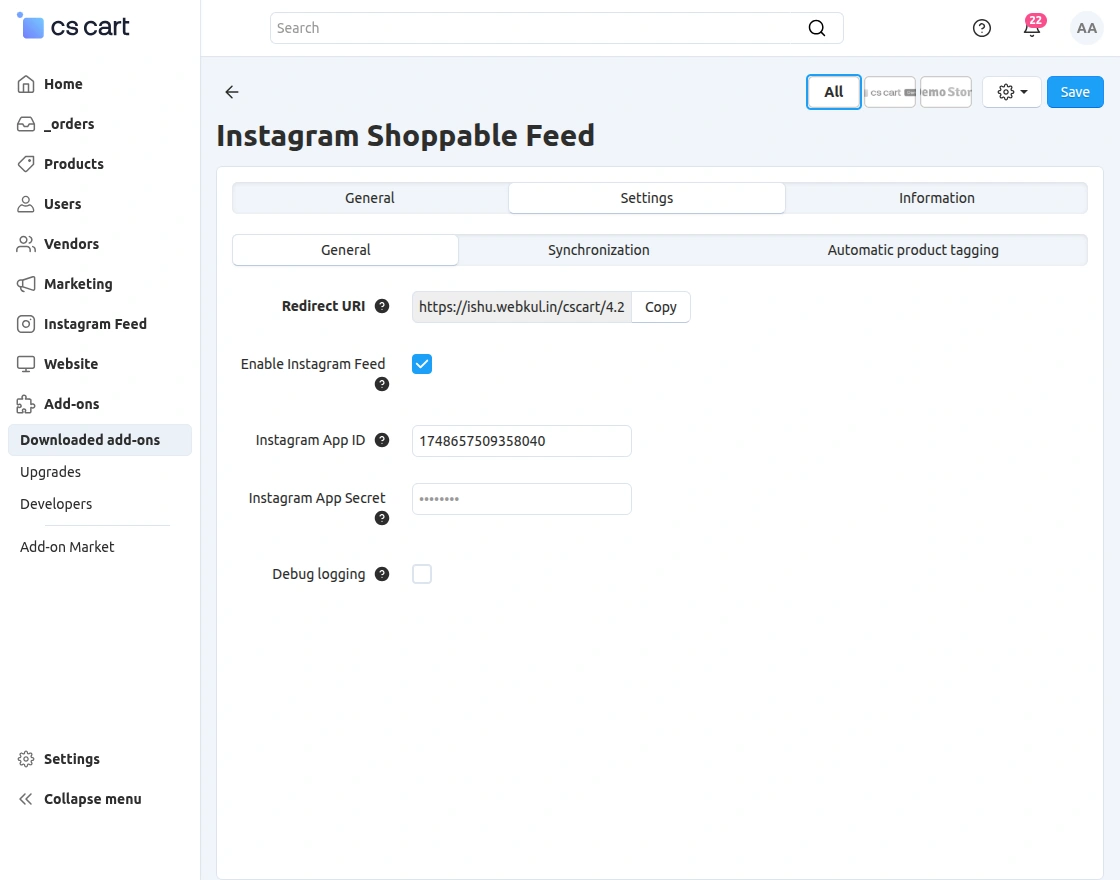
| Field | Description |
|---|---|
| Enable Instagram Feed | Enables or disables the Instagram Shoppable Feed functionality. |
| Instagram App ID | Enter the App ID of the Facebook/Instagram Developer application used to connect the Instagram Business account. |
| Instagram App Secret | Enter the App Secret of the Facebook/Instagram Developer application used for Instagram authentication. |
| Redirect URI | Displays the callback URL that needs to be configured in the Facebook/Instagram Developer application for OAuth authentication. |
| Debug Logging | Enables detailed logs for troubleshooting Instagram integration and synchronization issues. |
Synchronization Settings
The Synchronization section controls how Instagram media and background processes are handled.
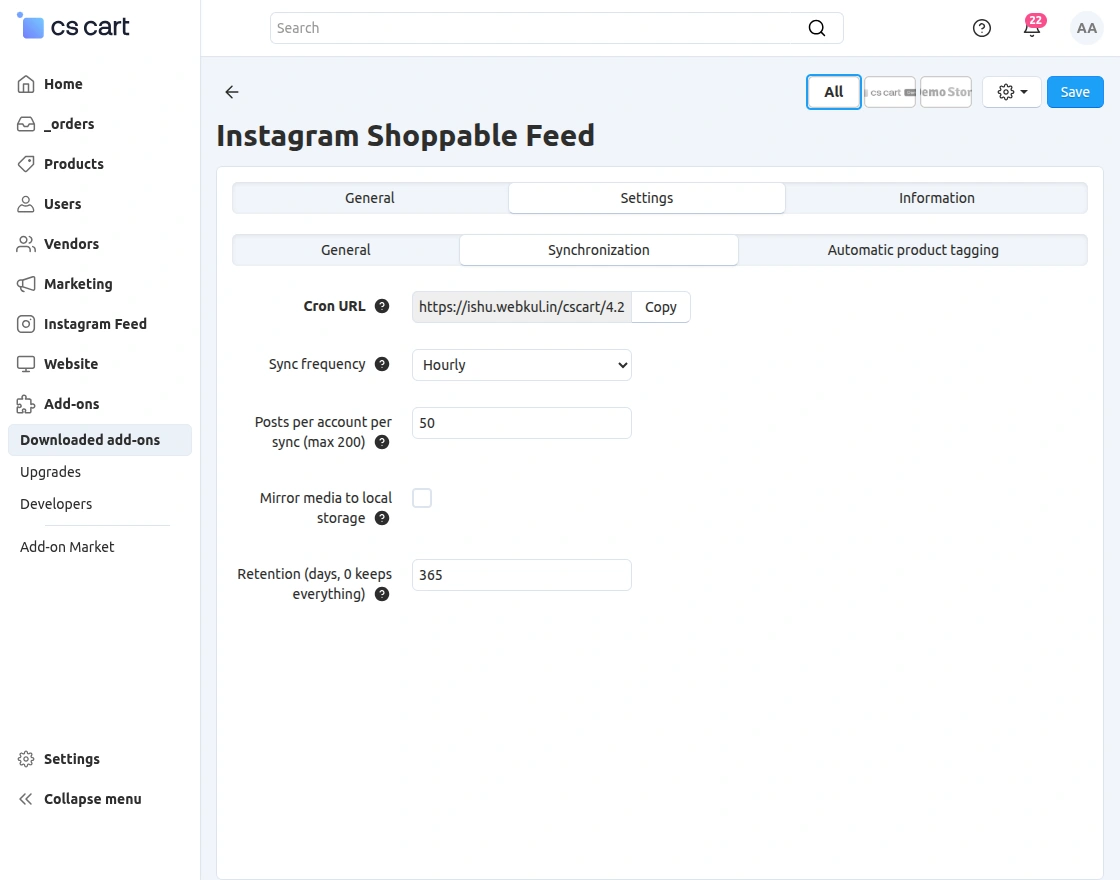
| Field | Description |
|---|---|
| Cron URL | Displays the URL used to run the add-on’s background automation through a server-side cron job. |
| Sync Frequency | Defines how frequently Instagram media synchronization is performed. |
| Posts per Account per Sync | Defines the maximum number of Instagram posts processed for each connected account during one synchronization. |
| Mirror Media to Local Storage | Downloads Instagram images and videos to the store server for local delivery. |
| Retention (Days) | Defines how long mirrored media is retained; 0 keeps the data indefinitely. |
Automatic Product Tagging
The Automatic Product Tagging section allows the add-on to identify CS-Cart products from Instagram captions.
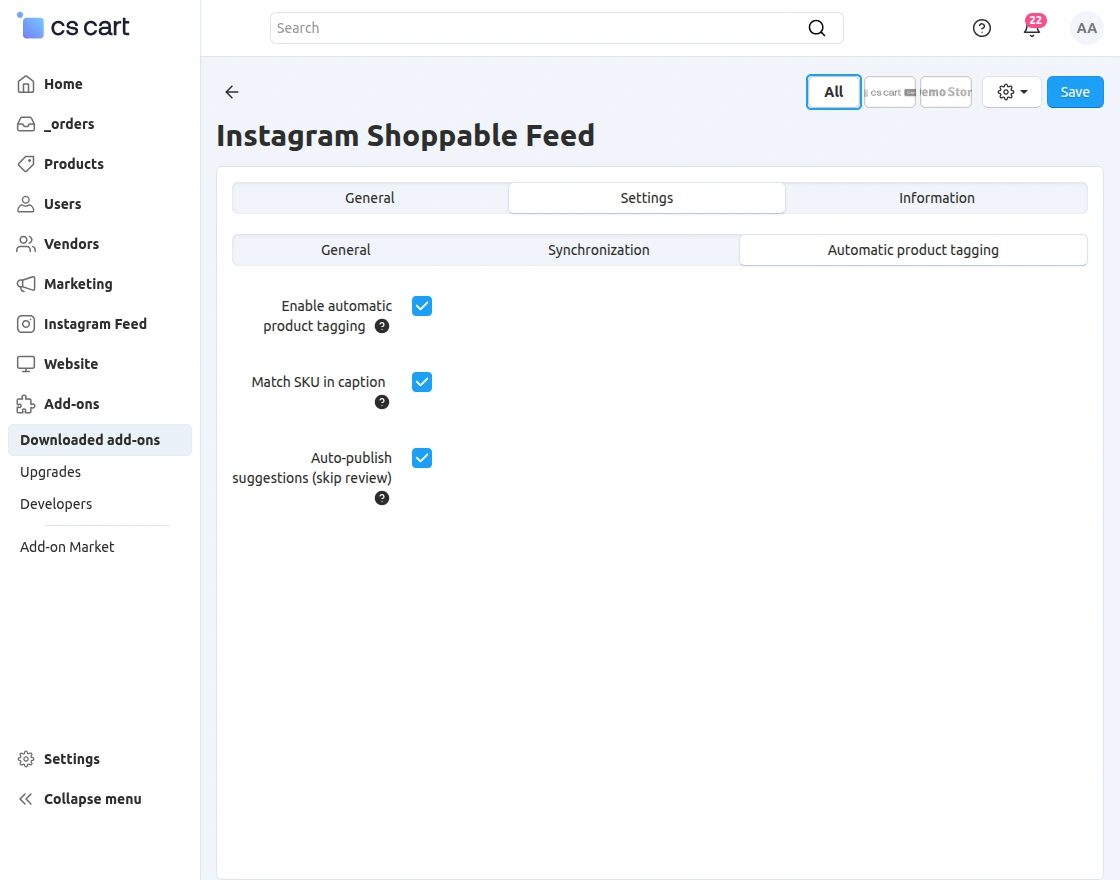
The available settings are:
| Field | Description |
|---|---|
| Enable Automatic Product Tagging | Enables automatic product identification from Instagram captions. |
| Match SKU in Caption | Searches Instagram captions for exact CS-Cart product SKUs and creates matching product suggestions. |
| Auto-Publish Suggestions (Skip Review) | Automatically publishes generated product tagging suggestions without manual approval. |
When enabled, automatically generated product tagging suggestions are published without requiring administrator review.
If disabled, administrators can review the generated suggestions before publishing them.
Instagram Feed in Admin Panel
After configuring the add-on settings, administrators can manage Instagram content from:
CS-Cart Admin Panel → Website → Instagram Feed
The Instagram Feed section contains the following sections:
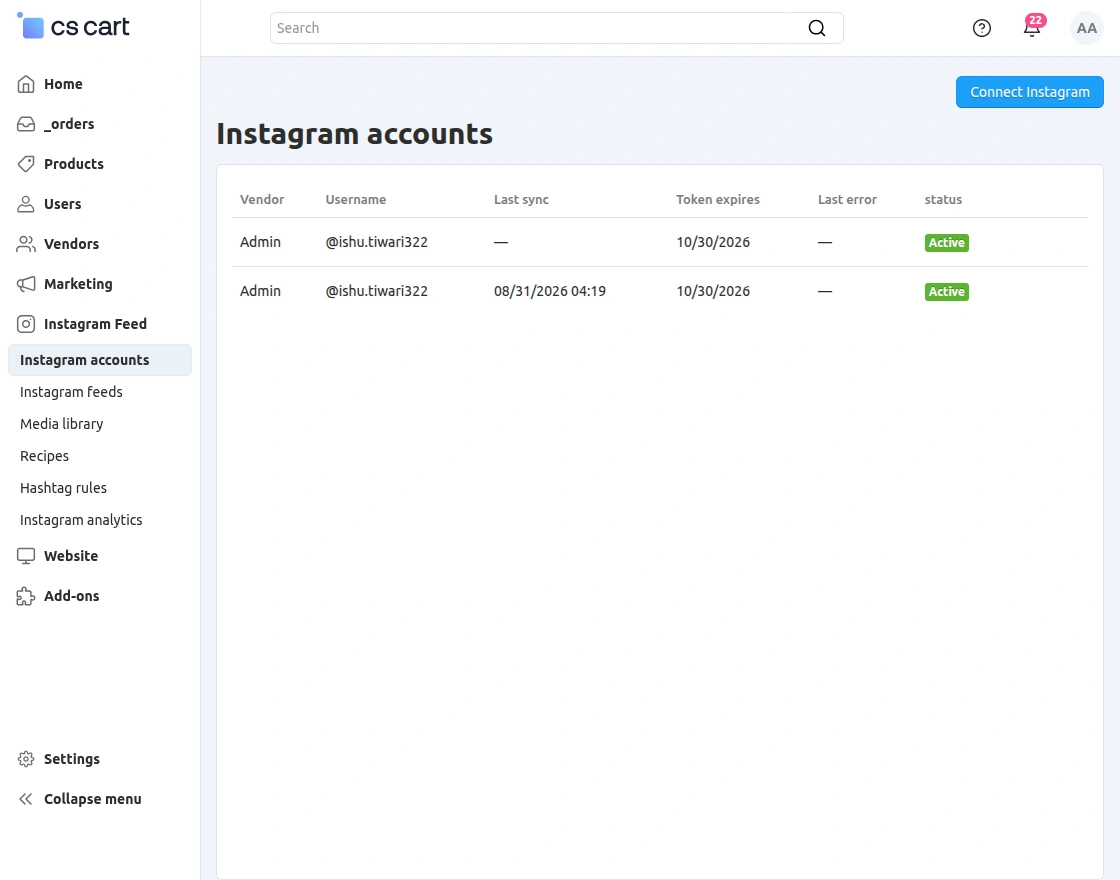
Instagram Accounts
- Vendor – Displays the administrator or vendor associated with the connected Instagram account.
- Username – Displays the username of the connected Instagram Business account.
- Last Sync – Shows the date and time when the Instagram account was last synchronized.
- Token Expires – Displays the expiration date of the Instagram access token.
- Last Error – Displays the latest synchronization or authentication error, if any.
- Status – Displays the current connection status of the Instagram account, such as Active, Expired, or Error.
Instagram Feeds
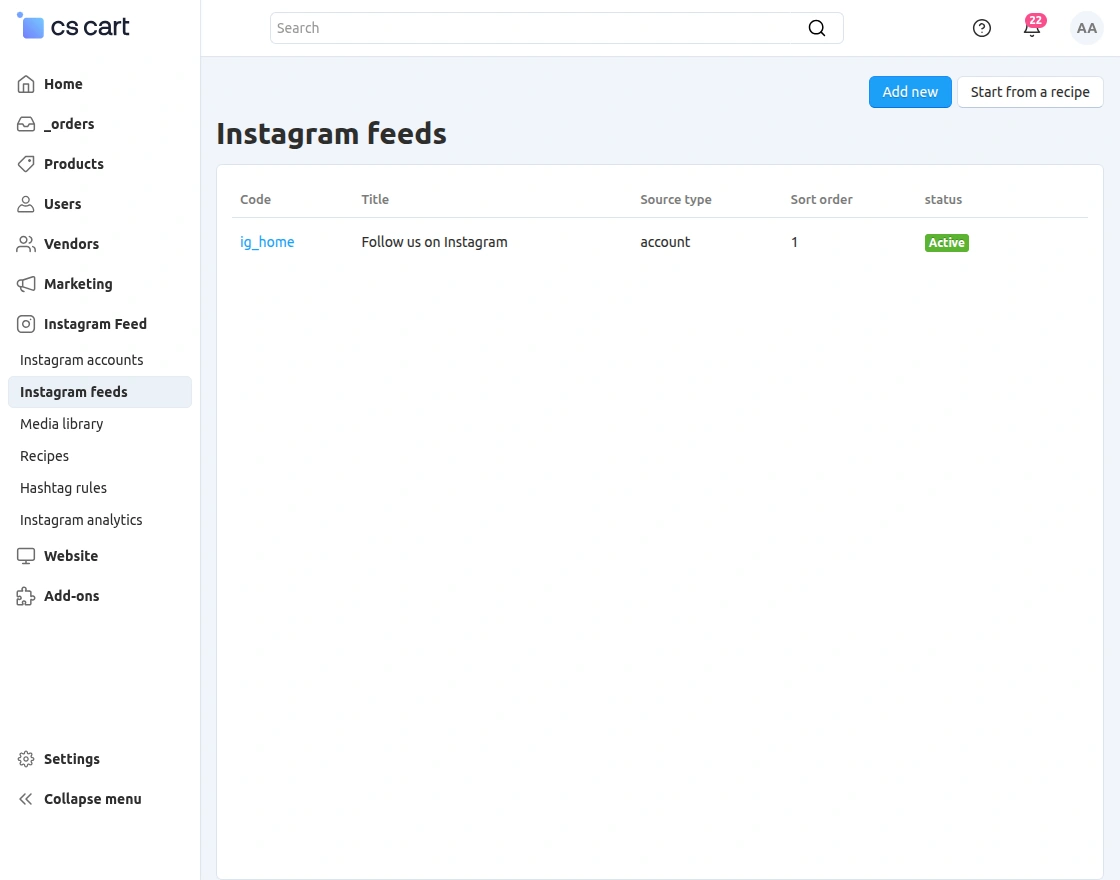
- Code – Displays the unique code used to identify the Instagram feed.
- Title – Displays the name or title of the Instagram feed.
- Source Type – Specifies the source of Instagram content, such as an Instagram account.
- Sort Order – Defines the display priority or order of the feed.
- Status – Displays the current status of the Instagram feed, such as Active or Disabled.
Media Library
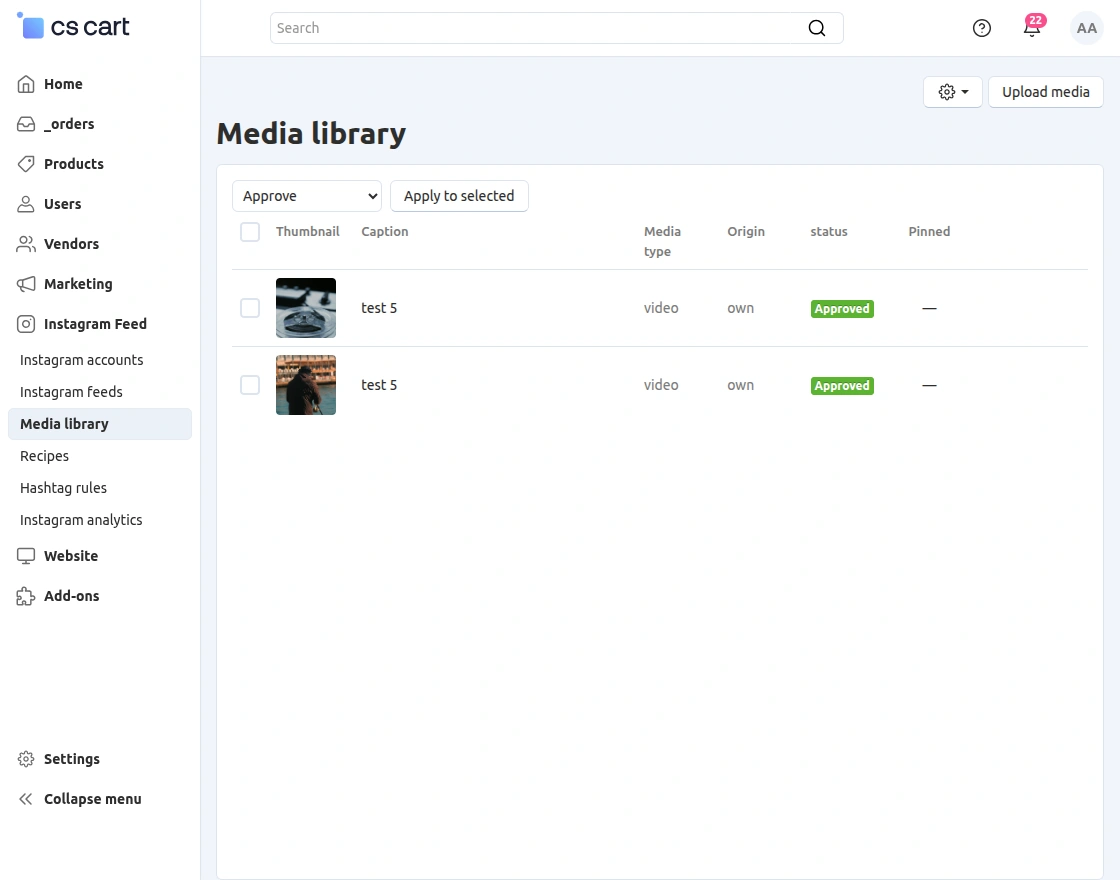
- Thumbnail – Displays a preview of the Instagram image or video.
- Caption – Displays the caption associated with the Instagram media.
- Media Type – Specifies the type of content, such as image or video.
- Origin – Indicates the source of the media, such as Instagram or own/uploaded media.
- Status – Displays the moderation status of the media, such as Pending, Approved, Rejected, or Hidden.
- Pinned – Indicates whether the media is pinned to appear at the top of the feed.
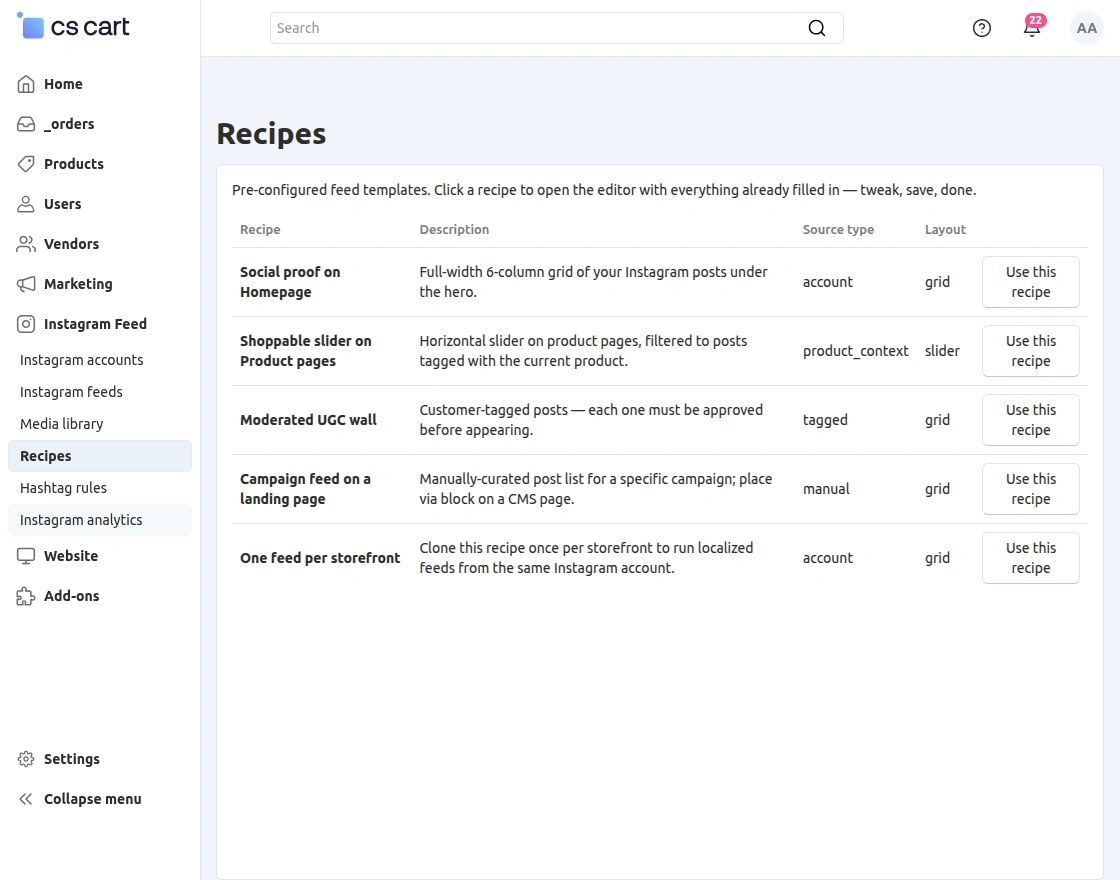
Recipes
- Recipe – Displays the name of the pre-configured feed template.
- Description – Provides a brief description of the feed layout and intended use.
- Source Type – Specifies the source of content, such as account, product context, tagged posts, or manually selected posts.
- Layout – Displays the feed presentation style, such as grid or slider.
- Use This Recipe – Opens the recipe editor with the predefined settings so administrators can customize, save, and create the feed.
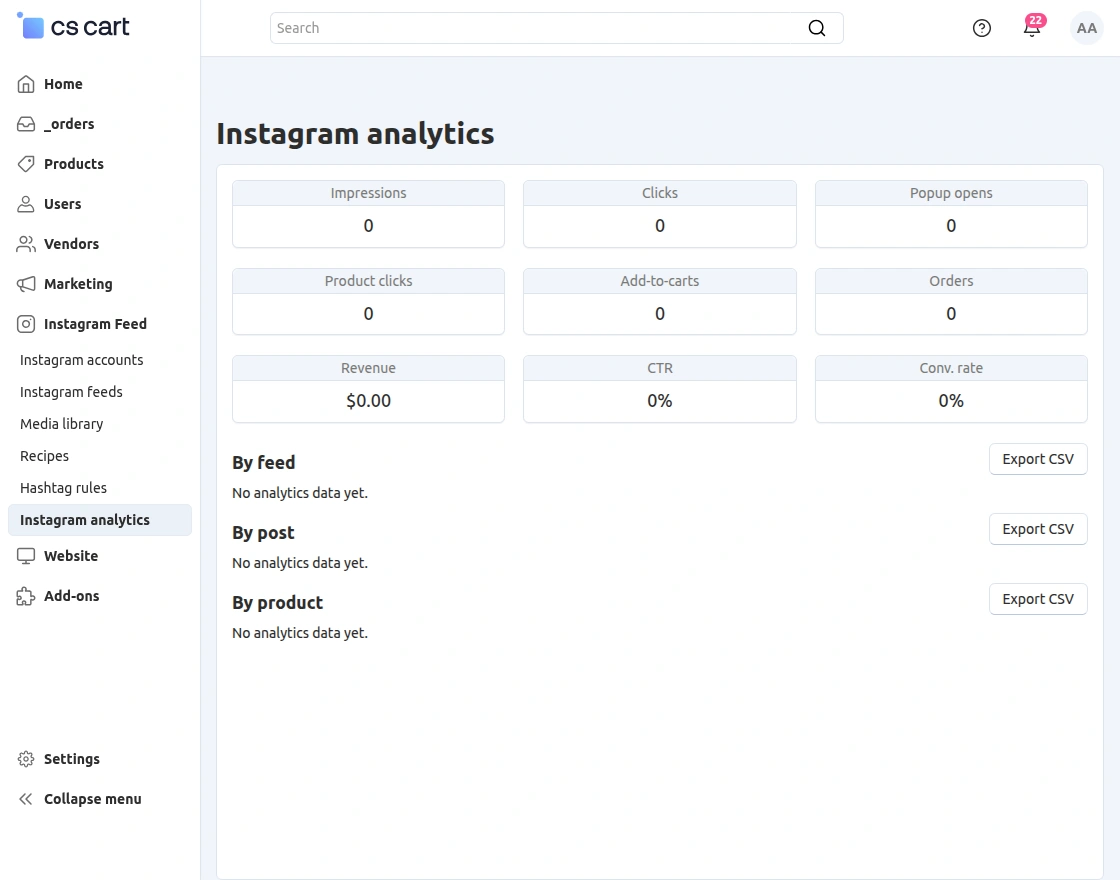
Instagram Analytics
- Impressions – Displays the total number of times Instagram feed content was viewed.
- Clicks – Displays the total number of clicks on Instagram feed content.
- Popup Opens – Displays the number of times customers opened the shoppable Instagram popup.
- Product Clicks – Displays the number of clicks on tagged products within the shoppable popup.
- Add-to-Carts – Displays the number of tagged products added to the cart.
- Orders – Displays the number of orders attributed to Instagram feed interactions.
- Revenue – Displays the total revenue attributed to purchases generated through Instagram content.
- CTR – Displays the click-through rate based on Instagram feed impressions and clicks.
- Conv. Rate – Displays the conversion rate generated from Instagram feed interactions.
- By Feed – Displays analytics data grouped by individual Instagram feeds, with an option to export the data as a CSV file.
- By Post – Displays analytics data grouped by individual Instagram posts, with an option to export the data as a CSV file.
- By Product – Displays analytics data grouped by tagged products, with an option to export the data as a CSV file.
These sections provide a centralized administration area for managing connected Instagram accounts, imported media, product tagging, storefront feeds, automatic tagging rules, and analytics.
How to Get Instagram API Credentials?
The admin needs to create a Meta Developer account/application to connect the Instagram Business account with the CS-Cart Instagram Shoppable Feed add-on.
First, log in to your Meta account and open the Meta for Developers platform.
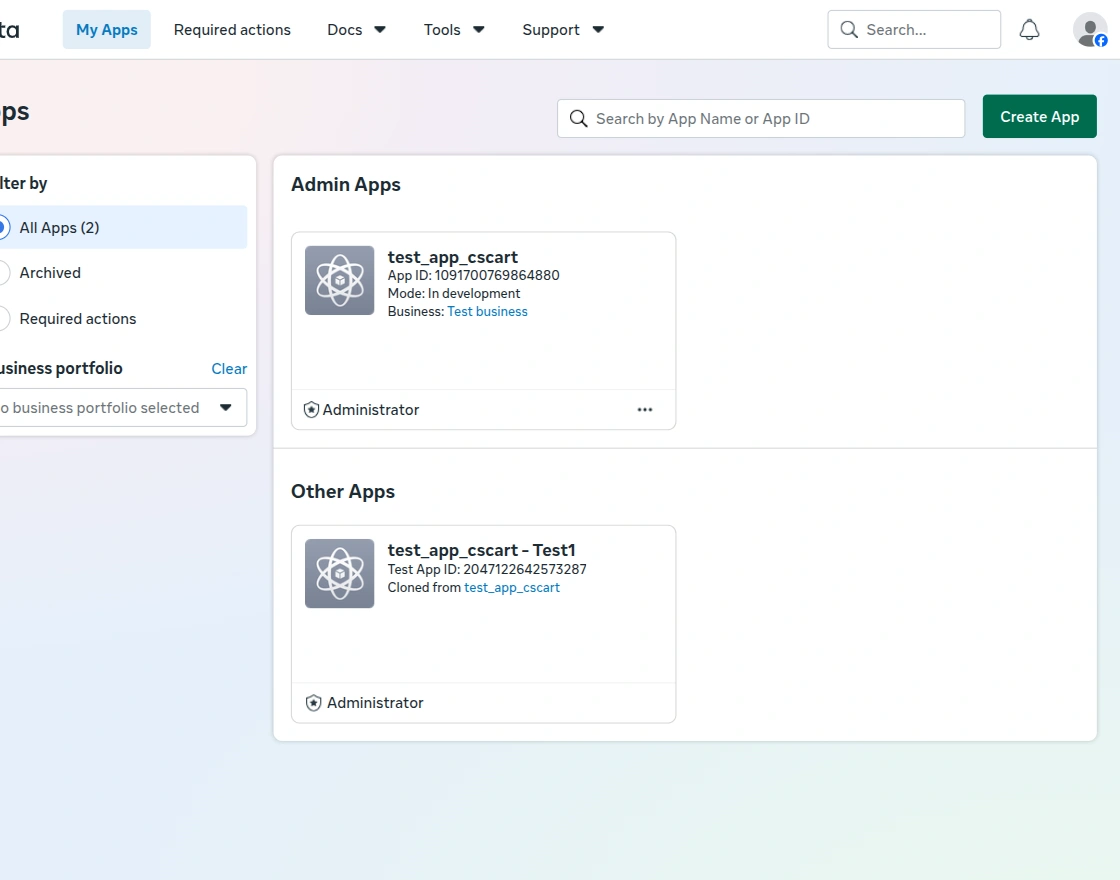
Click on My Apps and then click on the Create App option, as shown in the snapshot below.
Now, select the appropriate option for creating the application and click on the Next button to proceed.
The Create an App page will open. It contains different sections such as App Details, Use Cases, Business, Requirements, and Overview.
Enter App Details
Under the App details section, enter the required information.
Enter the App Name that you want to use for the Meta application.
The app name is displayed on the My Apps page and is associated with the generated App ID. Meta also allows you to change the app name later from the application settings.
Next, enter the App Contact Email.
Meta uses this email address to contact the administrator regarding the application, including policy notifications, app restrictions, or account recovery.
After entering the required details, proceed to the next step.
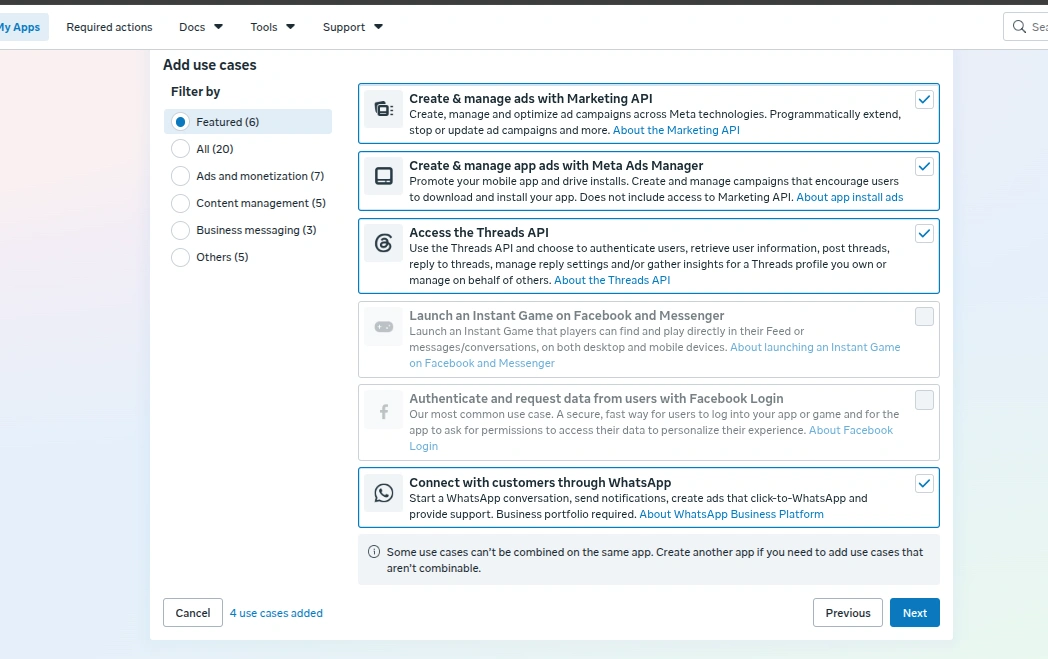
Add Use Cases
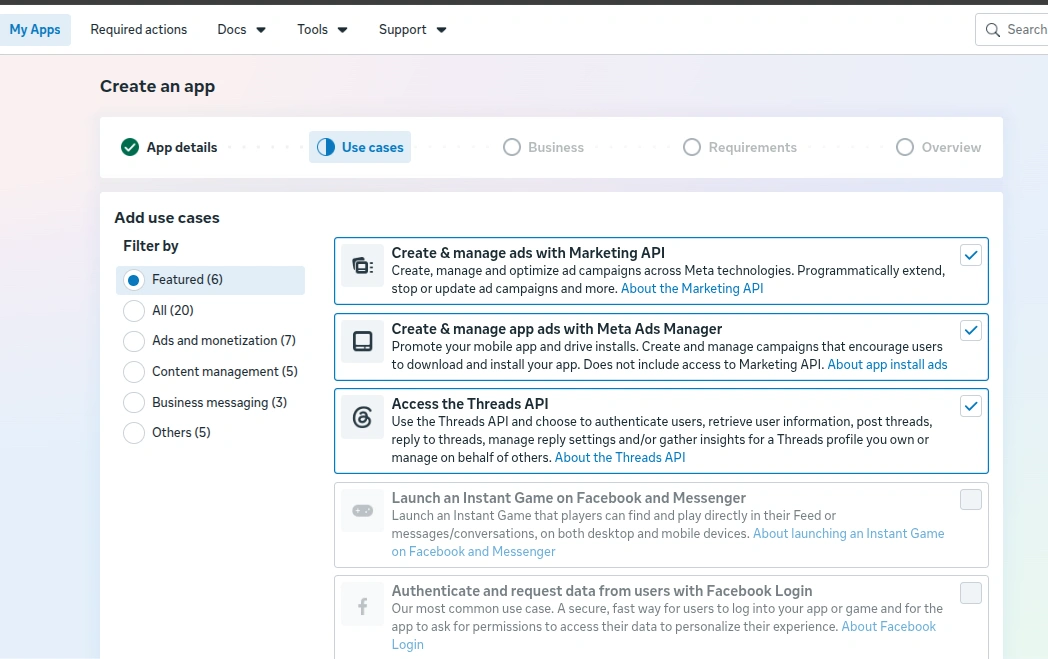
The Add use cases section allows you to select the functionality that you want to use with your Meta application.
The available use cases can be filtered using options such as:
- Featured
- All
- Ads and monetization
- Content management
- Business messaging
- Others
Select the use cases required for your application and click on the Next button to proceed.
Meta may display a message if certain use cases cannot be combined within the same application.
Connect a Business Portfolio
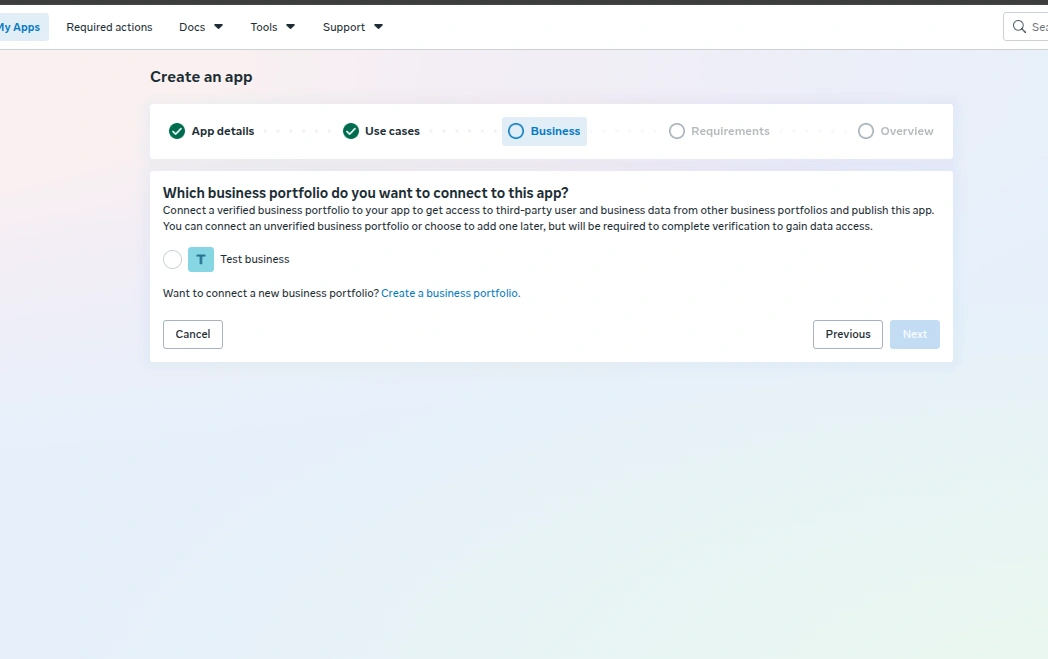
Next, Meta asks you to select the business portfolio that you want to connect to the application.
Select the required business portfolio from the available options.
Meta allows you to connect a verified business portfolio to access third-party user and business data and publish the application.
You can also connect an unverified business portfolio or choose to add one later. However, business verification may be required to access certain data or publish the application.
If you want to connect a new business portfolio, you can use the Create a business portfolio option.
Review Publishing Requirements
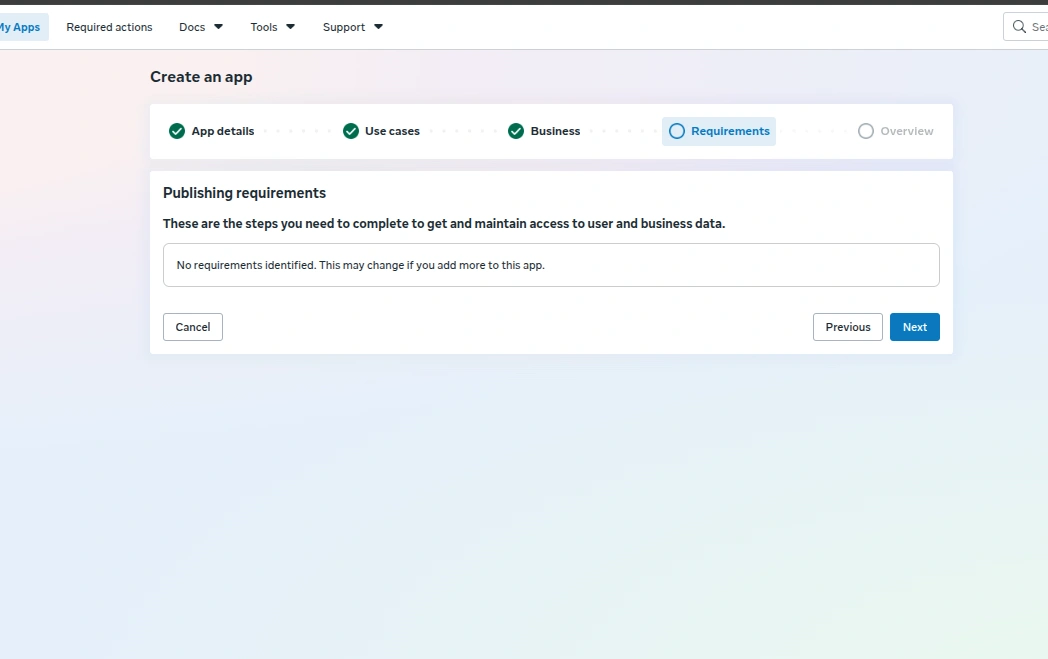
The Requirements section displays the requirements that need to be completed to obtain and maintain access to user and business data.
Review the requirements displayed for the selected use cases.
In some cases, Meta may show that there are no requirements at this stage. Additional requirements may appear later if you add more products, permissions, or use cases to the application.
Review App Information
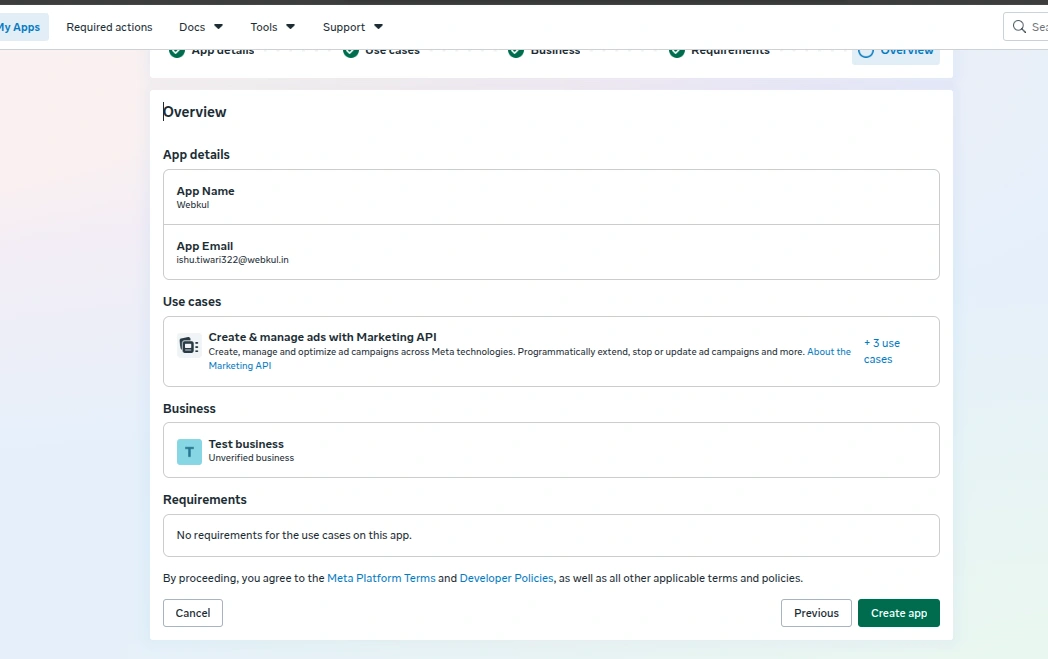
Before creating the application, Meta displays an Overview section containing the information entered during the app creation process.
Review the following details:
- App Name — Displays the name of the Meta application.
- App Email — Displays the contact email associated with the application.
- Use Cases — Displays the selected use cases.
- Business — Displays the connected business portfolio.
- Requirements — Displays the applicable publishing requirements.
Review all the information carefully before proceeding.
Configure Instagram API
After creating the Meta application, open the application dashboard and add/configure the required Instagram product or API functionality.
Select Instagram API
After creating the Meta application, open the newly created app and go to the Use Cases section.
Here, locate Instagram API and click on the Customize button to configure the Instagram API for the application.
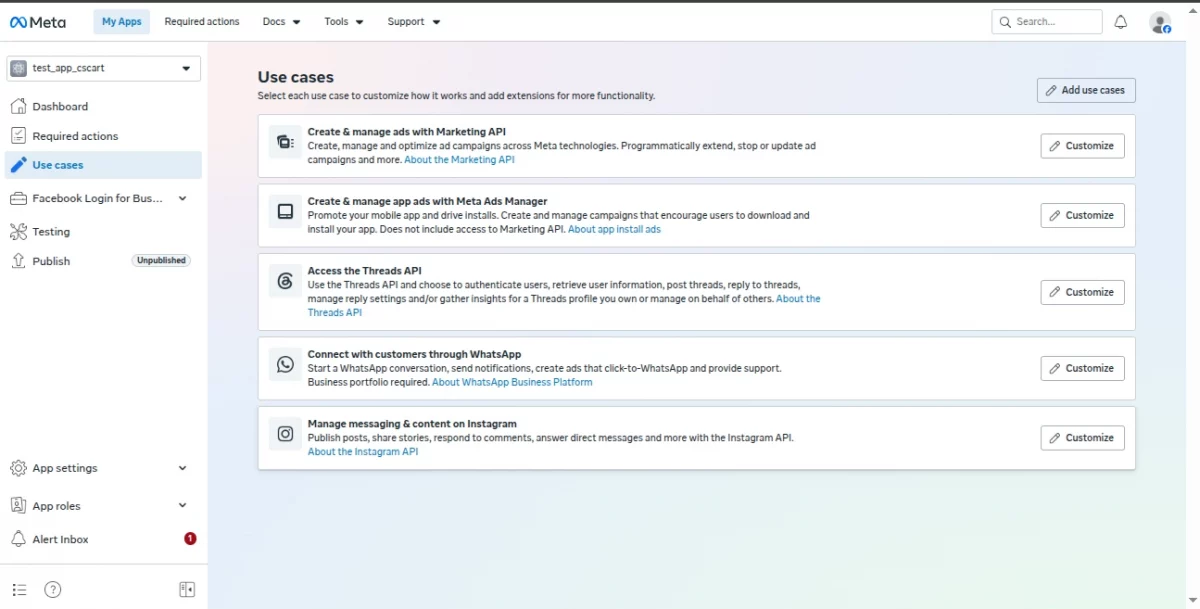
The admin can now proceed with the Instagram API configuration required to connect the Instagram Business account with the CS-Cart Instagram Shoppable Feed add-on.
Get Instagram App ID and App Secret
After clicking Customize for the Instagram API, the Instagram API configuration page will open.
Here, copy the Instagram App ID and Instagram App Secret displayed on the page.
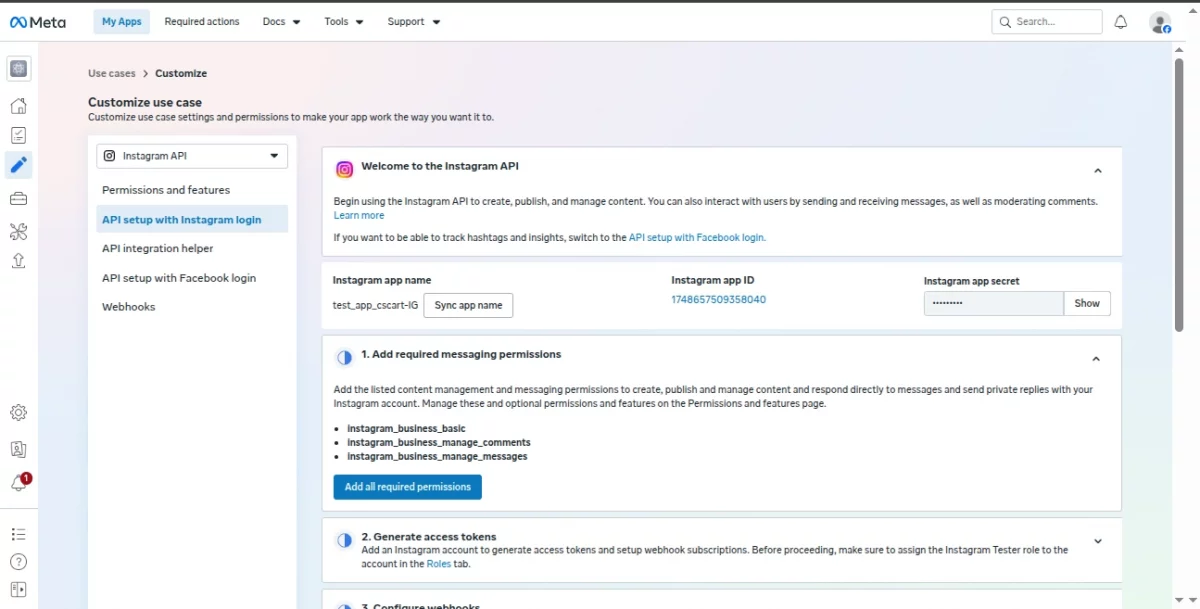
These credentials will be required to configure the CS-Cart Instagram Shoppable Feed add-on.
Configure Redirect URL
Now, the admin needs to configure the Redirect URL for the Instagram API authentication.
Go to:
CS-Cart Admin Panel → Add-ons → Manage Add-ons → Instagram Shoppable Feed → Settings
In the General section, the add-on displays the Redirect URI.
Copy this Redirect URI, as it needs to be added to the Meta Developer application for Instagram authentication.
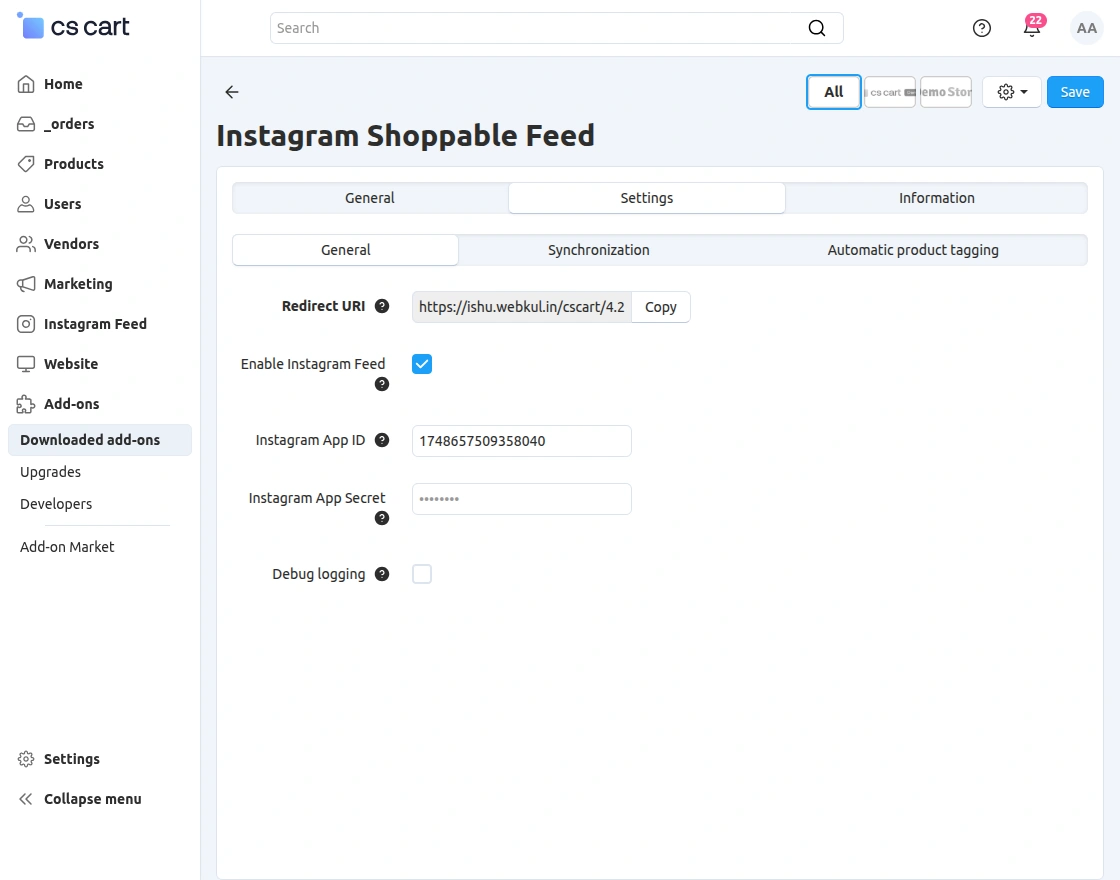
Next, return to the Instagram API configuration in the Meta Developer Dashboard and add the copied URL to the required Redirect URL field.
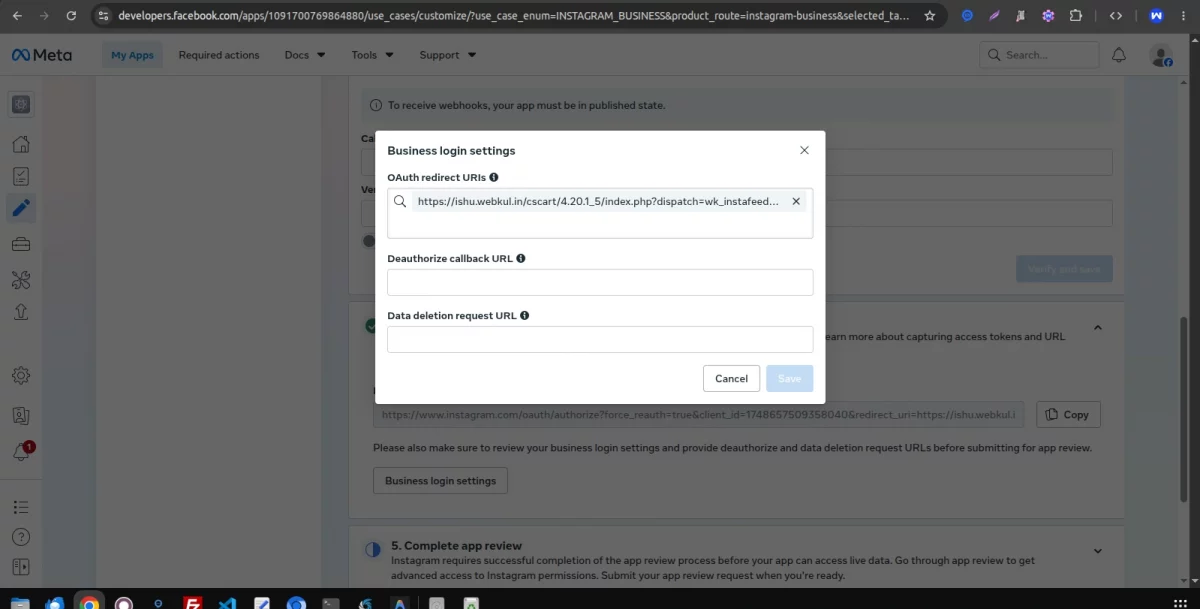
Make sure that the Redirect URL added in Meta exactly matches the Redirect URI provided by the CS-Cart Instagram Shoppable Feed add-on.
Instagram Feed Blocks for Vendor, Search, Homepage, and Category Pages
The CS-Cart Instagram Shoppable Feed allows administrators to display Instagram images and videos at different locations across the storefront, including the Homepage, Vendor pages, Category pages, Product pages, and Search pages.
Administrators can create separate Instagram feed blocks for each page type from the CS-Cart Admin Panel → Design → Layouts and configure the position and appearance of each block according to the storefront requirements.
Click on ”Create New Block” on the existing page to create a new block.

From the Layouts section, administrators can select the required storefront page and add an Instagram Feed block to the desired container.
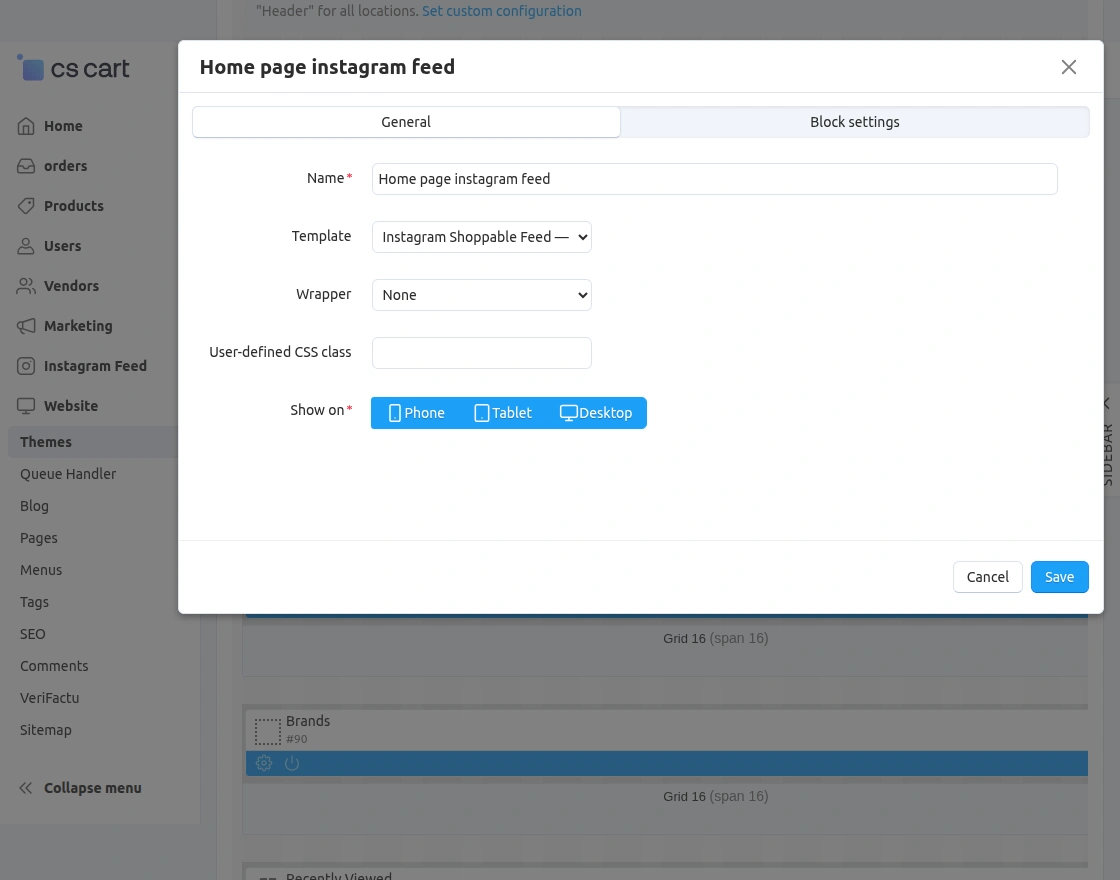
The block can then be configured with the required Instagram feed, layout, sorting, and other available options.
Separate blocks can be created for different storefront pages, giving administrators complete control over where Instagram content appears.
CS-Cart Instagram Shoppable Feed add-on allows administrators to display relevant Instagram images and videos on Vendor, Product, Category, and Search pages using separate storefront blocks.
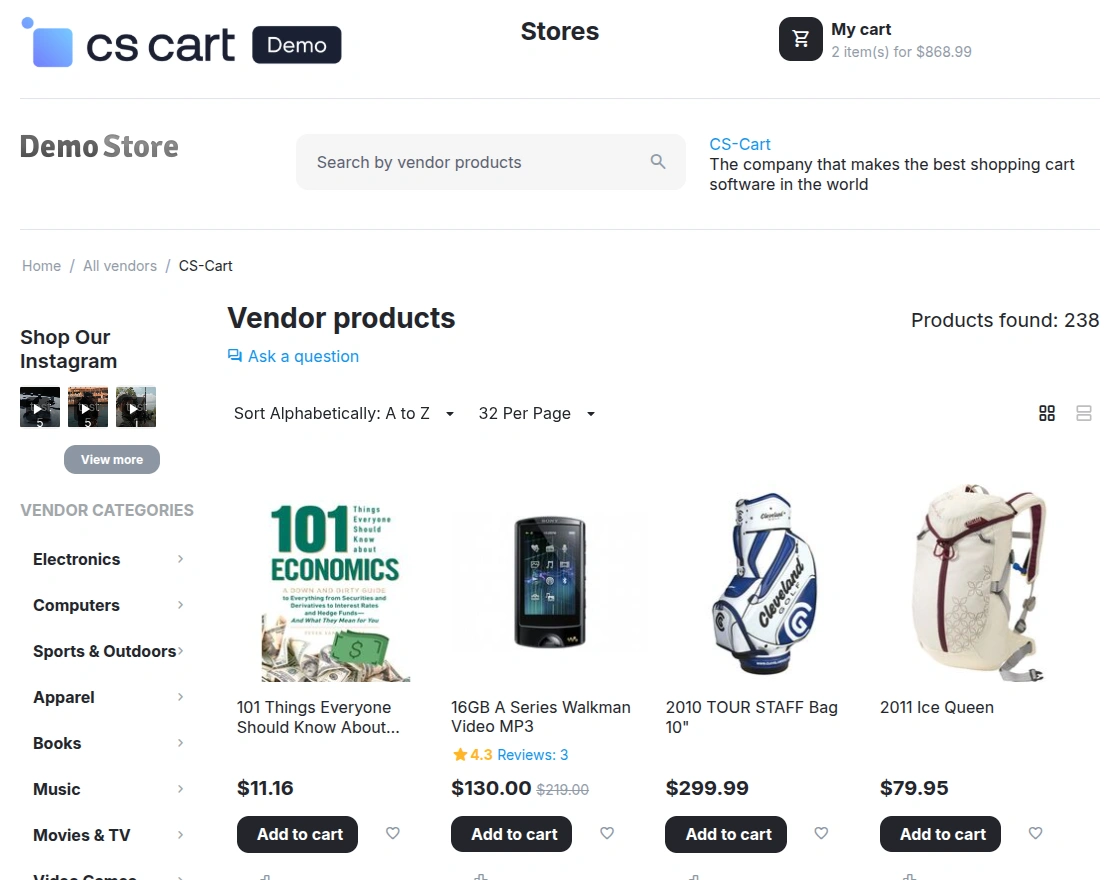
Administrators can create individual Instagram feed blocks for these page types through the
CS-Cart Block Manager
The add-on then displays Instagram content based on the products, categories, or vendors associated with the feed.
For example:
- Product Page: If an Instagram image or video is tagged with a particular product, the related Instagram media can be displayed when customers visit that product’s page.
- Category Page: When customers open a category, Instagram images and videos related to products in that category can be displayed automatically.
- Vendor Page: On a vendor page, the feed can display Instagram content associated with products belonging to that vendor.
- Search Page: When customers search for a product, the relevant Instagram images or videos associated with the matching product can also appear on the search page.
This allows the Instagram feed to remain contextually relevant to the customer’s current shopping page. For example, if a product has an associated Instagram video, customers searching for or viewing that product can see the same relevant video or image.
Similarly, category and vendor pages can display Instagram content related to the products available in that context.
Instagram Feed on the Homepage
The CS-Cart Instagram Shoppable Feed can also be displayed directly on the storefront homepage using a dedicated block.
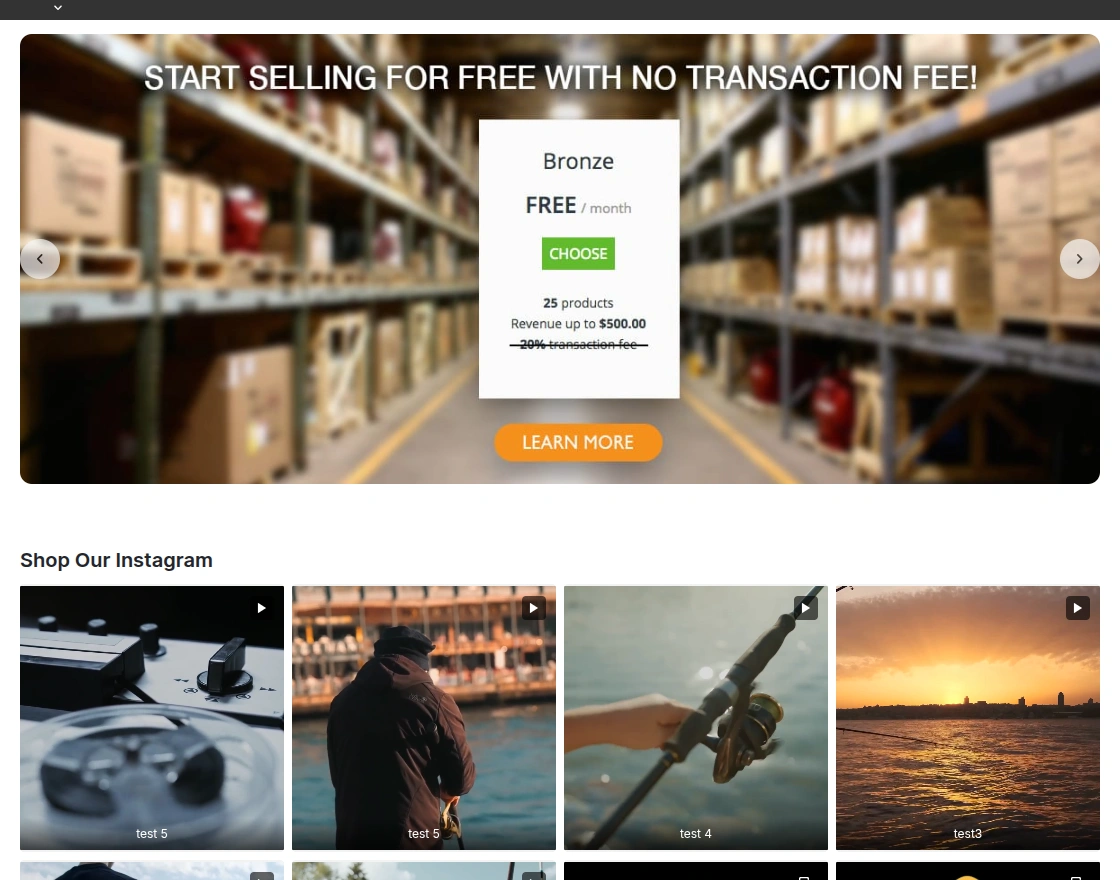
Administrators can create an Instagram feed block through the CS-Cart Block Manager and place it at the desired location on the homepage.
The block can display Instagram images and videos from the connected Instagram Business account, allowing customers to discover products through engaging social media content while browsing the store.
When customers click an Instagram post, a shoppable popup opens where they can view the tagged products associated with that post.
Customers can explore the products and add them to their cart directly from the Instagram content.
Separate blocks can be created for each page type, allowing administrators to control the placement and configuration of Instagram content independently across the storefront.
Conclusion
The CS-Cart Instagram Shoppable Feed add-on brings Instagram content directly into the CS-Cart storefront and turns social media posts into interactive shopping experiences.
Store owners can connect Instagram Business accounts, import and moderate media, tag products, configure recipes and hashtag rules, create custom feeds, and allow customers to purchase products directly from Instagram content.
With automatic product tagging, carousel support, local media mirroring, analytics, background automation, multiple Instagram accounts, and Multi-Vendor support, the add-on provides a complete solution for integrating Instagram shopping experiences into CS-Cart.
Support
Thank you for reading.
That’s all for the CS-Cart Instagram Shoppable Feed, Still, Have any issues, feel free to write here Http://Webkul.Uvdesk.Com and let us know your views to make the module better.
Besides this you can explore our cs-cart Development Services and Quality cs-cart add-ons.
Current Product Version - 1.0
Supported Framework Version - 4.18.x - 4.20.x

Be the first to comment.