The Laravel eCommerce Authorize.Net payment gateway lets you accept credit and debit card payments through a secure hosted payment page.
The module connects your Authorize.Net merchant account to your store and adds it as a checkout payment option.
It supports both sandbox and production modes, allowing you to test payments before going live.
Authorize.Net is a US-based payment gateway widely used by merchants in the USA, UK, Canada, and Australia. It is also PCI DSS Level 1 certified.
Features of the Laravel ecommerce Authorize.net payment
The module includes the following features to provide secure and reliable card payments.
- Hosted payment page: Customers enter their card details on an Authorize.Net-hosted page rather than on your store, therefore card data never reaches your server.
- Reduced PCI scope: Because your application never handles or stores card numbers, the compliance burden on your store drops significantly.
- Credit and debit card support: The hosted page accepts the major card brands your Authorize.Net account is enabled for, including Visa and Mastercard.
- Sandbox and production modes: A single toggle switches environments, and the module keeps a separate credential set for each one.
- Signed webhook verification: Incoming webhooks are checked with an HMAC-SHA512 signature; consequently, unsigned or mismatched payloads are rejected outright.
- Receipt fingerprint validation: When Authorize.Net posts transaction fields back, the module verifies their fingerprint before trusting the transaction ID.
- Automatic order and invoice creation: A successful payment creates the order, marks it processing, generates the invoice, and records the transaction.
- Payment recovery: Should a buyer pay but close the browser before returning, the webhook still reconciles the payment and creates the order.
- Channel-based configuration: Each store channel carries its own settings, so multi-channel merchants can run different accounts side by side.
- Multilingual admin and storefront strings: The module ships translations for all 22 locales that Bagisto supports.
How to Install the Laravel ecommerce Authorize.net payment
Installation takes five short steps. Work through them in order, because each one depends on the previous.
Step 1: Extract and merge the package files
After purchasing the extension, download the zip folder. Next, extract it and merge the packages/Webkul directory into your project root directory.
Step 2: Configure the autoloader
Open the composer.json file in your project root. Then add the following line under the psr-4 section:
"Webkul\\AuthorizeNet\\": "packages/Webkul/AuthorizeNet/src"
Step 3: Register the service provider
Open bootstrap/providers.php file and add the provider to the returned array:
use Webkul\AuthorizeNet\Providers\AuthorizeNetServiceProvider;

return [
    AuthorizeNetServiceProvider::class,
];
Step 4: Install and build the frontend assets
Navigate to the module directory at packages/Webkul/AuthorizeNet. From there, run the following commands to install and compile the assets:
npm install
npm run build
This build step publishes the payment method logo that appears at checkout. Skipping it leaves the option without an icon.
Step 5: Complete the setup
Finally, pull in the Authorize.Net SDK and refresh the autoloader:
composer require authorizenet/authorizenet:^2.0
composer dump-autoload
Afterwards, clear the application cache with php artisan optimize:clear. At this point the module is installed and ready for configuration.
How the Laravel ecommerce Authorize.net payment flow works
Understanding the flow helps enormously when you troubleshoot a live store. The module follows the Accept Hosted pattern, which splits a payment across three stages.
Redirecting to the hosted payment page
When a shopper places an order, the module requests a one-time form token from Authorize.Net and redirects the shopper to the hosted payment page to enter their card details.
Returning to your store
After a successful payment, the customer returns to your store. The module verifies the payment, creates the order, generates the invoice, and records the transaction.
Reconciling payments through the webhook
If a customer closes the page before returning to your store, the webhook automatically confirms the payment and creates the order. Secure verification prevents duplicate orders and keeps payment records accurate.
Admin Configuration for the Laravel ecommerce Authorize.net payment
After installing the module, the admin configures it from the Bagisto admin panel. Navigate to Configure >> Sales >> Payment Methods and open the Authorize.Net section.

Laravel ecommerce Authorize.net payment Configuration fields explained
The section exposes twelve fields.
- Status: Enables or disables the Authorize.Net payment method at checkout.
- Title: Sets the payment method name that customers see at checkout.
- Description: Adds a short description beneath the method name.
- Logo: Uploads a custom logo for this payment option, ideally sized 55 x 45 pixels(Optional).
- Sandbox: Switches between test and live mode. Consequently, it also decides which credential set the module uses.
- Sort Order: Controls where this method appears among the other payment options.
Credential fields
Six fields are provided for your API credentials. The Sandbox toggle lets you switch between production and sandbox credentials for easy testing.
- API Login ID: Holds the production API Login ID from your Authorize.Net account.
- Sandbox API Login ID: Holds the equivalent login ID issued for your sandbox account.
- Transaction Key: Authenticates every production API call the module makes.
- Sandbox Transaction Key: Authenticates the same calls against the Authorize.Net test environment.
- Signature Key: Verifies production webhook payloads and receipt fingerprints.
- Sandbox Signature Key: Verifies those same payloads while you run in test mode.
Remember that the module only offers the method at checkout when the status is on and the matching credentials are filled in. Otherwise, it hides the option entirely.
Step-by-Step: Laravel ecommerce Authorize.net payment in the admin panel
- Log in to the Bagisto admin panel.
- Click Configure in the left sidebar.
- Open Sales >> Payment Methods.
- Scroll to the Authorize.Net section.
- Turn the Status toggle on.
- Enter a Title and Description for the checkout page.
- Turn Sandbox on while testing, or leave it off for live payments.
- Fill in the credential set that matches your chosen mode.
- Set a Sort Order value.
- Click Save Configuration.
How to get your Authorize.Net API keys
The module needs three credentials: an API Login ID, a Transaction Key, and a Signature Key. You generate all three from the Authorize.Net merchant portal after creating an account.
API Login ID and Transaction Key
Sign in to your Authorize.Net account and click Account. From there, open Settings >> Security Settings >> API Credentials & Keys. The portal displays your API Login ID on this page.

Generating a new Transaction Key
Authorize.Net never shows an existing Transaction Key again, so generate a fresh one when you need it. Select New Transaction Key and submit the request.

Once you verify the PIN, the portal reveals the new Transaction Key. Copy it immediately, because you cannot view it a second time.

Signature Key for webhook verification
The Signature Key sits on the same API Credentials & Keys page, directly below the Transaction Key controls.
Note: This key matters more than it might first appear. Specifically, the module uses it to verify both webhook signatures and receipt fingerprints. Without it, the webhook endpoint rejects every incoming request as unsigned.
Sandbox accounts issue their own separate credentials. Therefore, generate them from sandbox.authorize.net and paste them into the three sandbox fields instead.
Laravel ecommerce Authorize.net payment : the customer experience
With configuration saved, customers can pay by card. The next three screens show the journey from checkout to confirmation.
Selecting Authorize.Net at checkout
Customers choose Authorize.Net under Payment Method alongside the other enabled options. After selecting it, they click Place Order.

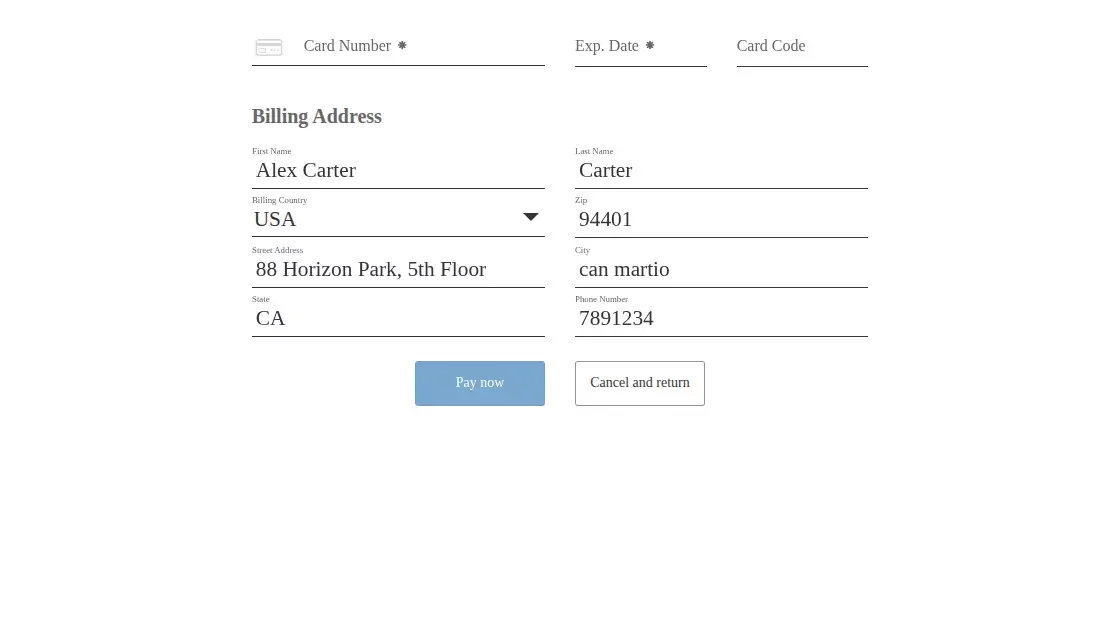
Paying on the hosted payment page
The store then redirects the customer to the Authorize.Net hosted payment page. Here they enter the card number, expiry date, card code, and billing address before clicking Pay now.
Confirming the order
Authorize.Net confirms the payment and shows a receipt with the authorization code and transaction ID. Clicking Continue returns the customer to the Bagisto order success page.

The module records the order, generates the invoice, and saves the Authorize.Net transaction ID. Admins can easily track the payment from the Bagisto order view.
Laravel ecommerce Authorize.net payment Conclusion
Accept secure card payments with Authorize.Net using a hosted payment page that protects sensitive data and keeps your checkout simple.
For further reading, browse the Bagisto developer documentation. If you need help with the extension, raise a ticket on the Bagisto support forum and our team will assist you.
You can also explore our Bagisto payment gateway extensions (eg: Stripe) for more payment options.
Current Product Version - 2.4.10
Supported Framework Version - Bagisto v2.4.10

2 comments
Warm Regards,
Team Webkul.