Magento 2 Shopify Connector – Every E-commerce merchant wants to expose the product range to more and more potential customers via multi-channel selling to grow their business.
However, if you are a multi-channel seller on Magento 2 and Shopify store then managing both the stores could be a tedious task.
By using the Magento 2 (Adobe Commerce) Shopify Connector module, the admin can integrate the Magento store with the Shopify store.
Further, the admin will no longer require to configure the product data and information on both the stores separately.
The admin can sync the product, and orders from Shopify to the Magento store. And, can even export the products from the Magento store to Shopify.
Moreover, the admin can synchronize the products and orders from the multiple Shopify accounts using the module.
Check a brief overview of the plugin configuration setting options –
-6vVHN0qeJs
Features
The admin can map Shopify categories with Magento 2 categories.
Admin can import Shopify products to Magento 2 store.
The admin can set the price rules for the imported/exported products.
Admin can set a default category for the imported products in the Magento 2 store.
The admin can set the default quantity for exported products in the Magento 2 store.
The admin can import Simple as well as Configurable(product with variants) product types.
The product information like base image, additional images, name, price, SKU, description, quantity, weight, and super attributes with options get import along with the product.
Order status and tracking number get updated to Shopify from Magento 2 when the order is processed from Magento 2.
The admin can export Magento 2 store products to the Shopify store.
The admin can export Simple as well as Configurable product types.
Imported Shopify product works like same as Magento product.
The admin can import Shopify orders to Magento 2 store.
Admin can set the default store view for the imported order in the Magento 2 store.
The admin can add multiple Shopify Accounts.
The admin can view and manage the Shopify Accounts.
The orders will fetch automatically via Cron and if order items do not exist in Magento, they will automatically be created.
Quantity management on Shopify for the orders placed at the Magento store.
Product export to Shopify with the listing template.
Shopify connector module also works with a multi-store Magento setup.
Send product information according to locales such as – en, es, de.
Export product and product model through product only export(CSV)
Works with simple, configurable, and virtual products.
Support multi-language translations.
Installation
In the mean time, check other quality Magento 2 extension that are easy to install.
Customers will get a zip folder and they have to extract the contents of this zip folder on their system.
Extracted folder has an src folder, inside the src folder you have the app folder.
You need to transfer this app folder into the Magento2 root directory on the server as shown below.
After the successful installation, you have to run these commands in the Magento2 root directory.
php bin/magento setup:upgrade
php bin/magento setup:di:compile
php bin/magento setup:static-content:deploy
php bin/magento indexer:reindex
php bin/magento cache:flush
Multi-Lingual Configuration
For Multilingual support, please navigate to Store>Configuration>General >Locale Options. And select your desire language from the Locale option.
Language Translation
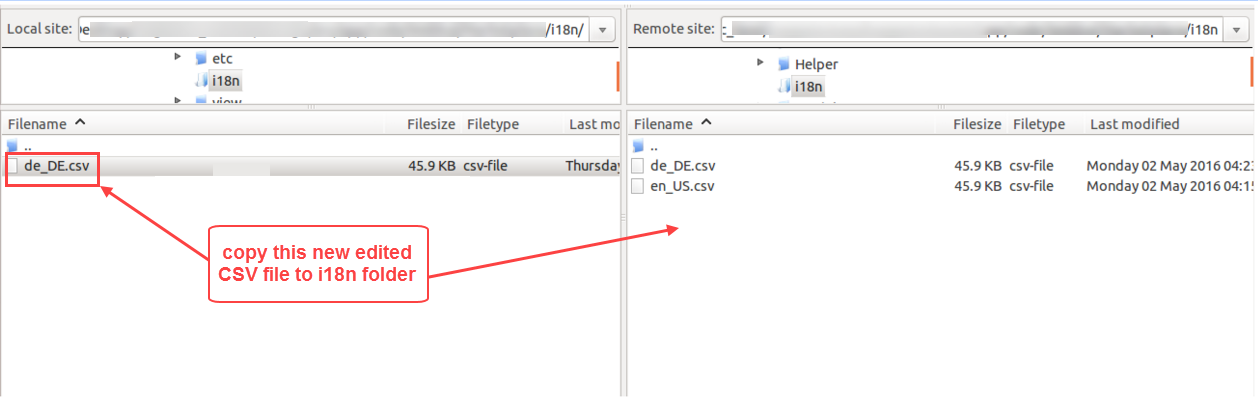
For module translation, navigate to the following path in your system app/code/Webkul/MultiShopifyStoreMageConnect/i18n/en_US.csv.
Open the file named en_US.CSV for editing as shown in the below screenshot.
Then replace the words after the comma(,) on the right in the file with your translated words.
After editing and translating the CSV file, you need to save the translated file name according to your region language and country code such as – de_DE.CSV.
Follows by uploading the translated file to the same folder from where you have obtained it. Now your module translation is complete.
How to Get API Credential From Your Shopify Account
To get the API credentials the admin needs to generate the Shopify API credential first using the Shopify account.
The admin can visit the Shopify store for which the admin wants to connect and sync the WooCommerce store.
Step 1 – Log in to your Shopify Admin
First, log in to your Shopify store using:
Your store URL
Your admin username and password
Make sure you are logged in as a store owner or have app developer permissions.
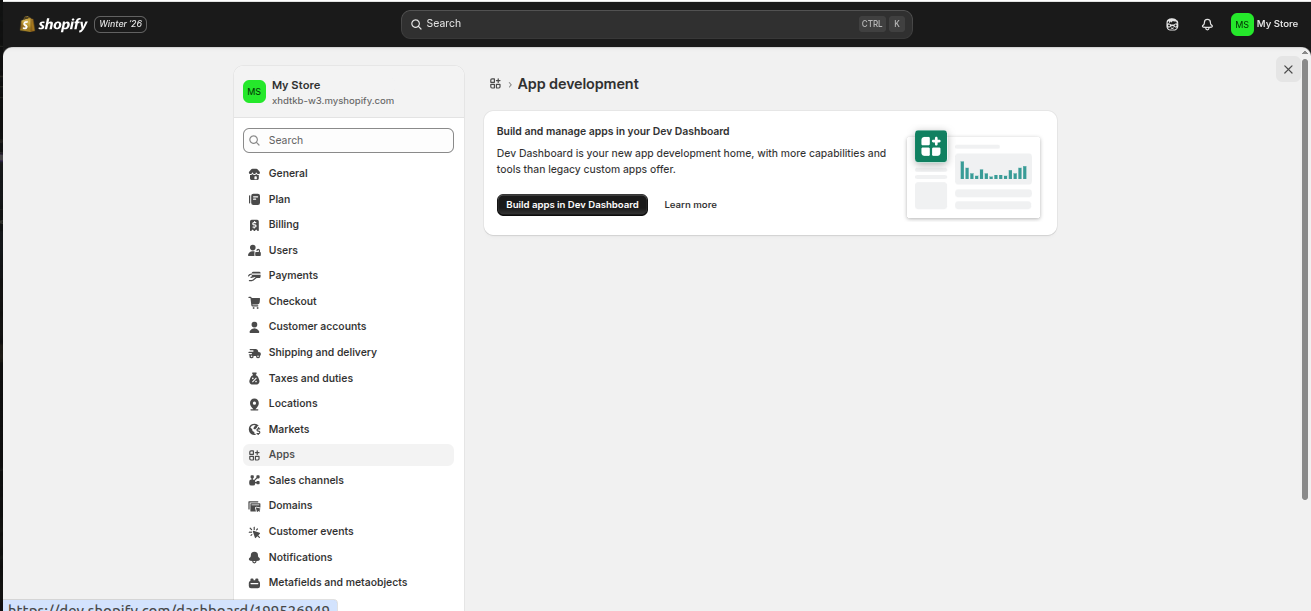
Step 2 – Navigate to “Apps ”
From the Shopify left sidebar menu:
Click Settings, then select Apps
This is where all integrations and custom apps are manage
Step 3 – Open the “Develop Apps” Section
On the top-right corner of the Apps page, click:
Develop apps
This option allows you to create custom/private apps for API integrations.
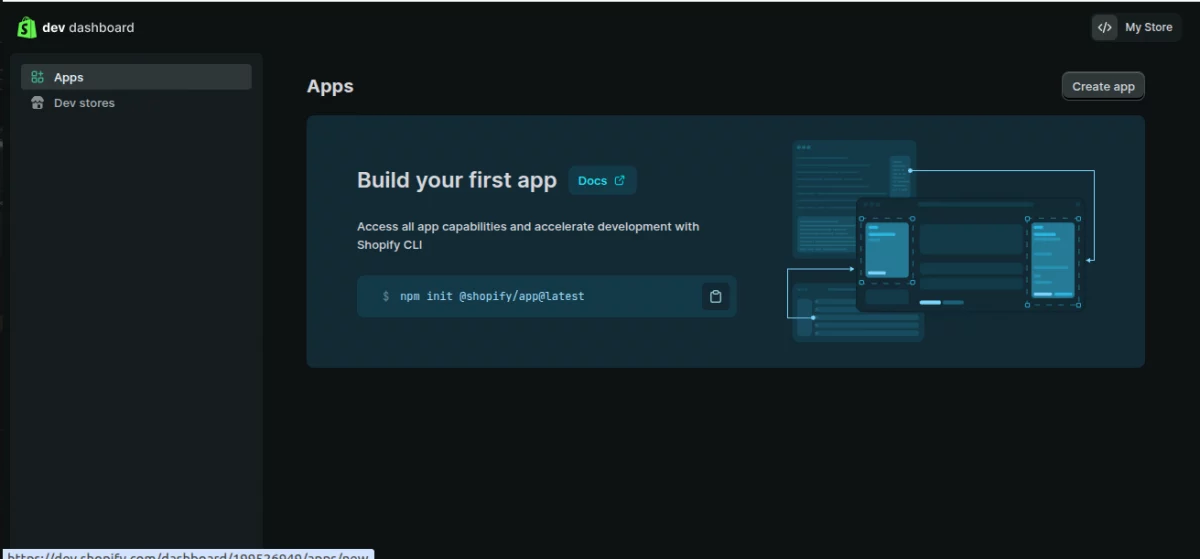
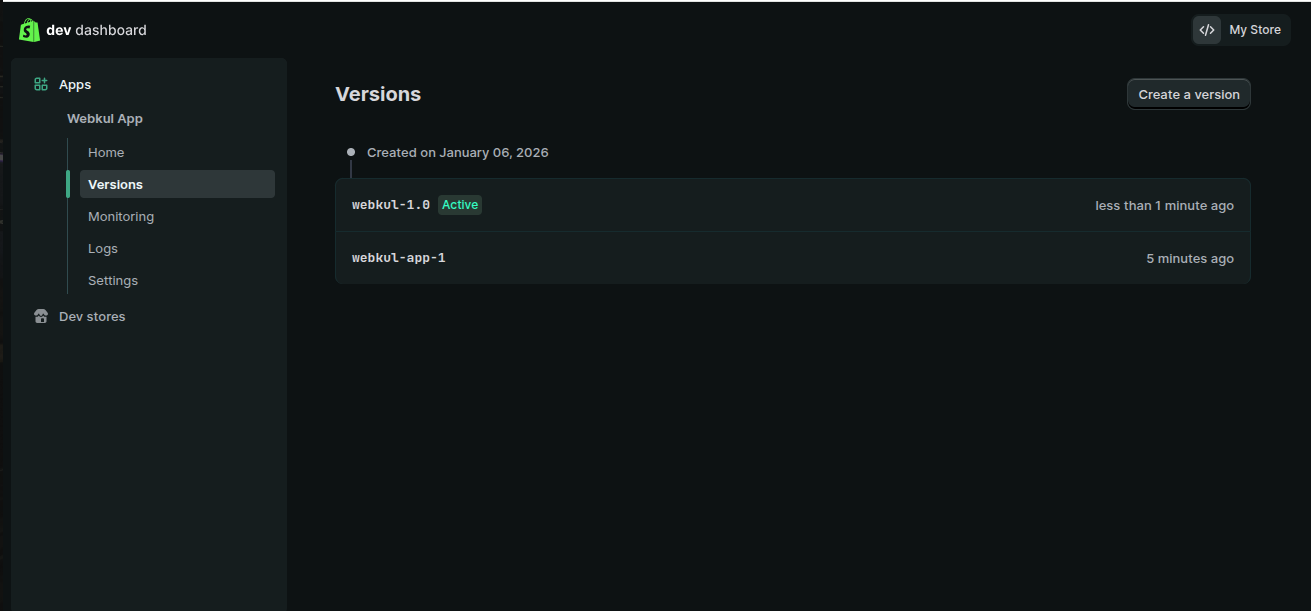
Step 4 – Click on the “Build apps in the developer dashboard” option.
The dev dashboard opens as shown in the image below
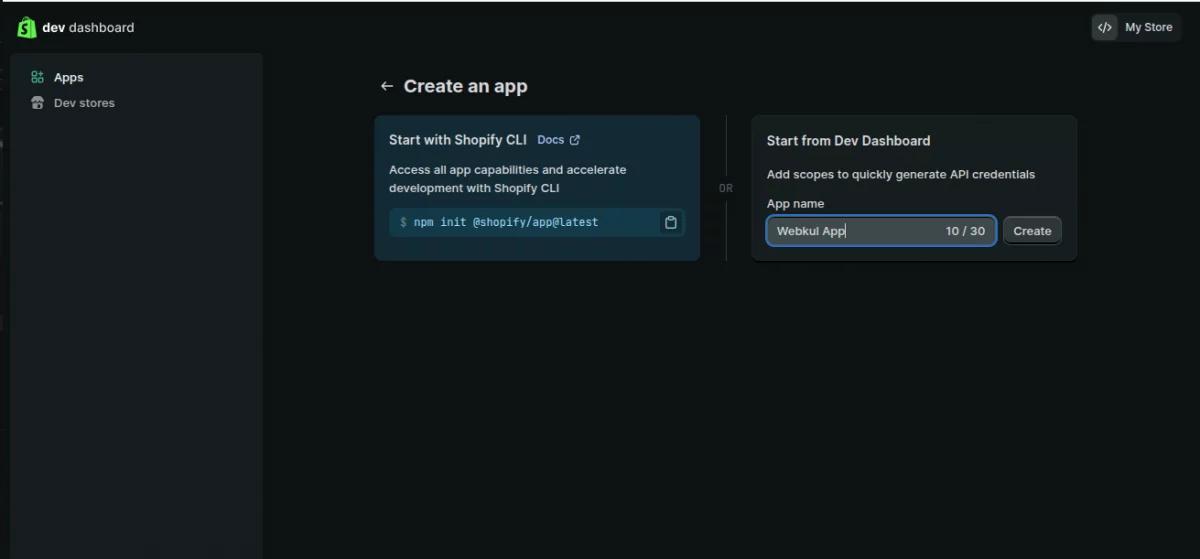
Step 5 – Create a New App
Next, click the button “Create app”
This will open the app creation pop-up.
Fill in the app name – Any name of your choice (In my case, I choose, “Webkul App”)
Then click Create
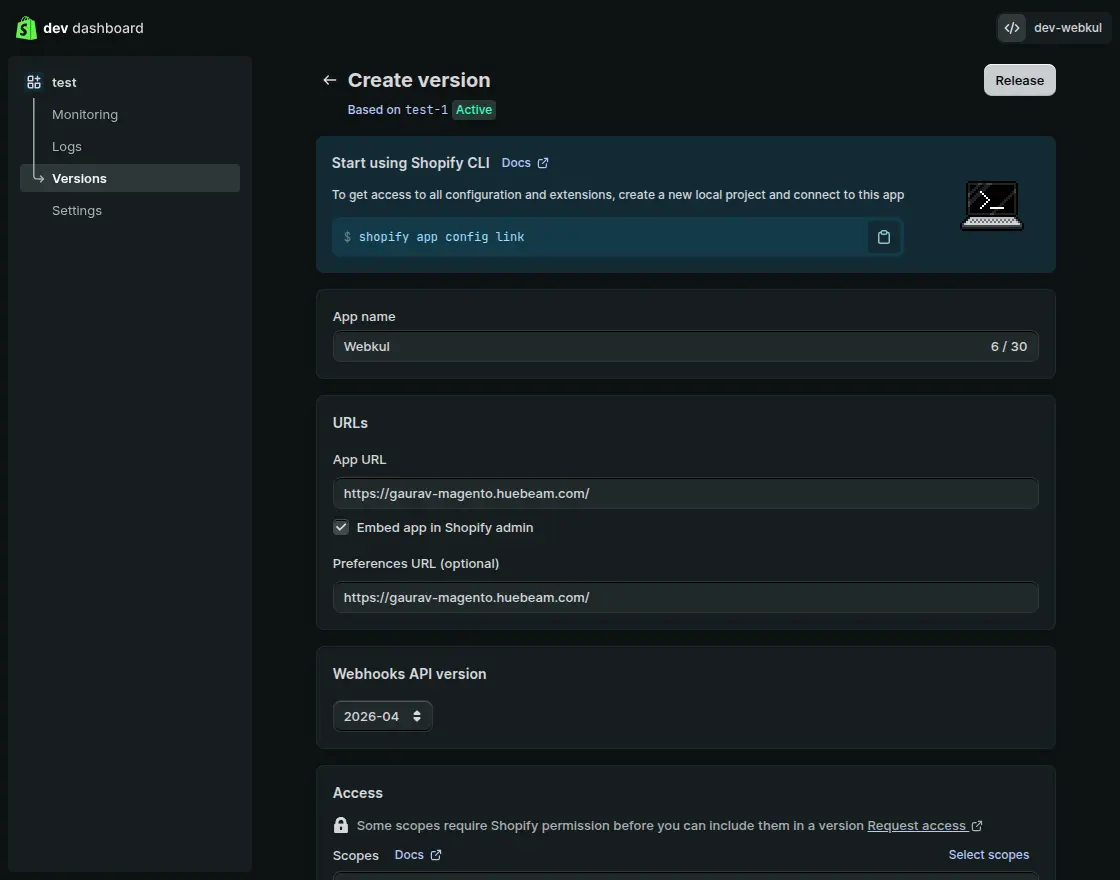
Now the App Integration and Configuration dashboard opens, where you can assign
the required permissions to your app as shown in the image below.
This is the URL where your app is hosted or where Shopify should send users after installing or opening the app.
Now you need to assign permissions to your app.
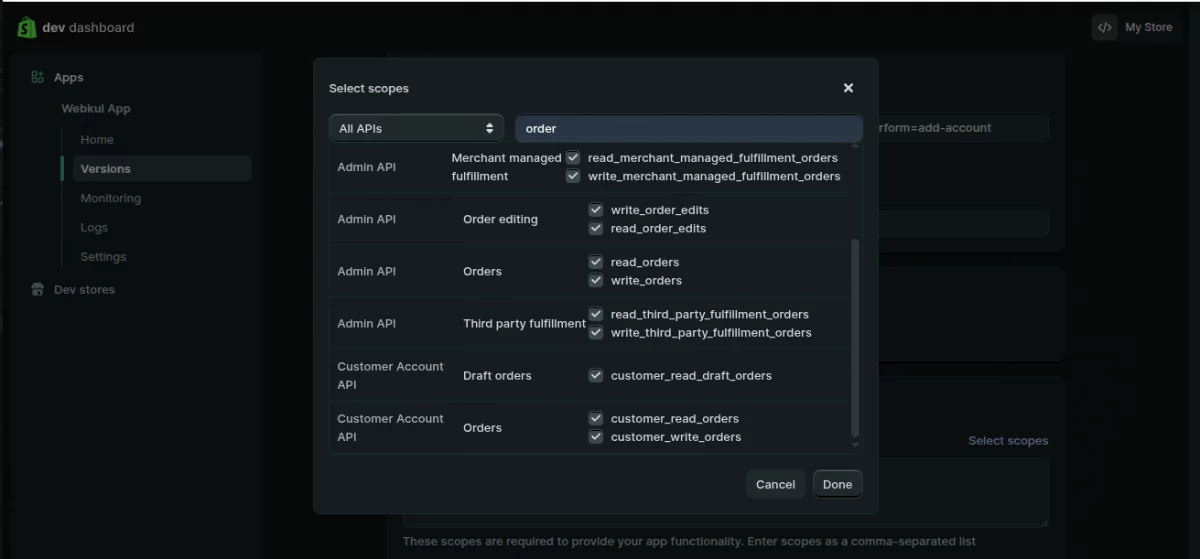
Then go to the Access section
From here, select the required API scopes/permissions (for example: Products,
Orders, Inventory, Customers etc.), depending on your module requirements.
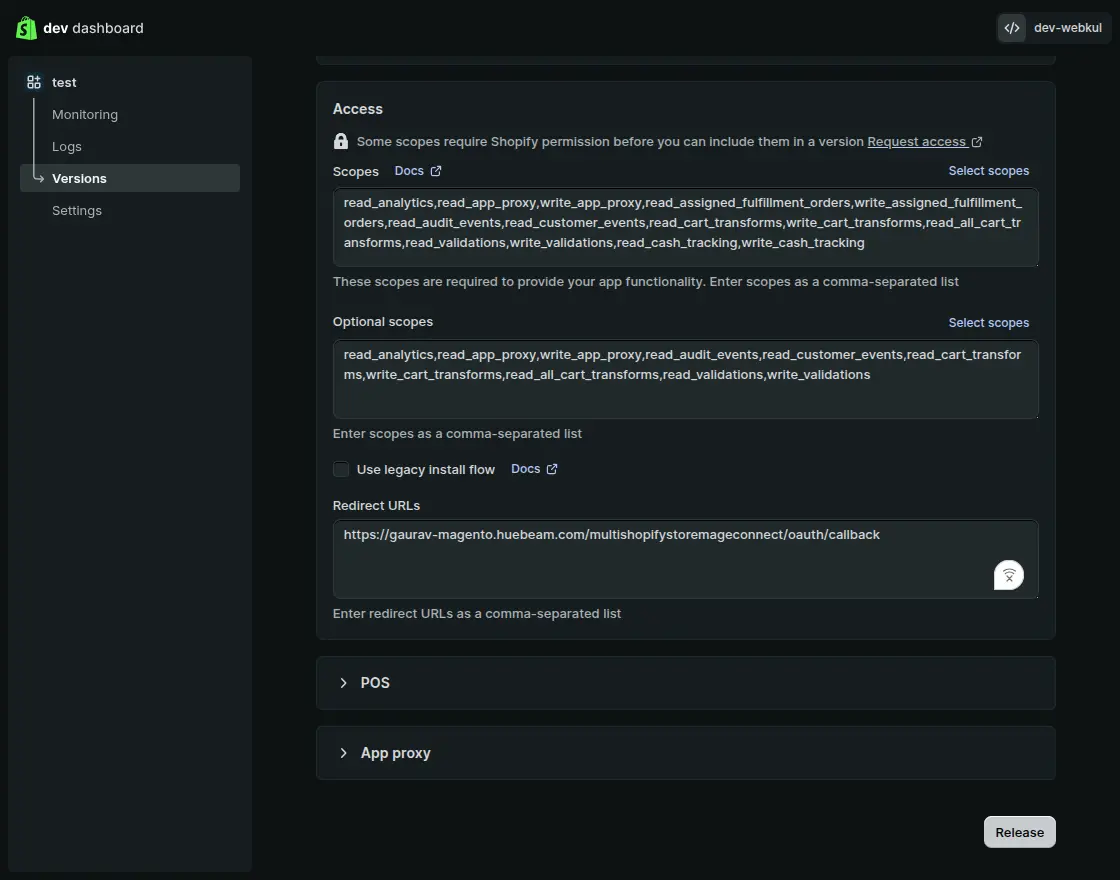
Also, it should have Read and Write API permission for the following:
Customer details and customer groups; inventory; orders, transactions, and fulfillment.
Product information including products, variants, and collections.
Locations
Shipping rates
Discounts
Online Store Pages access via the GraphQL API.
Note: While making the Webhook Subscription, please make sure to select the latest
Event Version.
After selecting the scopes and Event version, click Release.
After successfully selecting all the required permissions, click the Release button
again. A new version of the app will be created as shown in the image below.
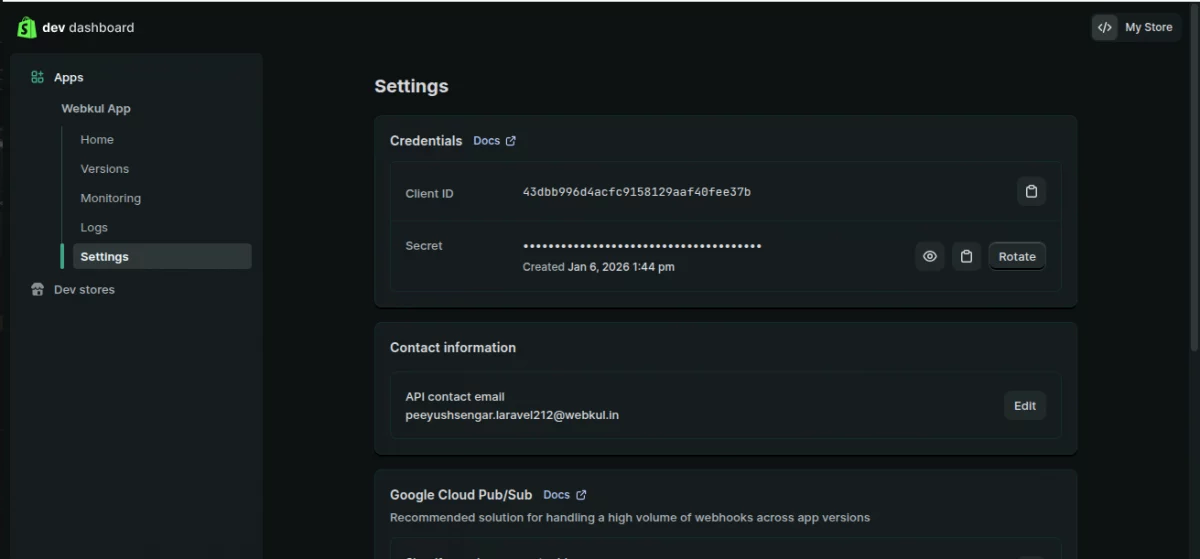
Step 7 – Retrieve Your API Credentials
After that, go to the API Credentials section in the app settings, where you can view
your generated keys.
You will be able to see:
Client ID (API Key)
Client Secret Key
Click Reveal to display the secret key.
Copy both values carefully and keep them stored in a secure location.
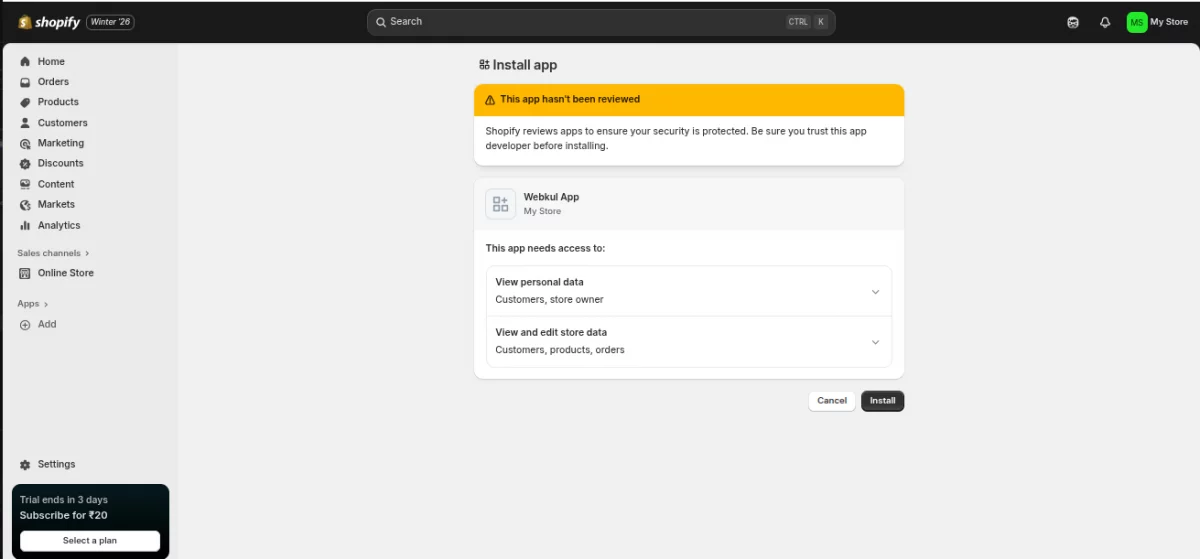
Step 8 – Install the App
Once scopes are configured, install the app to activate API access.
Click on Install app and confirm the installation in the pop-up.
This generates your OAuth application credentials.
How to Get Webhook Verification key in Add Shopify Account option?
In Shopify, a webhook is a way to automatically send data to an external URL when certain events happen in your store.
Steps to create/view webhook key:
Log in to your Shopify admin panel an navigate to the Webhooks section.
Click on “Settings” at the bottom of the left-hand menu.
Select “Notifications” from the Settings menu.
Scroll down to the “Webhooks” section.
Click the “Create webhook” button.
In the “Event” dropdown, select the event you want to trigger the webhook (e.g., “Order creation”).
The “Format” dropdown, choose the format in which the data will be sent (JSON or XML).
In the “URL” field, enter the URL of the endpoint where you want to receive the webhook data.
After filling in the details, click “Save webhook”.
Module Configuration
After the module installation, the admin will configure the module settings by navigating to the given path.
Stores > Configuration > Webkul > Shopify Connect as per the below image.
Here the admin will:
Update Product Qty- Set “Yes” to allow updating the product quantity on the Shopify store if the order for the product is placed on the Magento store. Else set “No” to don’t allow updating the product quantity on the Shopify store if the order for the product is placed on the Magento store.
Update Product – Set “Yes” to allow product updates on the Shopify store if the product is updated on the Magento store. Else set “No” to don’t allow product updates on the Shopify store if the product gets an update on the Magento store.
Use Lastname As Firstname In Order – Set “Yes” to use the Lastname of the customer as the Firstname in Magento 2 for order import. Else, Set “No” to enable the Custom Firstname option.
Custom Firstname – Input a custom Firstname of the customer in the order.
Location ID for Fulfillment – Here, the admin need to enter the location id of the Shopify store.
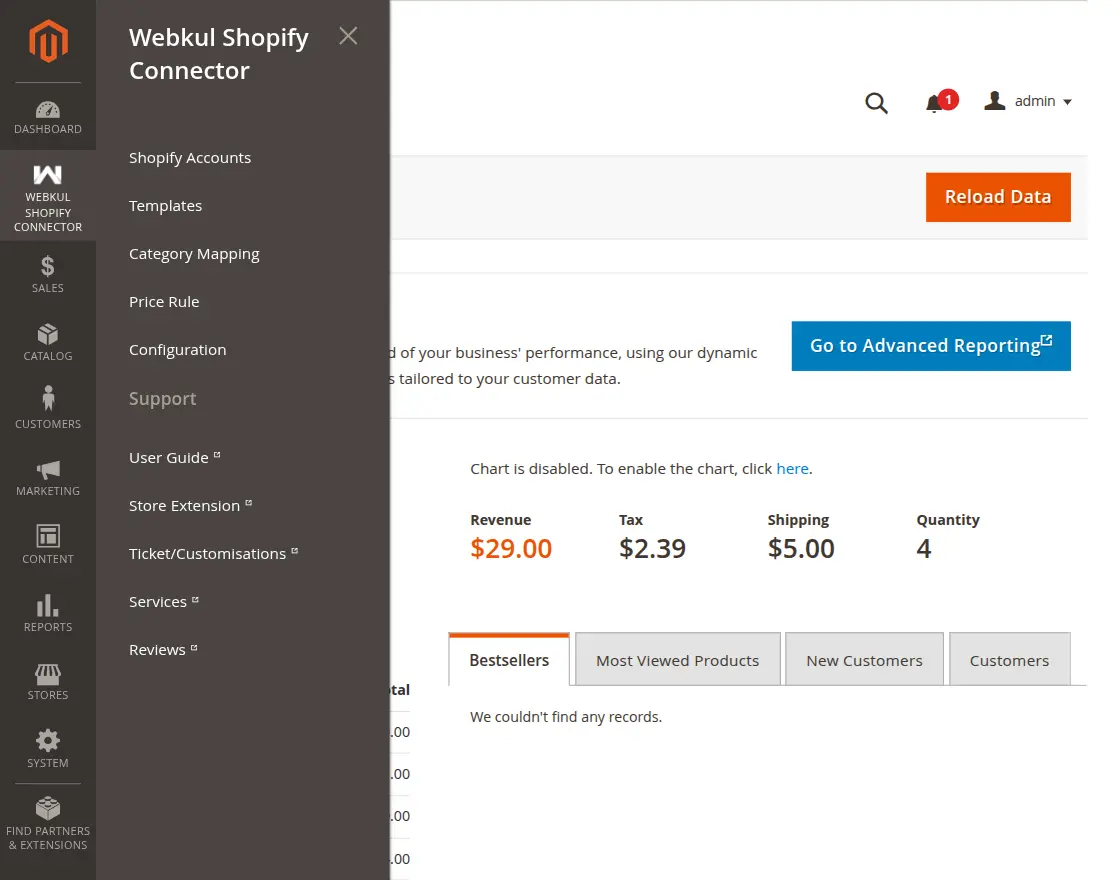
The admin can also navigate to the Configuration by navigating from the sidepanel, they have to follow the following path Webkul Shopify Connector>Configuration.
To get the Shopify store location, log in to your Shopify account and navigate to the location section.
Tap the location that you want to use and after that, in the URL you will find the Location Id as per the snapshot below.
Shopify Vendor name – Here, enter the Shopify store vendor name as per your Shopify store account name.
General Settings:
Product Auto Export to Shopify – Here, if this option is enabled then when you create the products in Magento they will automatically be exported to Shopify as required.
Default Shopify Store – Select the store from the drop-down option so when you create a product that will automatically be exported to the selected Shopify store.
Product Auto Delete – Choose Yes to auto delete product at Shopify when you delete at Magento 2 end.
After completing module settings, then the admin will have a Webkul Shopify Connector menu option as per the below image.
Here, the admin will have several sub-menu options to manage the Magento 2 Shopify Connector which we will discuss one by one in detail.
Shopify Accounts
Templates
Category Mapping
Price Rule
Configuration
Shopify Accounts
Now, the admin can add Shopify account credentials. The admin can navigate to Webkul Shopify Connector > Shopify Accounts for managing and adding Shopify Accounts.
After clicking on Shopify Account Connect, the following page will open showing Shopify accounts list with the Store Name and Shopify User Id.
Here, the admin can:
Edit – edit the Shopify account details by clicking on this link.
Delete – remove the existing Shopify account from the list using the action drop-down list.
Add Shopify Account – add/create a new Shopify account.
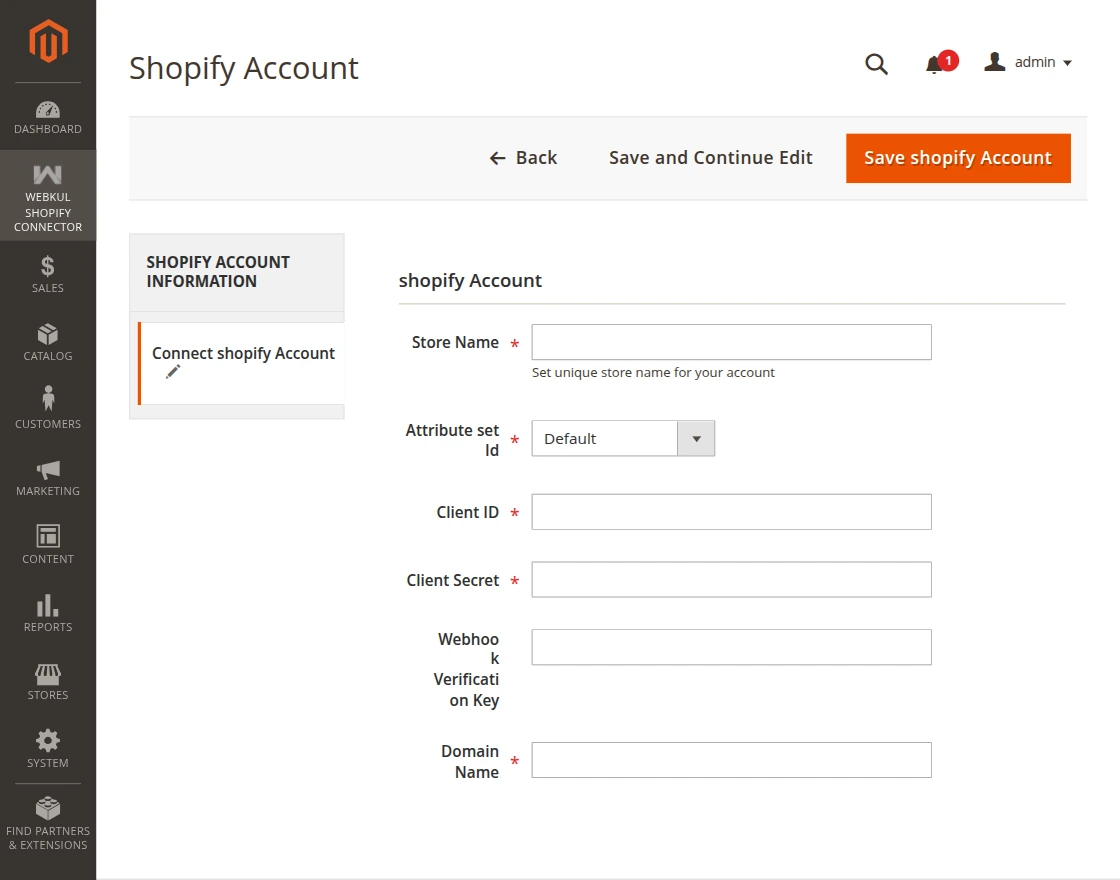
Add Shopify Account
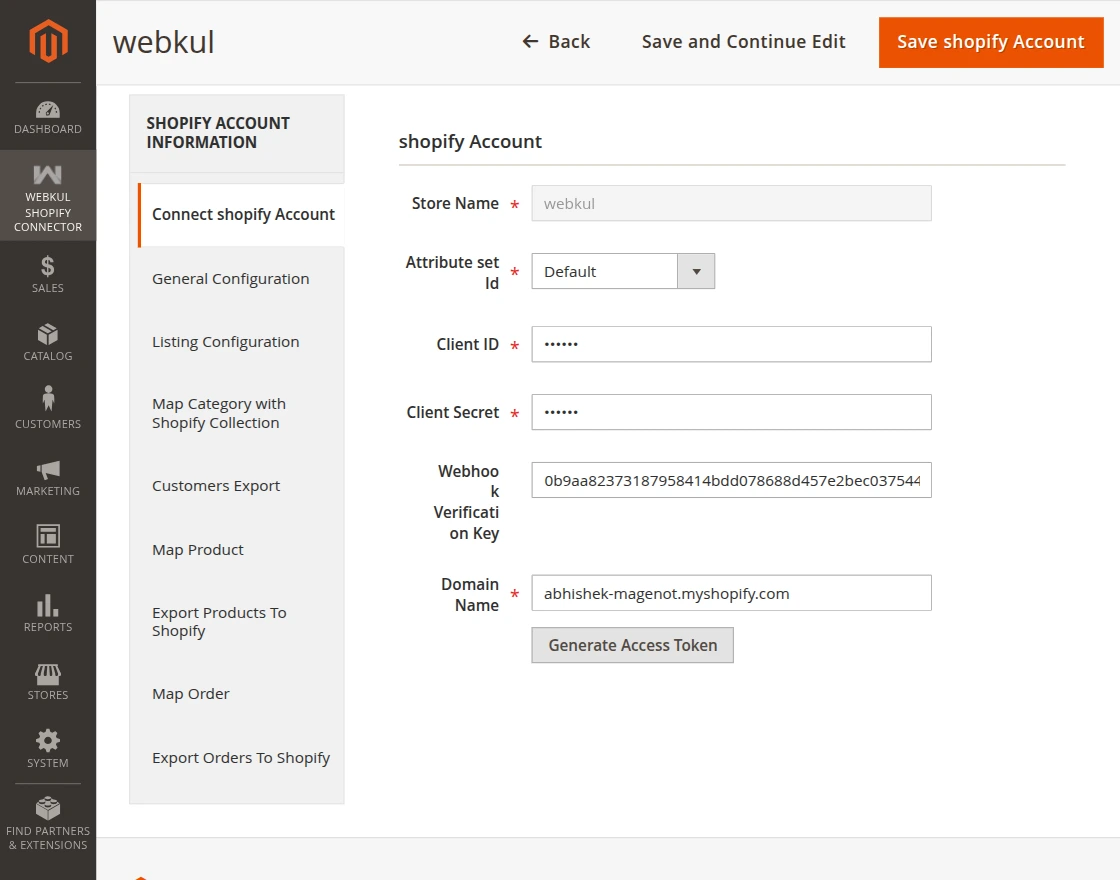
After clicking on “Add Shopify Account”, the admin will navigate to the New Shopify Account page as per the below image.
Here, the admin will enter :
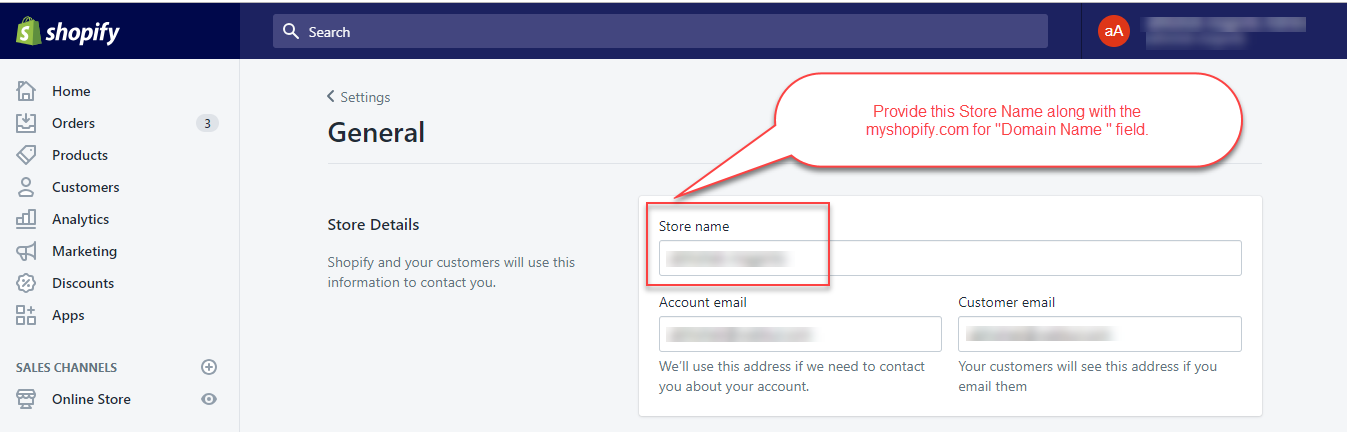
Store Name: Enter your Shopify store name and this will not get change once get save in the Magento 2 store.
Attribute set: Select the attribute set for the imported product.
Client ID: Enter the Client ID that the admin has received while creating the app from the Shopify account.
Client Secret: Enter the Client Secret that the admin has received while creating the app from the Shopify account.
Webhook Verification Key – In Shopify, a webhook is a way to automatically send data to an external URL when certain events happen in your store.
Domain Name: Enter the base URL of your Shopify store like – your store name.myshopify.com For example – webkul.myshopify.com
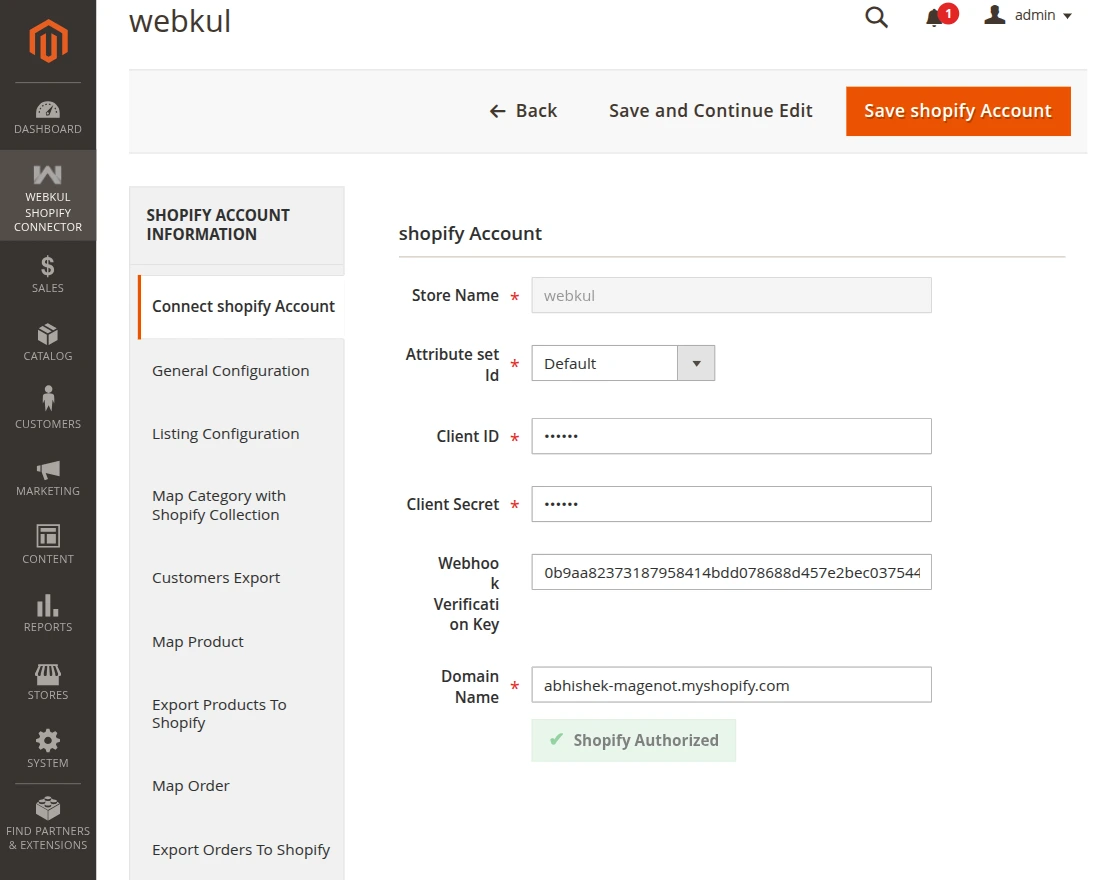
When the admin clicks on the “Save Shopify Account” button, the following options become visible as per the below image.
After entering the required details, the admin needs to click the “Generate Access Token” button to start the Shopify authentication process.
Once authentication is successfully completed, the system connects the Shopify store with Magento 2.
The system then displays the “Shopify Authorized” status below the Domain Name field, confirming that the Shopify account is connected.
Note: After the Shopify Connect account details are saved, the general configuration and listing configuration also need to be saved again for the further process.
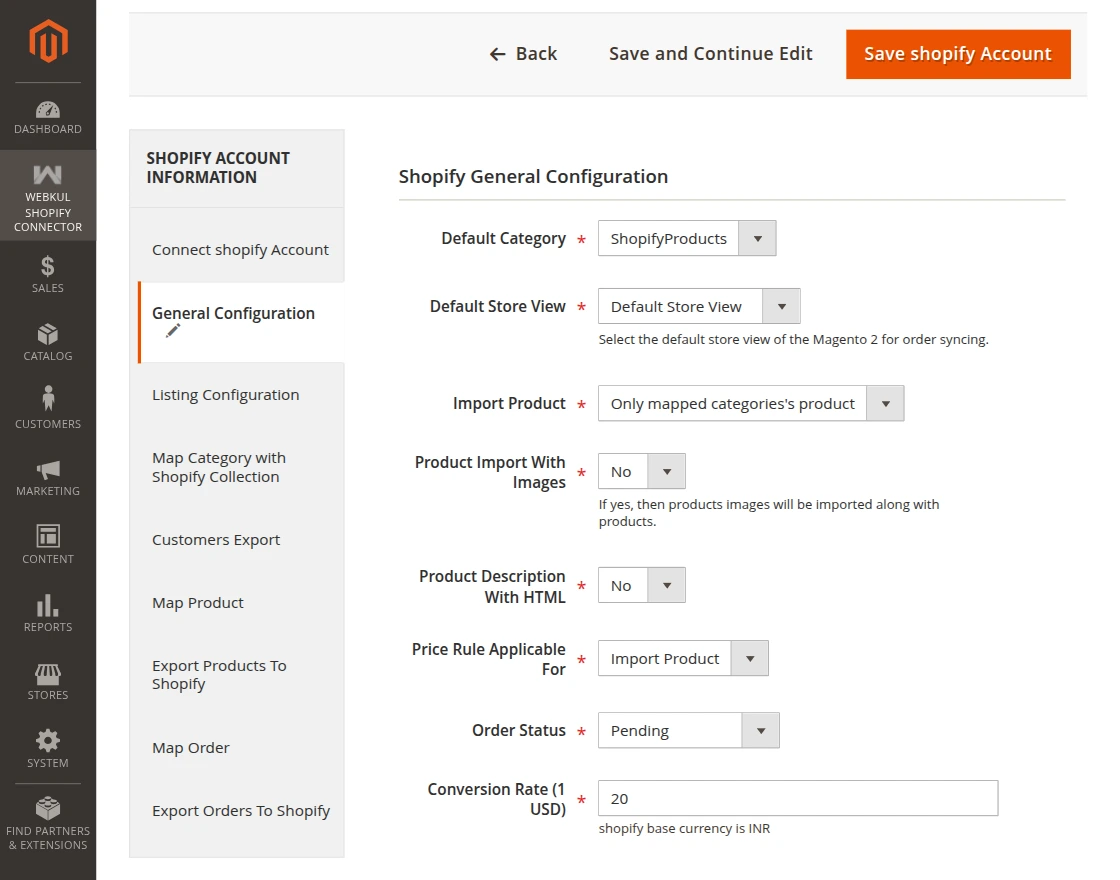
General Configuration:
Here admin will configure the “General Configuration”.
Revise Shopify Product: Select ‘Yes’ to revise Shopify item automatically when an item update on the Magento 2 store else select the ‘No’ option.
Default Category: Select the default category of Magento 2 store for assigning to Shopify products while product import.
Default Store View – Select the default store view of the Magento 2 for order syncing.
Import Product: Select “All Products” if want to import all the products. Else select “Only Mapped Categories Product’s” if want to import only those products whose Shopify store categories have been mapped with Magento 2 Store.
Product Description with HTML: Set “Yes” if want to show the product description in HTML format while import and export. Else set “No” if want to show the product description in plain text format.
Price Rule Applicable For: Choose to apply price rule on import product, export product or go with none option to remain the price rule unapplied.
Order Status: Set default order status for the orders which are import from the Shopify store.
Conversion Rate: Set the conversion rate.
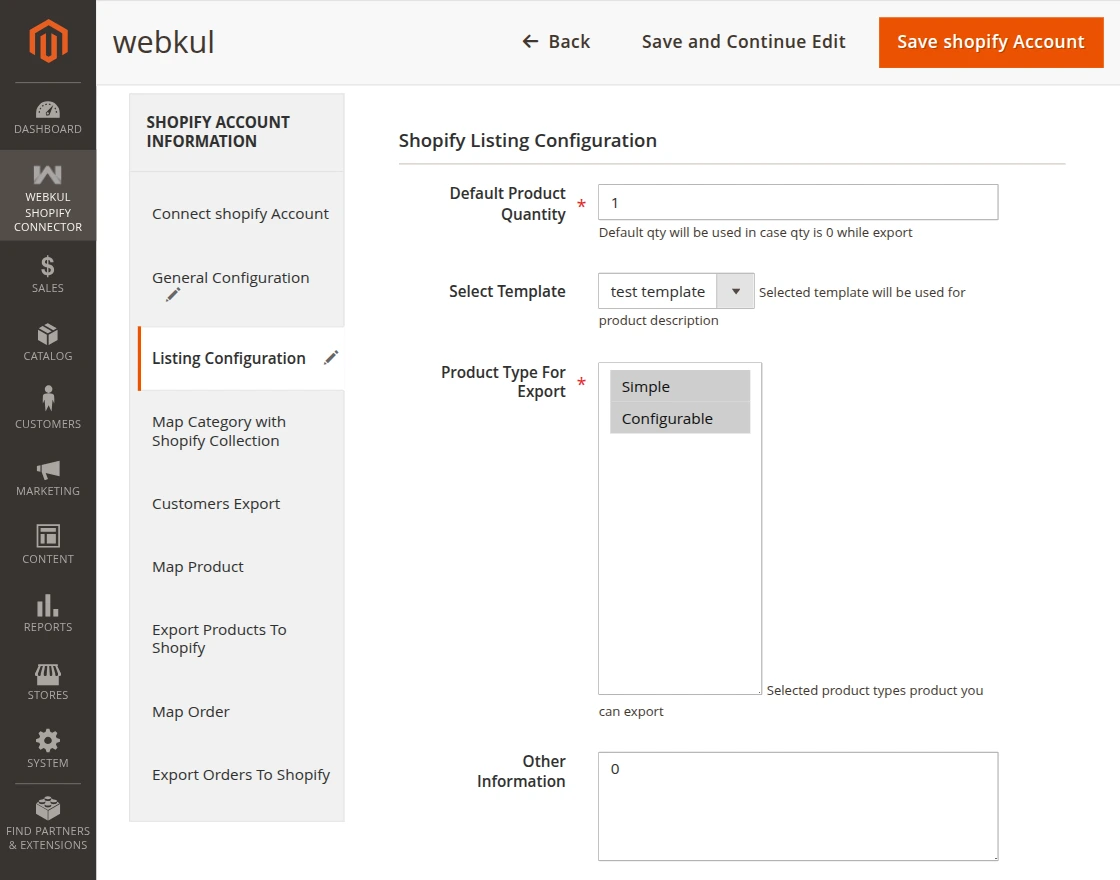
Listing Configuration:
Under this section, the admin will configure the listing settings.
Here, the admin will:
Default Product Quantity – Set default product quantity for a product that gets export to Shopify if product quantity is zero on the Magento 2 store.
Select Template – The admin can select the template. As per the chosen template, the additional information will get export along with the product.
Product Type for Export- Select the product type which the admin wants to export.
Other Information – Write any information for export products.
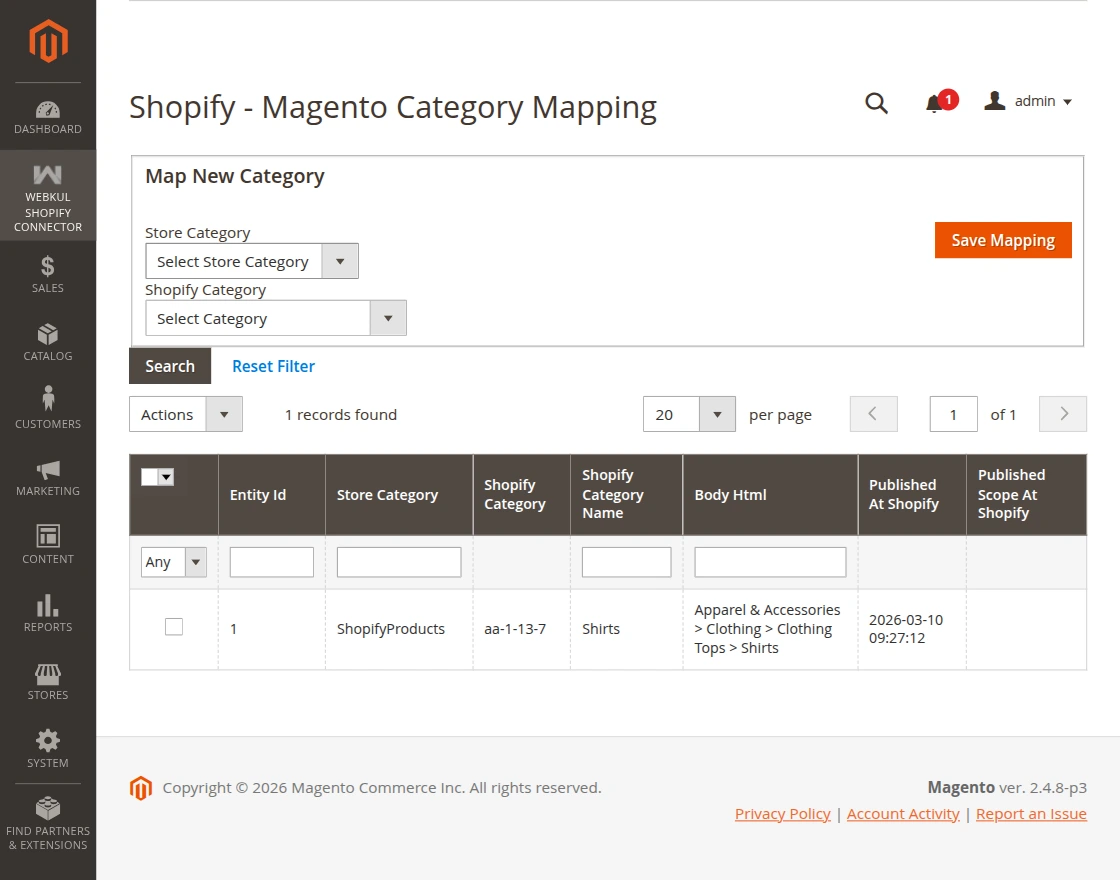
Category Mapping:
After this, the admin will map the Magento 2 store categories with the Shopify store categories by clicking on the Category Mapping tab.
This will navigate the admin to a new page as per the below image.
For mapping, select the Magento Store Category which the admin wants to map with the Shopify store Category.
Note:
Only one category will map at a time.
You cannot map the parent categories.
You need to select the sub-category for mapping.
For successful category mapping, hit the Save Mapping button. Then, a pop-up window will get a display in which the admin will click the Ok button.
And after mapping the categories, the admin can view them in the list.
Note:
Only the manual collection of the Shopify store will be visible at the Magento end for mapping.
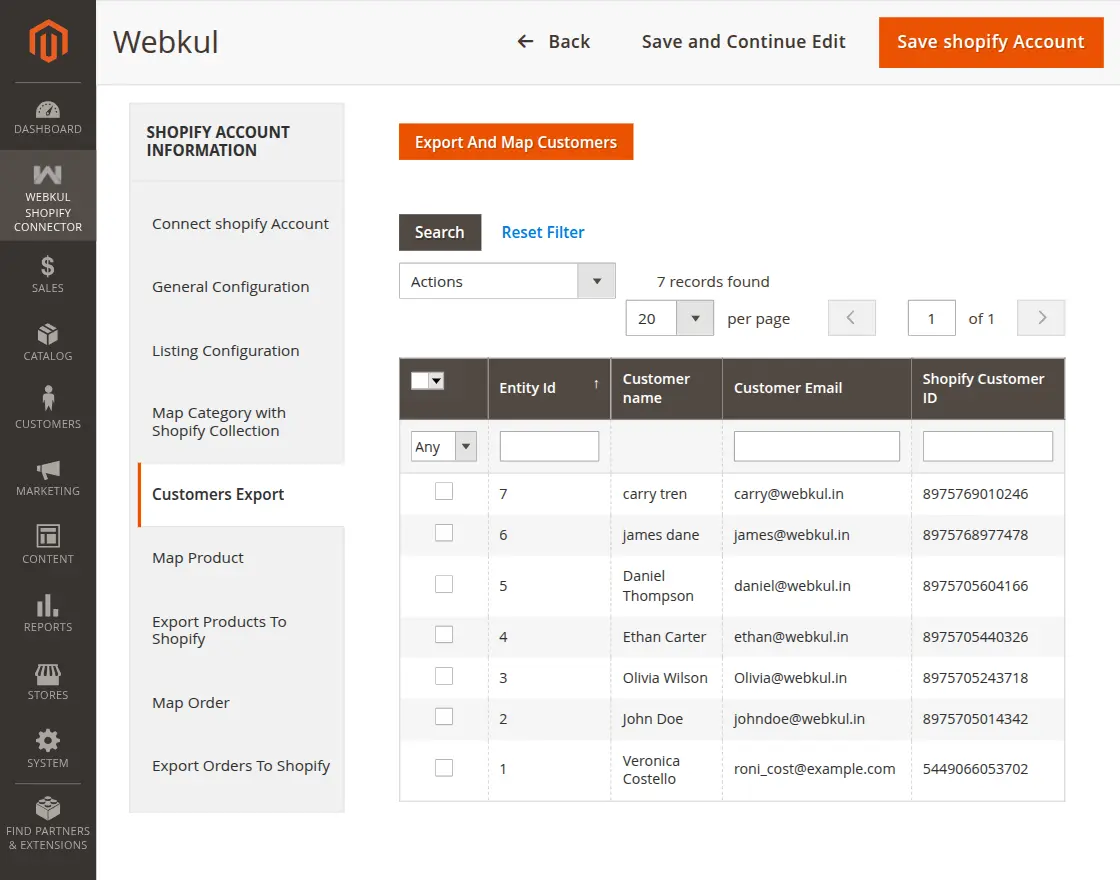
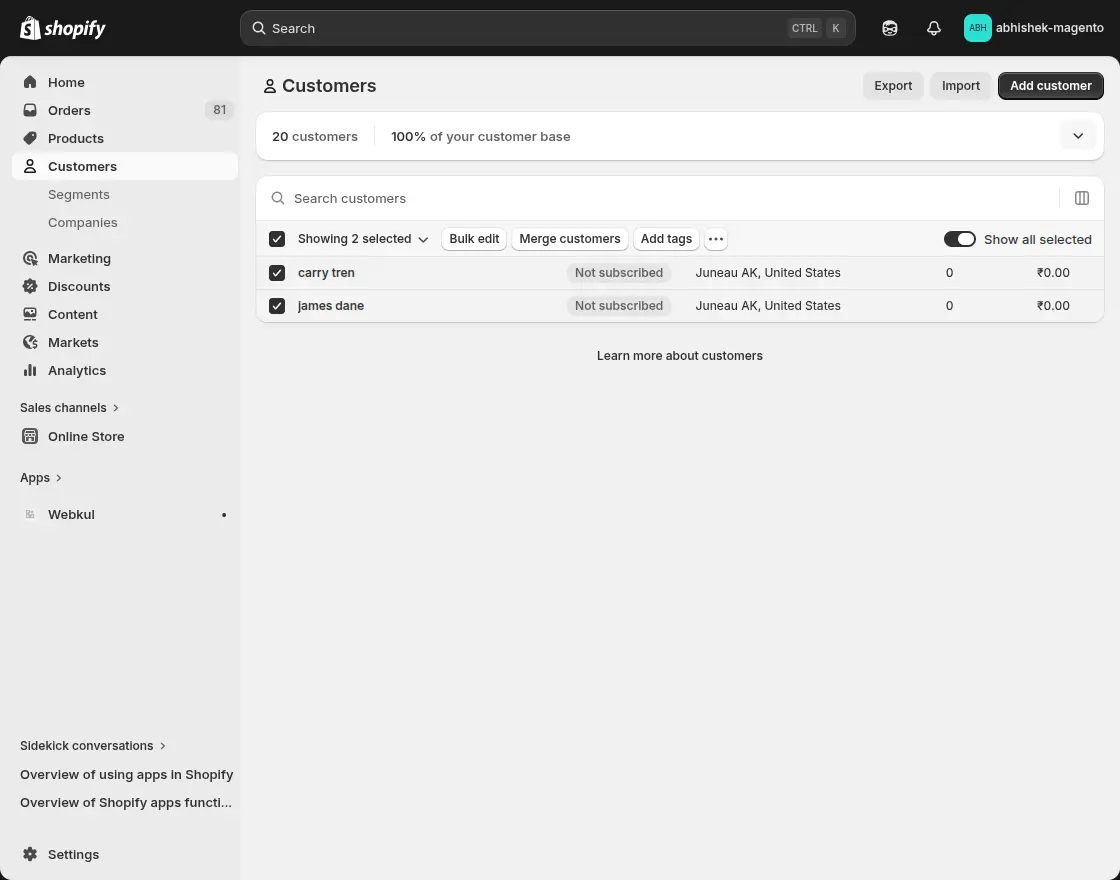
Export Customers
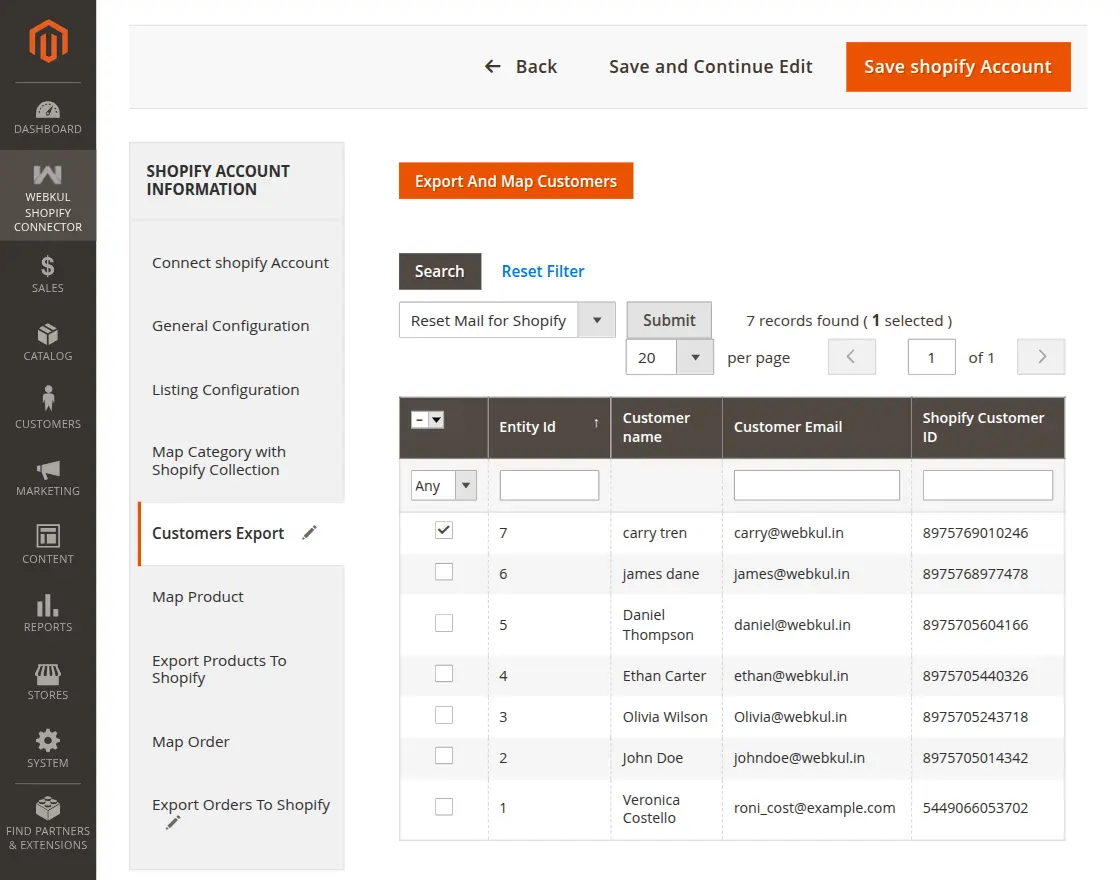
You can easily migrate customers from Magento 2 to Shopify using the Shopify Connector module. Follow the steps below to export and map customers successfully.
In the Magento 2 admin panel, navigate to: Webkul Shopify Connector -> Customers Export
From here, you can view all Magento 2 customers available for export to Shopify.
Select Customers for Export
Select the customers you want to export.
Use the checkbox option to choose multiple customers.
Click on the Export And Map Customers button.
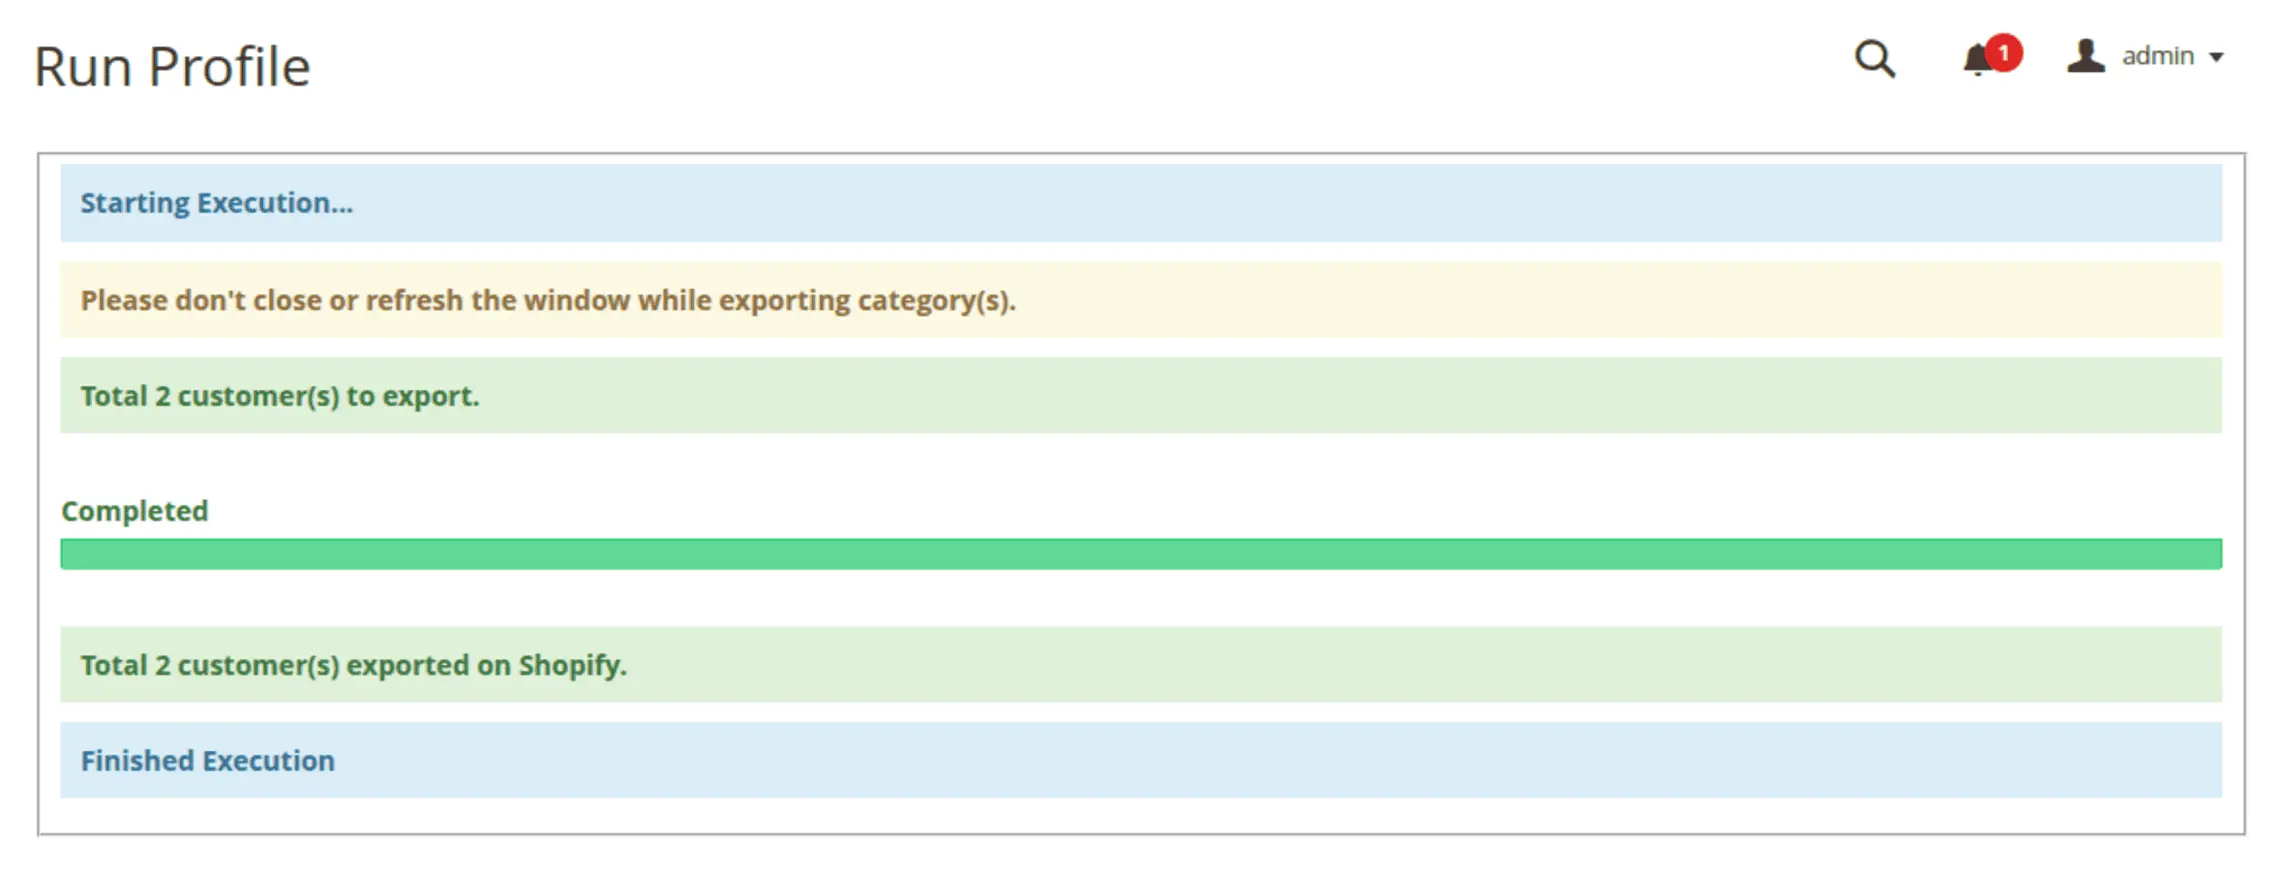
Customer Export Execution
Once the export process starts, the execution page will display the export progress.
Verify Customers in Shopify
After the system completes the export successfully:
Login to your Shopify admin panel.
Go to Customers.
Verify that the exported customers are available in Shopify.
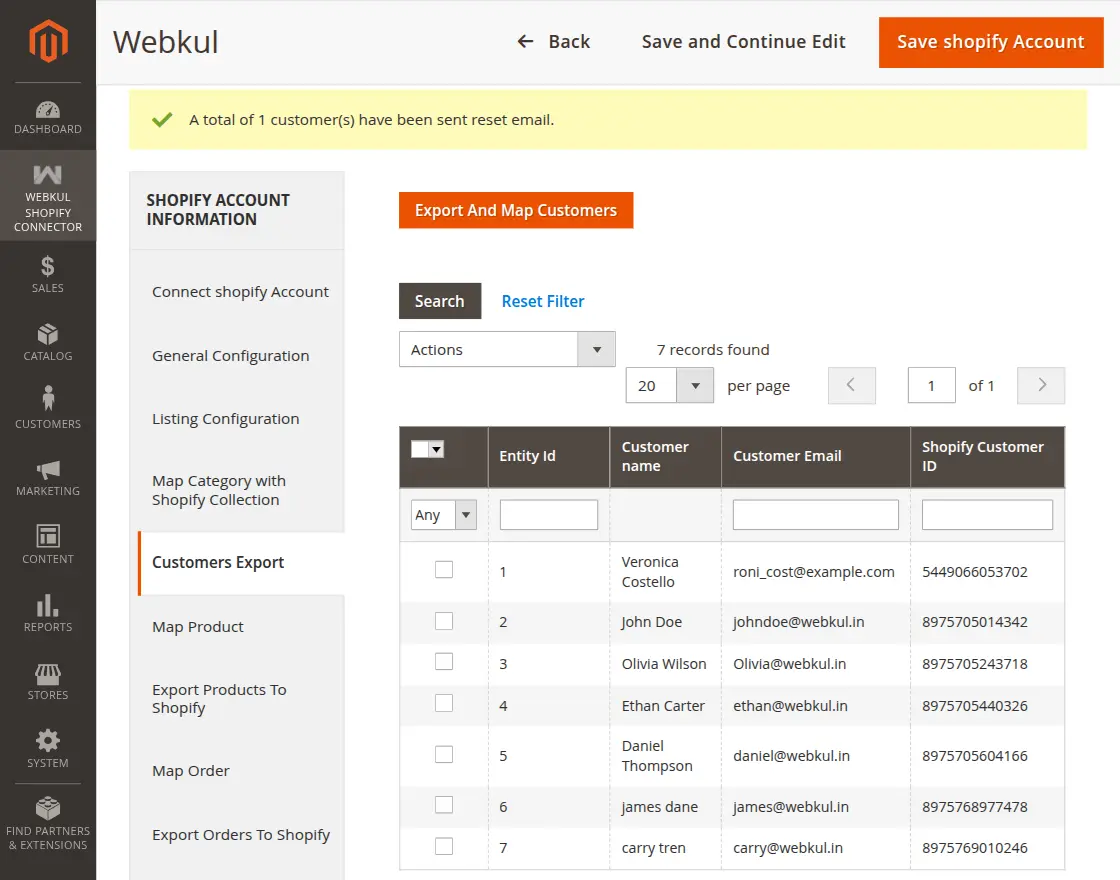
Send Customer Reset Mail for Shopify
The Shopify Connector module also allows the admin to send Shopify customer account reset emails directly from Magento 2.
This feature helps customers activate or reset their Shopify account passwords after customer export.
Here, the system displays all mapped Magento 2 and Shopify customers.
Select Customer and Choose Reset Mail Action
Select the customer using the checkbox.
From the Actions dropdown, choose: Reset Mail for Shopify
Click on the Submit button.
This action will send a Shopify customer account reset email to the selected customer email address.
After the system completes the action successfully, it displays a confirmation message indicating that it has sent the reset email.
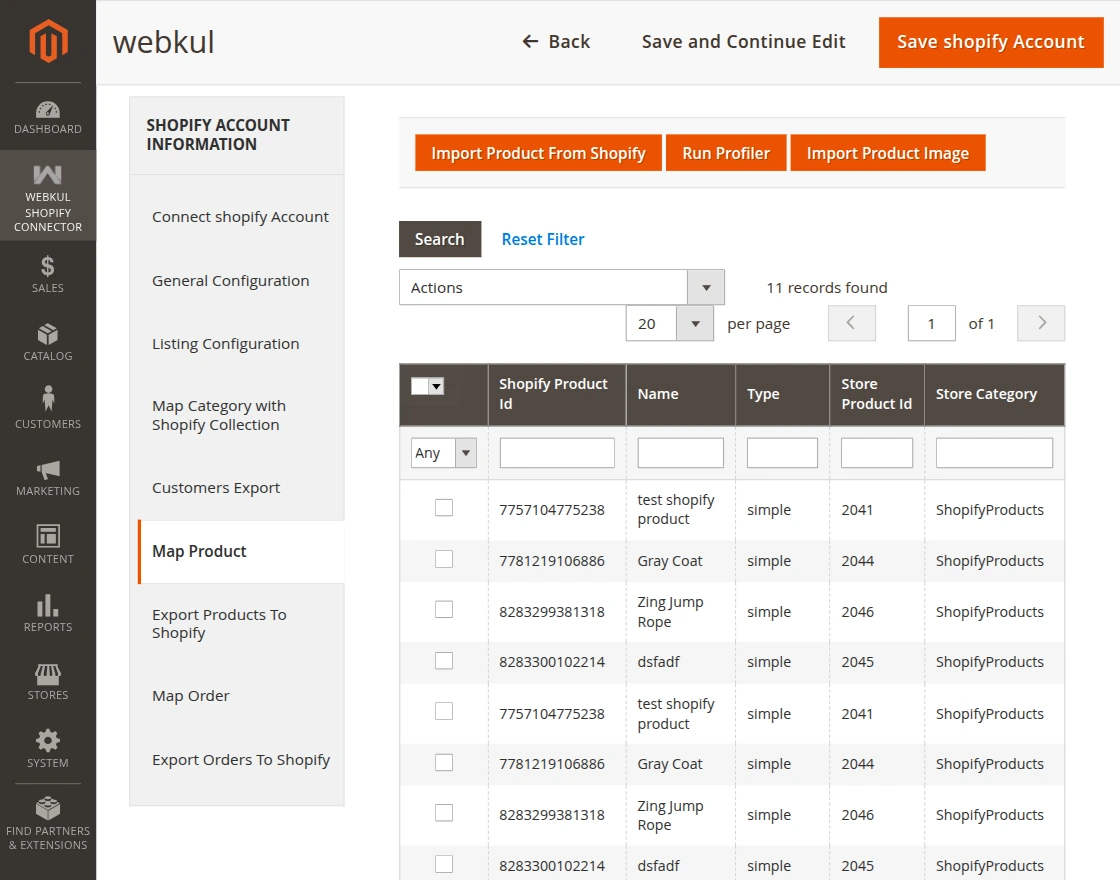
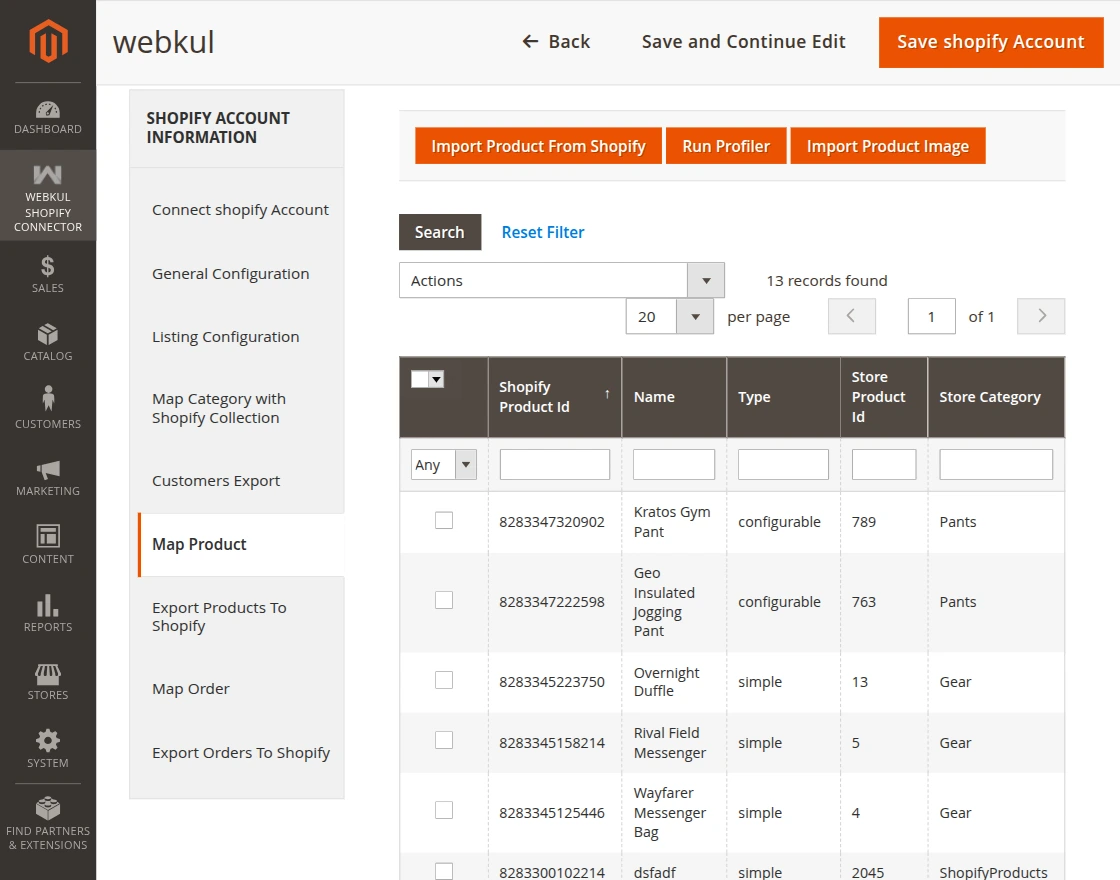
Import Product
The admin can import the desired products from the Shopify store to their Magento store.
To import products from the Shopify store, the admin will click on the Map Product tab as per the image.
Here, the admin will:
Import Product: when clicking on Import Product From Shopify, the temporary product data is created and stored in Magento 2 database.
Run Profile: It is used to create/add the imported products to Magento 2 store.
Clicking the Run Profile tab will initiate the product creation.
Import Product Image: It is used to import the product images from Shopify. Clicking on Import Product Image will initiate the image import.
After successful execution, the admin can check the imported products in the imported product list.
Also, by navigating to the Magento store category as per the category mapping is done for the imported product.
Note:
If category mapping is not done for the Shopify product category, then the imported products will be assigned to the default category as per the configuration.
If the category mapping is done for the Shopify product category, then the imported products will not be assigned to the default category.
The imported products automatically get assigned to the mapped category only.
Configurable Product:
Along with the simple product, the admin can even import the configurable product from the Shopify store.
To import the configurable product successfully, simply follow the import process defined above for simple product import.
After the import, the configurable product will be created in the Magento 2 store as per the below image.
The admin can even check the imported configurable product at the front-end also.
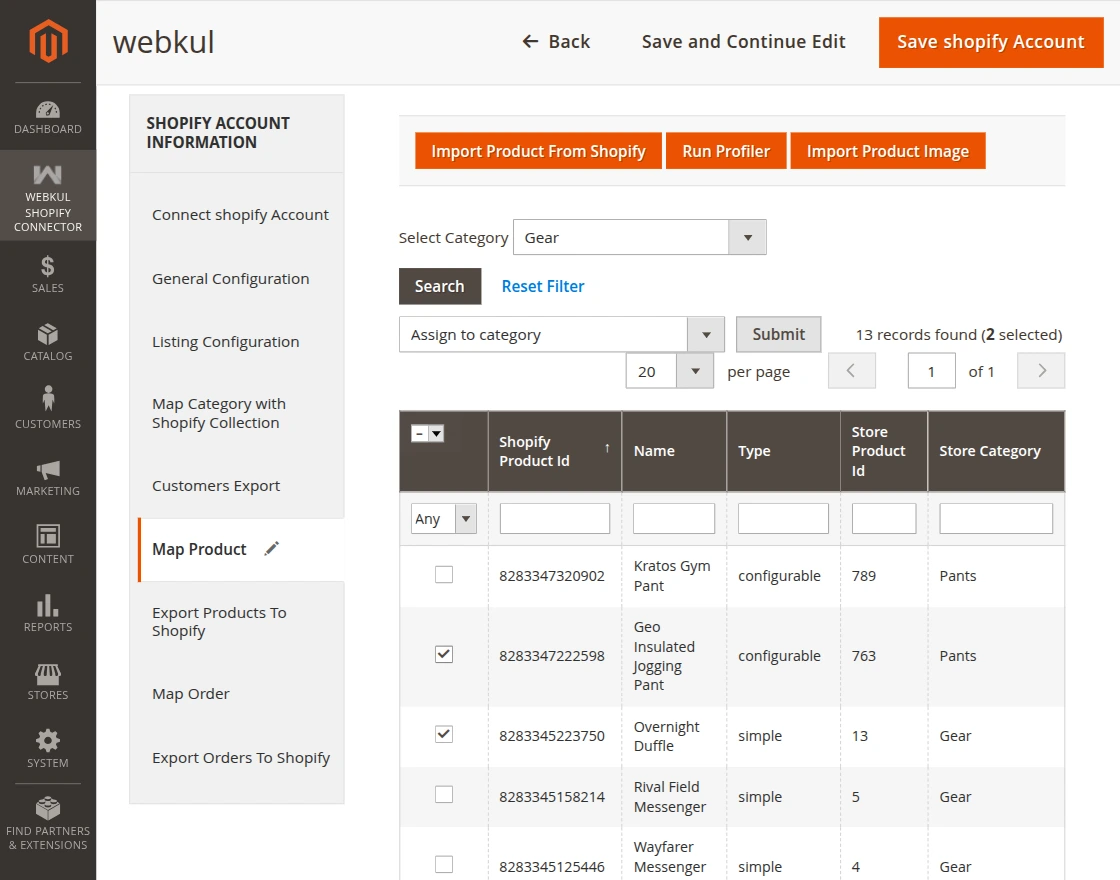
HOW TO CHANGE THE CATEGORY OF THE IMPORTED PRODUCTS?:
The admin can change the category of imported products. For this, the admin will click on Map Product tab as per the image.
To change the category of the imported products, the admin will do the following:
Select one or more than one product from the imported products list.
Select Assign to Category option from the Actions drop-down list. This will display the Category field and Submit button beside the Actions drop-down list.
Select the desired category from the Category drop-down list.
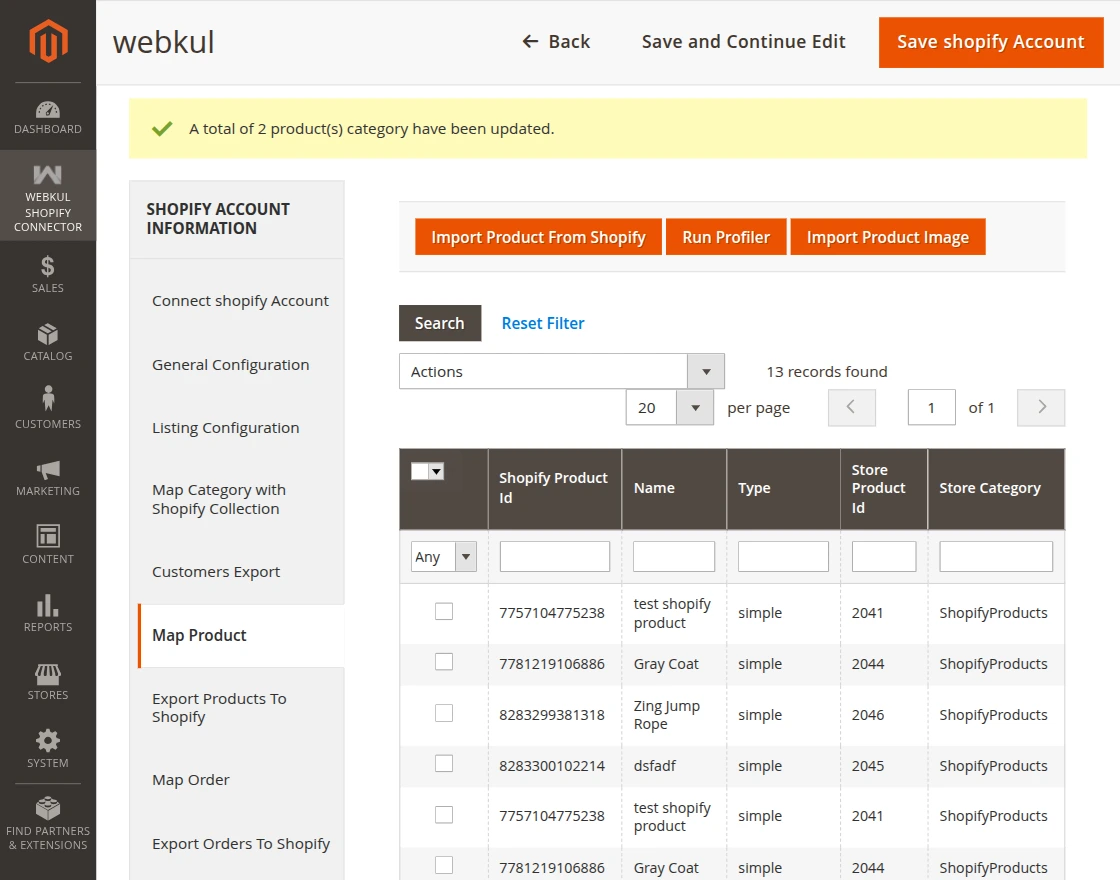
Proceed further by clicking on the Submit button.
Also, the admin can check the newly assigned category of the product by navigating to the category which has been assigned to the product.
NOTE:
The product information like base image, additional images, name, price, SKU, description, quantity, weight and super attributes with options get imported along with the product.
The module import simple and configurable product (product with variants) types.
If importing a product that has no weight then, at Magento end that product will have the default weight 1 after the import.
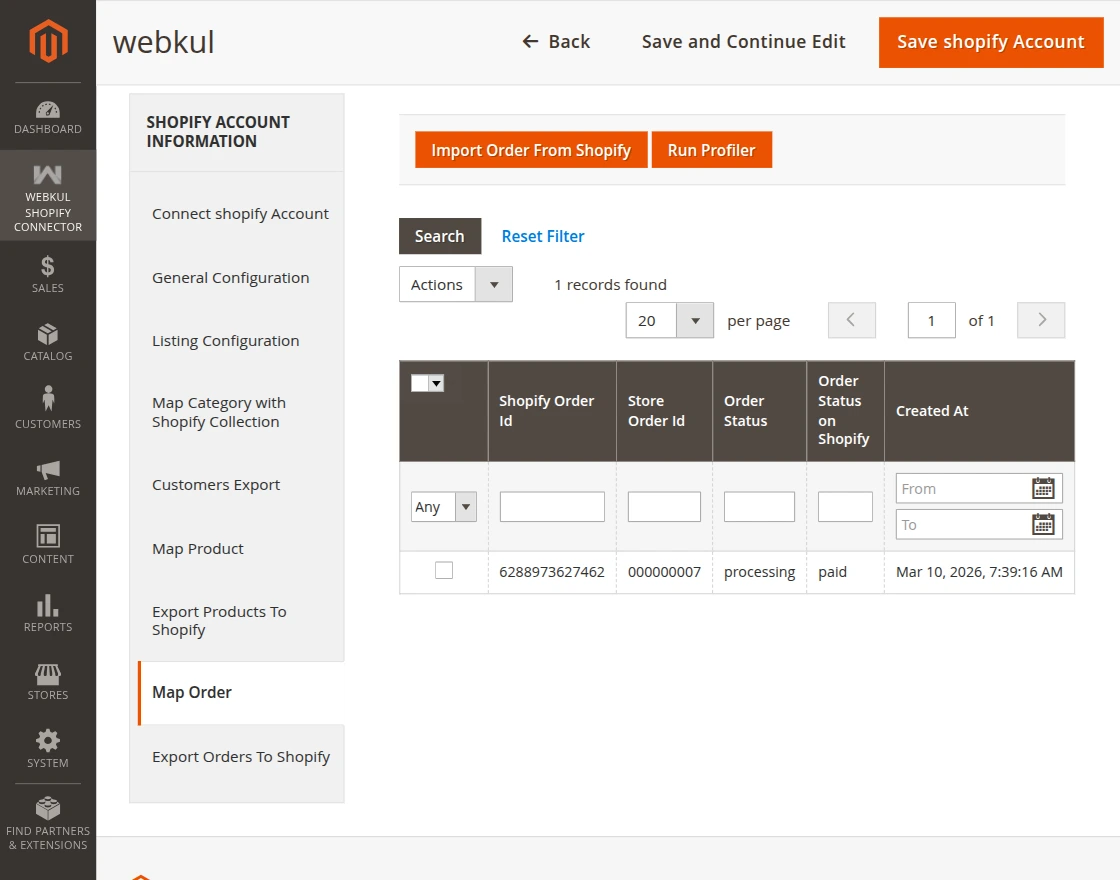
Import Order
To import the orders from the Shopify store, the admin will click on Import Order From Shopify tab as per the image.
Here the admin will:
Import Order From Shopify: when clicking on the “Import Order From Shopify” button, the temporary order data is created and stored in Magento 2 database.
Run Profiler: It is used to create/add the imported orders to Magento 2 store.
Clicking the “Create Imported Order” tab will initiate the Run Profile.
After successful execution, the admin can check the imported orders in the imported order list.
The admin can check the details of imported orders by navigating to the Sales>Orders.
Note –
A cron is set for this module for auto-synchronization of orders.
The admin has to configure the cron on Magento 2 server which will automatically import the orders from Shopify store to Magento 2 store after every one hour by default.
The admin can even change the default cron time.
If you are importing orders using cron and certainorder items do not exist in Magento 2 store. Then, first those items get created automatically in your Magento 2 store.
But if you are importing orders manually then, those products should be imported first.
The admin will not get any Email notifications for any order placed on the Shopify store.
However, the admin needs to check those orders normally by navigating to Sales > Orders after importing them.
If you are importing the Shopify order and that customer doesn’t exist in Magento 2. Then, while order import that Shopify customer gets created in Magento 2 automatically.
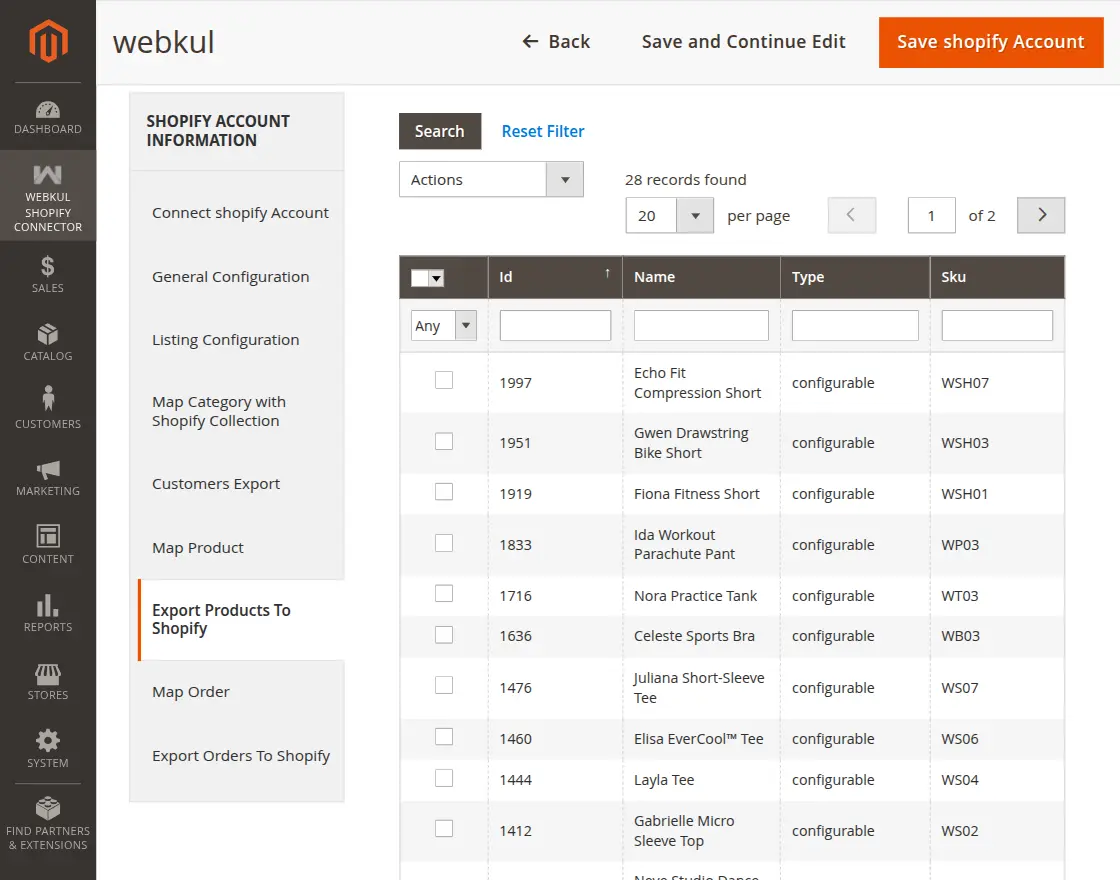
Export Product
The admin can export the desired products from the Magento store to their Shopify store.
To export products from the Magento store, the admin will click on the Export Products To Shopify tab as per the image.
To Export the products to the Shopify store, the admin will:
Select the products which the admin wants to export to the Shopify store.
Then select the “Export to Shopify” option from the “Action” drop-down list.
Proceed further by clicking on the “Submit” button which gets visible when selects the “Export to Shopify” option from the “Action” drop-down list.
This will navigate the admin to the “Run Profile” page as per the image.
Once the execution is completed, the admin can click the “Back” button to navigate back. Then, the admin will go to the Shopify account and navigates to the Selling page.
Note: If category mapping is not done for the Shopify product category, then the products will not be exported.
Configurable Product:
Along with the simple product, the admin can even export the configurable product from the Magento store.
To export the configurable product successfully, simply follow the export process defined above for simple product export.
After the export, the system creates the configurable product in the Shopify store as shown in the image below.
NOTE:
The system exports product information such as the base image, name, price, and quantity along with the product.
The admin can export the simple and configurable products from Magento store to the Shopify Store.
If exporting a product with no description then, at Shopify end that product will have its name as it’s description. Because at Shopify store, one cannot create the product without description.
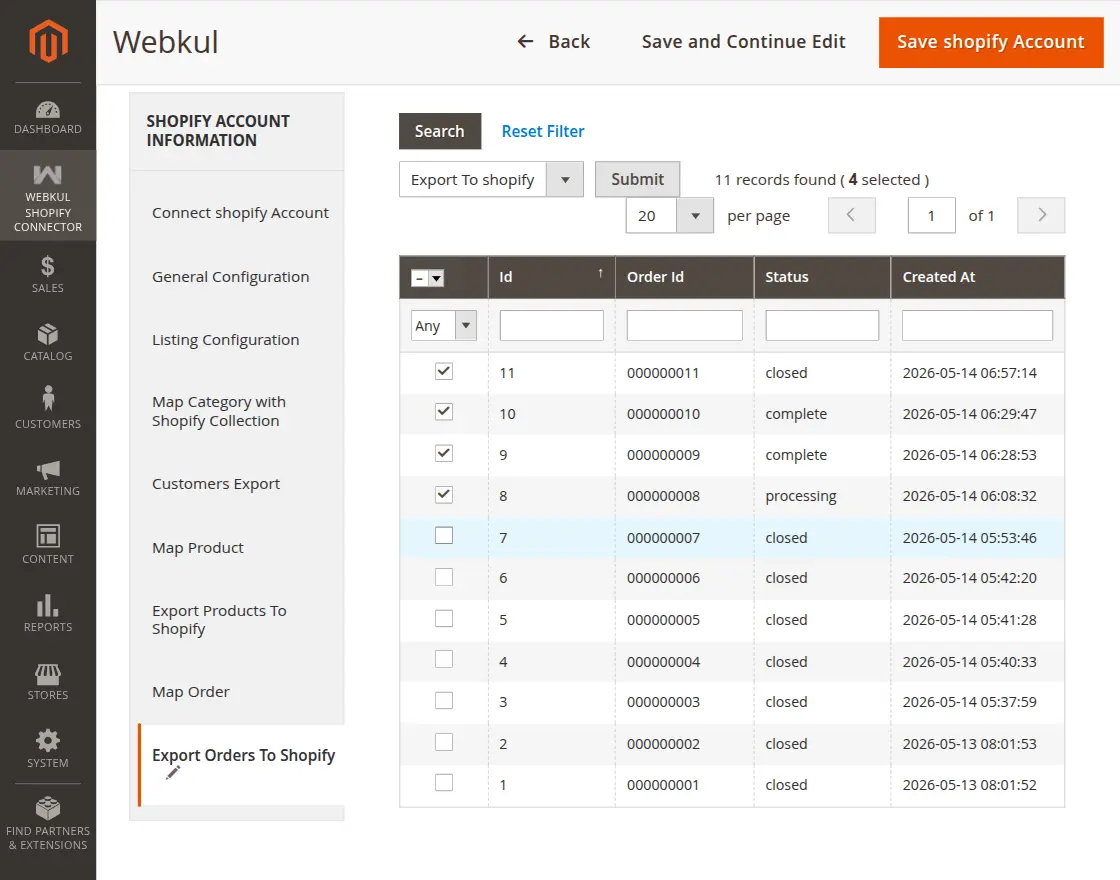
Export Orders To Shopify
The Webkul Shopify Connector allows the admin to export Magento 2 orders directly to Shopify in a few simple steps.
The connector supports exporting different order statuses such as: Complete, Processing, Closed, Pending, Refunded, And other Magento order statuses .
Go to the Webkul Shopify Connector -> Export Orders To Shopify: Select the required orders.
Choose Export To Shopify from the action dropdown.
Click Submit.
After submitting, the selected orders are prepared for export to Shopify.
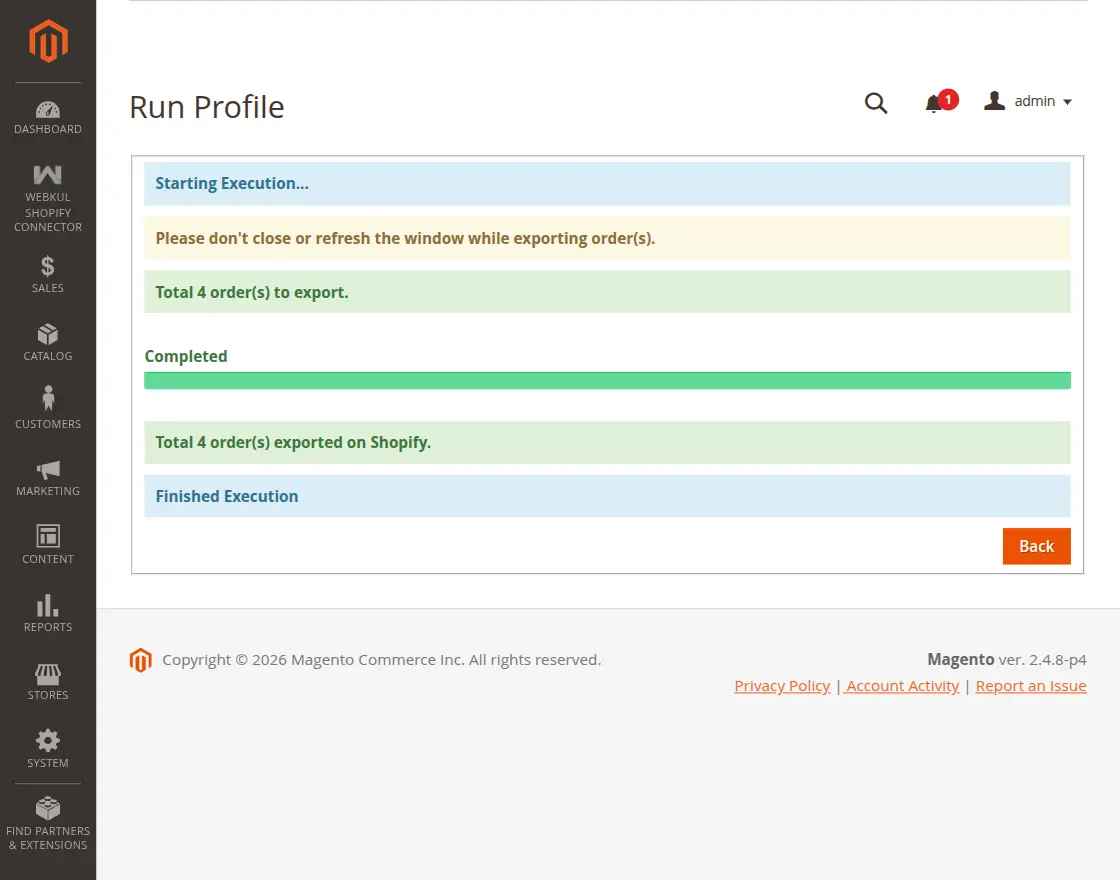
Once the orders are selected, the export profile starts running.
After the process is completed successfully, a confirmation message appears showing that the orders have been exported to Shopify.
View Exported Orders in Shopify
After the export process is completed, the orders become visible in the Shopify admin panel under the Orders section.
The orders are successfully synchronized from Magento 2 to Shopify and are ready for further processing in Shopify.
Templates
This module allows the admin to export the product’s additional information along with the product as per the choice.
For this, the admin needs to create the listing templates by navigating to Webkul Shopify Connector-> Templatesas per the below image.
Clicking on the “Templates” option will navigate the admin to the Shopify Listing Template page as per the below image.
Here, the admin can:
View the complete list of the templates.
Edit or delete the templates.
Add or create an unlimited number of templates.
Create Template: Shopify Template Listing
The admin will navigate to the Shopify Template Listing page when clicks on the Create Template button.
Here, the admin will:
Title- Enter the template name.
Template Content- Define the Template variables.
Status- Can enable or disable a template.
Map the Magento store product attributes to the configured template variables defined in the Template Content field.
Note: Each Variable should be unique within the same template.
When the product get export, the additional details will also get export to the Shopify store as per the below image.
And on the edit product page at Shopify, you can edit the Item Description section.
Price Rule: Update Price Of Synced Products
The admin can easily update the price of the synced products automatically.
For this, the admin needs to create the Price Rules by navigating to Webkul Shopify Connector –> Price Rule as per the below image.
After clicking on Price Rules option, the following page will open showing Price Rules list.
Here, the admin can:
Edit – edit the Price Rule details by clicking on this link.
Delete – remove the existing Price Rule from the list clicking Action drop-down.


Be the first to comment.