PrestaShop Marketplace Seller Central: The module will add a sell button on your site and every seller will now have a separate login page.
Not only this, admin can change the layout of the seller login page as per the requirement and can change the theme for the page.
With the help of this module, you can get more and more sellers to your site as there will be “sell” button on the site which increases the conversion rate of sellers on the site.
Also, an admin can add meta title, meta description, title line, page content and terms and conditions in multi-language as well.
Note: This module has been merged with PrestaShop Advanced Multi-Vendor Marketplace module version 7.0.0 and above. So, if you are using PrestaShop Advanced Multi-Vendor Marketplace module version 7.0.0 or above, then you don’t have to purchase this module separately.
Features
- Separate login page for sellers and the customers
- “Sell” button on the site
- Admin can change the theme for the seller landing page from the different themes provided.
- Admin can change the whole view of the seller login page accordingly.
- Meta title and description available in multi-language
- Admin can add the terms and conditions on the seller login page.
- Multi-language available for Terms and conditions content.
- Title line can be written in multi-language.
- Admin can enable/disable the SEO friendly URL.
- Admin can specify the text for SEO friendly URL.
- Display page content in multi-language.
- Seller can specify the default language for his shop.
- Seller can specify the shop name and address in multi-language.
- PrestaShop Marketplace Seller Central module is multi-shop compatible.
Installation
In order to install the module, you need to install the PrestaShop Advanced Multi-Vendor Marketplace module first.
After installing the marketplace module, you can now proceed to install the PrestaShop Marketplace Seller Central module.
- Firstly, go to the module manager in the back office and click on ‘upload a module’.
- After that, drag and drop the module file or select the file from the system.
- In this way, the module installation will be successful.


Configuring the Module
After the successful installation of the module, an admin needs to configure the module
After successful installation, admin can configure the module for SEO friendly URL.

The URL at the front-end when the SEO friendly URL is active.

The URL at the front-end when the SEO friendly URL is inactive.

Working of the Module
To make a New Seller Request
A sell button would now be available on every page. The seller can create their account using the sell button.

The customer who wants to become a seller can login from sell button. Customers can choose their desired language from here as added by the admin. After clicking on sell button:

Note
- Admin can customize the look and feel of the seller login page from the backend and can also change the theme for the page. Different themes are available on the backend and the admin can choose from the given themes.
- Once the seller registers from the sell button, then the seller will also become a customer. Then the seller would not have to separately register as a customer on the site.
Similarly, the customers registered on the store want to become seller and create the shop. Customer need not to fill the registration from again if they want to register with the same email.
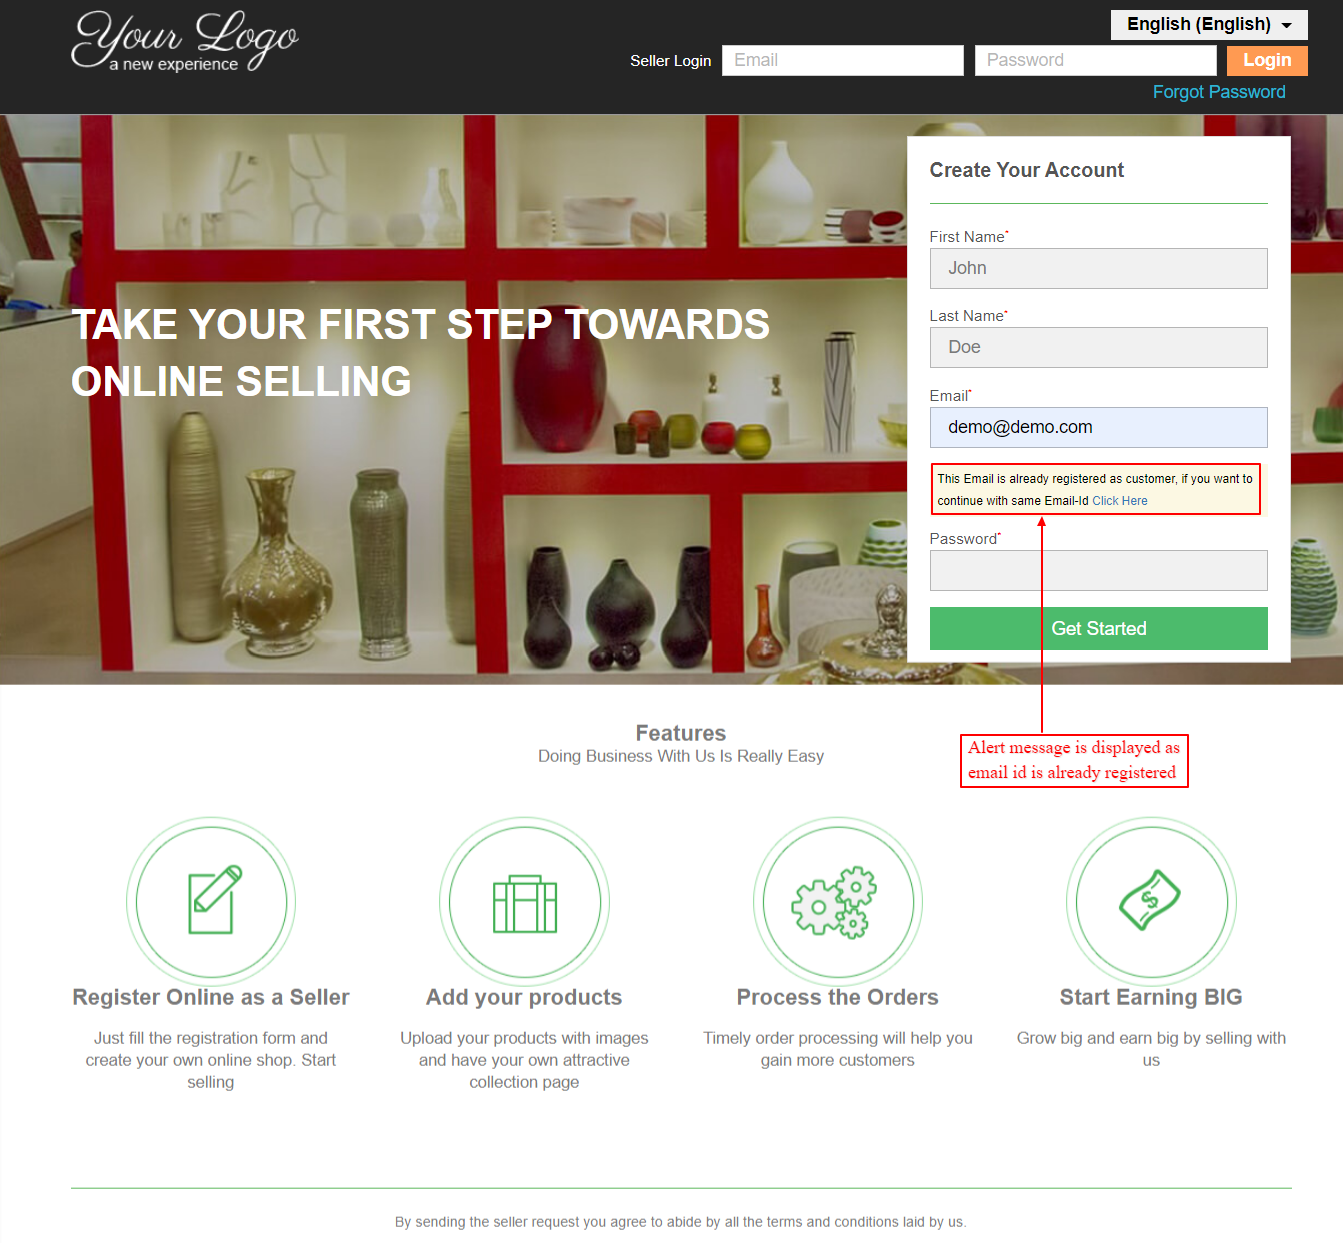
The customer can either change the email or can continue with the “click here” link.
If the customer is not willing to change the email and continues with the same customer email, then customer will get the seller shop form to fill.
Choose to enter the shop name in multiple languages as set by the admin.

Now after filling the shop details form, customer become a seller and can start adding products once the seller request is approved by admin.
The Admin can “Approve” or “Disapprove” the seller request by logging in the backend, under the Marketplace Management -> Manage Seller Profile.
If the admin has configured the module for auto approval, then the admin need not approve each seller request individually.

As soon as the Admin approves the Seller Request, the Seller would get complete access to the marketplace menu and can start uploading the products.
The Marketplace seller dashboard and all the other menus are shown here from the “sell” button:

This way, the customer can register as a seller on the site.
Admin-End
A new menu gets added to the Marketplace Management tab, i.e. Manage Seller Login Page and Seller login theme page.

From Seller Login Theme Page, admin can change the theme for the seller login page.

From the Manage Seller Login Page, admin can easily manage the view and the content of the seller login page.

Understanding the settings of the page.
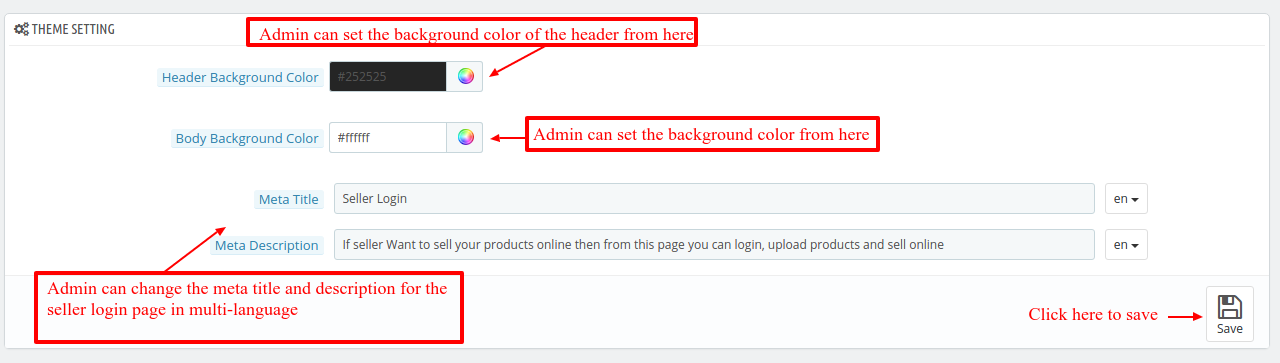
1) Theme Setting – Changing the header and the background color of the seller login page.

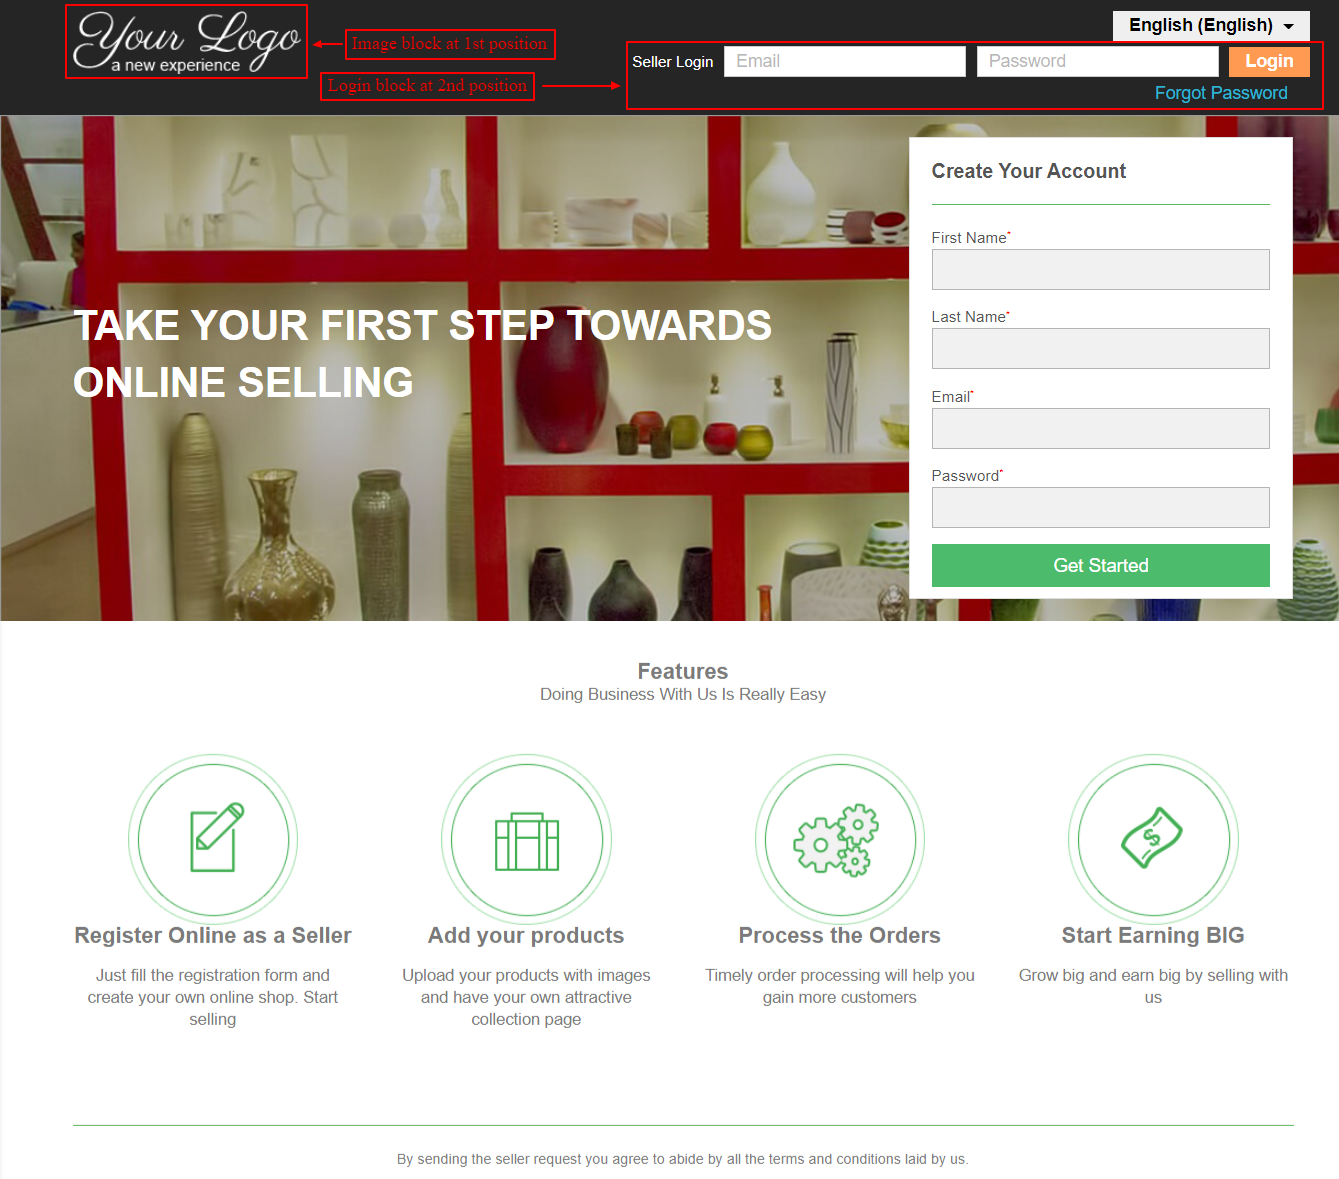
2) Header Block Position – With this admin can change the width and position of the logo and the login fields.

3) Registration Block Configuration – Admin can change the background and the text color of the registration block. Admin can also add title line in multiple languages.


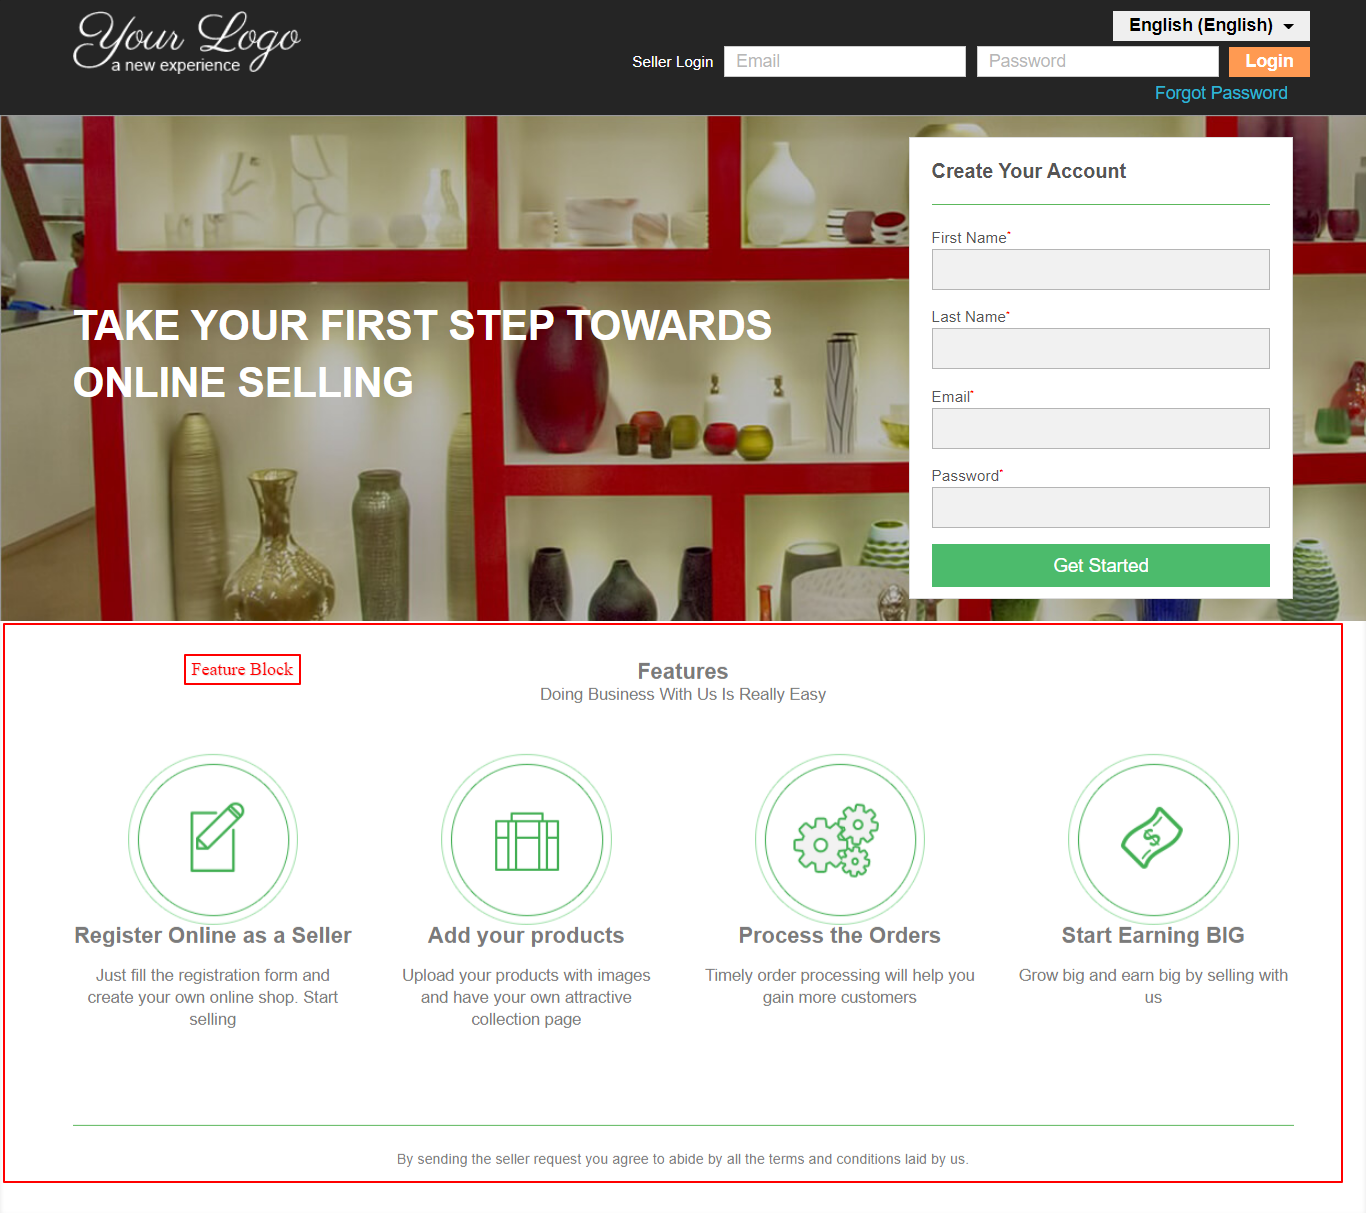
4) Content Block Configuration – Admin can change the position of the content ie, features and the terms & conditions on the seller login page.


5) Feature Block Configuration – Admin can change the content on the seller login page from here. Admin can also enable/disable it from the settings.
Choose to write the page content in multiple languages.

6) Terms and Conditions – Admin’s terms and conditions will be available on the seller registration page. Admin can change the background and the text color.
An admin can change the terms & conditions, in multi-language as well. Also, an admin can enable or disable the terms and conditions.


So, this was all about the PrestaShop Marketplace Seller Central module. I hope this document will help you in checking the functionality of the module in a better way.
Also, do let us know about your views in the comments.
Support
For any kind of technical assistance or query, please raise a ticket at http://webkul.uvdesk.com or send us a mail at [email protected]
Also, please explore our PrestaShop development services & vast range of featureful PrestaShop Addons.
Current Product Version - 5.1.2
Supported Framework Version - 8.x.x, 1.7.x.x

Be the first to comment.