Magento Marketplace Vendor Groups allows admin to categorize seller based upon the defined groups like Gold, Silver, Platinum etc. These Groups will restrict seller to upload a certain amount of product to his account, e.g. it will limit the number of product upload. Admin can restrict seller/vendors based on the group.
This module is an add-on of Marketplace Module. To use this module, you must have installed first Marketplace Module.
Note: For the proper functioning and working of this module the user will have to log into his PayPal account. The user needs to navigate to Account>Profile>Instant Payment Notification Preferences. Click the “Instant Payment Notification Preferences” link as shown below in the snapshot.
The user will be redirected to the Edit Instant Payment Notification(IPN) settings page. Here, the user will enter his module details like this – yourwebsite.com/mppartnergroup/ipn

Features Of Magento Marketplace Vendor Groups
- Admin can define seller to a group.
- By group limitation, the seller will be restricted to product upload.
- Admin driven assignment- the admin can configure the time period and the number of products that seller can upload.
- The admin can enter the default number of products that a seller who has not purchased any membership can add in its store.
- Admin can create Seller Groups like Platinum, Gold, Silver and much more.
- Allow admin to add one-time membership groups and subscription type groups.
- Recurring payment with PayPal Express Checkout is provided for seller’s payment.
- Check can be applied for Products, Time and Time & Product together.
- Admin can also view all the associated recurring profile for any particular Seller Group.
- In the recurring profile, the seller has the option like Cancel, Suspend & Get update.
- Easy and manageable from the usage point of view.
MARKETPLACE MOBILE APP
Mobikul Marketplace: Mobikul Marketplace converts your Magento marketplace store into a mobile app. Your customers can easily purchase products on the go. They don’t need to have a laptop or desktop, they can easily explore your store through their smartphones. It will not only benefit the store owner and customer it will benefit the sellers too. Sellers can see their dashboard, order history and can contact the admin through the mobile app. So what are you waiting for, you must now have a Mobikul marketplace to be a step ahead.
Highlighted Features:
- Seller Profile.
- Seller Dashboard.
- Seller Order History.
- Market Place Landing Page Where Popular sellers and Description about the marketplace is mentioned.
Note: The MOBIKUL Marketplace Mobile app is a different module. You have to install it separately.
Installation Of Magento Marketplace Vendor Groups
The customers will unzip the respective ‘Magento Marketplace Vendor Group’ module zip folder. Here, they will find the app and the skin folder. Now, move that app and skin folder in Magento root directory as per the screenshot.
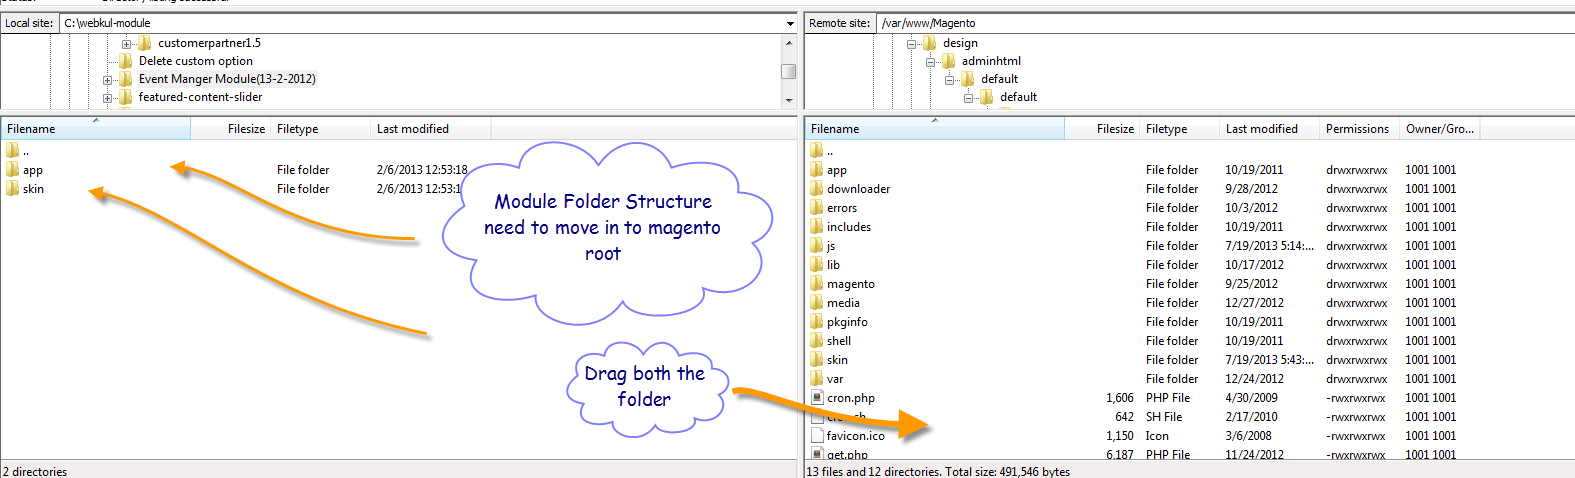
After moving both the folder flush the cache from Magento admin module. Under System > Cache management.

Admin Configuration Of Magento Marketplace Vendor Groups
After the successful installation of the Magento Marketplace Seller Groups module, the admin will be able to configure this module by navigating to System>Configuration>Webkul>Marketplace.
Under ‘Marketplace Partner Group Options’ two fields will be visible, ‘Number Of Products’ and ‘Check On’.

‘Number Of Products’- The admin has to enter the default number of products that a seller can add in its store. This will be the default value for the sellers who have not purchased any membership.
‘Check On’– The admin will select the membership type for the sellers as follows:
- Only Number of Products – If the admin wants to set the restriction for the number of products that a seller can add. Then the admin can select this option.
- Only Time – If the admin wants to set the restriction for the time that the sellers will be able to add an unlimited number of products for the specified time in the group. After the end of subscription, the products will get disabled automatically.
- Time & Number of Products – If this option is selected, then the limitation will apply on both time and number of products.
Now, the admin will configure the payment system associated with the Partner’s group by navigating to System->Configuration->Sales->Payment methods as per the below screen.

Under ‘Marketplace Partner Group Payment’, the admin will:
- enable/disable the Payment Method by either selecting Yes or No.
- select the Sandbox Active as Yes(Testing Mode) or No(Production Mode).
- type the Title name.
- type the Merchant PayPal Id which will be used to send the payouts to the sellers.
- enter the PayPal API User Name, PayPal API Password, PayPal API Signature.
Note – This Payment setting is for the seller for paying the group fee and not for the Magento normal product purchase.
Now, the admin can add/edit group from the admin panel by navigating to Marketplace Management->Manage Partners Group as per the snapshot below.
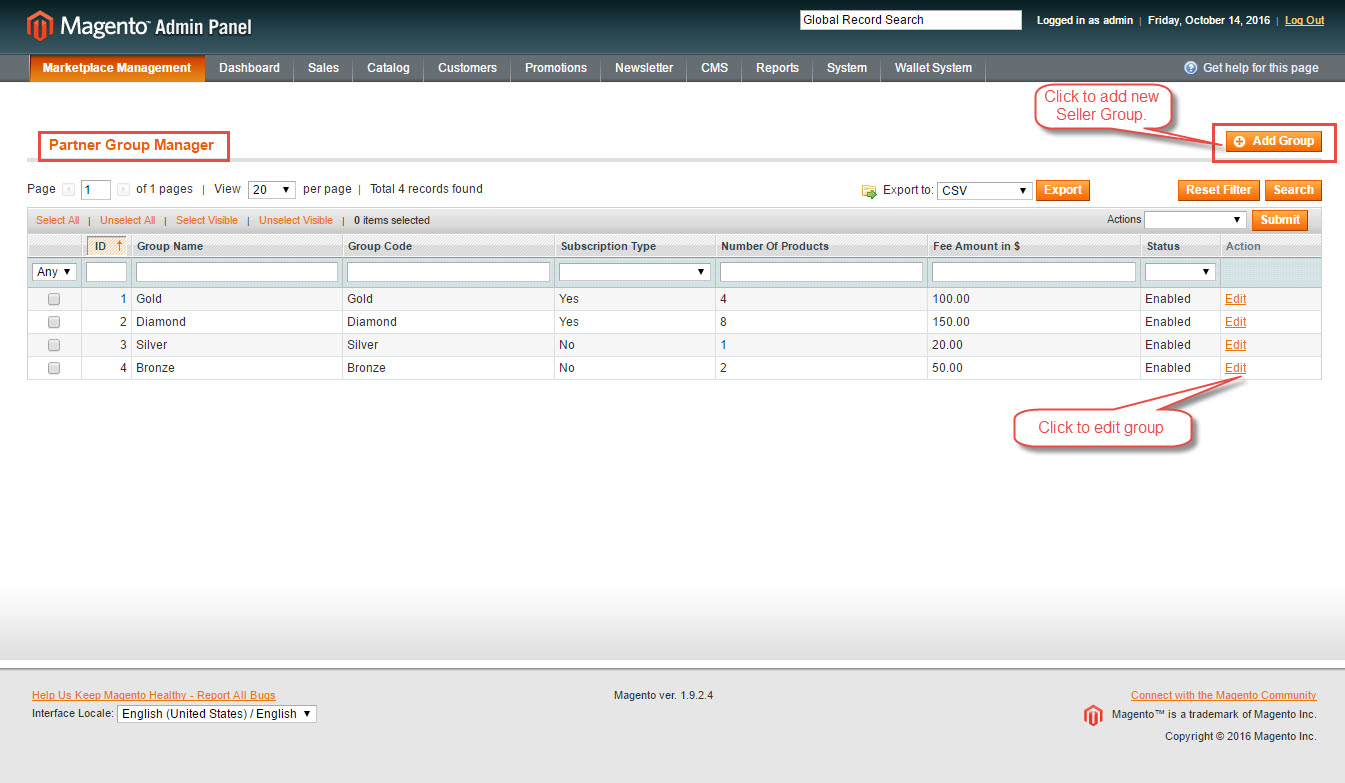
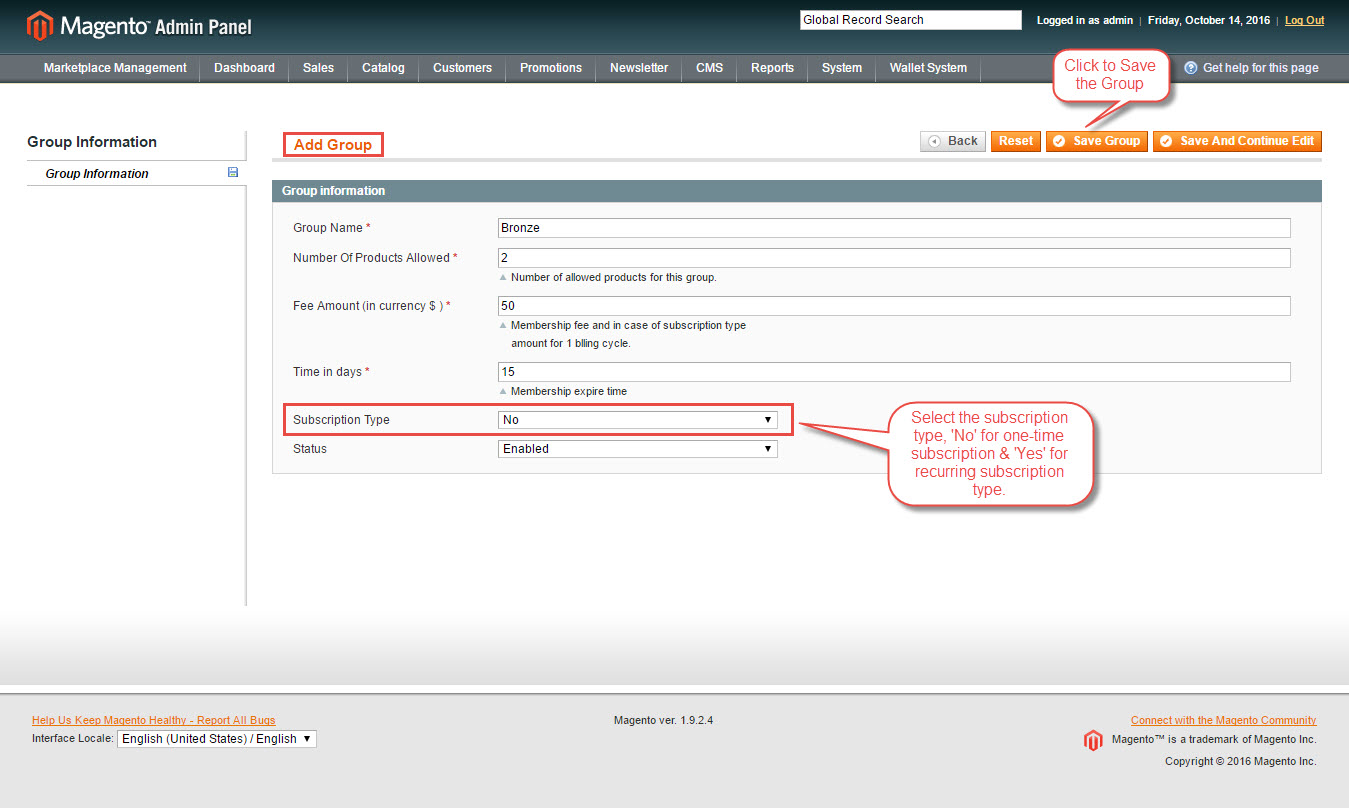
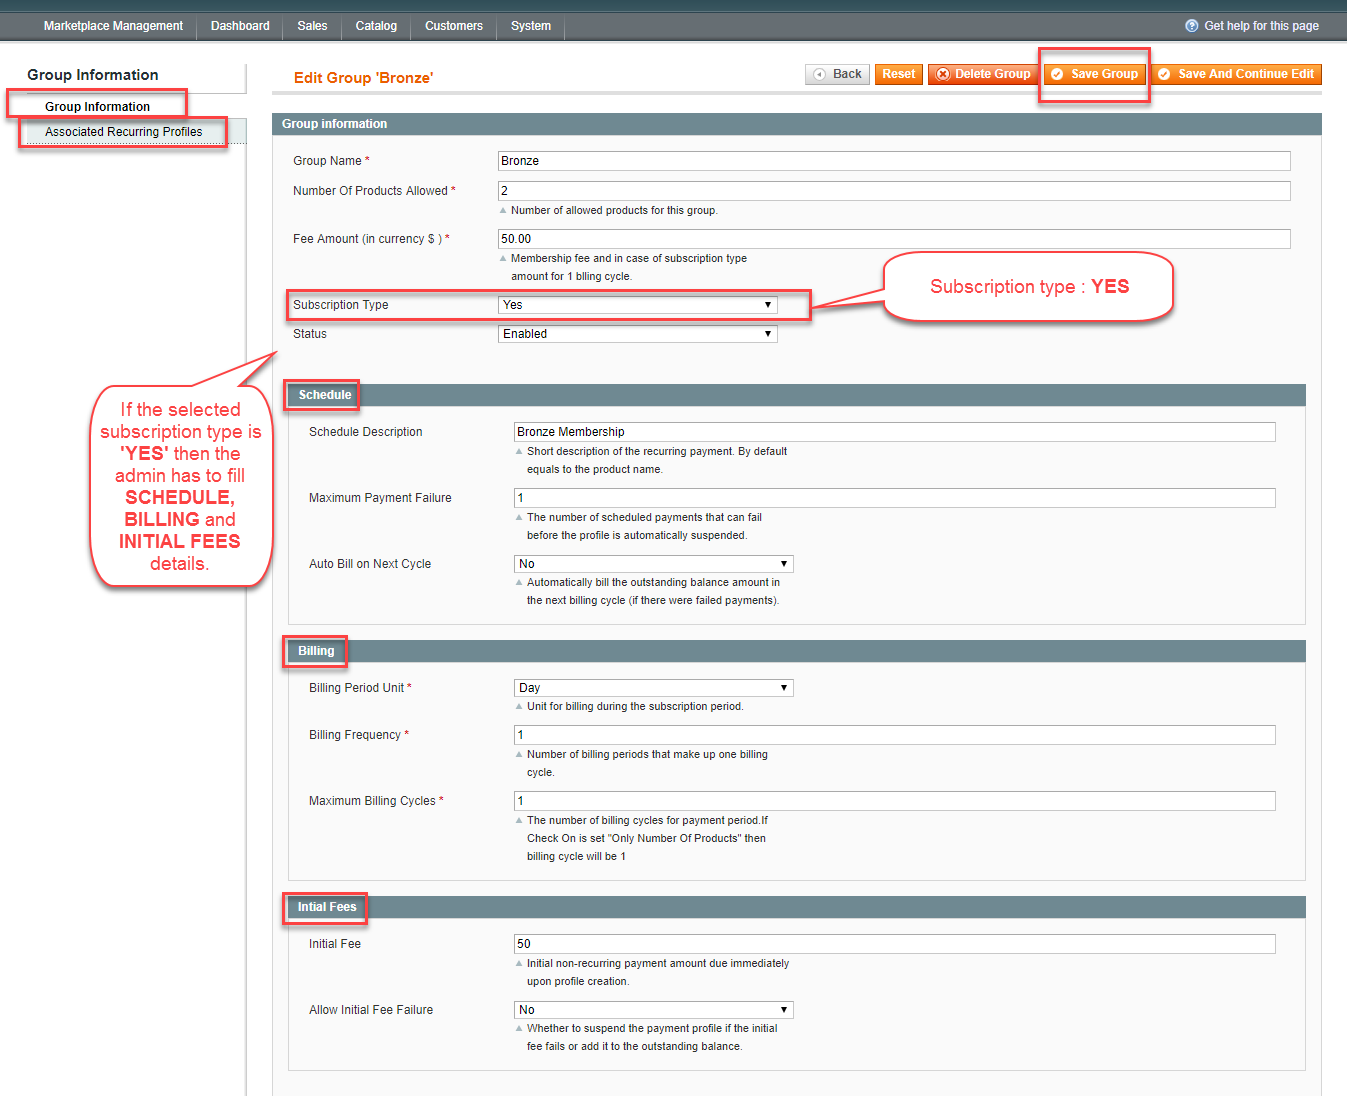
Under this, the admin can add a new group by clicking on ‘Add Group’ link. For this, the admin will enter:
- Group Name – the admin can enter any name he wants to give to a group.
- Number of Products Allowed – set a maximum number of products allowed to upload.
- Fee Amount – set amount for subscribing to this group.
- Time in Days – set the number of days for which sellers can add products.
- Subscription Type – either select Yes or No for setting the membership type.
- Status – set the status of the group as enabled/disabled.
Note: In the Subscription Type, either select ‘No’ for just allowing the seller to one-time subscription or ‘Yes’ for making the group as recurring type subscription membership.
Subscription Type: If selected ‘Yes’, then ‘Schedule’, ‘Billing’ and ‘Initial Fees’ tab becomes visible else not if selected ‘No’.
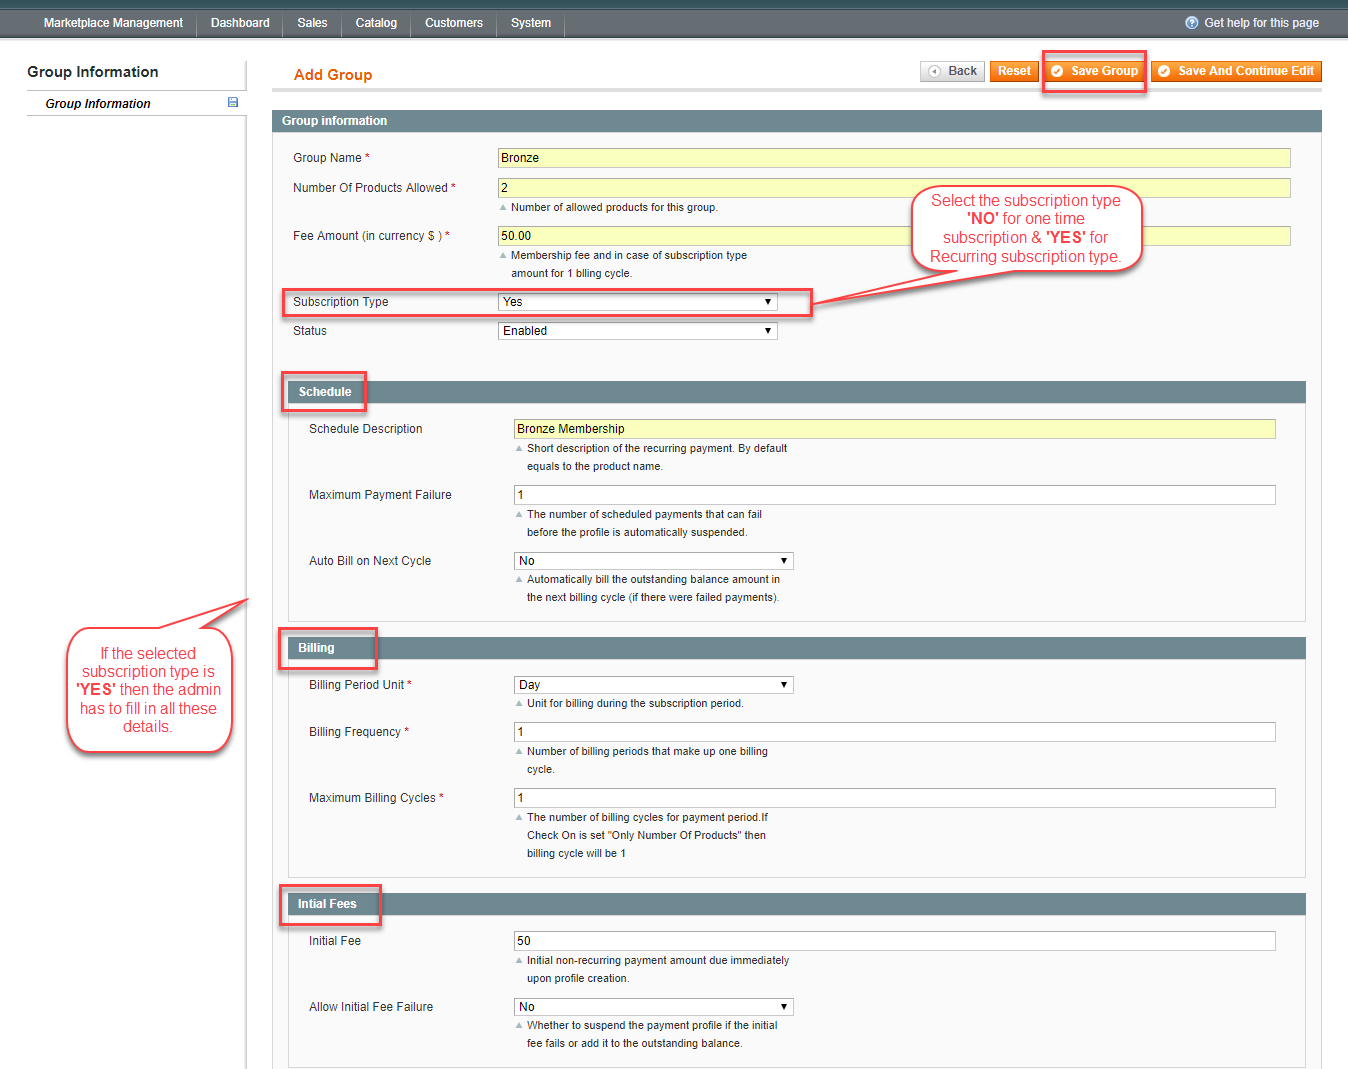
Schedule: In this, the admin will provide:
- Schedule Description : the admin will provide the subscription description in this field.
- Maximum Payment Failure : the admin can set maximum payment failures allowed.
- Auto Bill on Next Cycle : the admin can set whether to generate auto bill on next cycle or not.
Billing : In this, the admin will provide:
- Billing Period Unit : the admin can set billing period as per Day, Month, Year, Week, Semi-month.
- Billing Frequency : the admin can set the number of billing period that will make up one billing cycle.
- Maximum Billing Cycles : the admin can set the number of billing cycles for the payment period.
Suppose, Billing period Unit is Month, Billing Frequency is 2 and Maximum Billing Cycles is 3 so it denotes the customer will be charged every second month up to 3 times (i.e. stop charging after 6 months).
Initial Fees: In this, the admin will provide:
- Initial Fees: the admin can set this one-time payment amount which is to be paid along with first cycle payment.
- Allow Initial Fee Failure: the admin can allow initial fee failure by selecting either Yes or No.
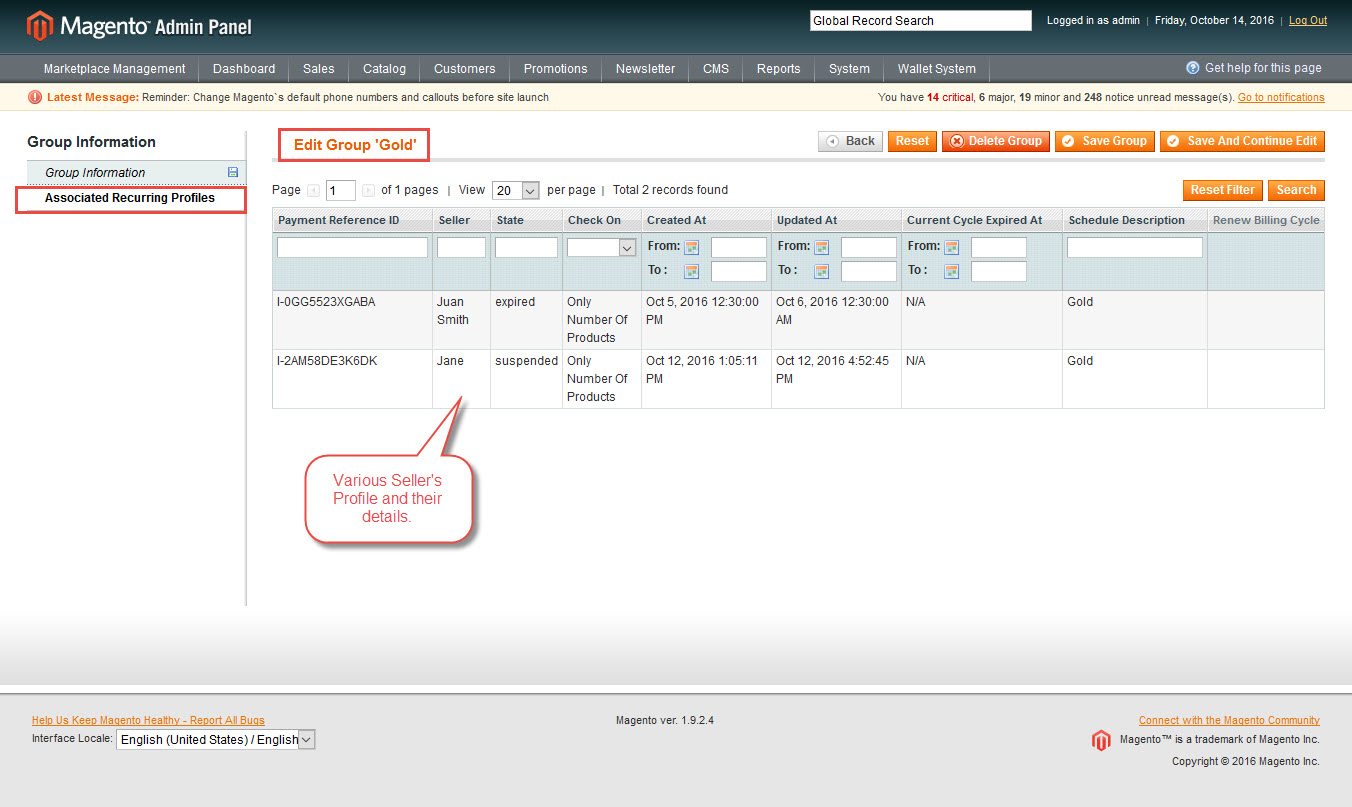
From here admin can edit any existing group by clicking on the ‘Edit’ link. For the groups that have subscription type set as ‘Yes’, there’s another tab ‘Associated Recurring Profiles’ will be visible under Group Information. But for the groups that have subscription type set as ‘No’, this tab will not be visible.
When the admin clicks on ‘Associated Recurring Profiles’, he can view various recurring profiles of the sellers along with their details.
Admin can also assign a group to any seller by navigating to Marketplace Management>Manage Seller. The admin can assign groups only to those sellers with “Group” status “Unassigned”. However, the admin can not change the purchased group of the seller.
The “Assign Group” menu option besides the “Action” menu option will only be visible when the admin first selects the “Assign Group” option from the “Action” drop-down list. Then, the admin can select any group from the “Assign Group” drop-down list and can assign them.

Front-End
The seller can add products to his Products List after logging into his seller account. But if Seller exceeds the default add product quantity limit then, an info message will be displayed on the Dashboard.

To add more product, the seller has to be assigned to a group. For this, the seller will select the “Seller Type” by going to “Pay Group Fee” and select a group as per the below image.

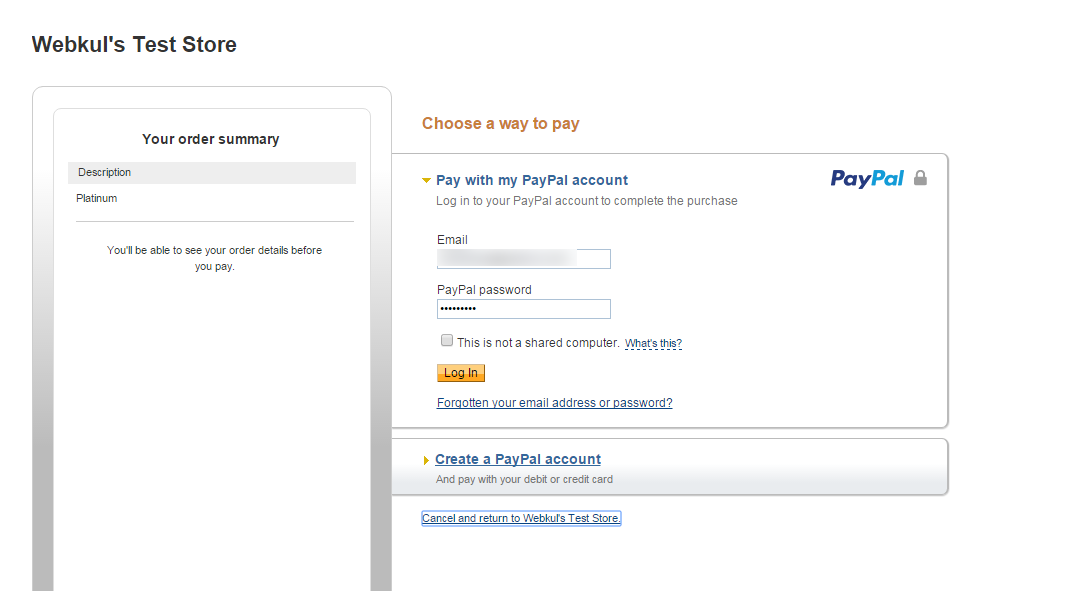
After the selection of “Seller Type Group”, if the selected group is recurring subscription type then the seller will make payment using PayPal from the seller account.

When the seller will click on “Pay” button, the seller will be redirected to the PayPal Account as per the image.
After making the payment, the seller can view the payment information under “Pay Group Fee” tab as per the below image.

Recurring Payment Details:
On clicking on the ‘Payment Reference Id’, Seller can view the recurring payment details like the image below:

Now Seller can add more product to his product list as per the membership group the seller has opted for.
If the seller selects the One-time subscription group type, the seller will be able to purchase the subscription just like he would do for any of the web store products he wants to purchase. The selected Group Type by the seller is ‘One-time subscription’, the seller will proceed to pay the group fee by clicking on ‘Pay’ button. Then, the seller will be directed to the following page as per the screenshot.

Then, the admin will click on ‘Proceed to Checkout’. After this, the seller will enter the ‘Billing Address’ and ‘Payment Information’. The seller can select from various payments methods and can pay subscription fees using any of those.

After making the payment, the seller can view the payment information under “Pay Group Fee” tab as per the below image.

If the seller exceeds either ‘add product limit’, ‘time limit’ or ‘both’ that is allowed for the assigned group then, a message will be displayed as per the below image.

Notes:
- Also, once the seller Membership gets expired, the seller and their products will get disabled. So, the seller needs to be assigned to a group again to add more products.
- The cron will execute at 01:00 am every day. This will “Disable All Products” when the seller membership plan will expires.
That’s all for the Magento Marketplace Vendor Groups still have any issue feel free to add a ticket and let us know your views to make the module better at https://webkul.uvdesk.com/en/
Current Product Version - 0.3.0
Supported Framework Version - 1.6.x.x, 1.7.x.x, 1.8.x.x, 1.9.x.x

4 comments
it depends upon the admin if he put the setting to allow default group to add the product then anyone will be able to do it