Firefox Profile : While installing Firefox, it creates a default profile folder in your local drive that saves info like bookmarks, passwords, user preferences and some other settings. You can have multiple Firefox profiles, each containing a separate set of user information. Lets say there are two users who are using same computer and both wants their own Firefox settings then both users can create & access their own Firefox profile whenever they open Firefox browser.
When Firefox is launched with Selenium WebDriver, certain plug-ins, extensions, bookmarks etc are not available. It opens a blank Firefox browser. Sometimes we need these plug-ins, extensions etc while executing selenium test case.
What is the need of creating custom Firefox profile?
- Many times we require some special settings in Firefox profile just to make test execution more reliable. The most common example is a SSL certificate settings or browser plug-ins that handles self-signed certificates. For these kind of requirements during test execution, we need to create custom profile that can easily handle this requirement & make test execution more reliable.
- Every time if you use different profiles, the SSL certificates you accepted or the plug-ins you installed would be different and that would make the tests behave differently on the machines.
- Always make sure that the profile you have created must be of very lightweight that only includes those plug-ins, extensions, settings which are required in test execution. Whenever selenium starts, a new session is created for Firefox instance that copies the entire profile in some temporary directory and if the profile is big, it makes it slow & unreliable.
Start Profile Manager :
- For windows : Open RUN & Enter “firefox.exe -p”
- For Linux : Open terminal and run the firefox -profilemanager command.
Create Custom Profile in Windows :
- In the Run dialog box, Enter “firefox.exe -p” and then Click OK.

- Click Create Profile button to create your custom profile.

- Now you will get a Create profile wizard, Click Next & proceed further.

- Now enter “New Profile Name” & finish the process.

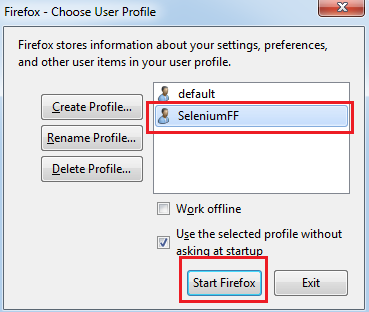
- Your custom profile is now created now. Select the newly created profile & start Firefox.
Access this custom profile in selenium webdriver test script.
There are two methods to call custom firefox profile :
Method 1 : Using webdriver’s Inbuilt class ProfilesIni and Its method getProfile()
ProfilesIni profile = new ProfilesIni();

// Create object for FirefoxProfile
FirefoxProfile FF = profile.getProfile("SeleniumFF");

// Initialize Firefox driver
WebDriver driver = new FirefoxDriver(FF);
Method 2 : Using local path of custom Firefox profile.
// Create object for FirefoxProfile
FirefoxProfile FF = new FirefoxProfile(new File("C:\\Users\\xyz\\AppData\\Roaming\\Mozilla\\Firefox\\Profiles\\jf4mx129.SeleniumFF"));

// Initialize Firefox driver
WebDriver driver = new FirefoxDriver(FF);
Use any of the above method & you are all set to use custom profile in test script.
Happy Testing 🙂

Be the first to comment.