WooCommerce WCFM Marketplace Point of Sale (POS) System lets WCFM vendors sell products in retail stores while syncing orders to their WooCommerce store.
Admins and vendors can set up multiple outlets and add agents to manage sales and customers.
The physical stores will use the WCFM POS system, where vendors can assign staff like agents or cashiers. They can handle sales and assist customers easily at the store.
The WooCommerce WCFM POS system helps improve daily sales by managing both online and physical stores together through a single system.
The WCFM POS interface is built with React to ensure a simple and smooth design.
It gives agents an easy-to-use experience and boosts POS speed for better performance.
Note:
- The WCFM POS system will work with devices having a 1280px screen resolution or above. Currently, we are working on making the POS work with up to 768px screen resolution and above.
- WCFM POS will not work in the Mozilla Firefox private window.
- To use the WooCommerce WCFM Marketplace Point of Sale System module you must have WooCommerce WCFM Marketplace, as well as WooCommerce POS module installed.
- This WCFM Marketplace POS module is now compatible with WooCommerce’s new High-Performance Order Storage (HPOS) feature.
- This plugin currently works with Centralized Inventory.
We provide a production version of the plugin. If you want a development version then you can get it at an additional cost. Please contact [email protected] for it.
Features
- Both admin and WCFM vendors can set up multiple retail outlets linked to their online stores.
- Admin and WCFM vendors can create agents to manage WCFM POS sales and customers.
- Allows WCFM vendors to sell products in retail stores with synced online orders.
- Supports barcode scanning feature to quickly add products to the cart.
- Provides multiple payment options like cash, card, or split payments.
- Offers a cart hold feature for saving and processing orders later.
- Allows custom theme color settings for the WCFM POS interface.
- Enables admins to create personalized invoice templates for the store.
- Provides detailed outlet-wise sales reports for performance tracking.
- Offers advanced order filtration options by outlet for easy management.
- Centralized inventory can be visible in the WCFM Marketplace POS store.
- WCFM POS agents can set the POS screen as a full screen if required.
- Admin or WCFM POS agents can set the unit price.
- Admin and WCFM POS cashiers can print barcode slips.
- Admin can choose the WCFM POS theme in default, dark, or light mode.
- WCFM POS agents can view the cash drawer to see the profit they made in a day or over days.
- WCFM POS agents can add coupons and discounts during checkout.
- WCFM POS agents can sell new or custom products not listed on the website.
- WooCommerce WCFM Marketplace Point of Sale is not multisite compatible.
Installation
The user will get a zip file which he has to upload in the “Add New Plugin” menu option in the WordPress admin panel.
For this login to the WordPress Admin Panel and Under the Dashboard hover your mouse over the “Plugins” menu option which brings out a Sub-Menu and then select the “Add New Plugin” option.

After that, you will see an option on the top of your page that is “Upload Plugin”, click the option to upload the zip file.
After that, click on the “Upload Plugin” option, you will see a button “Choose File” click on the button to browse for the zip file as per the snapshot below.

Therefore, now to browse the file, click the “Install Now” button to install the plugin.
When the plugin is installed correctly, you will see the success message and an option to activate the plugin.

After that, click on “Activate Plugin” to activate the installed plugin.

Thus, in this way, WooCommerce WCFM Marketplace Point of Sale module installation is completed.
Module Activation and Update
Check how to activate your WooCommerce plugin through the purchase code.
Also check how do you get updates on Webkul modules directly on the Plugins page.
Module Translation
To know how to translate the module, you can click here.
Module Configuration of WooCommerce WCFM Marketplace POS
After module installation, admin can see the Point Of Sale menu option to manage the marketplace WCFM POS system as shown below.

Under the Point Of Sale menu option, the admin will have other sub-menu options –
- Users
- Outlets
- Products
- Orders
- Drawer
- Reports
- Invoice Templates
- Settings
WCFM POS Settings – Admin End
Under the WCFM POS Settings section, the admin can set the default settings of the WCFM Marketplace Point of Sale.
For this, the admin will navigate to Point Of Sale -> Setting -> General as shown below.

General Configurations
- API Username and Password: The admin can configure the API username and then the password that will connect the WooCommerce site with the WCFM POS.
- POS Heading Login: This will be visible to the sales agent while logging in to the WCFM POS system.
- Brand name for footer section– The admin can mention the name of the organization for branding purposes which is visible in the footer section of the login page of WCFM POS.
- Brand Link for footer section- The name given in the footer section is linked with a URL redirecting towards the brand detail page.
- Invoice Logo- The admin can add a logo of the organization that shall be visible on the invoice.
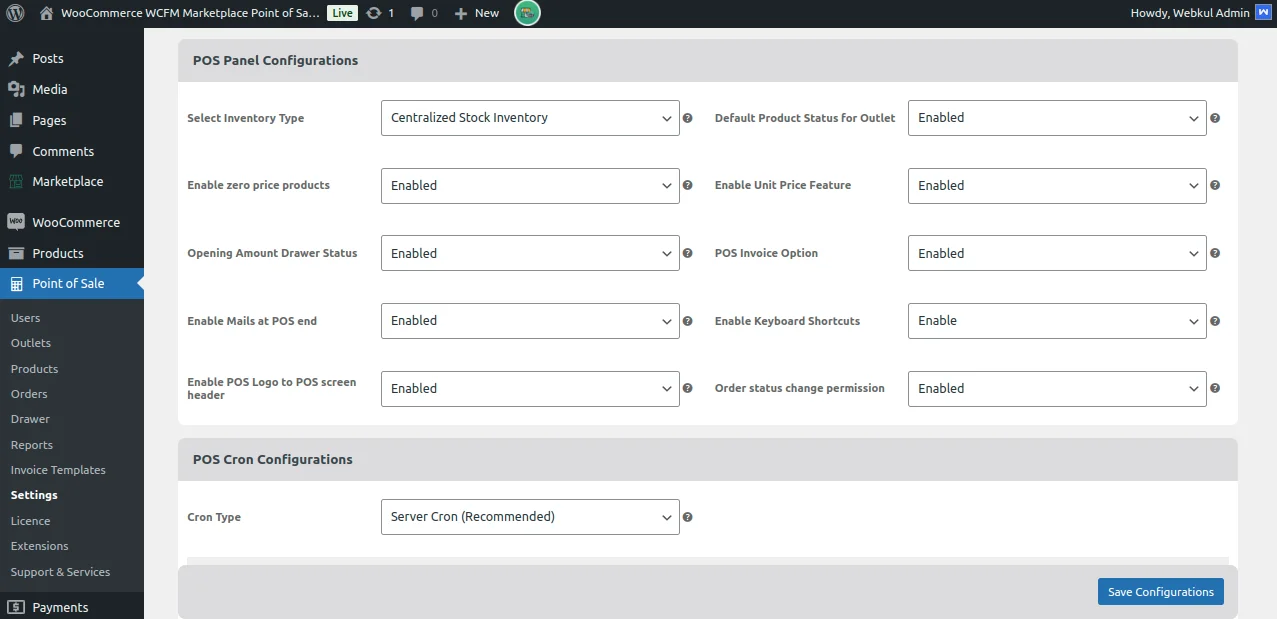
WCFM POS Panel Configurations
- Select Inventory Type: The admin can select from master stock and centralized inventories.
- Enable Zero price products: If this field is enabled, admin can allow the zero-price products to be visible on the POS.
- Opening Amount Drawer Status: When enabled, a popup for opening amount will be displayed to input the opening amount. If disabled, it sets the opening amount to zero(0).
- Enable Mails at WCFM POS: On enabling this field, both the admin and customer will receive emails as the customer places orders.
- Enable POS Logo to POS Screen Header: The admin can add a logo of the organization that will be displayed on the WCFM POS Screen header.
- Default Product Status for Outlet- The admin can enable this field so that all new created products will be in enabled state by default in all outlets.
- Enable Unit Price Feature- The admin set this field as enabled to allow selling of the product according to the weight (if the product has weight) in the outlet.
- WCFM POS Invoice- By enabling this field, the WCFM POS user gets the option to print the invoice through the POS system. Otherwise, they won’t be able to print the invoice.
- Enable Keyboard Shortcuts:- The admin can either enable or disable shortcuts of the keyboard.
- Order Status Change Permission- If enabled, the WCFM POS manager can change the order status.
NOTE- For detailed configuration of our WooCommerce Point of Sale system, you can check the WooCommerce POS Module User Guide.
Manage WCFM POS Outlets – Admin End
The admin can manage the POS outlets by navigating to the WCFM Marketplace Point Of Sale -> Point Of Sale menu as shown below

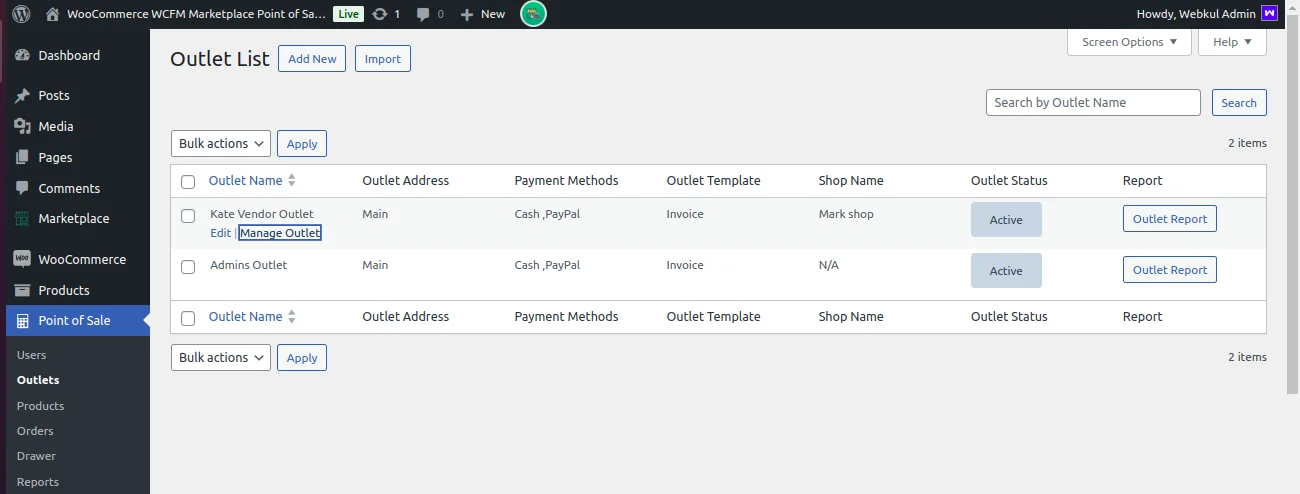
Here, the admin can –
- View the complete list of the existing POS outlets.
- Create new POS outlet stores by clicking the Add New button
- Perform bulk actions like Activate, Deactivate, or Delete the WCFM POS outlets from the Action drop-down list.
- Edit the POS outlet details by clicking the Edit link.
New Outlet Creation – Admin
Clicking the Add New button will navigate the admin to the Add POS Outlet page as shown below:
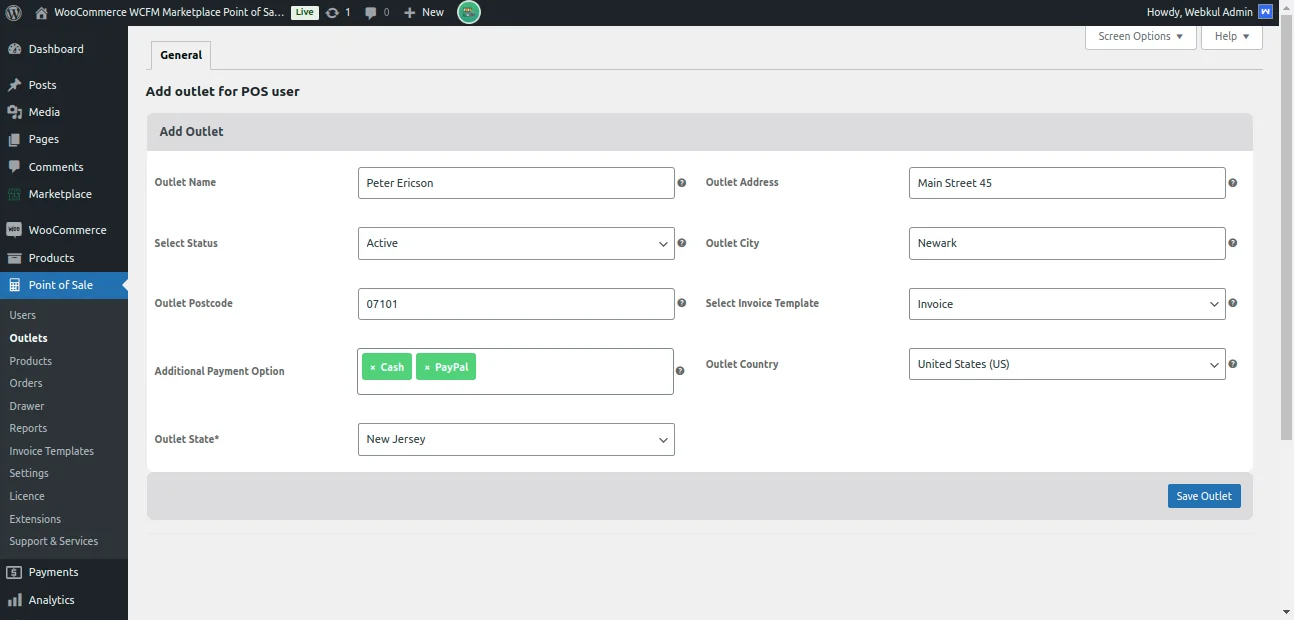
Here, the admin will enter the outlet details such as –
- Outlet Name – Name of the outlet.
- Outlet Address – Address of the outlet.
- Select Status – Status of the outlet.
- Outlet City – City of the outlet.
- Outlet State – State of the outlet.
- Outlet PostCode – Postcode of the outlet.
- Outlet Country – Country of the outlet.
- Additional Payment Option – payment options for the outlet
- Select Invoice Template – template invoice for the outlet
Lastly, hit the Save button to save the outlet configuration successfully.
Assigned Products
To check and assign products in the outlet, the admin needs to click on Manage Outlet.
Further, On the Manage outlet page by clicking on the Manage Products tab, the admin can check the assigned products to that store.

For Assigning Products to the Outlet, the Admin:
- First, select the products from the list.
- After that, hit the Enable from the Action drop-down list then hit the Apply button.
- Once the products are enabled, assign the product stock to the outlet under the column Assigned POS Stock.
Manage WCFM POS Users – Admin End
The admin can manage POS users by navigating through WCFM Marketplace Point Of Sale -> Point Of Sale -> Users as shown below.

Here, the admin can –
- View the complete list of the existing WCFM POS users.
- Create the POS users’ store by clicking the Add New button
- Perform the bulk actions like Activate or Deactivate on the WCFM POS users from the Action drop-down list.
- Edit the POS user’s details by clicking the Edit link.
New POS User Creation – Admin
Clicking the Add New button will navigate the admin to the Add POS User page to add new POS user as shown below:
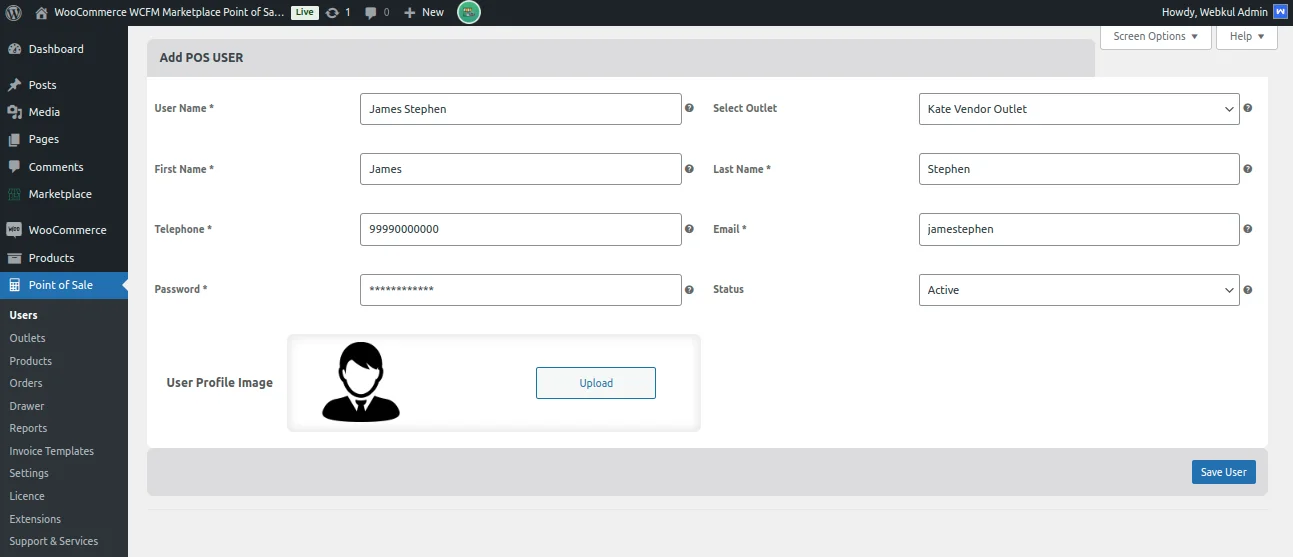
Here, the admin will configure the cashier account information:
- User Name: enter the user name of the POS user account.
- Select Outlet: enter the POS outlet name.
- First Name: enter the first name of the POS user.
- Last Name: enter the last name of the POS user.
- Telephone: enter the telephone details of the user.
- Email: enter the email address of the POS user.
- Password: edit the auto-generated password of the POS user account.
- Status: enable or disable the POS user account.
- Invoice Logo: upload an invoice image of the POS user.
And, lastly hit the Save button to save the outlet configuration successfully.
Thus, in this way the POS user account gets saved.
Note: The admin will manually provide the POS account credentials(username and password) to the POS user.
Manage WCFM POS Products – Admin End
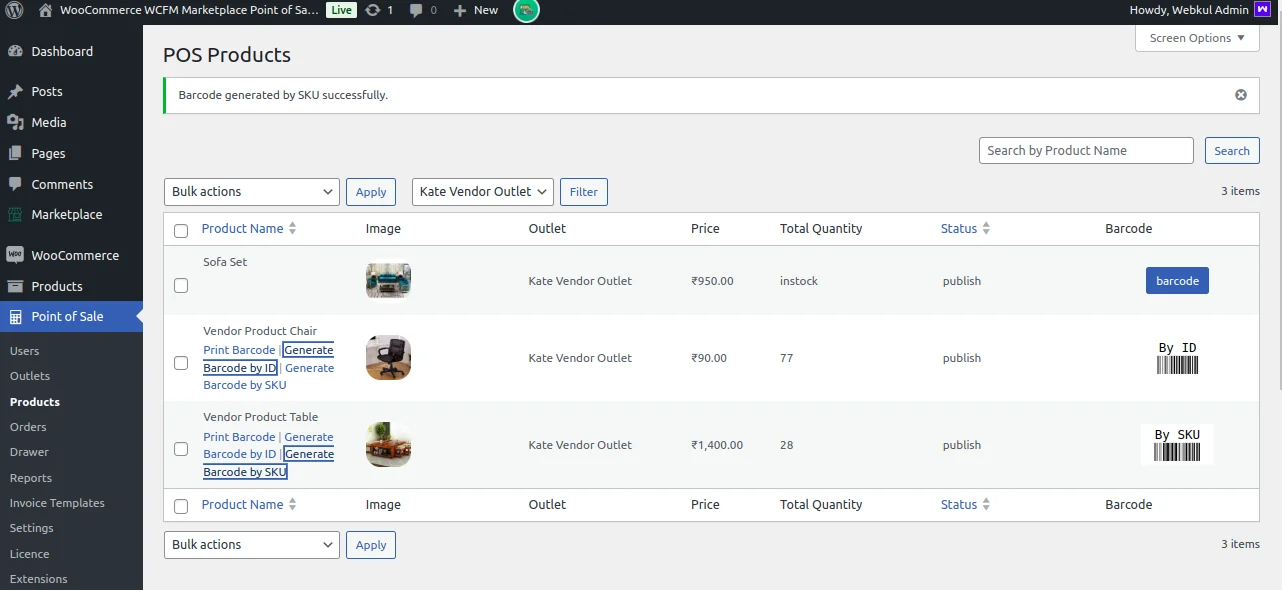
The admin can view and generate a barcode for the WCFM POS products by navigating to WCFM Marketplace Point Of Sale -> Point Of Sale -> Products as shown below.

The generated barcodes for the products are to be used by the WCFM POS agents to add a products to the cart during the check-out process.
To generate the barcode, the admin will select the products for which the admin wants to generate the barcodes.
Further, the admin selects the Generate Barcode by ID/SKU option from the drop-down list and hits the Apply button to generate barcodes.
Admin can also print a barcode for a product in a required quantity by clicking on the Print Barcode link available while hovering over the products.
Admin can also print the barcodes in the required quantity by clicking on the Print Barcode link available while hovering on the products.
Clicking the Print Barcode link displays a popup. Here, the admin needs to add the quantity of the barcode to print.

Manage WCFM POS Orders – Admin End
The admin can view WCFM POS orders by navigating through WCFM Marketplace Point Of Sale -> Point Of Sale -> POS Orders as shown below.

Therefore, the admin can view any order details by simply clicking on the order from the list.
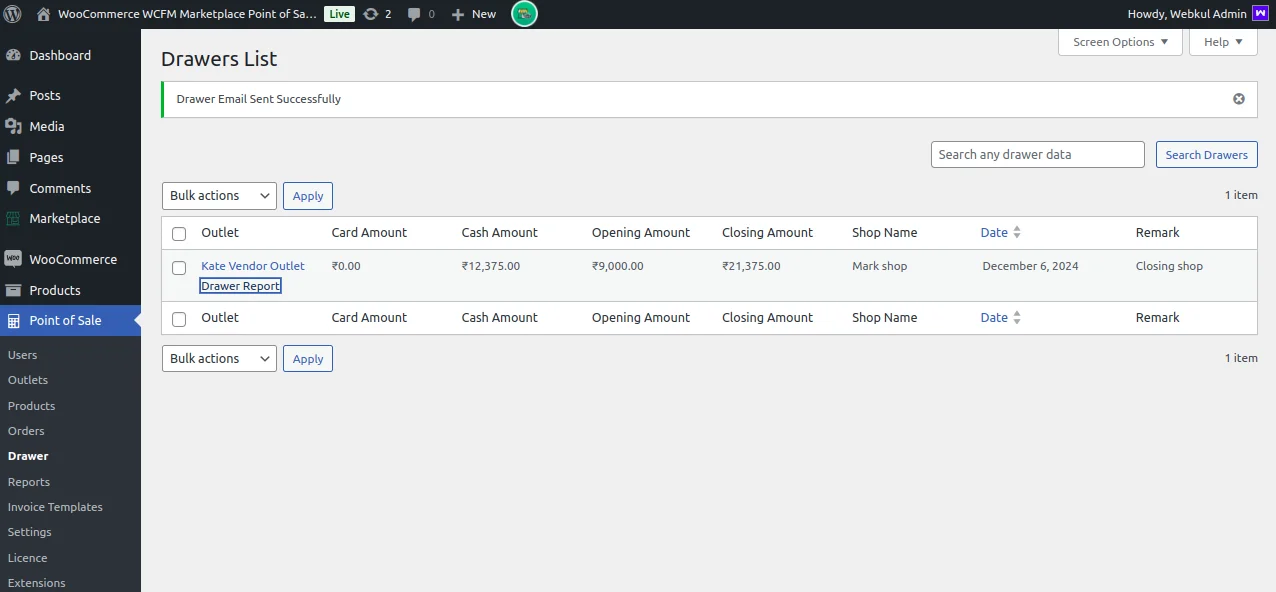
Manage WCFM POS Drawer – Admin End
Admins can view the drawers list for outlets and WCFM POS agents including outlet, card amount, cash amount, opening amount, closing amount, and shop name.
Also, drawer reports can be emailed to the admin by hovering over the outlet name and selecting the “Drawer Report” button.
Manage WCFM POS Outlets – WCFM Seller End
To create a new outlet, the WCFM vendor will need to click the Add New button by navigating to WCFM seller dashboard > POS Outlets
Further he must fill in details such as Outlet Name, Address, Status (set to Active), City, Postcode, Invoice Template, Additional Payment Options, and Country.

After filling up all these required details, the WCFM POS vendor will click on the Submit button to create the outlet.
Hereafter the WCFM vendor will be able to see a list of all the outlets created by the WCFM vendor.

Manage WCFM POS Users – WCFM Seller End
To create a new user, the WCFM vendor will need to click the Add New button by navigating to WCFM seller dashboard > POS Users
Further he must fill in details such as User Name, Select Outlet for user creation, First Name, Last Name, Phone, Email, Status (Active), upload a Profile Picture, and set a Login Password.

After filling up all these required details, the WCFM POS vendor will click on the Submit button to create the user.
Hereafter the WCFM vendor will be able to see a list of all the users created by the WCFM vendor.

Manage WCFM POS Drawer – WCFM Seller End
WCFM vendors can view the drawers list for outlets and WCFM POS agents including outlet, card amount, cash amount, opening amount, closing amount, and remark.
Also, drawer reports can be emailed to WCFM Vendors by clicking on the “Send Mail” button under the actions tab.

Manage WCFM POS Orders – WCFM Seller End
WCFM vendors can view the WCFM POS orders for their respective outlets by navigating to the WCFM seller dashboard > POS Orders

Therefore, the WCFM Vendors get to see the order details for their outlets by simply clicking on the order from the list.
Manage WCFM POS Products – WCFM Seller End
WCFM vendors can view and generate outlet-wise barcodes for their WCFM POS products by navigating to the WCFM seller dashboard > POS Products

The generated barcodes for the products are to be used by the WCFM POS agents to add products to the cart during the check-out process.
To generate the barcode, WCFM Vendor needs to Select the Outlet and Generate Barcode by ID/SKU option from the drop-down list and click on the submit button.
The WCFM Vendors can also print the barcode for the products in the required quantity by clicking on the Print Barcode button.

WCFM Point Of Sale System | Front-End
WCFM POS users can easily log into the WCFM POS frontend using the username (email address) and password created by the admin or WCFM vendor.

After that, the WCFM POS users will be redirected to their WCFM POS agent panel.
WCFM POS Cash Drawer Amount
WCFM POS agents, after logging in to the WCFM POS need to enter some cash drawer amount.
The opening amount for the cash drawer is the set amount required for that particular day.

After that, the WCFM POS user will see his panel where the WCFM POS user can see the products assigned to the outlet.
Furthermore, the WCFM POS users can set the WCFM POS screen as a full screen with the option of full screen present at the top-right corner as per convenience.

Additionally, the WCFM POS user panel also includes a cart section, which displays the products ordered by customers at the outlet.
WCFM POS – Search Products
WCFM POS users can search for products from the search bar and then add the resulting products to the cart as per requirement.
Moreover, the WCFM POS users can also look for the products in their respective categories.

Products added by the WCFM POS agents will be visible in the cart section for the agents to proceed to checkout on behalf of the customers.
WCFM POS System – Order Placement by Agents
WCFM POS users can handle sales activities like adding products to the cart, adding customer details, holding the cart for later, and processing payments.
After adding products to the cart, WCFM POS users can add customer details by clicking the default customer option and following the below-mentioned steps:

Note: The WCFM POS users can search customers by their name or email as well.

WCFM POS users can add a new customer if not listed or select one from the customer list and click the Change Customer button.
Next, the WCFM POS user will proceed with payment by clicking the Pay button or placing the Cart on Hold to process later.
Clicking Pay redirects to the Payment page, where customers can choose Cash Payment or Card Payment.
For cash payments, the customer provides an amount, and the WCFM POS user refunds the balance if needed.

Finally, hit the Confirm Payment & Generate Invoice button to complete the payment successfully.

WCFM POS users can even print the invoice for the order and then continue further with other orders.
If customers choose to pay by card, the total order amount will be deducted directly from their card using the Other Payment method.
Note: WCFM POS users can offer a split payment option, allowing customers to divide the payment between cash payment and card payment.
WCFM POS System – Apply Coupon
The WCFM POS users can apply available coupons to WCFM POS orders by clicking the Apply Coupon button to provide a discount.
Clicking the Coupon button will display a pop-up for coupon code in the WCFM POS agent panel.

After applying the coupon, WCFM POS users will see a “Coupon Applied Successfully” pop-up and the applied coupon in the cart.
WCFM POS System – Apply Discount
The WCFM POS users can apply the discount to the cart item in two ways –
- Percentage-Wise
- Flat Discount
To apply a discount, WCFM POS users can click the Discount button in the cart.
Percentage-Wise Discount
By clicking the Discount option, WCFM POS users can access the Apply Discount To Sale tab.
Here, they can select the % icon to calculate the discount as a percentage of the cart total.

Flat Discount
WCFM POS users can select the currency icon in the Apply Discount pop-up to apply a flat rate discount to the cart products.

WCFM POS System – Sale History
The WCFM POS users can view all recorded sales by navigating to WCFM POS > Order > Sale History.

Here, the WCFM POS users can –
- View the complete list of the orders placed.
- View the details of any order from the sales order list.
- Search the order from the Search Order By ID panel at the top.
- Print the invoice of the order by clicking the Print Invoice button.
- Send order details through the mail by clicking the Send order email.
WCFM POS System – POS Settings
The WCFM POS users can navigate to WCFM POS > Settings to edit settings for the account and WCFM POS settings as shown below:

Account Settings
Here, the WCFM POS user will –
- First Name – enter the first name of the POS user.
- Last Name – enter the second name of the POS user.
- Email – enter the email address.
- Previous Password – enter the previously saved password of the POS account.
- New Password – enter the new password for the POS account.
- Confirm Password – reenter the new password of the POS account to confirm it.
- Change Profile Image – Upload an image to change the profile image.
Finally, click the Update Account button to save the configuration for the WCFM POS system. In the Other Settings tab, the WCFM POS user can adjust additional settings as shown.
Here, the WCFM POS users can choose the invoice page size from the options under Select Invoice Page Size.

There are some shortcut keys available to access the WCFM POS panel under the KeyBoard Shortcut are shown below –

Thus, that’s all for the WooCommerce WCFM Marketplace POS module. Still, have any issues, feel free to add a ticket and let us know your views at webkul.uvdesk.com.
Check more such kinds of relevant WooCommerce Plugins.
Current Product Version - 1.0.0
Supported Framework Version - WordPress: 6.7.1 WooCommerce: 9.4.3 WooCommerce Point Of Sale: 6.1.0

Be the first to comment.