Quickbooks is an accounting software. Using this software, one can track and manage sales and business transactions and that’s why we have integrated QuickBook Connector in default WooCommerce.
There are two versions available i.e. QuickBooks Online and QuickBooks Desktop.
Using the WooCommerce QuickBook Connector, the admin will be able to sync the WooCommerce store orders on QuickBooks.
QuickBooks syncs all order-related information, including the customer’s name, email address, items ordered, and billing address.
This will also synchronize the customers who have placed the orders. It also syncs the products associated with the placed orders.
WooCommerce QuickBook Connector module will streamline and manage account information.
Please Note –
- You need to create API credentials – OAuth Consumer Key, OAuth Token Secret, and OAuth Consumer Secret.
- The WooCommerce QuickBook Connector module supports QuickBooks Online.
- This plugin is now compatible with WooCommerce’s latest High-Performance Order Storage (HPOS) and Cart and Checkout block.
Watch the video to understand the extension workflow:-
Features
- Automatic synchronization of the WooCommerce store orders to Quickbooks on a real-time basis.
- The admin can export and import customers.
- The admin can also export and import the products.
- Select one of the options from – Sales Receipt, Invoice, Estimate, or Credit Memo to map the orders in QuickBooks.
- Sync customer details like name, email, company name, phone number, billing & shipping address.
- Real-time syncing of product details like name, SKU, price, stock, and active/inactive status.
- The synced order information includes customer details, product information, payment method, shipping method, WooCommerce order ID, and taxes.
- WooCommerce QuickBook Connector module will sync the orders of registered customers only.
- Auto Inventory management with real-time two-way synchronization.
Installation
The user will get a zip file that he has to upload in the “Add New” menu option in the WordPress admin panel.
For this login to WordPress Admin Panel and Under the Dashboard hover your mouse over the “Plugins” menu option which brings out a Sub-Menu and then select the “Add New” option.

After this, you will see an option on the top of your page that is “Upload Plugin”, click the option to upload the zip file.

Once clicking on the “Upload Plugin” option, below that you will see a button “Choose File” click on the button to browse for the zip file as per the snapshot below.

After browsing the file, click the “Install Now” button to install the plugin as per the snapshot.

Once the plugin installs successfully, a confirmation message will appear along with an option to activate it. Click on “Activate Plugin” to activate the installed plugin.

Note: Check out how to Activate WooCommerce Plugin through the purchase code and get updates on Webkul Modules directly on the Plugins page.
How to get QuickBooks API Credentials – OAuth2
For OAuth2:
1. To get the Client Id and Client Secret for the OAuth2 authentication navigate to https://developer.intuit.com/.
Now, create a new account even if you already have an account by clicking the SignUp button.

2. Now, enter the details required for registration and then click the “Create Account” option on the registration page.

3. Verification of Phone number through OTP.

4. After verification, QuickBooks will create your account. Then, you will see a page with options to choose between “QuickBooks Online and Payments” or “QBMS Legacy.”
Tap the option – Select APIs.

5. Now, click on the QuickBooks online and payment and enter the name of the app and select a scope of it.
6. If you are using the application in the sandbox mode then you can make use of the Development keys. If you are using the application in the Live mode then you can make use of the Production keys.

7. Now, go to the “Keys & OAuth” menu option to find your – Client ID and Client Secret. Copy these keys to the module configuration part in the admin panel while using the OAuth2.

Note: You must set the redirect URL. To set the redirect URL click the Add URL link, enter the redirect URL, and click the save button after that.
As shown below, example.com is your site URL.

8. The Webhooks setting must be configured in QuickBooks to enable real-time synchronization between the WooCommerce store and QuickBooks. The Endpoint URL needs to be entered.
If example.com is your site URL, Add the endpoint URL as –
https://example.com/?wk_woo_quickbook=update

We can configure the notification options to update under Event Triggers for ‘item‘ entity on different actions such as Create, Delete, Merge, and update.

Module Configuration
Before using the WooCommerce QuickBook Connector, the admin must first connect QuickBooks with WooCommerce and then proceed with configuration settings.
Note- Refer to the Connection & Configuration sections below for complete setup details.
Connection
This section is for setting up a secure connection between WooCommerce and QuickBooks.
Enter the required API credentials to authenticate QuickBooks and enable data sync.
Once connected, orders, customers, and products will sync as per the configured settings. (Refer to the image below.)
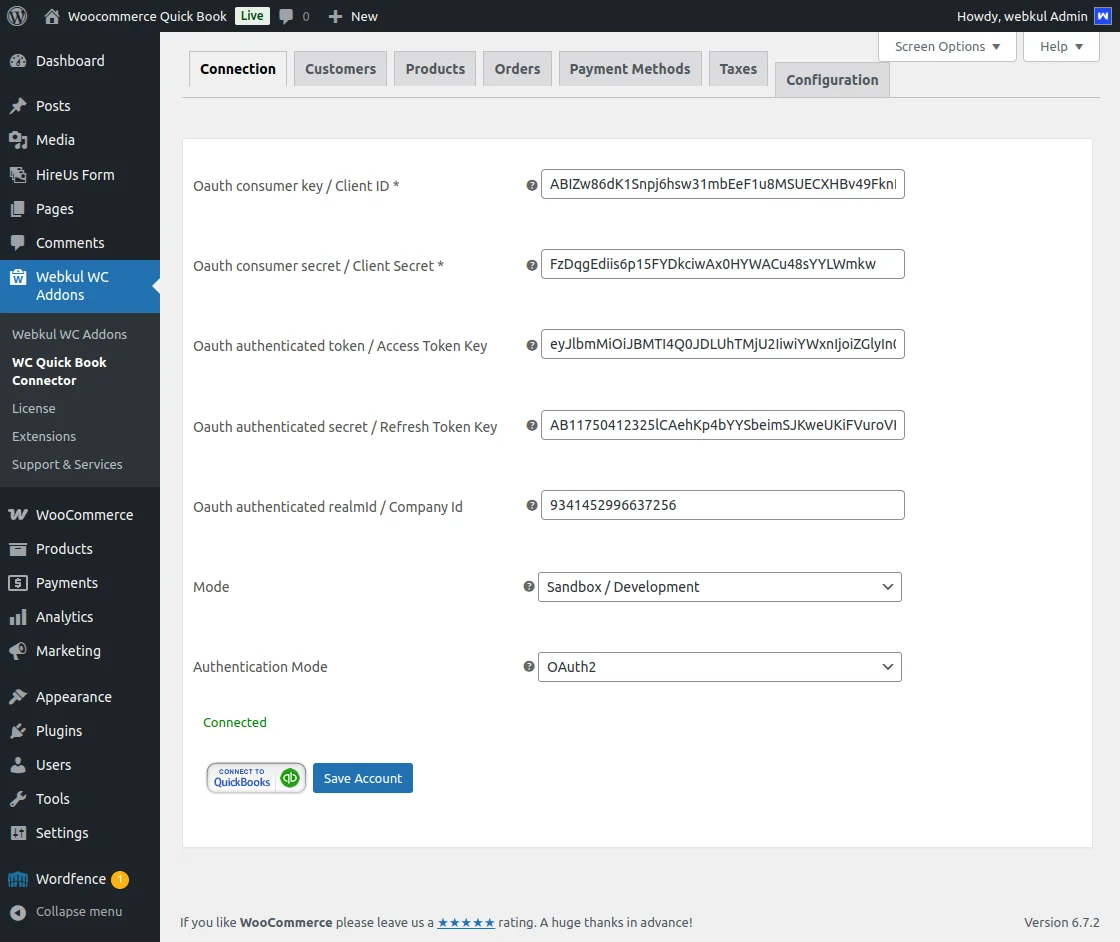
- OAuth Consumer Key / Client ID – Enter the Client ID from your QuickBooks developer account.
- OAuth Consumer Secret / Client Secret – Provide the Client Secret linked to your QuickBooks app.
- OAuth Authenticated Token / Access Token Key – This token allows WooCommerce to sync with QuickBooks.
- OAuth Authenticated Secret / Refresh Token Key – Used to refresh the access token after expiration.
- OAuth Authenticated RealmId / Company ID – Enter the unique Company ID assigned by QuickBooks.
- Mode (Sandbox / Development) – Choose Sandbox for testing or Development for live use.
- Authentication Mode (OAuth2) – Defines the method used to authorize WooCommerce with QuickBooks.
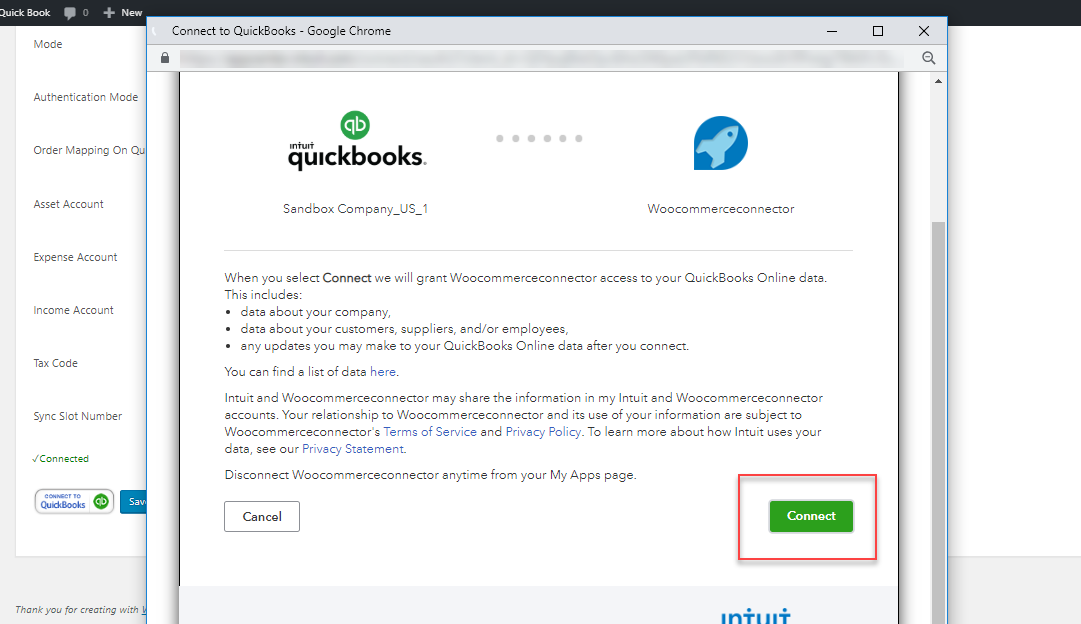
Connect To QuickBooks
Tap the Connect to QuickBooks button at the bottom. A pop-up window will appear, prompting the admin to log in to their QuickBooks account.

After logging in, select the company to connect with and click Connect.

Confirm the connection by clicking Connect again.
Once connected successfully, the admin will be redirected to the WooCommerce QuickBook Connector module configuration settings.
Refresh the page, and the connection status will update to Connected & Authorized, as shown below.
OAuth Authenticated Credentials
After connecting WooCommerce with QuickBooks successfully, the following credentials will be auto-fetched from QuickBooks:
- Token / Access Token Key – Auto-filled after a successful connection.
- Secret / Refresh Token Key – Auto-filled for authentication renewal.
- Realm ID / Company ID – Auto-filled with the connected QuickBooks company ID.
Configuration
After establishing the connection, configure how WooCommerce and QuickBooks will sync data. This section allows you to enable auto-sync, adjust general settings, and set order export preferences.
Auto Sync
To access the ‘Add Sync’ section, navigate through Configuration > Autosync in the menu.
The Auto Sync section lets you automate real-time data synchronization between WooCommerce and QuickBooks.
You can enable or disable sync options and select categories for product syncing. (Refer to the image below.)
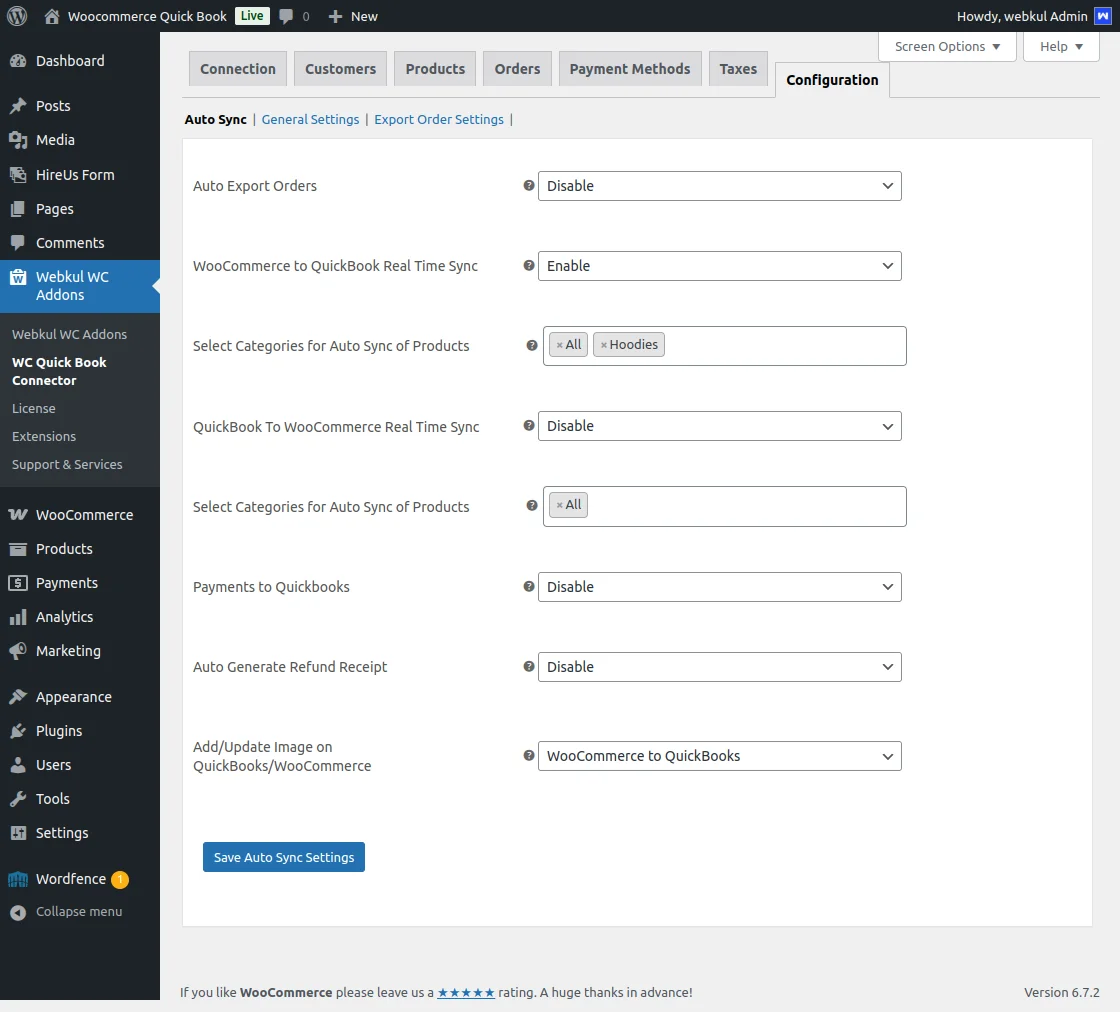
- Auto Export Order – Enable to automatically export WooCommerce orders to QuickBooks, or disable to manage them manually.
- WooCommerce to QuickBooks Real-Time Sync – Enable to sync WooCommerce data instantly with QuickBooks.
- Select Categories for Auto-Sync of Products – Choose specific WooCommerce product categories to sync with QuickBooks.
- QuickBooks to WooCommerce Real-Time Sync – Enable to sync QuickBooks data instantly with WooCommerce.
- Select Categories for Auto-Sync of Products – Choose QuickBooks product categories to sync with WooCommerce.
- Payments to QuickBooks – Enable to automatically sync WooCommerce payments with QuickBooks.
- Auto Generate Refund Receipt – Enable to create refund receipts automatically in QuickBooks.
- Add/Update Image on QuickBooks/WooCommerce – Choose whether to sync product images from WooCommerce to QuickBooks.
General Settings
To access the ‘General Settings’ section, navigate through Configuration > General Settings in the menu.
The General Settings section allows you to configure default account mappings between WooCommerce and QuickBooks.
Here, you can set asset, expense, income, and tax-related preferences for seamless data synchronization. (Refer to the image below.)
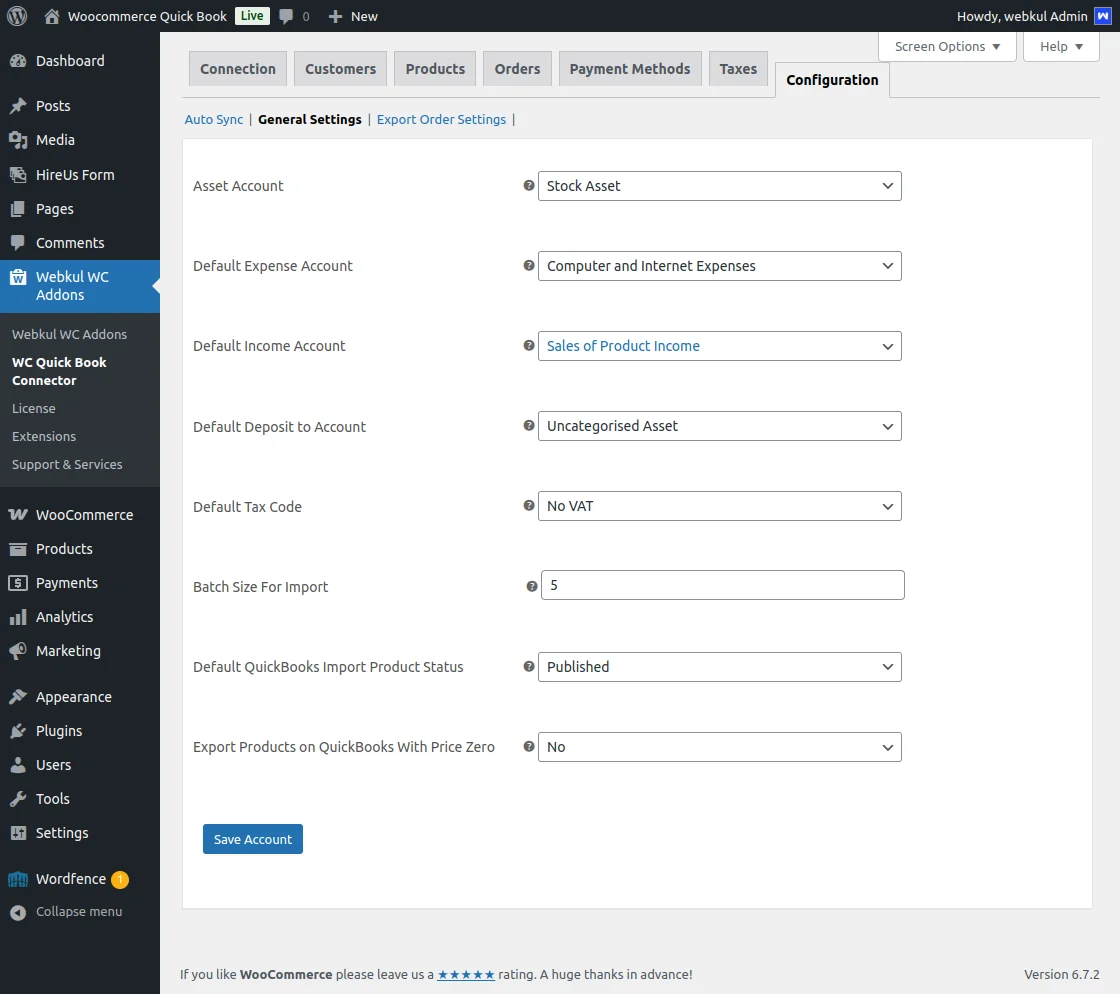
- Asset Account – Select the QuickBooks asset account where synced product inventory will be recorded.
- Default Expense Account – Choose the expense account for tracking costs related to product purchases.
- Default Income Account – Select the income account where revenue from WooCommerce sales will be recorded.
- Default Deposit to Account – Choose the account where received payments will be deposited in QuickBooks.
- Default Tax Code – Select the applicable tax code for transactions synced to QuickBooks.
- Batch Size for Import – Define how many records will be imported in a single batch for efficient data processing.
- Default QuickBooks Import Product Status – Set the default status for imported products (e.g., Published).
- Export Products on QuickBooks with Price Zero – Choose whether products with zero pricing should be exported.
Export Order Settings
To access the ‘Export Order Settings’ section, navigate through Configuration > Export Order Settings in the menu.
The Export Order Settings section lets you define how WooCommerce orders will be exported to QuickBooks.
You can choose export formats, configure order details, and map data fields for a seamless sync. (Refer to the image below.)
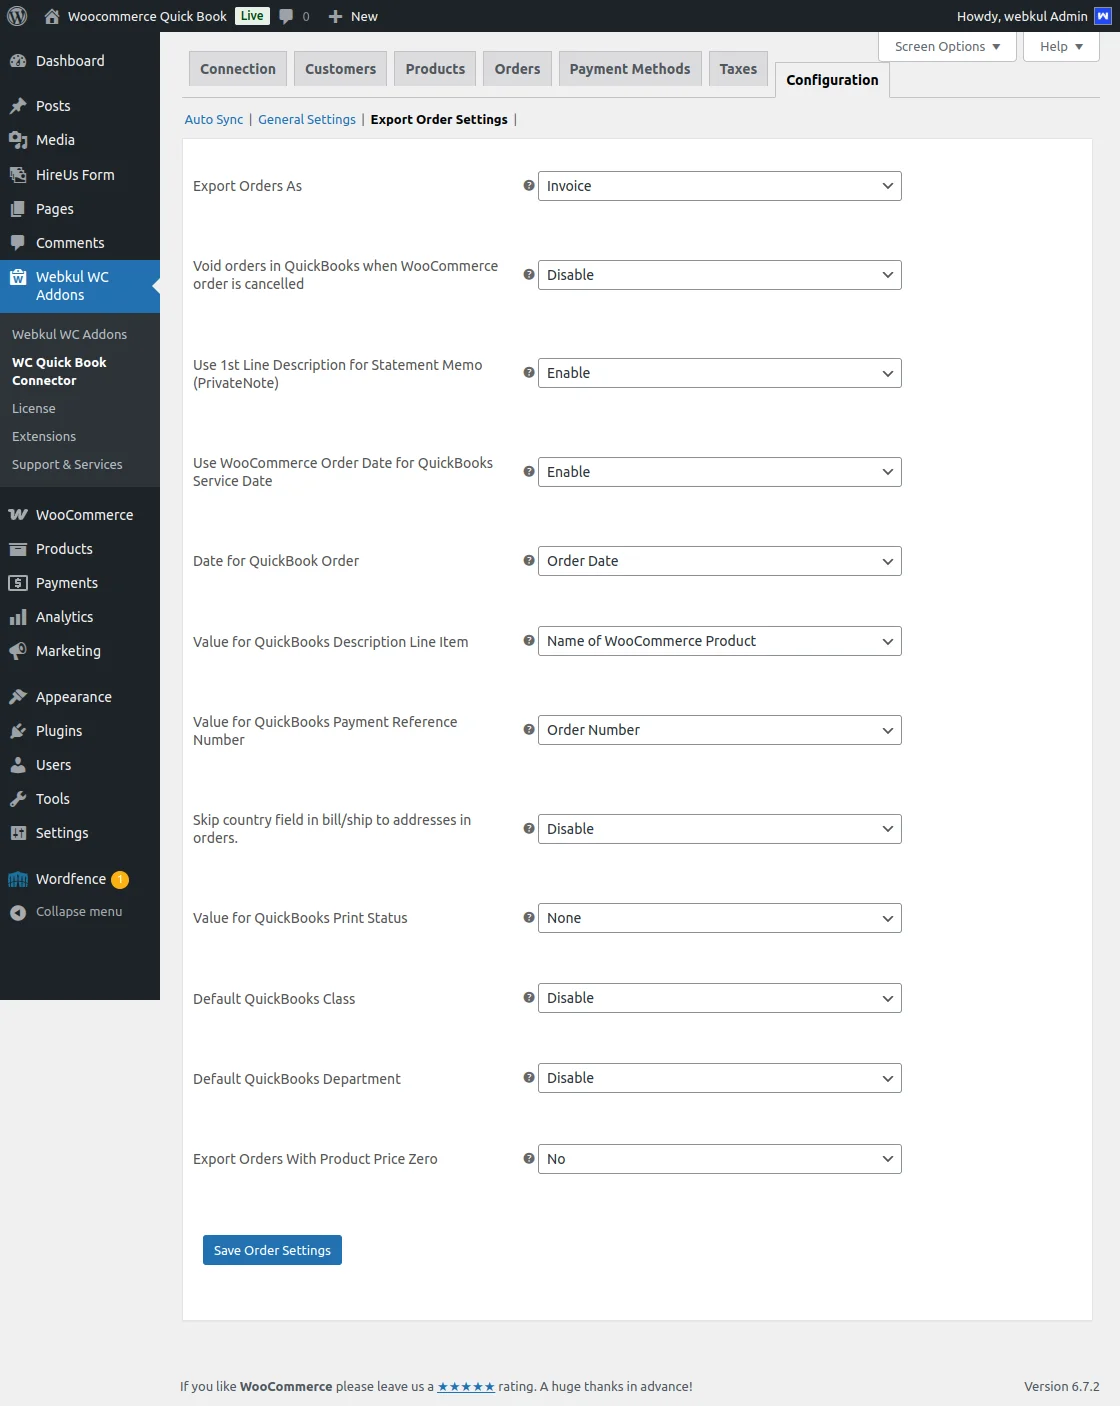
- Export Orders As – Select how orders should be recorded in QuickBooks: Invoice, Sales Receipt, Estimate, or Credit Memo.
- Void Orders in QuickBooks When WooCommerce Order is Cancelled – Enable to automatically void canceled WooCommerce orders in QuickBooks.
- Use 1st Line Description for Statement Memo (Private Note) – Enable to use the first line description as a private note in QuickBooks.
- Use WooCommerce Order Date for QuickBooks Service Date – Enable to set the WooCommerce order date as the QuickBooks service date.
- Date for QuickBooks Order – Select the date reference for QuickBooks orders (e.g., WooCommerce Order Date).
- Value for QuickBooks Description Line Item – Select the value to be used as the description in QuickBooks (e.g., WooCommerce Product Name).
- Value for QuickBooks Payment Reference Number – Set the order number as the payment reference in QuickBooks.
- Skip Country Field in Bill/Ship to Addresses in Orders – Enable to exclude the country field in billing/shipping addresses.
- Value for QuickBooks Print Status – Define the print status for QuickBooks orders (e.g., None).
- Default QuickBooks Class – Enable to assign a default class for exported orders.
- Default QuickBooks Department – Enable to assign a default department for exported orders.
- Export Orders with Product Price Zero – Select whether orders containing zero-priced products should be exported.
Real-Time Synchronization
With real-time sync, the admin does not need to manually export/import products or order data, as updates happen automatically.
Auto-inventory management updates stock levels in QuickBooks by reducing inventory when an order is placed in WooCommerce and increasing it when a product is returned.
WooCommerce QuickBooks Connector extension enables a two-way synchronization between WooCommerce and QuickBooks for seamless data updates.
Auto Refund Receipts
The WooCommerce QuickBooks Connector extension generates refund receipts automatically, allowing them to be shared with customers for reference.
The admin can enable or disable this feature from the backend.
- Easily manage refund receipts as per business needs.
- Send refund receipts to customers for transparency.
- Auto-sync refund receipts during export/import.
Sync Customers
With the WooCommerce QuickBook Connector, the admin can sync the customers by navigating to QuickBooks Connector → Customers, as shown below.
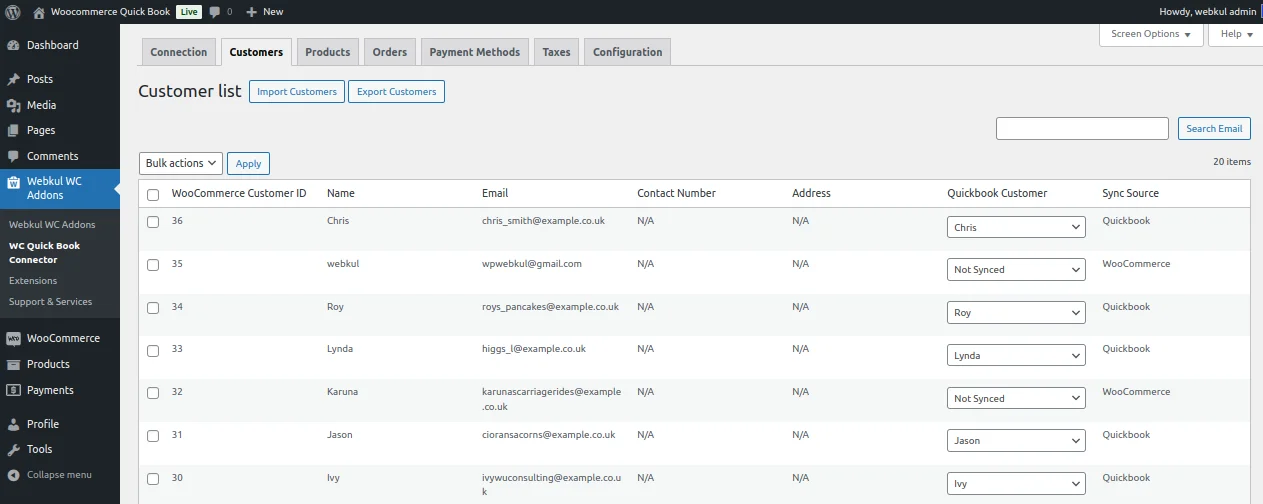
This will redirect the admin to the Customer List page, displaying the complete list of existing customers from the WooCommerce store.
Here, the admin can:
- Export Customers to QuickBooks.
- Import Customers from QuickBooks.
Export Customers
At the top, the admin will find the Export Customer button, which allows exporting WooCommerce customers to QuickBooks.
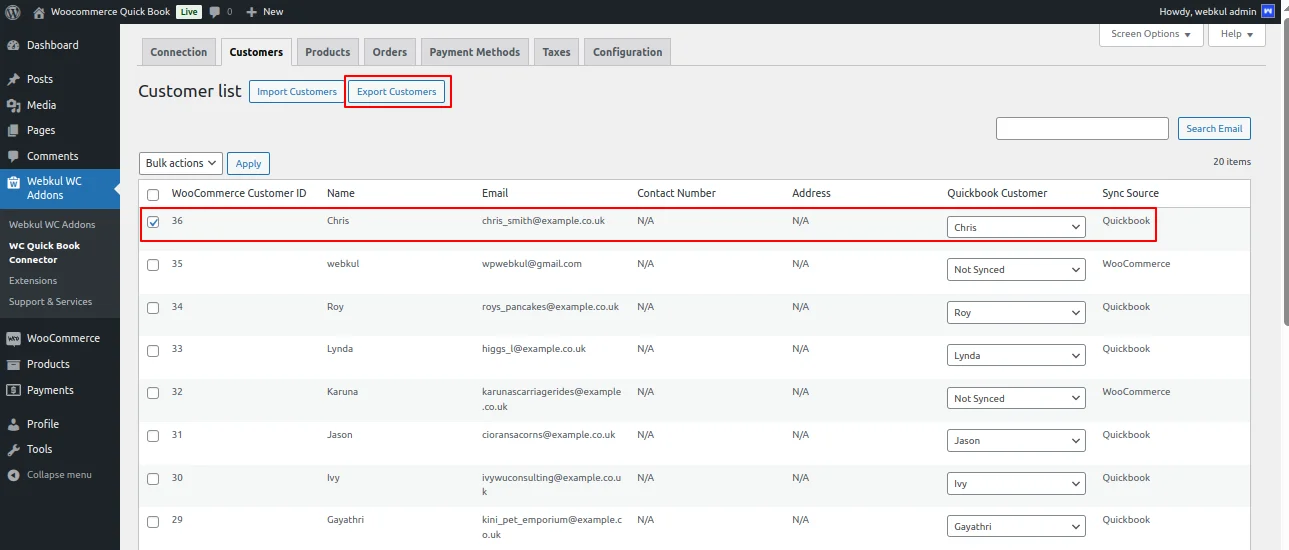
For this, the admin will:
- Select the customers from the list that need to be exported.
- Click the Export Customer button.
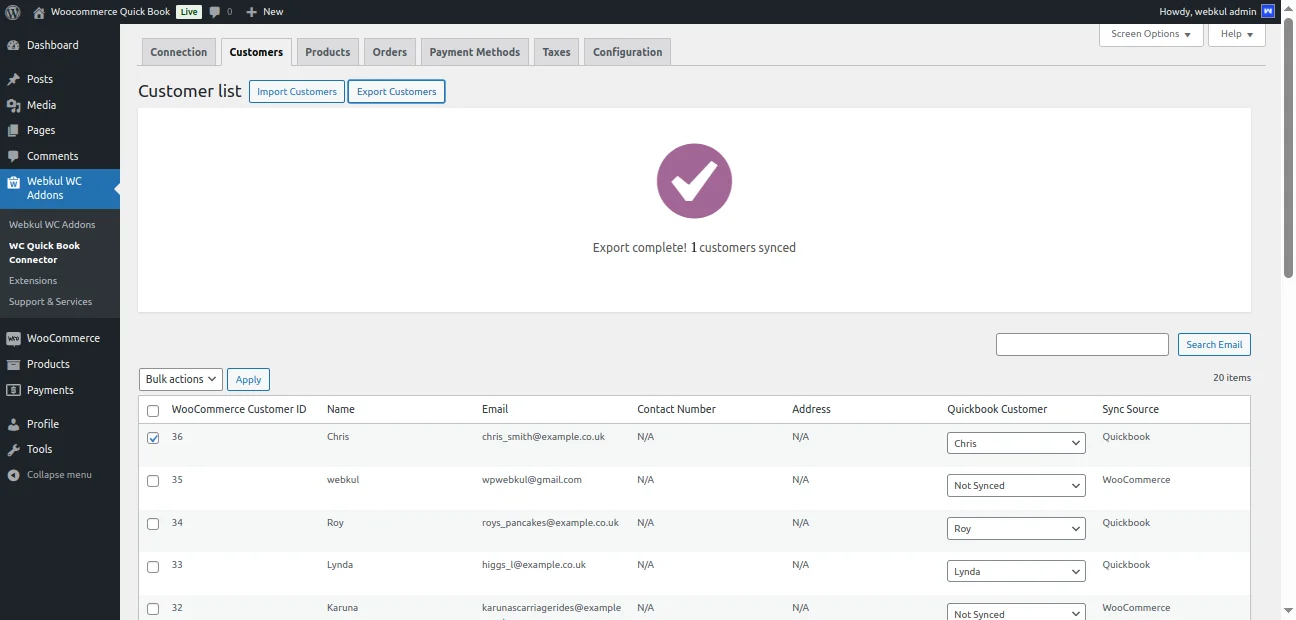
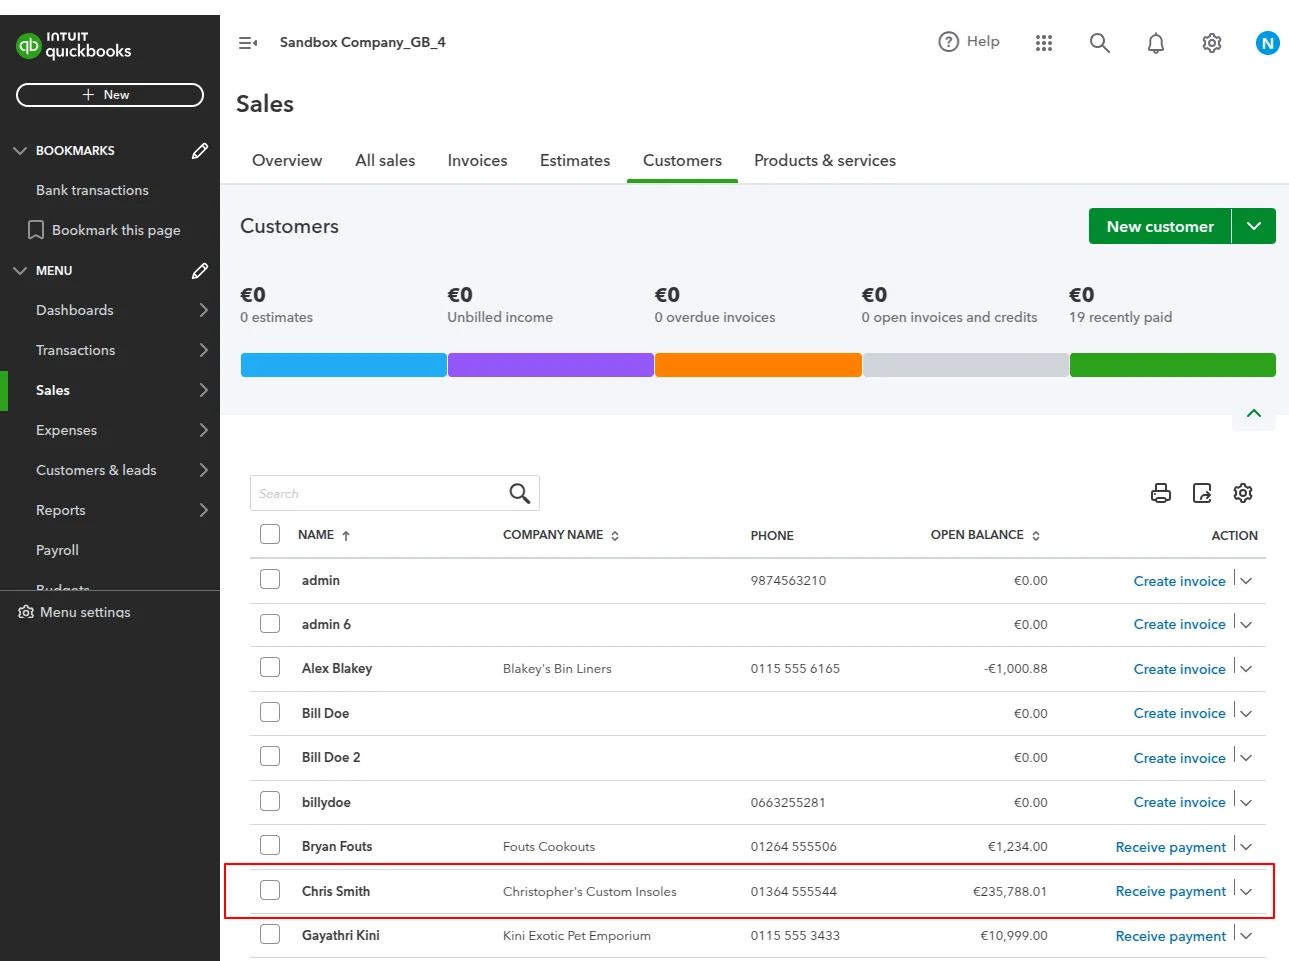
The admin can verify the exported customers in QuickBooks → Sales → Customers, as shown below.
Import Customers
The admin can also import customers from QuickBooks to WooCommerce. At the top, there is an Import Customer button for this purpose.
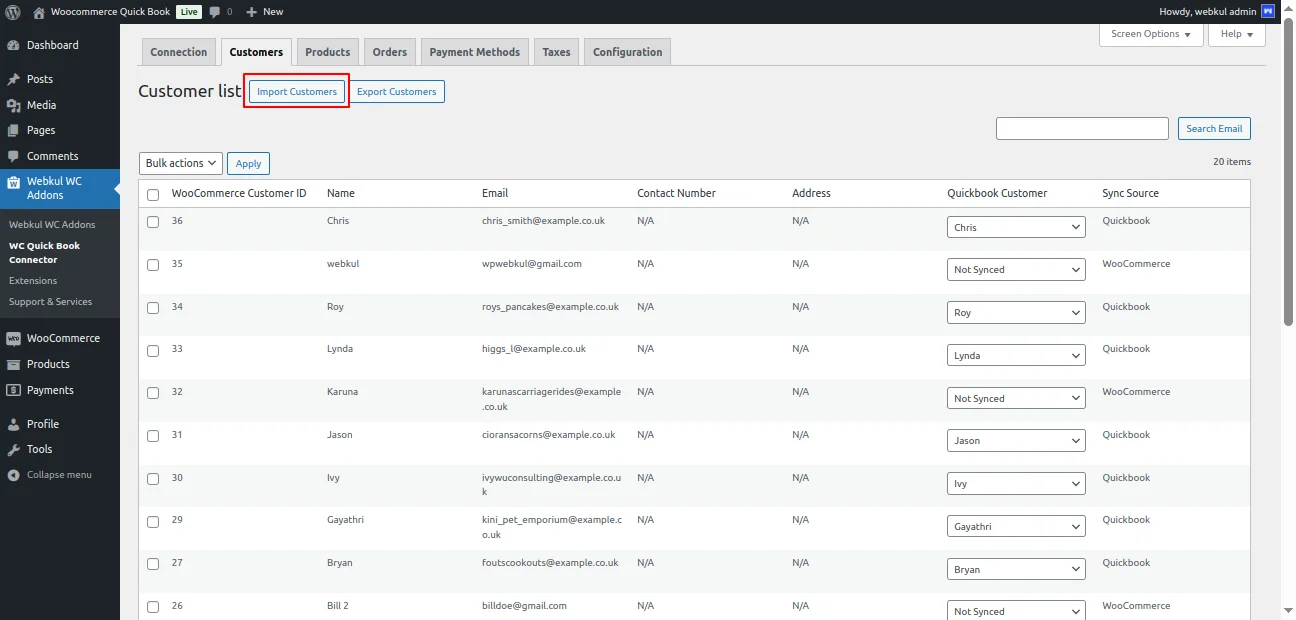
Here, the admin simply needs to click the Import Customer button.

The following customer details will sync:
- Name & Email
- Company Name & Phone Number
- Billing & Shipping Address
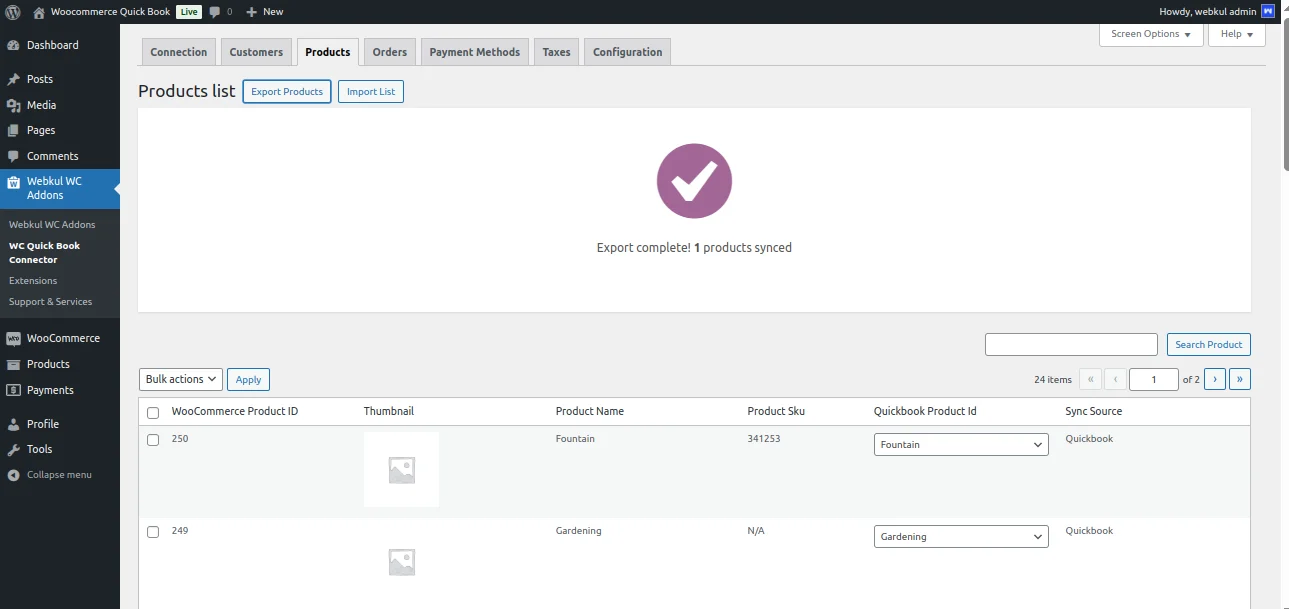
Sync Products
With the WooCommerce QuickBook Connector, the admin can sync products by navigating to QuickBooks Connector -> Products, as shown below.
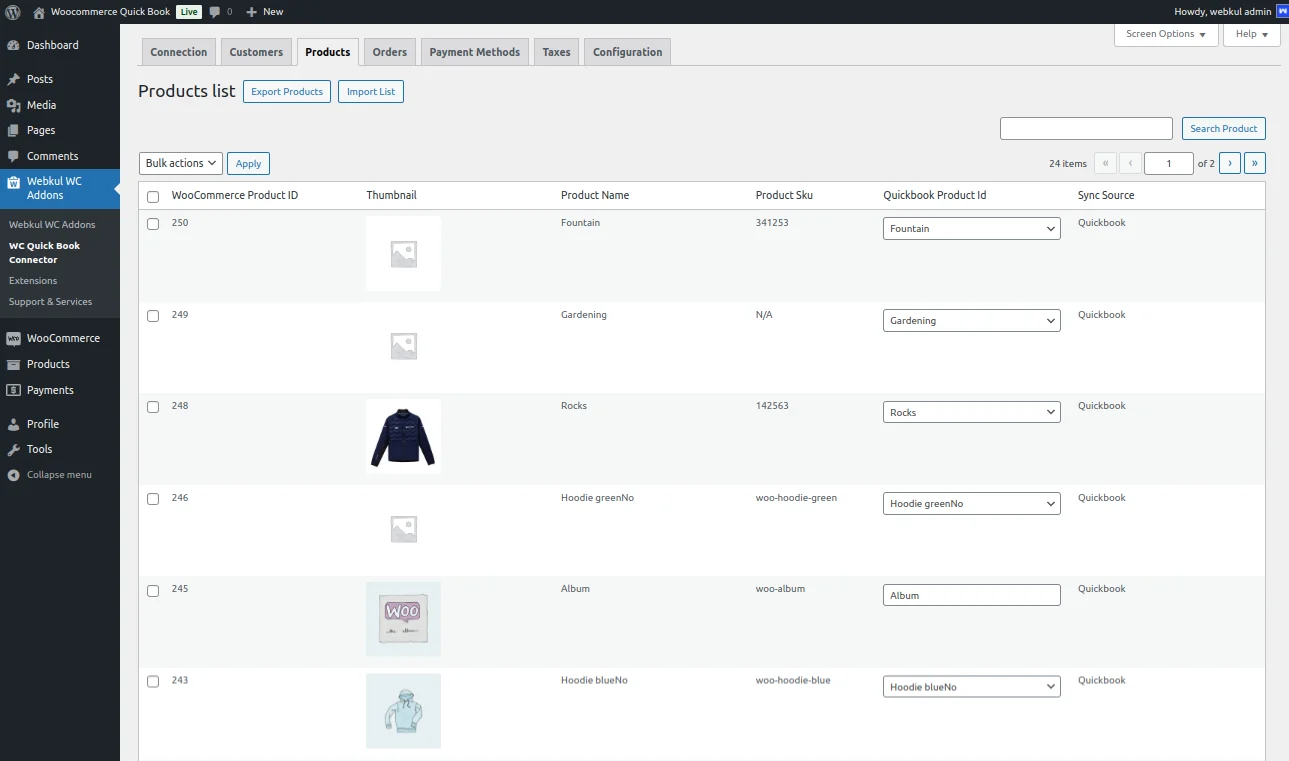
This redirects the admin to the Product List page, displaying all existing WooCommerce store products. Here, the admin can:
- Export Products
- Import Products
Export Products
At the top, the admin will find the Export Products button to export WooCommerce products to QuickBooks.
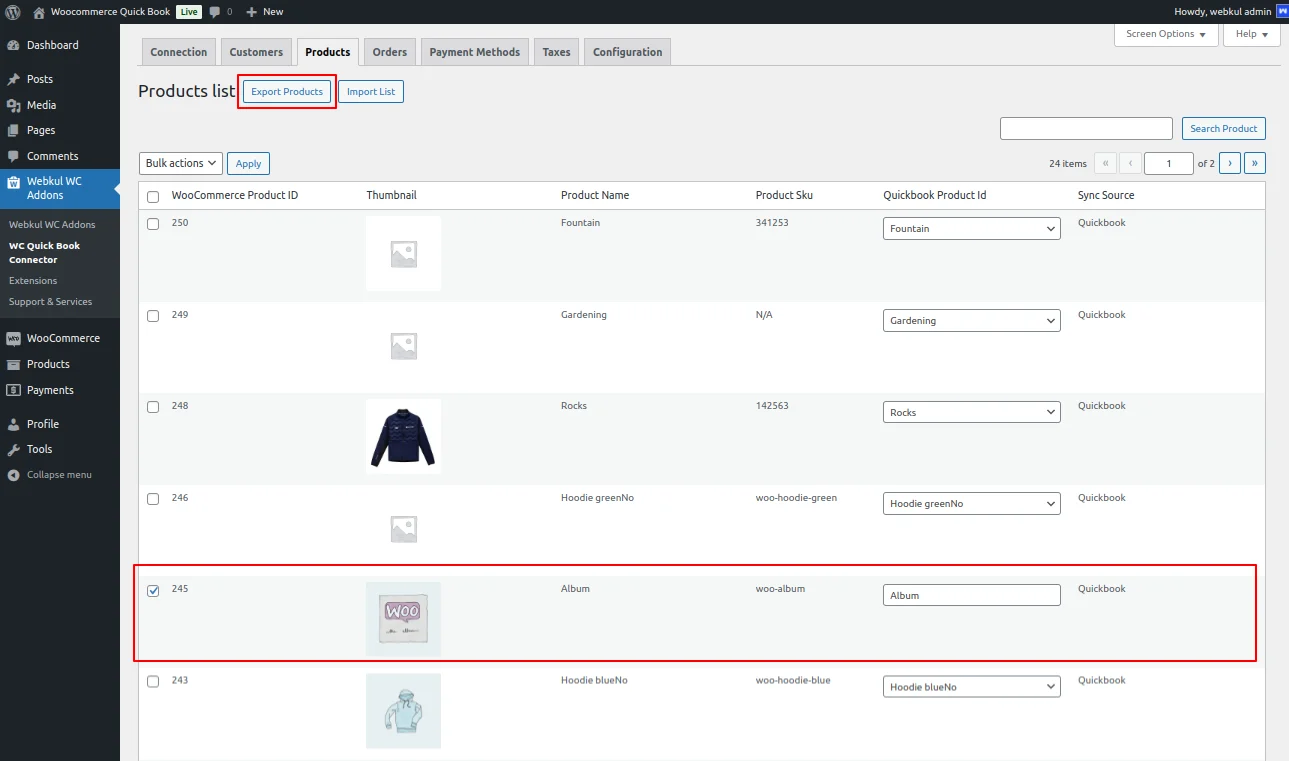
To export products:
- Select the products from the list that you want to export.
- Click the Export Product button.
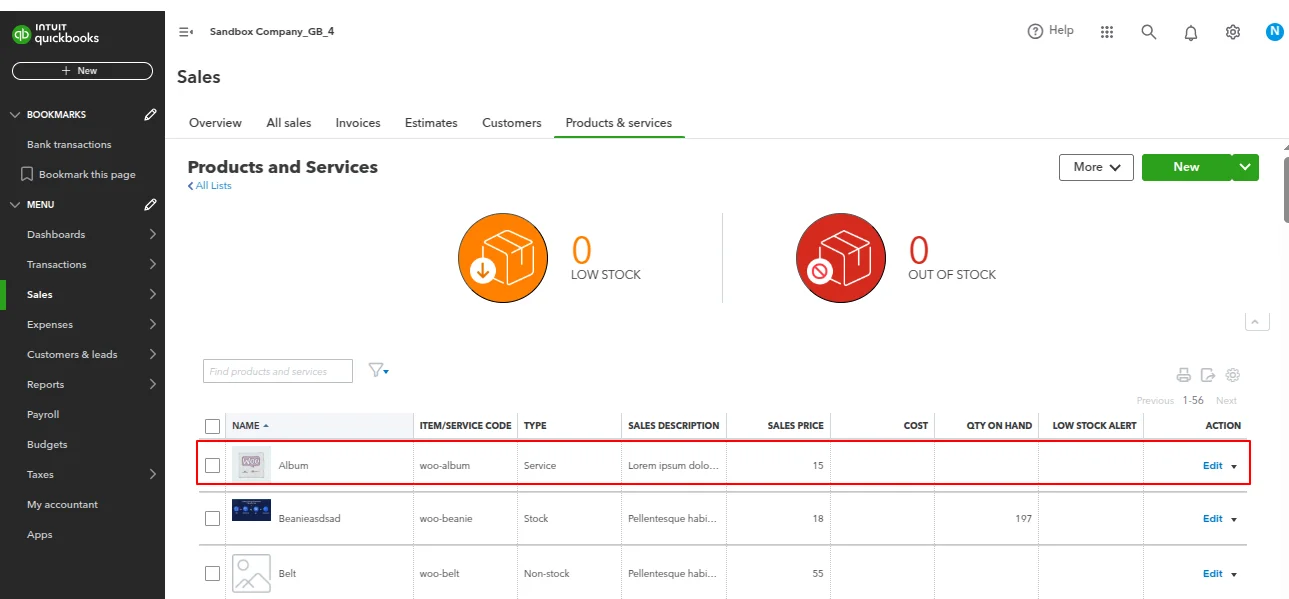
The admin can verify the exported products in QuickBooks by logging in and navigating to Sales -> Products and Services, as shown below.
Import Products
The admin can also import products from QuickBooks to WooCommerce, making the process seamless and efficient.
Similar to the export option, an Import Products button is available.

To import products, the admin simply clicks the Import Products button.

Note: The product information synced includes name, SKU, price, stock, and active/inactive status.
Order Sync
If WooCommerce does not sync customers and products with QuickBooks, it cannot export their associated orders, leading to potential data inconsistencies.
Ensure customers and products are synced first.
After syncing customers and products, the admin can export WooCommerce orders by navigating to QuickBooks Connector -> Orders, as shown below.
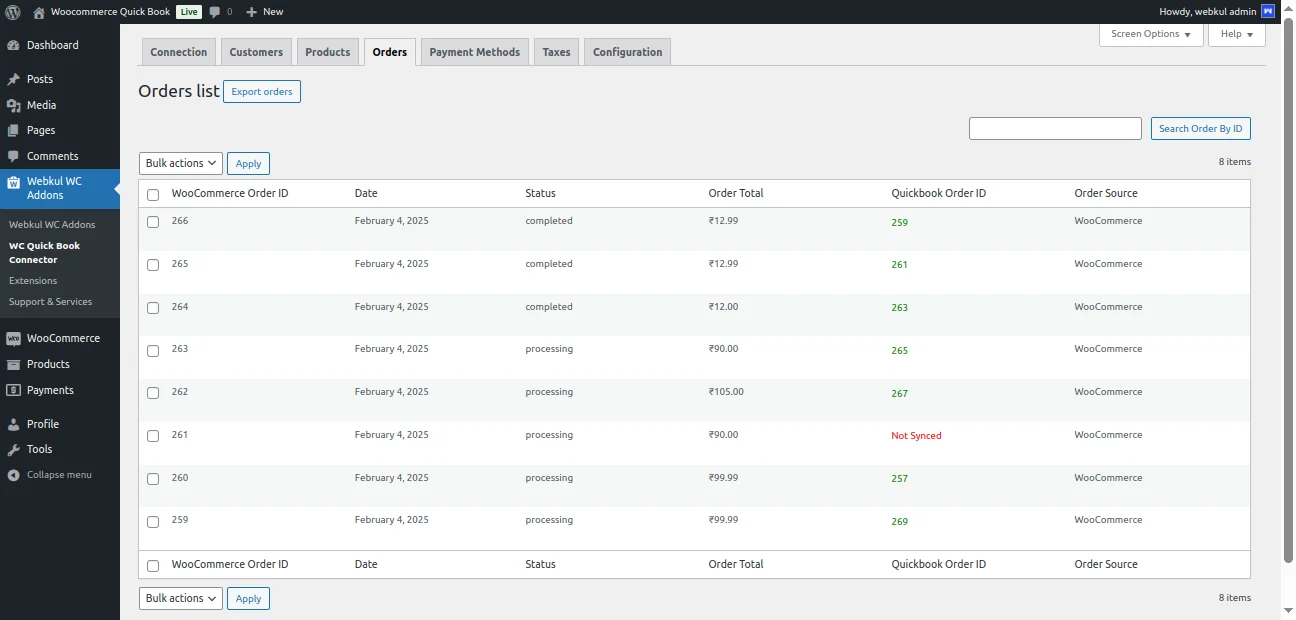
This redirects the admin to the Order List page, displaying all existing WooCommerce orders. Here, the admin can export orders.
The admin will find an Export Order button to export WooCommerce orders to QuickBooks.
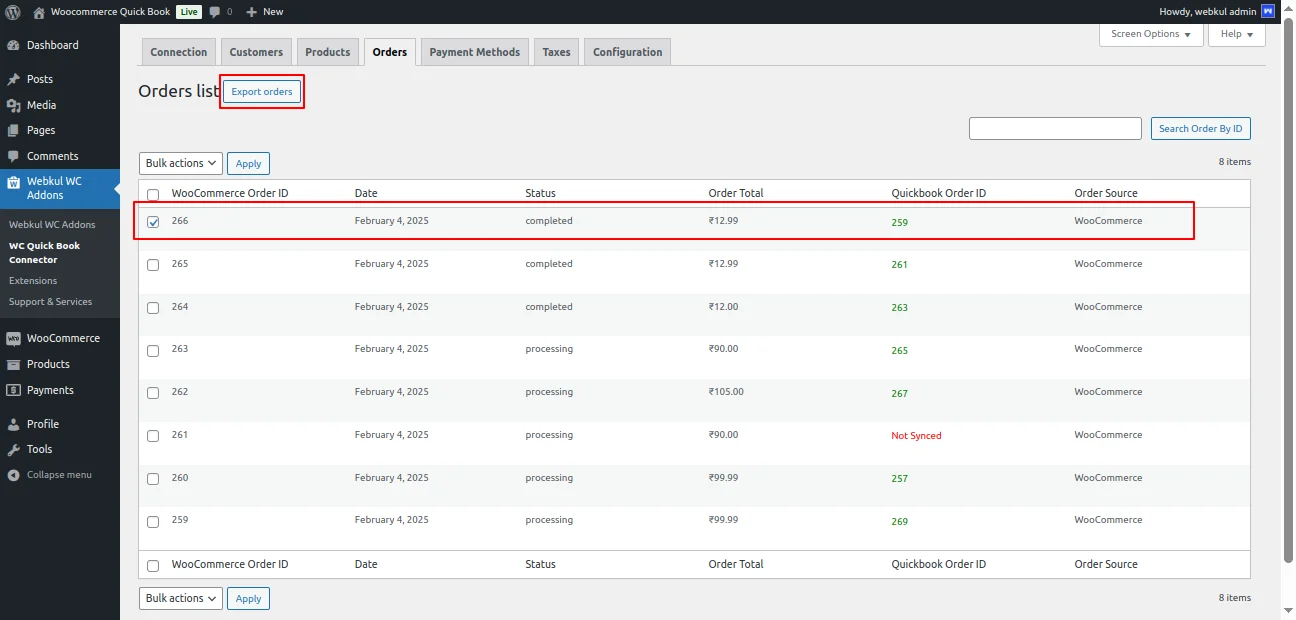
To export orders:
- Select the orders from the list to export them.
- Click the Export Order button.
If the order is placed using the POS (Point of Sale System for WooCommerce), the Source of the Order will be displayed as POS under the source column, as shown in the image below.
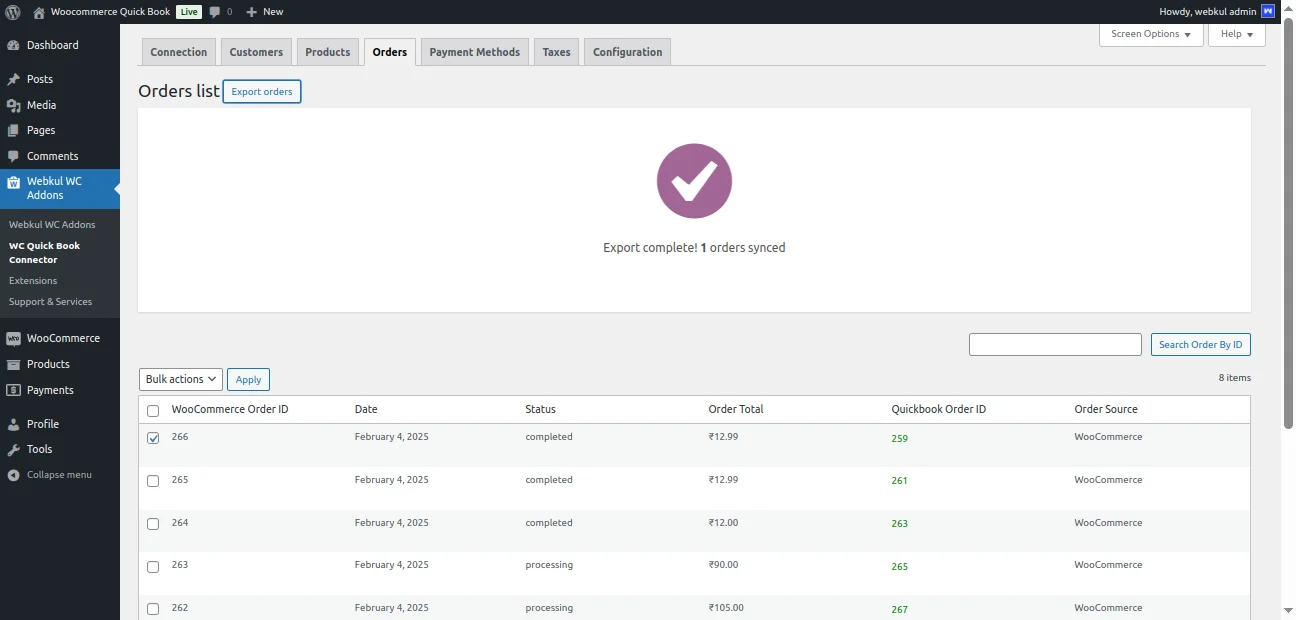
The order source allows customers to differentiate between website orders and those made via POS.
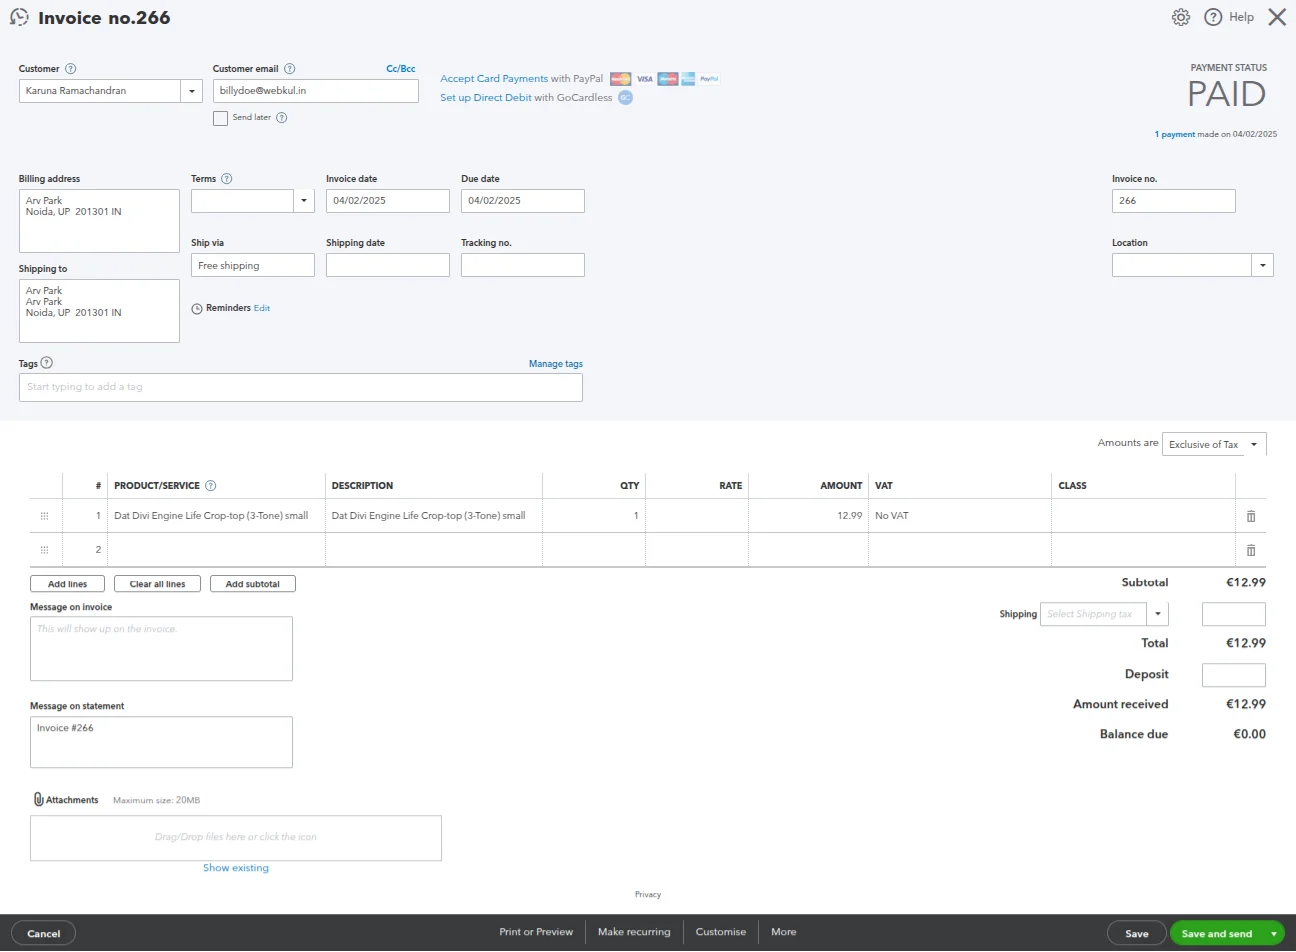
Similarly, the admin can verify the exported orders in QuickBooks by logging in and then navigating to Sales -> All Sales, as shown below.
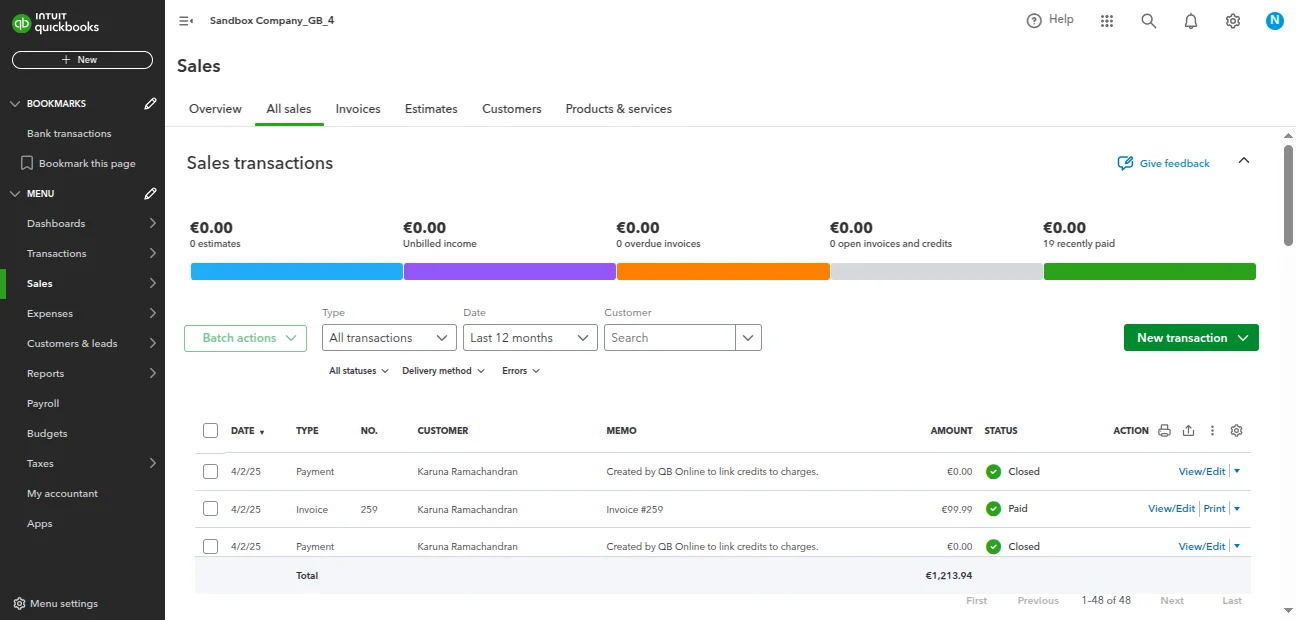
Note: The synced order information includes customer details, product details, payment method, shipping method, WooCommerce order ID, and taxes.
Payment Methods
The Payment Methods section allows you to map WooCommerce payment options with QuickBooks.
This helps record payment data accurately in QuickBooks during order synchronization.
You can enable or disable payment method mapping and configure advanced settings as needed. (Refer to the image below.)
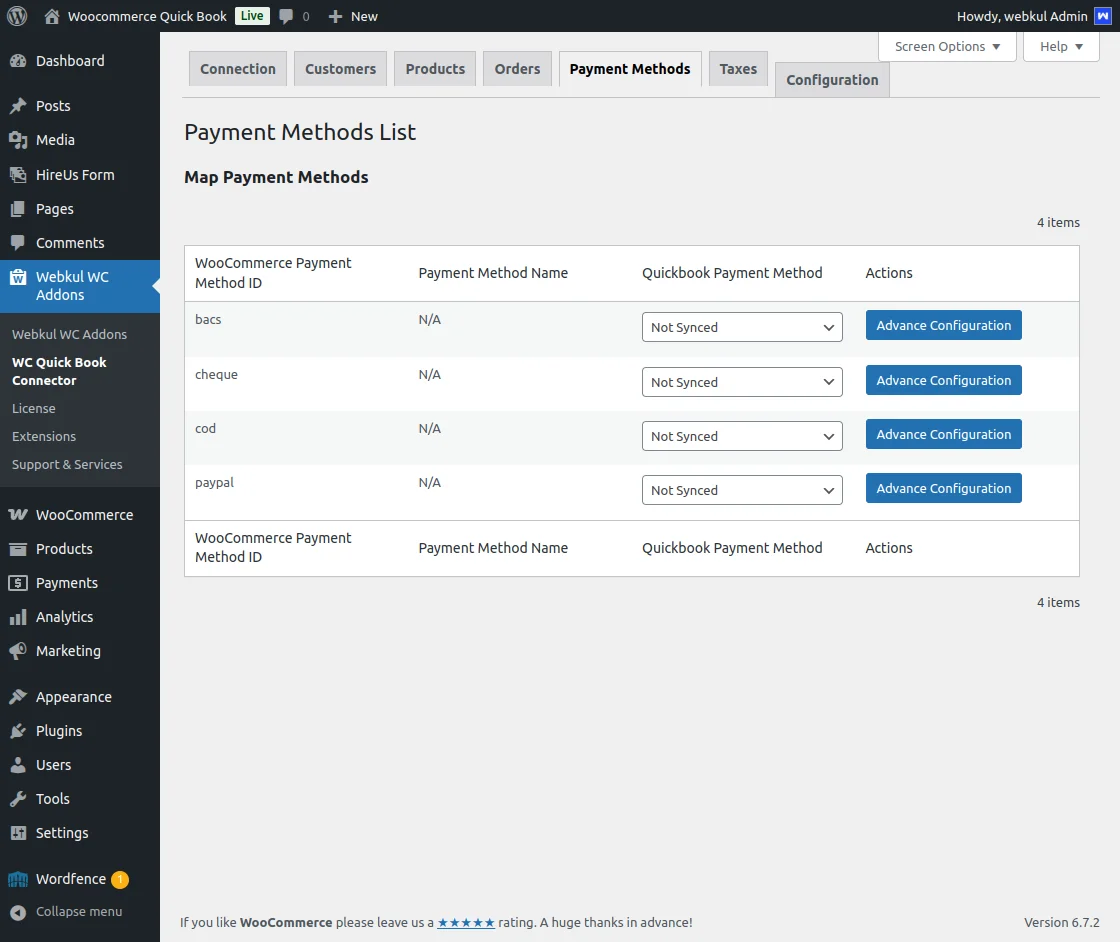
- Payment Methods List – Displays all available WooCommerce payment methods along with their sync status.
- Map Payment Methods – Link WooCommerce payment methods to their respective QuickBooks payment counterparts.
- WooCommerce Payment Method ID – Unique identifier for each payment method in WooCommerce.
- Payment Method Name – The name of the payment method as set in WooCommerce.
- QuickBooks Payment Method – The QuickBooks payment method to which WooCommerce payments are mapped.
- Actions – Options to sync or configure payment methods for accurate transaction recording.
- Not Synced – Indicates that the payment method has not been linked with QuickBooks yet.
Advance Configuration
The Advance Configuration section provides additional settings for payment method syncing between WooCommerce and QuickBooks.
Here, you can manage transaction fees, bank deposits, and other financial details to ensure accurate bookkeeping. (Refer to the image below.)
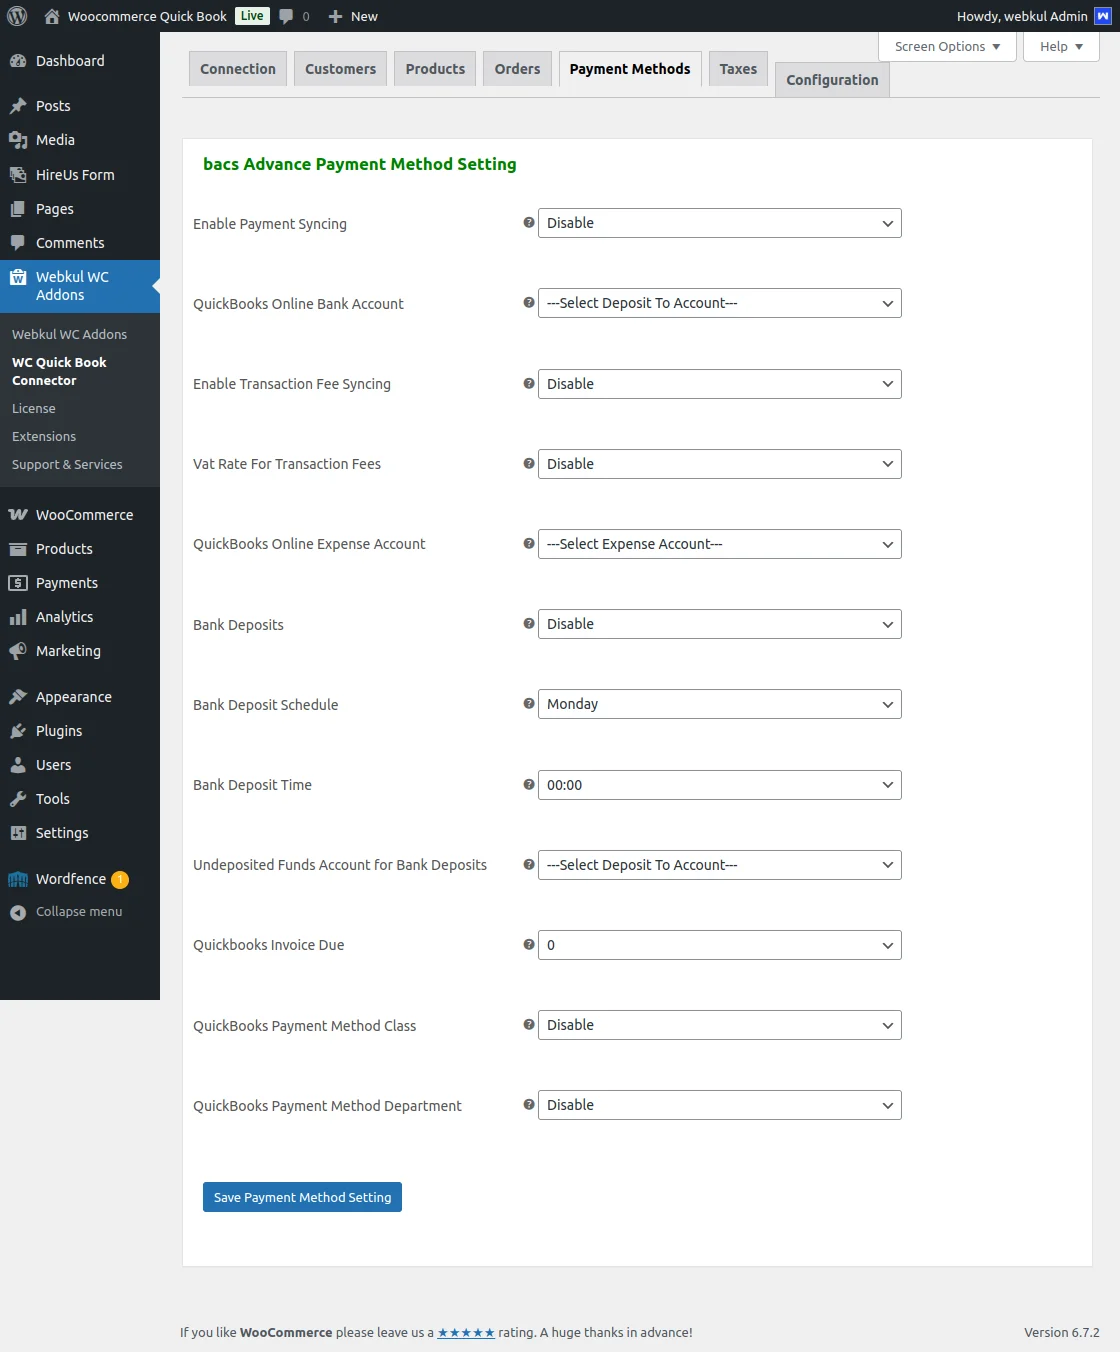
- Enable Payment Syncing – Enable payment sync when the WooCommerce order status is set to completed.
- QuickBooks Online Bank Account – Choose the QuickBooks account to record synced payments.
- Enable Transaction Fee Syncing – Enable to automatically sync payment gateway transaction fees with QuickBooks.
- VAT Rate for Transaction Fees – Set a VAT rate for transaction fees, if applicable.
- QuickBooks Online Expense Account – Select the expense account for recording transaction fees.
- Bank Deposits – Enable to sync bank deposits for received payments.
- Bank Deposit Schedule – Choose the day for recording bank deposits in QuickBooks.
- Bank Deposit Time – Define the exact time for scheduled bank deposits.
- Undeposited Funds Account for Bank Deposits – Select the QuickBooks account to temporarily hold undeposited funds.
- QuickBooks Invoice Due – Set the default number of days before a QuickBooks invoice is due.
- QuickBooks Payment Method Class – Enable to categorize payments using QuickBooks classes.
- QuickBooks Payment Method Department – Enable to assign payments to a specific QuickBooks department.
Map all payment methods correctly to prevent discrepancies in transaction records.
Taxes
The Taxes section allows you to map WooCommerce tax classes with QuickBooks tax settings.
This ensures accurate tax rate application when syncing orders between both platforms.
You can configure tax mappings to maintain accurate financial records. (Refer to the image below.)
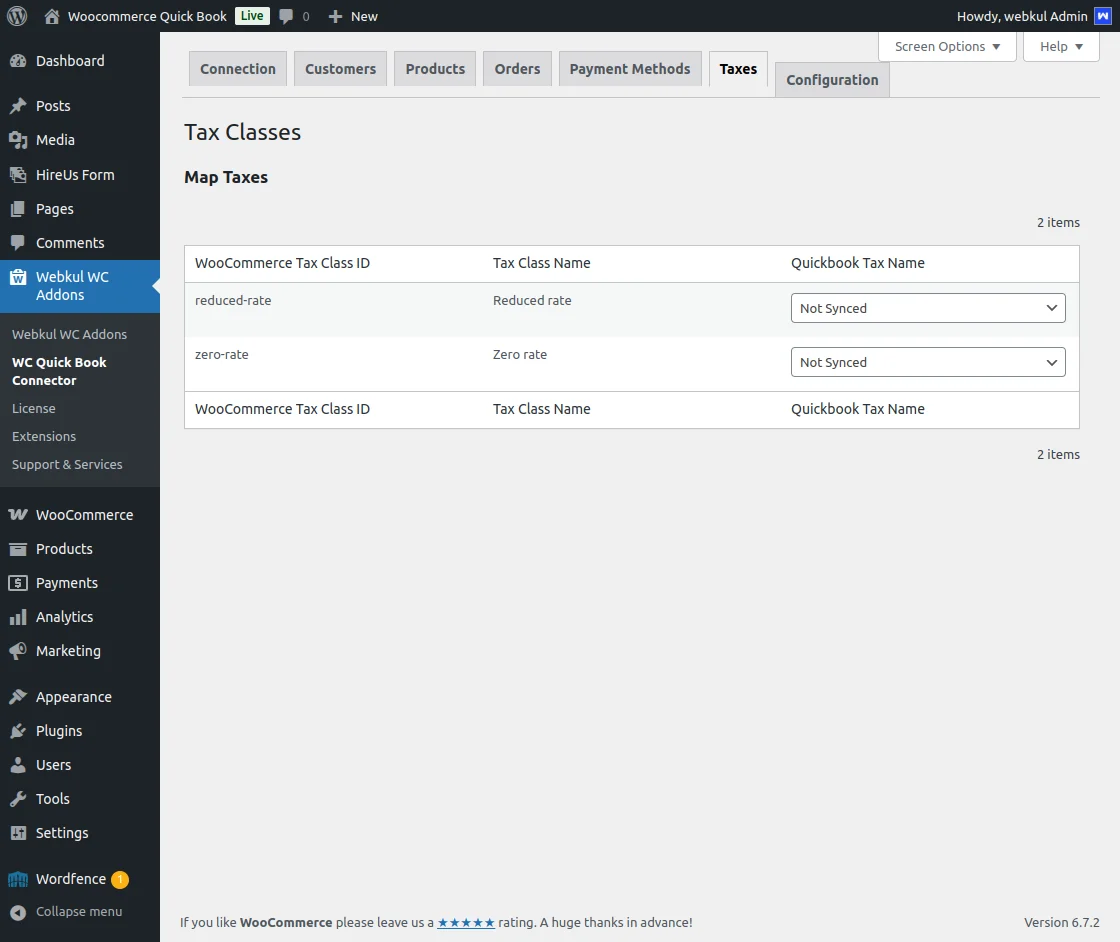
- Tax Classes – Displays all WooCommerce tax classes and their QuickBooks mapping status.
- Map Taxes – Enables the mapping of WooCommerce tax classes to their respective QuickBooks tax names.
- WooCommerce Tax Class ID – The unique identifier assigned to each tax class in WooCommerce.
- Tax Class Name – The name of the tax class as set in WooCommerce.
- QuickBooks Tax Name – The QuickBooks tax name to which WooCommerce tax classes are mapped.
- Not Synced – This indicates that the tax class has not been linked to QuickBooks yet.
Proper tax mapping ensures accurate tax calculations and compliance with financial regulations.
That’s all for the WordPress WooCommerce QuickBooks Connector module. Still, have any issue, feel free to add a ticket and let us know your views at HelpDesk System.
Current Product Version - 2.2.0
Supported Framework Version - WordPress version- 7.0.0, WooCommerce - 10.9.4

Be the first to comment.