With the help of the WooCommerce POS Configurable Barcode Plugin, the admin can create multiple barcodes for a product and assign them with multiple quantities.
At the front end, the POS agent simply needs to scan the barcode or enter the Barcode Name to add the product with its associated quantities to the cart.
A barcode scan can do wonders by processing things for the customers’ at the spur of the moment, thus providing the customers with a fascinating user experience and generating real sales and revenue.
Note:
- WooCommerce POS Configurable Barcode is an add-on of WooCommerce POS. Therefore, you must have installed the WooCommerce POS Plugin in the first place.
- For POS Marketplace solution, kindly refer to Marketplace Point of Sale System WooCommerce Plugin.
- We provide a production version of the plugin. If you want a development version then you can get it at an additional cost. Please contact [email protected] for it.
Note – This plugin is now compatible with WooCommerce’s latest High-Performance Order Storage (HPOS) and Cart and Checkout block.
Watch the below video & check the plugin workflow:
Features
- The admin can create multiple barcodes for a product.
- Different quantities can be assigned to each barcode.
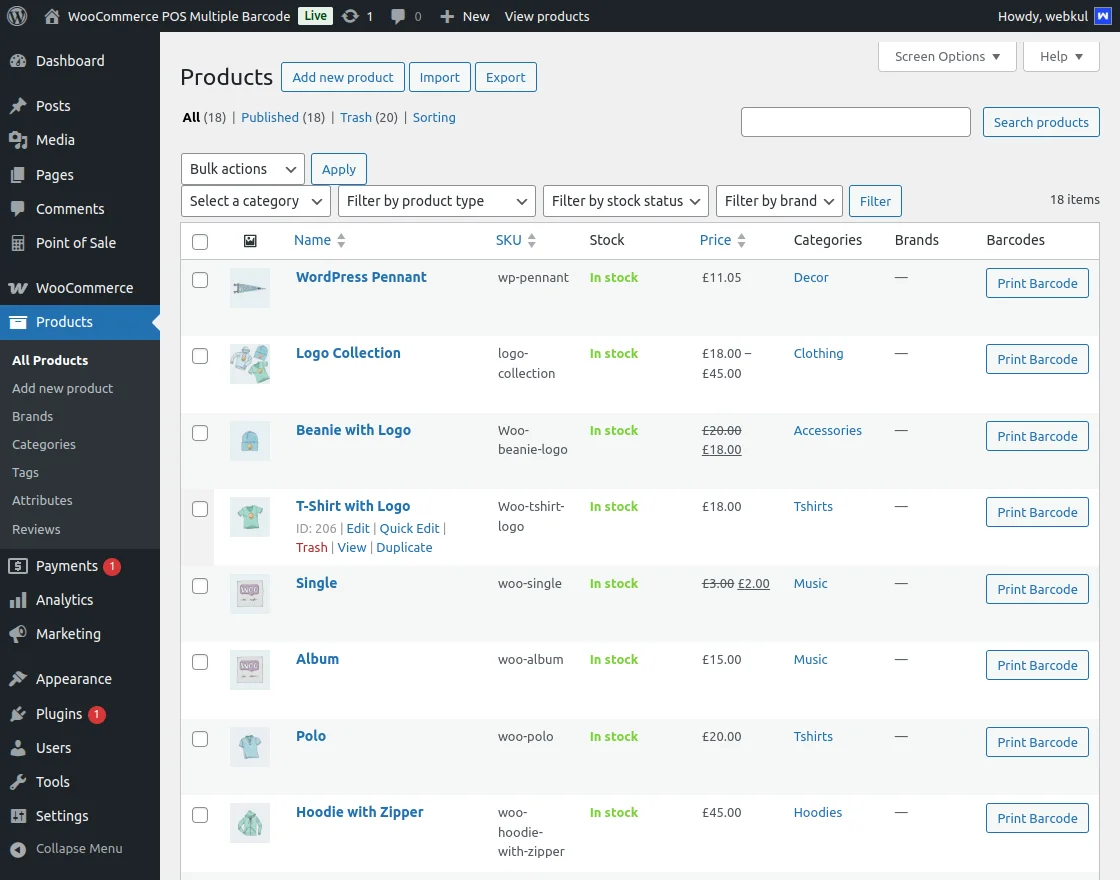
- The multiple barcodes can be printed from the product grid by clicking the barcode icon for a specific product.
- The POS agent needs to scan or can enter the barcode name to add the product units in the cart.
- Multiple barcodes for a single product save time & increase the efficiency of a sales agent to add products to orders.
- WooCommerce POS Configurable Barcode is not multisite compatible.
Note- This plugin is compatible with the dark theme and in order to work one should use the pos 3.6.3 version.
Installation
The user will get a zip file which needs to be uploaded in the “Add New” menu option in the WordPress admin panel.
For this login to WordPress Admin Panel and in the Dashboard hover your mouse over the “Plugins” menu option select the “Add New” option.

Thereafter, the user will see an “Upload Plugin” option at the top of the page, click the option to upload the zip file.

On clicking the “Upload Plugin” option, the user will see a “Choose File” button. Click on the button to browse for the zip file as per the image below.

On browsing the file, click on the “Install Now” button so as to install the plugin as per the snapshot.
Once the user installs the plugin, the user can activate the plugin. The user needs to click on the “Activate Plugin” button to activate the plugin.

Activate and Update Plugin
Check out how to activate the WooCommerce Plugin through the purchase code and get updates on Webkul Modules directly on the Plugins page
Generation Of Multiple Barcodes
After the easy installation process of the plugin, the admin in order to create barcodes for a product moves to the product option in admin panel.
From here the admin can create new product and with it the respective barcodes as well or can even create barcodes for an existing product.
For instance if the admin wants to create multiple barcodes for product then admin will edit the product.
While configuring the details of the product, the admin comes across Inventory option as shown in the image below.
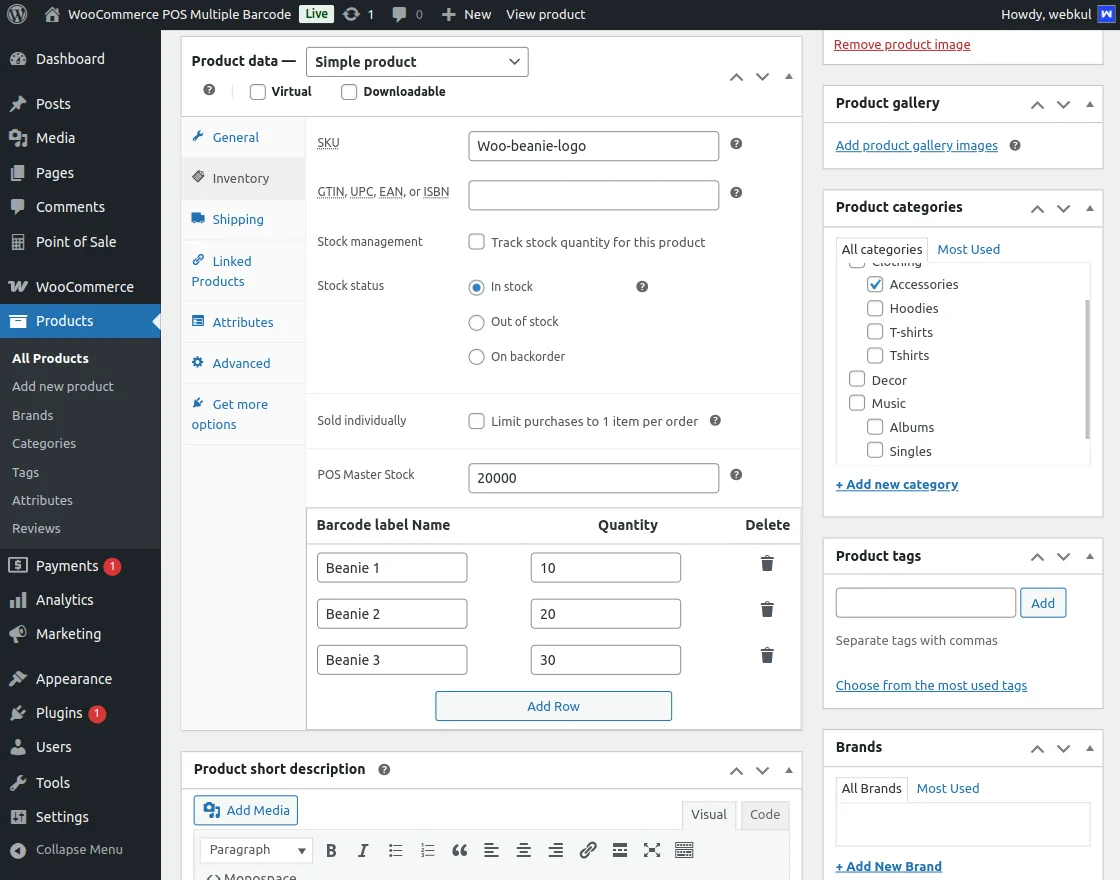
The admin scrolls down & finds the fields for creating multiple barcodes for product with different quantities assigned to each barcode.
The admin can create multiple barcodes by just inserting more rows by clicking on the “Add Row” option & saves the product.
Note:
- The barcode name which the admin assigns to the Barcode must be unique, though the Quantity can be same.
Generating Combo Barcodes in WooCommerce POS Configurable Barcode
For generating barcodes with product combinations, admin navigates to Point of Sale > Combo Barcode. Here, they’re redirected to the below page,
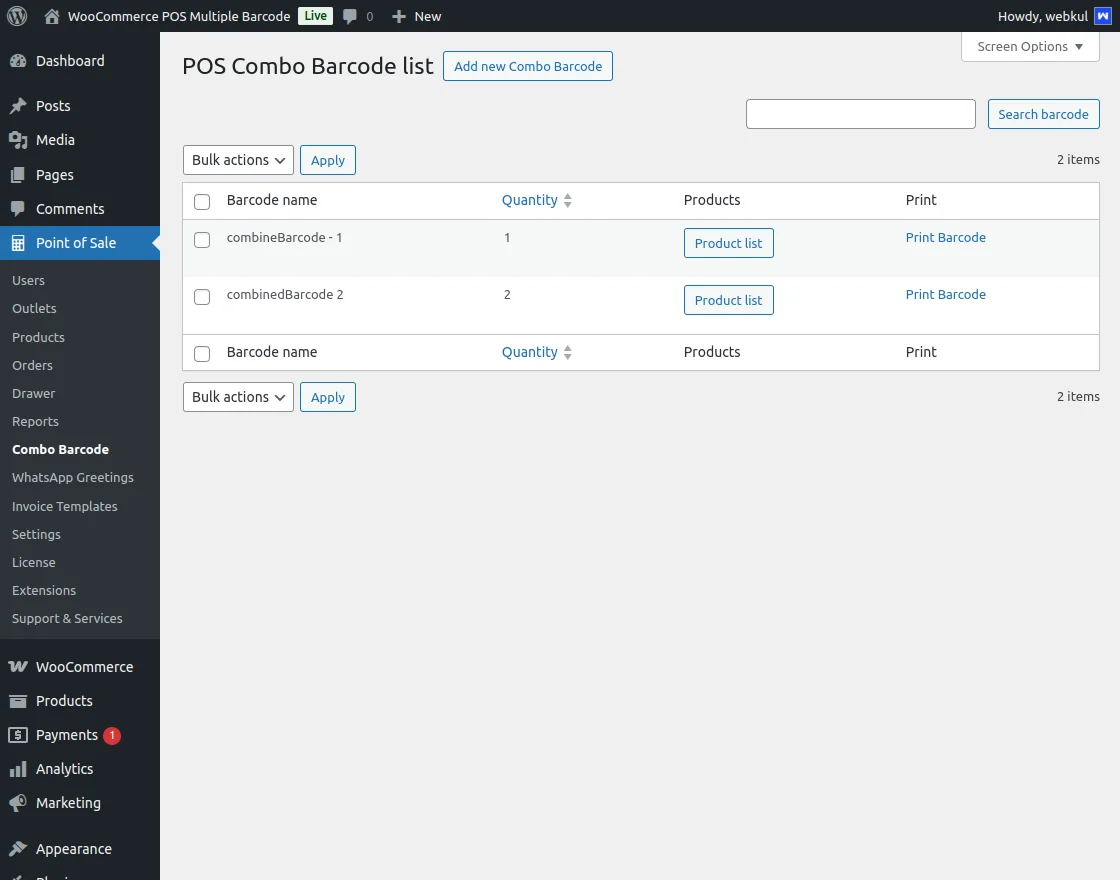
To create a new combo barcode, Tap on Add New Combo Barcode button which will redirect to below page,
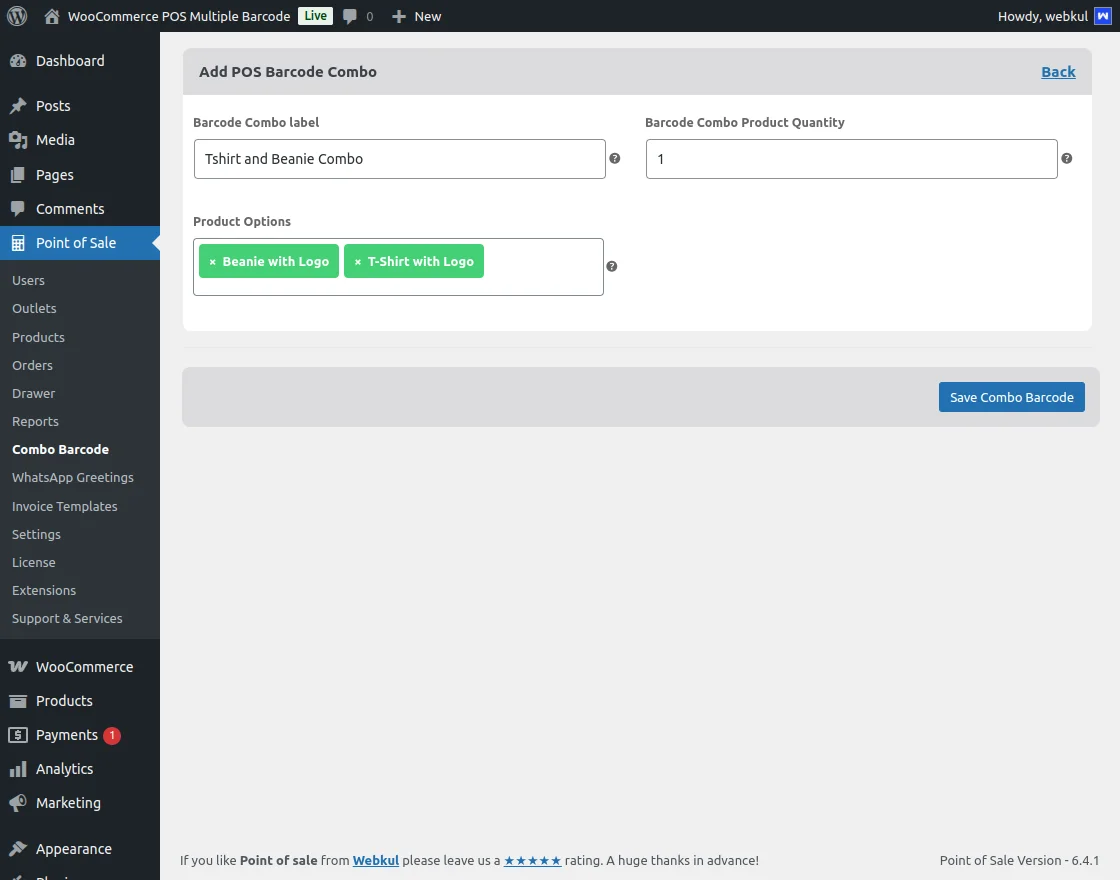
Here, admin fills the following details,
- Barcode Combo Label – Enter Label Name for barcode combo.
- Barcode Combo Product Quantity – Enter the quantity for combo product.
- Product Options – Select the products for combo.
Once the details are filled out, tap on Save Combo Barcode button to save and it’ll be visible on the combo barcodes listing page.
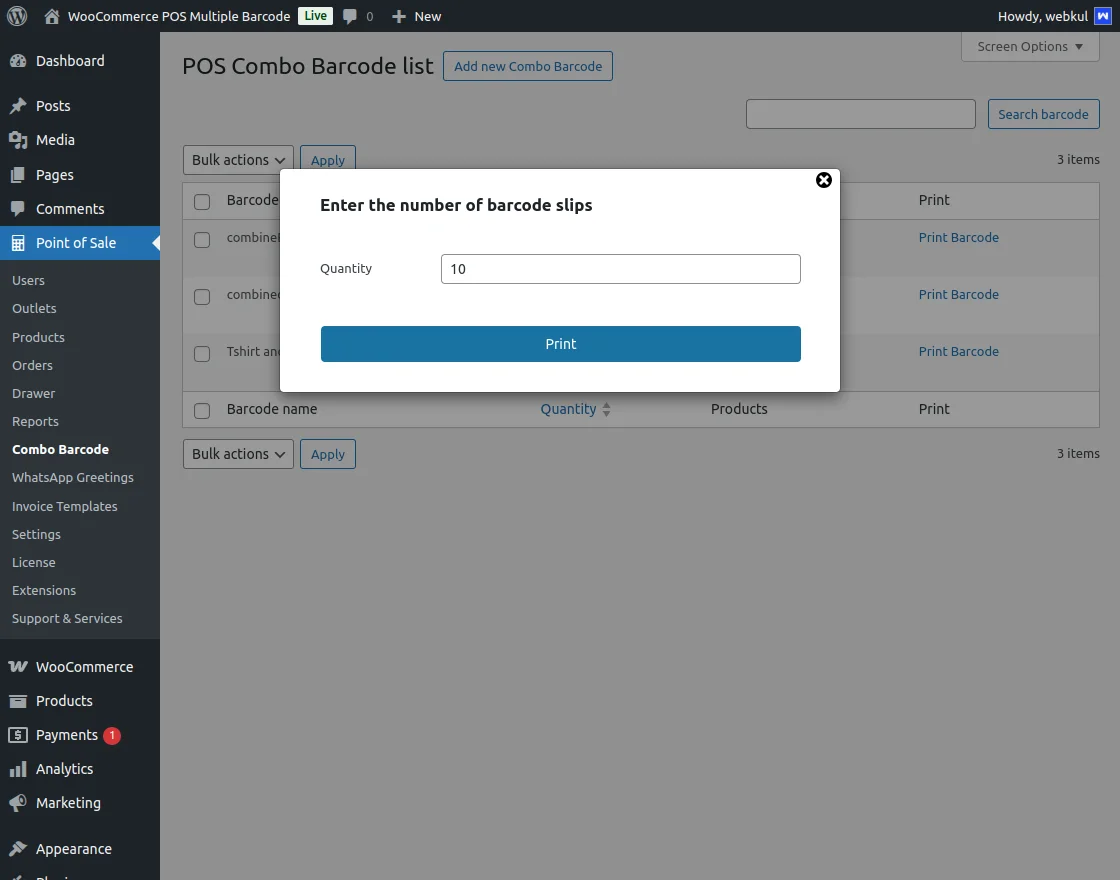
Further, admin can proceed to print the combo barcode by tapping on the Print Barcode button.
Print Barcodes
After creating multiple barcodes for products, the admin can easily from the product grid print the barcodes associated with the products.

In addition, to print the barcodes associated with a product, the admin will click on “Print Barcode” button adjacent to the selected product.
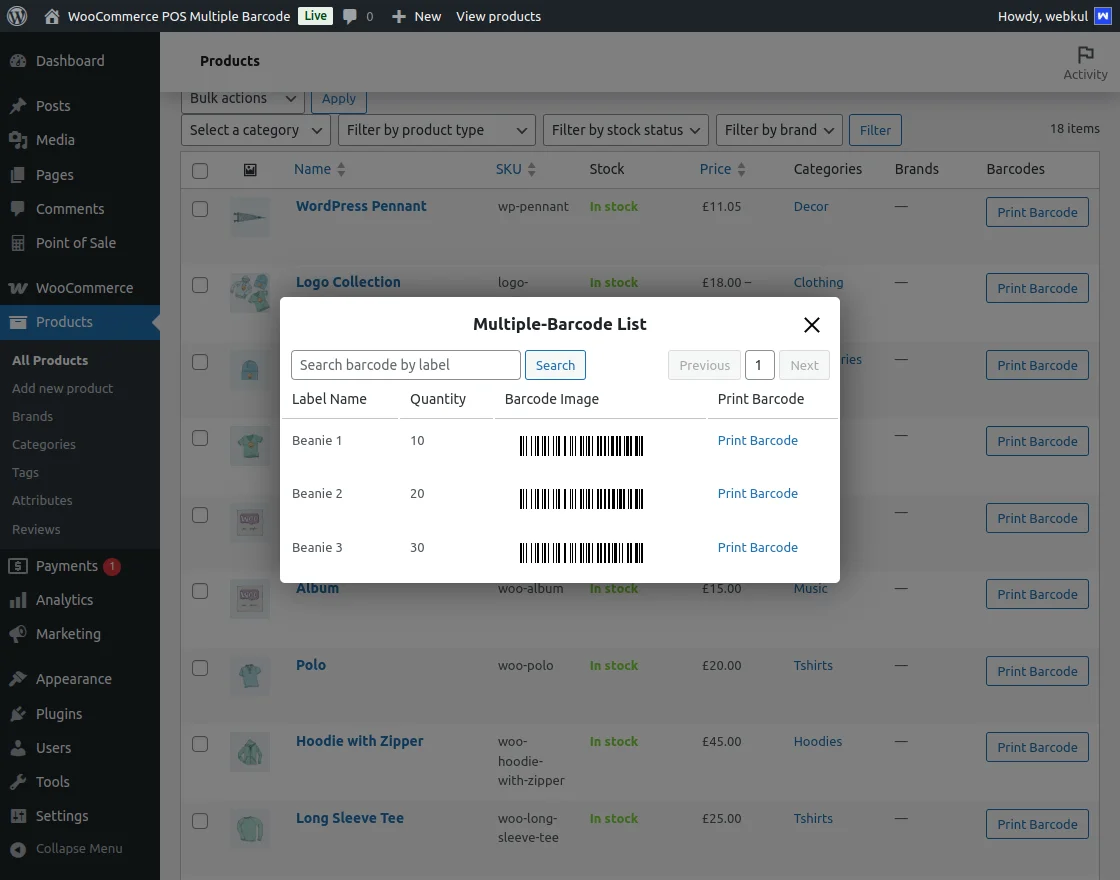
From here the admin can print the barcodes of a product with defined quantities by just clicking on the Print Barcode option.
For Example:- If admin wants to have barcode assigned with 20 quantities of the product.
After that, the admin will click on print barcode option after that on next pop needs to enter the quantity of barcode slips the admin wants to print.
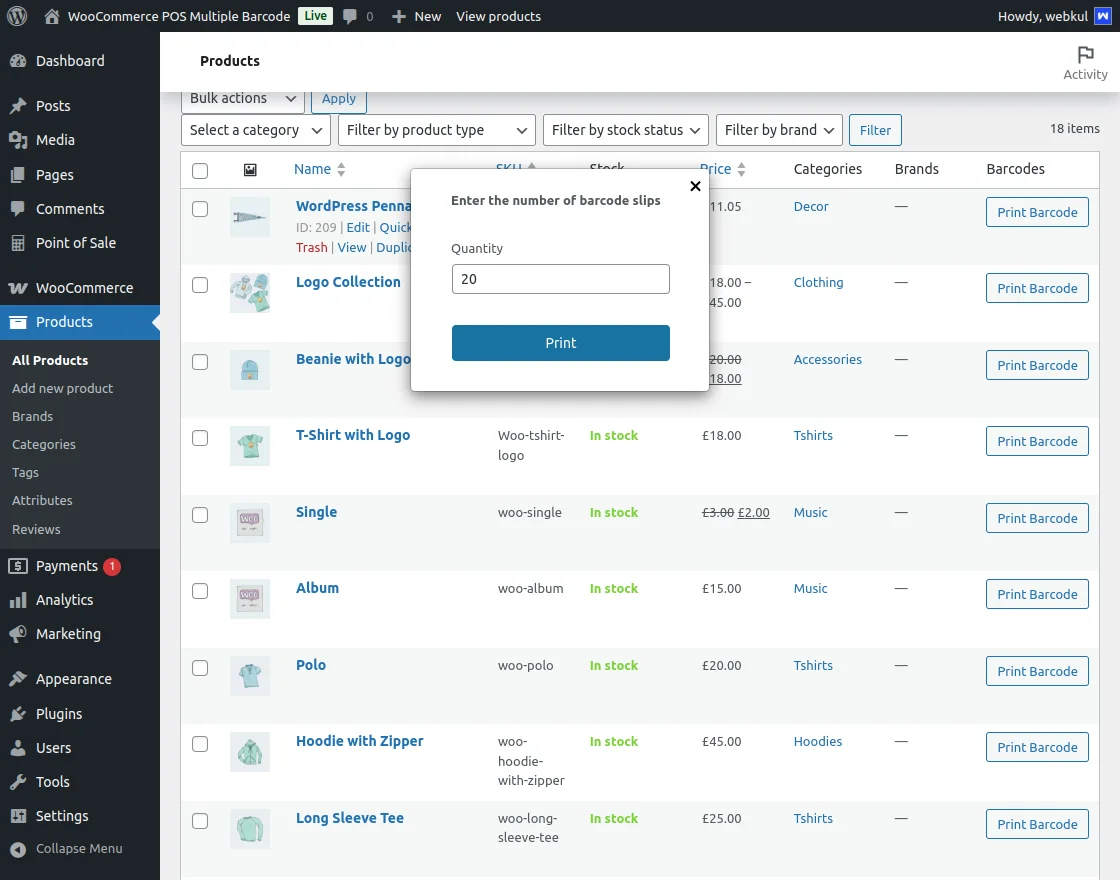
The admin enters the quantity for barcode slips and will click on “Print” button to print the slips.
Sales Agent – POS End Functionality
After generating the barcodes for a product, the sales agent operating the POS will finds to add the products to order very easy and hurdle free.
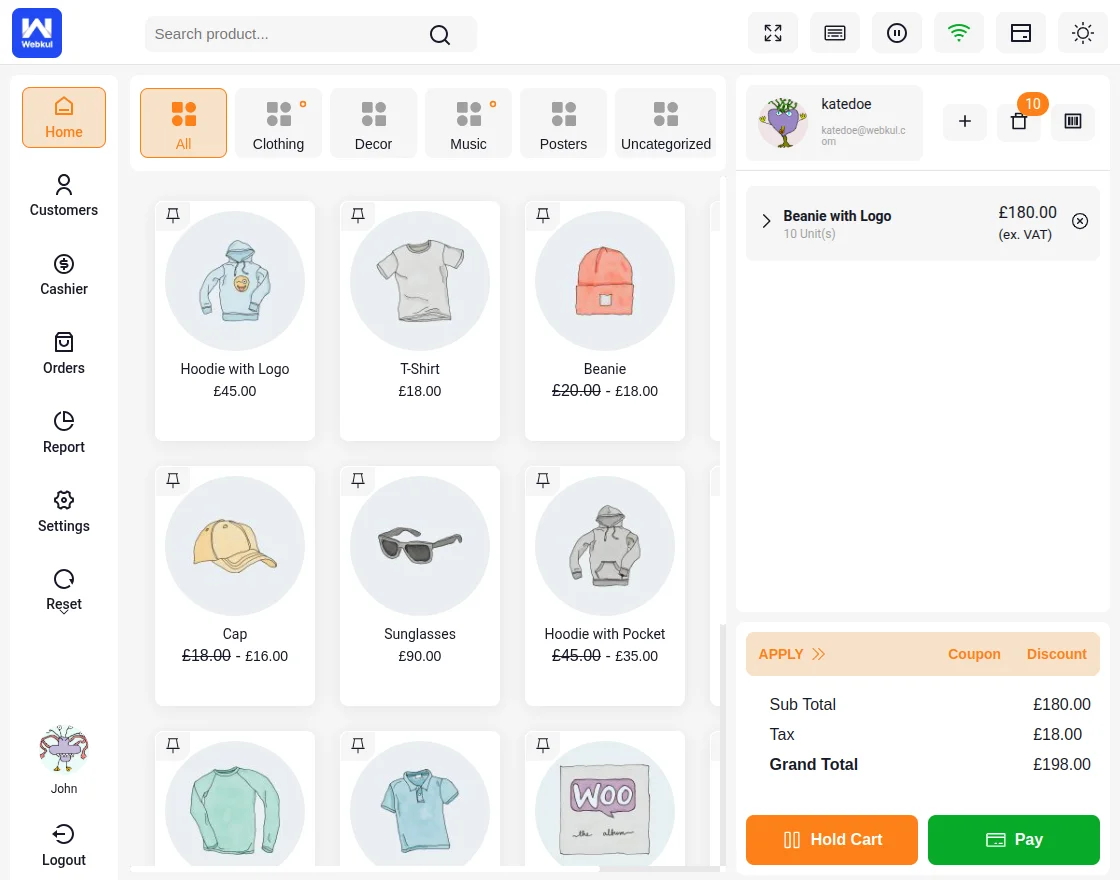
For Example:- If a customer needs to have a product with 10 quantities then in such case.
The sales agent instead of scanning the product for 10 times just scan the product barcode slip mapped with 10 quantities or enter the barcode name.
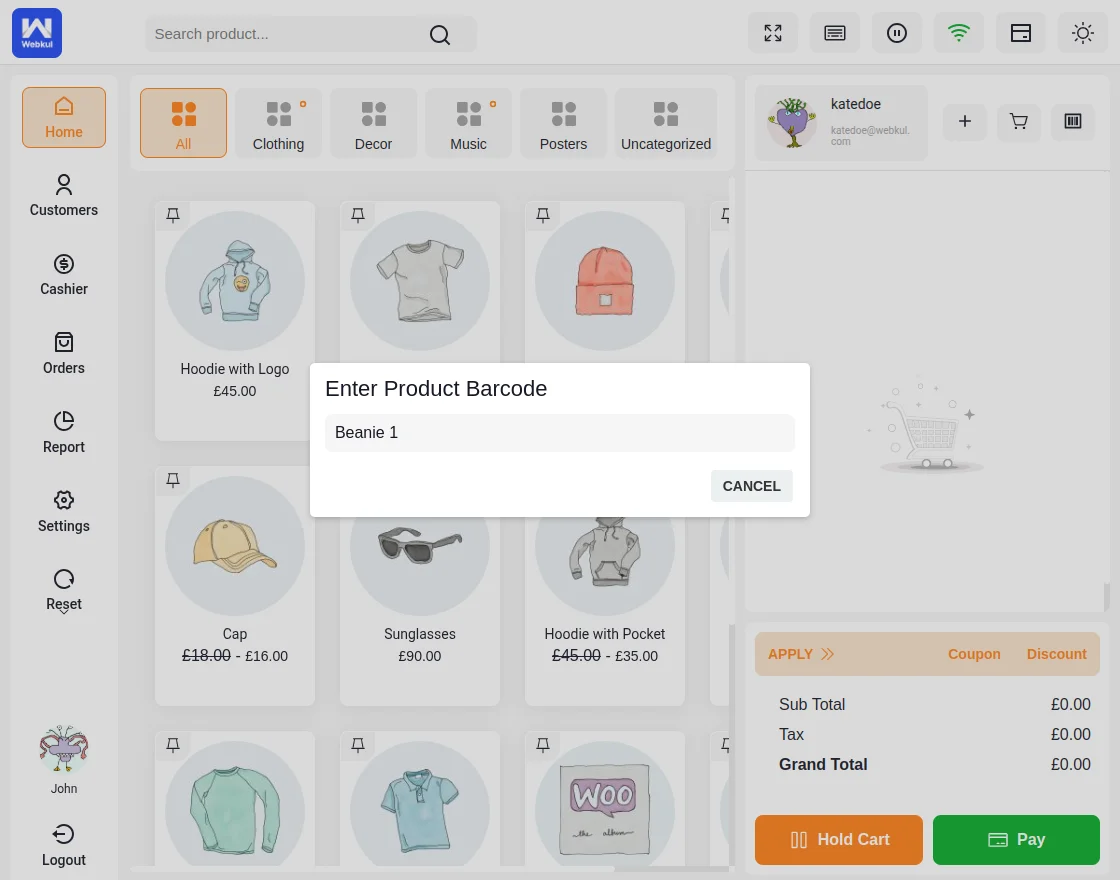
As the POS agent enters, 10 units of product display on the cart as shown in the image below. Results in adding the 10 units of that product at instant.
Just like this in order to add more quantities of the same product, the POS agent again needs to tap on the Barcode/Sku tab.
They then add the barcode name to add the required number of product units.
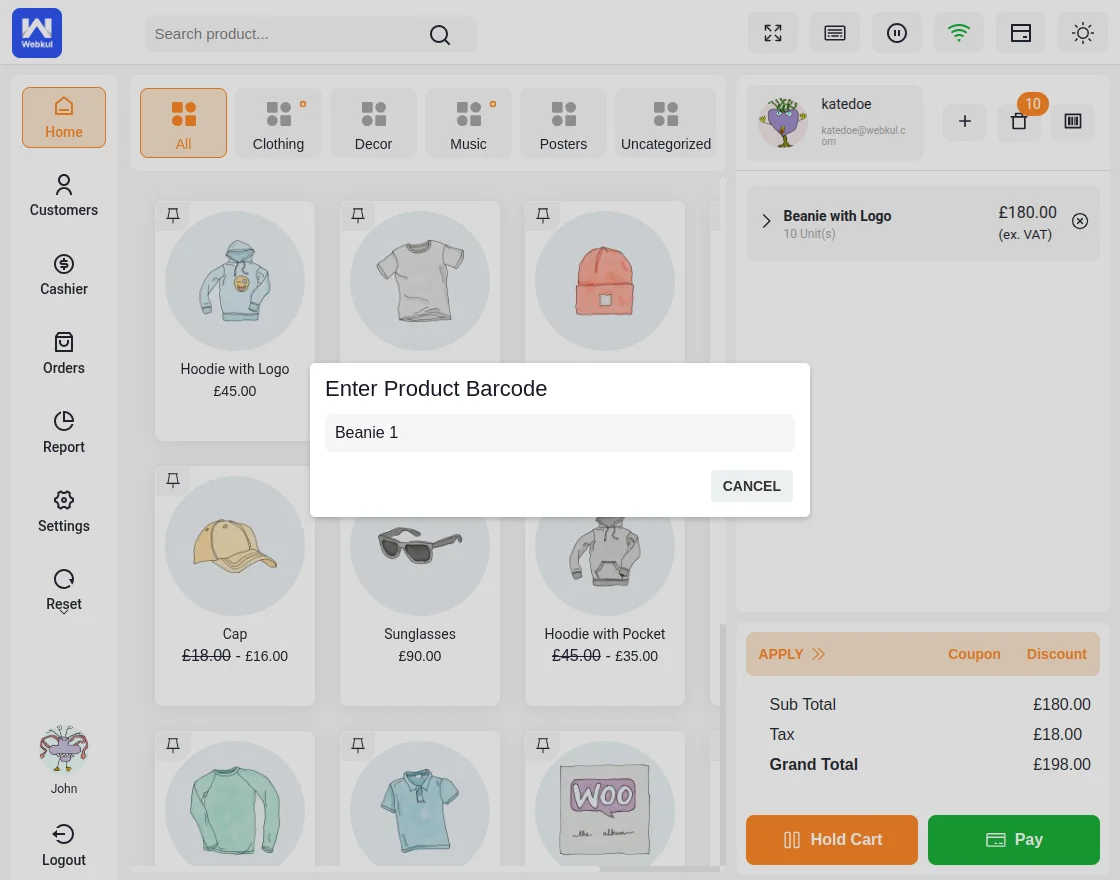
Again, as the POS agent clicks on DONE, 20 units of product gets displayed on the cart as shown in the image below. Results in adding the 20 units of that product at instant.

Further, the POS agent proceeds to checkout on behalf of the customer and place the order as shown in the image below.
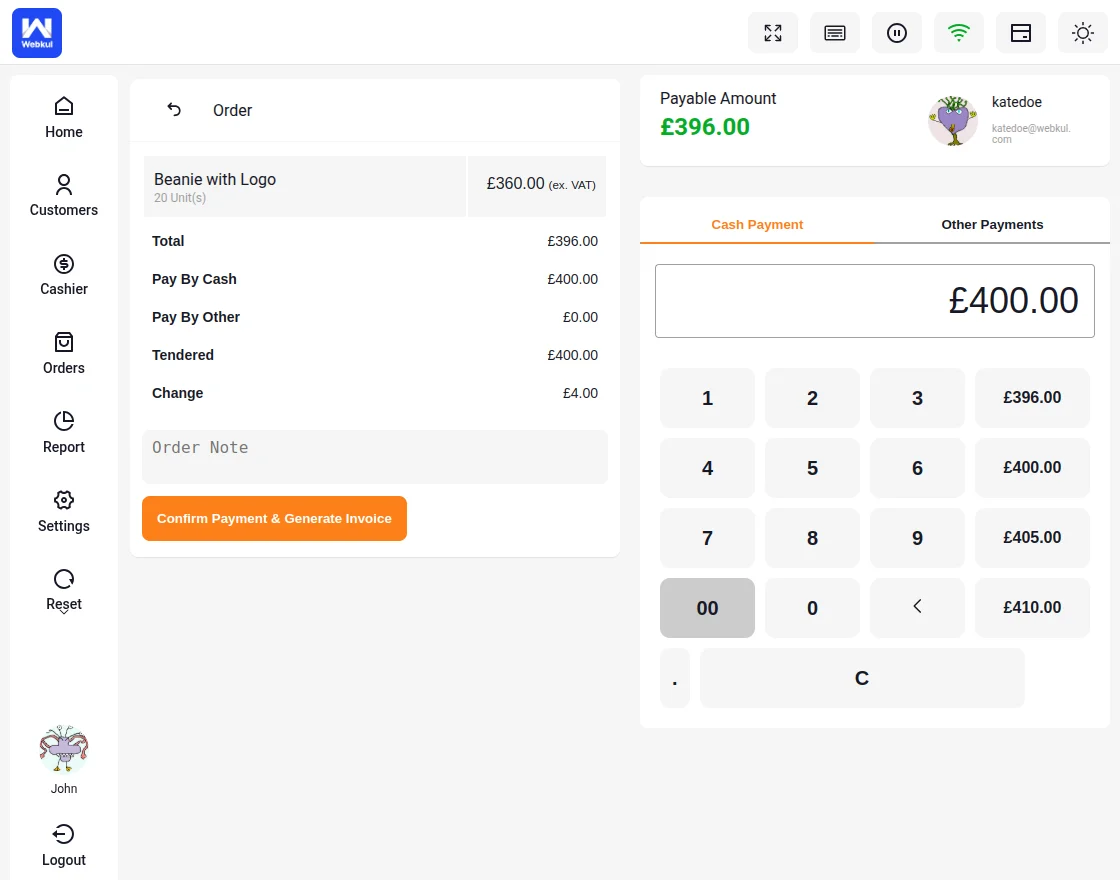
The order details displayed on placing the order as shown in the image below.
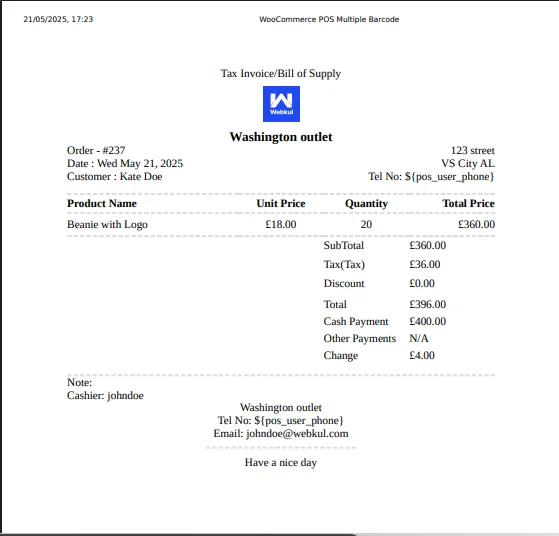
The POS agent can print the invoice for the order by clicking the Print Invoice button.
In conclusion, that’s all for the WooCommerce POS Configurable Barcode extension. If you face any issues, feel free to raise the issue and add a ticket at webkul.uvdesk.com
Current Product Version - 1.0.3
Supported Framework Version - WordPress 6.7, WooCommerce 9.8.7, POS: 6.4

Be the first to comment.