Introduction
WooCommerce Marketplace POS System provides marketplace sellers to easily manage their online stores along with the physical stores.
The physical stores will have a POS front-end management system for which the seller can assign a store agent. They can easily manage the sales and customers at that particular store.
WooCommerce Marketplace POS system plays a vital role in increasing day-to-day sales by having a management system to manage online stores along with physical stores.
The POS front end is built on React to allow an effective UI. Thus, the POS agent can get a user-friendly experience. It also increases the performance of POS by optimizing the speed.
Check the plugin workflow at vendors & pos terminal end –
Check the admin workflow and the configuration settings –
Note:
- The POS system will work with devices having a 1280 screen resolution or above. Currently, we are working on making the POS work with up to 768 screen resolution and above.
- POS will not work in the Mozilla Firefox private window.
- The WooCommerce Marketplace POS module supports the WooCommerce Marketplace version: 6.1.0
- To know more about centralized inventory in the WooCommerce Marketplace Point of Sale (POS) system, you can check this article.
- To use the WooCommerce Marketplace Point of Sale System module you must have WooCommerce Marketplace, as well as WooCommerce POS.
- This module is now compatible with WooCommerce’s new High-Performance Order Storage (HPOS) feature.
Features
- Admin and the seller can create multiple store outlets for online stores.
- The admin and the seller can create agents for the outlets to manage sales and customers at their end.
- The admin and the seller can create a default customer.
- Centralized inventory can be visible in the POS store.
- Quick addition of new customers by POS agent for their panel.
- The admin can set the unit price.
- The POS User can set the POS screen as full screen according to the convenience.
- Effective sales and inventory management system for the admin and the seller.
- Barcode readers can be used to add products to the cart.
- Admin can add customer grouping.
- Admin can do a web app setting.
- The admin or sales agent can set the unit price based.
- Admin/Seller can Print Barcode Slip.
- At the time of checkout, the POS agent can apply a coupon to the cart. However, the POS user can edit the price of items in the cart or customer based discount is applicable for a few products.
- The admin can setup the POS theme in the OS Default, dark, and light mode
- The sales agent can view the cash drawer for computing the profit generated in a day or days by them.
- Hassle-free payment via cash, card, or split method and checkout system.
- At the time of checkout, the POS agent can apply a coupon and discount to the cart.
- The cart can be put on hold for future processing.
- Better sales management by POS agent by monitoring sales history, hold sales, and offline sales from the POS panel.
- Sellers can use the shortcut key from the POS panel.
- POS agents can sell a new/custom product which is not available on the website.
- Admin can manage outlets created by sellers if the seller’s account is disapproved or deleted.
- WooCommerce Marketplace Point Of Sale System is not multisite compatible .
Installation
The user will get a zip file which he has to upload in the “Add New” menu option in the WordPress admin panel.
For this login to WordPress Admin Panel and Under the Dashboard hover your mouse over the “Plugins” menu option which brings out a Sub-Menu and then selects the “Add New” option.

After that, you will see an option on the top of your page that is “Upload Plugin”, click the option to upload the zip file.

After that, click on the “Upload Plugin” option, below that you will see a button “Choose File” click on the button to browse for the zip file as per the snapshot below.

Therefore, now for browsing the file, click the “Install Now” button to install the plugin.
When the plugin is installed correctly, you will see the success message and an option to activate the plugin.
After that, click on “Activate Plugin” to activate the installed plugin.

Thus, in this way, module installation completes.
Module Translation
To know how to translate the module, you can click here.
Module Configuration of WooCommerce Marketplace POS
The admin installed the module.
After that, the admin will have the Point Of Sale menu option to manage the marketplace POS system as shown below.
 Under the Point Of Sale menu option, the admin will have other sub-menu options –
- Users
- Outlets
- Products
- Orders
- Reports
- Invoice Templates
- Settings
POS Settings – Admin End
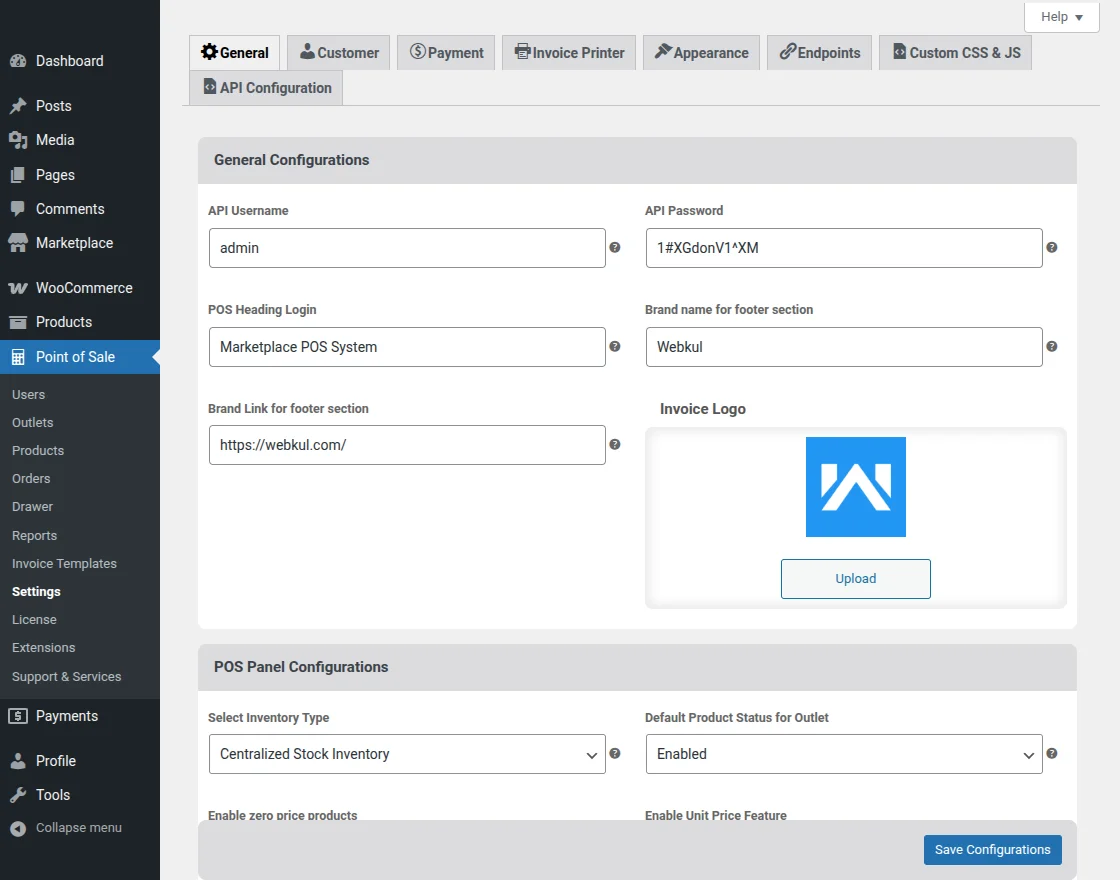
Under the POS Settings section, the admin can set the default settings of the marketplace POS. For this, the admin will navigate to Point Of Sale -> Setting -> General as shown below.
General Configurations
- API Username and Password: The admin can configure the API username and then the password that will connect the WooCommerce site with the POS.
- POS Heading Login: It will be visible to the sales agent while logging in to the POS system.
- Brand name for footer section– The admin can mention the name of the organization for branding purposes that is visible in the footer section of the login page of POS.
- Brand Link for footer section- The name given in the footer section is linked with a URL redirecting towards the brand detail page.
- Invoice Logo- The admin can add a logo of the organization that shall be visible on the invoice.
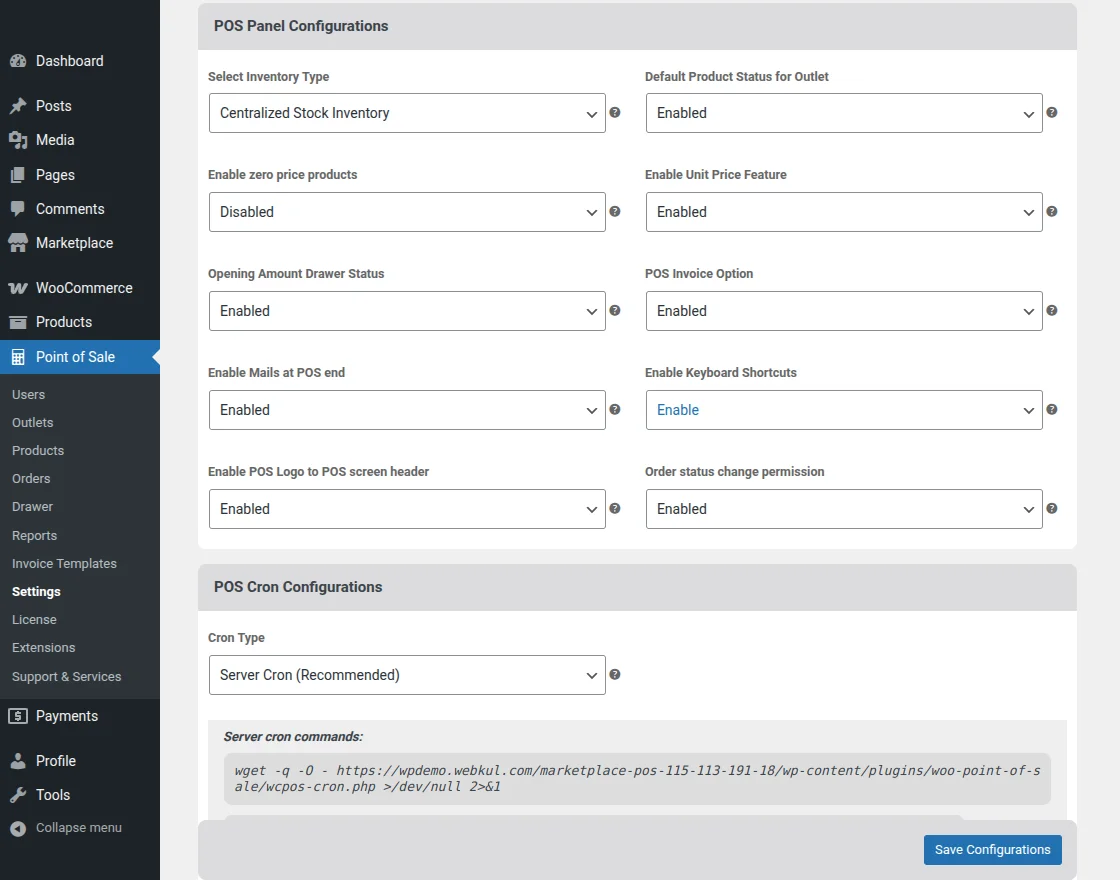
POS Panel Configurations
- Select Inventory Type- The admin can select amongst master stock and centralized inventories.
- Enable Zero price products- If this field is enabled, admin can allow the zero price products to be visible on the POS.
- Opening Amount Drawer Status- When enabled, a popup for opening amount will be displayed to input the opening amount. If disabled, it sets the opening amount to zero(0).
- Enable Mails at POS end:- On enabling this field, both the admin and customer will receive emails as the customer places orders.
- Enable POS Logo to POS Screen Header: The admin can add a logo of the organization that will display on the POS Screen header.
- Default Product Status for Outlet- The admin can enable this field so that all new created products will be in enabled state by default in all outlets.
- Enable Unit Price Feature- The admin set this field as enabling, to the allow selling of the product according to the weight (if the product is having weight) in the outlet.
- POS Invoice Option- By enabling this field, the POS user gets the option to print the invoice through the POS. Otherwise, they won’t be able to print the invoice.
- Enable Keyboard Shortcuts:- The admin can either enable or disable shortcuts of the keyboard.
- Order Status Change Permission- If enabled, the POS manager can change the order status.
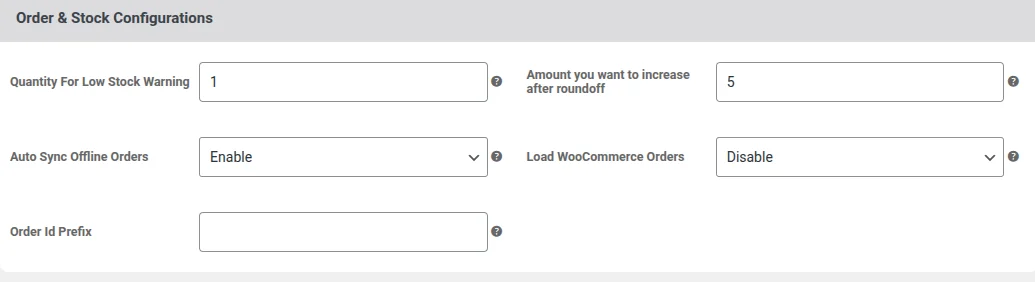
Order & Stock Configurations
- Quantity for Low Stock Warning- The admin can set the maximum quantity for the products to show low stock warning.
- Auto Sync Offline Orders- When enabled, the offline orders will sync automatically when any order is created online.
- Order ID prefix- Field to set the Order ID prefix.
- Amount you want to increase after roundoff- To set the amount to be increased after roundoff in the POS payment custom option.
- Load WooCommerce Orders- If enabled, the WooCommerce store orders will sync with the POS outlets.
Barcode Settings
After that, the admin can configure the barcode settings.

- Width:- The admin can set the
-
Height:- The admin can set the barcode height.
-
Text Position:-The admin can select the barcode text position.
-
Text Size:-The admin can set the barcode text size.
-
Print Preview:-The admin can select the barcode print preview.
Web App Settings
After that, the admin can configure the web app settings.

- Name and Short Name: The admin can set the names and short names for the following fields that will be visible in the web application.
- Theme and Background color: The admin can even set the theme and background color of the application.
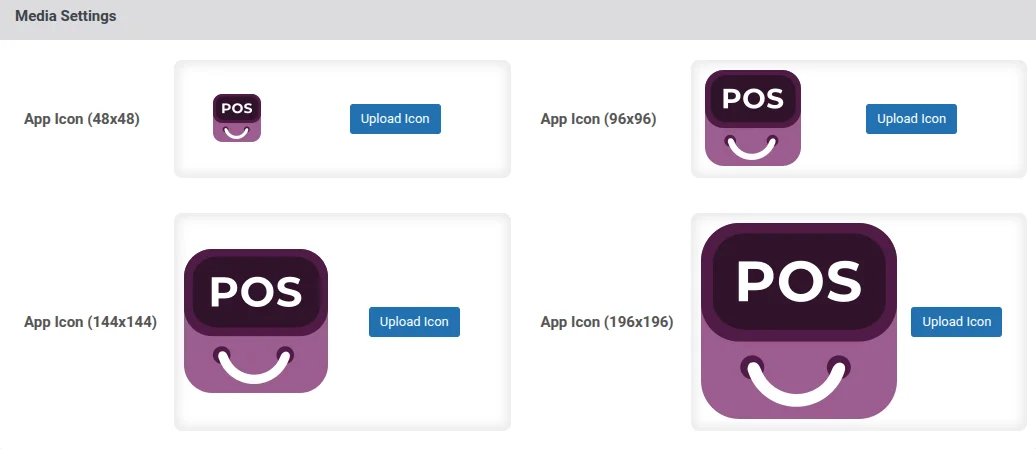
Media Settings
After that, the admin can configure the media settings. This section will contain the App Icon in different dimensions as shown in the image below.
Customer Settings
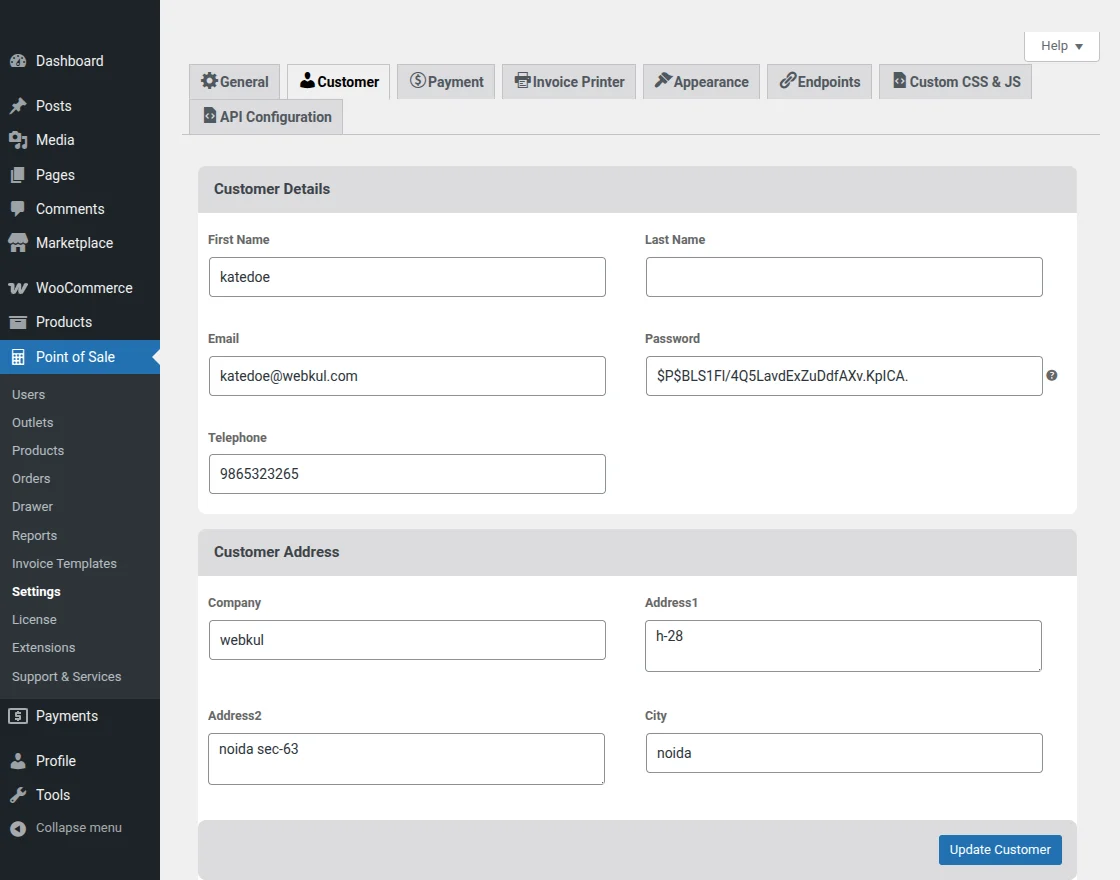
Here, the admin will configure the details for the default customer:-
Customer Detail
- First Name – Enter the first name of the default customer.
- Last Name – Enter the last name of the default customer.
- Email – Enter the email id of the default customer.
- Password – Enter the password
- Telephone – Enter the telephone number of the default customer.
Customer Address
Enter the address of the customer.
- Company:- Enter the company name.
- Address1:- Enter the company address 1.
- Address2:-Enter the company address 2.
- City:- Enter the city.
- Postcode:- Enter the postcode.
- Country:- Enter the country.
Payment Method
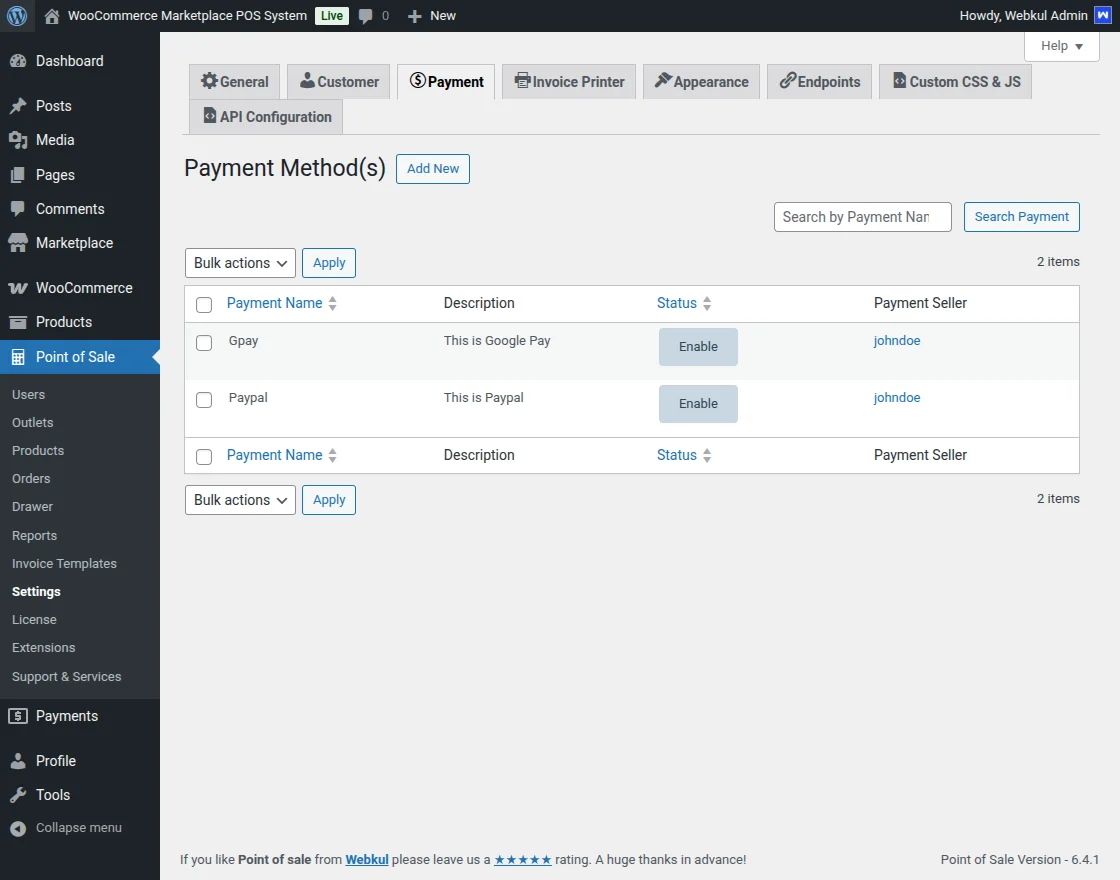
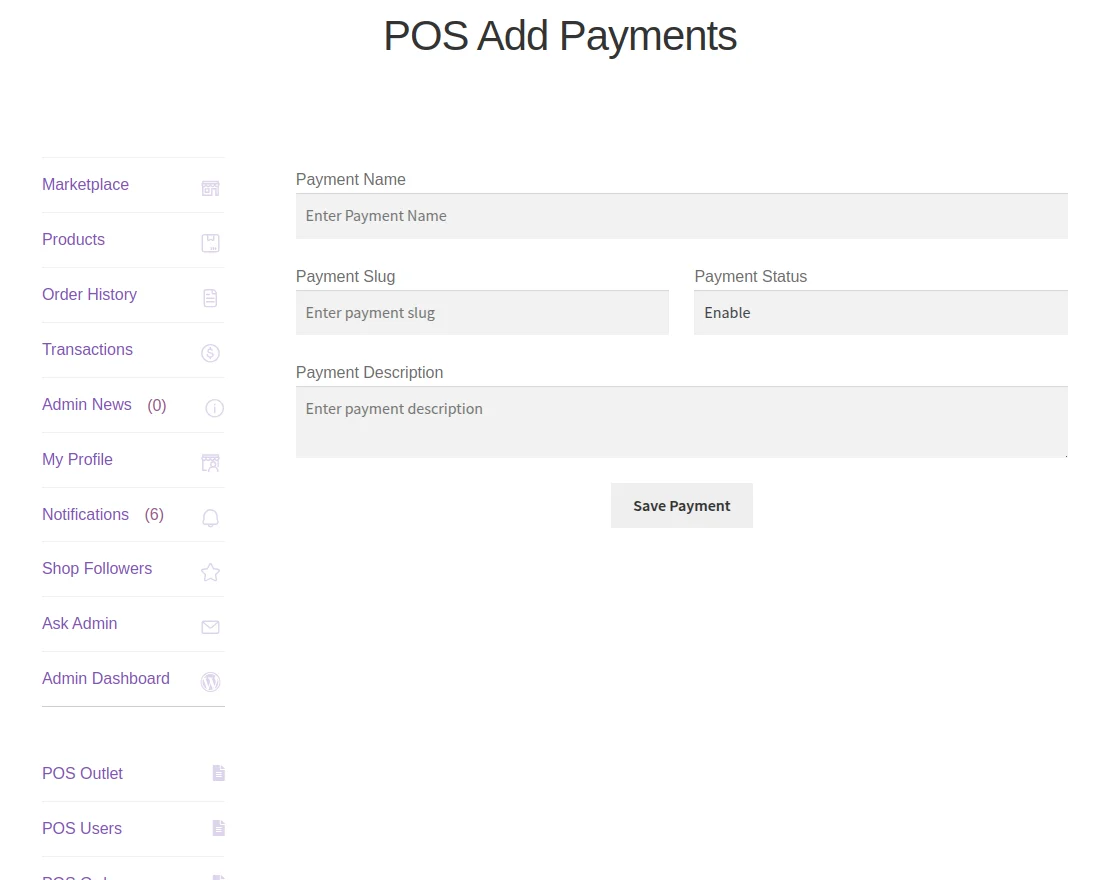
After that, the admin can configure the details for the payment methods:-
- Payment Name:- The admin can mention the name of the payment method.
- Description:- The admin can describe the payment method.
- Status:-The admin can either enable or disable the payment method
- Payment Seller:-The admin can mention the name of the payment seller.
Invoice Printer
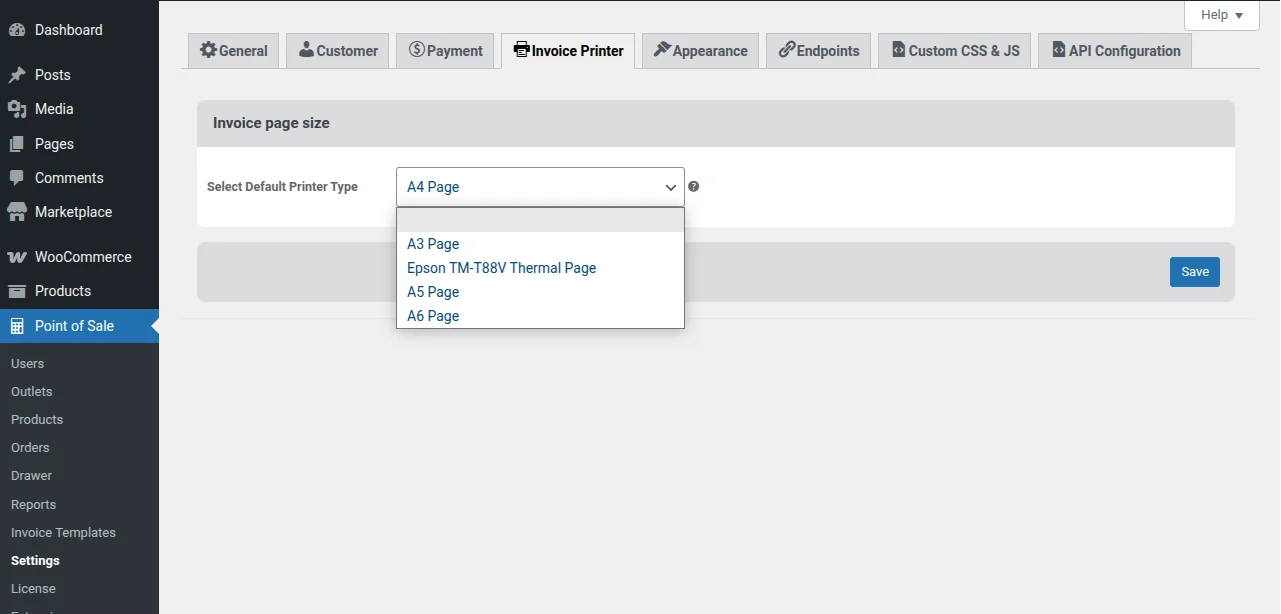
After that, the admin can set the printer from the list for the POS by Select Default Printer Type.
Appearance
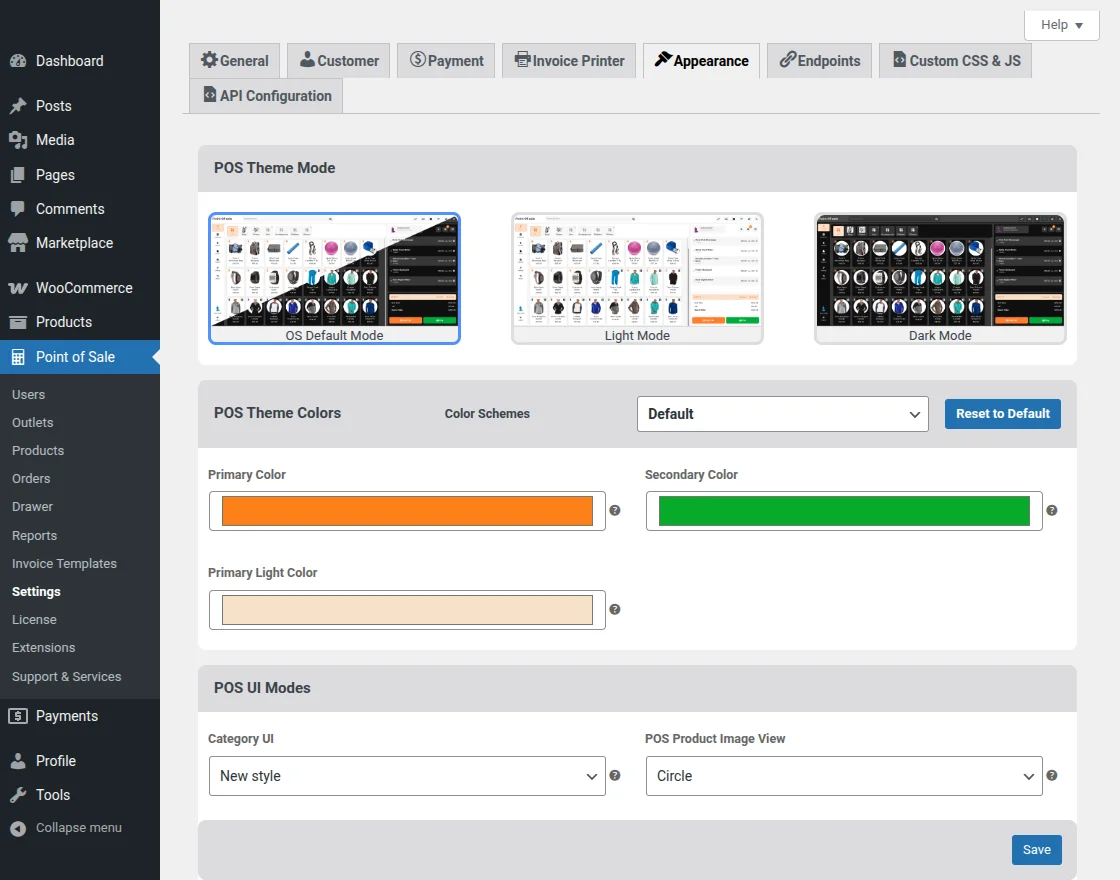
The admin can setup the appearance of the POS under the Appearance tab:-
POS Theme Mode
- OS Default Mode:- The admin can set the default theme which turns with the default setting of the device either light mode or dark mode.
- Light Mode:- The admin can set light mode for the POS.
- Dark Mode:-The admin can set dark mode for the POS.
POS Theme Colors
The admin can either select a list of pre-defined colors from the Color Schemes dropdown list or select the Primary Color, Secondary Color and Primary Light Color individually as well for the POS.
POS UI Modes
- Category UI– The admin can choose between the New Style or Old Style for the category UI.
- POS Product Image View– Using this field, admin can set the style of the product image view in the POS.
POS Endpoint
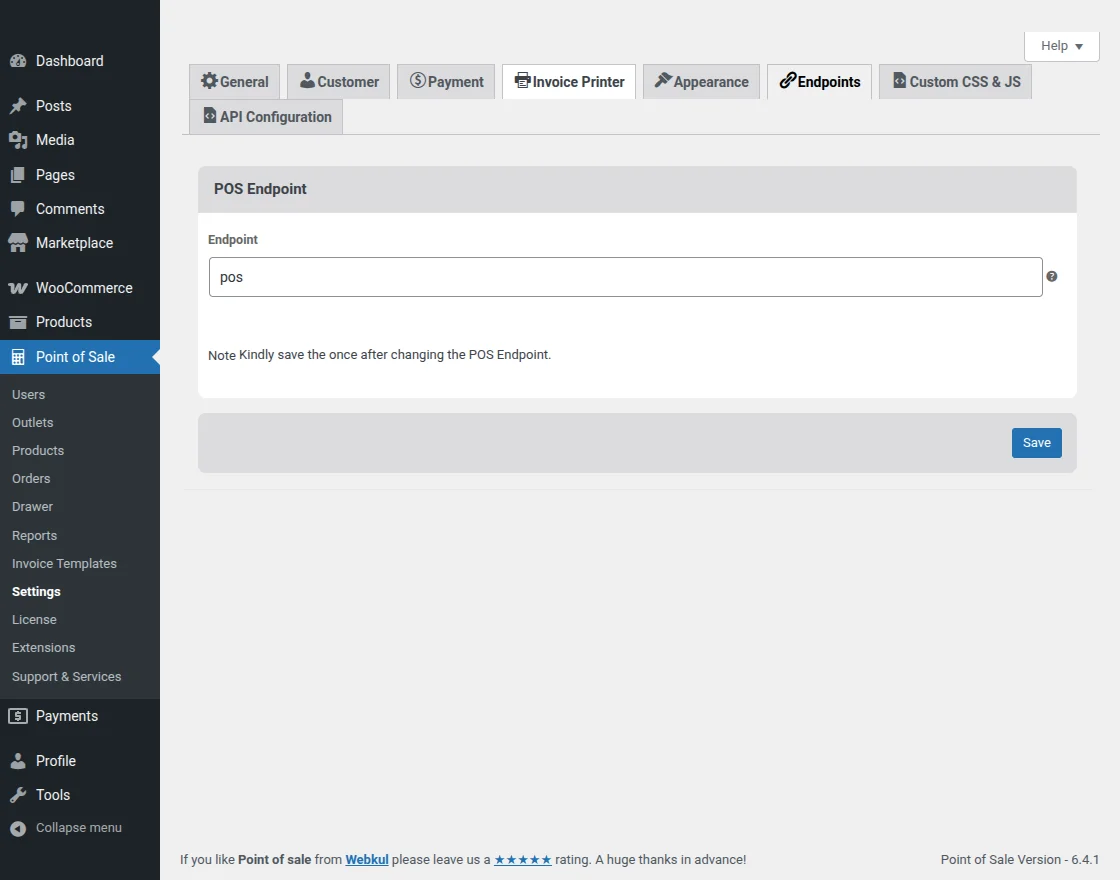
Lastly, the admin can set up the endpoint of the POS.
Manage POS Outlets – Admin End
The admin can manage the POS outlets by navigating to the Marketplace Point Of Sale -> Point Of Sale as shown below –
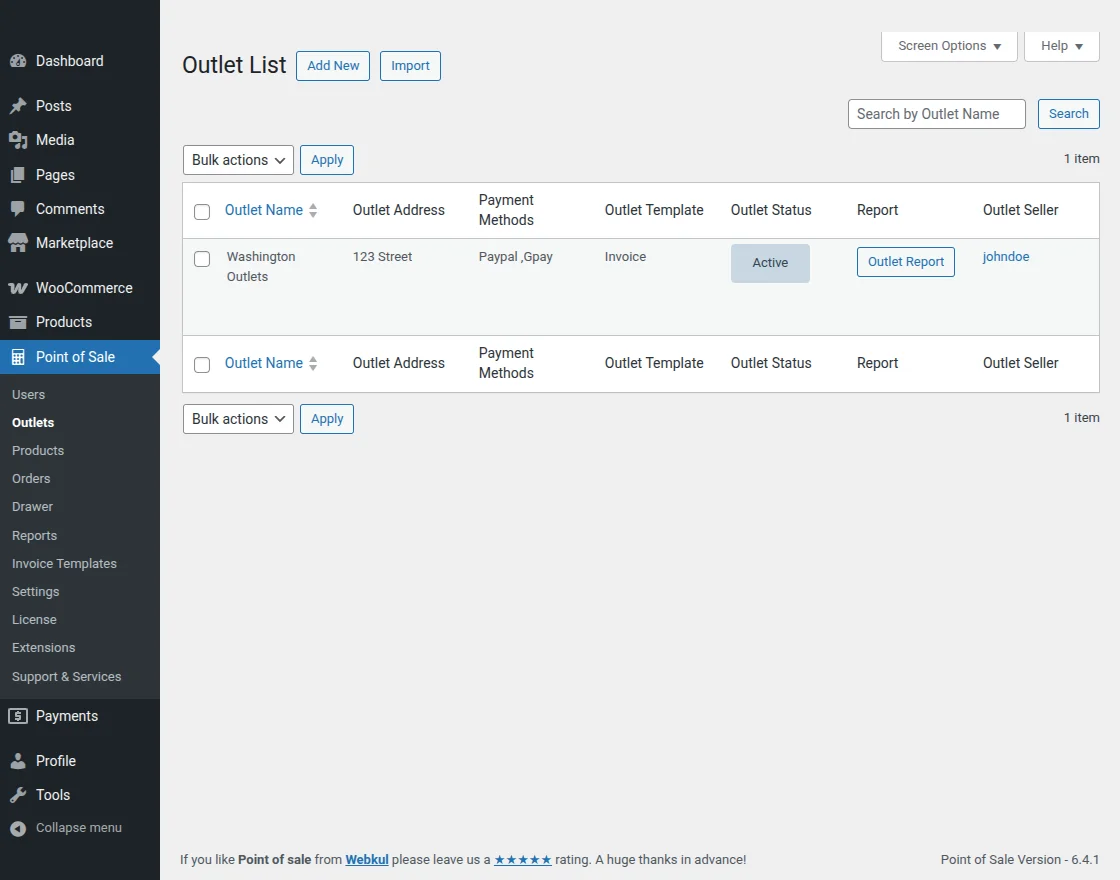
Here, the admin can –
- View the complete list of the existing POS outlets.
- Create the POS outlet store by clicking the Add New button
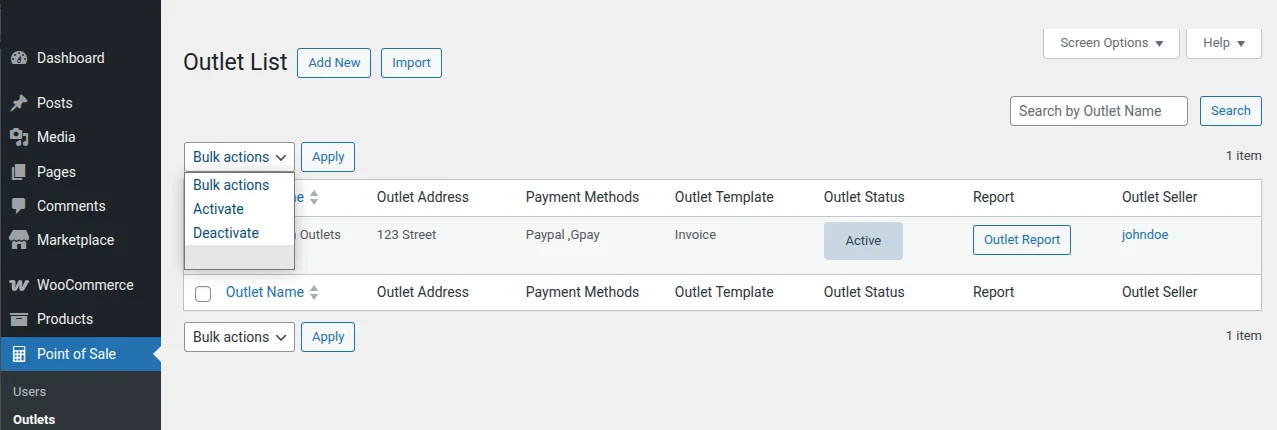
- Perform the bulk actions like Activate, Deactivate, or Delete the POS outlets from the Action drop-down list.
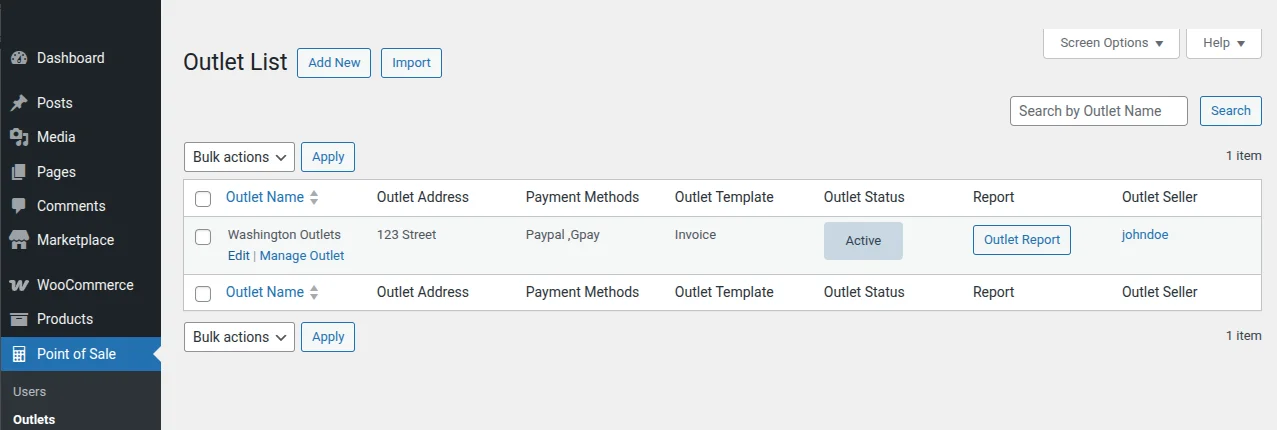
- Edit the POS outlet details by clicking the Edit link.
Add POS Outlet
Clicking the Add New button will navigate the admin to the Add POS Outlet page.
The admin can even directly navigate to the Marketplace Point Of Sale -> Add POS Outlet to add the POS Outlet as shown below.
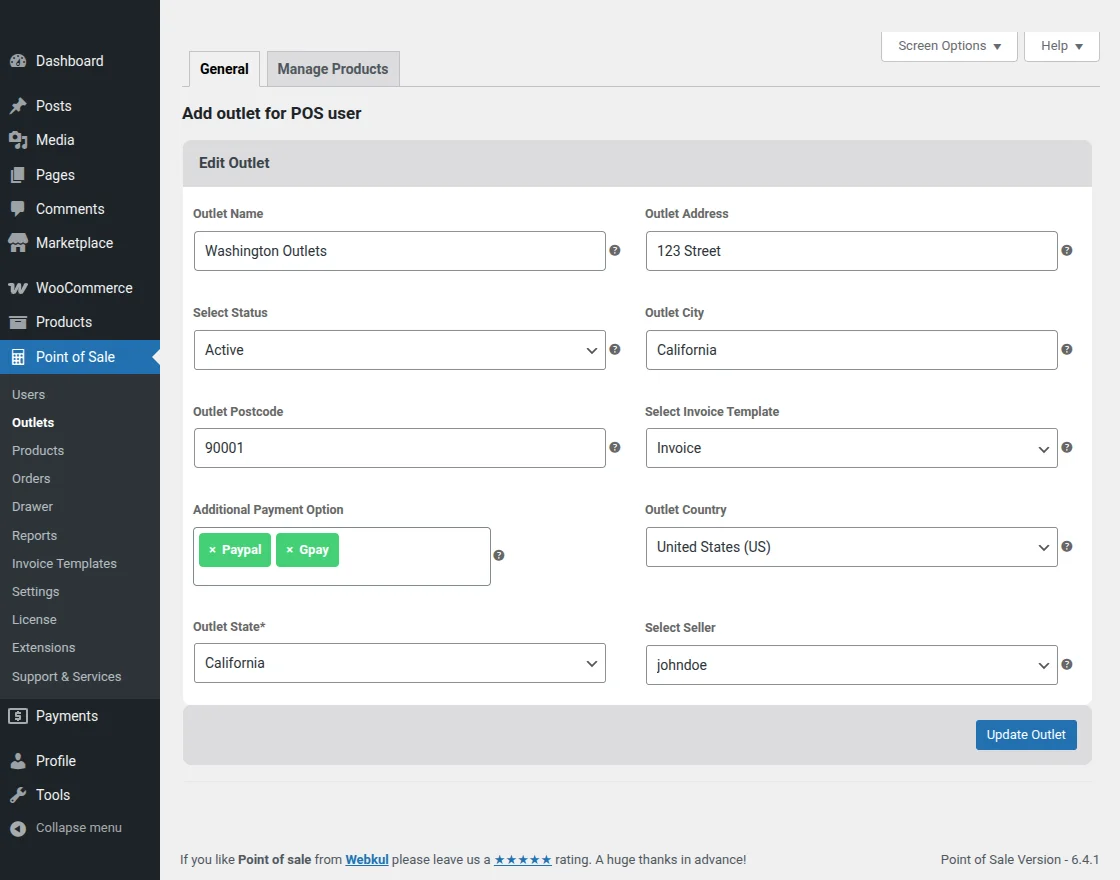
Here, the admin will enter the outlet details such as –
- Outlet Name – Name of the outlet.
- Outlet Address – Address of the outlet.
- Select Status – Status of the outlet.
- Outlet City – City of the outlet.
- Outlet State – State of the outlet.
- Outlet PostCode – Postcode of the outlet.
- Outlet Country – Country of the outlet.
- Additional Payment Option – payment options for the outlet
- Select Invoice Template – template invoice for the outlet
Lastly, hit the Save button to save the outlet configuration successfully.
Assigned Products
After that, the admin will click on Manage Outlet. 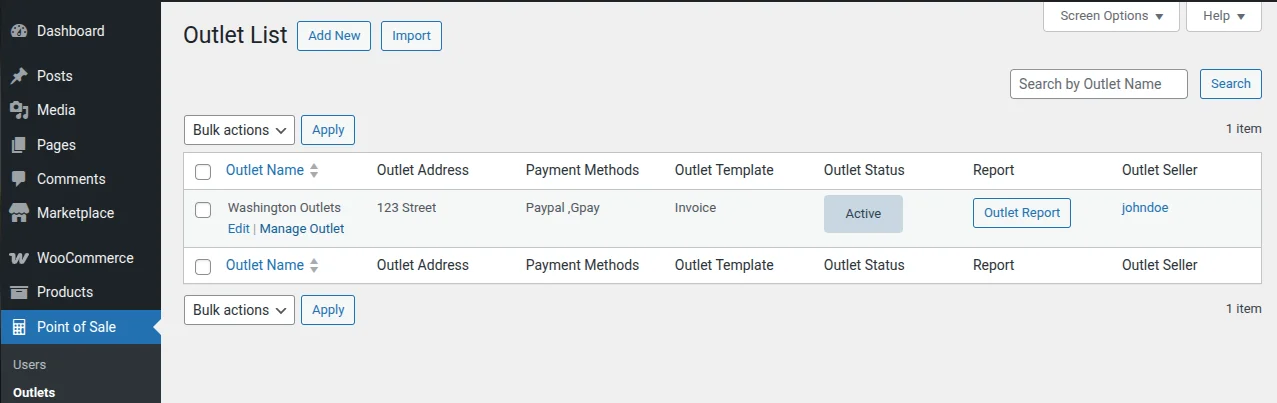
On the Manage outlet page, the admin can check the assigned products from Manage product.
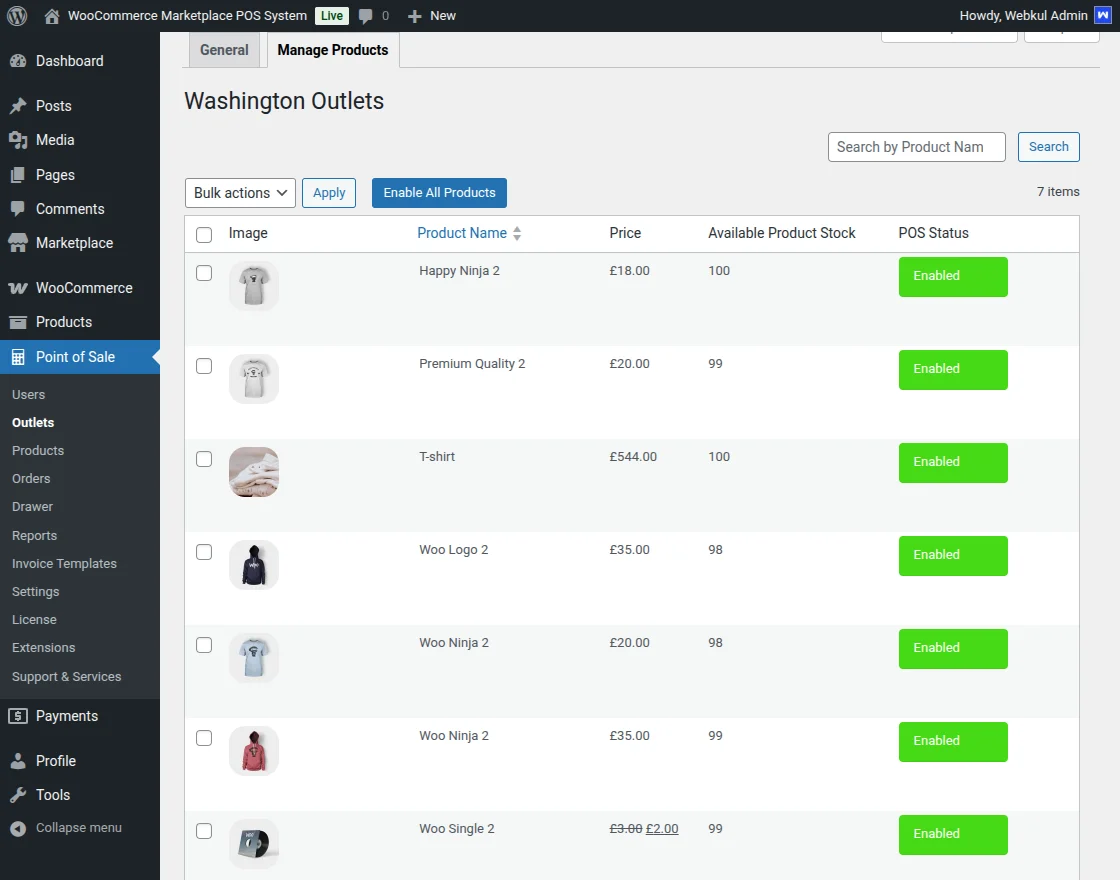
Under the Manage Products tab, the admin checks the assigned products to that store.
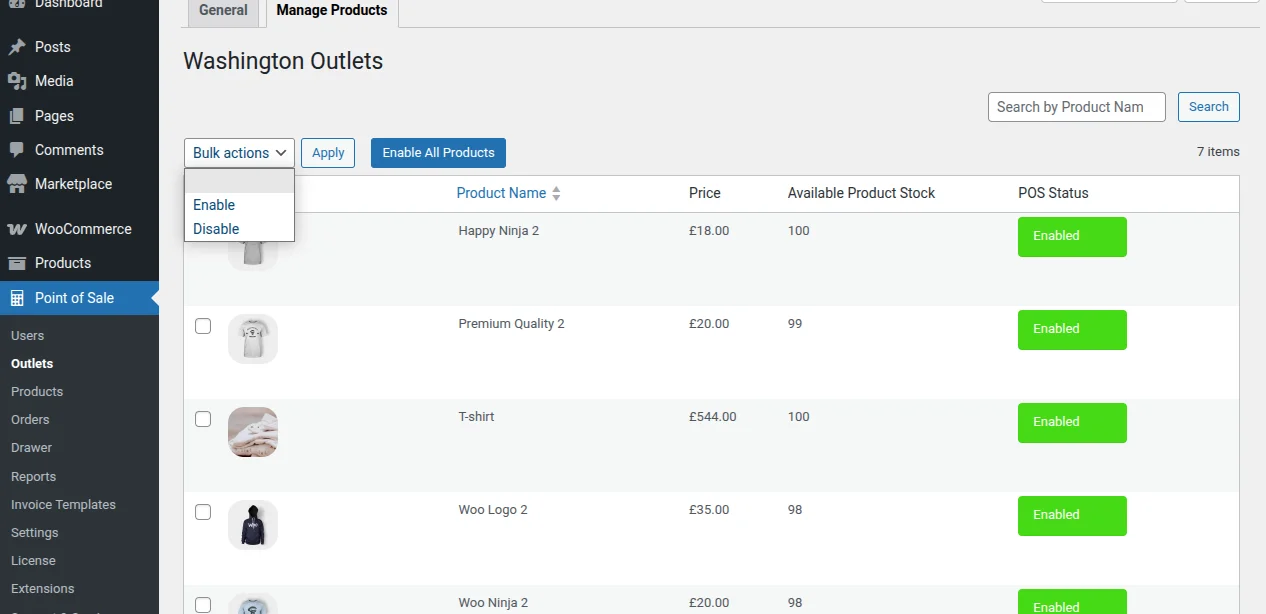
Therefore, for assigning the products to the outlet, the admin –
- First, select the products from the list.
- After that, hit the Enable from the Action drop-down list then hit the Apply button.
- Once the products are enabled, assign the product stock to the outlet under the column Assigned POS Stock.
Manage POS Users/POS Agents/POS Cashiers/Sales Person – Admin End
The admin can manage POS users by navigating through Marketplace Point Of Sale -> Point Of Sale -> User as shown below.

Here, the admin can –
- View the complete list of the existing POS users.
- Create the POS users’ store by clicking the Add New button
- Perform the bulk actions like Activate or Deactivate on the POS users from the Action drop-down list.
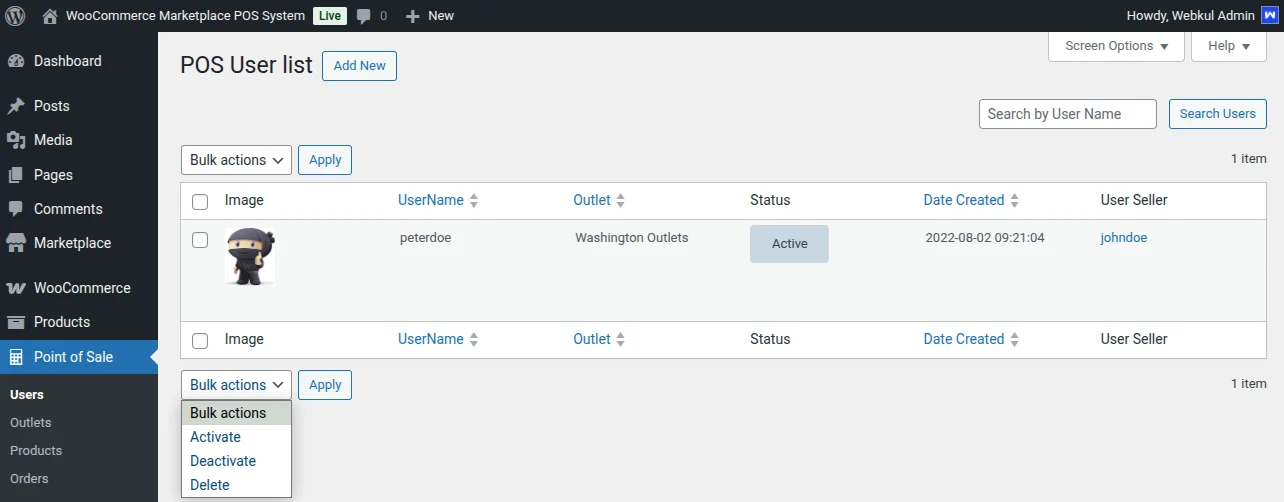
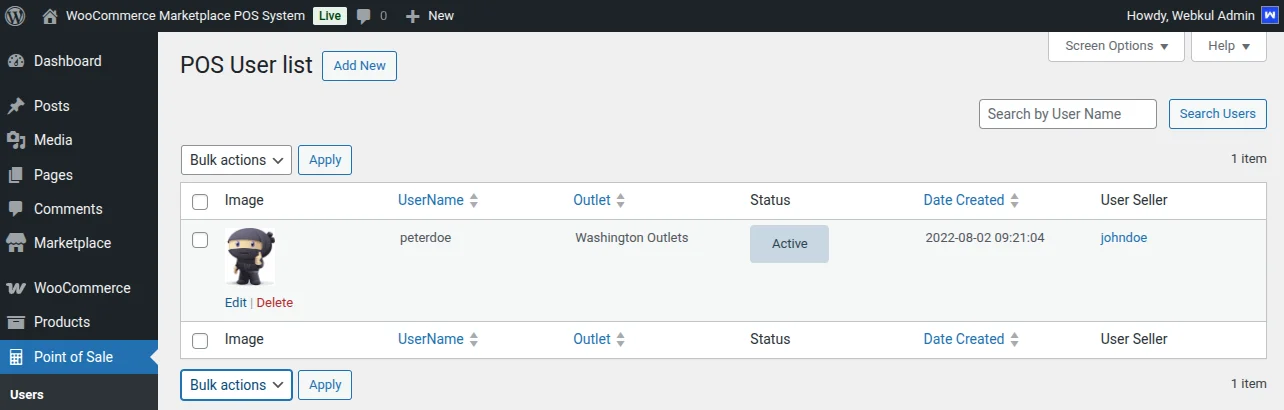
- Edit the POS user’s details by clicking the Edit link.
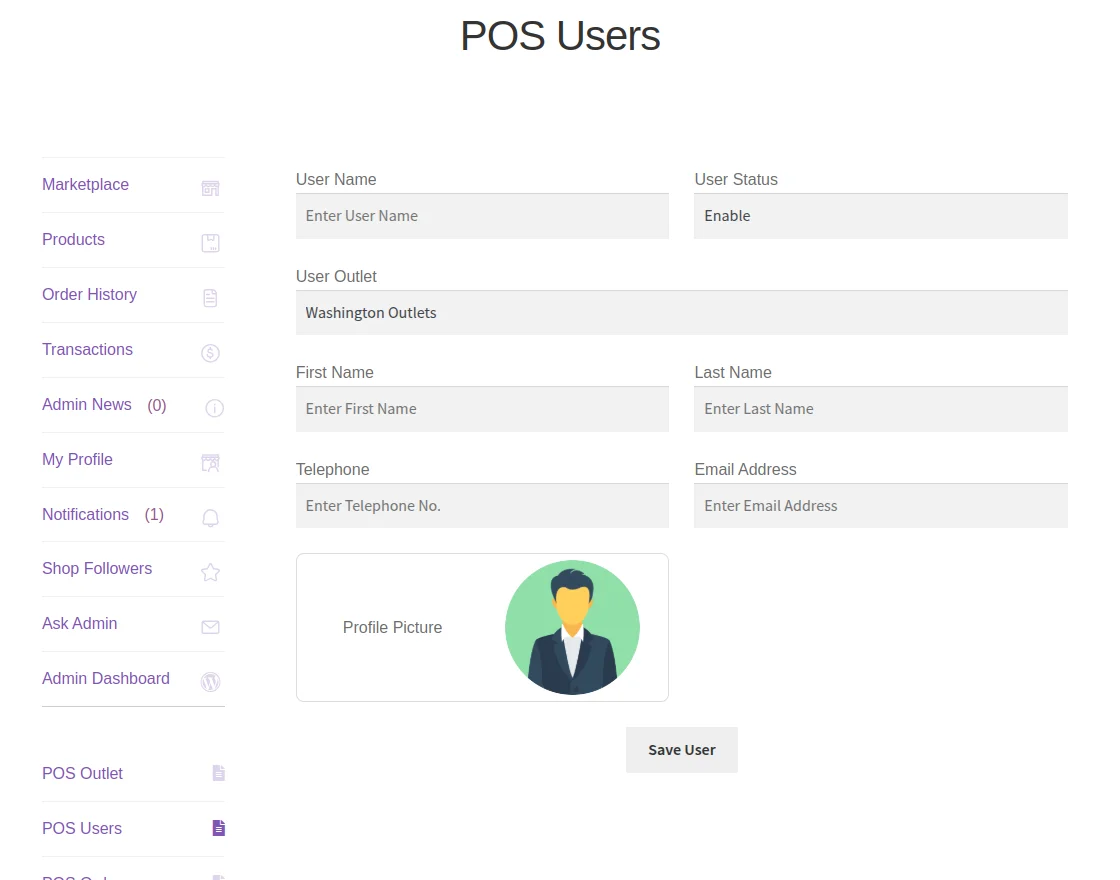
Add POS User
Clicking the Add New button will navigate the admin to the Add POS User page.
The admin can even directly navigate to the Marketplace Point Of Sale -> User ->Add User to add the POS user as shown below.
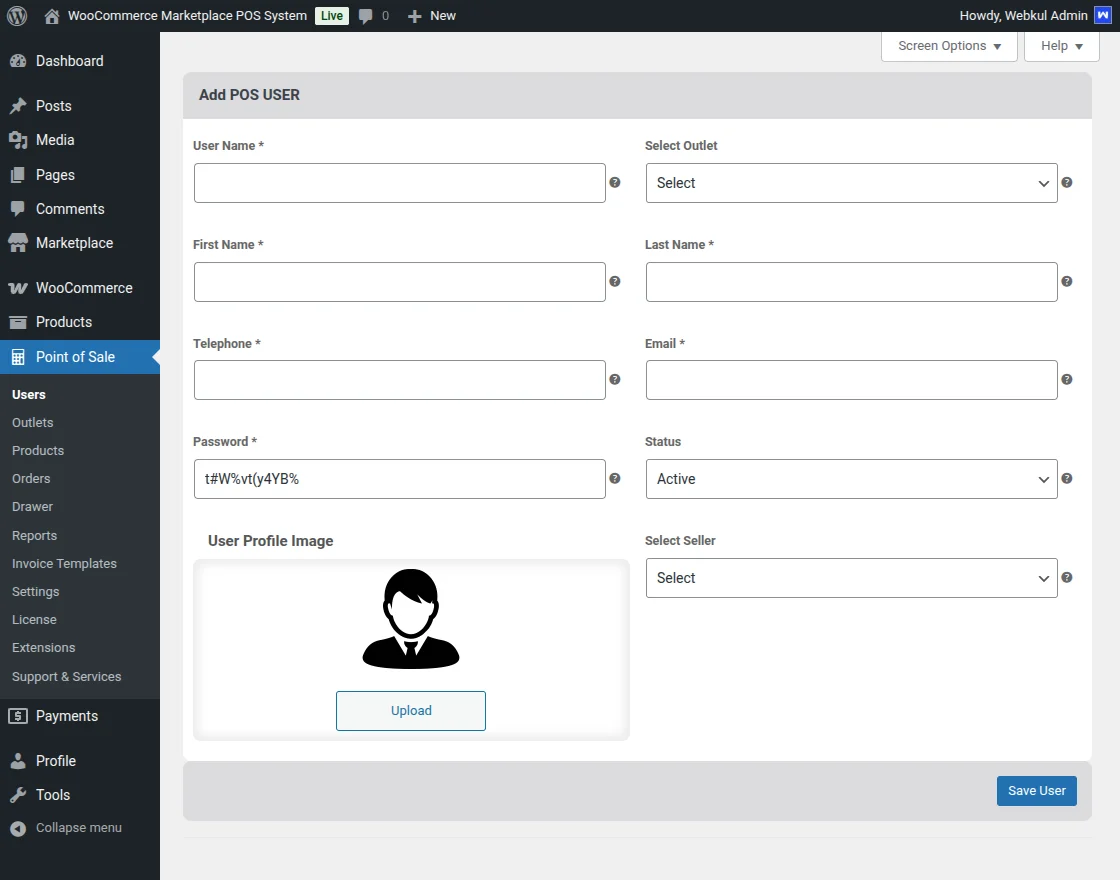
Here, the admin will configure the cashier account information:
- User Name: enter the user name of the POS user account.
- Select Outlet: enter the POS outlet name.
- First Name: enter the first name of the POS user.
- Last Name: enter the last name of the POS user.
- Telephone: enter the telephone details of the user.
- Email: enter the email address of the POS user.
- Password: edit the auto-generated password of the POS user account.
- Status: enable or disable the POS user account.
- Invoice Logo: upload an invoice image of the POS user.
And, lastly hit the Save button to save the outlet configuration successfully.
Thus, in this way the POS user account gets saved.
Note: The admin will manually provide the POS account credentials(username and password) to the POS user.
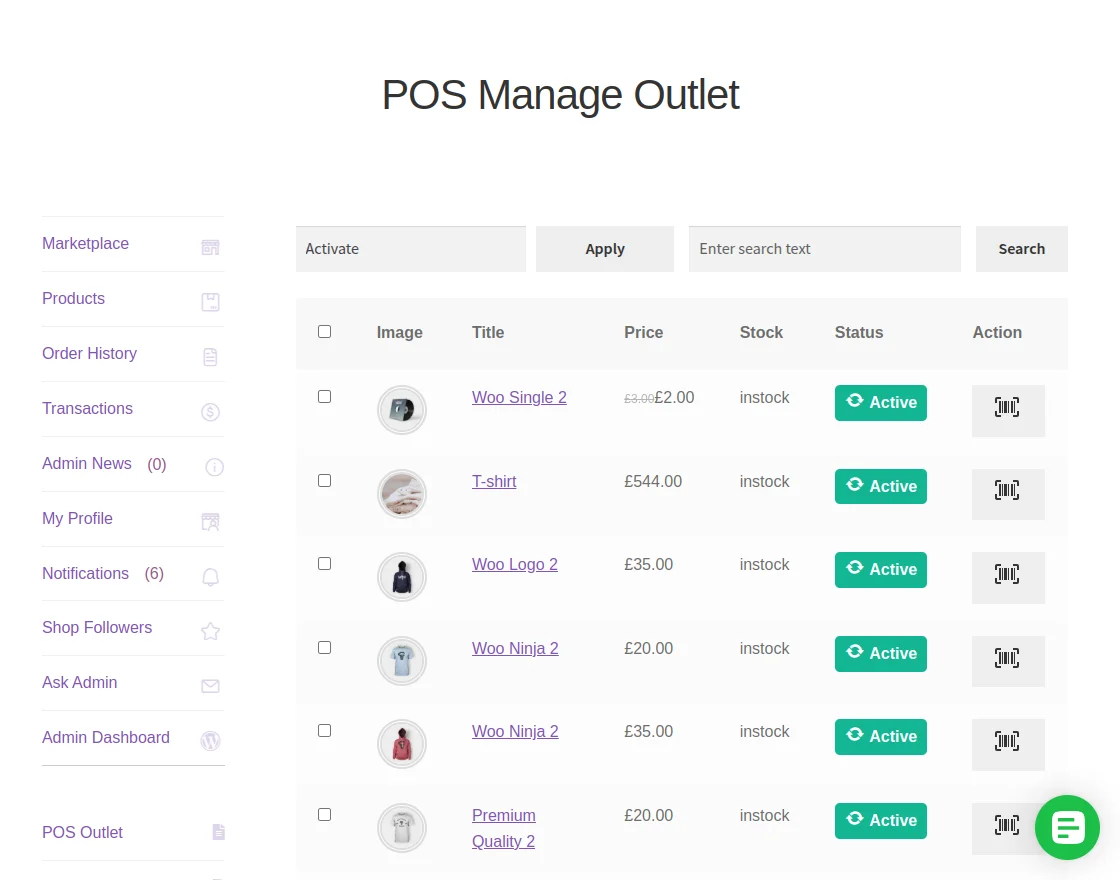
Manage POS Products – Admin End
The admin can view and generate a barcode for the POS products by navigating to the Marketplace Point Of Sale -> Point Of Sale -> Products as shown below.
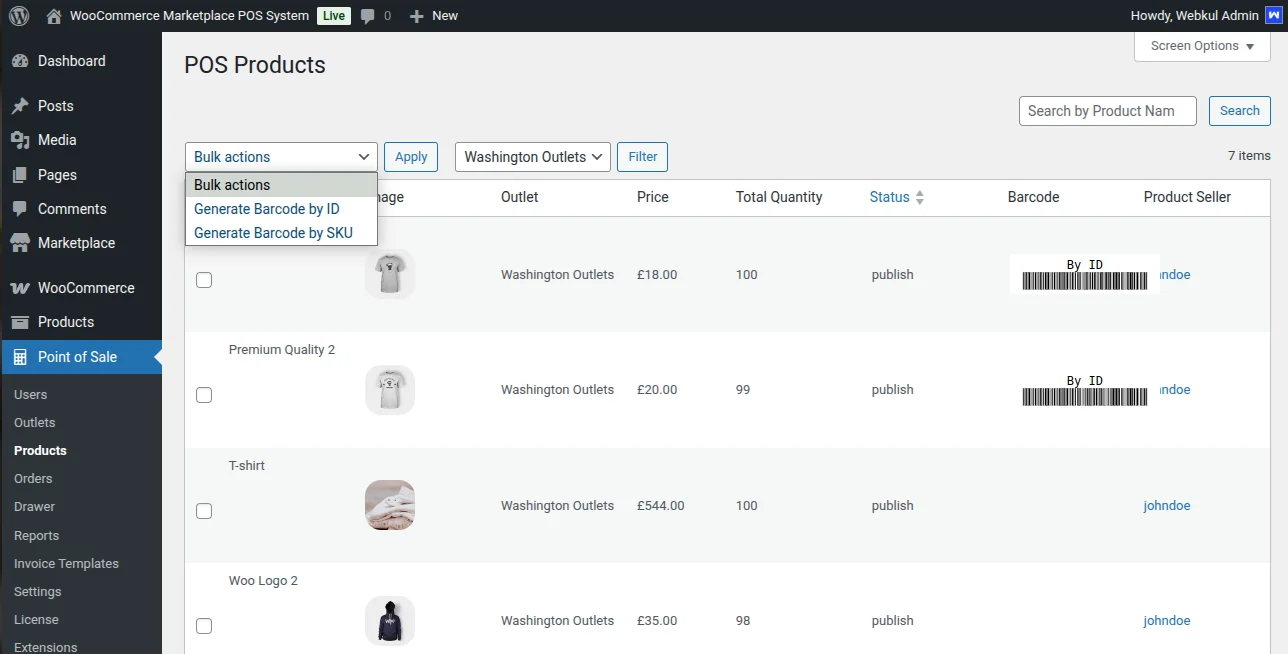
The generated barcodes for the products are to be used by the POS agent to add a product to the cart during the check-out process.
To generate the barcode, the admin will select the products for which the admin wants to generate the barcodes.
And then, select the Generate Barcode option from the drop-down list and hit the Apply button to generate barcodes.
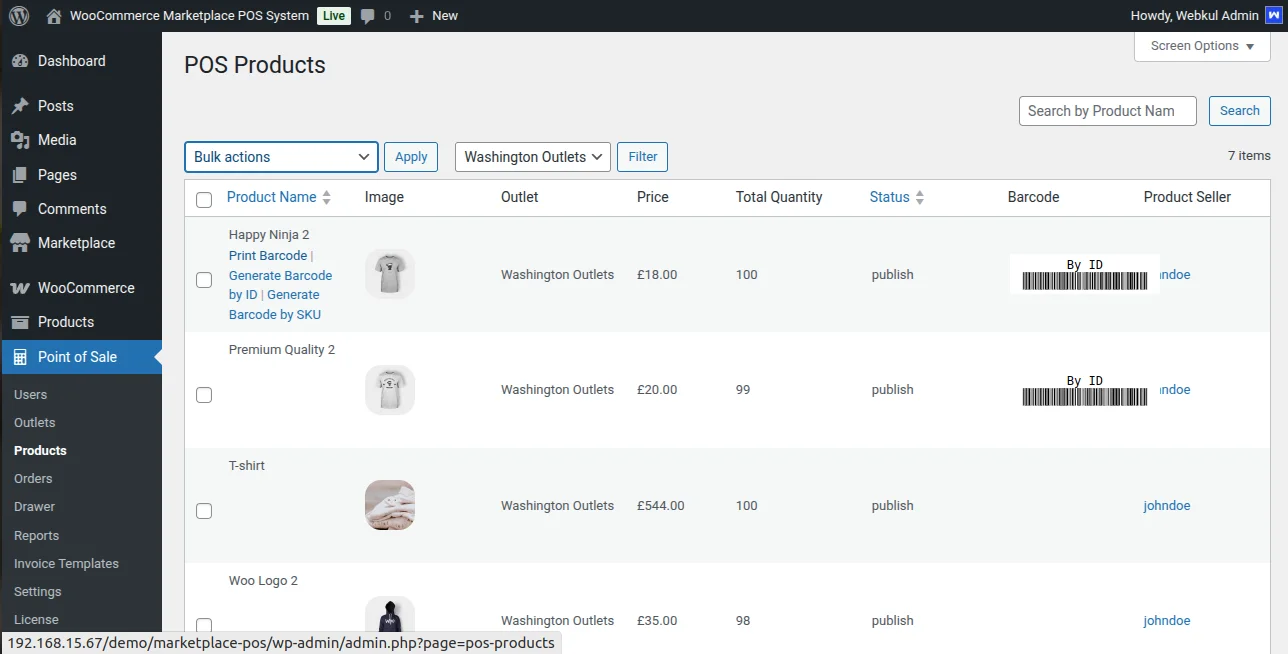
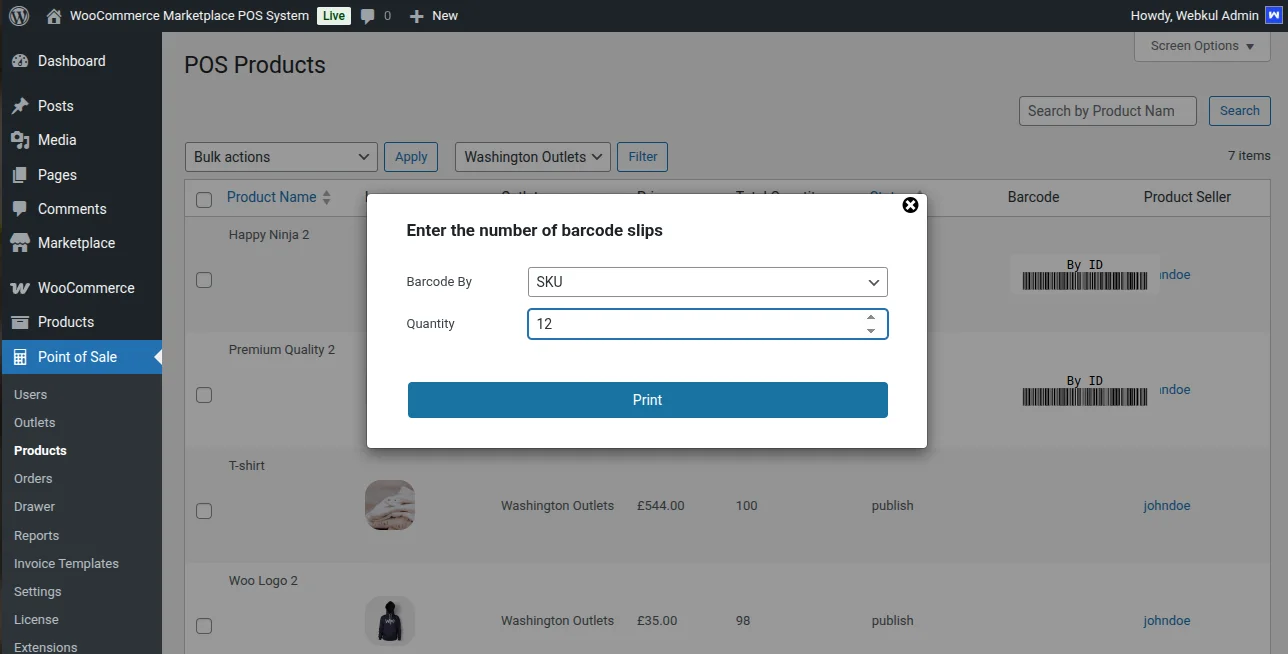
The admin can also print a barcode for a product in a required quantity by clicking on the Print Barcode link available while hovering on the product under column the Image as shown below.
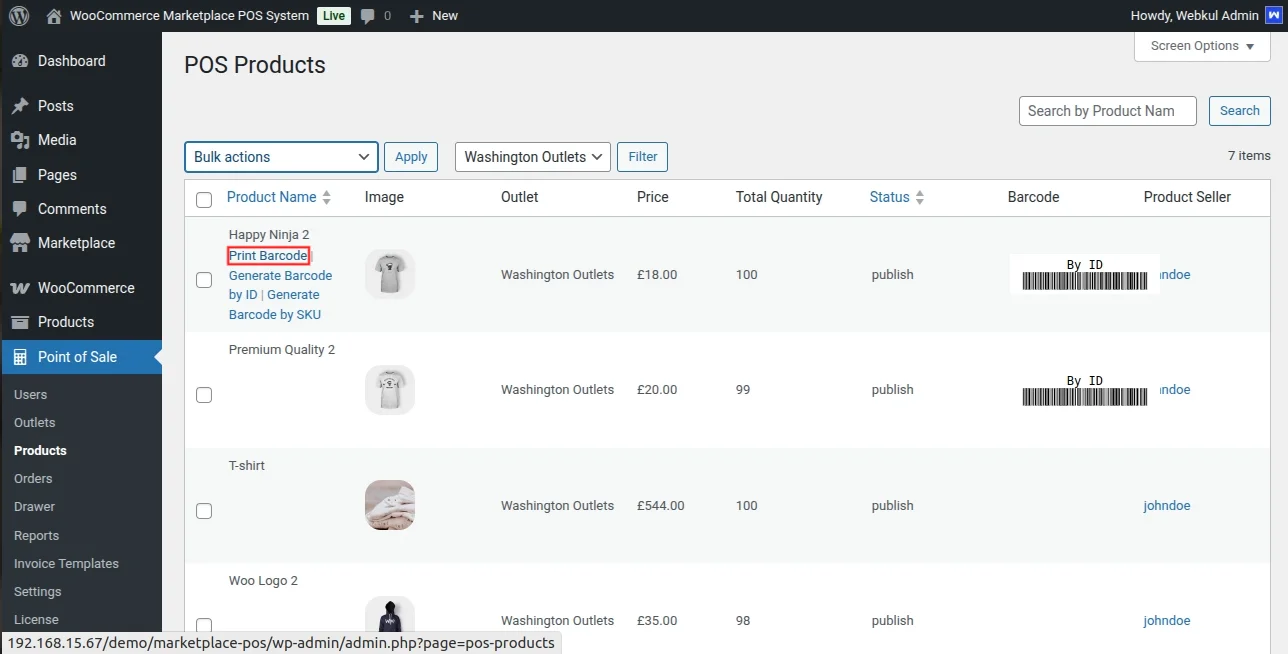
Clicking the Print Barcode link will display a popup. Here, the admin will add the quantity of the barcode to print.
Generate Barcode For Variable Products
The admin can generate a barcode for the variable products also as shown below.

If the barcode is not generated, then click the Barcode button as shown below.
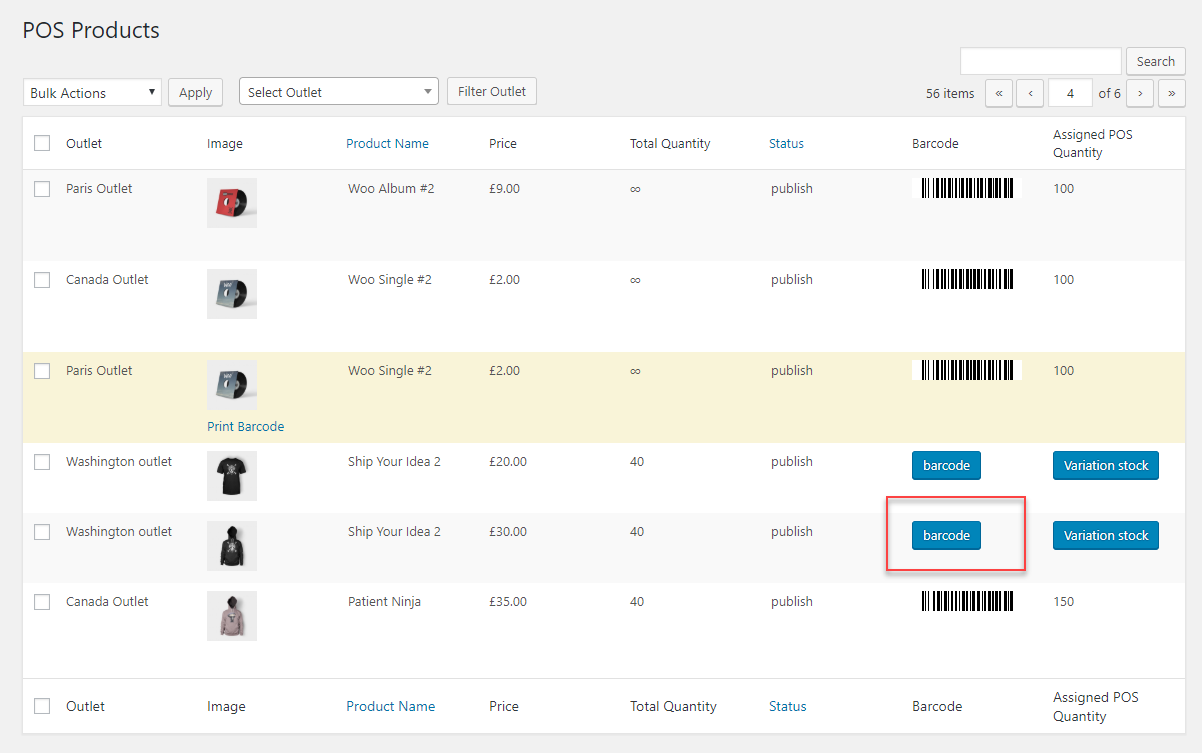
After clicking the Barcode button, click the Variation Stock button to view the generated barcode.

Clicking the Print Barcode link will display a popup. Here, the admin will add the quantity of the barcode to print.
Default Commission
The admin can configure it under “Marketplace > Settings > General”.
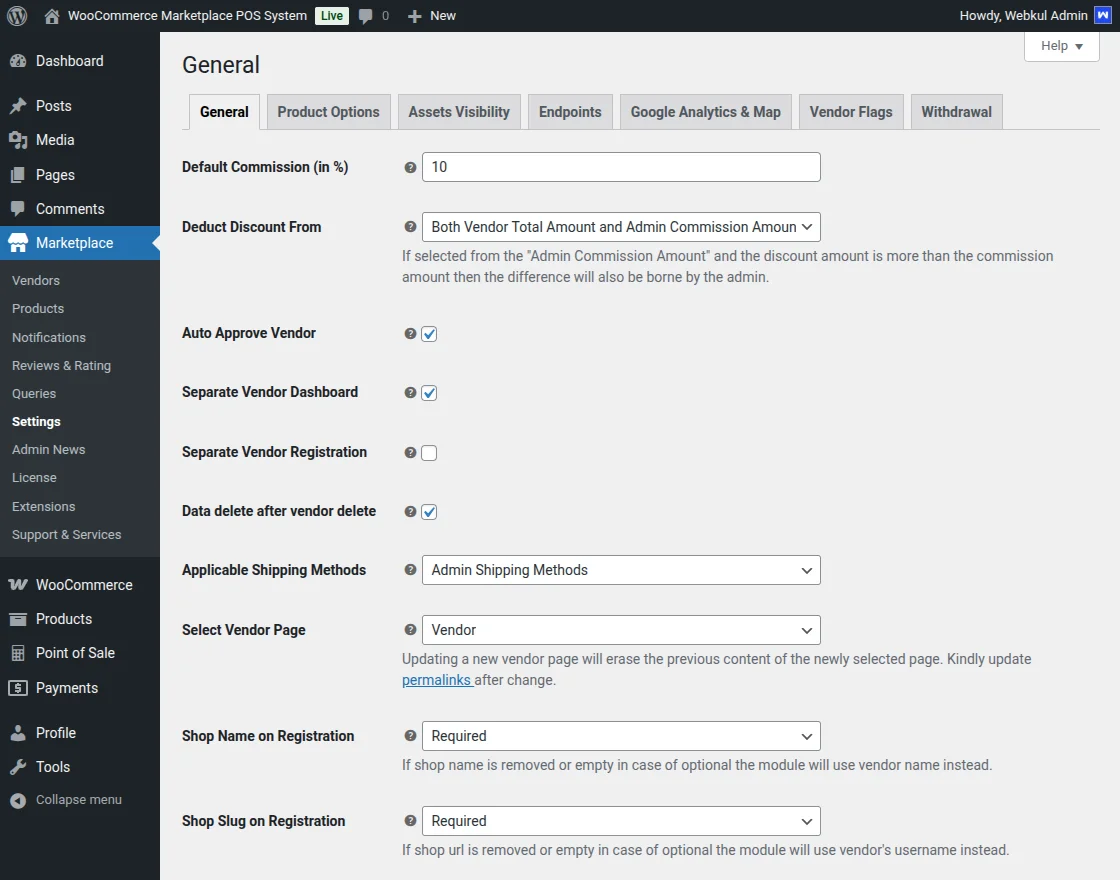
Default Commission – Default Commission will be used if the commission is not set on a seller basis.
For example, there is a seller “S1” and his/her product “P1”, and its price is 100 USD. So on the sale of product “P1”, the seller will get 80 USD and the admin will get 20 USD as a commission.
Auto Approve Seller – If checked then the seller will be auto-approved after the registration as a seller.
Ex – If the admin allows this option then the user who will sign up in the store as a seller will convert into a seller automatically. Otherwise, approval is required by the admin.
Separate Seller Dashboard – If checked, then the seller can have a separate dashboard like that of the admin.
Separate Login Form – If checked a separate login form will be created for sellers.
Data delete after seller delete – If checked, the data of the seller will also get deleted along with the seller else the data will get assigned to the admin.
Applicable Shipping Methods – From here the admin can select the Admin or Sellers shipping method that is to apply on the cart page.
Select Seller Page – Updating a new seller page will erase the previous content of the newly selected page. Kindly update permalinks after the change.
Manage POS Orders – Admin End
The admin can view POS orders by navigating through Marketplace Point Of Sale -> Point Of Sale -> POS Orders as shown below.
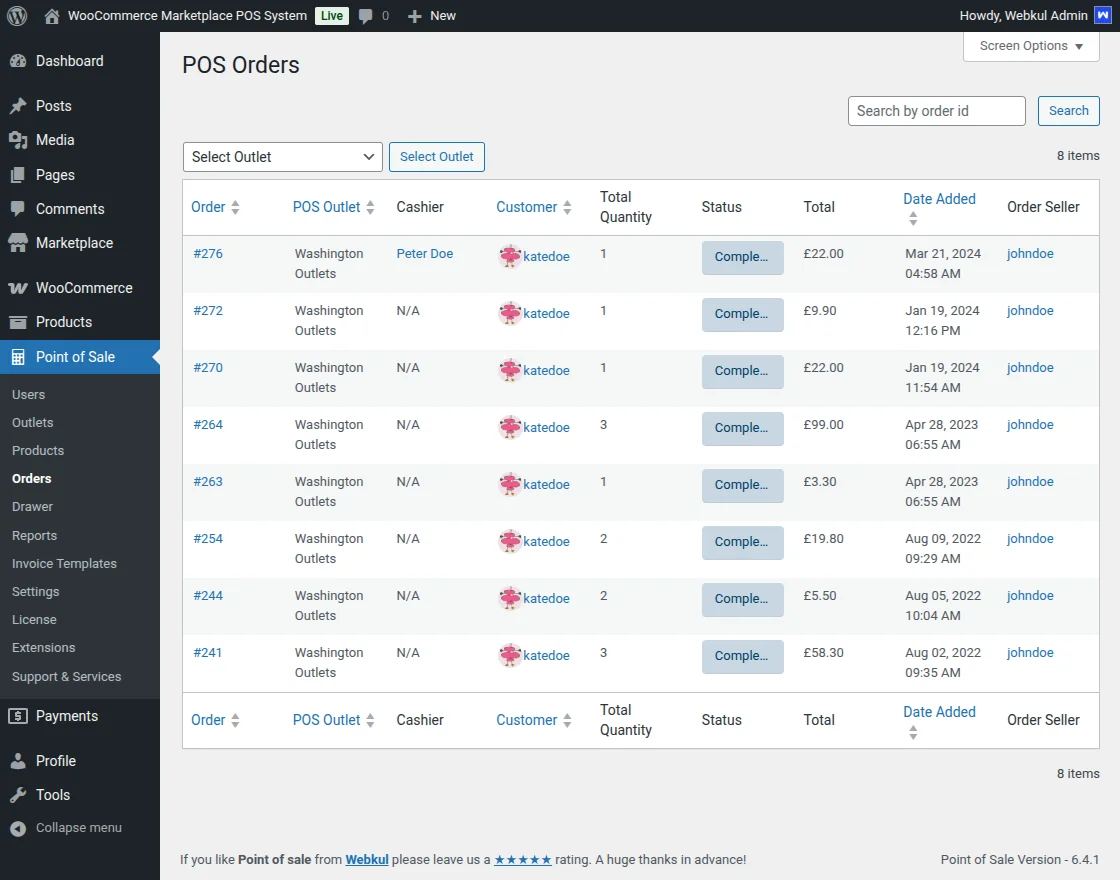
Therefore, the admin can view any order details by simply clicking on the order from the list.
Seller List
In the seller list, the admin can check the full bio of the seller and can edit his profile in the “Username” tab in the WooCommerce admin panel with several options.
Which include personal options, name, contact info, about page, account management, billing, and shipping address. The admin can also approve or disapprove the seller.
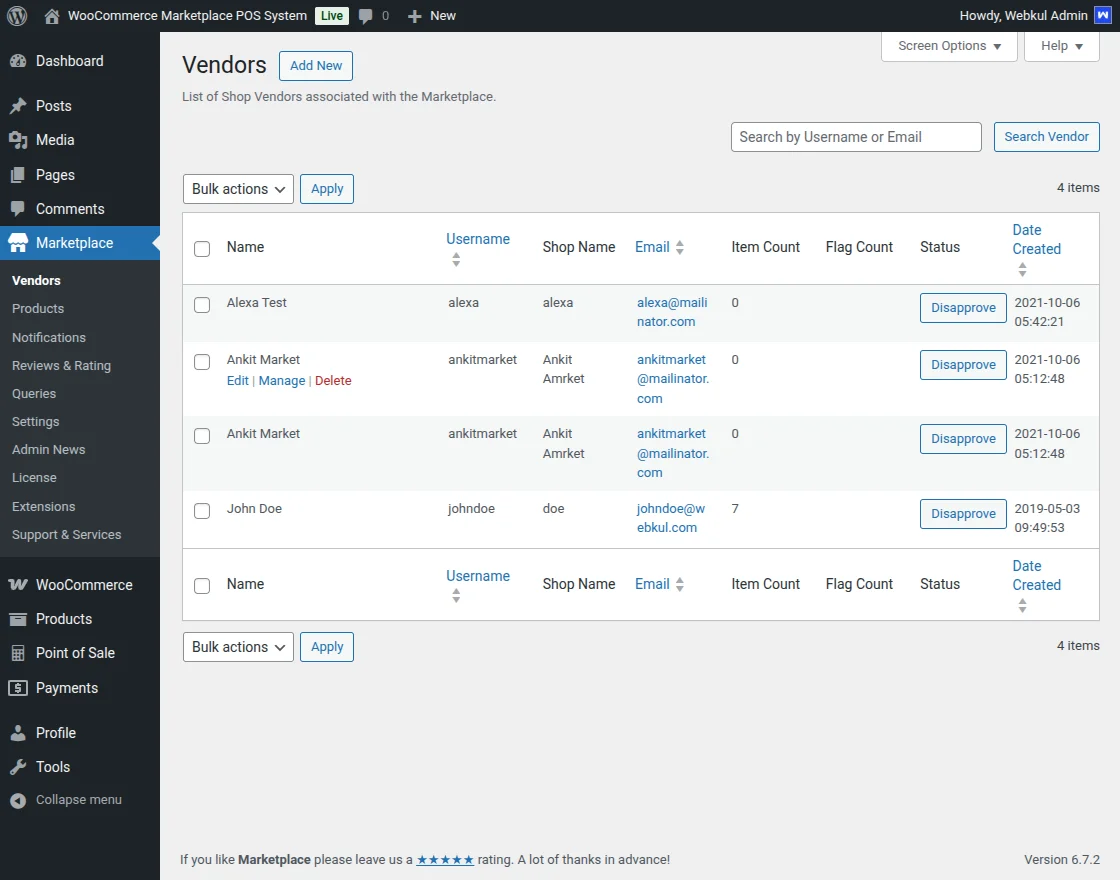
Furthermore, the admin can manage a seller by clicking on the Manage button. Here he will be provided with several options to manage a seller.
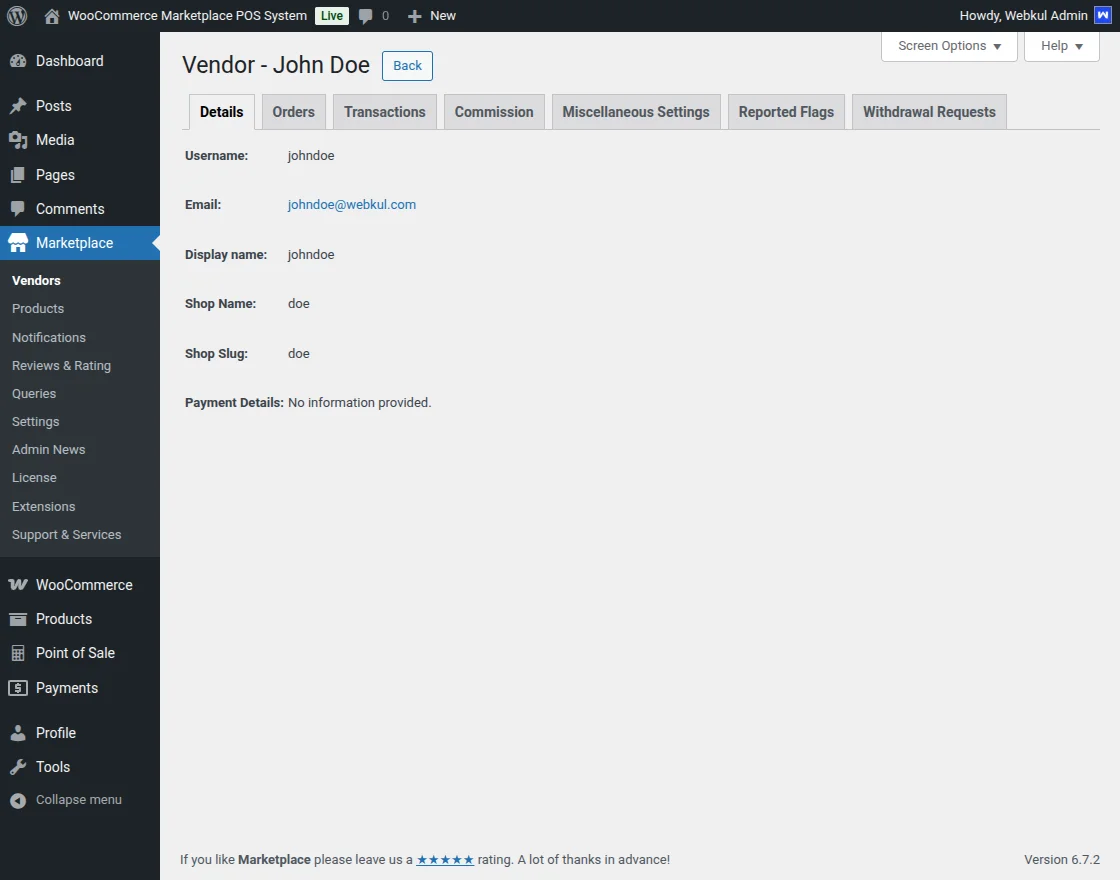
Details
The admin can see the details of the seller like username, email, display name, shop address, etc. and the admin can also enter the payment details of the seller.
Orders
The admin can see all the orders of a seller and can mark the order for which he has made a payment to the seller.
Therefore, the admin will click on the Pay button available on the order to mark the order amount paid to the seller.
After that, a transaction will be created for the order under Transactions.

Transactions
After making a payment for an order the admin will mark the order as paid under Orders and a transaction for the order gets created under Transactions having the details like –
Order Id, Amount, Type, Method, and date Created On.

After that, the admin can click on a transaction to view the details of the transaction.

Commission
The admin can manage the commission rate for the seller and can see the total sale of the seller and the admission commission from the sale.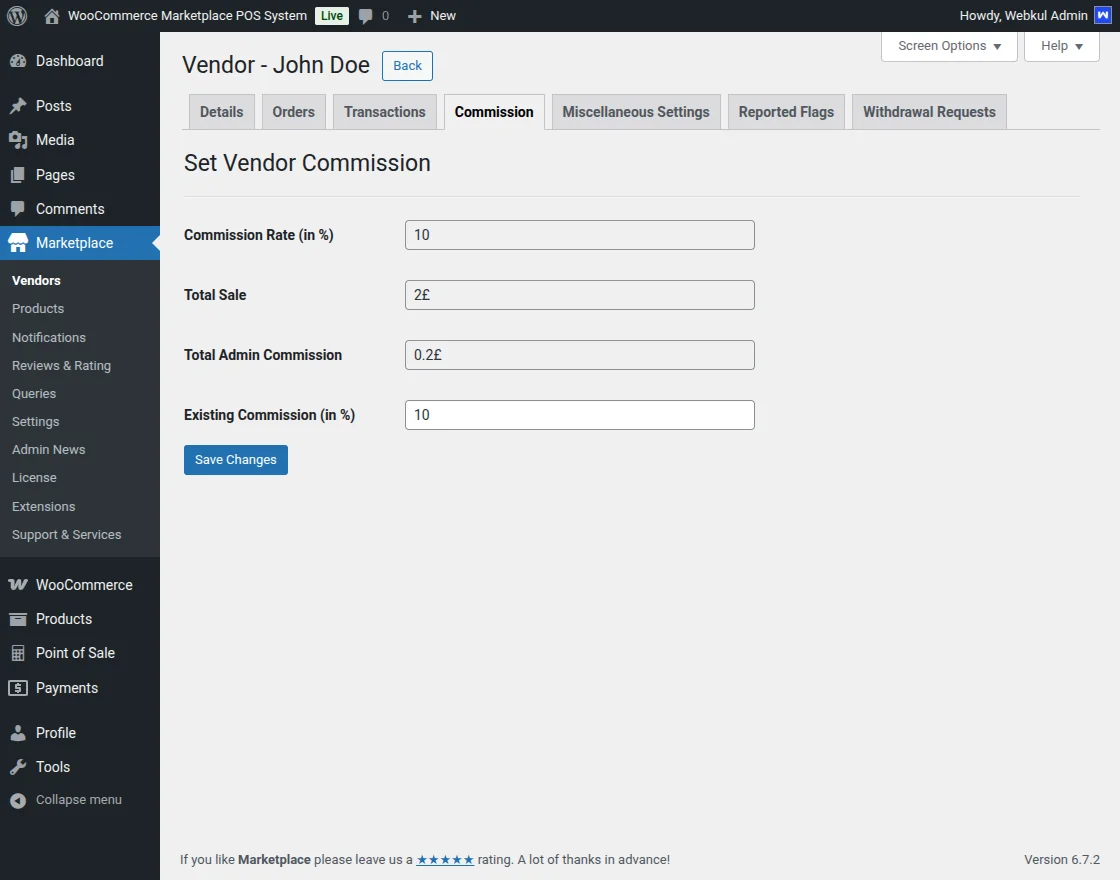
Assign Category
The admin can assign categories to the seller which will be available to the seller while adding a new product.

Seller Admin Dashboard
The seller also has an admin dashboard to manage the POS. They can navigate to it by going to Point Of Sale from the dashboard. They have the following settings available:
- Users
- Outlets
- Products
- Orders
- Reports
- Invoice Templates
- Settings

The Seller can navigate to the Settings tab by going to Point of Sale>Settings to access the Payments tab.
They can check the already enabled payment method(s) and add new one’s by clicking on the Add New button.
They are able to mass Enable, Disable or Delete the listed payment methods as well.

Next, the Seller can tap on Users by navigating to Point of Sale>Users to access the POS Users list. Here, they can view and check the list of active POS Users.
They can also add new Users by clicking on Add New button. They can also bulk Activate or Deactivate the POS users as per requirement.
Search functionality by UserName is also provided.

Further, the seller can go to the Outlets section by navigating to Point Of Sale>Outlets to view the list of POS Outlets.
Here, they can add new outlets by clicking on Add New button. They also have the option to import the outlet list using CSV using the Import button.
The seller can also view the outlet report by tapping on Outlet Report. It will redirect to the Reports section to view them in detail.
POS Configurations – Seller End
Under this section, the seller can manage the printer type of the POS.
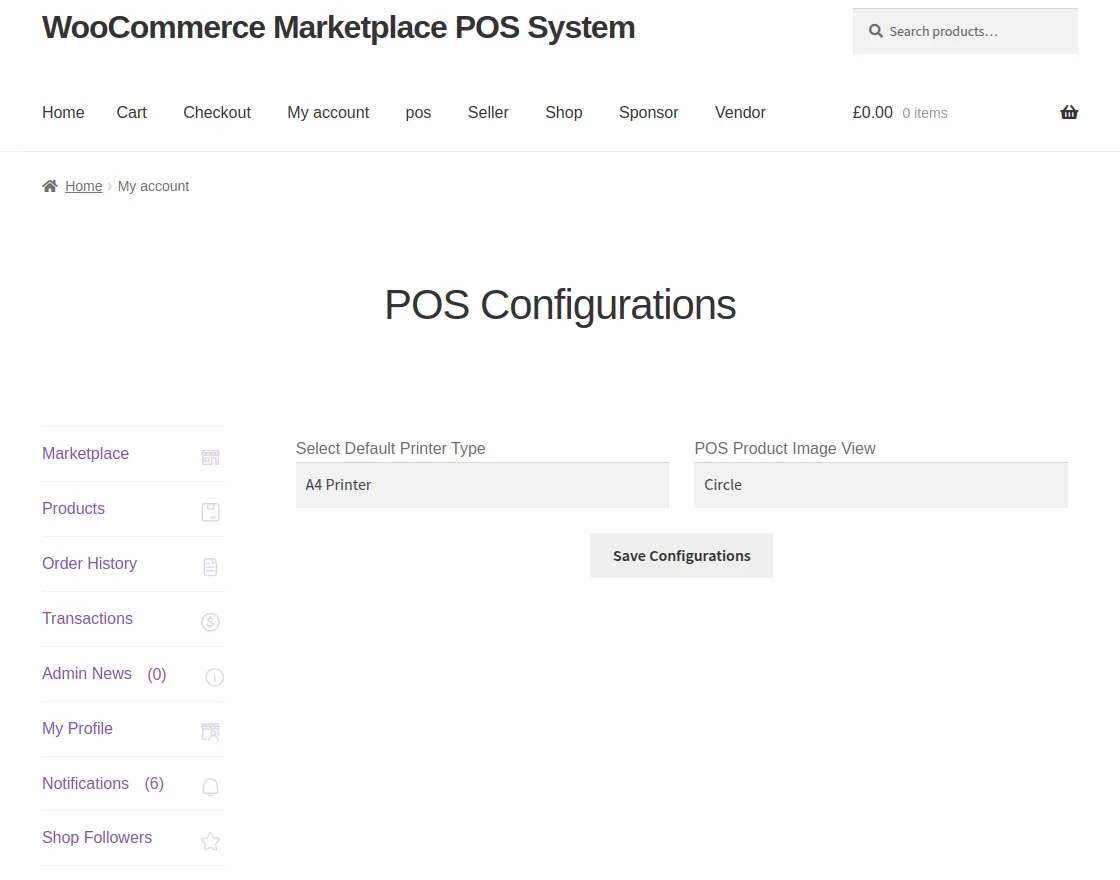
- Select Default Printer Type:- Seller can select the printer type from the dropdown.
- POS Product Image View:- Seller can select the frame of the POS product image view.
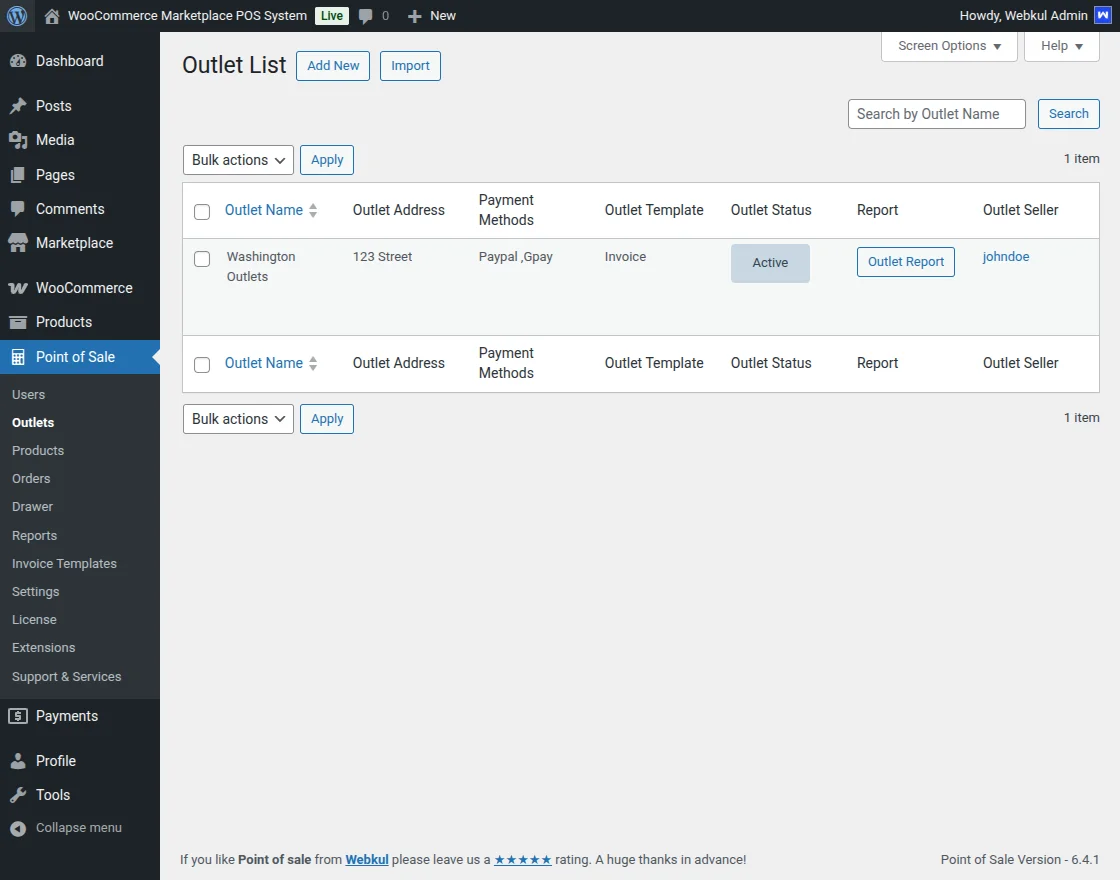
POS Outlets – Seller End
Under this section, the sellers can manage the POS outlets as shown below –
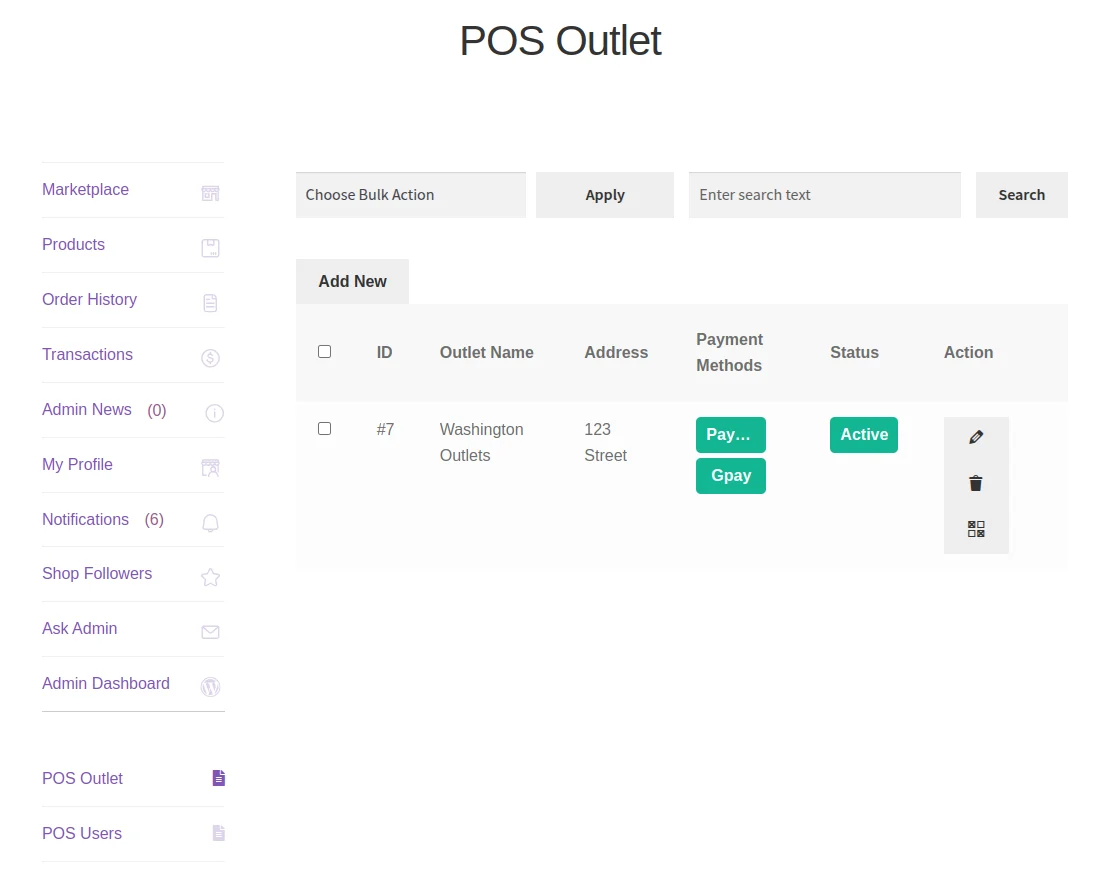
Here, the seller can –
- View the complete list of the existing POS outlets.
- Create the POS outlet store by clicking the Add New Outlet button
- Payment methods for the outlet.
- Remove the outlet by clicking the Delete button.
- Edit the POS outlet details by clicking the Edit link.
Add POS Outlet
Clicking the Add New Outlet button will navigate the seller to the Add POS Outlet page.

Here, the seller will enter outlet information, such as –
- Outlet Name – Name of the outlet.
- Outlet Address – Address of the outlet.
- Outlet Country – Country of the outlet.
- Outlet State – State of the outlet.
- Outlet City – City of the outlet.
- Outlet PostCode – Postcode of the outlet.
- Other Payments – Other payment methods of the outlet.
And, lastly hit the Save button to save the outlet configuration successfully.
Manage Outlet
After creating the outlet, the seller will navigate to the outlet manage page to check the assigned products.
Under the Manage Products tab, the seller checks the assigned products to that store.
For assigning the products to the outlet, the seller –
- First, select the products from the list.
- After selecting the products, hit the Enable from the Action drop-down list and then hit the Apply button.
POS Users – Seller End
Under this section, the seller can click POS Users for managing the POS users.

Here, the sellers can –
- View the complete list of the existing POS users.
- Create the POS manager store by clicking the Add New User button
- Remove the POS manager by clicking the Delete button.
- Edit the POS manager details by clicking the Edit link.
Add POS User
Clicking the Add New User button will navigate the seller to the Add POS User page.
Therefore, the seller will configure the cashier account information:
- User Name: enter the user name of the POS user account.
- User Status: enable or disable the POS user account.
- User Outlet: enter the POS outlet name.
- First Name: enter the first name of the POS user.
- Last Name: enter the last name of the POS user.
- Telephone: enter the telephone number of the POS user.
- Email Address: enter the email address of the POS user.
- Image: upload an image of the POS user.
Lastly, hit the Save button to save the outlet configuration successfully.
Note: An Email will be sent to the POS User to Set Password once the configuration is saved successfully.
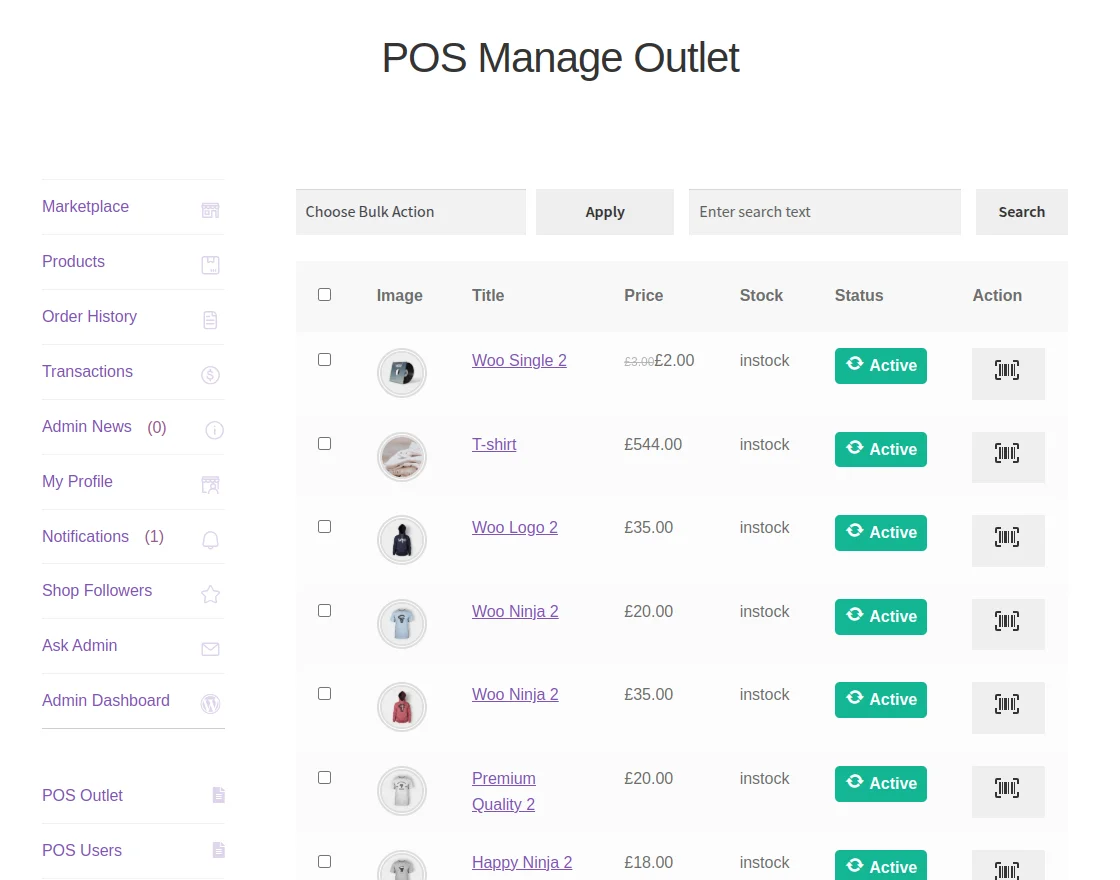
Manage Outlet Products – Seller End
The seller can click on POS outlet-> POS Manage Outlet. After that, sellers can have a POS product list as in the below image.
After that, the seller can view details of a POS product’s barcode by clicking on the barcode as mentioned in the image.
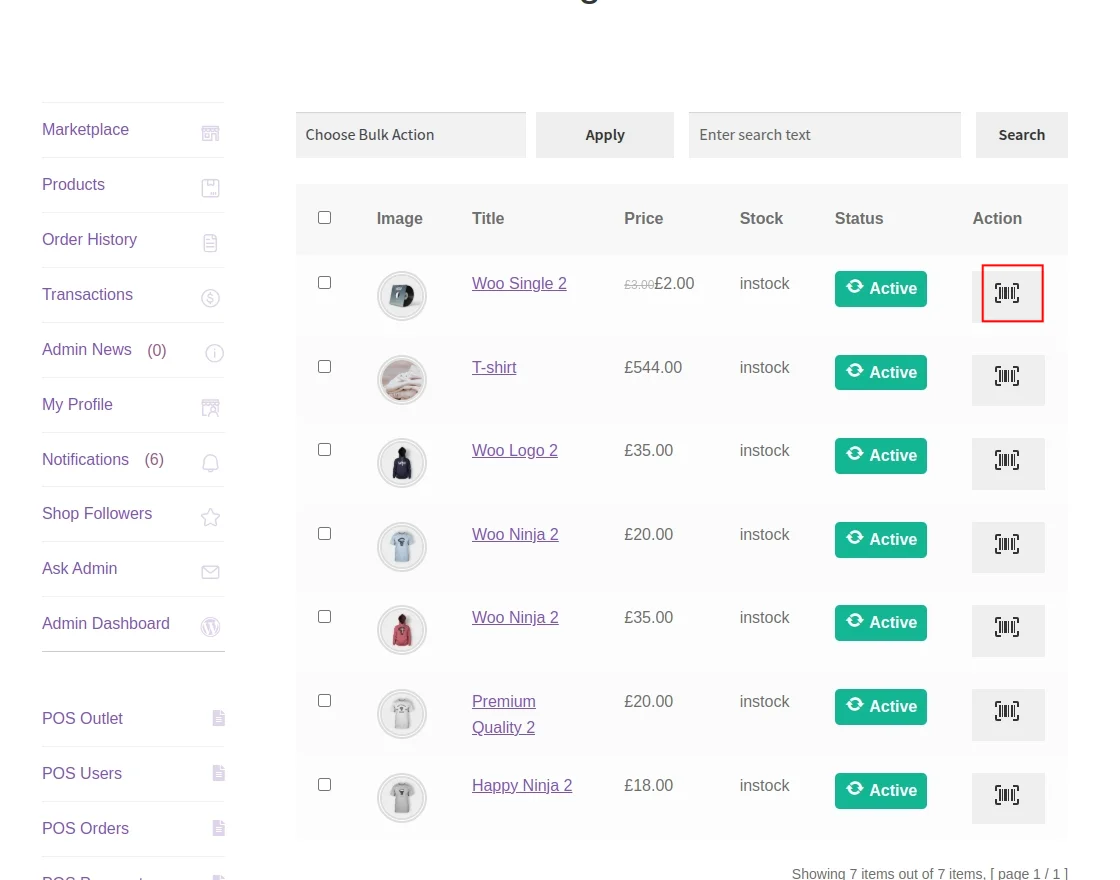
Therefore, sellers can view the barcode details.

The generated barcodes for the products are to be used by the POS agent to add a product to the cart during the check-out process.
The seller can also print a barcode for a product in a required quantity by clicking on the Print Barcode link available
while hovering on the product under the column the Product Name as shown above image.
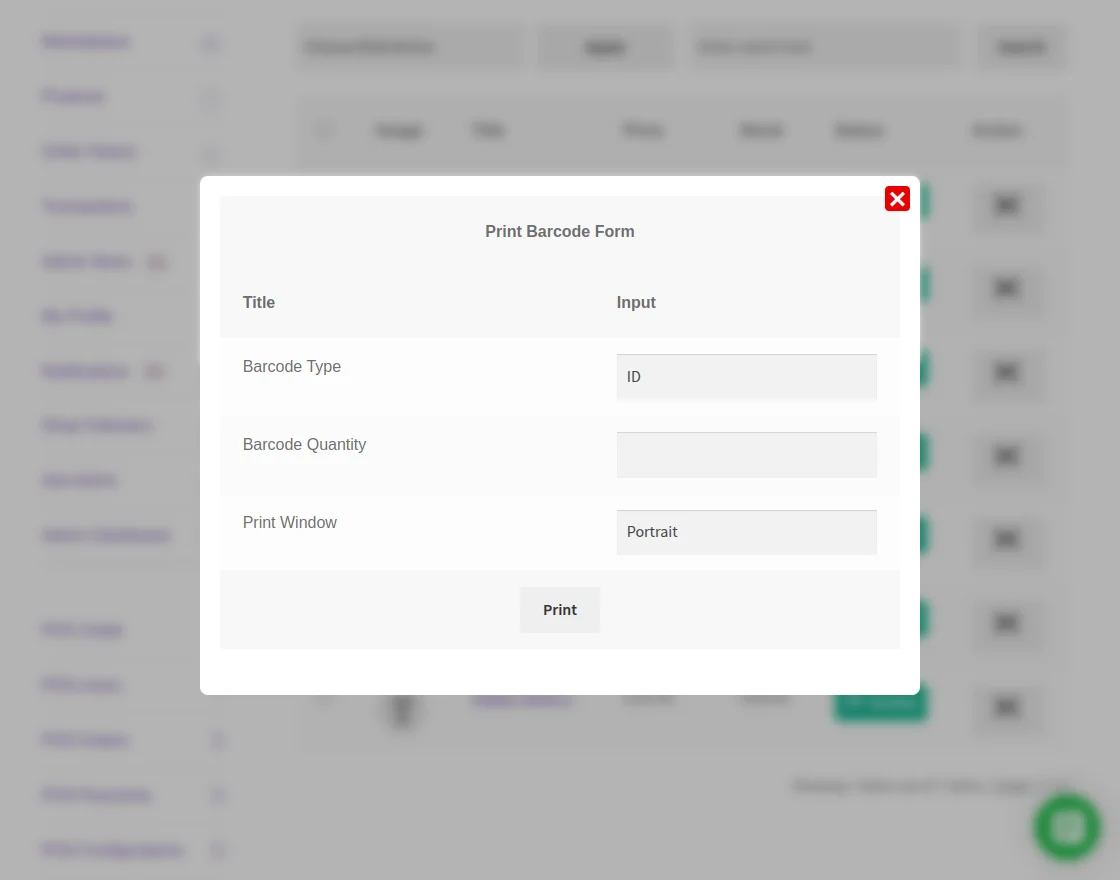
Clicking the Print Barcode link will display a popup. Here, the admin will add the quantity of the barcode to print.
POS Orders – Seller End
Under this section, the seller can view POS orders as shown below.
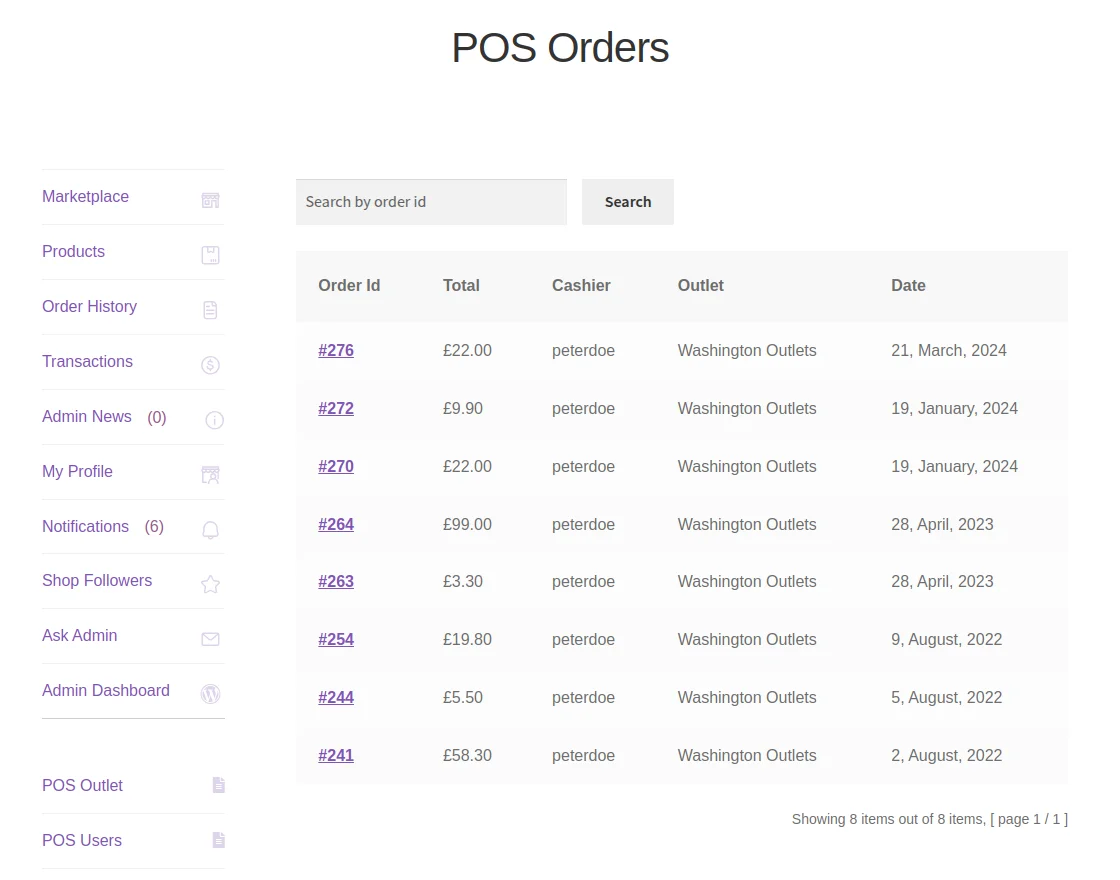
The seller can view any order details by simply clicking on the order from the list.
POS Payment – Seller End
After that, the seller can either add or edit the payment method.
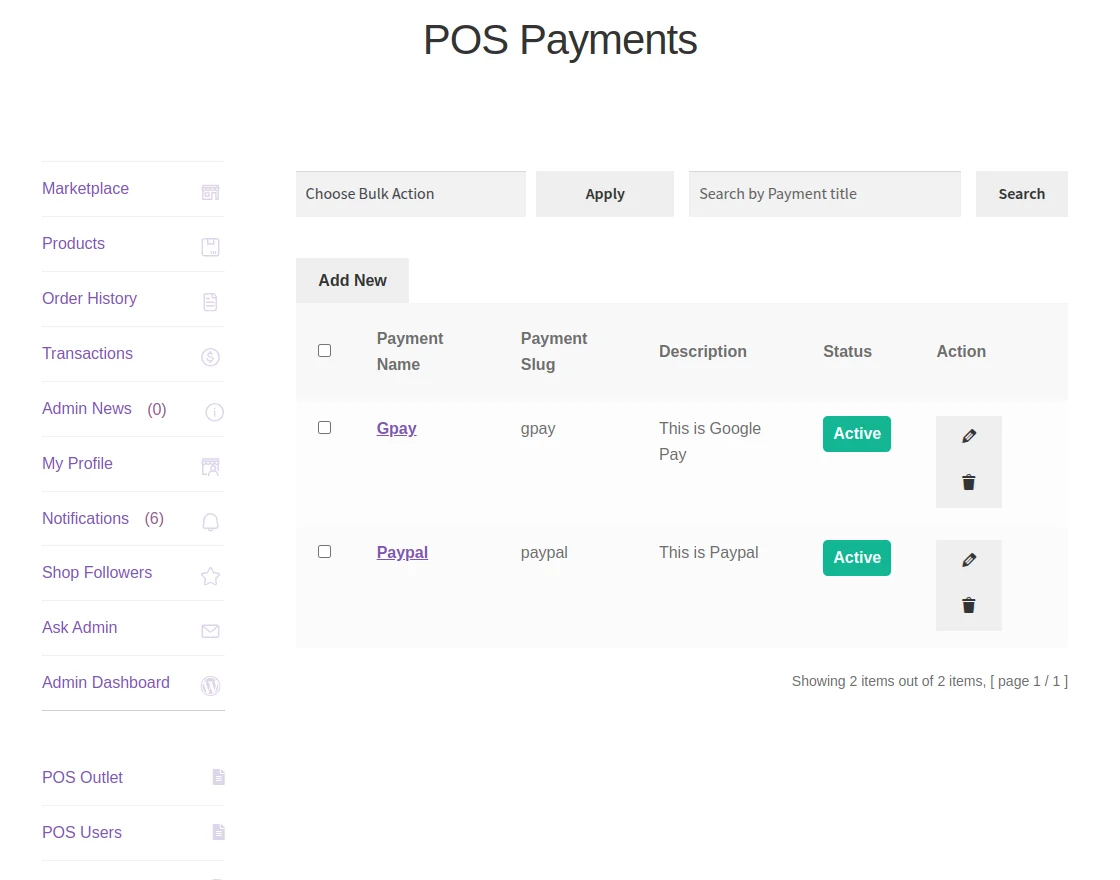
Therefore, sellers can add a new payment method by clicking on Add New.
Thus, the seller can view any payment details by simply clicking on the payment from the list and adding a new payment.
Front-End Point Of Sale Panel
The user can easily log in to the POS System (frontend) by using the Username (email address) and Password which is created by the admin or seller.

After that, the POS Users will be redirected to their POS panel.
Furthermore, the POS User can set the POS screen as a full screen with the option of full screen present at the top-right corner as per convenience.
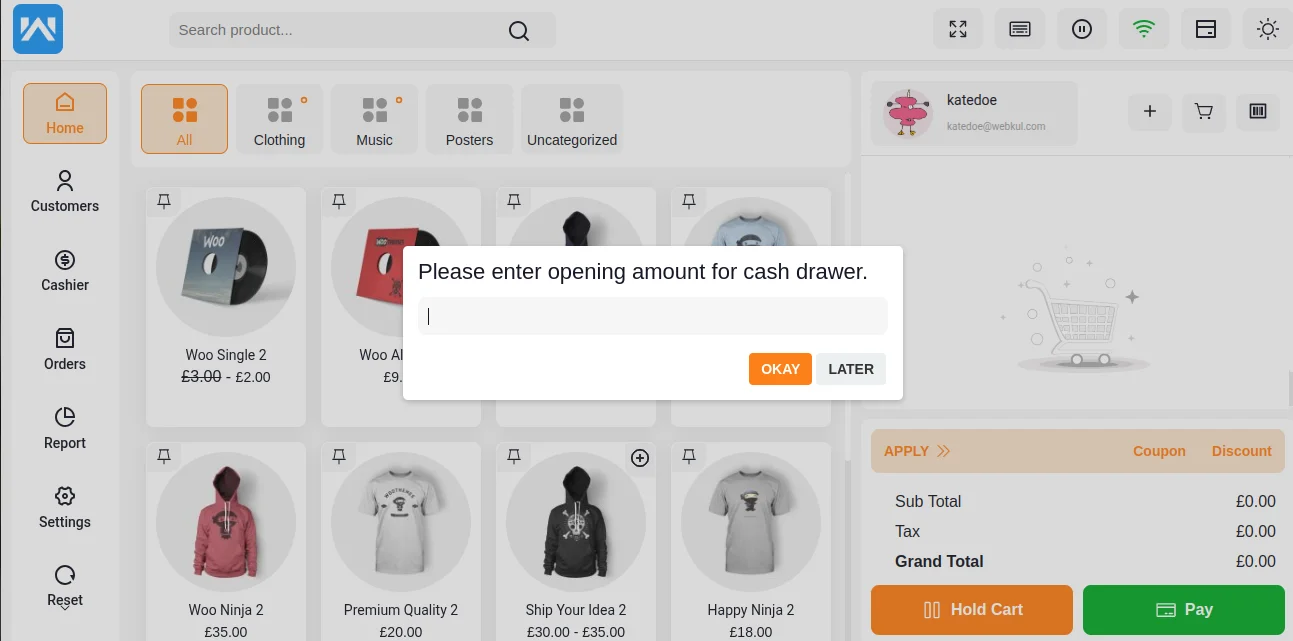
POS Cash Drawer Amount
The POS agent, after logging in to the POS has to enter some cash drawer amount. A tab opens which asks the user to enter the Opening Amount For Cash Drawer as shown below.
The cash drawer amount is the set amount required for that particular day.
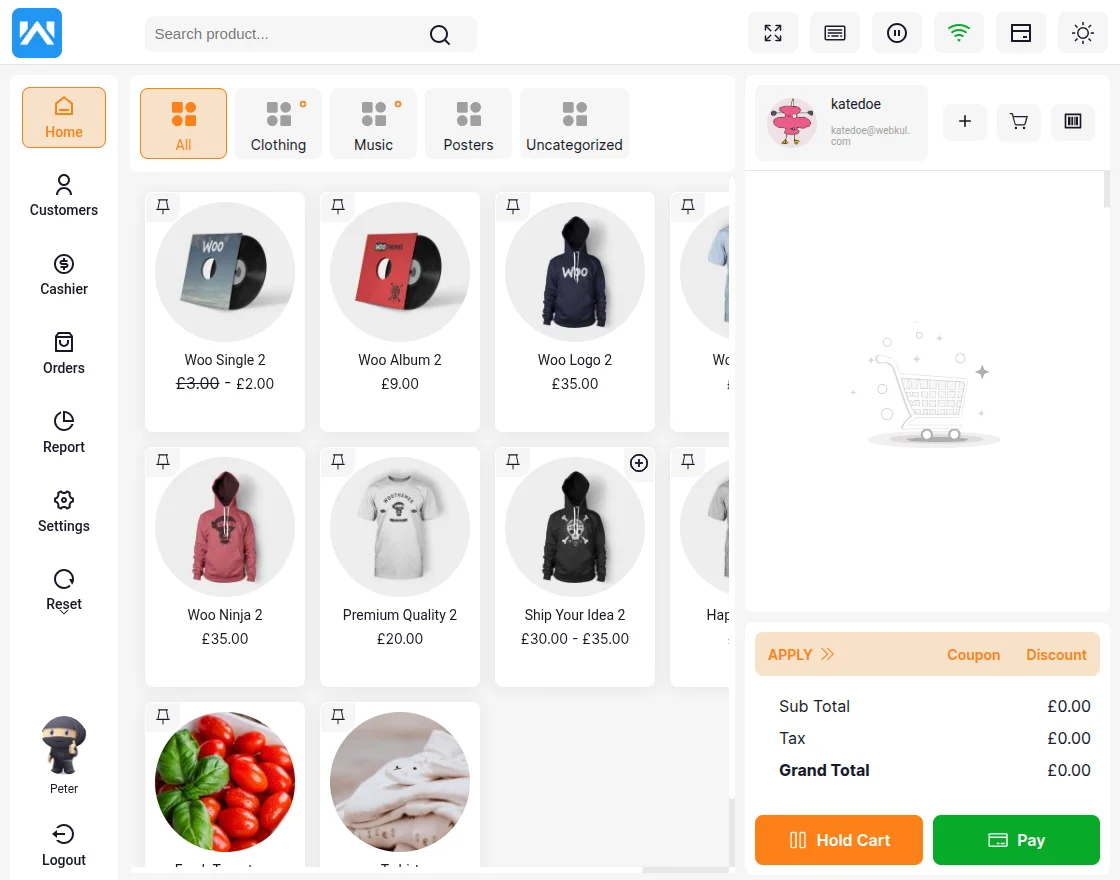
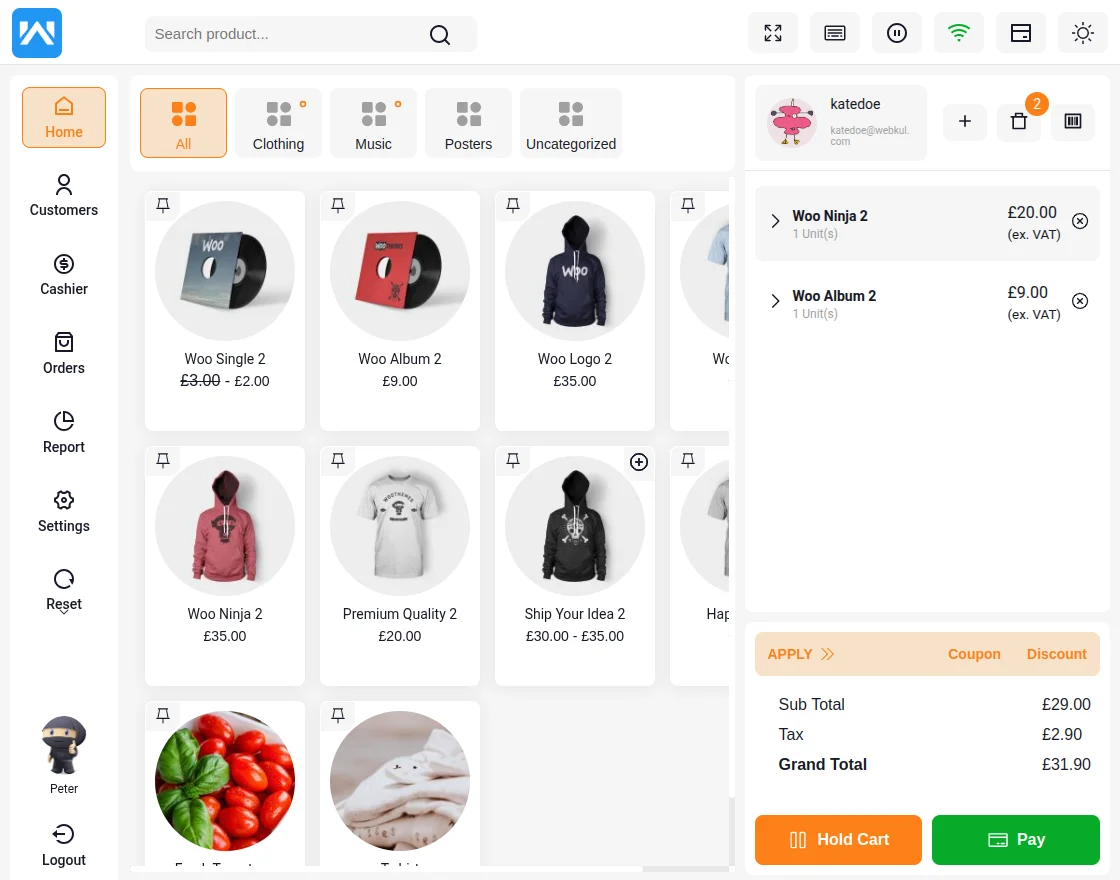
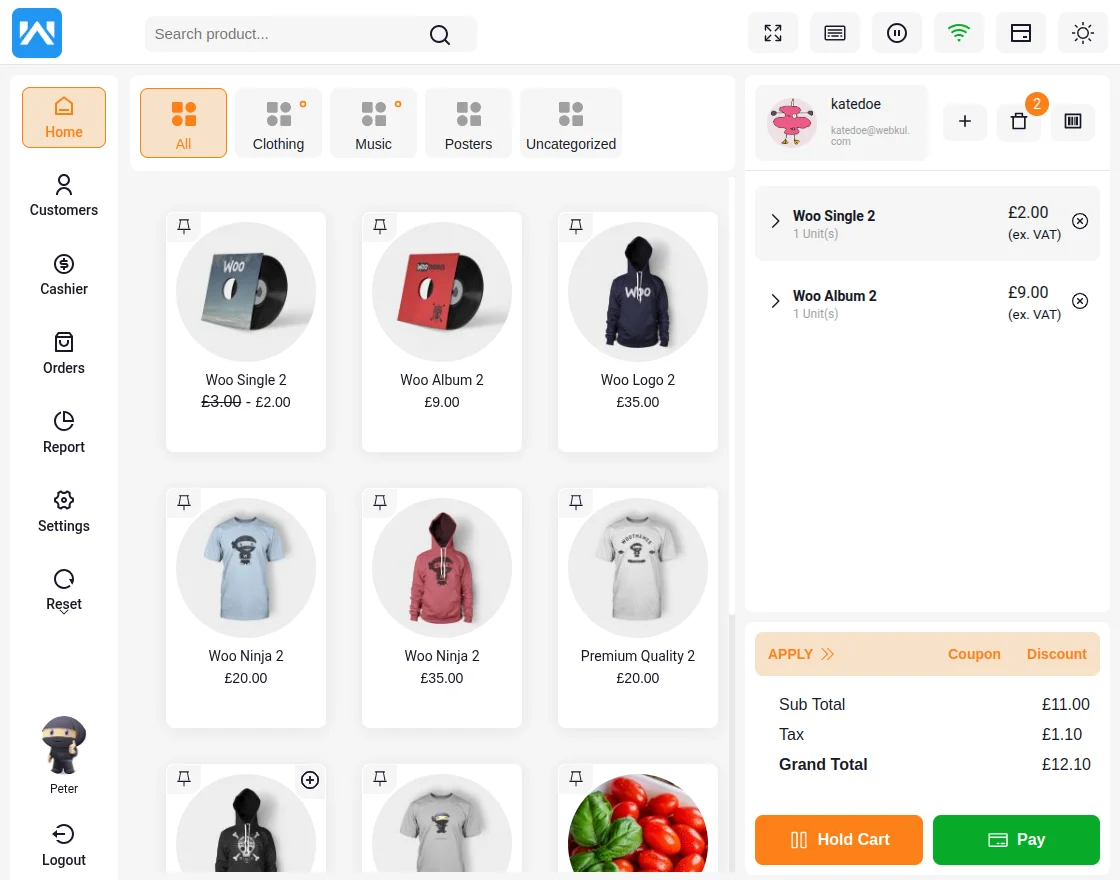
After that, the POS user will see his panel where the POS user can see the products assigned to the outlet.
Additionally, the cart option where the ordered products by the customer will be shown.
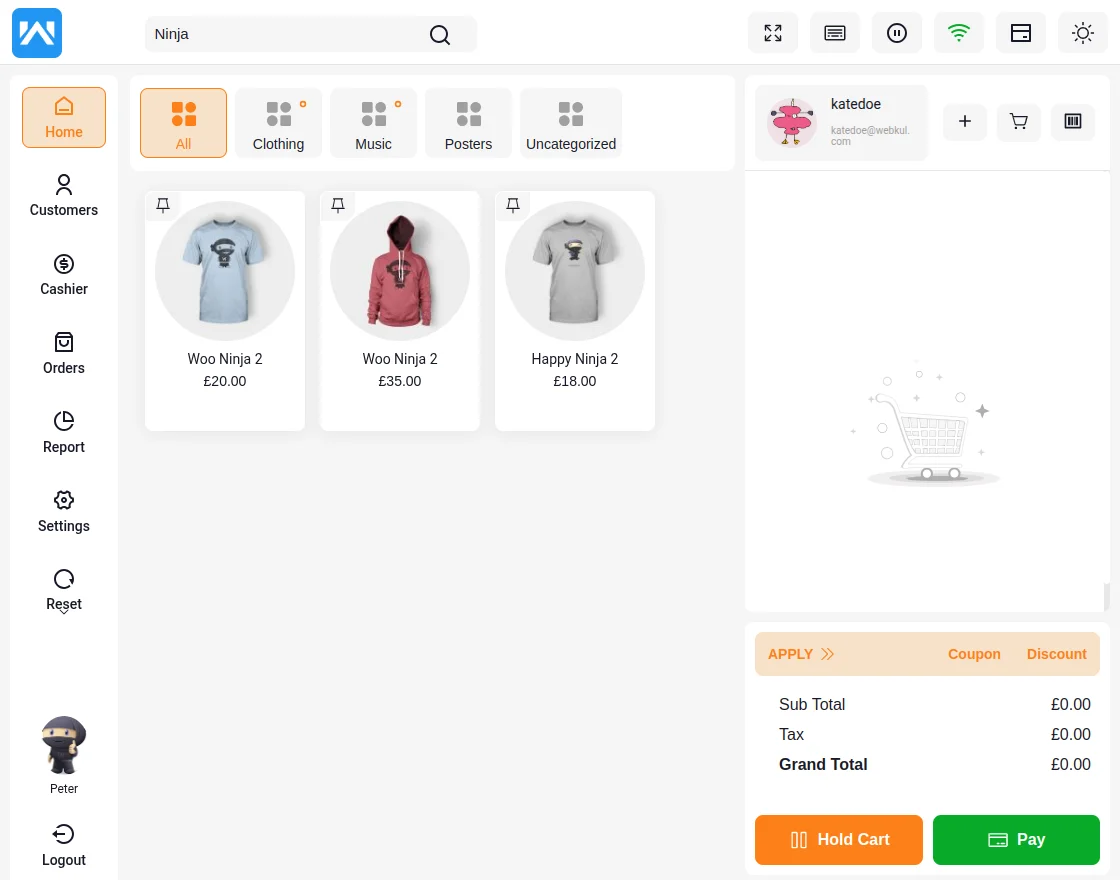
The user can search products from the search bar and than can add the resulted products to the cart as per requirement.
Users can also look for the products in their respective categories.
 POS Panel – Custom Product
The POS user can also add a product to the cart which is not available on the website but the product is available in the physical store.
For this, the POS user will have to click on the plus sign button as shown below.
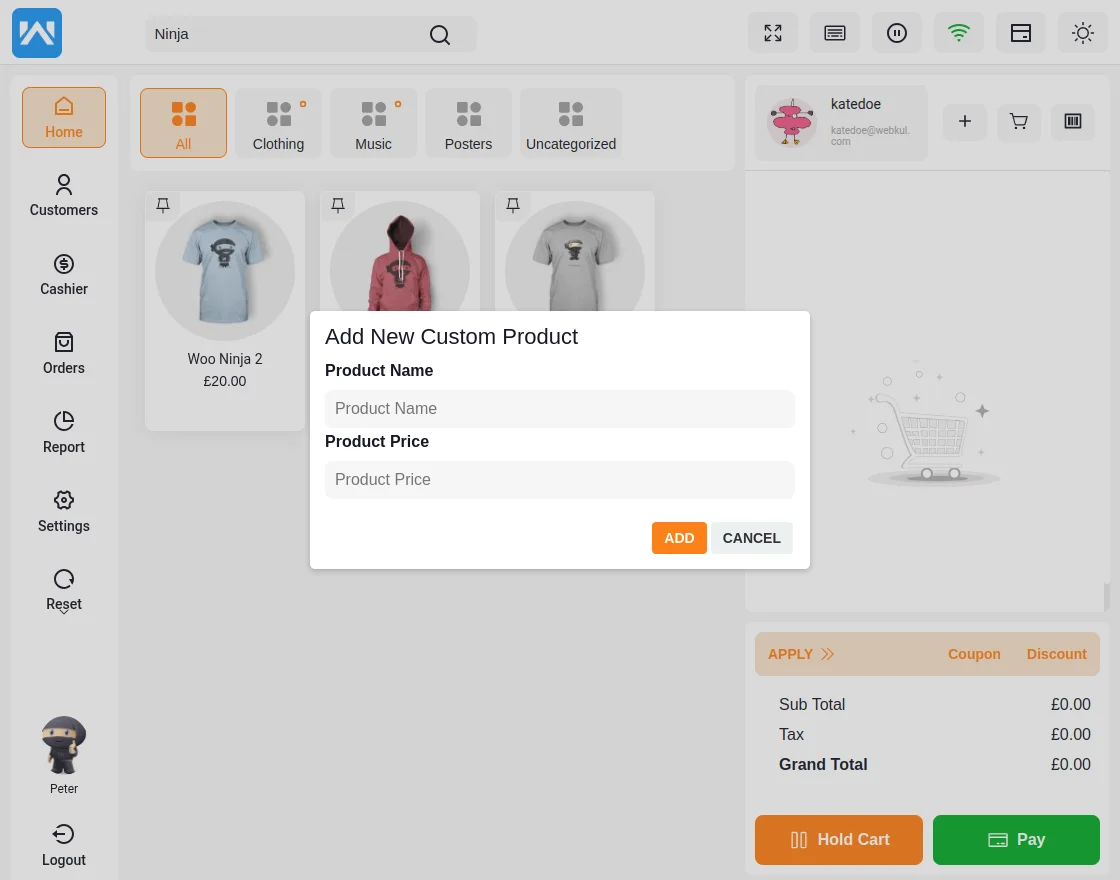
Here, the POS user will have to enter the product details ( product name and product price ) and then add the product into the cart by clicking on the ADD button.
After that, all processes will be the same as a normal website’s product.
POS Panel – Cashier Management
Under the Cashier tab, the POS user manages the functionalities like –
- Close Counter
- Today Cash
- Sale History
Close Counter
On clicking the Close Counter tab, Drawer Account Summary like; Opening Amount, Expected Amount in Drawer, and the Difference between closing and the opening amount will be visible.
Here, a remark section is also available to put a remark. Below the remark section, a Close Drawer button is visible.
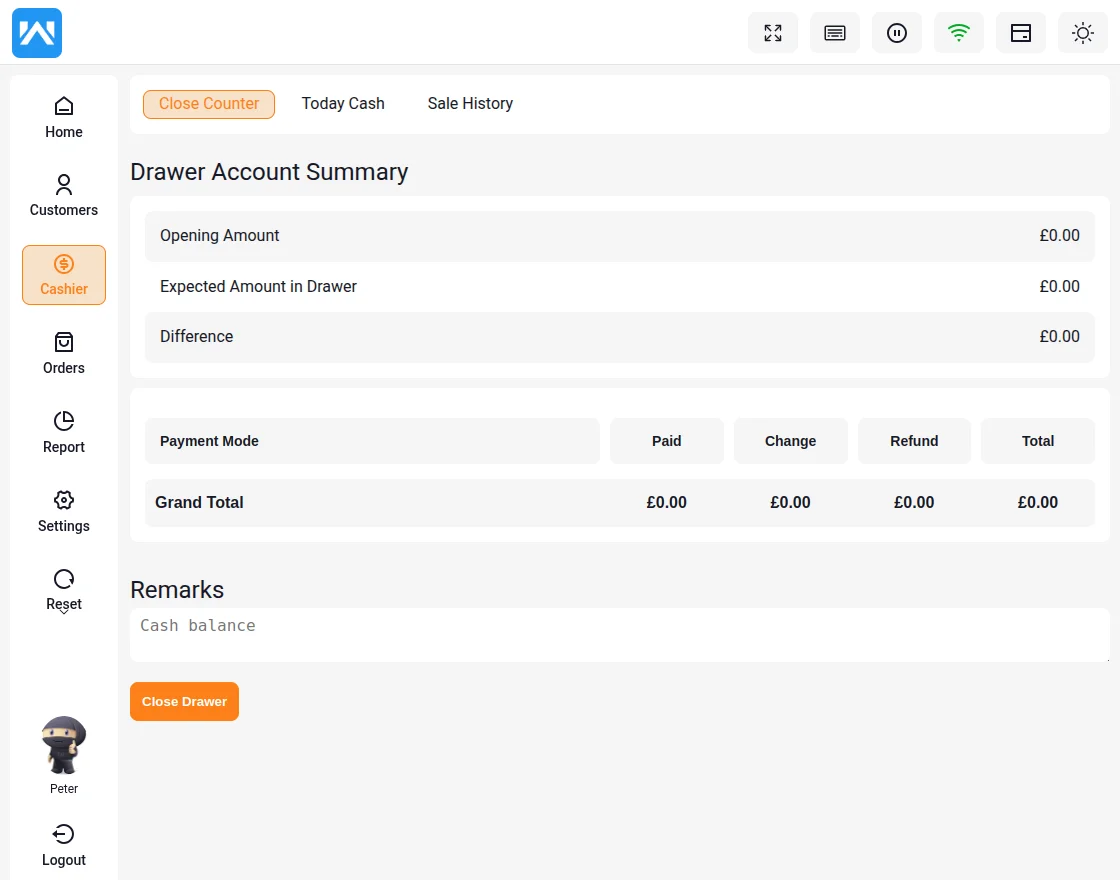
- The Drawer Amount Details display the opening amount which is $10.00 here, today sales is $95.00 and the expected amount in the drawer is $105.00
- Under the Counted Drawer Amount displays the remarks. The POS agent may add the remarks as well.
- Closing Drawer Details displays the closing balance details for a particular day. The difference between the opening and the closing amount may be viewed under the Closing Drawer Details options.
Today Cash
Under Cashier, there is another option Today Cash is available which displays the Opening Drawer Amount, Today Cash Sale, and the Today Other Payments Sale.
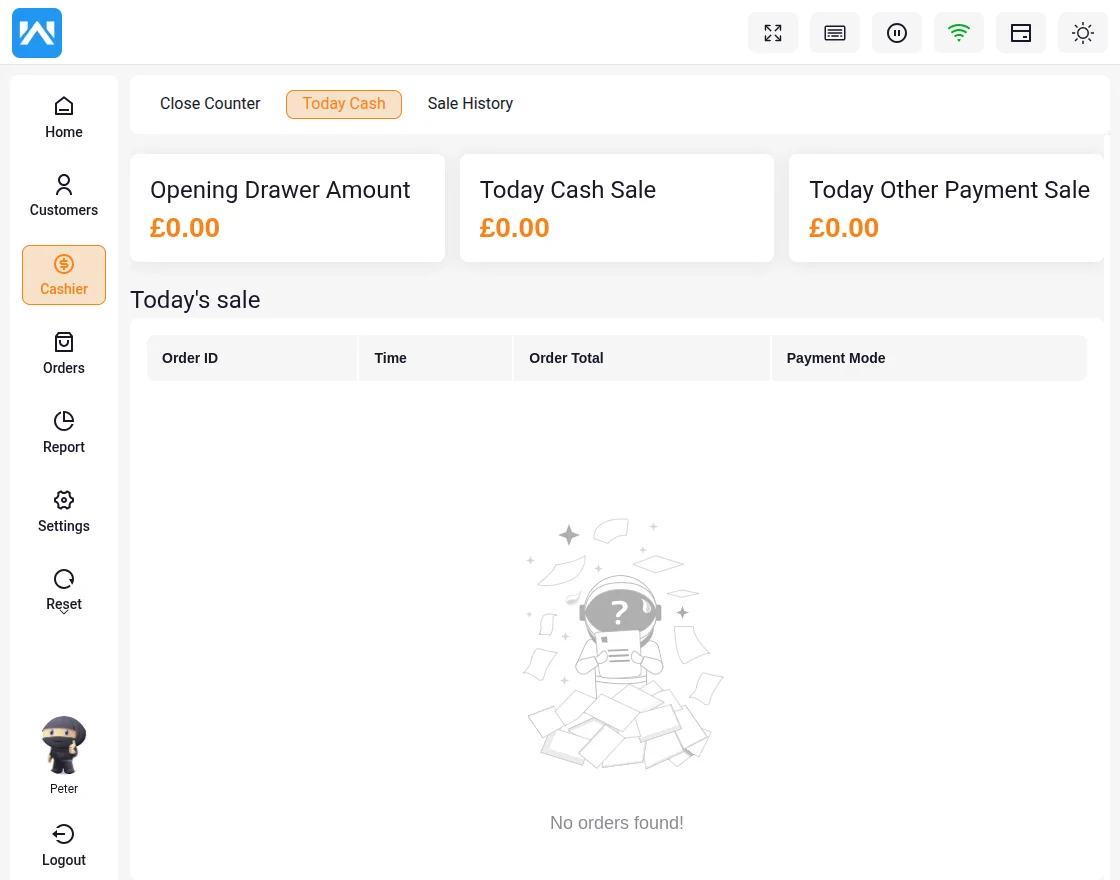
The order id, time, order total, and the order payment mode details are also visible to the POS agent under the Today Cash option.
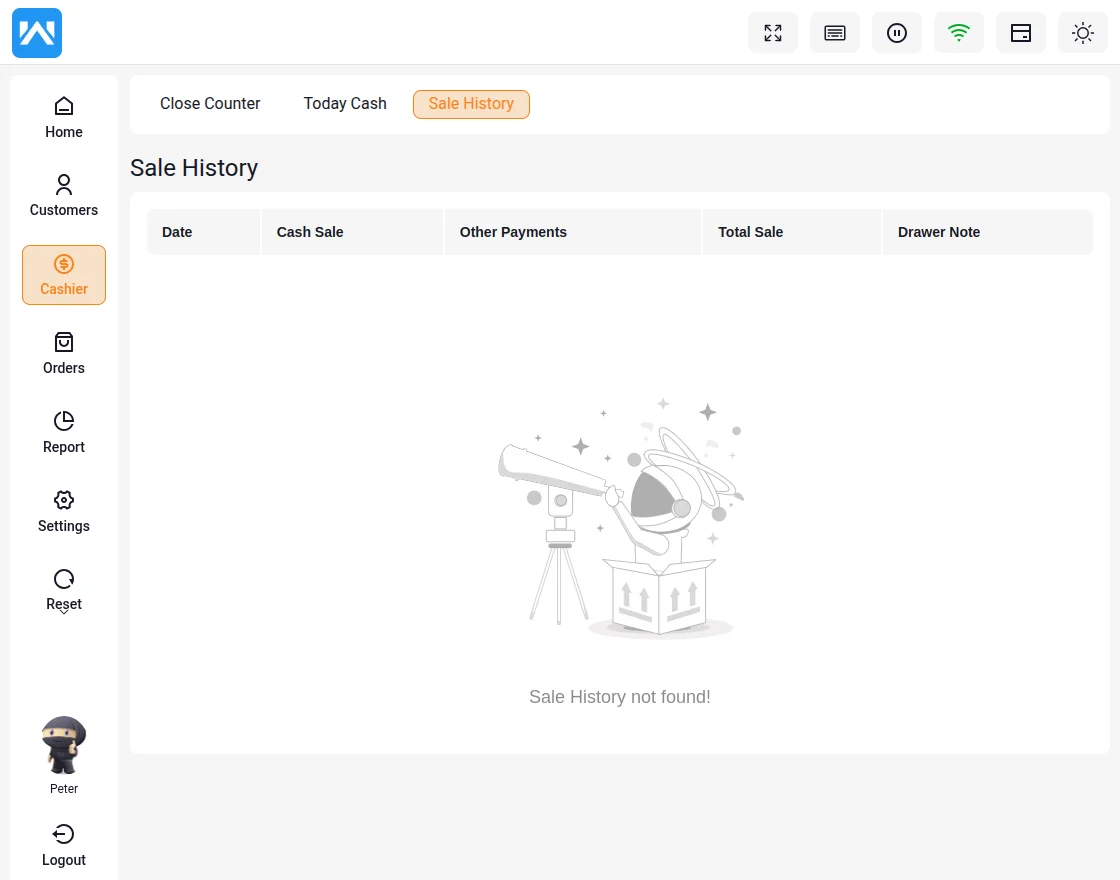
Sale History
The POS user can view the sale history under the Sale History option. For a particular date, the cash sale and the card sale are listed under Sale History.
The total sale displays the total sales after adding up the cash and the card sale.
POS Panel – Manage Orders
The POS user can manage the sales activity like adding products to the cart, adding customer details, hold the cart to process after some time, pay for the order from his panel as shown below.

After adding the products to the cart the user will now add customer details by clicking on the default customer option and then follow the steps as shown in the screenshot below.
Note: The Pos user can search customers by their name or email as well.

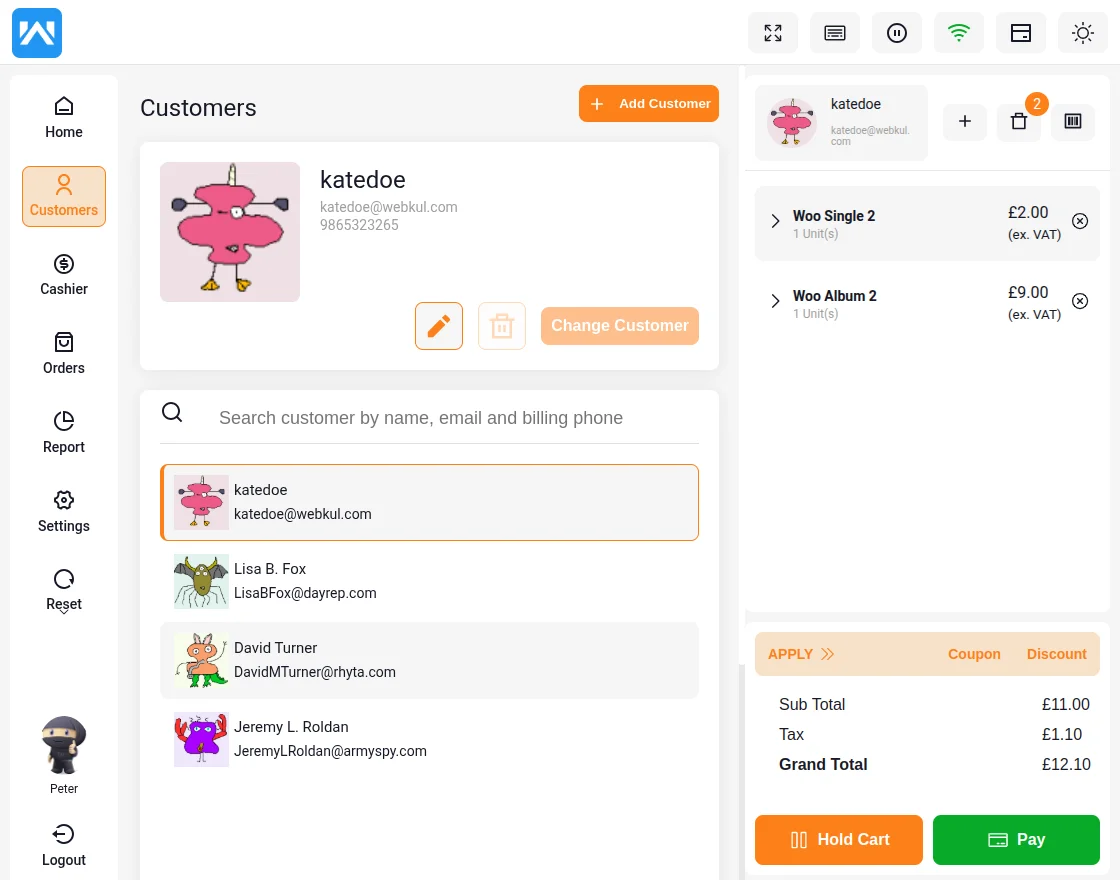
The POS user will add a new customer if the new/required customer is not present on the customer list.
Else, select the customer from the customer list to pay for the order and hit the Change Customer button.
After this, the POS user will proceed further with the order payment by clicking the Pay button.
The POS user can even put the Cart-On Hold if wishes to complete/process the order later.
Clicking the Pay button will navigate the POS user to the Payment page as shown below.
Now at the time of payment, the customer has two options to pay for the order – cash payment and card payment.
If the customer has chosen the cash method then the customer will provide some amount to pay for the order and the POS user will refund him the remaining money as shown in the screenshot below.
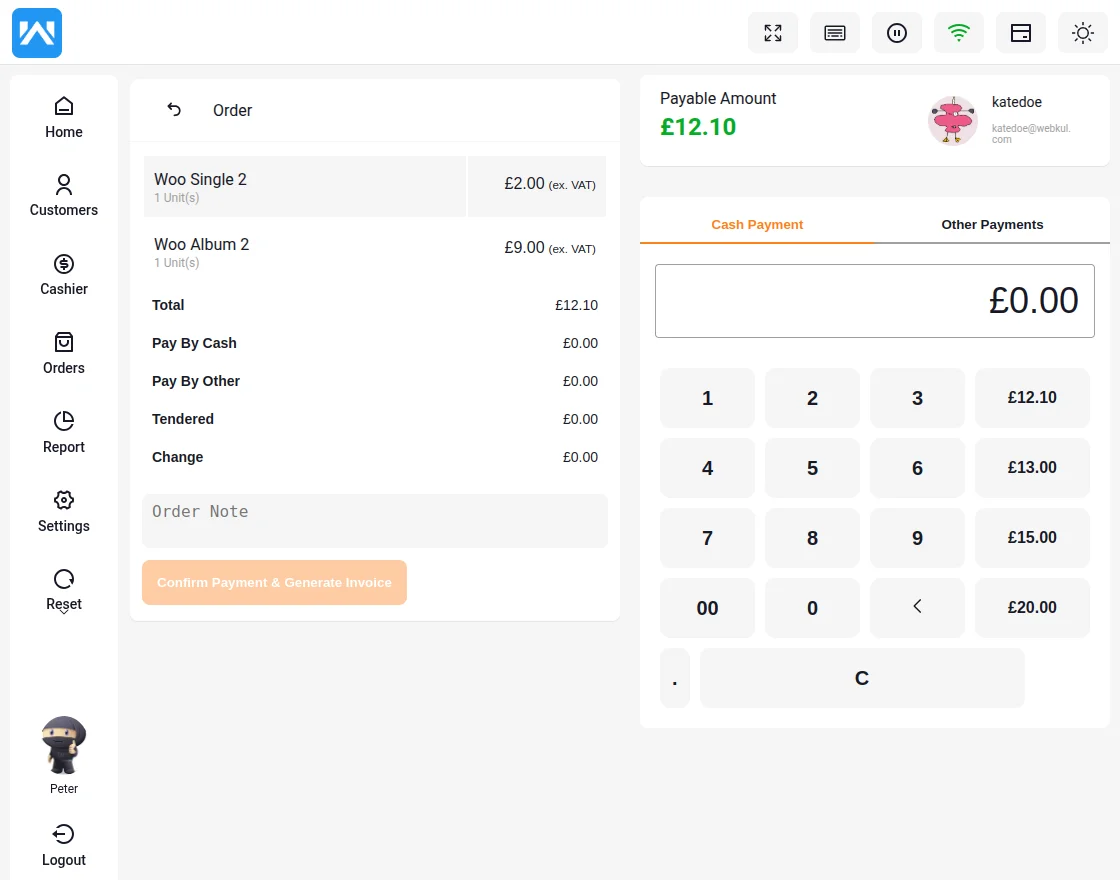
Finally, hit the Confirm Payment & Generate Invoice button to complete the payment successfully.

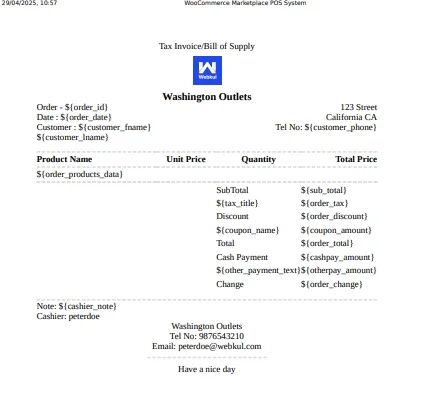
The POS user can even print the invoice for the order and then can continue further with other orders.
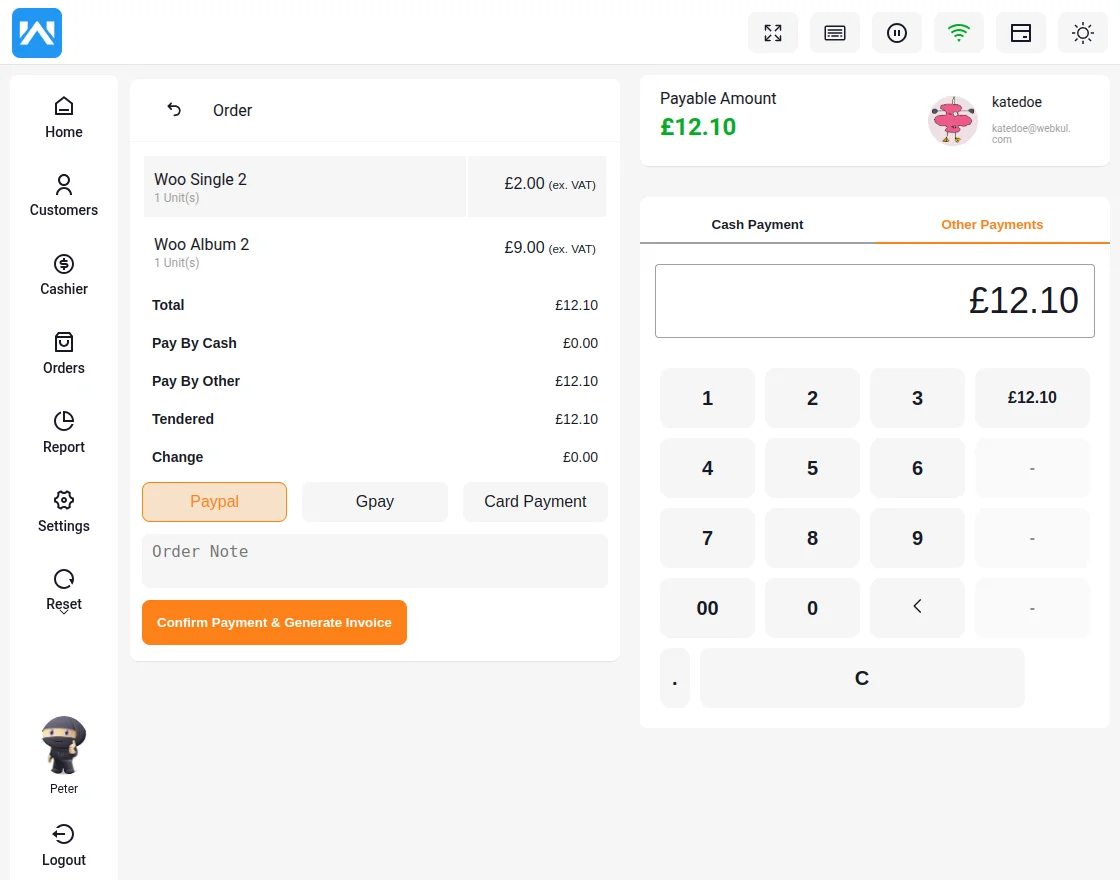
If the customers want to pay via card, then the customers can use their cards to pay for the order.
In the Other Payment method, the total amount of the order will be deducted from the customer’s card.
Note:
The POS user can allow its customer to split the payment between card and cash by split payment option.
This option is meant for dividing the payment amount into bits as the customer can pay some amount in cash and some amount by card.
POS Panel – Apply Coupon
The users of POS can apply a coupon to selected orders if there is a coupon available for the same. The POS user will click on the Apply Coupon button to apply the coupon to the order.

Clicking the Coupon button will display a pop-up to enter the coupon code.

After that, the user will get a pop-up message Coupon Applied Successfully and can see the applied coupon in the cart as well.

The POS user can even remove the applied coupons as shown above.
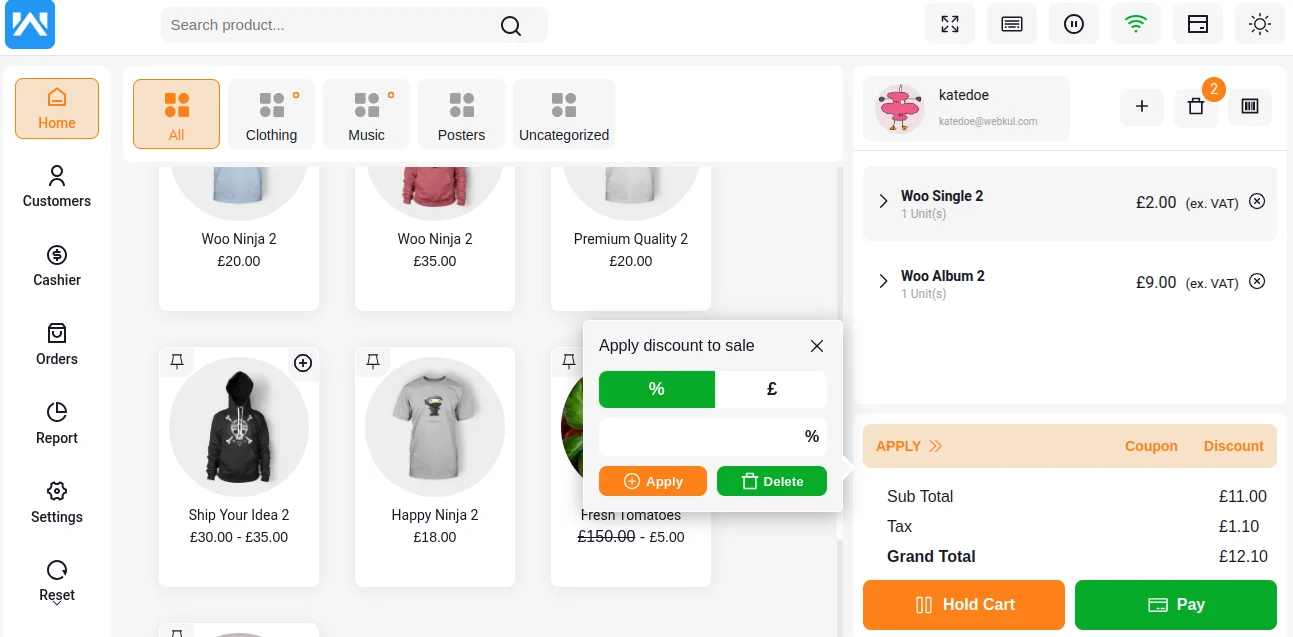
POS Panel – Apply Discount
The POS user can apply the discount to the cart item in two ways –
- Percentage-Wise
- Flat Discount
To apply the discount, the POS user will click the Discount option available in the cart as shown below.

Percentage-Wise
Clicking the Discount option will display the Apply Discount To Sale tab. Here, the POS agent selects the “%” option, which tabulates the discount for cart products on a percentage basis.

Flat Discount
Clicking the Discount option will display the Apply Discount To Sale tab. Here, the POS agent selects the “currency” option, which tabulates the discount for cart products as Flat rate Discounts.
POS Panel – Cart-On Hold
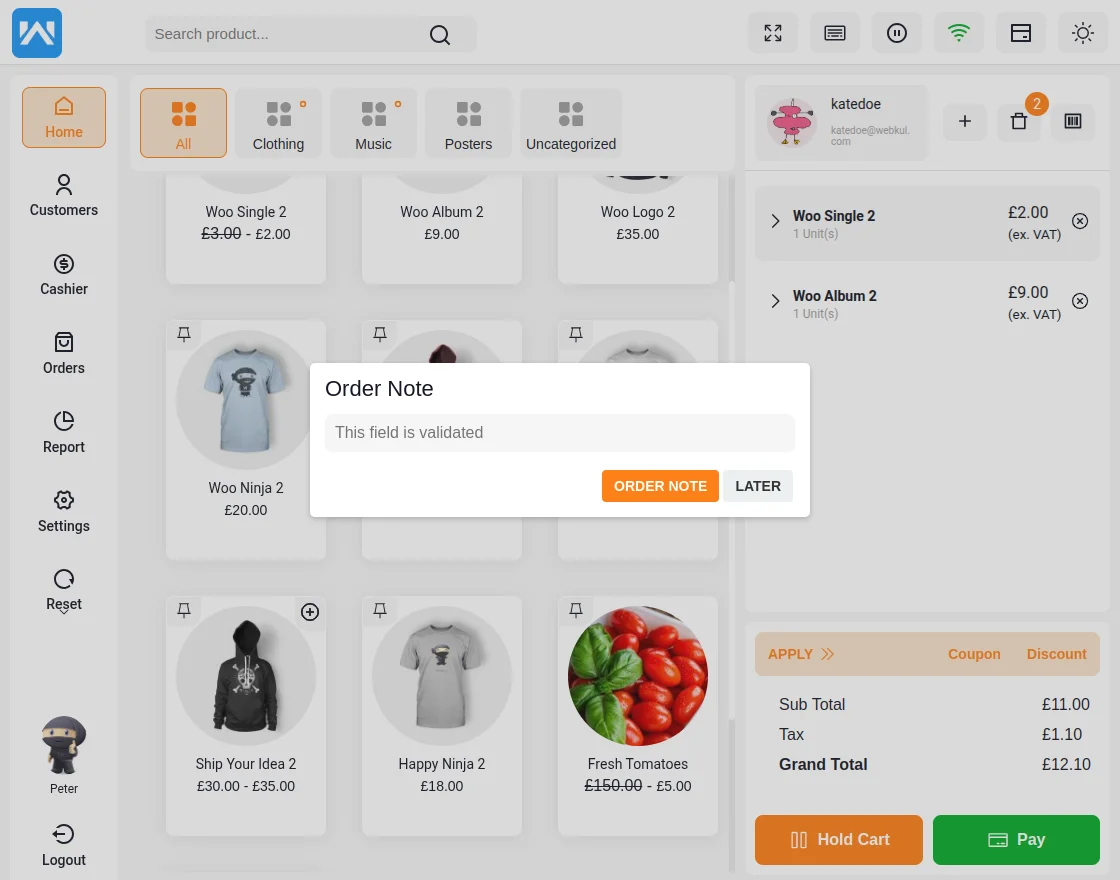
The POS user can put a cart On Hold to process it later by simply clicking on the Hold Cart option as shown below.
Clicking the Hold Cart option will display a pop-up where the POS user will specify the reason for putting the cart-on hold by adding a note.
After adding the note, hit the Add Order Note Here button as shown below.
This will navigate the POS user to a page where the POS user can view the complete list of the carts put on-hold.
The POS user can even directly visit the carts on-hold list by navigating to POS > Order > Hold Sale.
The image below displays the cart details of the product which has been put on Hold.
The Note entered by the POS user is also displayed under the Note section.
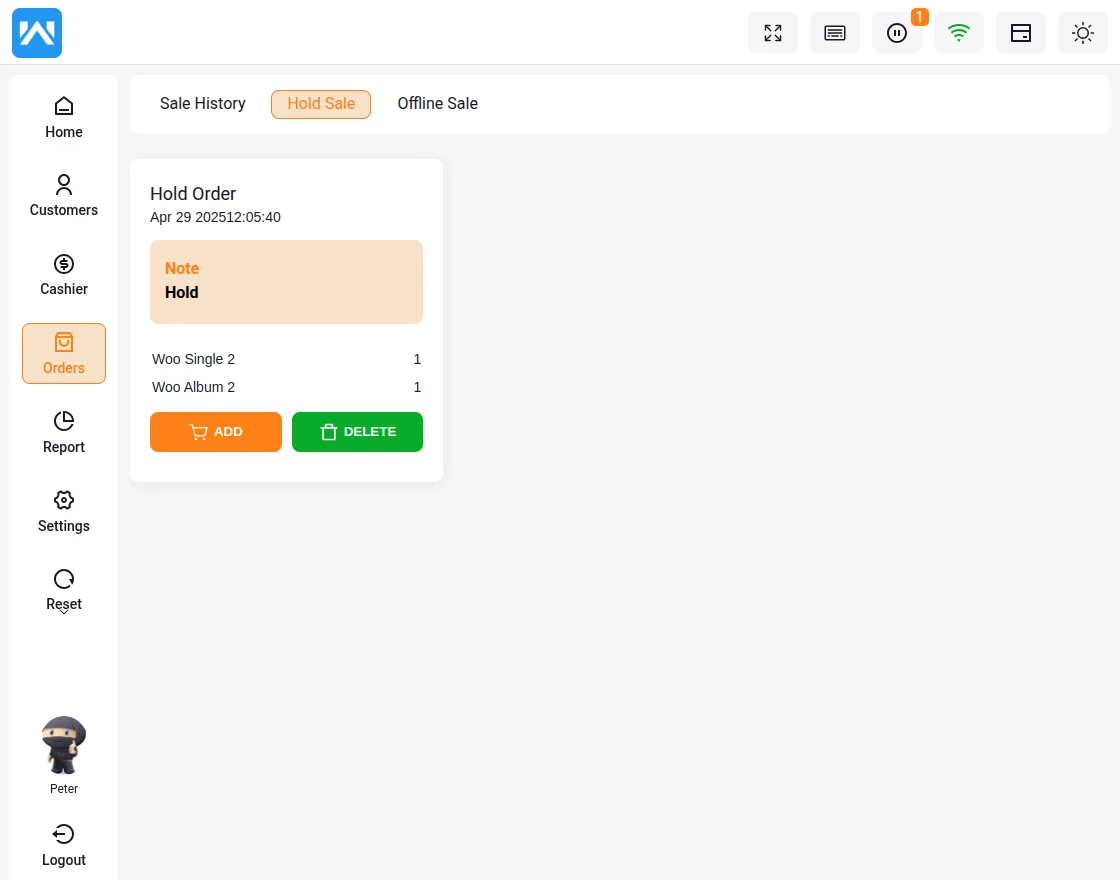
Here, the POS user can –
- Click the Add button to add the order back to the cart to process it further.
- Click the Delete button to delete the complete order cart.
POS Panel – Sale History
Here, the POS user can see all the sales recorded in the system by navigating to POS > Order > Sale history as shown below.
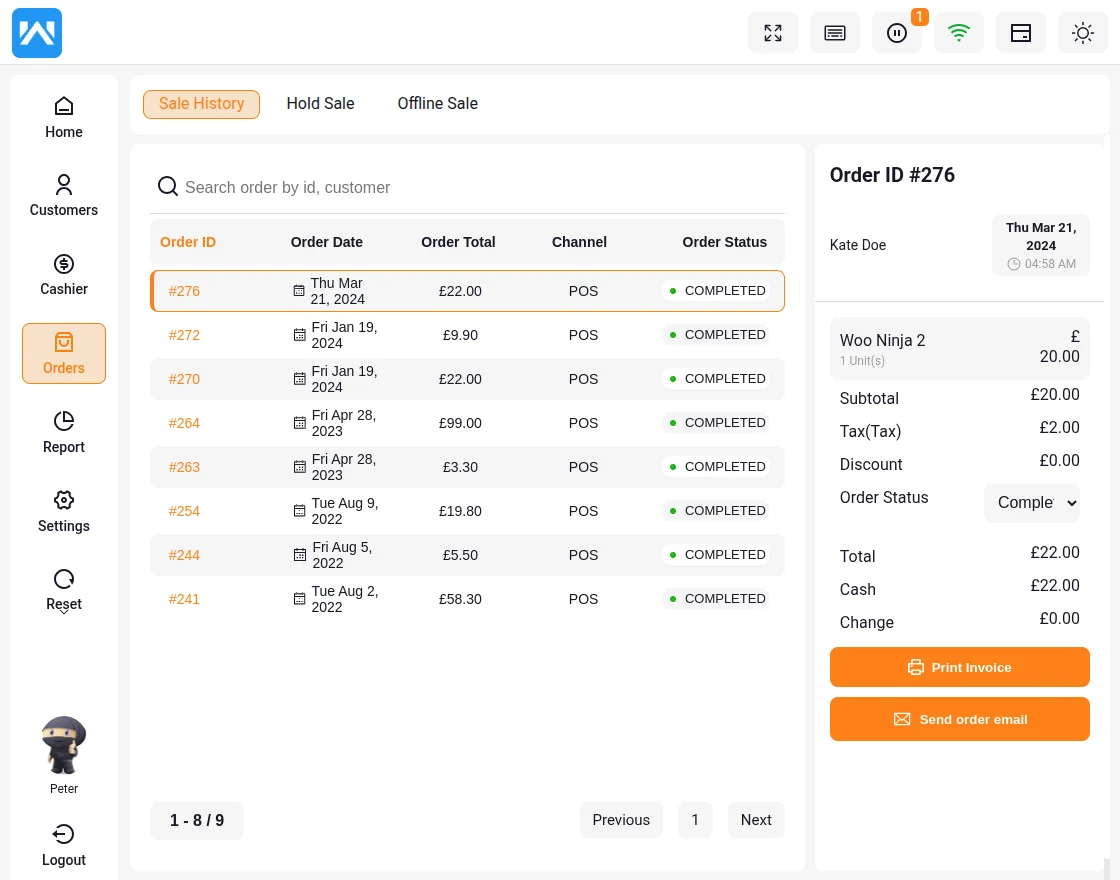
Here, the POS user can –
- View the complete list of the orders placed.
- View the details of any order from the sales order list.
- Search the order from the Search Order By Id panel at the top.
- Print the invoice of the order by clicking the Print Invoice button.
- Send order details through the mail by clicking the Send order email.
Adding Customer-Based Discount :
Adding Customer based discounts helps in enhance store sales by attracting customers. Herein, the admin will enter different prices for different customer groups.
Thus, from the backend, the admin can create a coupon for the POS products based on the different groups by adding an email address.
When the POS user will choose a particular customer group then the discount coupon will be applied to the particular order.

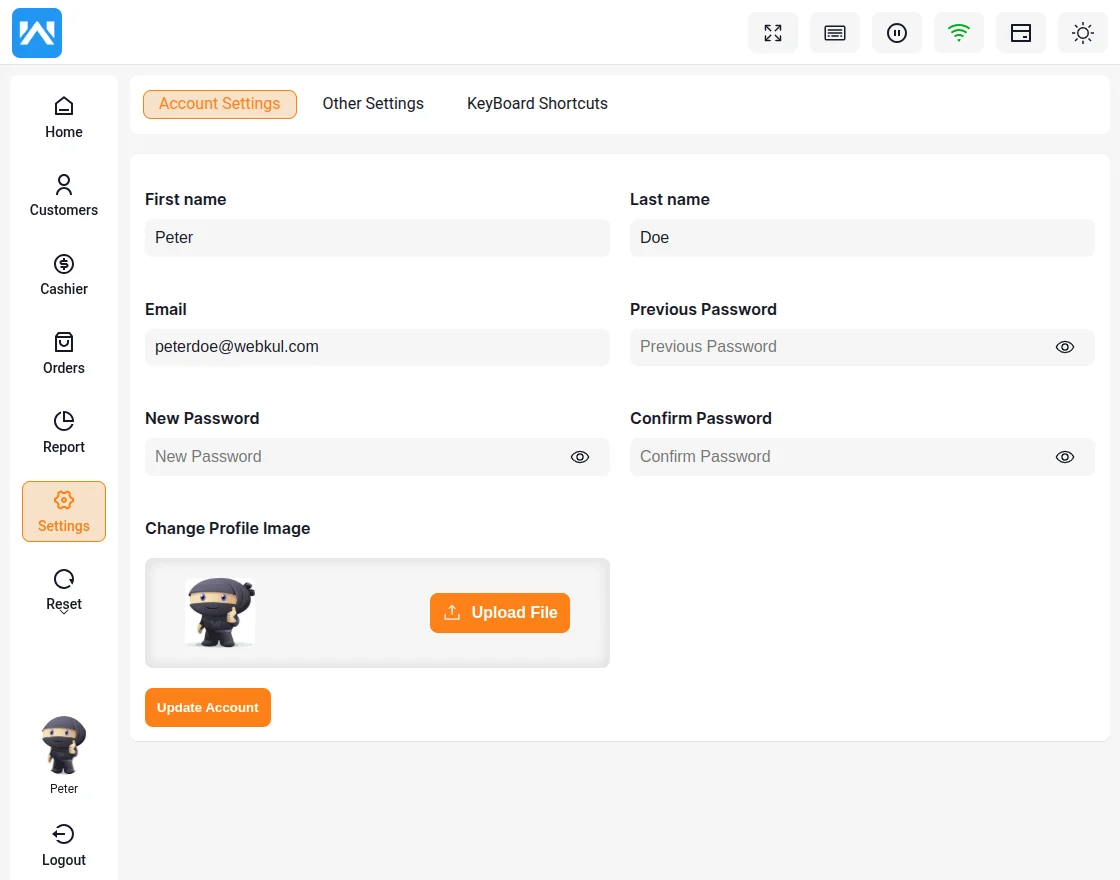
POS Panel – POS Settings
The POS user can navigate to POS > Settings to edit settings for the account and POS settings as shown below.
Account Settings
Here, the POS user will –
- First Name – enter the first name of the POS user.
- Last Name – enter the second name of the POS user.
- Email – enter the email address.
- Previous Password – enter the previously saved password of the POS account.
- New Password – enter the new password for the POS account.
- Confirm Password – reenter the new password of the POS account to confirm it.
- Change Profile Image – Upload an image to change the profile image.
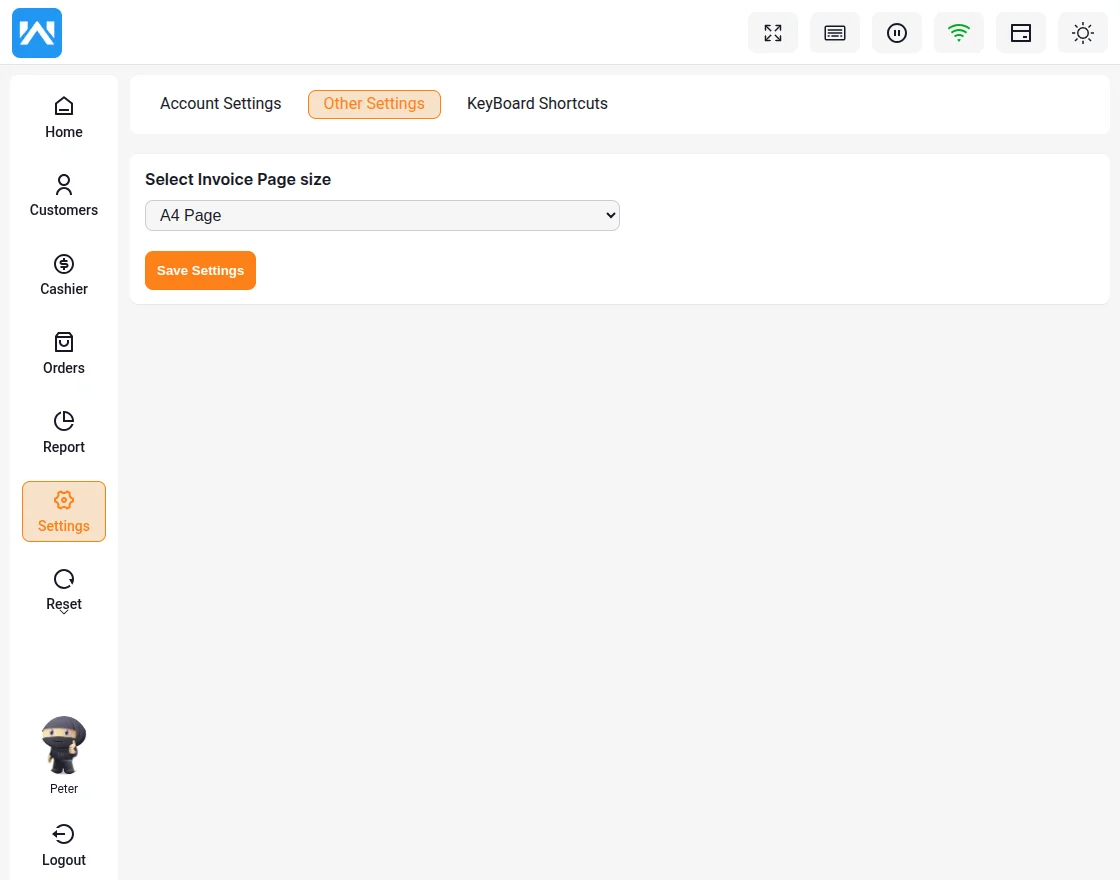
After that, lastly hit the Update Account button to save the configuration successfully. Now in the Other Settings tab, the POS user can configure the other settings as shown below.
Here, the POS user will select the invoice page size. The options will be available under the Select Invoice Page Size as shown below –
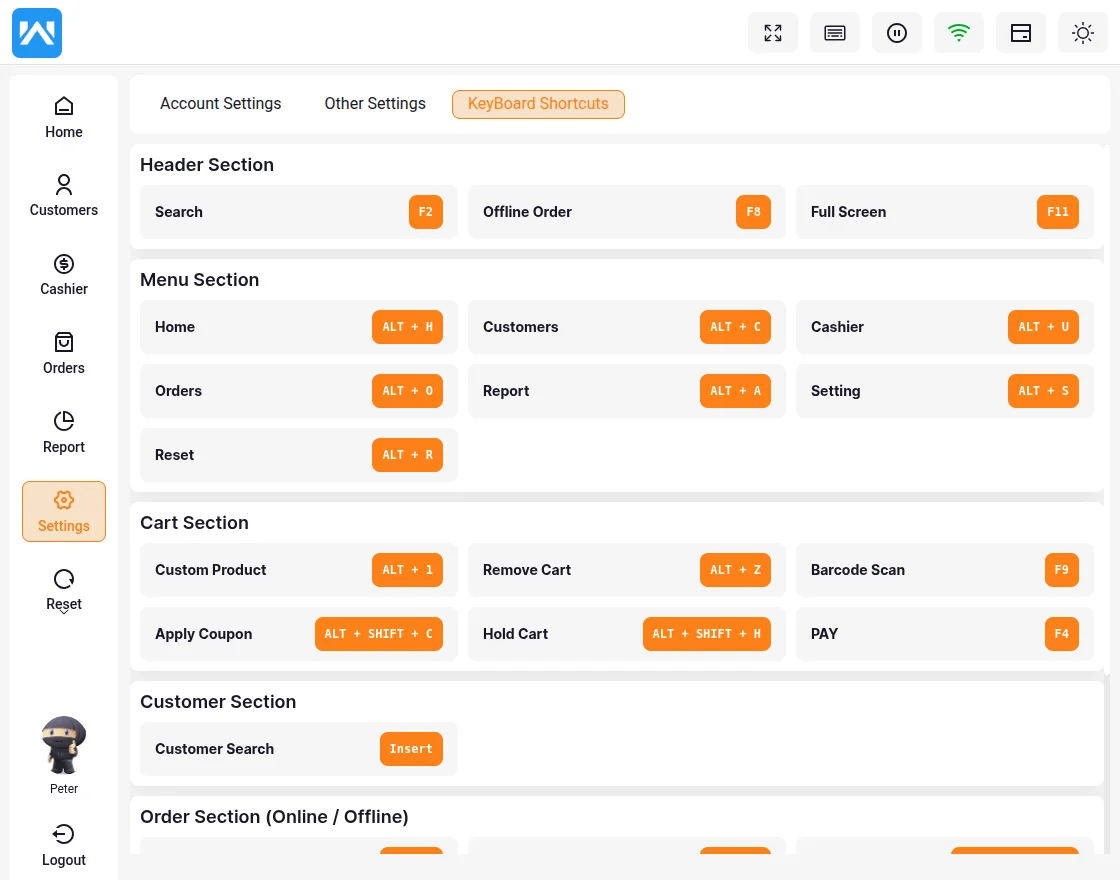
There are shortcut keys available to access the POS panel under the KeyBoard Shortcut are shown below –
Page Not Found Error- Point Of Sale System
Whenever there is a missing page in the POS the sales agent can see 404 pages not found an error.

Thus, that’s all for the WordPress WooCommerce Marketplace POS module. Still, have any issues, feel free to add a ticket and let us know your views at webkul.uvdesk.com.
Check more such kinds of relevant WooCommerce Plugins.
Current Product Version - 4.0.0
Supported Framework Version - WooCommerce Marketplace: 6.1.0; WooCommerce Point Of Sale: 6.4.1; WooCommerce : 9.7; WordPress: 6.7
