WooCommerce Booking and Reservation: These days, customers want to purchase and book everything online including booking tickets, booking courses, doctors’ appointments, etc.
WooCommerce Booking and Reservation plugin will create a dynamic booking and reservation for the products. This will convert the store into a dynamic event-driven site.
This plugin introduces a new product type, bookable products. This empowers the store owner to sell bookable services as a product with respect to hourly and daily reservations.
It will completely match with services such as motels, hotels, events, and tourism.
It will provide the following types of bookings for the products that are –Many Bookings in One Day , One Booking For Many Days and Rental Booking.
This product type lets the admin manage all necessary booking service attributes such as date available, bookable period, slot period, stock value, and price multiplier settings.
Such products in the store catalog are represented with a native store calendar, allowing for the date and time of booking.
Note – This plugin is now compatible with WooCommerce’s latest High-Performance Order Storage (HPOS) and Cart and Checkout block.
Note- This module will work only for Bookable Products e.g. doctor’s appointments, movie booking system, etc.
Check a brief overview of the plugin –
Support
Dear Customers, if you have a question/query, please raise a ticket at webkul.uvdesk.com. We will do our best to answer as quick as it is possible.
Don’t give us a low rate without contacting support on the issue you’ve faced with. We are always happy to help you.
Features
MODULE:
—Dynamic:
- event creation
- time setting
- event display
—User-friendly interface for both admin and customers.
ADMIN:
- Can create bookable products.
- Manage bookable products.
- “Availability” tab is displayed when adding or editing a product.
- Can create three kinds of bookable products: Many Bookings in One Day, One Booking For Many Days and Rental bookings.
- Set a period available for bookings and reservations, e.g. bookings can be made only from 8:00 AM – 6:00 PM or 14 Sep 17 to 20 Sep 17.
- Configure booking status for each slot (open or close).
- Added an open and close panel with slider counter which will follow the module minimalist approach.
- Add start and end date, number of items available for each slot.
- For date selection, Date Time Picker is also enabled in the input field.
- Flexible exclude days rules to prevent bookings for certain time slots and days (disable particular time slot, random days, and continuous days).
- See all bookings in Booking customers list page.
- WordPress’ inherent date-time functionality.
- Functionality to alter booking schedules for customers.
- Retrieve the PDF invoice for the customer’s booking.
- Sending emails for rescheduled and canceled bookings.
- Admin can enable or disable the extend booking or remaining booking cancellations.
- Admin can add penalty rules according to the hours or days.
CUSTOMER:
- Booking calendar is displayed in the front end, where customers can view availability and can make bookings.
- The customers can get SMS notifications.
- Booking calendar allows selecting the date to book any product.
- Check the availability, they can set the quantity of the bookable product while booking.
- Click on the calendar’s days or time slots to select the booking period they want.
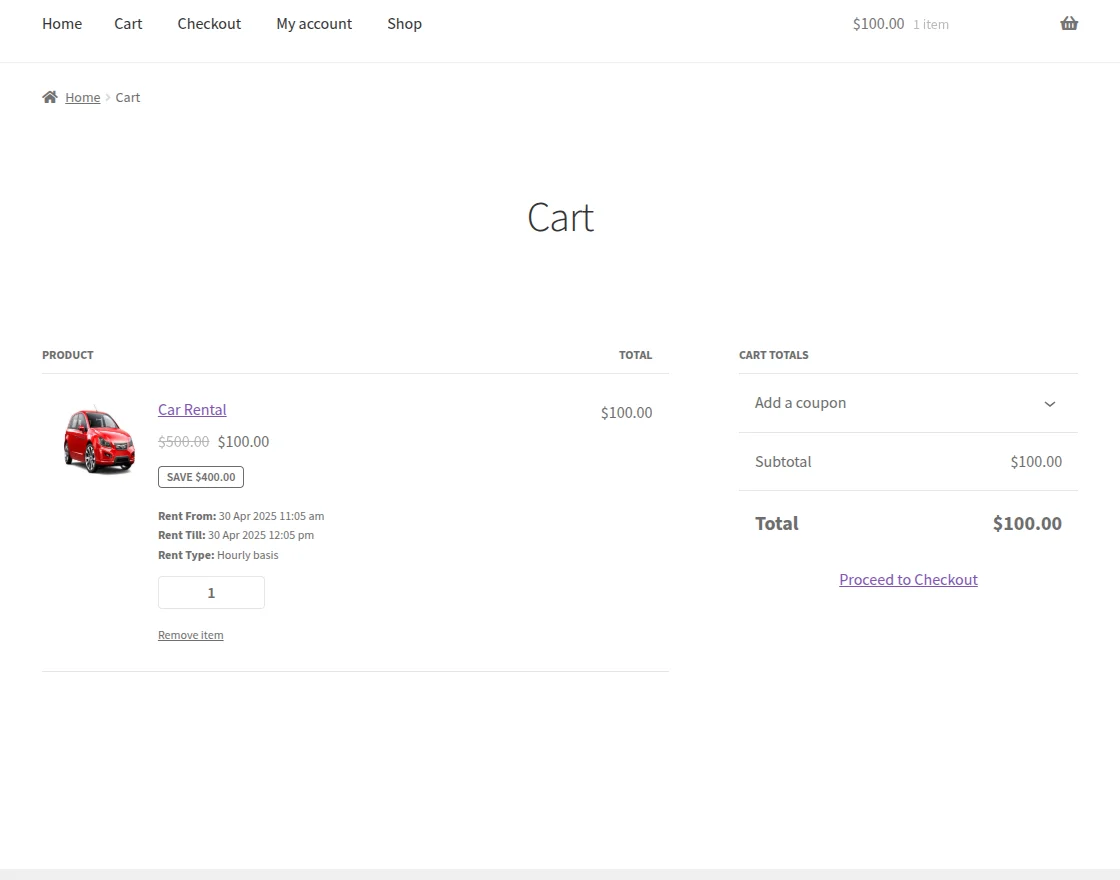
- See booking/reservation details in the shopping cart before placing the order.
- Allow selected one or more timeslots.
- Allow multiple bookings for the same time slot based on the available quantity of the bookable product.
- They can extend the booking for next slots for both many booking for one day and one booking for many days.
- They can also cancel the booking for the specific period from their booking slot for both many booking for one day and one booking for many days.
- Booking details are sent to customers through Email along with .ics file as well.
Note : This module is now compatible with WooCommerce’s new High-Performance Order Storage (HPOS) feature.
Installation
The user will get a zip file which needs to be uploaded in the “Add New” menu option in the WordPress admin panel.
For this login to WordPress Admin Panel and in the Dashboard hover your mouse over the “Plugins” menu option select the “Add New” option.

After this, the user will see an option on the top of the page that is “Upload Plugin”, click the option to upload the zip file.

On clicking the “Upload Plugin” option, the user will see a “Choose File” button. Click on the button to browse for the zip file as per the image below.

After browsing the file, click on the “Install Now” button so as to install the plugin as per the snapshot.
Once the user installs the plugin, a message “Plugin installed successfully” displays and an “Activate Plugin” is visible to activate the plugin.
The user needs to click on the “Activate Plugin” button to activate the plugin.
Module Translation
To know how to translate the module, you can click here.
Module Activation
Check how to activate your WooCommerce plugin through the purchase code.
Generate API Key – For Displaying Maps
-
- Go to the Google Maps Platform
- Tap ‘Get Started‘ on the top right-hand side.

- Now, check all options – ‘Maps‘, ‘Routes‘ and ‘Places‘ and tap ‘Continue‘.

- If you want to use an existing project, please select it from the list. Otherwise, select ‘Create a new project‘ and enter a project name.

- Create Billing Account.
- Now, tap ‘Next‘ to continue and complete the steps.
- Click ‘Next‘ to enable the APIs for the selected project.
- lastly, you need to copy the generated API key within the settings sub-menu option under the WC Booking System.

Configuration
After the installation, the admin can create Bookings and Reservations. For this, the admin will have to navigate the Webkul WC Addons-> WC Booking System tab in the admin panel.
Under the WC Booking System tab, the admin will see three options as shown in the image below.
- Booking Product
- Booking Orders
- Configuration

General
- Module Status: The admin can Enable/Disable the module as per the choice.
- Google API Key: Here, the admin is required to give the Google API key and then click on the “Save Changes” button.
- Allow Booking Cancellations: Before this time the user can cancel the booking.
- Allow Booking Reschedule: Users can reschedule the booking before this time.
- Allow PDF: Customer can download the booking details pdf.
SMS

- Account SID: Here, the admin needs to enter the account SID.
- Auth Token: The admin has to provide their Auth Token which they receive from Twilio.
- Phone number: Under phone number, the admin gives their phone number.
Template

- Configure Template: Here, the admin can configure the template.
- SMS Notification: The admin can Enable/Disable SMS Notification.
Booking Configuration

- Enable Extend Booking: Here, the admin can enable or disable the extended booking for customers.
- Enable Remaining Booking Cancellations: Here, the admin can enable or disable remaining booking cancellations.
Penalty Rules
Penalty rules for Cancellation Remaining Booking.

Edit Penalty Rule
- Rule Name: Here, the admin can set the penalty Rule Name as per their choice.
- Penalty Type: Select either Fixed or Percentage.
- Penalty Unit: Select the penalty unit either days or hours.
- Status: Admin can enable or disable the penalty rules functionality.
- Penalty Amount: Admin can set the desired penalty amount.
- Penalty Per Unit: Enter the unit for the penalty in days or hours.
Note: Penalty rules will be applicable as per days or hours.
After all the changes are done by the admin, then need to apply them by clicking Save Changes.
Booking Product
Many Booking In One Day
The admin can easily create the multiple time slots for “Many booking in one-day” type Bookable product. For this, the admin will add a product by navigating to Products>Add New.
While adding a product, the admin will select the Bookable Product as a product type from the drop-down list.
The admin can configure the fields as under:
- Select Booking Type: Select the “Many Booking in one day” option from the drop-down list.
- Start Date: Set the date for the “Many Booking in one day” to be active from.
- End Date: Set the date for the “Many Booking in one day” to get inactive.
- Booking Stock per Slot: Defines the stock which can be booked in per slot. The customer can only book the product stock on the frontend, up to the limit defined by the admin at the backend.
- Location: Can enter the location where the booking is to made.
- Status: Enable/ disable the status “Many Booking in one day”.
- Time Slot: Set the time span of a slot.
- Break Time Slot: Set the break time between the slots.
- Booking Break Time Between Bookings: Enter the break time between bookings so that there is a specific time while making next booking.
In the grid, the admin sets the available times for bookings and reservations for each day as per the choice, e.g. reservations can be made only from 11:50 AM – 10:00 PM.
Note:
- The admin can also disable the bookings and reservations for a particular day.
- For this, the admin will select a “close” option from the drop-down list available against the time slots.
After creating the Bookable product, the user can view the manage slots page, from where the slots for the product can be edited.

Then, click on the “Edit Slots” button against the created product and navigate to the “Slot List” page as per the below image.

The admin can see all the slots, as well as, can “Open” or “Close” the slots for the customers on the front end and update the status at once.
Instead of disabling the complete bookings and reservations for a particular day, the admin can disable a particular time slot of a day.
The admin simply selects the “Close” option for any time slot from the available drop-down list as per the image.

At the front end, the bookings will disable for that particular time slot.
The admin simply selects the “Close” option for any time slot from the available drop-down list as per the image.
At the front end, the bookings will disable for that particular time slot.
For instance, if the admin disables a slot 14:40 pm to 15:55 pm for Wednesday, the booking for that slot displays as Unavailable as shown in the image below.

DISABLE BOOKINGS AND RESERVATION FOR RANDOM DAYS WITH TIME:
To disable the bookings for random days, the admin will click on the “Disable Time Span” tab as per the image.
The admin will select the random dates from the calendar and can also select the time slot to be closed at a particular time and then click on the “Update Status” button.
At the front end, the bookings will get disabled for that random day for that particular time slot.

DISABLE BOOKINGS AND RESERVATION FOR CONTINUOUS DAYS:
To disable the bookings for continuous days, the admin will click on the “Disable Days Span” tab as per the image.

Here, the admin will:
- Select the “Closed From” date from the calendar.
- And then select the “Closed till” date from the calendar.
- Proceed further by clicking on the “Update Status” button.
The admin can disable the bookings for multiple continuous days by clicking on the “Add ” button. The admin can also enable the bookings by clicking on the “Remove” button.
At the front end, the bookings will get disabled as per the below image.

Front End
Once the admin has created the “Many booking in one-day” type Bookable product, the customer can see it on the product catalog page as shown in the image below.

The Bookable products will have the “BOOK NOW” button so that the customers can easily differentiate the Bookable products.
The customers will click on the desired Bookable product for booking and reservation.
This redirects the customers to the product page as per the below image.

On clicking the ‘Book Now’ tab, customers will get a pop-up window as shown in the image below.
Customers can:
- Select the date from the calendar for which they want to book the slot. Days from the Start date to End date will be enabled and rest of the dates will be disabled in the calendar.
- Select the slot for the selected date and set the quantity.
- Then click on “Add To Cart” button.
One Booking For Many Days
The admin can easily create multiple day’s slots for “One Booking for many days” type Bookable product. Firstly, the admin will add a product by navigating to Products > Add New.
While adding a product, the admin will select the Bookable Product as a product type from the drop-down list.
Then, Availability option becomes visible as per the image.

Here, the admin will:
- Select Booking Type: Select the “One Booking for many days” option from the drop-down list.
- Booking Status: Enable/disable the “One Booking for many days”.
- Start Date: Set the date for the “One Booking for many days” to be active from.
- End Date: Set the date for the “One Booking for many days” to get inactive.
- Booking Stock Per Slot: Defines the stock which can be booked in per slot. The customer can only book the product stock on the frontend, up to the limit defined by the admin at the backend.
- Booking Location: Enter the location where the booking is to be made.
After this, the admin will create the slots as per the image.

Here, the admin can:
- Select the weekday, enter the start time, select the end day, enter the end time.
- Remove the existing time slots by clicking on the “Remove ” button & can even add bookings by clicking on “Add Booking” button.
After creating the Bookable product, the user can view the manage slots page where the product slots can be edited by the user.

Then, click on the “Edit Slots” button against the created product and get navigated to the “Slot List” page as per the below image.

The admin can open the slots or close any slot as need be.
DISABLE TIME SLOTS:
Instead of disabling or removing the complete bookings and reservations for a particular day, the admin can disable a particular slot accordingly.
The admin simply selects the “Close” option for any time slot from the available drop-down list as per the image.
DISABLE BOOKINGS AND RESERVATION FOR CONTINUOUS DAYS:
To disable the bookings for continuous days, the admin will click on the “Disable Days” tab as per the image.

Here, the admin will:
- Select the “Closed From” date from the calendar.
- And then select the “Closed till” date from the calendar.
- Proceed further by clicking on the “Update Status” button.
The admin can disable the bookings for multiple continuous days by clicking on the “Add More” button. The admin can also enable the bookings by clicking on the “Remove” button.
Front End
Once the admin has created the “One Booking for many days” type Bookable product, the customer can see it on the product catalog page as per the image.

The Bookable products will have the “BOOK NOW” button so that the customers can easily differentiate the Bookable products.
The customers will click on the desired Bookable product for booking and reservation purpose. They will be redirected to the product page as shown in the image below.

The customer will get a pop-up window by clicking the “BOOK NOW” button as per the image.

Here, the customers will:
- Select the date from the calendar for which they want to book the slot. Only the Start date of every slot will be enabled and the rest of the dates will be disabled in the calendar.
- Select the slot for the selected date and set the quantity.
- Then click on the “Book Now” button to book the slot.
Rental Booking
To create a Rental Booking type product, admin selects the Rental Booking option from the dropdown list. It is displayed as per the image below,
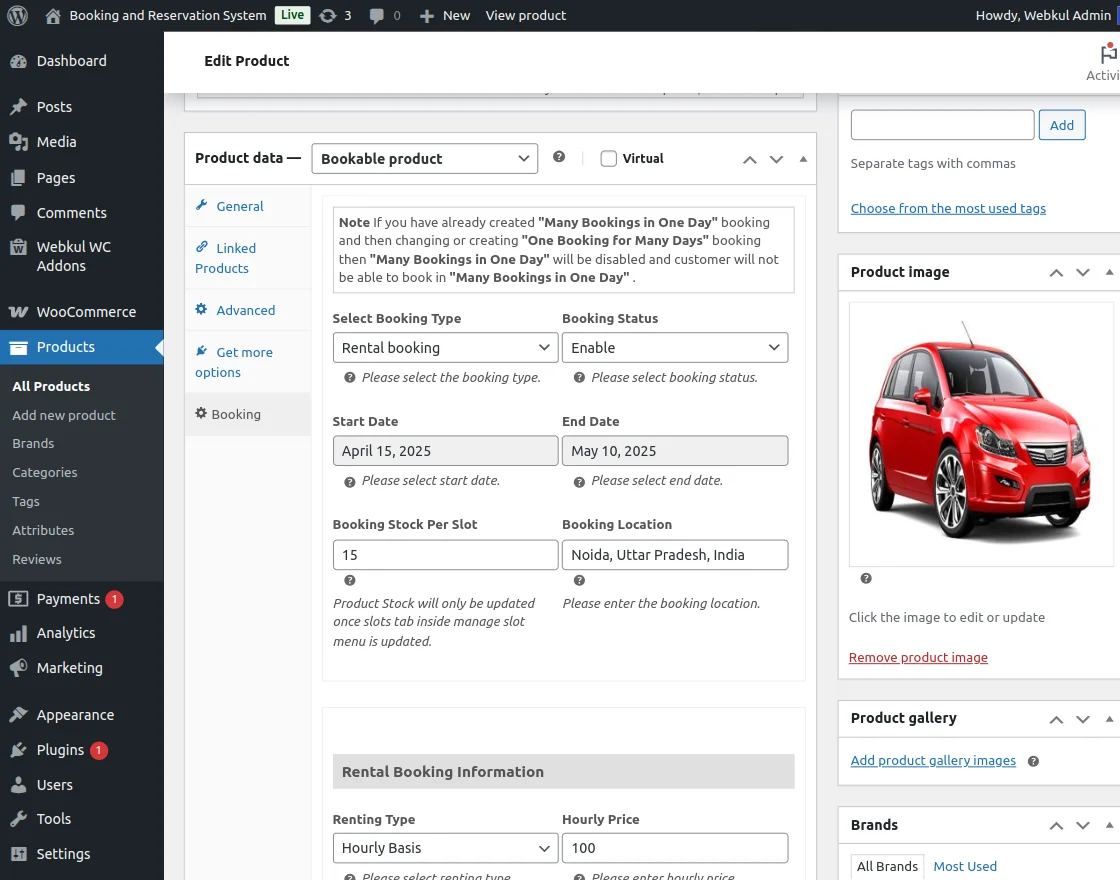
The following options are available to them,
- Select Booking Type – Select the type of Booking.
- Booking Status – Enable or Disable the booking status.
- Start Date – Select the Start Date.
- End Date – Select the End Date.
- Booking Stock Per Slot – Select Stock Slot for Product.
- Booking Location – Please enter the booking location.
Rental Booking Information
Renting Type – Select the Renting type as Hourly, Daily or Both (Hourly + Daily).
Daily Price – Set the Daily Price.
Hourly Price – Set the Hourly Price
Hourly Renting Information
Prevent Scheduling(in minutes) – Enter the minutes to prevent scheduling.
Hour Has Quantity – If it is enabled then every hour rule has it’s own stock.
Hourly Booking Slots – Set the Slots for hourly booking.
Once the Product is enabled, it is visible on the Frontend as per below image,
Daily Basis

Here, Customers can Select Daily Basis and Hourly basis rental booking as per requirement. If they select Daily Basis, they get the following options,
- Select From and To Dates.
- Enter the required Quantity.
Next, to book the product on a daily basis, customer taps on Book Now button which adds the product to the cart as per below image,
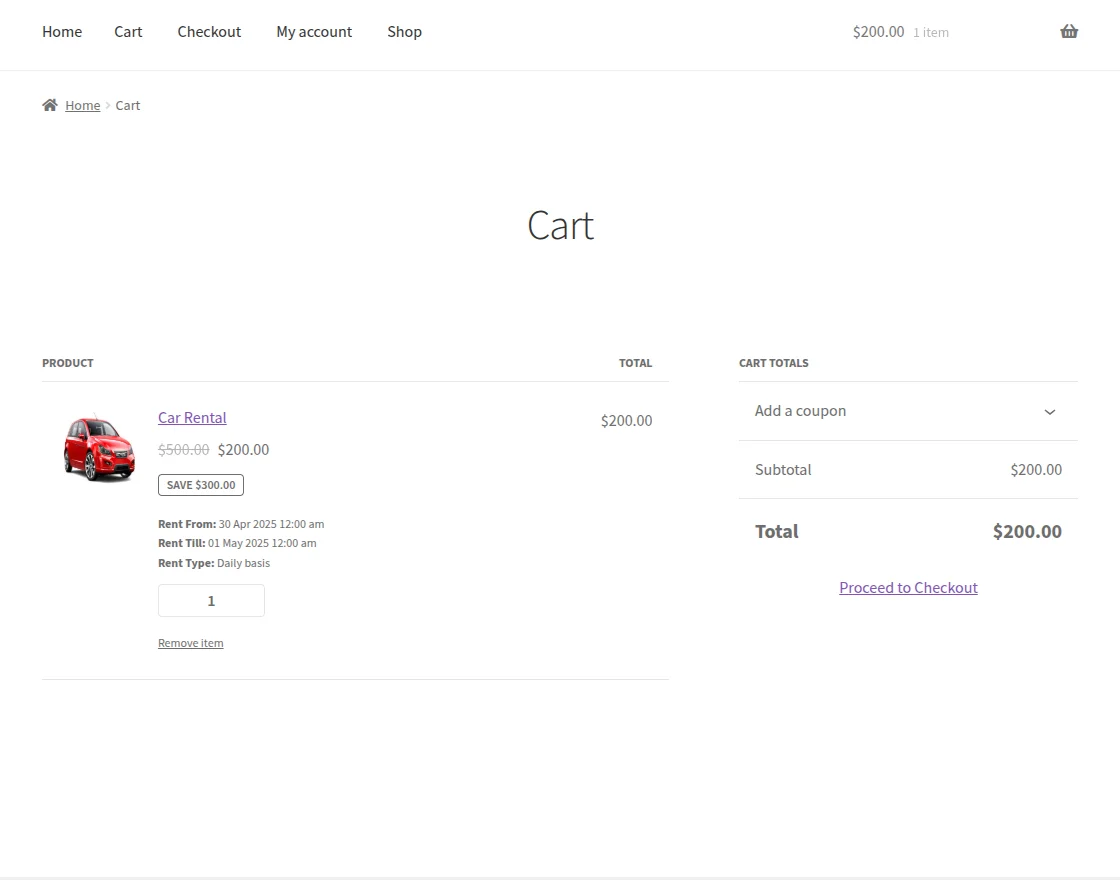
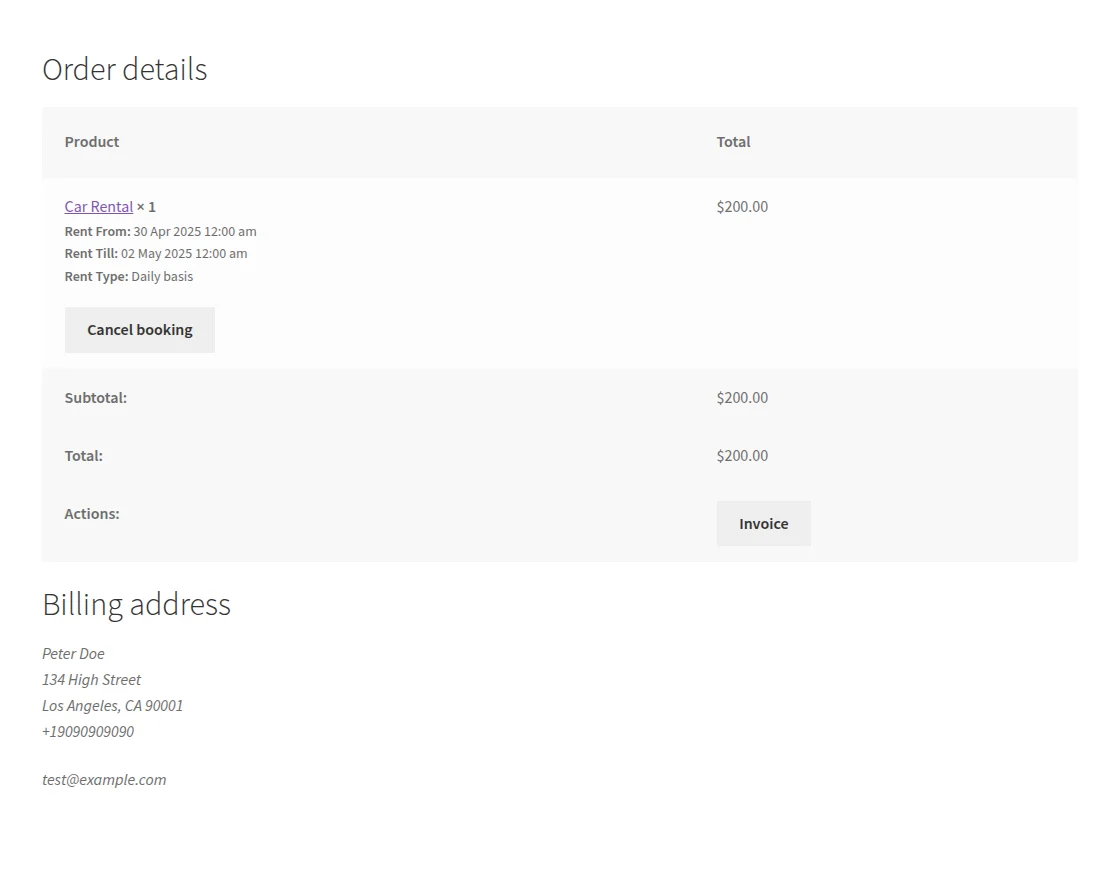
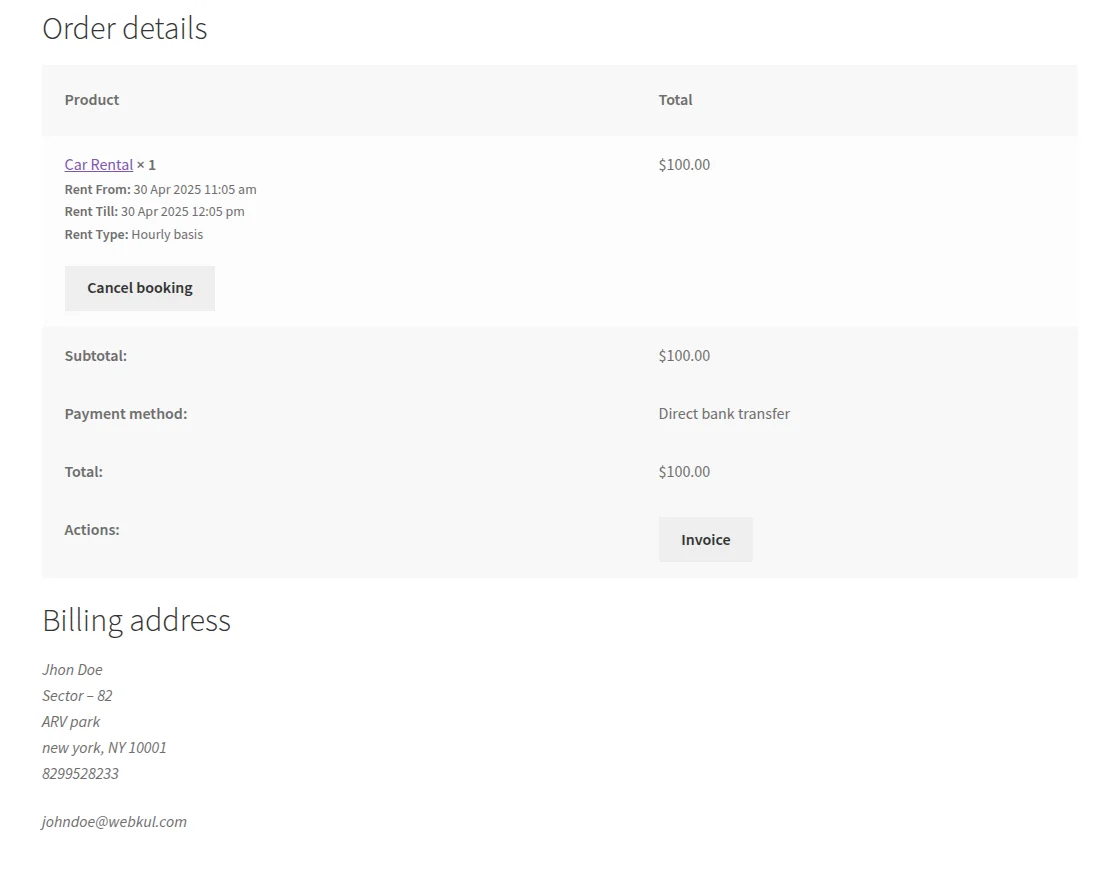
After this, they check the details of booking and then proceed for checkout and order placement. The order details is listed in below image once order is placed.
Hourly Basis
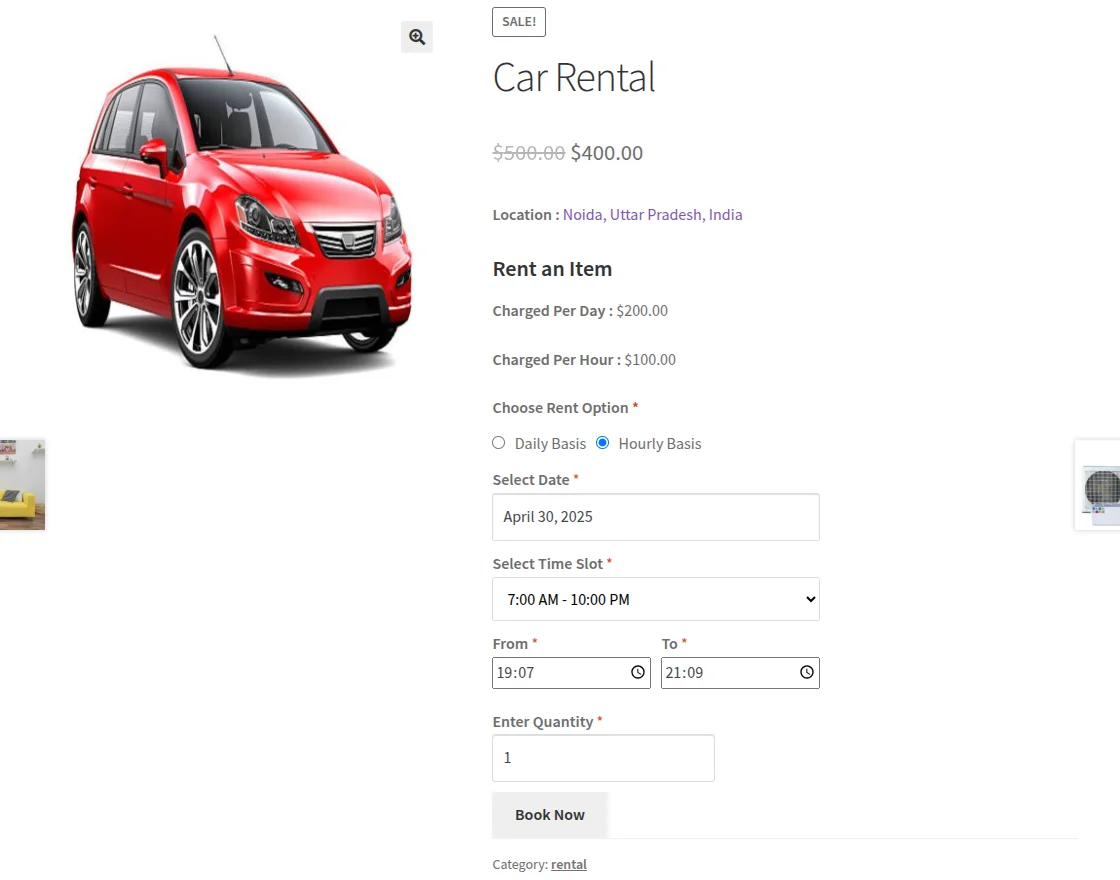
If the customer selects Hourly Basis rental booking, then, the following options get available to them,
- Select Date – Customer selects date for booking.
- Select Time Slot – Enter the time slot of booking.
- Select From and To Times.
- Enter Quantity – Field to set quantity for booking
Once details are filled out, Customers tap on Book Now button to proceed further. Next, they are redirected to the Cart page after which customers proceed to checkout and place order.
After Order is placed, Order details for hourly booking are displayed accordingly.
Bookings Orders
The admin can easily view the booking details of the Bookable products. Collectively from a single page. For this, the admin needs to navigate to the “Booking Orders” option.

The admin can also view the order details for the booking made by clicking on the “Order ID” option.

Apart from that, the admin can also view the order booking list for a particular bookable product by navigating Booking Product->Bookings.


Extend and Cancellation Remaining Booking at Customer’s End


After clicking on the place order button, the order gets placed and redirected to the order detailed success page.

Extend Booking
Now, the customer can extend the booking by clicking Extend Booking in order details.
After clicking on extend booking the customer will again redirected to the cart page along with the extended booking order.

Cancel Remaining Booking
Now, the customer can also cancel the remaining booking by clicking on Cancel Remaining Booking Button.
After cancellation, the customer will receive the details such as booking refund amount, booking till, previous booking, and booking status in order details as you can see in the below image.

Admin can also extend the booking and cancel the remaining booking from the order detail page in as you can see in the below image.

Steps to create an account on Twilio
Note- The admin will have to run the command to install Twilio via the terminal.
- The user can hit the link- www.twilio.com to sign up with the Twilio SMS provider.

On clicking the link, the user will be redirected to the Sign-Up page. The user will have to enter details such as Name, Email, Password etc.
Once the user submits the sign-up details and completes the sign-up process, the admin can check Twilio credentials under the Console Dashboard as shown in the image below.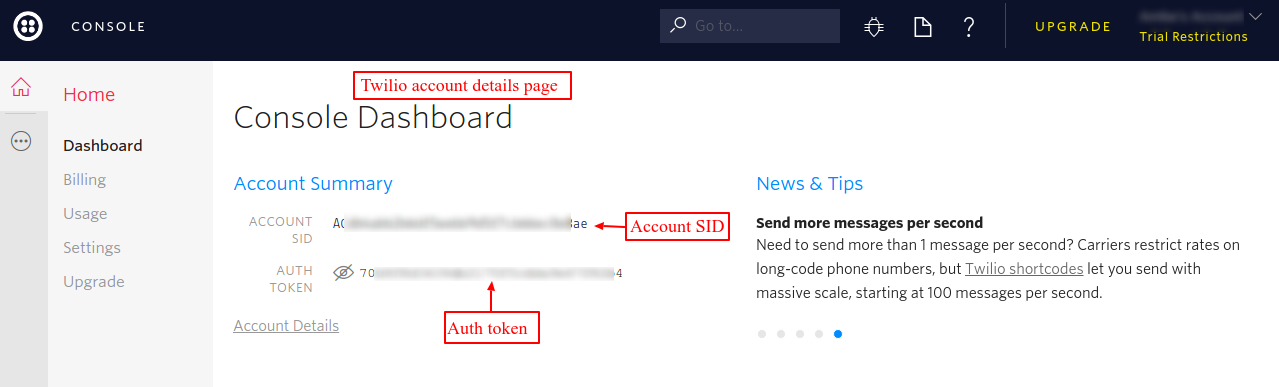
On receiving the credentials, the admin can complete the module configuration with the Twilio SMS provider.
SMS on Customer’s End
Order Confirmation Notification
The customer will receive the confirmation SMS for their booking along with the booking details as shown below.


That’s all for the WordPress WooCommerce Booking and Reservation plugin. Still, have any issue, feel free to add a ticket and let us know your views to make the plugin better at webkul.uvdesk.com
Current Product Version - 3.2.0
Supported Framework Version - Woocommerce 9.8.1, WordPress 6.5.4

11 comments
For the WooCommerce web-store to sell booking and reservation types of products from the Point Of Sale terminal, you can use this module – https://store.webkul.com/woocommerce-booking-reservation-pos-system.html.
Note: To make use of this add-on you must have installed first the:
WooCommerce Point of Sale extension.
Booking and Reservation extension.
Also, please share the complete requirement regarding the sharable bookable assets that you are referring to on [email protected].
So that we can assist you in a better way.
Thank You.
This module is an add-on of Woocommerce and will be installed on your woocommerce website. This is the user guide of the module that is sold on codecanyon. If the Razorpay Payment is integrated on your Woocommerce Website then the products will accept payments through it.
In case of any further queries, please drop us a mail at [email protected] and we will assist you further.
Thanks
Is the booking plugin compatible with the Marketplace plugin? Can they work together in tandem?
This can work with the marketplace but it will only give the facility to the admin to create a booking. Additionally, we have a separate plugin that deals with marketplace functionality that is- Marketplace Booking Reservation for WooCommerce
For Tandem language learning app solution integration, kindly connect to us on [email protected].
Thanks and Regards.
Currently, in this module, the admin can create booking type products only. If you want us to implement the required feature then this will require extra efforts from our end. Please mail us at [email protected] with your complete requirement so that we can assist you accordingly.
Thanks
example: adult-elderly-baby-baby? each with a different value where in each one they will inform the quantity and the value is increased in total.
Currently, there is no feature as such but can be achieved through customization.