Smart Weather Forecaster is a lightning component that displays the weather of Leads, Accounts, Contacts, Communities and it allows to select the City and display weather accordingly on your record page.
It is available as a lightning component for every object page and one can also use this component on the community page to get the complete weather details by selecting the City, Country.
Features
- It can easily track the complete weather info based on City name or Country/City.
- It provides an option to set the number of upcoming days up to which you want to see the weather info.If the days exceeded the 10 then it would show error.
- It displays the temperature in Celcius & Fahrenheit
- It shows the options to set the date format.
- It present a complete weather information details that include Sunrise Time, Sunset Time, wind speed, highest temperature, lowest temperature and pressure as well.
- The feature is available on the homepage and on every record page i.e Leads, Accounts, Contacts, Contracts, Communities etc.
- It is optimized for the Salesforce1 mobile app as well.
- Easily manageable.
Smart Weather Forecaster Configuration Tutorial
Smart Weather Forecaster Lightning Configuration View
To use the application at the Lightning end, it is required to register the domain first. Kindly go through the article: How to register your Domain in Salesforce.
Once you get registered with your Domain, please make sure that custom tabs related to Weather Forecaster should be Default On.
Follow the steps to verify or update it : From Setup | Manage Users | Profiles | Select Profile and click Edit to verify as mentioned in the screenshot below.
Once done, Click on Save and Switch to Lightning Experience and proceed with the configuration at Lightning view as shown below.
How to Generate API to use our Smart Weather Component?
In order to generate API, you need to follow this procedure. You need to first visit this website: https://www.weatherapi.com/
Then, you need to Sign Up on the website and create a free account with the help of your login credentials
Please follow the steps shown in the screenshot below to generate API:


Click on Home Tab and then Click on ‘Edit Page‘
Add the Weather Forecaster Lightning Component by drag and drop concept as shown below in the screenshot.

In weather forecaster component configuration, you can Set the Number of Days up to 3 to see the weather details. If the value exceed then the error would display at configuration section.

user can set the date format according to their requirement

You can also, Set the Speed from Km/h to Mph through the drop down menu.

You can also, Set the Distance from Km to mi from the drop down section.

You can also Set the Pressure from mb to in through the drop down menu.

Set the location as State or City and Set the Color as color code or color name to set the background.

Click on save.
Now, click on ‘Next‘.

Click on ‘Activate‘ to activate the component on Homepage.

Homepage view of Weather Forecaster with Complete Weather Information is shown below:

Now with our side panel menu option, you can easily check Today’s, Weekly, Hourly, Air Quality Index and Particular Date’s Weather as per your preference.
You just need to click on the given options to operate these weather timelines.
For Hourly Data:
You need to click on Hourly from the side panel drop down option:

Once you click on Hourly, you will be able to see Hourly Weather Updates for your region:

Similary, you can update the weather information for Weekly basis:

You can also check the Air Quality Index of your region similarly:

As per temparture constraints, you can check the weather information in both Celsius & Fahrenheit:


Similary to this, you can easily update the weather information as per a particular Date as shown below:
Once you select a particular date, the weather information will get updated for that particular day.


Accounts Weather Forecast View
To get weather info on Accounts page, click on the Accounts tab and open any Account record as shown below: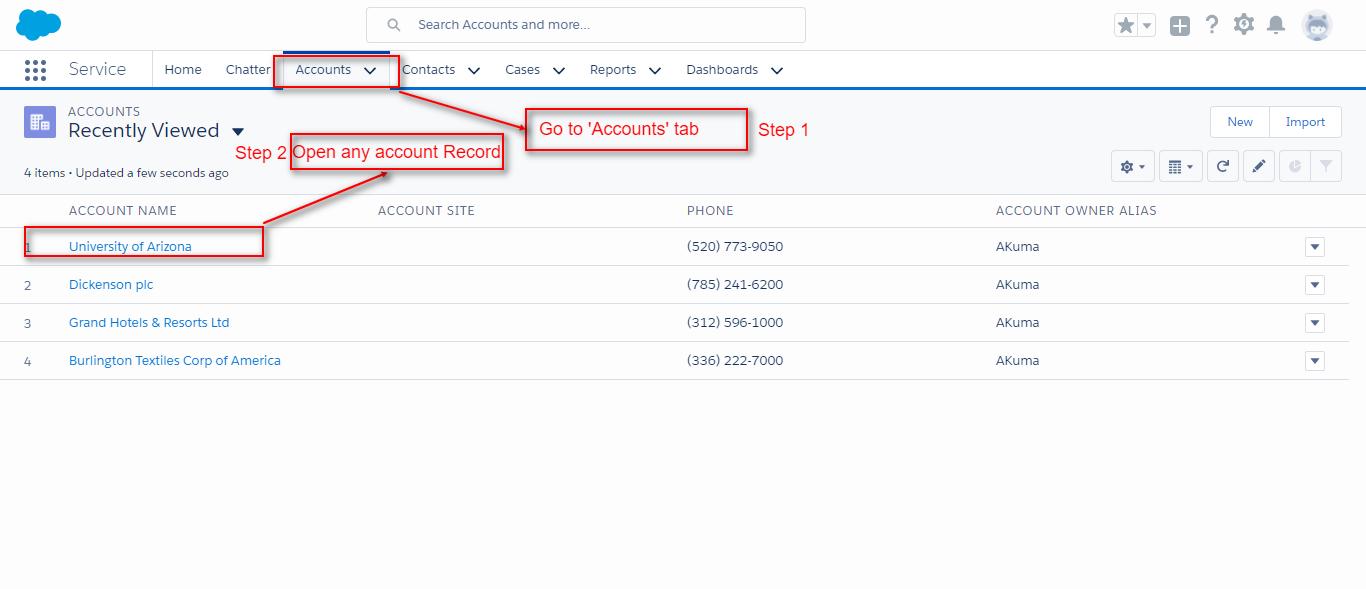
Add the Weather Forecaster Lightning Component by drag and drop concept as shown below in the screenshot.

Once you click on Save and then Activate, please click on Assign as Default as shown below:

Now, please click on Save
 The Accounts page view of Weather Forecaster with Complete Weather Information is shown below:
Similary, you can update the weather information for your Account Details page as per your preference for Today, Hourly, Weekly, Temperature Wise, Date Wise, and as per AQI.

Similarly, you can have a lightning view of Weather Forecaster component on every other record Page like Contacts, Leads, Contracts etc.
Community Weather Forecast View
Weather Forecaster Component can also be made visible for Community page as well.
To view the weather info on Community Page, type All Sites in the ‘Quick Find Search Box‘ and open the ‘Builder Page‘ of your community as shown below.

When you click on All Sites, you will be redirected to Community Page where you need to click on the Builder to open the Builder page.
After clicking on the buider, you need to Click on Components and drag and drop the Weather Forecaster component to the required location as shown below:


Click on Publish. The Weather Forecaster on the Community page will appear as shown below
Similary, you can customise the weather information as per your prefernce for today, hourly, weekly, AQI and Date as shown in the above steps for HomePage.

Salesforce1 Mobile App Settings
Go to Setup | Mobile Administration | Salesforce1 Navigation . Add Weather Forecaster Lightning from the available section to Selected list and click Save.
The below Snapshot shows different tabs of Weather Forecaster Lightning component in mobile Salesforce1 App.
Smart Weather Forecaster Installation Link
You can visit the link below to install this Application from Appexchange
https://appexchange.salesforce.com/appxListingDetail?listingId=a0N3A00000EJX7eUAH
Support
Still have questions? If yes, feel free to create a ticket and contact us https://webkul.uvdesk.com/en/customer/create-ticket

2 comments
Thank you for reaching out to us and showing interest in our Lightning component Weather Forecaster.
As per the standard functionality of this component, we have provided you an option to set the Weather info manually through ZipCode, State/Country, or City Name.
However, if you wish, we can customize it for you so that the weather details gets listed dynamically as per the record page which is displayed.
We’ll proceed with the customization after your approval.
You can let me know your preferred time so that we may have conversation on call or via GoToMeeting for your better understanding.
Looking forward to your response.
Regards,
Ajit KumarSalesforce Consultant (Salesforce)Webkul Software Pvt. Ltd. Contact : India (+91)-9650486699 USA (+1)-9143531684A 67 Sector 63 ,Noida-201301 (U.P.)