PrestaShop UnoPim Connector is a PrestaShop module that enables automated, bi-directional synchronization of the products between your PrestaShop store and the UnoPim platform.
Features of PrestaShop UnoPim Connector
- Import/Export product synchronization via UnoPim REST API v1
- Map each UnoPim channel to a specific locale and currency.
- Map PrestaShop product fields (name, price, quantity, description, meta tags, EAN, dimensions, etc.) to UnoPim attributes.
- Map PrestaShop categories to UnoPim category.
- Link PrestaShop attribute groups to UnoPim attributes.
- Automatic attribute value mapping with support for creating missing UnoPim options.
- Assign UnoPim families for simple and configurable product types.
- Webhook endpoint for real-time UnoPim product update events.
- Synchronization log with detailed batch results, CSV export, and log management.
How to install the PrestaShop UnoPim Connector module
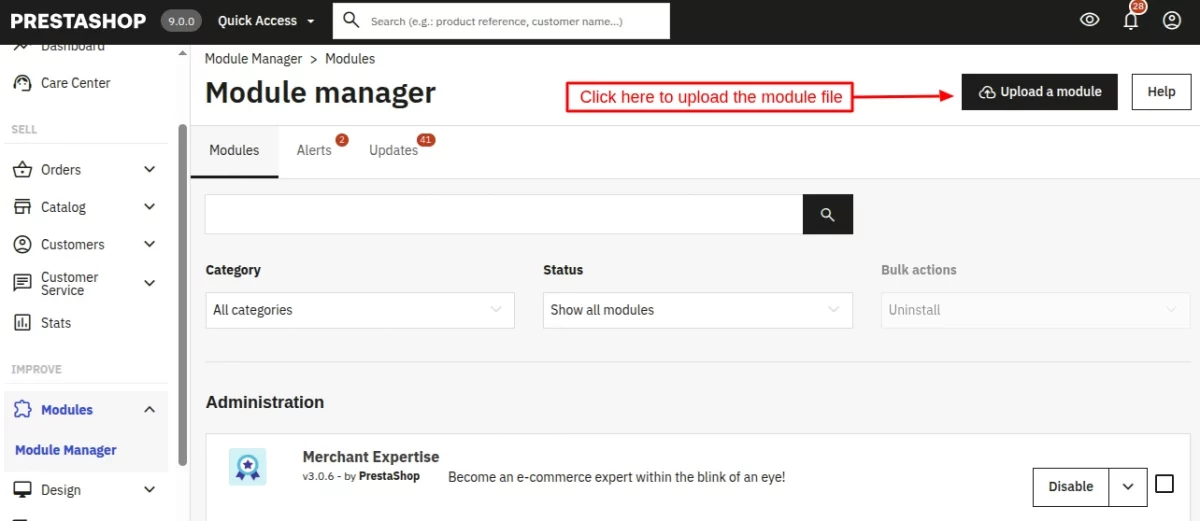
- Firstly, go to the module manager in the back office and click on ‘upload a module’.
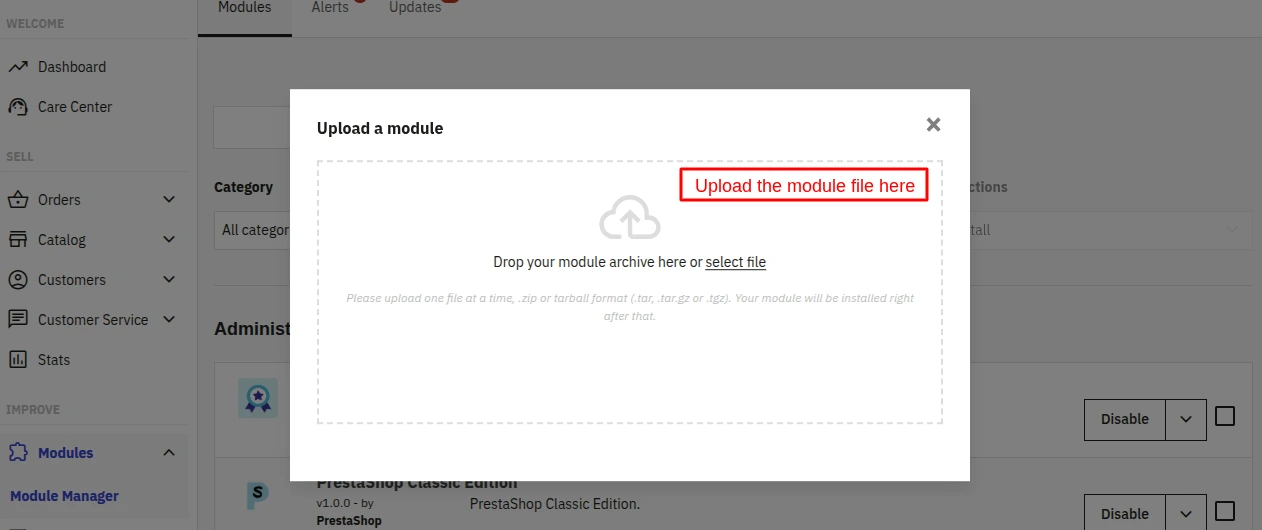
- After that, drag and drop the module file or select the file from the system.
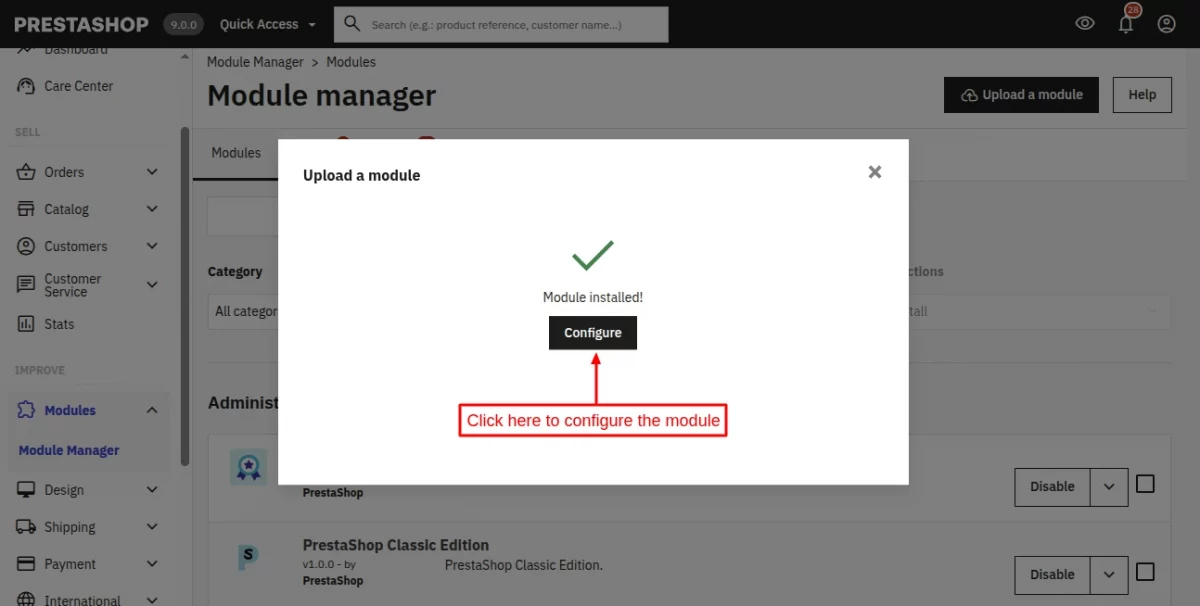
- In this way, the module installation will be successful.
How to generate UnoPim API credentials
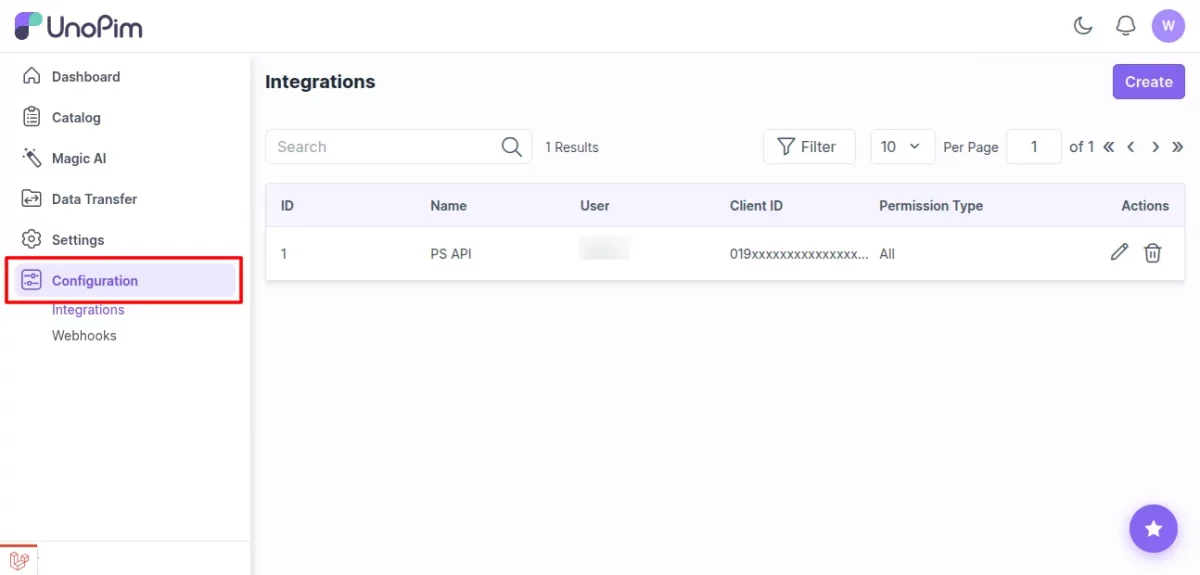
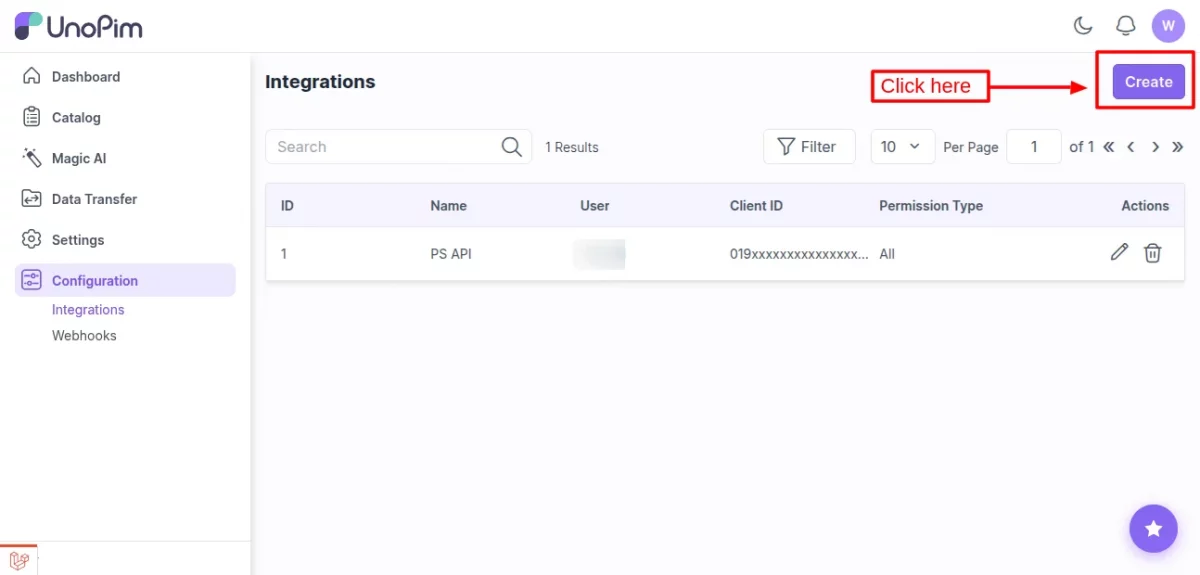
First, log in to your UnoPim back office account and click on Configuration < Integrations section.
Now, click on the “Create” button.
Then, allow “All” permission and set “Name” and select “User” to generate the API credentials.
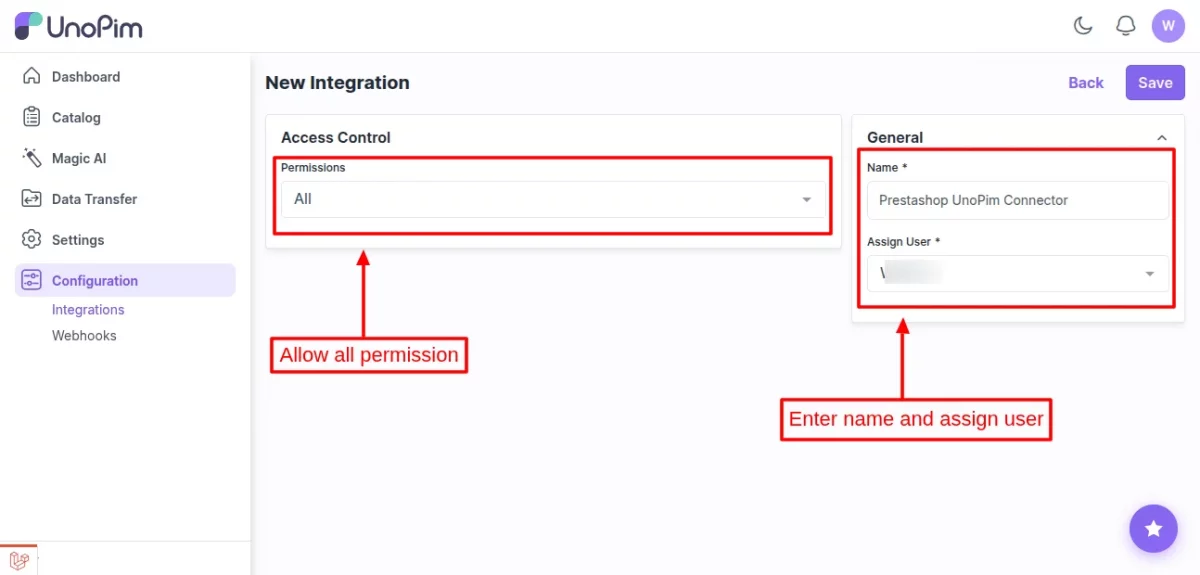
After clicking on the “Save” button, the new Client ID and Secret Key credentials will be generated.

PrestaShop UnoPim Connector Module Configuration
After installing the module, the admin has to configure it by entering the API credentials generated from UnoPim and setting up the settings according to their need.
API
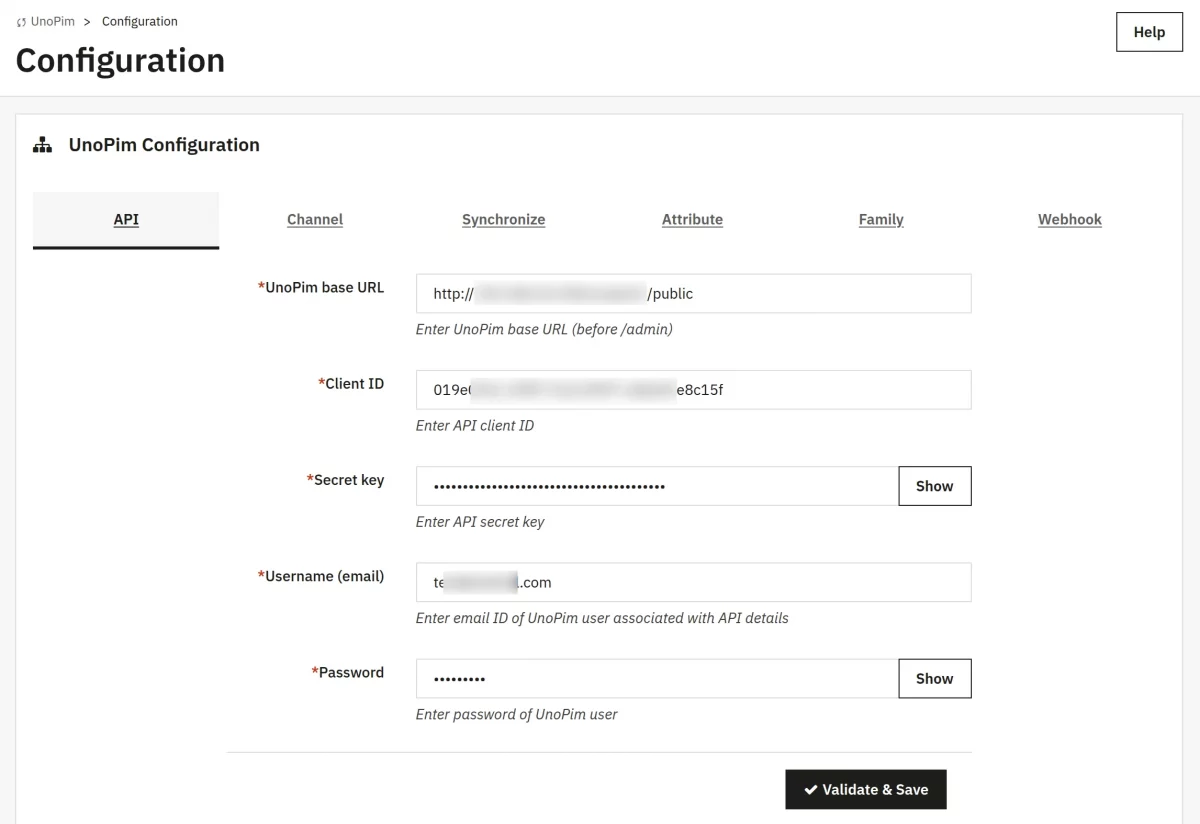
Enter your following UnoPim API credentials:
- API Base URL,
- Client ID,
- Secret Key,
- Username, and
- Password
Now, click ‘Validate & Save’ to authenticate. A valid API connection is required before other configuration tabs become available.
Important Note: Here, the admin must enter the Username and Password for the same user that the admin selects while creating the API credentials from UnoPim.
Channel
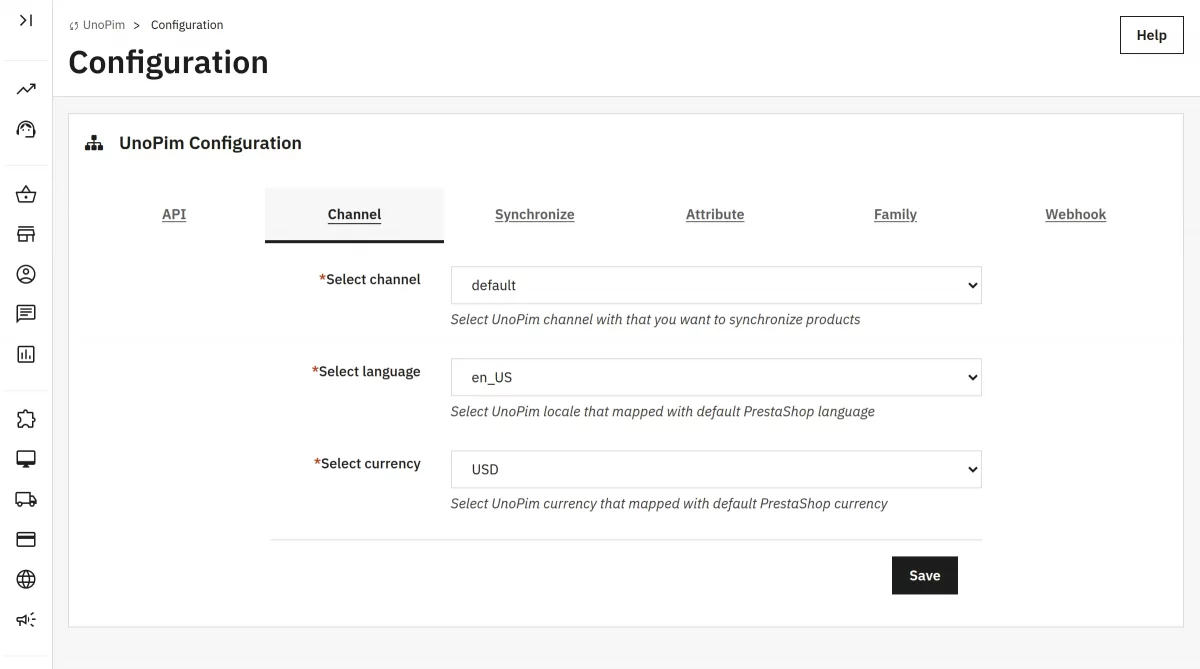
Select the UnoPim channel your PrestaShop store belongs to. After selecting a channel, the locale and currency dropdowns populate automatically from UnoPim.
Choose the appropriate locale and currency, then click Save.
Synchronize
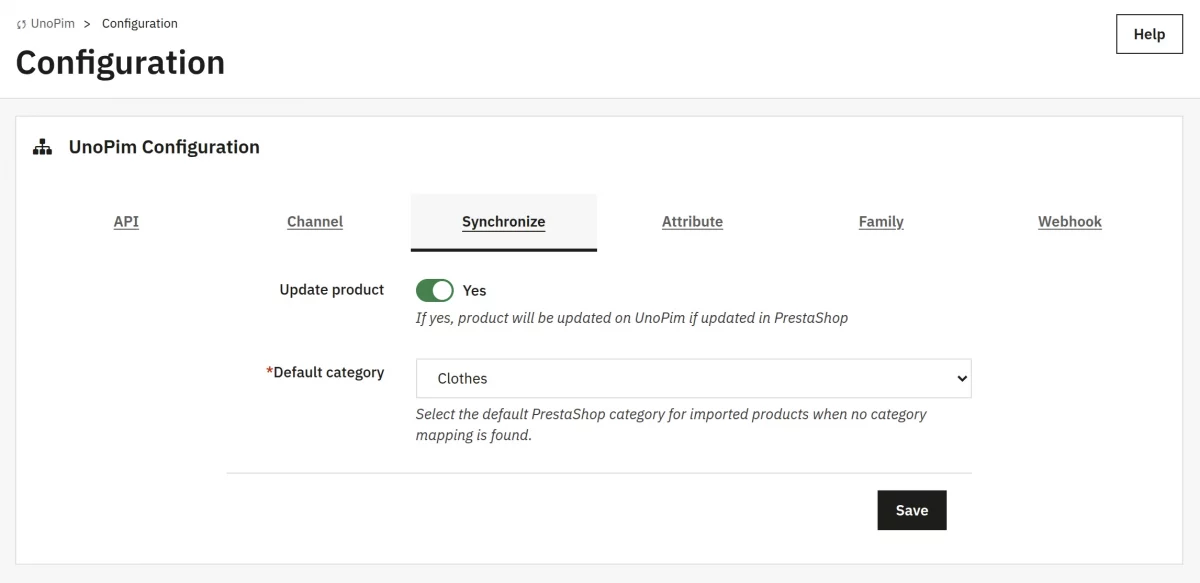
Update Product: Enable it to automatically push product changes from PrestaShop to UnoPim.
Default category: Select a default PrestaShop category for products imported from UnoPim that have no category mapping configured.
Attribute
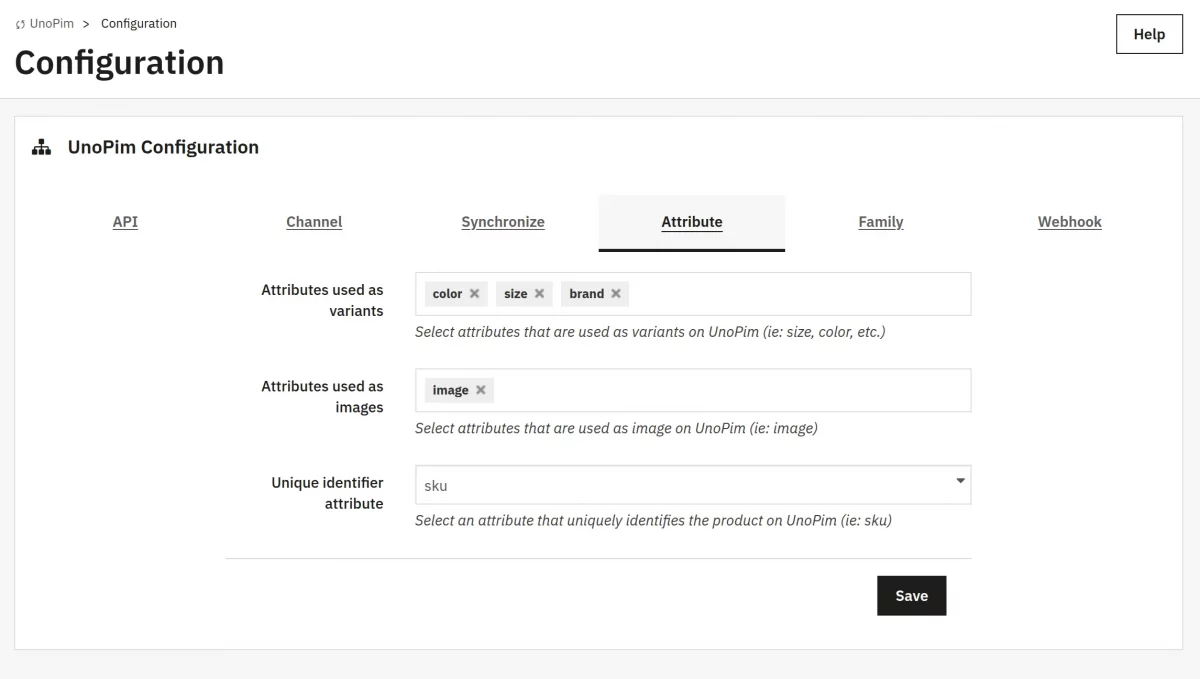
Map UnoPim attributes to three PrestaShop roles:
- Attributes used as variants — Select UnoPim attribute to become PrestaShop combination attributes (e.g., Size, Color).
- Attributes used as images — Select the UnoPim attribute used for images to assign product images while importing products on Prestashop.
- Unique identifier attribute — Select the UnoPim attribute that uniquely identifies each product (typically the SKU).
Family
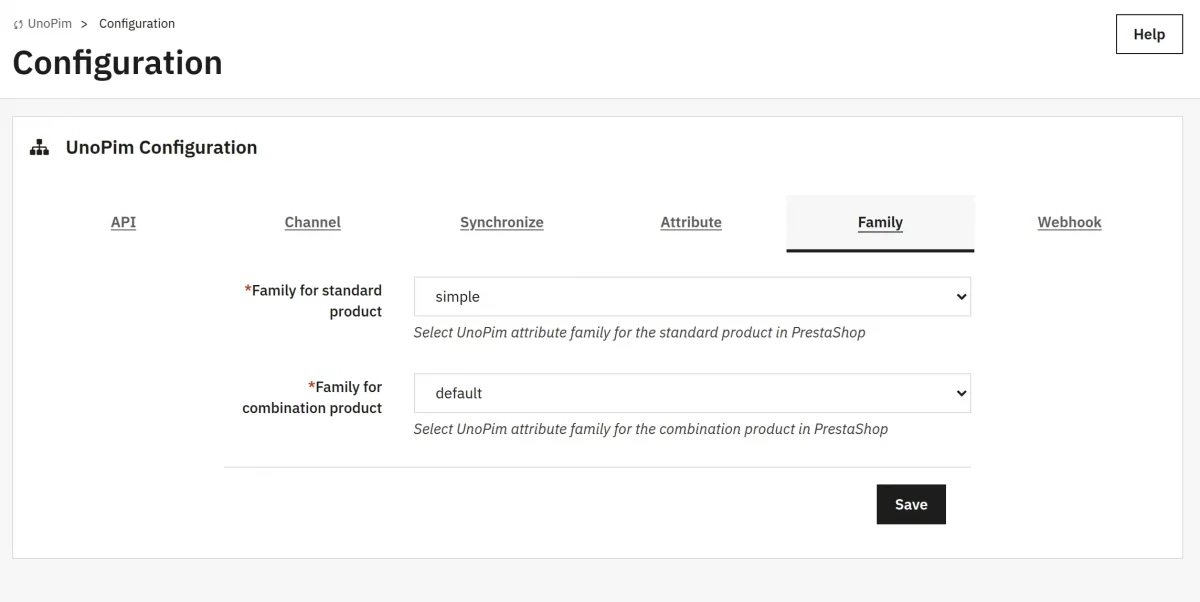
Assign the UnoPim product family to use for Standard products and for Combination products. Families are fetched from UnoPim based on your API credentials.
Correct family assignment ensures proper attribute sets during import and export.
Webhook

Enable the “Update product” option to update products automatically on the Prestashop end when updated on UnoPim.
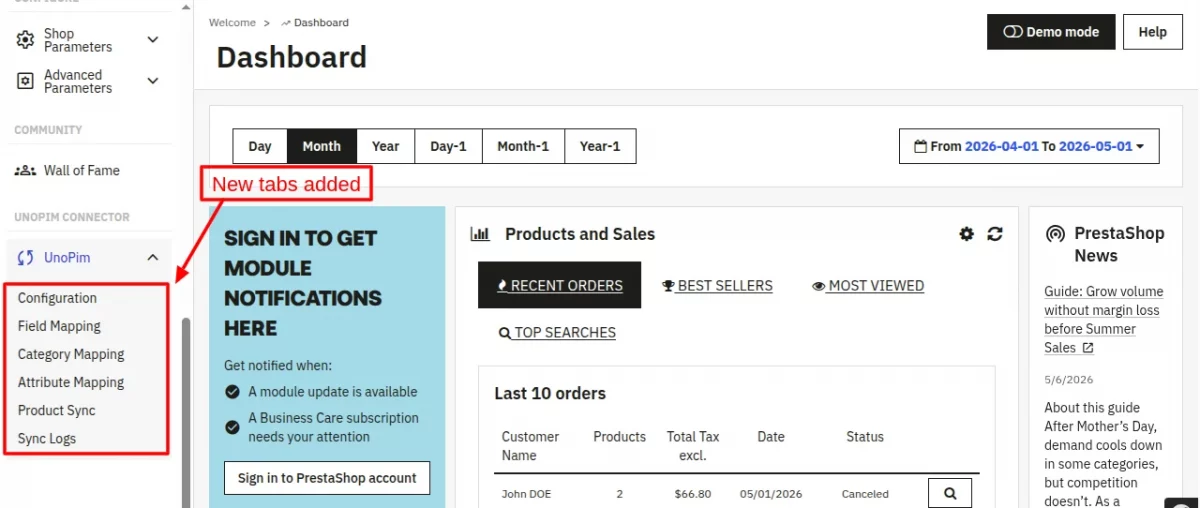
Managing PrestaShop UnoPim Connector from the Admin Panel
UnoPim Connector (Dashboard)
After configuring the module, use the left sidebar navigation to access the following tabs:
- Field Mapping,
- Category Mapping,
- Attribute Mapping,
- Product Sync, and
- Sync Logs
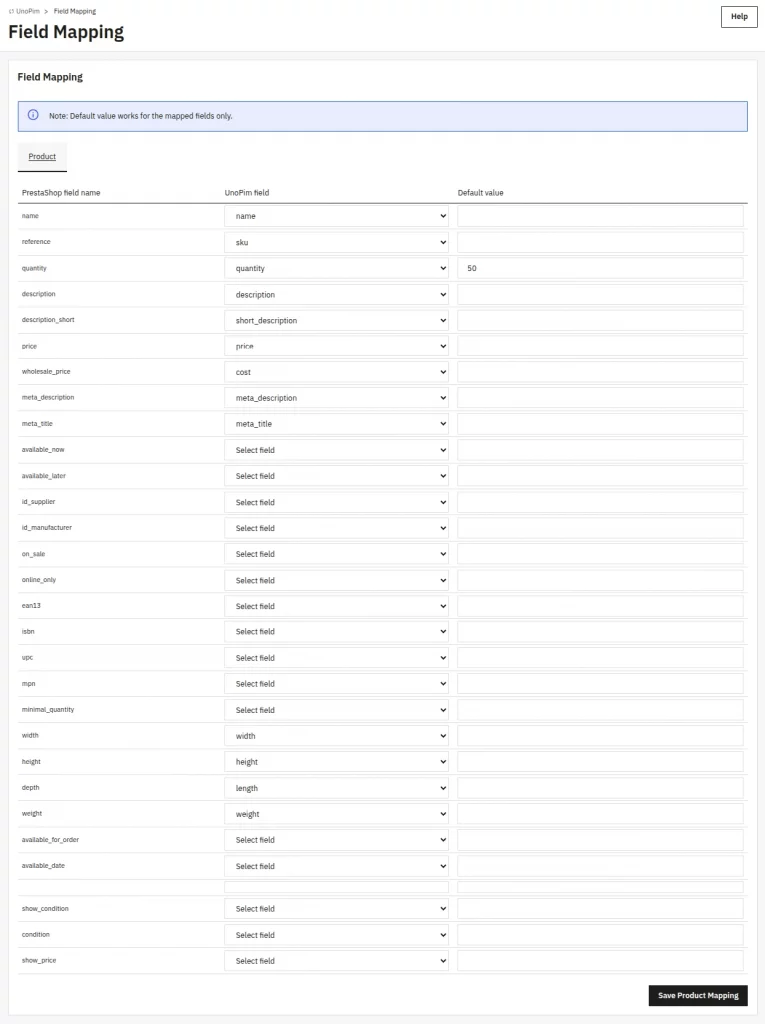
Field Mapping
The Field Mapping panel is a Product tab, in which the admin has to map PrestaShop fields (name, reference, price, quantity, description, meta tags, manufacturer, etc.) to the UnoPim attribute.
Also, the admin can set the default value of the field, so while product import, if the system doesn’t find any data for that field, then the product will be imported with the set default value.
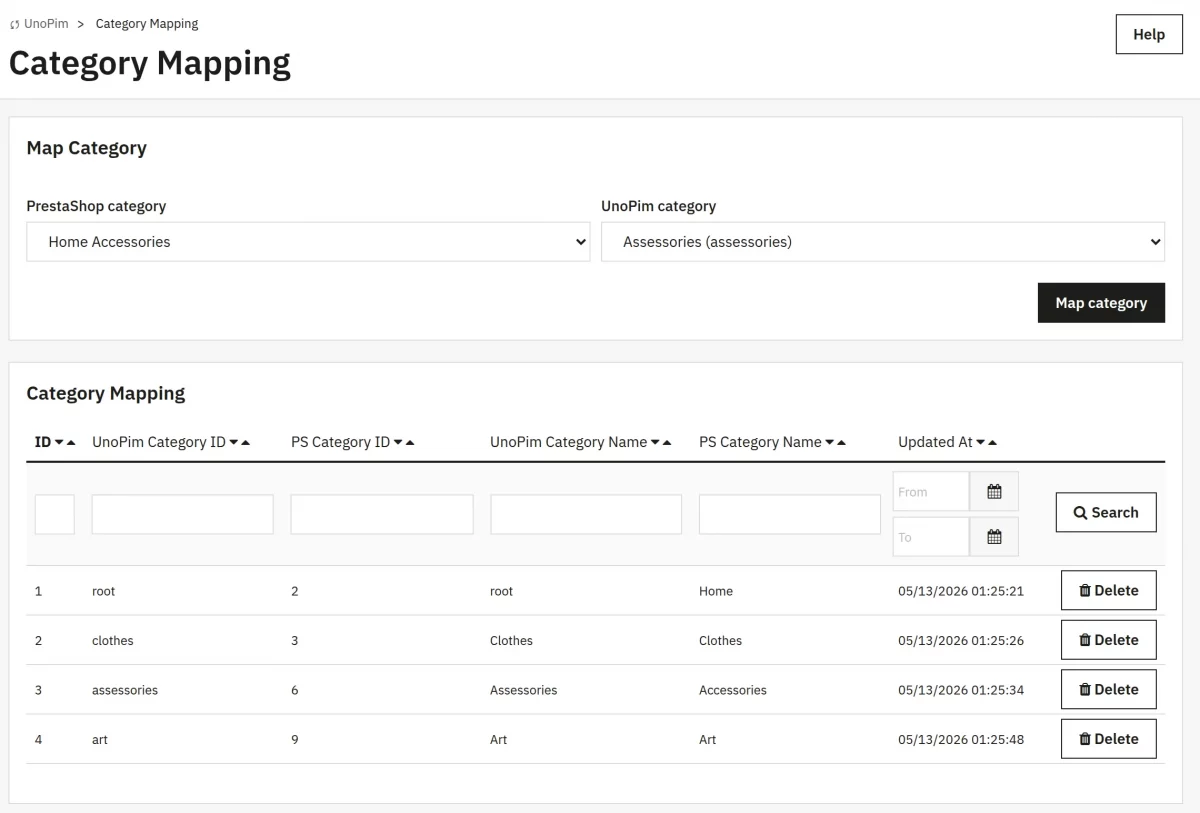
Category Mapping
The Category Mapping panel displays a form to link PrestaShop categories to UnoPim category. Select a PrestaShop category, enter or select the corresponding UnoPim category, and submit.
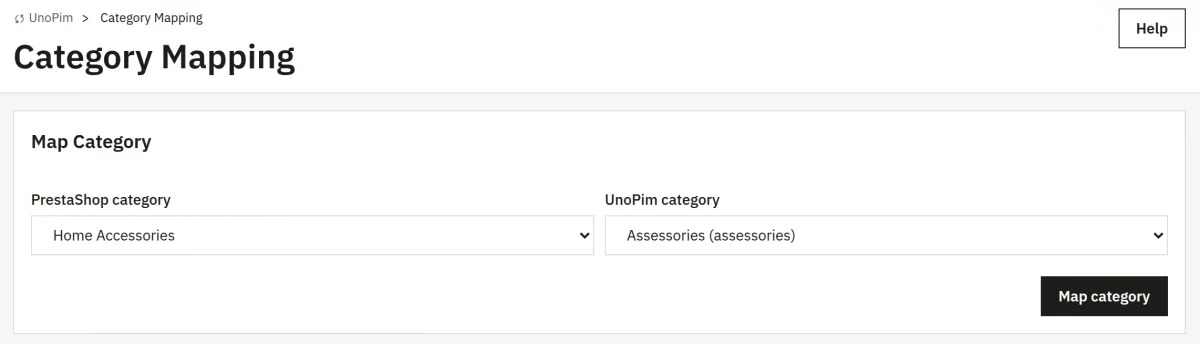
Mapped categories appear in a list below.
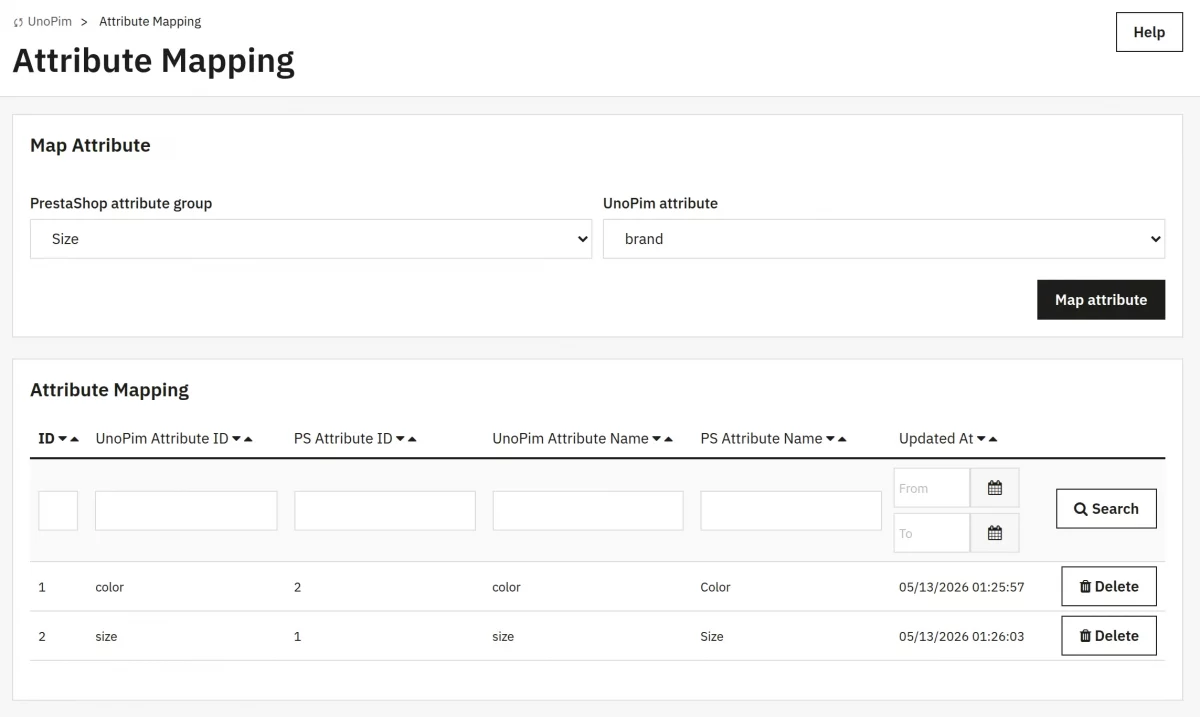
Attribute Mapping
The Attribute Mapping panel lets you link PrestaShop attribute groups to UnoPim attributes.
Select a PrestaShop attribute group from the first dropdown, then select the corresponding UnoPim attribute from the second.
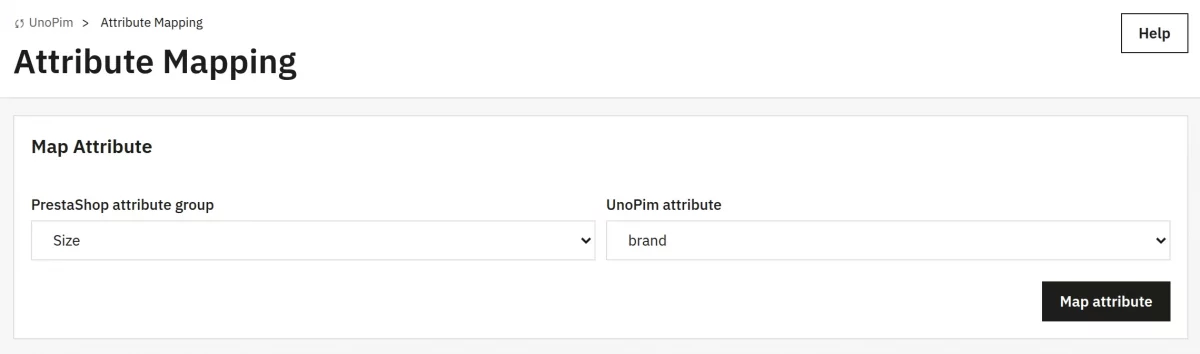
Submit to create the mapping, which then appears in the list below.
Product Sync
The Product Sync panel provides two modes:
- Import (from UnoPim to PrestaShop), and
- Export (from PrestaShop to UnoPim)
To import/export the products, the admin has to click on the “Product Sync” button.
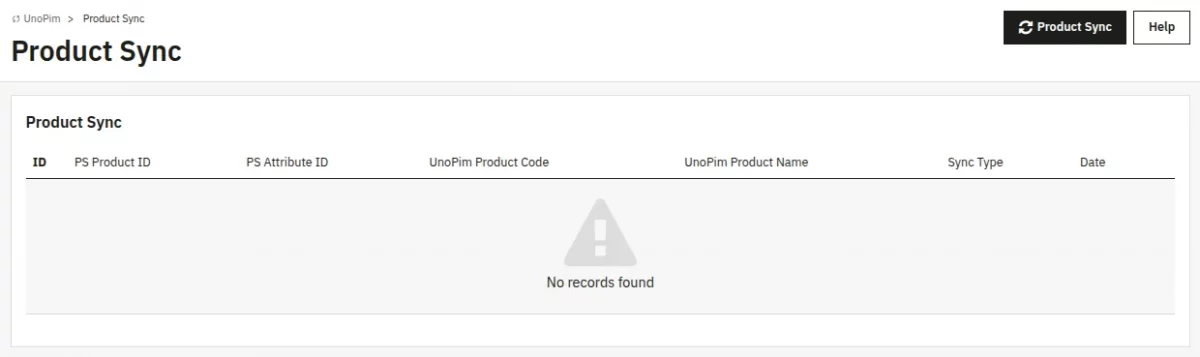
Each mode supports bulk operations on all products or selected individual products.
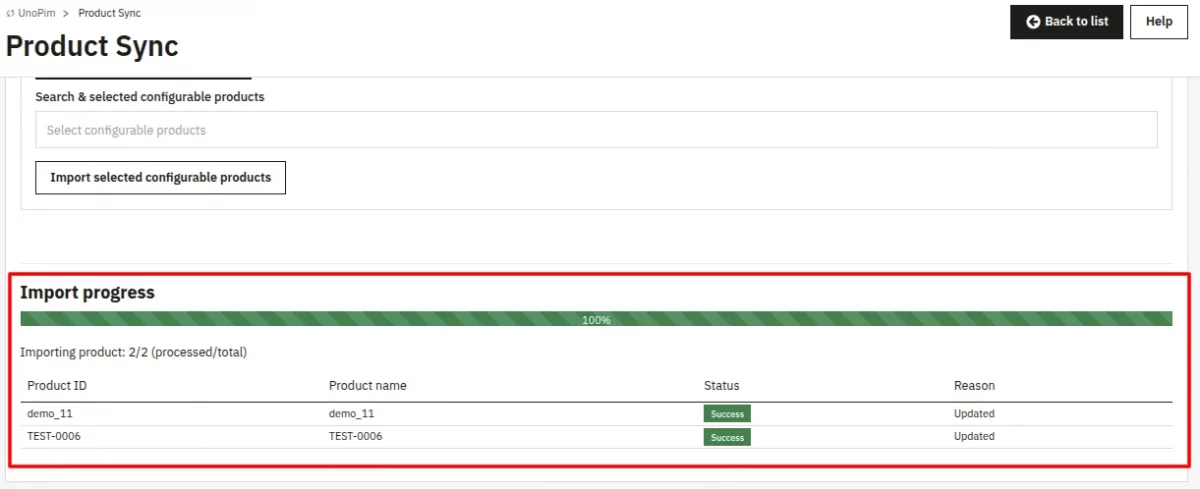
Progress is tracked via an animated progress bar, and each product’s result (success or failure with reason) is displayed in a results table.
Importing Products

The admin can choose either to import ‘All standard products’ or ‘All combinational products’, or use the search-and-select dropdown to pick individual products.
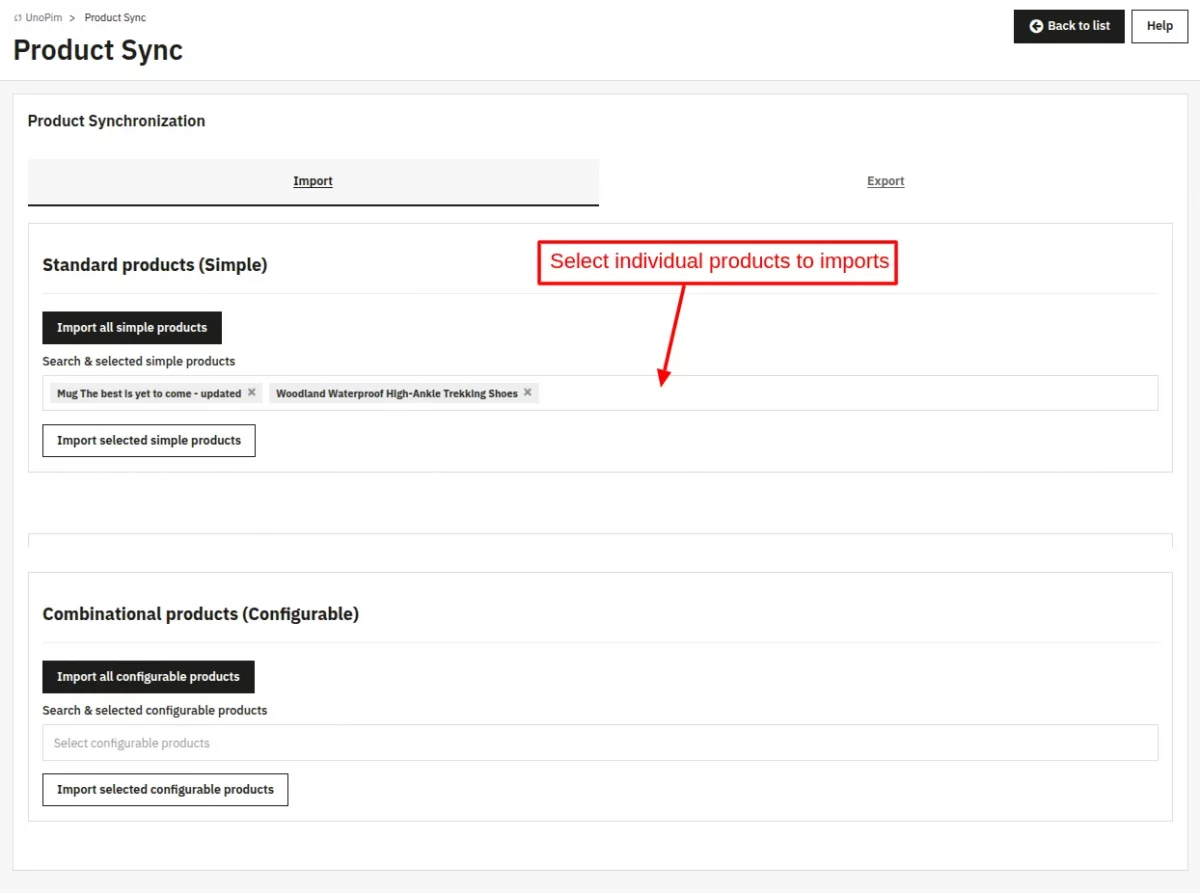
Click the import trigger button. A progress bar appears showing the current product and overall completion.
Exporting Products
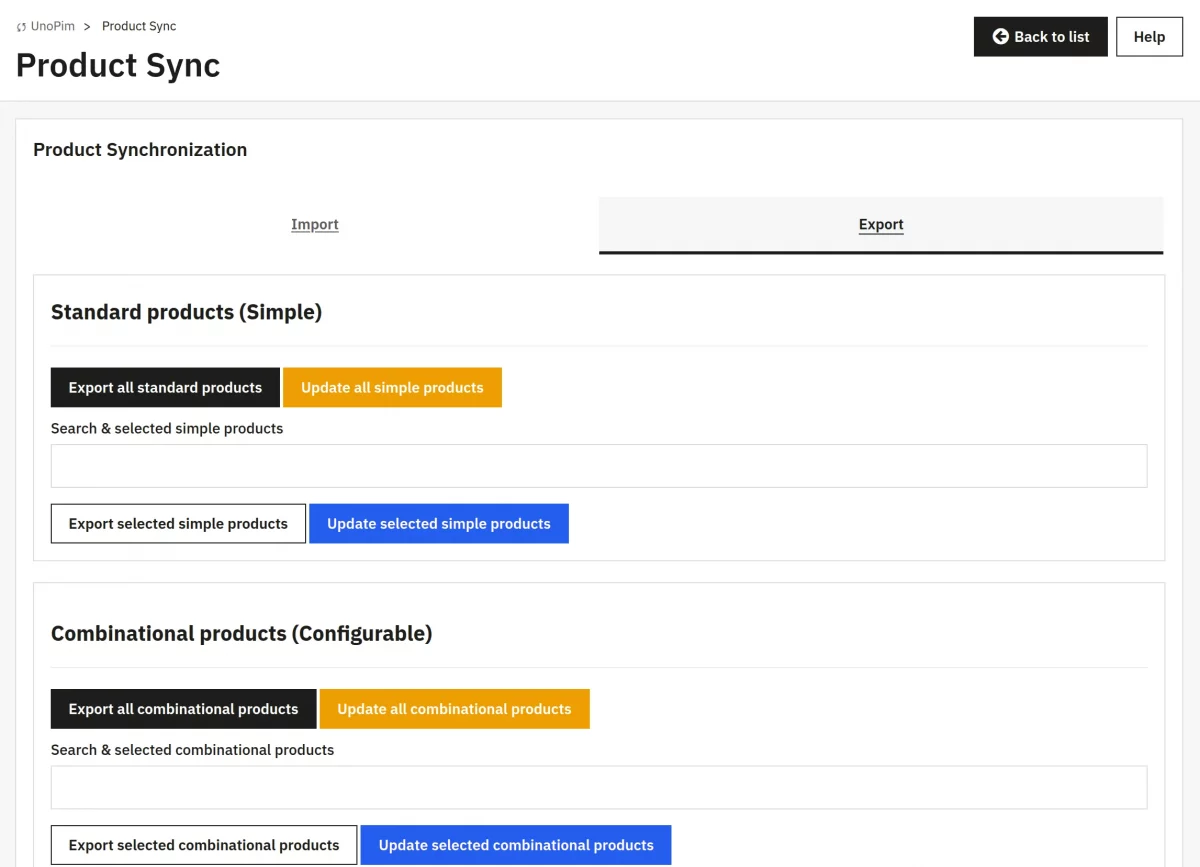
The admin can choose either to export ‘All standard products’ or ‘All combinational products’, or use the search-and-select dropdown to pick individual products.
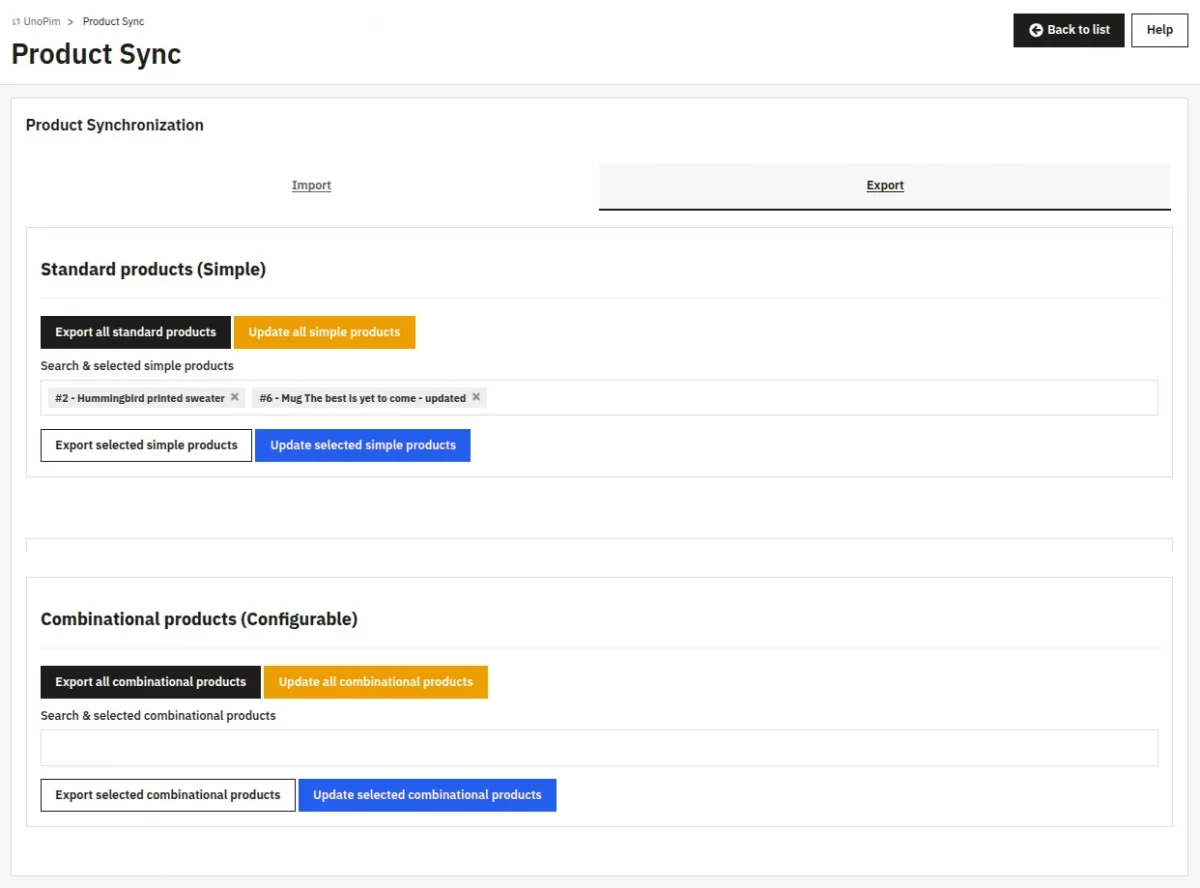
Click the import trigger button. A progress bar appears showing the current product and overall completion.
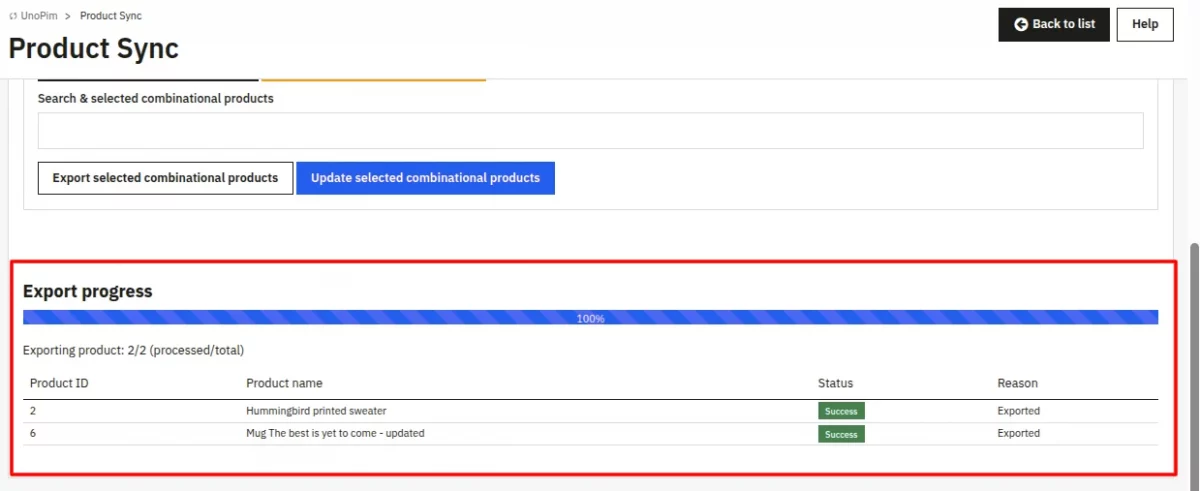
After importing/exporting the products, a list of imported/exported products will be displayed on clicking the “Product Sync” tab.
Using the “Update all simple products” and “Update all combinational products” buttons, the admin can update the already mapped products on UnoPim.

Important note: Updating the products reference on PrestaShop or the SKU on Unopim may create duplicate products if already mapped.
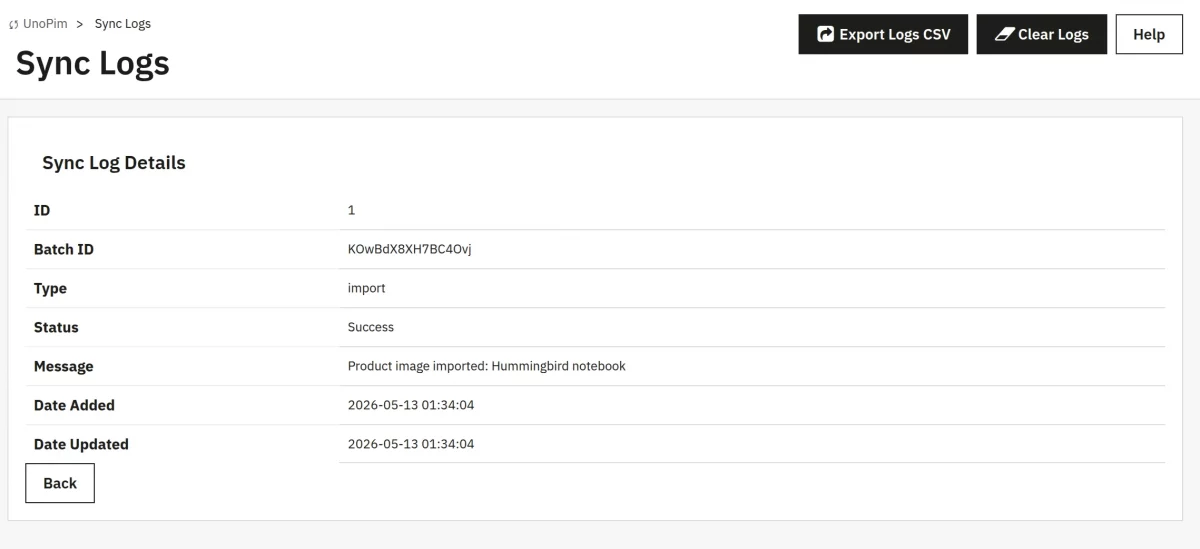
Sync Logs
The Sync Logs panel lists every import and export batch operation. Each entry shows the Batch ID, Type (import/export), Status (success/failed), Message, and timestamps.
Use the toolbar buttons to export logs as CSV or clear all logs.
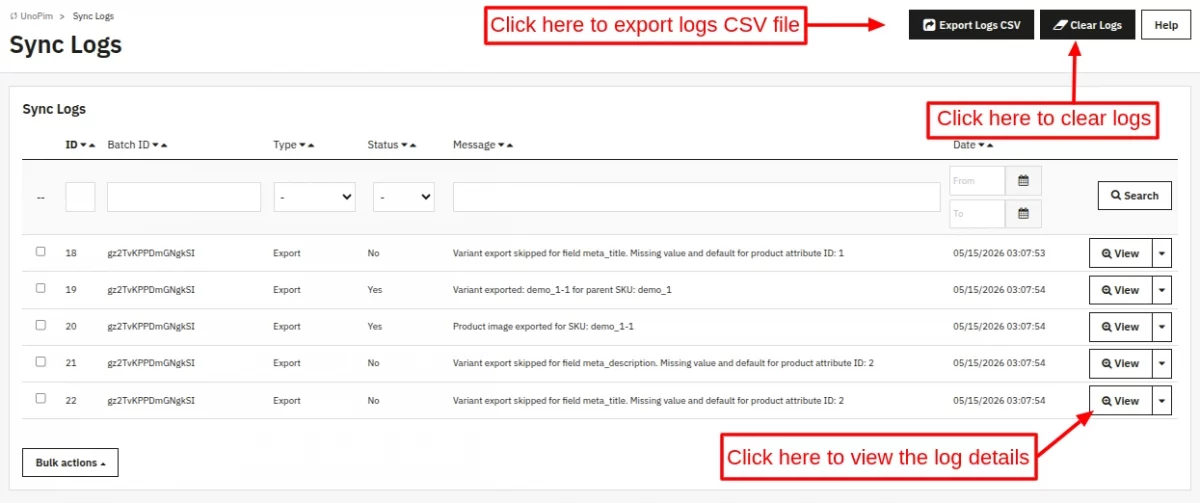
After clicking on the “View” button, the admin will be able to view the log details.
Support
For any kind of technical assistance or query, please raise a ticket or send us a mail at [email protected]
Also, please explore our Prestashop development services and a vast range of quality Prestashop addons.
Current Product Version - 1.0.0
Supported Framework Version - 9.x.x, 8.x.x, 1.7.x.x

Be the first to comment.