Testing can be boring and time consuming task if you are performing same task multiple times. To make it easier have to use some tools. In Magento there are various “repetitive” tasks that need to be done after the first install like we need to create a test account, add product in cart order placement etc. CasperJs is the best tool to overcome this problem.
CasperJS allows you to build full navigation scenarios using high-level functions and a straight forward interface to accomplish all sizes of tasks. CasperJS comes with a basic testing suite that allows you to run full featured tests without the overhead of a full browser.
For the installation and basic CasperJs knowledge you can check here. Now we’ll proceed with the testing process. Here we’ll get to learn how we can register or signup a new customer using CasperJs into a magento2 store.
The code procedure is as follows-
Open home page of your Magento2 store, click on “Create an Account” link, open “Create New Customer Account” page to fill out the form, submit it, wait to be redirected to “My Account Dashboard and then get url of the dashboard page along with screenshot.
Here we have used some Casperjs methods like-
click() method is used to click a link and buttons.
capture() method is user to capture the particular page and you can see the screenshots parallel to your script.
fill() method is used to fill the forms.
getCurrentUrl() is used to get the current page url.
/**
* Webkul Software.
*
* @category Webkul
* @package Webkul_CasperJS
* @author Webkul
* @copyright Copyright (c) 2010-2016 Webkul Software Private Limited (https://webkul.com)
* @license https://store.webkul.com/license.html
*/

var BASE_URL = casper.cli.get('url');//'url' will be entered on terminal

// Go to home page
casper.test.comment('Go to Home Page');
casper.start(BASE_URL, function() {
    this.test.pass('Home page was loaded');
});
// Click on "Create an account Option"
casper.then(function () {
    this.click('ul.header li:last-child a:last-child');
    this.test.pass('register page was loaded');
});
// Fill Create New Customer Account form
casper.then(function () {
    this.test.info('Current location is ' + this.getCurrentUrl());
    this.fill('form#form-validate', {
        'firstname': 'John',
        'lastname': 'Doe',
        'email': '[email protected]',
        'password': 'Admin123',
        'password_confirmation': 'Admin123'
    }, true);
    this.capture('form_populated.png'); //you'll see the screenshot of populated form parallel to your script.
    this.test.pass('form populated');
});

// Registration completed
casper.then(function() {
    this.test.info('Current location is ' + this.getCurrentUrl());
    this.test.pass('Registered');
});
// Account dashboard/welcome page
casper.then(function() {
    casper.wait(2000, function () {
        this.capture('dashboard.png'); //you'll see the screenshot of Dashboard parallel to your script.
        this.test.pass('Dashboard In');
    });
});
casper.run(function () {
    this.test.done();
});
Now you have to run a command on your terminal-
casperjs test your_file_name.js –url=http://your_magento_homepage
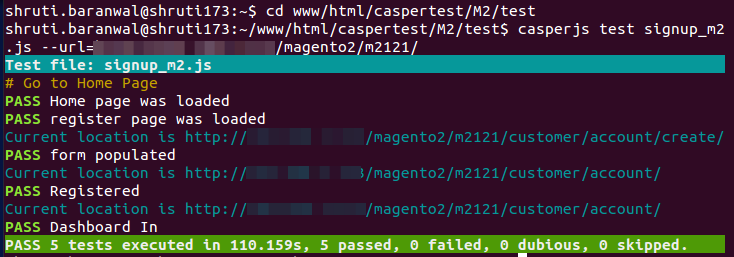
Here, you can see the result on your terminal –
After completing the test execution you can see the screenshots parallel to your script.

Be the first to comment.