No one wants to lose customers when the product goes out of stock. Keeping this in mind, we come up with the Pre-order Controller App for Shopify.
Using the Pre-order Controller App, you can add products for pre-order on your store and earn profits on them even before releasing the items.
Basically, the preorder products are the products that are about to launch or that are currently not in stock.
Thus, the customers can pre-order products by paying the partial or full pre-order amount.
The customers can pre-order a product even when the item goes out of stock. Once the products will be available in stock, the customer will get notified for the same and he/she can purchase the item.
PLEASE NOTE:- Customers need to have an account on the admin’s store to preorder the products.
Additional Features
- Admin can add products for pre-order.
- You can configure all the settings related to pre-order.
- Products that are about to launch can be added as a “Pre-Order Product”.
- Customers can order products even if the products get out of stock.
- And customers will get the notification via mail once the product comes in stock again.
- Admin can set the payment type for the customers. i.e. whether the customer will pay the full or partial amount at the time of pre-order any product.
- Also, the admin can configure the labels within the app.
- Restrict vendors to create preorder on products. Know More
How to install the App
To install the app, visit the Shopify App store & get the Pre-order Controller App.
Home Page
HAVE AN INFORMATIVE HOME PAGE
You will get the complete idea about the “Most sold pre-order products”, “Recently Sold pre-order products”, stats for current pre-order sales just by looking at the home page.
Moreover, you can also get the overall sales that you earn via pre-order from the home page of the Pre-order controller app.

Configurations
Backend Configuration
The backend configuration of the Pre-order controller app is having three sections: Pre-order Configuration, Label Configuration, and Mail Configuration.
Let us understand it one by one.
PRE-ORDER CONFIGURATION
It includes three sections.General Configuration, Pre-order Configuration, Frontend Configuration.
General Configuration: You can configure your business email and shop logo from this section.

Pre-order Configuration: All the pre-order details will be configured from this section.
for single

Preorder Type:
Manual Preorder:-
Pre-order>>Visit “Pre-order Product” section>>On the Pre-order listing page.
Click on “Add Product” button>>Select any product>>Enter the preorder details>>Save it or click on “Publish Now” button.
You can view the list of all pre-order products created by the admin in this section

Automated Preorder:-
Partial Pay: Manage how partial payments are handled during Automatic Preorder.
1. Set Partial Pay Percentage For Preorder: You can set a specific percentage of the product price to be paid during preorder.
i) Set as duration: Set the Number of Days for the remaining payment

ii) Set as Restock: Automatically updates pending partial orders to paid status when product stock increases

Frontend Configuration: You can configure your product page details from this section.

That is how you can configure the pre-order details.

LABEL CONFIGURATION
You can configure the labels of your store from this section. i.e. Labels for your Product page and Order Management Page.
For Product Page: You can configure all the product page labels on your own the way you want to make it visible on your storefront.

For Order Management Page: Admin can also configure all the labels visible on the pre-order management page by his/her own.

Not only this, just scroll down and you can configure almost all the labels of the app from your end.
MAIL CONFIGURATION
You can now configure the mail under the mail configuration section.

In this way, you can configure mail templates on your own.

Also, you can anytime enable or disable the mail template on your end. Once you disable it, customers will not receive any mail for any action within the app.
In this way, you can configure the backend for the Pre-order controller app.
Please Note:- Once you add pre-orders to products the “Continue Selling Out of Products” option will get enabled for that product on Shopify end.
So, once the pre-order duration gets over for that product, make sure to disable that option manually by editing the product on Shopify end.

NOTE: Now you can end you pre-order product from the admin side.
Admin Shopify store >> products >> edit product page >> purchasing option >> click on remove button.

Configure Front End
How to Configure FrontEnd for this App?
To configure the frontend for the Pre-order controller app, enable the countdown timer options in the backend configuration to display it on the product and collection pages.
Then after you need to paste the codes in their respective template files.
First, click on the “Configure Frontend” button and inject the code either automatically or manually.
CREATE MENU
Additionally, you can create the menu from the Shopify backend section which will show the list of all the pre-order products on the frontend.
PreOrder Widget on Product Page
-To display “PreOrder Widget” on Product Description Page, copy the below-given code and paste it to the given template file:
{% render 'wk-po-widget-selling-plan'%}

Account Page
-To display the “PreOrder” button on the customer’s “My Account” section, copy the below-given code and paste it to the given template file.
<div><a href ='https://wk-pre-order.myshopify.com/pages/preorder-management' ><button class='btn'>Preorder</button></a></div>

Count Down Timer on Product Page
In order to display the countdown timer on the collection page, copy the below-given code and paste it to the given template file.
{% render 'wk-po-collection-widget'%}

You need to copy the below given code and paste it into Templates/cart.liquid or Sections/cart-template.liquid just next to cart loop({% for item in cart.items %}) to count total preorder products.
{% if item.product.tags contains 'preorder' %}<span class='wk_po_count' style='display:none;'></span>{% endif %}
Copy the below-given code and paste it into Templates/cart.liquid or Sections/cart-template.liquid inside price to change preorder product price.
{% if item.product.tags contains 'preorder'%} id='wk_price_{{item.key}}'{% endif %}
You need to copy the below-given code and paste it into Templates/cart.liquid or Sections/cart-template.liquid inside total price to change preorder product total price.
{% if item.product.tags contains 'preorder'%} id='wk_total_price_{{item.key}}'{% endif %}
Copy the below-given code and paste it into Templates/cart.liquid or Sections/cart-template.liquid inside subtotal price to change the subtotal price:
id='wk_subtotal_price'
Preorder Now Available for New Customer Accounts
We have updated the pre-order feature to support Shopify’s new customer accounts. Earlier, it was only compatible with legacy customer accounts, but now it works with the new customer account system as well.
Here are the steps to set up the New Customer Account.
Steps to Setup:
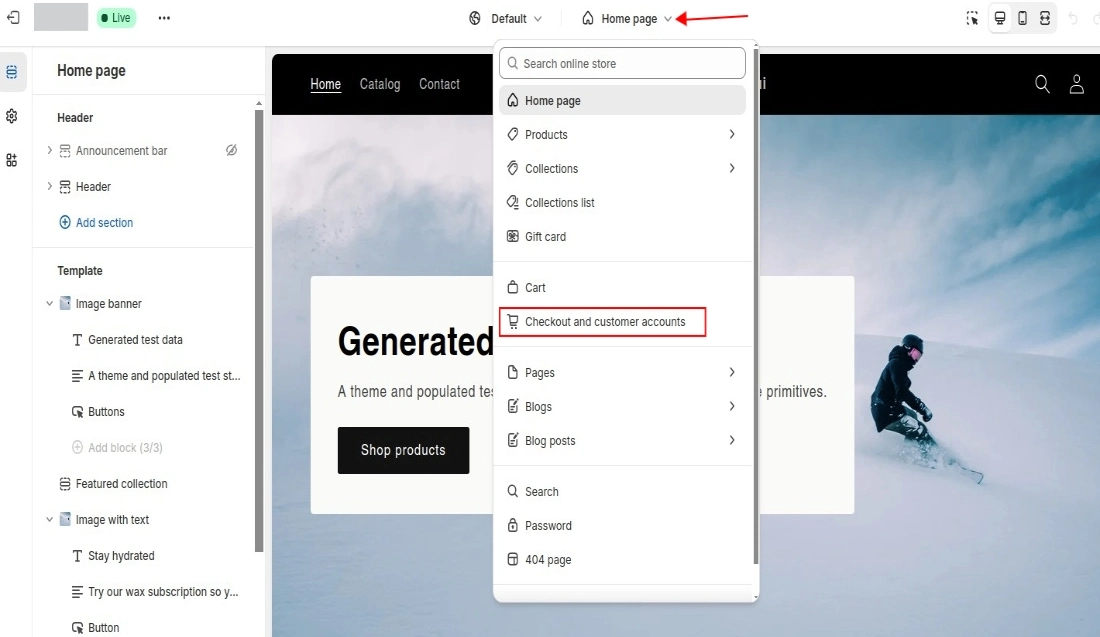
Go to your Shopify admin panel and navigate to Online Store > Themes, then click on Edit Theme. From the top dropdown, select Checkout and Customer Accounts
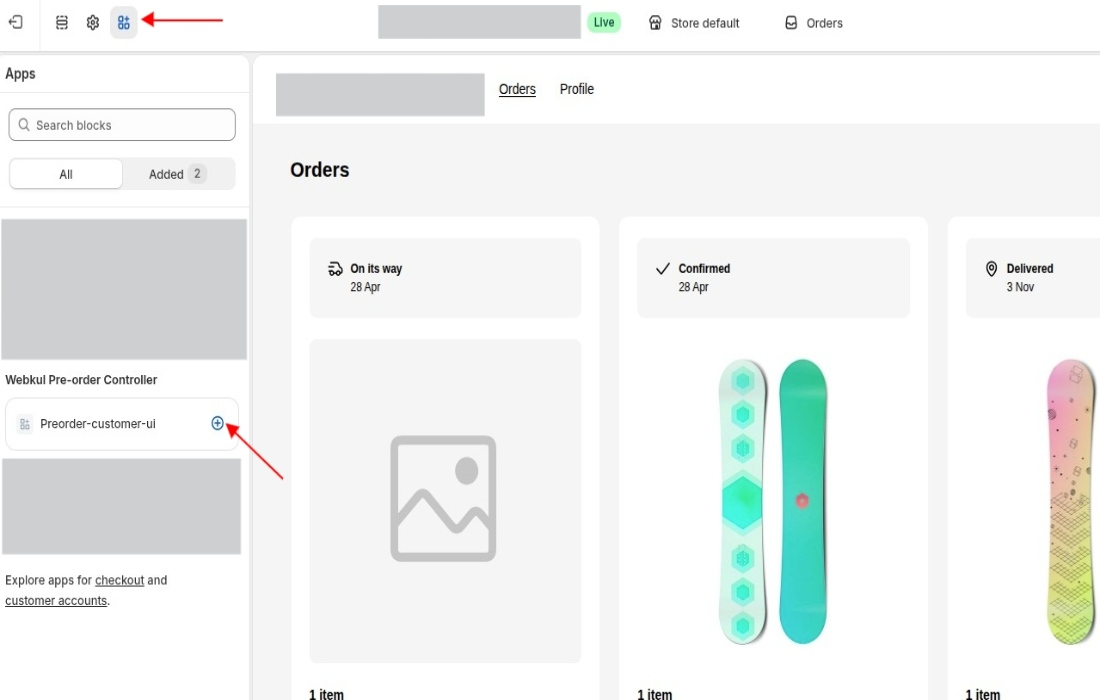
In the Apps section, add preorder-customer-account-ui and place it on the Order Page
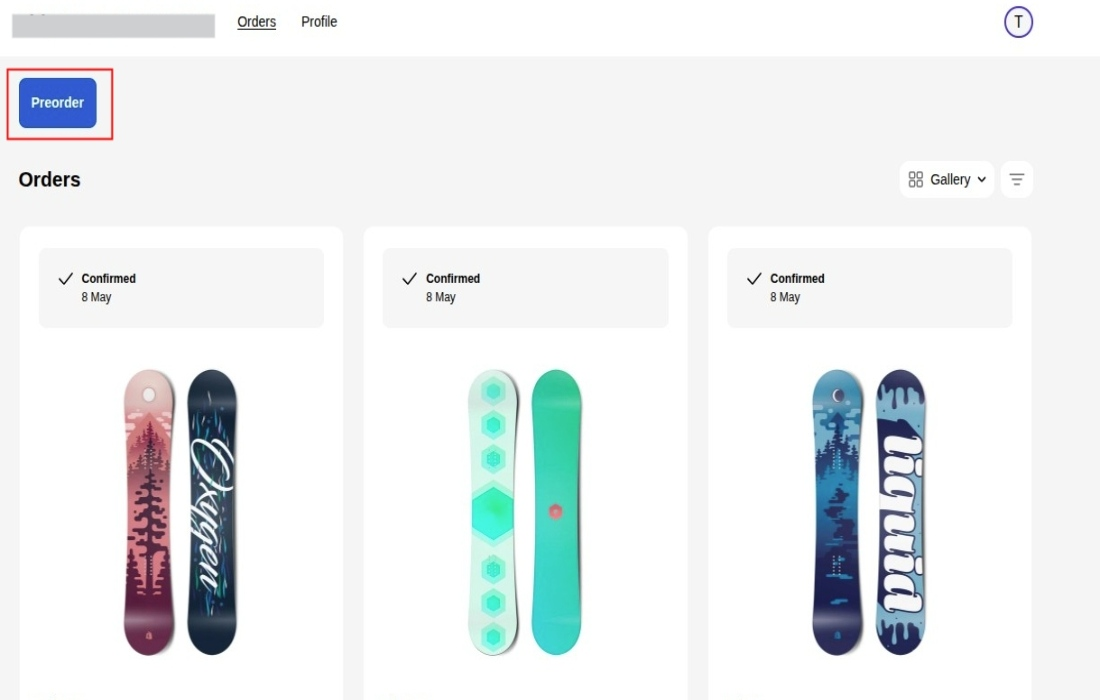
Click on Save to apply the changes. After saving, the preorder section will be displayed on the customer account order page.
Code Pasting for Online Store 2.0
To display “PreOrder Widget” on the Product Description Page, copy the below-given code and paste it to product.json >> sections/main-product.liquid file:-
{% render 'wk-po-widget-selling-plan'%}

To display the “PreOrder” button on the customer’s “My Account” section:-
- Copy the below-given code.
- Make the changes as per your store URL.
- Add the code to customer/account.liquid file.
POINT TO BE NOTED:- THE CODE IS DYNAMIC. SO, MAKE THE CHANGES ACCORDINGLY.
<div><a href ='https://<strong>example</strong>.myshopify.com/pages/preorder-management' ><button class='btn'>Preorder</button></a></div>
In order to display the countdown timer on the collection page, copy the below-given code and paste it to-
collection.json >> sections/main-collection-product-grid.liquid >> snippets/product-card.liquid file:-
{% render 'wk-po-collection-widget', product: product_card_product%}

{% if item.product.tags contains 'preorder' %}<span class='wk_po_count' style='display:none;'></span>{% endif %}

{% if item.product.tags contains 'preorder'%} id='wk_price_{{item.key}}'{% endif %}

{% if item.product.tags contains 'preorder'%} id='wk_total_price_{{item.key}}'{% endif %}
Add the code to section/main-cart-footer.liquid :-
id='wk_subtotal_price'

IMPORTANT NOTE:- The app is dependent on page reload so, please make sure to add the below codes.

In this way, you can configure your app frontend.
How to Add Pre-order Products?
If you want your customers to order your out-of-stock products or products that are about to launch on your store then, first you need to add products for pre-order from the backend.
You can go through the directions suggested below to create a pre-order product:

Pre-order>>Visit “Pre-order Product” section>>On the Pre-order listing page.
click on “Add Product” button>>Select any product>>Enter the preorder details>>Save it or click on “Publish Now” button.
You can view the list of all pre-order products created by the admin in this section.
Now once you click on the create button you will be straightaway redirected to a page where you can fill all the pre-order details on your end.

Here you need to select any store product first and choose its variants which you want your customers to pre-order. Now select the start and end date & time of selected pre-order products.

Now you can scroll down and enter the inventory details in this section. Additionally, you can set the pre-order amount that you want to charge from your customers.
Now, you need to set the condition to receive payment from the customers on every pre-order.
Payment Type
You can select any of the payment types as “Full” or “Part” which is directly visible to the customers at the time of pre-order.

If you set the payment type as “Partial”, you can choose either fixed or percentage amount.

Set time duration to recover the remaining amount
- An exact date to recover the remaining amount (From here, you can set the exact date to receive the remaining amount of the preorder.
- Days after checkout to recover the remaining payment (From here, you can set the days after checkout to receive the remaining amount of the preorder.)
Note: Disabling the Mandate Payment option, you need to manage the Partial Payment manually.
A mail will be triggered to admin as a reminder based on the number of days configured to get the partial payment for the preorder.
Pre-order Product Description (Add few points about this pre-order product.)

If your pre-order product is not ready to publish then you can save that product to pending state just by clicking the save button.
Once the product reaches its publish date and time, it will get published automatically.

Now you can view the list of products from this section which you have added for pre-order.

Also, you can view or edit the pre-order details of the product which are in active and pending state. And add the product for pre-order which is in “End” state.


Once you click on “Edit Preorder” you can disable the pre-order status as well as end pre-order on this product.
Please Note:- You cannot edit the start date for the product whose pre-order status is “Running” i.e. the product in the active state.
Orders

This section of the app lists all the pre-order products ordered by the customers along with the payment status as well as the order status.

By clicking on the “View” button, you will get the complete details about that product ordered by the customer.
REMINDER MAIL OPTION & NOTIFY FOR DELAY SHIPPING: PARTIAL PAYMENT CASE
If the payment is partially paid, You will get the
- Reminder Mail Option to send the reminder mail to the customers to pay the remaining balance amount.
- Notify for Delay Shipping option to send shipping delay mail to the customer in case of shipping delay.

Thus, the customers will get the option in the mail to pay the remaining amount.
In this way, you will get a complete idea about all your pre-ordered products from this section.
Customer End
To avail the benefits of this app, Your customers need to have an account on your Store.
Thus, the admin needs to set the option as “Accounts are Required” from backend so that customers can create their account.
Follow the Procedure for the same:
Shopify Store Admin Panel>>Click on Settings>>Click on Checkout>>Visit Customer Accounts section>>Set to “Accounts are Required“>>Click on Save button.
Now, Once the admin creates a menu for Pre-order Listing from Shopify backend, the customer can directly view the list of all the Pre-order Products on the frontend.
Here in this section the customer can view all the running and upcoming pre-orders and can pre-order any of the products by paying the pre-order amount set by the admin.
Customers can view the countdown timers running on every pre-order product (Full Payment)

(Part Payment)

Clicking the PreOrder button, the customer will straightaway be redirected to checkout.
Now, the customer can select any of the products from here and order them. Just select the payment option and click on the “PreOrder” button.
Once you are done with the pre-order then on the thank you page you will also get a button for cancellation.

If your customer will find any product that is currently not in stock, he/she can visit that product page and enter his/her email ID to get notified once the product comes in stock.

Once the customer order any product, he/she can view all the details in the “My Account” section.

Once the customer clicks on the “Preorder” button displayed on frontend, he/she will get the list of all the products ordered by him/her.
This includes the “Pre-order Status”, “Payment Status” and “pre-order duration”.

Moreover, from the “Action” menu customer can raise a cancel request.
That is all about the PreOrder Controller app.
Demo Details
You can go through the below-given link to check the demo of the Pre-order Controller App for Shopify.
Need Support?
Hope you like this blog. To get more interesting blogs, keep in touch with us. If you need any kind of support, simply raise a ticket at https://webkul.uvdesk.com/en/.
You can contact [email protected] to get proper assistance.
Thank You for reading this Blog!

Be the first to comment.