Earlier in Shopify, we had no options for our customers to manage orders purchased by them.
Keeping this in mind, Webkul is here with a new app called Customer Order Management, which enables your customers to manage their orders from their Shopify account.
Using this app, admin can allow their customers to raise RMA(Return, Cancel or Exchange) request, invoice request and many more.
Also, Customers can request the admin to change their shipping address using this app.
And the customers will get notification via email for all the activities.
Moreover, customers can reorder their previous purchase on which admin will provide discount benefits to their customers.
These discounts will be provided by the admin either on the customer’s current reorder or next reorder.
CUSTOMER’S BENEFITS
- Raise RMA requests.
-Request the admin to cancel, return or exchange orders if required. - Request for order Invoice.
-Customers can anytime request the admin to send an order invoice. Once provided, customers can easily download it from their respective My Account section. - Reorder their previous purchase & get discount benefits.
-Let the customers reorder their previous purchase & get amazing discounts on current or next reorders. - Change their shipping address.
-The simplest way for customers to request admin to change the shipping address of unfulfilled orders.
ADMIN’S BENEFITS
- Admin can configure details related to invoice request, RMA request, change address request & much more.
- Supports the Multi-vendor Marketplace app for Shopify as it is now integrated with the customer order management app.
- All the labels & mails send to the customers can be configured.
- Admin can provide discount codes to the customers on the current reorder or next reorder.
- Order Lookup Functionality for the customers whose accounts are disabled.
- Admin can manage the return requests raised by the customers.
- Also, the admin can accept or reject the customer’s request for changing the shipping address.
- Advanced filter option for reordering, invoice and RMA request listing.
- Enable API to access specific actions performed in the app.
-You can easily integrate the customer order management app with third-party mobile applications or on other platforms. - You can configure your own SMTP to send emails to the customers from your own mail engine.
You can visit the Landing Page of the Customer Order Management App to install this app on your Shopify Store.

All you need to do is to enter your Store URL and click on the “Install” button.
New Update
We are pleased to announce that our application now provides comprehensive support for new customers.
To configure this feature, follow these simple steps:
- Log in to your Shopify Store
- Navigate to Apps
- Select Webkul Order Management App
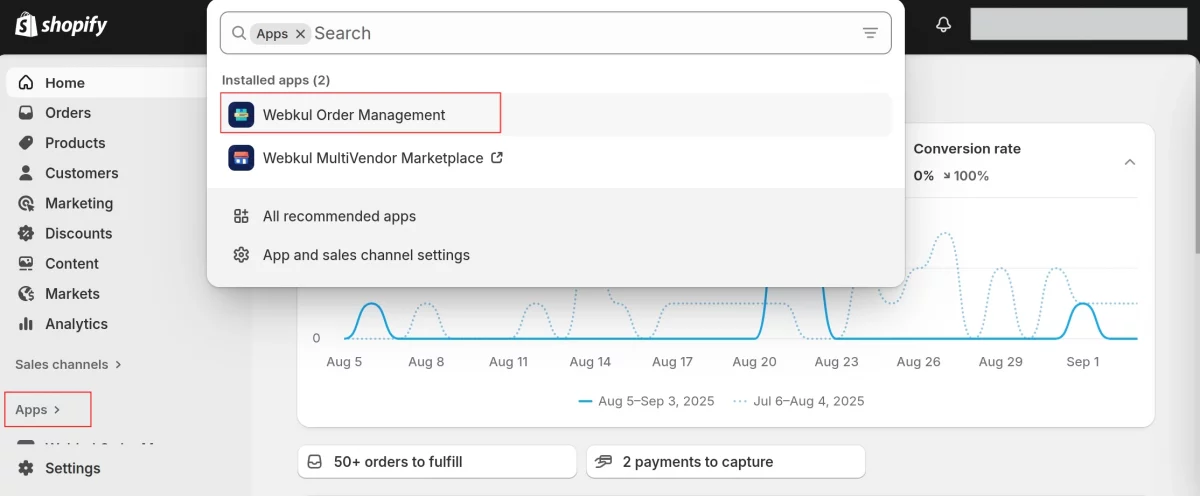
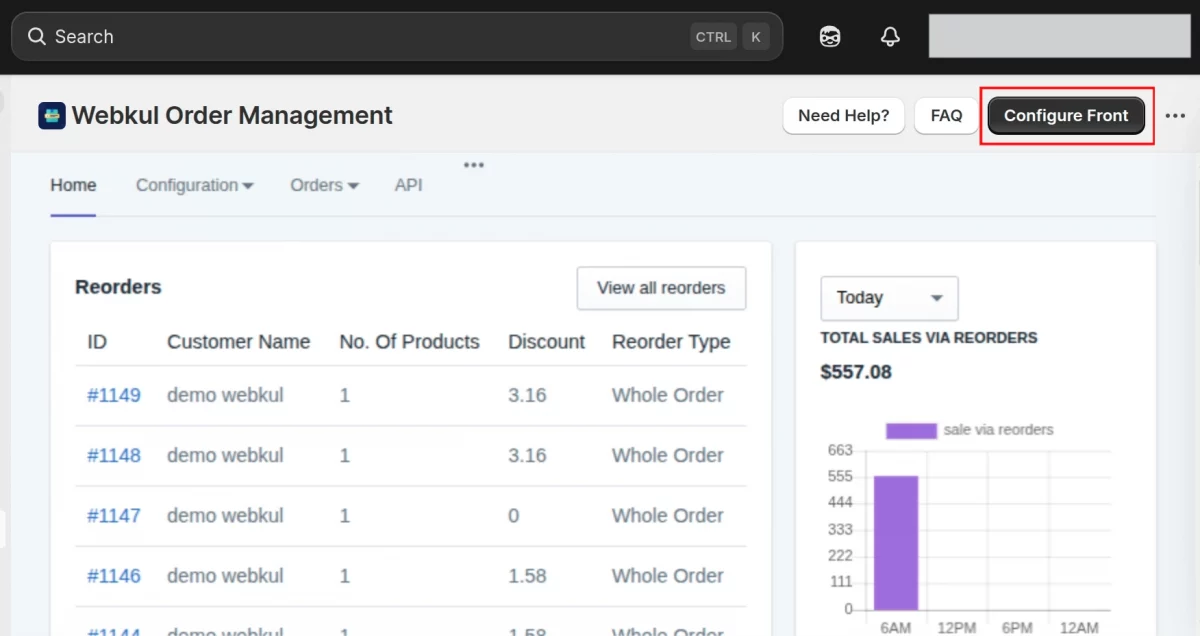
- Click on Configure Front (located on the right side)
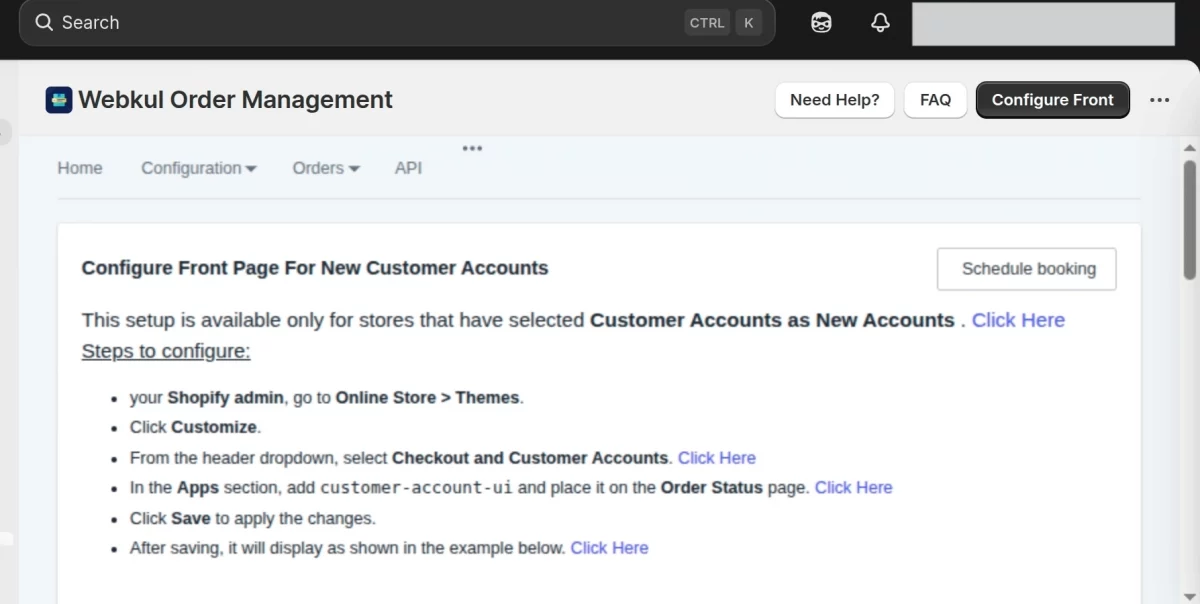
This enhancement ensures a seamless experience, allowing first-time users to register, explore features, and utilize the platform with ease.
Configuration
Home Page:
In Shopify Customer Order Management app, merchant will get the complete idea about the reorders, return and invoice request, total sales and much more.
Also, merchant can view all the reorders and RMA requested by the customers. Configuration:
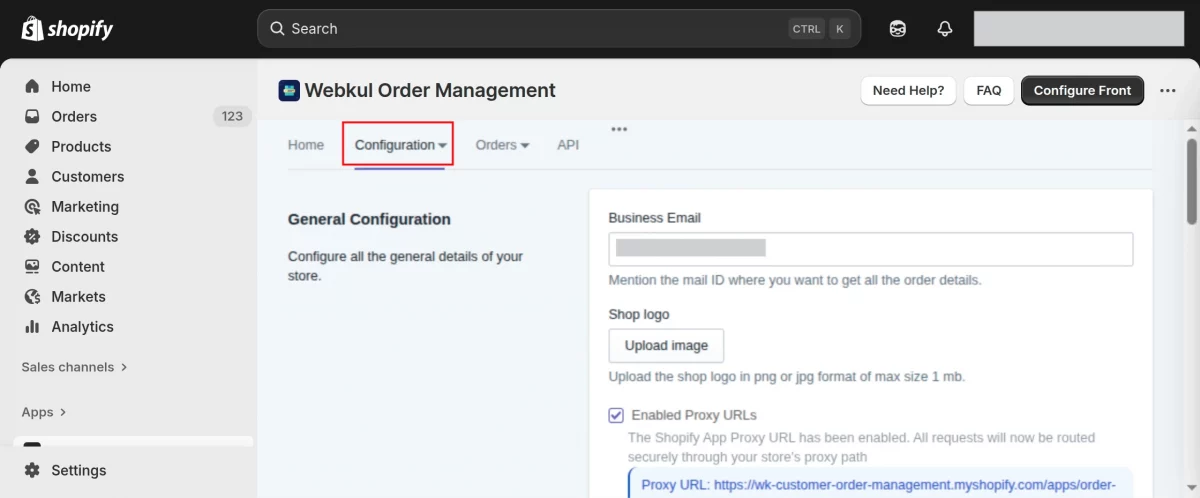
Configuration of this app contains 4 menus i.e. General, Label, Mail and RMA Configuration.
- General Configuration: Admin can configure the general details of his store such as business email, shop logo created at store back end.
The menu includes two more sections. Reorder Discount Configuration and Frontend Configuration.
Thus from Reorder Discount Configuration section, admin can configure all the details related to discount on reorder. You as an admin can also set the discount type from this section.

Additionally, You can select whether you want to provide discount to customers at the time of reorder or on the next reorder.
Note: If the admin selects ‘Next Reorder’ type for the ‘Reorder Discount’ then,
in this case, the customer won’t receive the discount code unless and until the current reorder is not fulfilled by the admin.
As soon as the admin fulfills the current reorder, the customer will receive an email with the discount code.
From Frontend Configuration section, you can configure the frontend for this app.

Also, You can allow your customers to reorders, request for invoice, change shipping address and send RMA request by displaying these buttons on frontend.
Once you enable these requests from this section, you can paste the codes to their respective template files to display these request buttons on frontend.
Now You can click on “Auto Code Inject” button to display the Request Return, Request Invoice, Reorder and Change Shipping Address buttons on customer’s “Order Page” in their My Account section.
Please Note:– If you find any issue while injecting the code automatically, you can also choose the manual option explained below.
Manual Option:
Copy the below given code and paste it to customers/account.liquid file template:
<div id="wk-order-page-buttons" wkOrderStatus="{{ order.cancelled }}" wkOrderId="{{ order.id }}" wkOrderStatusUrl="{{ order.order_status_url }}" wkOrderFulfillment="{{ order.fulfillment_status }}"></div>

In order to display the reorder section on customer’s “Order Page” in their My Account section, you can copy the below given code and paste it to customers/account.liquid file template:
<th>Actions</th>
To display a “Reorder” button, you can copy the below given code and paste it to customers/account.liquid file template:
<td><a wk-line-variant="{{ line_item.variant_id }}" class="wk-individual-reorder">Reorder</a></td>

If you are using Online store 2.0 (Example- Dawn), you need to follow the same steps to add the codes as stated above.
This is how you can configure your frontend for this app.
2. Label Configuration:

From this section, you can configure the labels to be shown on the order page, change address page and RMA detail page.
3. Mail Configuration:

From this section, you can configure all the mails send to the customers once they request for invoice,change their address, their RMA request gets approved and so on.

Also You can configure Email subject and content from this section.
SMTP Configuration
4. RMA Configuration:
From this section, you can configure the details related to Return Merchandise Authorisation.

Thus, you can configure the duration of submitting the return request for your customers.
Also, from this section you can enable the options to select return type as Return, Exchange or Cancel for the customers.
CANCEL BUTTON
Enable this option to let the customers cancel the whole order.

SHIPPING
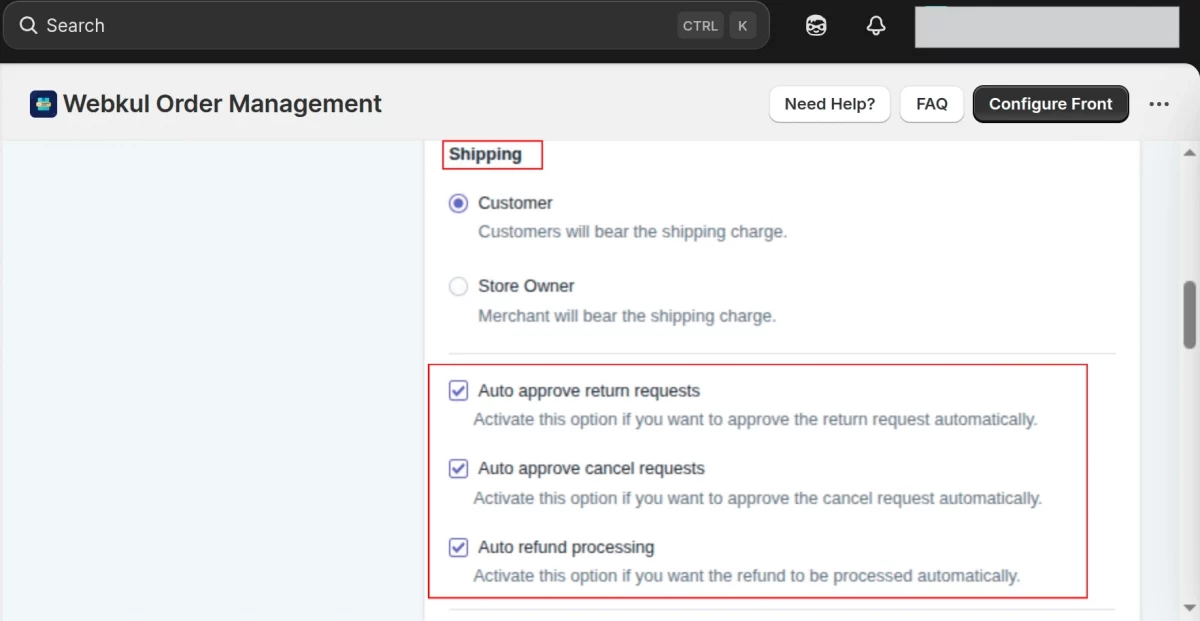
Also, you can select whether you want your customers or the merchant to bear the shipping charges. You can auto-approve the customer’s return or cancel the request.
Managing refunds can be time-consuming, but with the Auto Refund Processing feature, the process becomes seamless and efficient.
Now, whenever the admin approves the request, the system can automatically process the refund without requiring any manual intervention.
Note: If the admin selects the ‘Auto approve cancel requests’ option then the inventory will auto-update on every cancellation.
CREATE REASON FOR CUSTOMER

From this “Create Reason for Customer” section, you can add various return request reasons.
Your customers will select any of the reasons added by you at the time of return.
You can edit, activate/deactivate or delete any of the reason if you want.
CREATE RMA PROCESS STAGE

Moreover you can create new stages for RMA process.
That’s how you can configure this app.
Reorders

This section of the app lists all the reorders requested by the customers.
Also, You can view the complete details of every reorder such as customer name, no of products reordered by the customer, discount on reorder(if any) and reorder type.
“Reorder Discounts” is an another menu added in this listing. This section lists all the reorders to which discount is applied.

Here, you can view the customer name, the discount code given to that customer on reorder, discount type, discount amount and validity of discount as well.
Invoice Request

From this section, you can view the details of invoice requested by the customers on each order.
There will be a list of invoice requests raised by the customers.
And the admin can upload the invoice from this section only to send it to the customers.

Now, once you click on upload button a pop up will generate where you can upload the invoice of suggested file size.
Thus you can send the invoice to your customer simply by clicking “Send Invoice” button.
In this way, you can send invoice to the customers.
RMA Requests: NEW UPDATE

This section lists all the products for which customers have raised RMA requests i.e. request to cancel, return or exchange of order.
In the new update, you can view the RMA details & update the RMA status by selecting the product quantity.
Now, to view the complete RMA details, you can click on the product and perform necessary actions on the request.
These necessary actions include:-
Request status:- You can update the status as approved, declined, inprocess & done.
Request Stage:- View the different stages that you have added from the RMA Configuration menu of the app & update the stage for your customer request.
Reason for the action:- Update a valid reason for the customer request. (You can add reasons from RMA Configuration menu of the app).
Product Quantity:- Mention the product quantity requested by the customer.


Clicking the Update Status button, you can update the RMA status, stage, reason for your action & product quantity.
Now, Save Changes.
Change Address
In this section of the app, you can view the list of customers who have requested to change their shipping address.

Now, once you get the address change request from the customers, you can either approve or reject the request from the action menu.
Customer End

As soon as the Customer places an order, he/she will get these options to Request Return, Request Invoice and Reorder and Change Shipping Address.
Now, once the Customer’s order gets fulfilled, he/she can get the three options in their “My Account” section i.e Return Request, Request Invoice, Reorder.

REQUEST RETURN/EXCHANGE

Now Once the customer clicks on the “Return Request” button, a page appears.
From here, the customer can request for return or exchange.
In case of return:

In case of exchange:

Here, the customer needs to enter the number of items he wishes to exchange.
Select the Return Type as Exchange. Provide a reason for exchange.
Moreover, needs to select a variant of the product with which the customer wants to exchange the item.
Lastly, leave a comment and submit the request.
NOTE: The variants shown in the ‘product for exchange’ dropdown will be of the same price as the purchased item was.
Moreover, only those variants will be shown that are in stock.
A customer can exchange with a similar variant as the purchases one.
Further, the customer can view the details b clicking on View details. Refer:


Similarly, the admin can see the variant to be exchanged from the backend. Refer:
Visit Shopify Admin Panel > Customer Order Management App > Orders > RMA Request > Click on order name:

The admin will have the name of the variant with which the customer wants to exchange the purchased product. Refer:

NOTE: The inventory of requested exchange variants needs to be managed manually.
ORDER CANCELLATION

To cancel an order, customer will visit the My Account section & raise cancel request for his/her order.


Clicking the Return Request button, you can click the Cancel button to cancel the order.
Now, customer needs to fill the details & submit the form.

Once the customer submits the form, the admin will get the request in the RMA requests section of the app.
Thus, admin can update the request status from there & that too will reflect at the customer end.
The same will reflect at the customer end:
Again the admin will update the status from the app & the same will reflect at customer end:
This way, the admin can update the return request status.
REQUEST INVOICE

Customers will also get an option to request invoice for the order placed by them.
All they need to do is to click on the “Request Invoice” button and the admin will get notified via mail for this invoice request.
REORDER

Also, Customer can reorder any of their previous purchase just by clicking on the “Reorder” button on the order page. The admin will get notified for the same.

Now, once the customer clicks on the “Reorder” button, you can update the product quantity if you want and redirected to the checkout page to reorder the product.
If more than one item is reordered, the customers will have the option to reorder the whole items or any particular item from the order.
He/she will get the discount benefits accordingly.

CHANGE SHIPPING ADDRESS

You can also provide an option to change the Shipping Address of unfulfilled orders.


Once the customer clicks on this button, a page appears where he/she can either select an address from drop-down or add a new shipping address.
Once the request is submitted, the customer can view the request status on his/her end.
In this way, the customer can change the shipping address of any unfulfilled item even after placing the order.
Order Lookup Functionality
Customers who don’t have their account on your Shopify store can also manage their orders using Order Lookup functionality.
It is the simplest way to manage orders.
Similarly, those customers whose Shopify accounts are disabled, can also perform various actions on any of their order within the app.
This can be possible once the admin creates a menu as “Order Lookup” on the frontend.
Visiting to this page, Customer can enter their order ID and email address and click on “Lookup” button to proceed.
After this, admin will get notified for the same and he/she needs to verify the email address of the customer.

Once verified, customers can have the complete order details and thus can manage their orders in the easiest possible way.
Customers will get the fulfillment status & quantity information on the same page:

This is all about the Customer Order Management App for Shopify.
Enable API
You will now have the option to access the API of the Customer Order Management app.
Visiting the Home Page of the app, you will get a button to enable API.
As soon as you enable the API, a new menu gets added to the app.

After clicking the Enable API button, enter a unique API name & mention a webhook URL in case you want to check any action performed in the app.

Now, as soon as you enable the API, you will get all the API credentials i.e.
Client ID, Client Secret key & access token that allows getting hit rest of the APIs to check the response in the app.
Once enabled, visit the API section & get the credentials.

As the app provides you the complete API Doc, you can easily check the responses of various actions performed in the app.
For that, the admin needs to create a Private App and enable the required permissions.
API PERMISSIONS FOR ADMIN
Here is the required Permission for the private app:
Store content like articles, blogs, comments, pages, and redirects (Read access)
read_content, write_content
Customer details and customer groups (Read access)
read_customers, write_customers
Orders, transactions, and fulfillment (Read access)
read_orders, write_orders
Products, variants, and collection (Read access)
read_products, write_products
Storefront API:-
Enable these two permissions for the Customer Order Management App (as shown in the screenshot below):-
1. Read products, variants, and collections
2. Read and modify customer details


Using this doc, the admin can check the responses of specific actions performed in the app.
Demo Details
Customer Order Management App demo link:- https://wk-customer-order-management.myshopify.com/account/login
Webkul Support
Hope you like this blog. To get more interesting blog keep in touch with us.
If you need any kind of support, simply raise a ticket at https://webkul.uvdesk.com/en/. You can contact [email protected] to get proper assistance.
Thank You for reading this Blog!

Be the first to comment.