Introduction
Akeneo Connector for Shopify allows you to integrate your Shopify store with the Akeneo PIM platform.
Using this PIM for shopify you can add and update products, collections, and variants from Akeneo to Shopify.
Various product details can be export such as- title, description, multiple images, SEO information, SKU, barcode, price, compare at price, quantity, weight, etc.
You can also check the Akeneo Shopify App for importing and exporting product data easily.
Also, Akeneo Wix connector integrate Akeneo PIM (Product Information Management) with Wix storefor enriching the products for your Wix store.
Please Note -Akeneo Connector for Shopify is also compatible with Shopify Plus.
Basic Requirements
Before you begin, please see the minimum requirements for using this module:
- You need to create a Shopify private app for Akeneo integration.
- This module is compatible with the Akeneo community and Enterprise(Flexibility) edition.
- If you want to use this extension on Akeneo EE Serenity mode, please contact us.
- For the Akeneo installation, your Akeneo server should meet these system requirements.
- For exporting images to Shopify, HTTPS protocol should be enabled on the Akeneo server.
- This module works with Akeneo 2.0.x, 2.1.x, 2.2.x, 2.3.x, 3.0.x, 3.1.x, 3.2.x, 4.0.x, 5.0.x, 6.0.x. and 7.0.x. Download Akeneo from here
Video Tutorials
Check out the following video tutorials below:
How to get API keys?
How to do module configuration?
Exporting Simple Product from Akeneo to Shopify
Features
- Export Akeneo categories as ‘Collections’ in Shopify
- Export product data including variations
- Specify variation’s price, SKU, quantity, barcode, weight
- Send multiple product images to Shopify
- Update exported products on Shopify by running the export job again.
- Map Akeneo attributes with Shopify product details.
- Added for configuring multiple Shopify store
- New updated mapping for meta fields like String, Integer, and Json_string for export jobs.
- Set fixed values for exported products in Akeneo settings.
- This module support Shopify API version 2025-01
- Export quantity, barcode, weight, product type, vendor, tags with product data.
- Send SEO information – page title, meta description, URL
- Akeneo Connector for Shopify is compatible with the latest Akeneo version 7.0.x
- Mention price and compare at price.
- Added import mapping with matched SKU and create a new mapping to prevent duplicate products.
- Specify “Charge taxes on this product” is required or not.
- Export metric units with tags.
- Filter products to export based on – category, families, completeness, time condition, status
- The export specific product(s) using the identifier (SKU)
- Connect multiple Shopify stores with Akeneo by providing separate credentials
- Link variant image of the product to its variation
- Compatible with the Shopify Plus platform also.
- Quick export functionality is included for exporting a selection of products.
- Shopify Meta Fields mapping is supported.
- Import products, variations, categories, and attributes from Shopify to Akeneo.
- Using Shopify’s standard attribute code, you can map additional attributes for imported products.
- Quick export currency mapping
- Multiple attribute mapping by concatenating the attributes
- The source code is 100% open for customization.
- Added support for the Shopify Graphql API
Shopify API Credentials
Step 1 – Log in to your Shopify Store admin panel, then select “Apps” from the left-hand menu. On the top right, select “Develop apps.”

Step 2 – After that, go to “Create an app” and then choose an “App name” for your app.

Step 3 -After that select a “App developer” from your list, then click “Create app.” After that, select “Configure Admin API scopes”

Ensure that the “read and write” checks for the following scope categories are selected:
1. Shop locales
write_locales
read_locales
2. Fulfillment services
write_fulfillments
read_fulfillments
3. Inventory
write_inventory
read_inventory
4. Product listings
write_product_listings
read_product_listings
5. Products
write_products
read_products
6. Translation
write_translations
read_translations
7. Sales Channel
write_channels
read_channels
8. Location
write_locations
read_locations
9. Publications
write_Publications
read_Publications
Please note that Akeneo needs read and write access; you should select all checkboxes that start with “read and write”.

Step 4 –Then, in the top right corner, click “Save” and then “Install app.” Click “Install” in the new dialogue box that appears.


5 –Shopify should take you to the “API credentials” tab, Here you will get the data for Akeneo credentials, enter your app’s “Admin API access token” and “API key”:
Note: Please use the Access token instead of the API password when adding a Shopify credential in Akeneo versions prior to 6. x and 7. x.

Note: For exporting images to Shopify, HTTPS (SSL with a valid certificate) should be enabled on the Akeneo server.
Installation
For the module, there are two different installation processes available.
- Composer Installation
- Manual Installation
Installation using Composer Installation
Before beginning the composer installation
1: Get the ACCESS KEYS [Create a support ticket]
2: In Akeneo composer.json, add our repository as well as the installation script.
For Akeneo 6.x and 7.x
{
  "scripts": {
        "post-update-cmd": [
           "vendor/webkul/shopifyconnector/src/Webkul/ShopifyBundle/install/config.sh COMPOSER=true NO_DOCKER=true"
        ],
        "post-install-cmd": [
           "vendor/webkul/shopifyconnector/src/Webkul/ShopifyBundle/install/config.sh COMPOSER=true NO_DOCKER=true"
        ],
        "post-create-project-cmd": [
          "vendor/webkul/shopifyconnector/src/Webkul/ShopifyBundle/install/config.sh COMPOSER=true NO_DOCKER=true"
       ]
   },
  "repositories": [{
    "type": "composer",
    "url": "https://akeneorepo.webkul.com/"
  }]
}
For Akeneo <=5.x
{
  "scripts": {
        "post-update-cmd": [

"vendor/webkul/shopifyconnector/composer_install.sh"
        ],
        "post-install-cmd": [

"vendor/webkul/shopifyconnector/composer_install.sh"
        ],
        "post-create-project-cmd": [

"vendor/webkul/shopifyconnector/composer_install.sh"
       ]
   },
  "repositories": [{
    "type": "composer",
    "url": "https://akeneorepo.webkul.com/"
  }]
}
3: Use composer to install the extension.
composer require webkul/shopifyconnector
4: Complete the authentication form.
5: Send a Message of Success
6: Delete your browser’s cache.
Manual Installation for Version 6. x and 7. x
- After unzipping the appropriate extension zip, merge the “src” folder into the akeneo project.
- From the PIM directory, run the following command over the NO-DOCKER Instance.
./src/Webkul/ShopifyBundle/install/config.sh COMPOSER=false NO_DOCKER=true
- Run the command below over the PIM directory’s DOCKER instance.
./src/Webkul/ShopifyBundle/install/config.sh COMPOSER=false NO_DOCKER=false
- Command for Mapping Migration [If you’re updating from Module Version 2. x to the most recent version of the module]
php bin/console shopify:migration
Manual Installation for Version 4.0.x to 5.0.x
For installing this module in Akeneo, please follow the further steps:
1 – Unzip the respective extension zip then merge the “src” folder into the akeneo project root directory.

2 – After that goto config/Bundles.php then add the line:
Webkul\ShopifyBundle\ShopifyBundle::class => ['all' => true],

in the return array.
3 – Then copy the “config” folder into Akeneo project root directory for routing.

4 – To run the Quick export in Akeneo 5.0.x, you need to run the below command.
Install composer dependency
php -d memory_limit=4G /usr/local/bin/composer --prefer-dist --no-scripts require navneetbhardwaj/akeneo-quickexport-configurator;
After that, register the bundle in config/bundles.php
Webkul\QuickExportConfiguratorBundle\QuickExportConfiguratorBundle::class => ['all' => true],
Then define routing to create a file in the config/routes/wk_quick_export.yml
wk_quick_expoort:
        resource: "@QuickExportConfiguratorBundle/Resources/config/routing.yml"
        prefix:   /
5 – After that run this command after ssh to your akeneo server by the terminal.
rm -rf var/cache && php bin/console ca:warmup && php bin/console shopify:setup:install
6 – If you are using php-fpm then you need to restart the php-fpm services and apache web server.
For Akeneo 5
sudo service php-fpm7.4 restart
For Akeneo 4
sudo service php-fpm7.3 restart
Docker Installation Command :
For Akeneo 5
alias docker_php='docker-compose run -u www-data --rm php php';
alias docker_yarn='docker-compose run -u node --rm node yarn';
docker_php bin/console cache:clear --env=prod;
docker_php bin/console pim:installer:assets --symlink --clean --env=prod;
docker_php bin/console d:s:u --force;
docker_yarn run webpack;
docker_yarn run update-extensions;
docker_yarn run less;
For Akeneo 4
alias docker_php='docker-compose run -u www-data --rm php php';
alias docker_yarn='docker-compose run -u node --rm node yarn';
docker_php bin/console cache:clear --env=prod;
docker_php bin/console pim:installer:assets --symlink --clean --env=prod;
docker_php bin/console d:s:u --force;
docker_yarn run webpack;
docker_yarn run less;
- Command for Mapping Migration [If you’re updating from Module Version 2. x to the most recent version of the module]
php bin/console shopify:migration
Manual Installation For Version 2. x to 3. x
For installing this module in Akeneo, please follow the further steps:
1 – Unzip the respective extension zip and then merge the “src” folder into the akeneo project root directory.
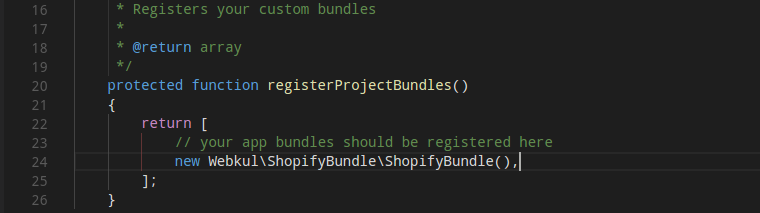
2 -Go to app/AppKernel.php then add the line.
new Webkul\ShopifyBundle\ShopifyBundle(),
in function registerProjectBundles()
3 – After that go to app/config/routing.yml and add these lines at the top of the file.
shopify:
    resource: "@ShopifyBundle/Resources/config/routing.yml"
    prefix:   /

4 – Then you have to navigate to Akeneo Installation Directory(Ex. cd /opt/bitnami/apps/akeneo/htdocs ) then run this command after ssh to your akeneo server by the terminal.
rm -rf var/cache && php bin/console ca:warmup && php bin/console shopify:setup:install
5 – If you are using php-fpm then you need to restart the php-fpm services.
sudo service php-fpm7.2 restart
Command for Mapping Migration [If you’re updating from Module Version 2. x to the most recent version of the module]
php bin/console shopify:migration
Common Issues After Installation
It might happen that even after proper installation, upon opening your Akeneo admin dashboard, you see a loading screen. In that case, do check for the following solution:
- Webpack Installation: If you get the below error
 It means that the web pack is not installed in your system. Run the following command
npm install --save-prod webpack
npm install
- Module routing.yml is not configured properly. Re-check the routing.yml file as mentioned in the 3rd step of Module Installation
- Clear your browser cache.
Uninstall Module: For Akeneo 6 and 7
- From the PIM directory, run the command below over the NO-DOCKER Instance.
./src/Webkul/ShopifyBundle/uninstall/uninstall.sh COMPOSER=false NO_DOCKER=true
- Run the command below over the PIM directory’s DOCKER instance.
./src/Webkul/ShopifyBundle/uninstall/config.sh COMPOSER=false NO_DOCKER=false
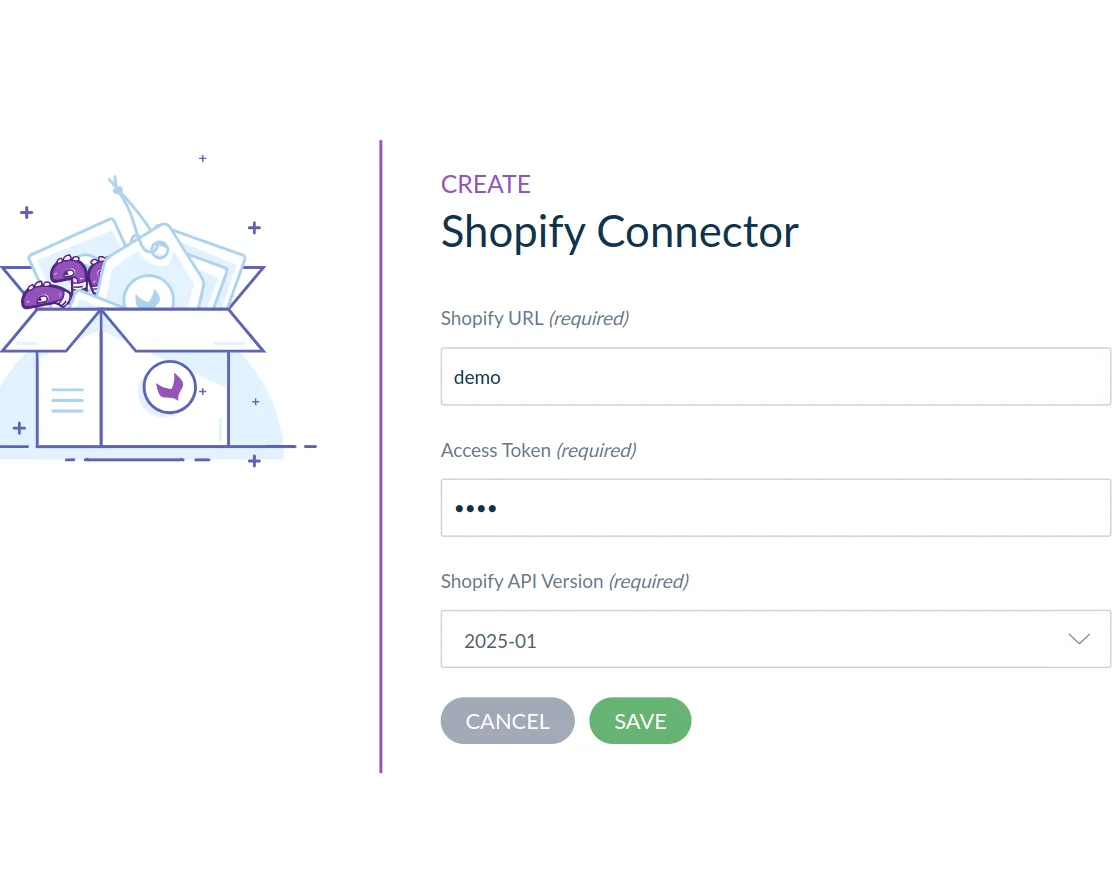
Setup Akeneo Credentials
After you’ve installed the modules, then Go to Shopify >> Documentation.

After that, go to the Credentials tab and select Create Credentials to add new Shopify credentials.

Then fill in the details with the API token and your Shopify Shop Front URL. For configuration, you can add multiple Shopify stores.
Graphql Translation Mapping
To check the Graphql Translation Mapping click on the edit credential. After saving the Shopify credential, All the Shopify locales fetch automatically.
If you add any new locale at the Shopify end then you will fetch that locale by clicking on the Validate fetch Button, you can get all of the published locales.
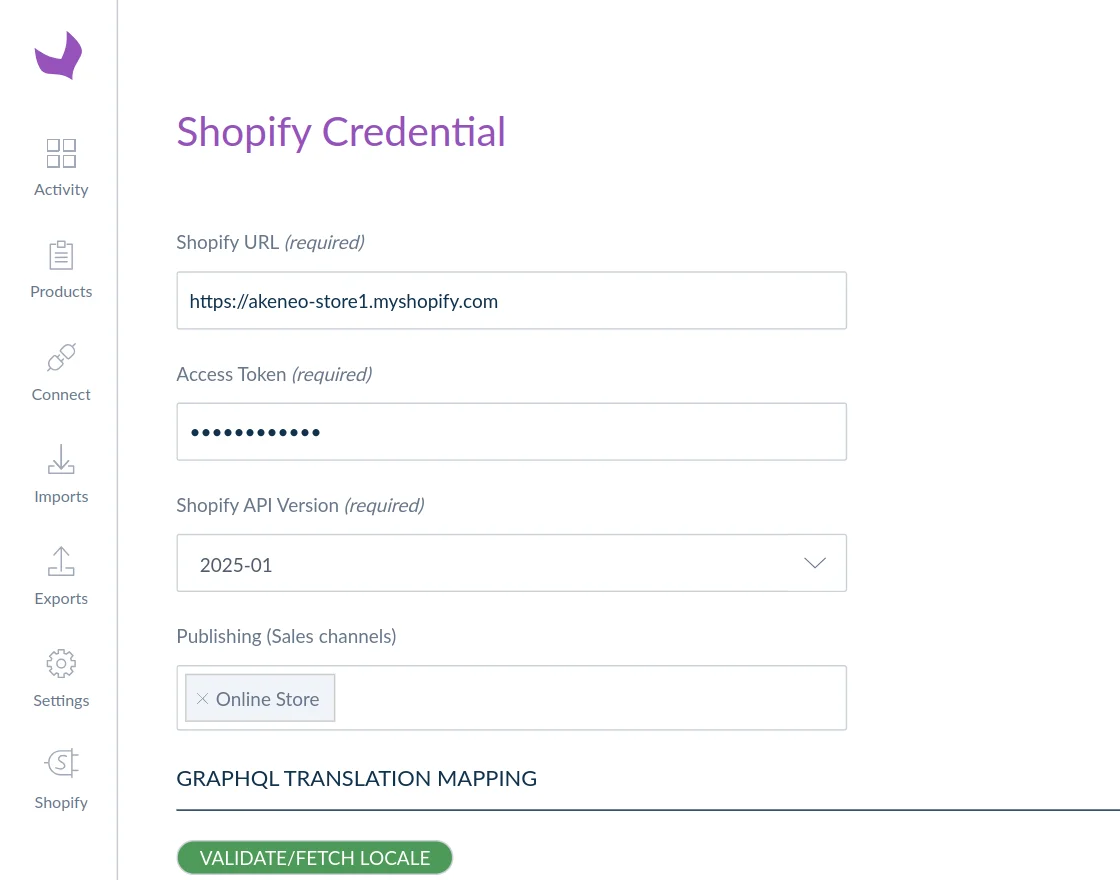
The Publishing (Sales channels) is a required field that enables you to select the relevant Shopify sales channels, such as the Online Store.
This ensures your products are properly published and available for distribution across the right channels.
Export Attributes Mapping
You can sync detailed information about the products from Akeneo to Shopify. But first, you need to do the mapping of Akeneo attributes with Shopify product fields.
After that please go to the Export Attributes Mapping tab. On the left, you will find all the product fields that can be synchronized with Akeneo attributes.
Then in the middle, you need to select the attribute of Akeneo which will be mapped with the Shopify product fields.
The following attributes can be mapped:
- Name
- Description
- Price
- Stock Quantity
- Vendor
- URL and handle
- Taxable (1/0)
- Fulfillment Service
- Weight
Note – To create a single value, click on the check box and concatenate the values of many attributes.

Use This Fixed Value – In case you want to use any definite (same) value for the attribute, you can enter it on the right.
Please note, that all the exported products will be using this mentioned attribute value.
For eg., If you want the weight of all the exported products to be 1, then you need to deselect the Akeneo attribute in the middle and enter 1 as the fixed value on the right.
Now, all the exported products’ weight will be shown as 1 in Shopify.

Map Existing Categories of Shopify with Akeneo
If you already have products and categories in your Shopify setup, please map them to akeneo to avoid creating duplicate records first go to Export Mapping>Map Product/Category.

After that click the Create Mapping button for creating a new mapping for a category, or product.

Select Mapping Type as – Category, and product.
Then, select Akeneo value and Shopify value accordingly after that click Save.

Shopify Other Mapping –
Image Mapping – Provide the attributes created as image type which you want to export to your Shopify store.
Association Mapping – Associations like Cross-Sell, Upsell, Substitution, etc can be mapped in meta fields as shown in the image.

Note – To make this field available, first map the “URL and handle” attribute mapping under standard attribute mapping.

Attribute to be used as Meta field – If you want to export Meta fields to Akeneo, simply create the required attributes in Akeneo.
Then select them from Attributes to be used as Meta Fields option. There will be three options-
- String
- Integer
- Json_string
Multi-attributes must be added in accordance with string, integer, and JSON String specifications.
NOTE – You must install the Metafields Guru App in order to use MetaFields.

Quick Export Currency Mapping – From this option, you need to select the currency for the export job. After that, the selected currency attribute value will be used for all quick export jobs.

Import Attributes Mapping
After the release of Akeneo Connector for Shopify version 2.0.0, the module now supports bi-directional synchronization.
This means you can now send as well receive your product data between Shopify and Akeneo.
In the Import Attributes Mapping section, you need to configure some settings so that import functionality works properly:

Map More Attributes –
If your products have lots of information, you can enter Shopify attribute code ID and then click Add Field. Shopify Akeneo Connector module supports various attributes of Shopify products.
Please make sure to use the same attribute code of Shopify in Akeneo.

Shopify Other Mappings-
Set Family (for simple products) – From this option, you need to select an Akeneo family for imported products. All the simple products imported from the Shopify stores will come under this family.
Set Common Images – From here, you need to select the Akeneo image attributes which will be the common images for the product model.
This option is meant for Shopify imported products with variants. Make sure you have created the required attributes in Akeneo already.
Set Variant Image – From here, you need to select an Akeneo image attribute which will be mapped with Shopify’s imported product variant’s image.
Import Smart Collection as Collection – With this you can Import a collection in Akeneo with a smart collection.
*Therefore A smart collection is a grouping of products established by the merchant’s rules. Based on the rules, Shopify adjusts the contents of a smart collection.

Other Setting –
Logs Setting –
After that in other settings, you can Enable API Request Logs and Enable API Response Log in which you can check all the export/import processing.
If there is any error or issue in the export/import process that will be visible.

Tags Export Setting –
These tags will be exported from Akeneo to Shopify. There will be three types to export the tag –
You want to pull tags as Named Tags – If you want to include the attribute name in the tag if you enable this option.
As seen in the referenced image, attributes and attribute values are displayed in a named tag format.

Do you want to pull through the attribute name as well in tags – In this, you can export the name and tags both the name and tags will be separated by a dash, colon, or space.
Do you want to pull through the Metric UNIT name as well in tags – In this, you can export metric value when you will enable this unit will also be exported as well.

Meta Fields Export Setting –In this, you can export the meta field with the Use key and UseNamespace. There will be two types –

- Use Key for Meta Field as Attribute Code / Label – selected attribute will be exported through attribute code/attribute label.
- Use Namespace for Meta Field as Attribute Group Code / global – Selected attributes can be exported through attribute group code or global.
- Strip Tags of Meta Fields Value – If you will enable this option it will be exported in the content format in Shopify as shown in the image. If you will disable this option then the code format will be exported in Shopify.
Other Settings –
Remove Extra fractional Zeros of Metric Attribute Value –If you will enable this feature then the extra zeros of metric attribute value will be removed
Value for Option Name as Attribute Label – Enable this option to export the variant axis as label or code (for Product Model) as shown in the below image.


Creating Product in Akeneo
To create a product in Akeneo, go to navigate to Products then click the Create button. After that, you need to choose the product type – Product or Product Model.
Product – Select this type for creating a simple product.
Product Model – Select this type for creating a product having multiple variations such as colors, and sizes.
 Then enter the required SKU, choose a family, and click the Save button.
Product Family – A family is a set of attributes that will be the same for all products belonging to a family.
The product family represents products type, imposes product information structure, and defines the list of attributes for a product that it belongs.

Add Product Details
After that, you need to provide the basic details about a product such as a name, description, weight, price, etc.

Select Attribute
For adding product information, select the attribute options you require. You can also create new options for the attribute. You can export furthermore attributes from Akeneo to Shopify:
- Name
- Description
- Price
- Weight
- Stock quantity
- Inventory policy
- Allow customers to purchase this product when it’s out of stock
- Vendor
- Product type
- Tags
- Barcode
- Compare Price
- Meta Title
- Meta Description
- URL and handle
- Taxable (1/0)
- Fulfillment Service

Mention the product’s price and its compare at price (if any). Then, you can mention the search engine listing information – page title, description, URL.

Add New Attribute Option
If an attribute option is missing for a select attribute type (simple or multi-select) then you can directly add it to the Product Edit Form. Enter a Code and Label values, then click Save.

Upload an Image
In this connector, we can upload the images. We can click on the image attribute to add an image. After it, we can delete, change, and download the image.

Select category
After that select a category for the product from the left panel and use the checkbox.

Creating Product Variants
After that to create a product with variations, go to Products>Create and select the Product Model.

Then, enter a Code, select Family, and select Variant. In Variant, you need to select how the variations will be created.

Then, enter the basic product details which are common to all the variations. You can mention the product name, description, vendor, product type, taxable, upload images, SEO information,

To add a variation, click the down arrow symbol.

Then, mention variant axis such as size, and color and enter SKU for variation product.

Once the variation product is created, you can mention its price, and compare at price, barcode, weight, and quantity.

Creating Export Job
After that to export your product data you need to create a job profile. First, go to Exports>Create Export Profile

After that enter a unique code, and label then select Shopify Export Job
Credentials for Multi-Store
If you have multiple stores in Shopify, you can enter the store credentials here by going to the Credential section.

After saving the export profile, go to the Content section and select Locale and Currency for the exported products.

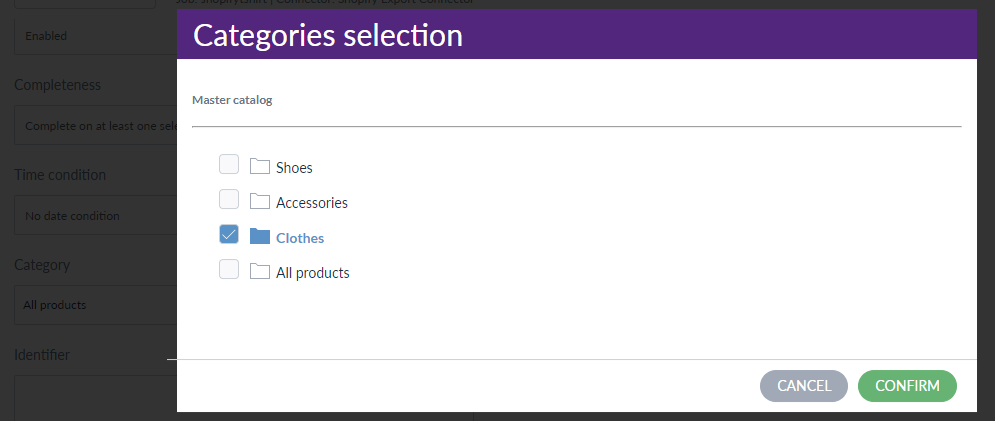
Filter Products to Export
Then you can decide which products you want to export and filter them using various options. After that to export a specific product you can enter its SKU in Identifier.

Filter product based on category selection and click Confirm.
Execution Process
Once you have filtered the products and saved your export job profile, click the Export Now button.

After the completion of the execution process, you can see the number of products exported from Akeneo to Shopify, and also see the status as completed.
![]()
View Products in Shopify
After that, you can see the products have been created using Akeneo mentioning all the product details.

Then you can edit and update any product information as you like.

All the variation information will also appear mentioning inventory, price, SKU. SEO information can also be seen here.

Shopify Storefront
Once the export job is complete, the products will appear on the storefront. The customer will see the name, price, images, and description on the product page.

Shopify Quick Export
After that, the module also supports Quick Export functionality.
It basically allows you to export some selection of products without going through the process of creating an export job profile and following the long procedure.

To do quick export, simply select the product(s), go to the Quick Export option, and choose Shopify Export (All Attributes) and other options.

Once you click the Export option, the execution process will run.

After that, you can check the details from the notifications section and check the progress in the process tracker.
![]()
Import Job
For importing product data from Shopify to Akeneo, go to Imports>Create Import Profile.
There are Category, Attribute, family, product, and product model types of import jobs in the connector.

After that enter a code, label, and select Job as Shopify Import Product.

Then go to Content and select the appropriate channel, locale, and currency for importing Shopify products to Akeneo.

In case you are managing multiple Shopify stores, you can select the store credential from the drop-down, and click Save.

After that, click the Import Now button to execute the import process.
![]()
Import profile – Shopify Delete / Reimport Product Data Mapping
Using this import job you can delete the export product mapping which is deleted from Shopify.
Create an import profile then enter the details

After that, click the Import Now button to execute the import process.
![]()
Support
So, that was much about the User Guide of Akeneo Connector for Shopify for any queries or doubts reach out to us at [email protected]. You can also raise a ticket at our HelpDesk System.
Please explore our Akeneo Development Services and Quality Akeneo Extensions.
Current Product Version - Akeneo 2 to 5 || 5.0.0, Akeneo 6 || 4.0.2 and Akeneo 7 || 5.3.0
Supported Framework Version - Akeneo Version 2.0.x, 2.1.x, 2.2.x, 2.3.x, 3.0.x, 3.1.x, 3.2.x, 4.0.x, 5.0.x, 6.0.x and 7.0.x
