Magento 2 is an e-commerce platform, while ReactJS is a JavaScript library widely used for building user interfaces and headless development.
Integrating Magento 2 React JS with the front-end can significantly enhance the user experience, offering a modern, dynamic, and highly responsive interface.
This blog covers integrating ReactJS with Magento 2 React development to build components, focusing on login integration using the customer details REST API.
Let’s see the implementation –
Step 1: Create a ReactJS Project
The ReactJS project needs to be set up and configured first before integrating the login REST API.
Now our ReactJS app name is "my_app". The command below must be used to create and navigate the project directory after it has been established.
npx create-react-app my_app
cd my_app
To create a React application, we can follow a blog on How to create a React App.
Step 2: Install Dependencies
We will install the required dependencies to handle forms with validation and manage page routing in our ReactJS project.
Execute the subsequent command within your terminal.
npm install use-react-form react-router-dom
npm install -D tailwindcss@3
npx tailwindcss init
For detailed instructions on Tailwind CSS setup, click here.
Step 3: Create components
We have created a directory with the component’s name, which contains all components.
But before going to create components, we need to implement the router provider. In the code base below, we have updated the code in the index.js file for the router provider.
Update index.js for Route provider
import React from 'react';
import ReactDOM from 'react-dom/client';
import './index.css';
import App from './App';
import reportWebVitals from './reportWebVitals';
import {
  createBrowserRouter,
  RouterProvider,
} from "react-router-dom";

const router = createBrowserRouter([
  {
    path: "/",
    element:<App/>,
  },
]);
const root = ReactDOM.createRoot(document.getElementById('root'));
root.render(
  <React.StrictMode>
    <RouterProvider router={router} />
  </React.StrictMode>
);

// If you want to start measuring performance in your app, pass a function
// to log results (for example: reportWebVitals(console.log))
// or send to an analytics endpoint. Learn more: https://bit.ly/CRA-vitals
reportWebVitals();
Create Login.jsx
The Login component, located in Login.jsx, is the core component responsible for managing the login functionality.
import React, { useEffect, useState } from "react";
import { useForm } from "react-hook-form";
import { Link } from 'react-router-dom';
export default function Login() {
const [showPassword, setShowPassword] = useState(false);
const [apiMsg, setApiMsg] = useState("");
const [isLoading, setLoading] = useState(false);
const {
register,
handleSubmit,
formState: { errors },
} = useForm();
const onSubmit = (data) => {
setLoading(true);
fetch(
process.env.BASE_URL + "/rest/V1/integration/customer/token",
{
method: "POST",
headers: {
"Content-Type": "application/json",
},
body: JSON.stringify(data),
}
)
.then((response) => response.json())
.then((data) => {
if (data?.message) {
setApiMsg({
status: "error",
message: data.message,
});
} else {
// store the token for further need
setApiMsg({
status: "success",
message: "Logged in successfully",
});
}
})
.catch((error) => {
console.error(error);
});
};
useEffect(() => {
if (apiMsg?.message) {
setTimeout(() => {
setApiMsg("");
}, 3000);
}
}, [apiMsg]);
return (
<div className='lg:px-60'>
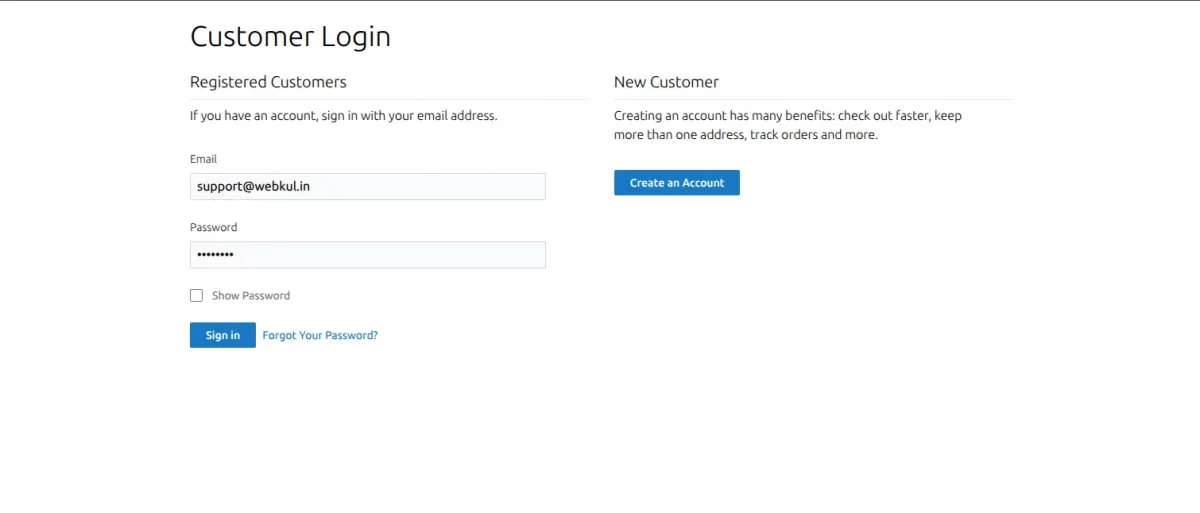
<h1 className='text-4xl lg:px-0 md:px-0 px-10 pt-6 font-light'>Customer Login </h1>
{apiMsg && (
<div
className={`text-sm mt-4 rounded-sm ${
apiMsg?.status === "success" ? "bg-green-200" : " bg-red-200"
} px-2 py-2 flex`}
>
{" "}
<svg
onClick={() => setApiMsg("")}
xmlns='http://www.w3.org/2000/svg'
className={`w-4 h-4 mt-[0.1625rem] mr-2 rounded-full ${
apiMsg?.status === "success" ? "bg-green-500" : "bg-red-500"
} p-0.5 text-white`}
viewBox='0 0 24 24'
fill='none'
stroke='currentColor'
stroke-width='2'
>
<path d='M18 6L6 18' />
<path d='M6 6L18 18' />
</svg>
{apiMsg.message}
</div>
)}
<div className='lg:flex md:flex block gap-8 lg:px-0 md:px-0 px-10 '>
<div className='lg:w-1/2 md:w-1/2 w-full'>
<section class=''>
<h3 className='text-xl pt-6 py-2 border-b font-light'>
Registered Customers
</h3>
<div class='flex flex-col mx-auto md:h-[90vh] lg:py-0'>
<div class='w-full bg-white rounded-lg md:mt-0 sm:max-w-md xl:p-0 '>
<div class=' space-y-4 md:space-y-6 '>
<p className='py-2 font-light'>
If you have an account, sign in with your email address.
</p>
<form
class='space-y-4 md:space-y-6'
onSubmit={handleSubmit(onSubmit)}
>
<div>
<label
for='email'
class='block mb-2 text-sm text-gray-900 font-light'
>
Email
</label>
<input
type='email'
name='email'
id='email'
class='bg-gray-50 border text-black border-gray-300 focus:outline-none focus:ring-primary-600 focus:border-primary-600 block w-full p-1 px-2 rounded-sm dark:focus:ring-blue-500 dark:focus:border-blue-500 focus:shadow-[0_0_3px_1px_#00699d]'
required='true'
{...register("username", {
required: "Email is required",
})}
/>
{errors.username && (
<p role='alert' className='text-red-500 text-sm'>
{errors.username?.message}
</p>
)}
</div>
<div>
<label
for='password'
class='block mb-2 text-sm font-light text-gray-900 '
>
Password
</label>
<input
type={showPassword ? "text" : "password"}
name='password'
id='password'
class='bg-gray-50 border border-gray-300 text-black focus:outline-none focus:ring-primary-600 focus:border-primary-600 block w-full p-1 px-2 focus:shadow-[0_0_3px_1px_#00699d]'
required=''
{...register("password", {
required: "Password is required",
})}
/>
{errors.password && (
<p role='alert' className='text-red-500 text-sm'>
{errors.password?.message}
</p>
)}
</div>
<div class='flex items-center justify-between'>
<div class='flex items-start'>
<div
class='flex items-center h-5'
onClick={() => setShowPassword(!showPassword)}
>
<input
type='checkbox'
class='w-4 h-4 border border-gray-300 rounded bg-gray-50 focus:ring-3 focus:ring-primary-300 '
required=''
/>
</div>
<div class='ml-3 text-sm'>
<label for='remember' class='text-gray-500'>
Show Password
</label>
</div>
</div>
</div>
<button
disabled={isLoading}
type='submit'
class=' text-white bg-[#1979c3] hover:bg-primary-700 focus:ring-4 focus:outline-none focus:ring-primary-300 font-medium text-sm px-5 py-1.5 rounded-sm text-center dark:bg-primary-600 dark:hover:bg-primary-700 dark:focus:ring-primary-800'
>
Sign in
</button>
<span className='pl-2'>
<Link to='/' class='text-sm text-[#1979c3]'>
Forgot Your Password?
</Link>
</span>
</form>
</div>
</div>
</div>
</section>
</div>
<div className='lg:w-1/2 md:w-1/2 w-full'>
<section class=''>
<h3 className='text-xl pt-6 py-2 border-b font-light'>
New Customer
</h3>
<div class='flex flex-col mx-auto md:h-[90vh] lg:py-0'>
<div class='w-full bg-white rounded-lg md:mt-0 sm:max-w-md xl:p-0 '>
<div class=' space-y-4 md:space-y-6 '>
<p className='py-2 font-light'>
Creating an account has many benefits: check out faster,
keep more than one address, track orders and more.
</p>
<button
type='button'
class=' text-white bg-[#1979c3] hover:bg-primary-700 focus:ring-4 focus:outline-none focus:ring-primary-300 font-medium text-sm px-5 py-1.5 rounded-sm text-center dark:bg-primary-600 dark:hover:bg-primary-700 dark:focus:ring-primary-800'
>
Create an Account
</button>
</div>
</div>
</div>
</section>
</div>
</div>
</div>
);
}
Here’s a step-by-step explanation –
- Login Form: The code creates a login form that asks for the customer’s email and password.
- Validation: The code checks if the email and password are valid. If not, it shows an error message.
- Login Button: When the customer clicks the login button, the code sends a request to the server to verify the email and password.
- Server Response: If the email and password are correct, the server sends a response with a token. The code uses this token to get the customer’s details.
- Error Messages: If there’s an error during the login process, the code shows an error message to the customer.
- Forgot Password: The code provides a link to reset the password if the customer forgets it.
- Create Account: The code provides a button to create a new account for customers who don’t have one.
Other features
- The code uses a “show password” feature that allows customers to see their password as they type it.
- The code uses a loading animation to show that the login process is in progress.
Finally, we have completed all our major components and implementation.
We have to import these components into one component App. Need to pay attention here, we have already used App components as React Router providers in our first code example.
import './App.css';
import Login from './components/Login';
function App() {
  return (
    <>
     <Login/>
    </>
  );
}

export default App;
Our React application – structure looks like as mentioned below.
.
├── src/
│   ├── components/
│        ├── Login.jsx
│   ├── App.js
│   ├── App.css
│   ├── App.test.js
|   ├── index.js
|   ├── index.css
│   └── logo.svg
├── public/
│   ├── index.html
│   ├── logo.svg
│   ├── robots.txt
│   └── manifest.json
├── package-lock.json
├── package.json
├── tailwind.config.js
└── README.md
Now, start the React application using the following command.
npm start
After starting, when we open our React application at http://localhost:3000, we will get below mentioned visual pages.
Conclusion
Integrating ReactJS with Magento 2 front-end using a headless approach can revolutionize your e-commerce platform.
Separating the front end and back end allows you to deliver a fast, flexible, and personalized shopping experience.
With Magento 2 and ReactJS integration, ReactJS handles the front end while Magento 2 manages the back end, helping you maximize your e-commerce potential.
For technical assistance, please get in touch with us via email at [email protected].
Discover powerful solutions to enhance your Magento 2 store by exploring our Magento 2 plugins page.
Bring your vision to life with custom-built solutions—hire skilled Magento 2 developers today.
Start your Headless Development with Webkul.
Happy Coding !!

Be the first to comment.