PrestaShop Worldpay Payment Gateway module allows merchants to offer payment via Worldpay to their customers.
Online payment methods are very beneficial for your eCommerce store. It is a very popular payment service provider providing quick & secure payments to customers.
It is one of the largest payment service providers in the UK processing almost 26 million transactions per day.
Buyers can easily pay for their orders using this payment gateway. Admin can also refund the amount fully or partially to the buyers in case the buyer asks for a refund.
Important Note
As of 06th March 2023, Worldpay Online Payments Gateway (WPOP) has been decommissioned. After this date you will not be able to transact any MOTO, eCom and recurring payments.
Here is a video to make the configuration & workflow of the module more clearer for you.
Features of the PrestaShop Worldpay Payment Gateway module
- A new payment method is available to the buyers while placing an order.
- Use this module either in test mode or live mode as per the requirement.
- Enter the API keys according to the mode you selected to use the module.
- View list of all the orders whose payment is made through Worldpay under “Worldpay Transactions”.
- Choose to refund the order amount to the customers.
- Either refund the full order amount or partial amount of the order to the customer.
- Make the refund with an amount that is less than or equal to the total amount paid by the buyer for the order.
- View the refund information under the Worldpay transaction tab.
- Customers will be redirected to the Worldpay 3DS page to authenticate the cardholder and complete payment.
How to install the PrestaShop Worldpay Payment Gateway module
- Firstly, go to the module manager in back office and click on ‘upload a module’.
- After that, drag and drop the module file or select the file from the system.
- In this way, the module installation will be successful.


Note
1. It works on the Global API and not on the secured API.
2. It does not allow hosted checkout.
3. Module works when you create Worldpay credentials from here – https://online.worldpay.com/
How to configure the module
After the successful installation of the module, an admin needs to configure it.
In order to configure the module, an admin needs to enter the service key and client key.
They can also choose whether they want to use the module in live mode or test mode.

How to get the API keys
In order to get the API keys, an admin needs to create their account on Worldpay. After that, they’ll select the mode for which they need the API keys.

Now, click on Setting to go to API Keys. Enter these API keys in the configuration settings of the module.

Workflow
After configuring the module successfully, your customers will get an option to pay via Worldpay on the checkout page.

After proceeding to pay via Worldpay, a customer will need to fill in the card details in order to proceed.

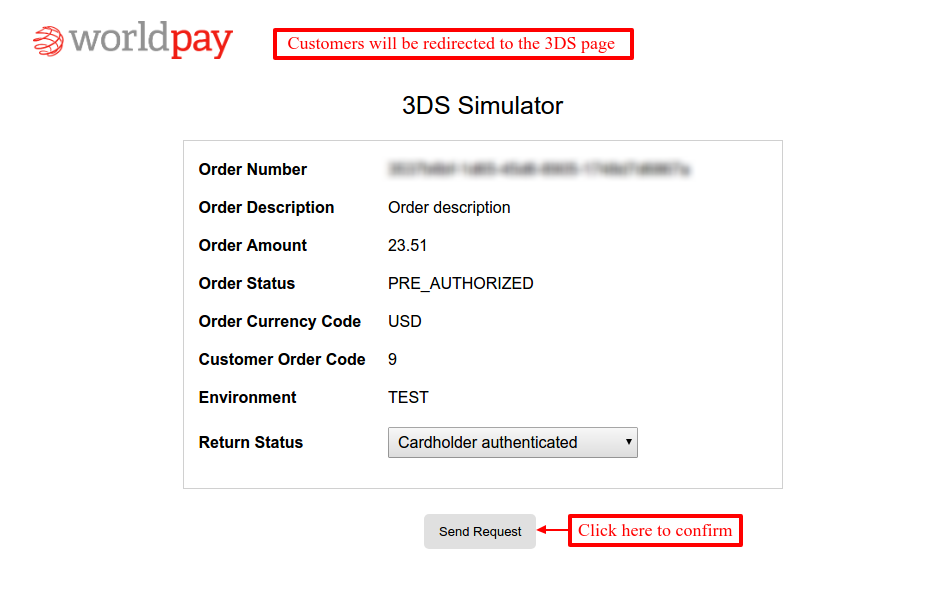
Now, the customer will redirect to Worldpay 3DS page to authorize the transaction.
After authenticating the card and submitting the request, the order will process.
And, now customers would redirect back to the order confirmation page on the store.

At the admin’s end
A new tab adds at the backend from where the admin can view the list of orders. It contains all the orders for which customers paid via the Worldpay payment gateway.

After clicking on «Worldpay Transactions», admin can view the list of all those orders for which customer paid via Worldpay Payment Gateway.

On clicking the Refund tab, Admin gets an option to select the type of refund.
Admin has two options to make the refund to the buyer :
- Full Refund
- Partial Refund

On selecting a partial refund, an admin gets an option to enter the amount that he/she wants to refund. This amount can be less than or equal to the total order amount.

Suppose the order amount of a buyer is $110 and the admin makes a refund of $50. Then, an admin will see the details like in the screenshot below.

Admin can see all transaction details in the Worldpay account too.

By clicking on the view button on the Worldpay dashboard, an admin can view the order details.

So, this was all about the PrestaShop Worldpay Payment Gateway module. I hope this document will help you in checking the functionality of the module in a better way.
Also, do let us know about your views in the comments.
Support
For any kind of technical assistance or query, please raise a ticket at http://webkul.uvdesk.com or send us a mail at [email protected]
Also, please explore our vast range of featureful PrestaShop Addons.
Current Product Version - 4.0.3
Supported Framework Version - 1.7.x.x

Be the first to comment.