Protect your website from hacker attacks and malicious activities with Prestashop Security Suite Extension.
Two-factor authentication to add an extra level of protection to your admin panel.
Ensure protection against SQL, cross-site scripting (XSS), Shell, and HTML injection attacks with Web Application Firewall.
Note: Prestashop Security Suite module is compatible with PrestaShop multi-store feature.
Features of Prestashop Security Suite
- Disable cut, copy, paste, and text selection to prevent text theft.
- Disable right clicks to prevent your images from being copied or saved.
- Also, you can disable View Page Source and Inspect Element.
- Enable security headers to protect your store against XSS, clickjacking, and content sniffing attacks.
- Enable 2-factor authentication to protect your back office from unauthorized access.
- The overall security of the website’s data is taken care of by Web Application Firewall and it protects your site from XSS, SQL, SHELL, and HTML injection attacks.
- Exclude Two-Factor Authentication (2FA) for Specific IPs.
How to Install Prestashop Security Suite Module
- Firstly, go to the module manager in the back office and click on ‘upload a module’.
- After that, drag and drop the module file or select the file from the system.
- In this way, the module installation will be successful.


Custom Hooks Information
In Prestashop versions 1.7.x, and 8.x.x the admin needs to add two custom hooks in the below files:
{hook h='displayWkAdminLoginForm'}
Add this hook in the “<YOUR_ADMIN_FOLDER>/themes/default/template/controllers/login/content.tpl” below password input field, in id=”login_form”, where <div class=”form-group”> close

Hook::exec('actionWkAdminLoginControllerSubmit', array('controller' => $this));
Add this hook in the “controllers/admin/AdminLoginController.php” in function processLogin() just above line “if (!count($this->errors)) {“

For Prestashop versions 9.x.x, The admin needs to add custom hooks in the files below:
1) src/PrestaShopBundle/Controller/Admin/LoginController.php
Need to put the code below in loginAction method after $requestPasswordResetForm = $requestResetPasswordFormHandler->getForm(); line:
if ($request->getSession()->has('wk_auth_error')) {
    $this->addFlash('error', $request->getSession()->get('wk_auth_error'));
    $request->getSession()->remove('wk_auth_error');
}
2) src/PrestaShopBundle/Form/Admin/Login/LoginType.php
Replace the code below in buildForm method before ->add('stay_logged_in', CheckboxType::class, [: after line 59:
->add('passwd', PasswordType::class, [
     'label' => $this->translator->trans('Password', [], 'Admin.Global'),
 ]);
 \Hook::exec('displayWkAdminLoginForm', ['builder' => $builder]);

 $builder->add('submit_login', SubmitType::class, [
     'label' => $this->translator->trans('Log in', [], 'Admin.Login.Feature'),
 ])
Reference Image

3) vendor/symfony/security-http/Authentication/AuthenticatorManager.php
Put the code below in the executeAuthenticator method just after try {:
\Hook::exec('actionWkAdminLoginControllerSubmit', ['request' => $request])
Module Configuration
After the successful installation of the module, you need to configure it.
You will have to configure the Content Protection, Security Headers, HTTP Authentication, 2-Step Verification, and Web Application Firewall tabs.
Let us take a deep dive into each tab configuration, individually.
Content Protection
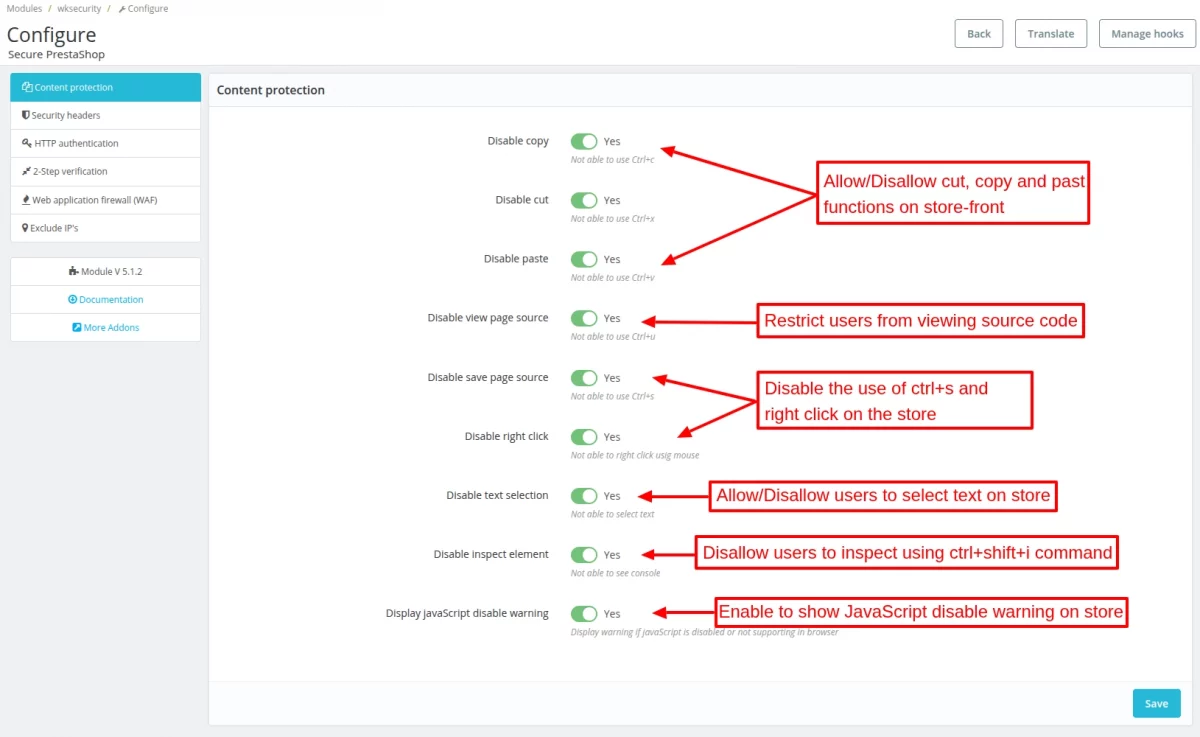
Disable Copy: Enable this field to disallow users to copy the content from the website. This option allows you to disable the ctrl+c command on your website.
Disable Cut: Enable this field to disallow the use of the ctrl+x command in the Prestashop store.
Disable Paste: This option allows you to disable the use of the Ctrl+V command on your website.
View Page Source: Disallow customers from using the Ctrl+U command on the website to view the page source.
Save page source: Disallow the use of Ctrl+S command on the website.
Disable Right Click: Enable this field to disallow the use of right-click using the mouse in the store.
Disable Text Selection: Enable this field to disallow users from selecting text in the store.
Inspect Element: Disallow users to inspect using the Ctrl+Shift+i command.
Display JavaScript Disable Warning: This option lets you display a warning when JavaScript is disabled or not supported in the browser.
Security Headers
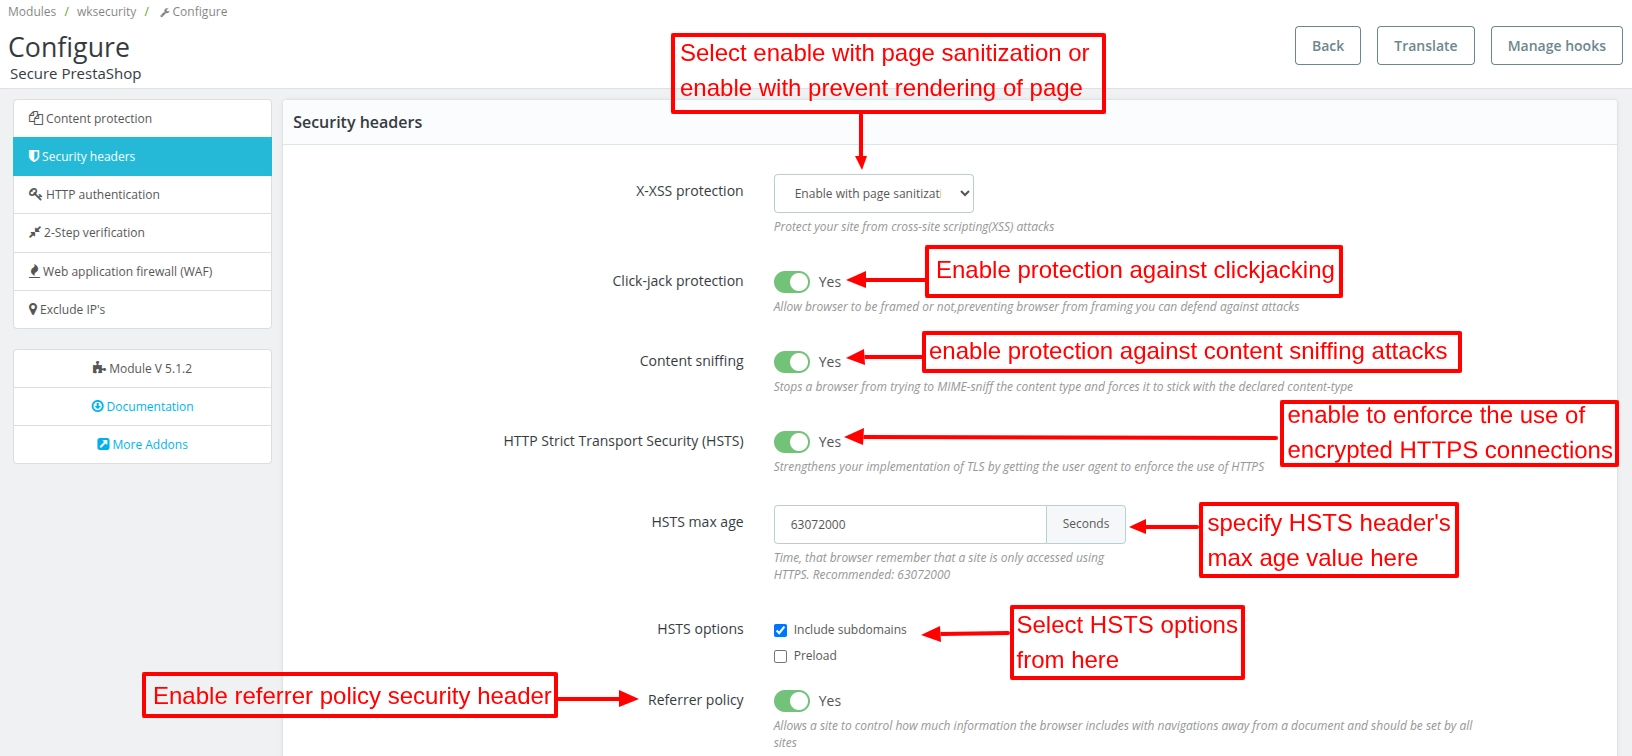
X-XSS Protection
Enable this option to protect your website from cross-site scripting (XSS) attacks.
- Disable: If selected disable, then the module will not block the XSS attacks that occur on the website.
- Enable with page sanitization: If a cross-site scripting attack is detected, then the module will sanitize the page and then render.
- Enable with prevent rendering of page: If a cross-site scripting attack is detected, then the module will prevent rendering of the page.
Click-jack Protection
The option lets you tell the browser whether you want to allow your site to frame or not. Defend your site against attacks like clickjacking by preventing a browser from framing your site.
Content Sniffing
Stop a browser from trying to MIME-sniff the content type and force it to stick with the declared content type.
HTTP Strict Transport Security (HSTS)
The HSTS header enforces the use of HTTPS only on your site and strengthens your implementation of TLS.
HSTS Max Age
In this field, you need to specify the time (in seconds). It tells a browser to enable HSTS for that exact domain or subdomain, and to remember it for a given number of seconds.
Referrer policy
This header allows a website to control how much information the browser includes with navigations away from a document and should be set by all sites.
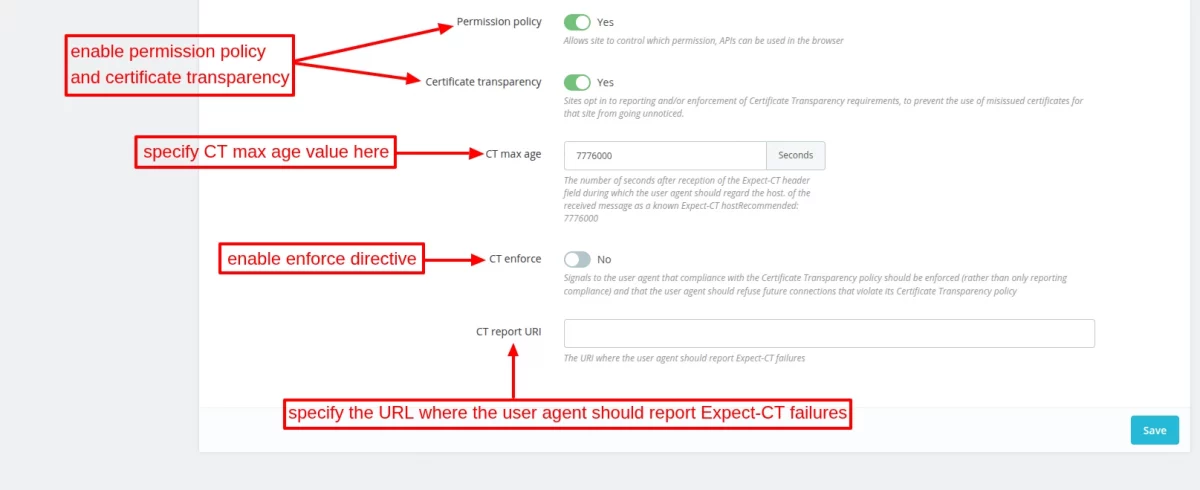
Permission Policy
This header allows you to control which features and APIs can be used in the browser.
Certificate Transparency
This header allows sites to opt in to reporting and or enforcement of Certificate Transparency requirements to prevent the use of misissued certificates for that site from going unnoticed.
CT Max Age
Specify the number of seconds after the reception of the Expect-CT header field during which the user agent should regard the host of the received message as a Known Expect-CT host.
CT Enforce
The header Signals to the user agent that compliance with the Certificate Transparency policy should be enforced (rather than only reporting compliance).
And the user agent should refuse future connections that violate its Certificate Transparency policy.
CT Report URI
Specify the URI where the user agent should report Expect-CT failures.
You can scan your website on https://securityheaders.com/.


In the above two screenshots, you can review the security of your website before and after enabling the security headers.
HTTP Authentication
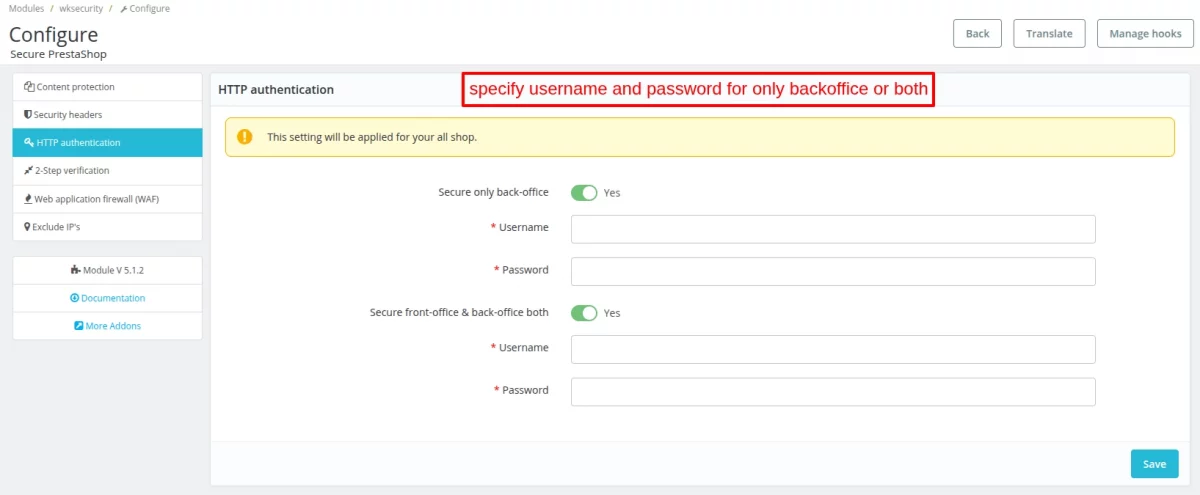
Add an additional layer of security to the webstore with HTTP authentication. Under HTTP Authentication, the admin needs to specify username and password for back office and front office login.
When someone tries to log in to the admin’s back office, a pop-up window appears where they need to specify the username and password to log in.

Similarly, when a customer tries to log in to the Prestashop store, a pop window appears where a customer needs to specify the username and password to log in.

2-Step Verification
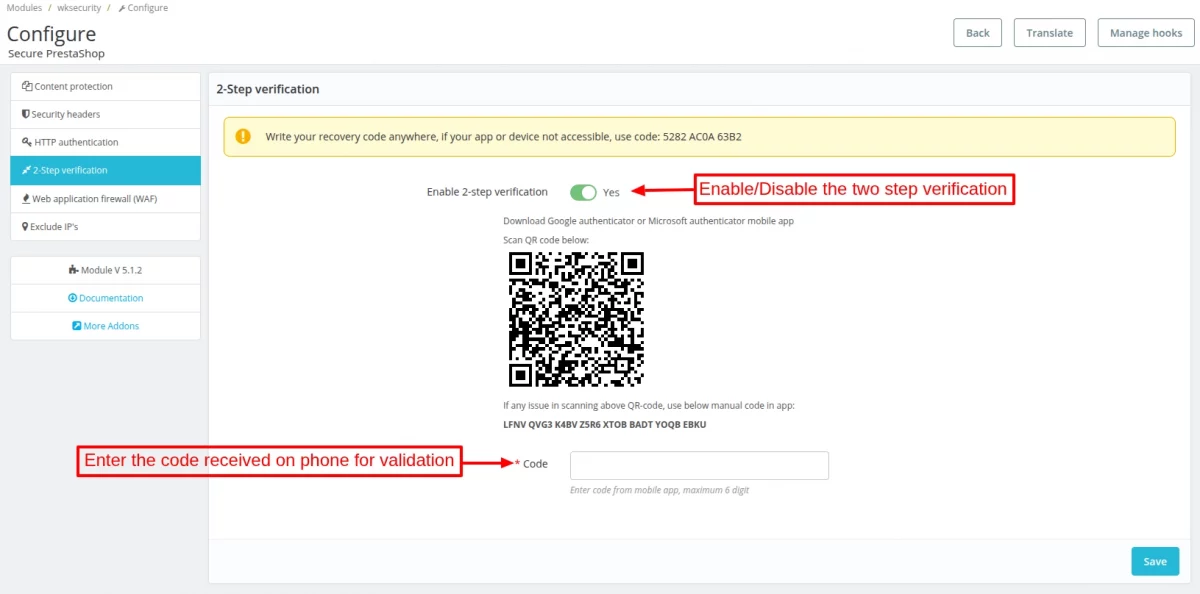
Prestashop Security Suite extension facilitates the 2-factor authentication process for the admin. The store owner can use 2-factor authentication to protect his back office from unauthorized access.
Admin needs to download the two-factor authentication app like Google Authenticator, Microsoft Authenticator, or any app that supports the TOTP algorithm.
Admin needs to open the app and scan the QR code to receive the code on their phone.
Once received, the admin needs to enter it in the code field to verify that 2-step verification is configured successfully.
After successful verification, the code field gets disabled.
Next time, when the admin tries to log in to the back office, an additional field will appear where he needs to specify the verification code that appears in the authenticator app.

If the admin enables the 2-step verification feature from his end then the other employees can log in to the back office without entering the valid authentication code.
Unless employees have configured their own 2FA settings.
NOTE:
- If admin’s device is not accessible, then the admin can use a 2-FA recovery code to log in. To display 2-FA authentication code field on the back office login page, you must have to add both custom hooks specified previously in this blog.
- Employees can individually configure and manage their own 2FA Settings according to their preferences and security requirements
Web Application Firewall
Web Application Firewall helps you protect your website from attacks such as cross-site-scripting (XSS), SQL, Shell, and HTML injection.
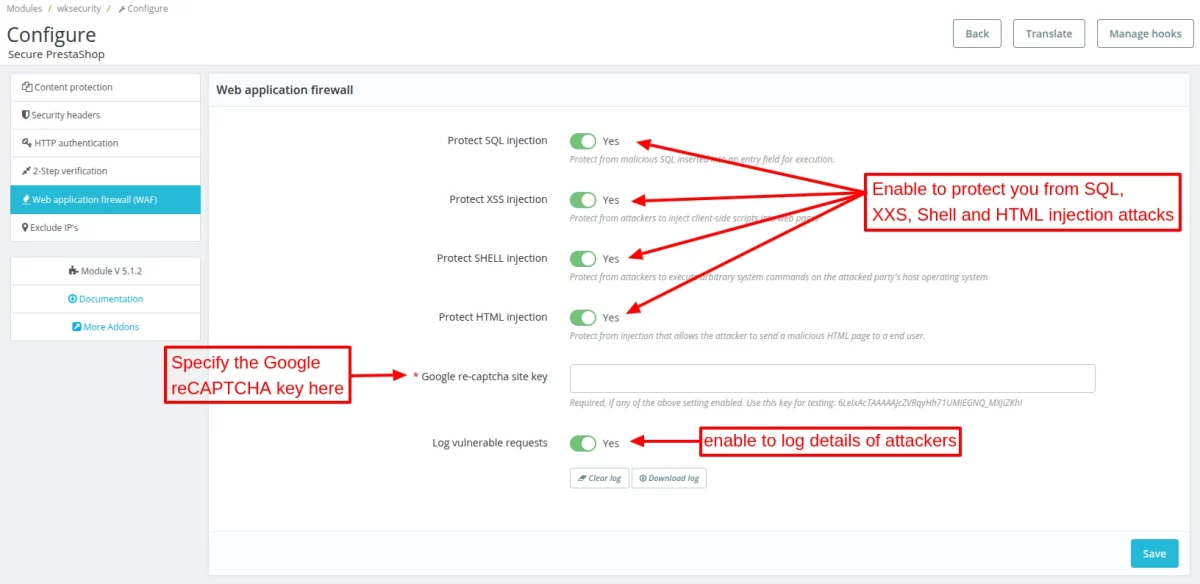
Protect SQL Injection – Enable this field to protect your website from malicious SQL statements inserted into an entry field for execution.
Protect XSS Injection – Protect your website from attackers who inject client-side scripts into web pages viewed by other users.
Log vulnerable requests – This option lets you log the details of attacks on your website. Also, you can choose to delete or download the log.
Protect SHELL Injection – Enable this field to protect your website from attackers trying to execute arbitrary system commands on the attacked party’s host operating system.
Protect HTML Injection – Enable this field to protect your website from the injection that enables the attacker to send a malicious HTML page to an end-user.
Google Re-Captcha Site Key – Add Google reCAPTCHA to your website pages for verification of any suspicious activity.
Exclude IP’s
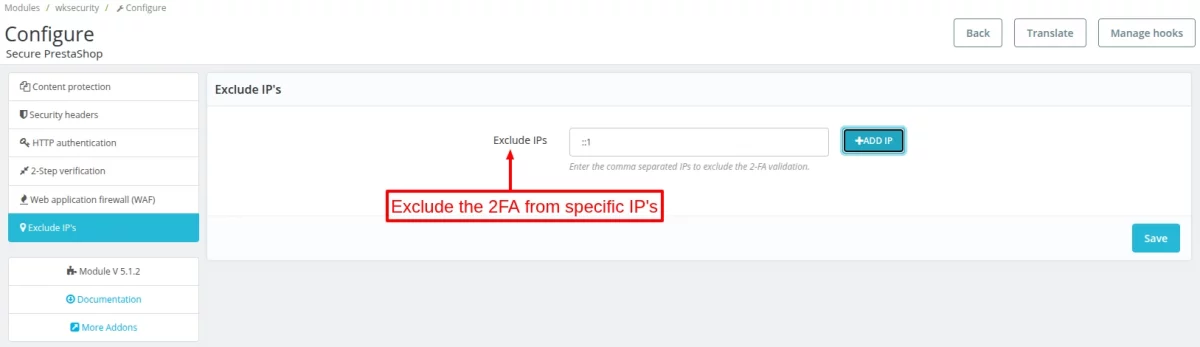
Exclude Two-Factor Authentication (2FA) for Specific IPs.
This was all about Prestashop Security Suite Module. I hope this document will help you in checking the functionality of the module in a better way.
Also, do let us know about your views in the comments.
Support
For any kind of technical assistance or query, please raise a ticket or send us a mail at [email protected]
Also, please explore our Prestashop development services and vast range of quality Prestashop addons.
Current Product Version - 5.1.2
Supported Framework Version - 9.x.x, 8.x.x, 1.7.x.x

Be the first to comment.