PrestaShop PayPal Recurring Payment Gateway module allows shop owners to offer subscription products & let customers pay via PayPal for the subscription.
A shop owner can create multiple plans for the subscription & assign multiple products to the subscription plan.
Using this module, a shop owner will be able to offer subscription products as well & set the frequency of payment in days, weeks, months or years.
There is an additional functionality of refund too. A shop owner can choose to initiate either a full or partial refund to the customer.
Note: PrestaShop PayPal Recurring Payment Gateway module is compatible with PrestaShop version 9.x.x and multi-store feature.
Features of the PrestaShop PayPal Recurring Payment Gateway module
- Offer your customers to subscribe to a product using PayPal payment mode.
- Customers can also purchase a normal (non-subscription) product via Paypal payment option.
- Use the module either in the test mode or live mode.
- Customize the name of the payment mode to show on the checkout page.
- Also, customize the subscription details to show on the product page.
- Choose to apply tax on subcription plan amount.
- Choose to show one time purchase option on subscription product page.
- Enable or disable the creation of an order when the subscription is renewed.
- Let your customers cancel their subscriptions by themselves.
- The subscribe button is also available on the ‘quick view’ page of the product.
- Create subscription plans & set the payment frequency in days, weeks, months or years.
- Assign products to the subscription plan.
- A list of subscribed products and their subscribers are also available at the admin end.
- A list of orders of all the subscription products is also available at the admin end.
- Also, choose to initiate either a full or partial refund to the customer.
- Notify the customer via mail of various events.
How to install the PrestaShop PayPal Recurring Payment Gateway module?
- Firstly, go to the module manager in back office and click on ‘upload a module’.
- After that, drag and drop the module file or select the file from the system.
- In this way, the module installation will be successful.


How to configure the module?
After the successful installation of the module, an admin can proceed to configure the module.
To configure the module, an admin will need API keys. And, the process to get the API keys are available in the next section.
Also, an admin can choose to customize the name of the payment mode to show to the customer on the checkout page.
Additionally, an option to customize the product subscription information to show on the product page is also available.
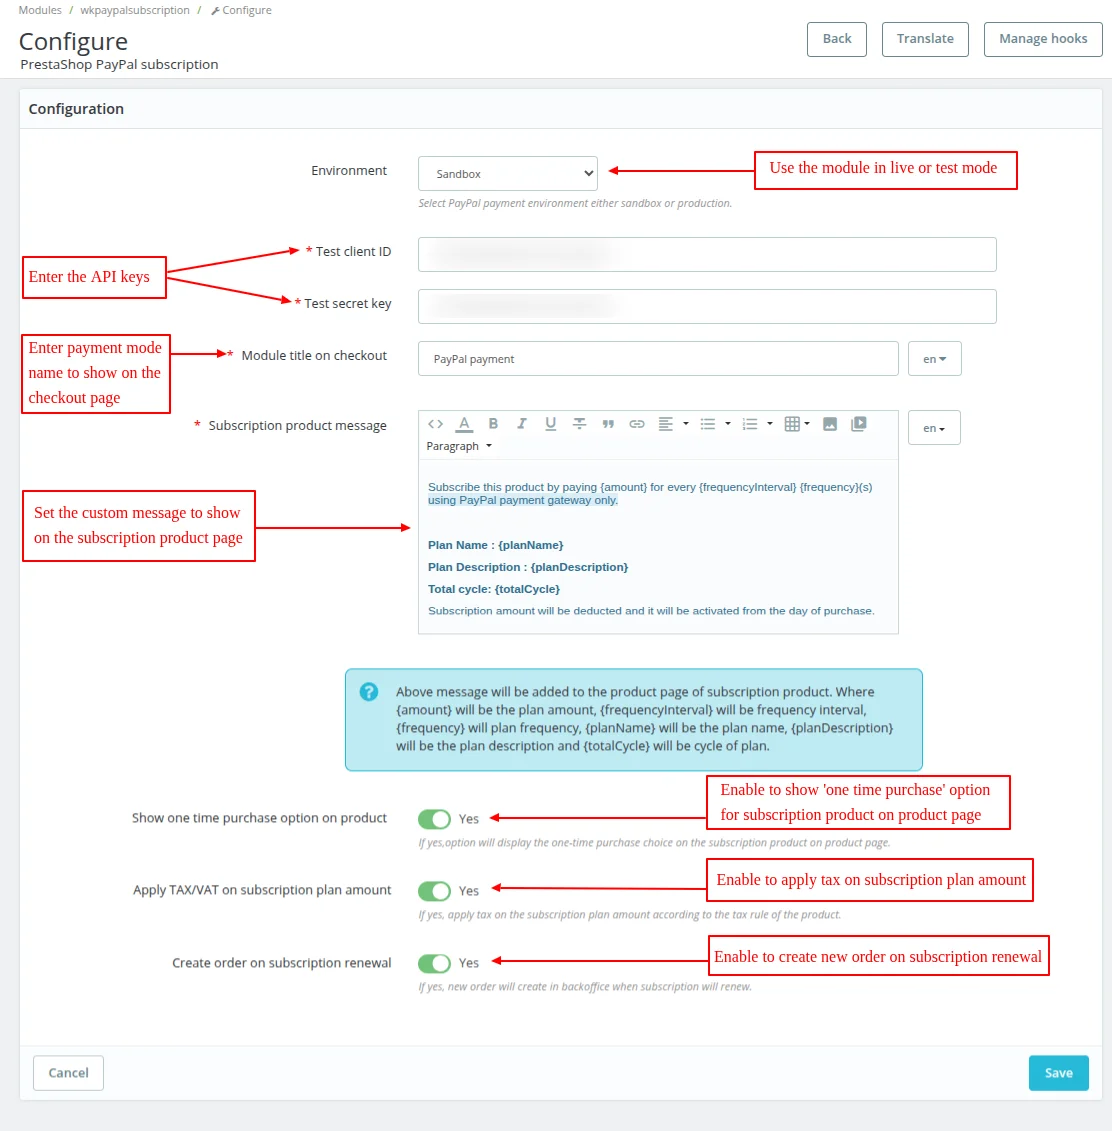
Admin can choose to show or hide the ‘one-time purchase’ option for subscription products and apply tax on the subscription plan amount.
Admin can also choose to enable or disable the creation of an order when the subscription is renewed.
How to get the API keys?
To get/generate the API keys, firstly visit the PayPal website.

After that, log in to your Paypal account using your credentials. In case, if you don’t have a PayPal developer account then create one.

On logging in successfully, the following page will open. Here, you will need to create an app first to get the API keys.
So, click on the Create App button & continue.

On clicking the button, the following page will open. Here enter the name of the app & select app type as “merchant” & proceed.

Now, on clicking the Create App button, API keys will generate. Copy the API keys from here & use it to configure the module.

So, this was all about the process to generate the API keys for the module.
Workflow
After the installation of the module, new tabs add under the PayPal section on the dashboard.

Create a Subscription Plan
To create a new subscription plan, click on the “Add Plan” button.

After clicking on the button, the following page will open. Fill in the details to create a new plan.
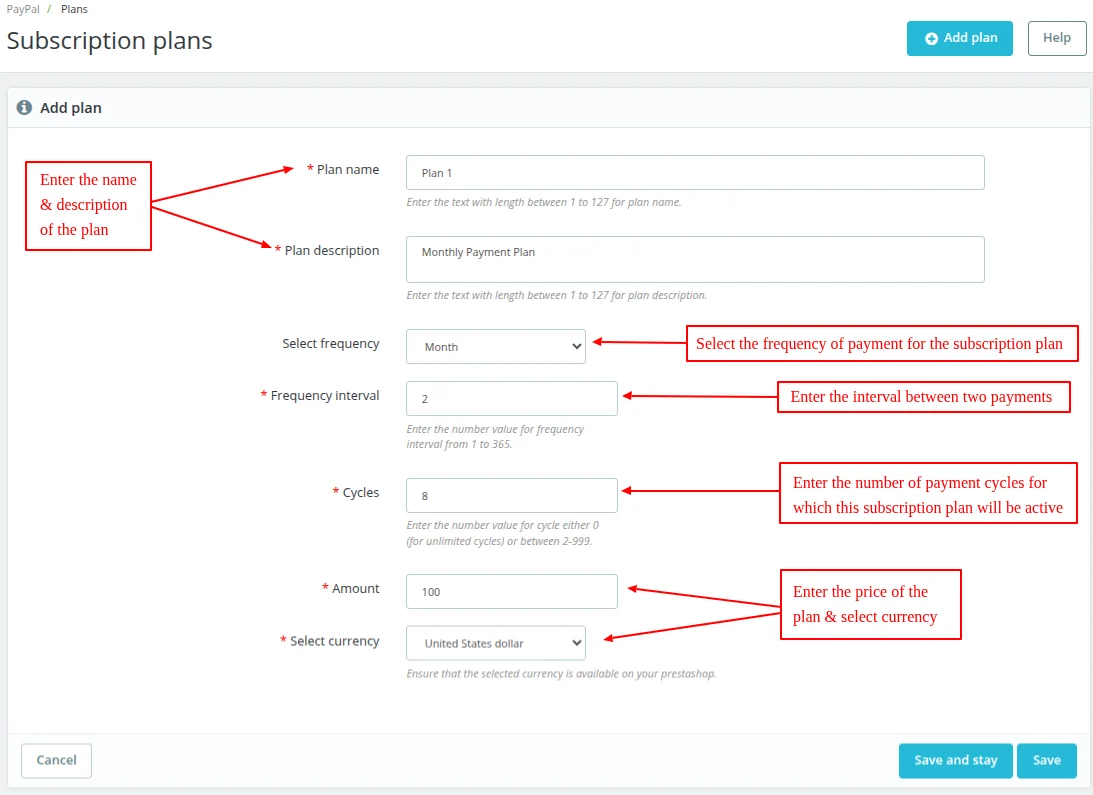
After saving the plan, a plan ID will generate. And, you can not edit any details of the plan apart from the price.

Assign products to the plan
Under the products section, an admin will get an option to assign plan to products.

To assign a plan to the product, an admin needs to do the following things.
- Select the subscription plan
- Choose the product to which the plan will be assigned.
- Select the combination(if it exists) of the product on which the plan will be active.

After assigning the plan, the product will be available in the list.

There is also another way to assign a plan on the product.
You can also assign a plan to a product from the modules section available on the edit product page.

How to subscribe to a product using PayPal?
The detail of the subscription plan is also available on the product page.

If admin has disabled the display of “one time purchase” option, then it will not be visible to customer on the product page.

A label for identification of the subscription product will show on the cart page. Also, as configured by admin from the back office, tax will apply on the subscription plan amount.

Now, on the checkout page, a customer will get an option to pay via PayPal.

On proceeding with the PayPal option, a new window will open where a customer will need to log in to his/her PayPal account.


On logging in successfully to PayPal, a customer will see all the payment modes added by him/her to their PayPal account.

After selecting a particular payment mode, a customer will need to agree to terms & conditions & subscribe to the product.

On making the payment successfully, the order will be placed. The details of subscription are also available on the order details page too.

The PayPal payment gateway will also be available for normal product purchases.


Customer Dashboard
On the customer dashboard, a new tab i.e., “My PayPal Subscription” will be available now.

Under the tab, a list of all the products subscribed by the customer will be available.

A customer can also see the list of all the transactions made against the subscription of a particular product.

At the PayPal end
The details of the transaction & the subscription are also available at the PayPal end. A customer can view these details under his/her PayPal account.


At the admin’s end
A list of all the subscriptions of all the customers is also available under the “PayPal Subscription” tab at the admin’s end.
You can choose to perform the following actions here:
- Cancel the subscription of a customer.
- View the transactions made against the subscription.
- View the subscription details of the product.

On clicking the “view” button, the following page will open where all the details of subscription will be available.

Whereas, on clicking the “view transactions” button, the following page will open.
Here, the list of all the transactions made against the particular subscription will be available.
To view the details of a particular transaction, click on the “view” button.

On clicking the “view” button, the following page will open. Here, all the details of a particular transaction will be available.
An admin can also choose to initiate a refund to the customer from here. You can either make the full refund or the partial refund to the customer.
In case of initiating a refund, the list of all the refunds initiated for a transaction will also become available on this page.

So, this was all about the PrestaShop PayPal Recurring Payment Gateway Module. I hope this document will help you in checking the functionality of the module in a better way.
Also, do let us know about your views in the comments.
Support
For any kind of technical assistance or query, please raise a ticket at http://webkul.uvdesk.com or send us a mail at [email protected]
Also, please explore our PrestaShop development services & vast range of featureful PrestaShop Addons.
Current Product Version - 4.1.0
Supported Framework Version - 9.x.x, 8.x.x, 1.7.x.x

Be the first to comment.