Prestashop Etsy Connector module offers shop owners to export products from Prestashop to Etsy & import products from Etsy to Prestashop.
The module with its import and export features make the management on both platforms or say shop very easy. You would easily be able to import the products to Etsy in one go.
And on getting the order of those products on Etsy, you can also import those orders to Prestashop.
To maximise efficiency, Prestashop Etsy connector module also allows you to keep products updated on Etsy as well with automatic updates via cron.
Note: Prestashop Etsy Connector module is compatible with latest Etsy APIs V3.
Features of the Prestashop Etsy Connector
- Export the products from the Prestashop site to Etsy.
- Import the products from Etsy to the Prestashop site.
- Map Etsy categories with Prestashop categories.
- Set default order status for orders imported from Etsy to Prestashop.
- Import the shipping templates from Etsy to Prestashop.
- Admin can add a new shipping profile and synchronize the shipping profile with the Etsy store.
- Import orders from Etsy marketplace by date, order status, and order id.
- Import or update Etsy marketplace products by listing Id.
- Update Products on Prestashop when product updates on Etsy through Cron.
How to install Prestashop Etsy Connector
For PrestaShop Etsy Connector module versions up to 4.0.1, you need to install/enable the Oauth libraries on your Prestashop server to install this module.

Note: The OAuth version must be 2.0.5 or above.
To install this module, please follow the below steps.
- Firstly, go to the module manager in the back office and click on ‘upload a module’.
- After that, drag and drop the module file or select the file from the system.
- In this way, the module installation will be successful.
Note: Please make sure to have an approved Etsy app and API keys before purchasing the module.


How to Get Etsy API Key
For creating app over Etsy API visit the link https://www.etsy.com/developers/register and register as developers.

Fill in the required details to complete the registration process. You can also register for Etsy developer account using your Facebook or Google account.
After submitting the details you will receive a confirmation email which you will need to verify to get access of developer account.
After verification, you need to click on create a new app.

Here you can register your app to get the access key and secret key.

While creating the app, you will need to fill the following details.
- Application Name- Enter the name of application, it will be visible to user while authenticating for getting OAuth Token and OAuth Secret.
- Describe your Application- Enter the description for your app, it will be visible to the user during authentication.
- Application Website- In this field, you have to enter the URL of your Prestashop website.
- What type of Application are you building?- In this field, you have to select Seller Tools option.
- Who will be the users of this application?- Select Just myself or colleagues option.
- Is your application commercial?- Select No in this field.
- Will your app do any of the following?- You have to select all the three options i.e Upload or edit listings, Read sales data and Send email.
Finally, verify the ReCaptcha & click on the Read Terms & Create App button.

Here mark the terms and conditions and then click on Create App.
Etsy API Credentials
After completing the above-mentioned steps, your app will create over Etsy developer account for accessing your Etsy data using REST API.

How to configure Prestashop Etsy Connector
After successful installation, the admin needs to configure the module.
API Settings
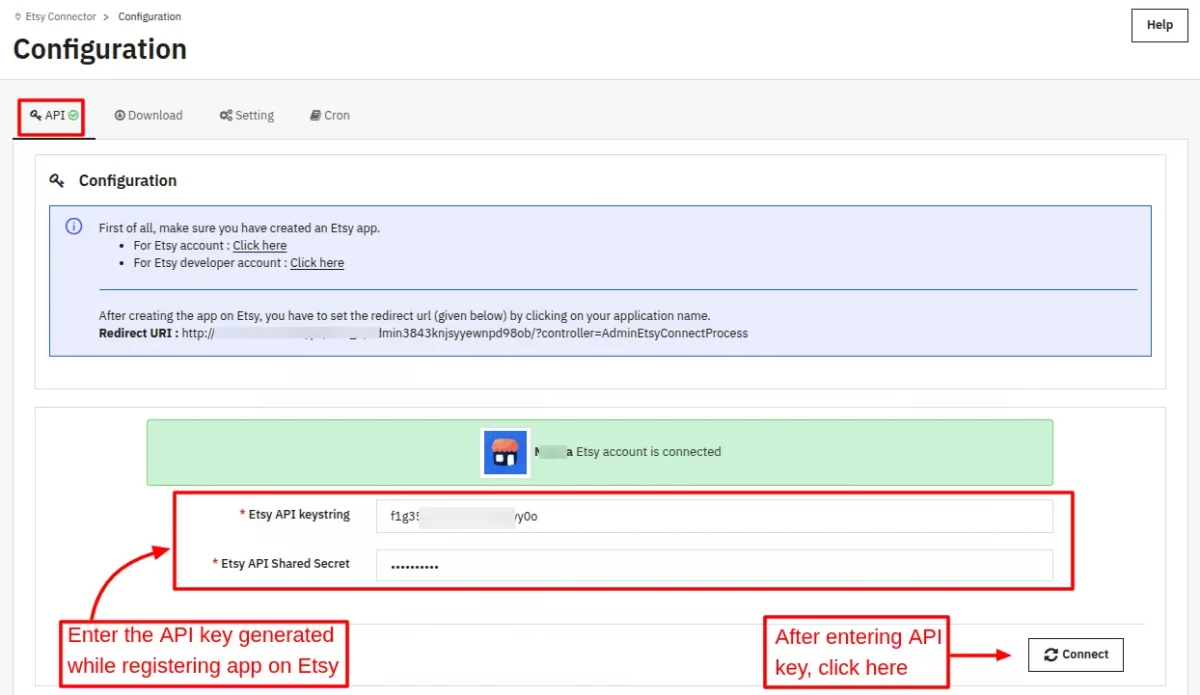
Here, the admin needs to enter Etsy API Keystring and the Shared Secret that he has received after registering the app on Etsy.
After entering Etsy Api keystring and the Shared Secret, click on “connect“.
After clicking on Connect, the admin gets redirected to Etsy website. Here, the admin needs to connect an application to his account and then click on “Allow Access“.
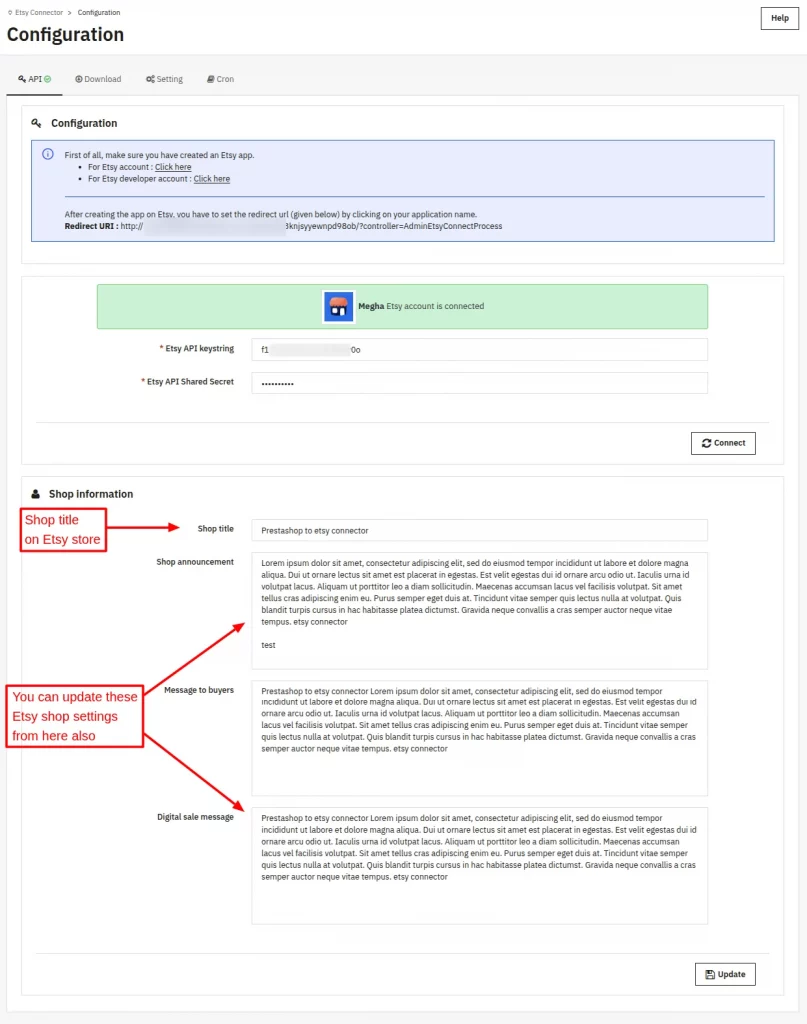
By clicking on Allow Access, admin can view:
- Shop information such as shop title, shop banner image, shop announcement, message to buyers etc.
- Welcome Message.
- Payment, shipping, and Returns & exchange policy.
- Additional information about the shop
Download

Under “Download” tab, the admin can download all the categories on Etsy website by clicking on “Download Etsy seller taxonomy“.
Settings
Import Settings
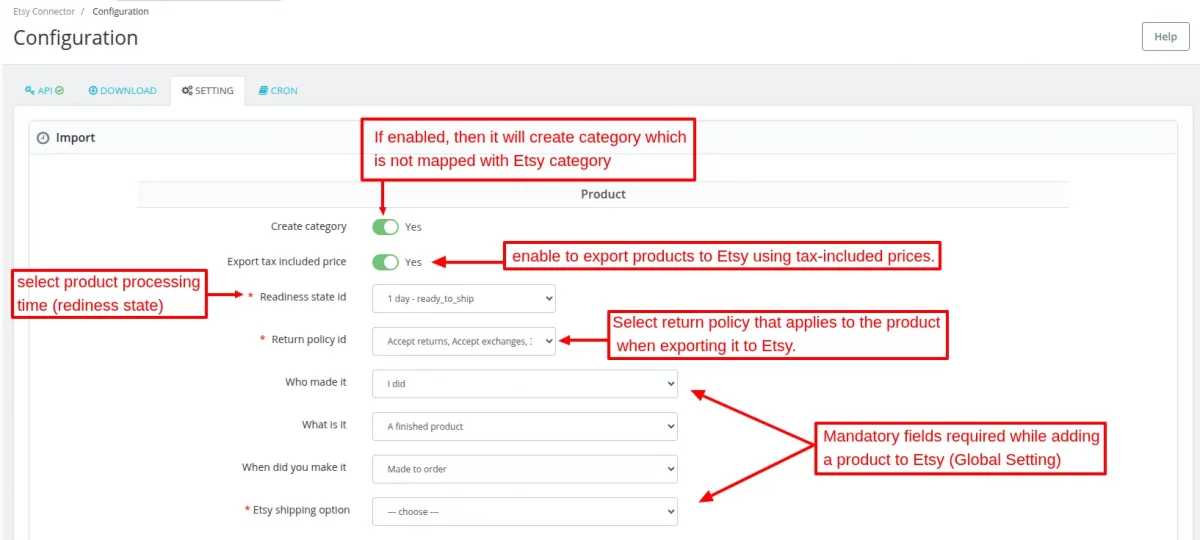
Product
In case, if a product is imported from Etsy to Prestashop without mapping to any category of Prestashop site.
Then, a category will automatically create for the imported product if Create Category field is enabled.
If selected No in create category field, then the category will not be created for an imported product.
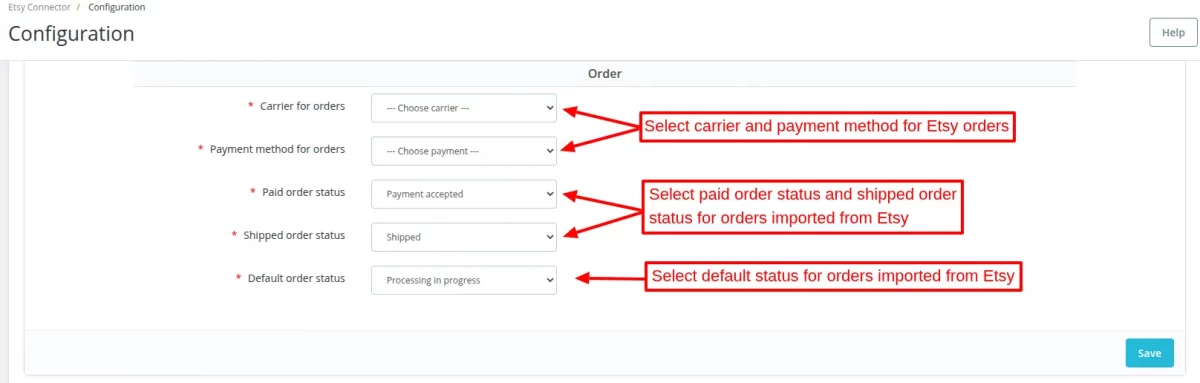
Order
- Carrier for orders – In this field, select carrier for the orders imported from Etsy to the Prestashop site.
- Payment method for orders – Select a payment method for Etsy orders.
- Paid Order Status – Select paid order status for the orders imported from Etsy.
- Shipped Order Status – In this field, select shipped order status for the orders imported from Etsy.
- Default Order Status – Set default order status for the orders imported from Etsy.
Real time update settings

- Prestashop to Etsy product quantity update – If set to YES, the product quantity will update on etsy if you receive orders on the Prestashop. For example, you sell one product P1 having 10 quantities on Prestashop then the product quantity will update as 9 on Etsy.
- Etsy Order status update with Prestashop order status – If set to YES, the order status on Etsy will update as soon as the order status on the Prestashop changes.
- Update Full Product detail – If set to YES, then all the changes to the product on the Prestashop site will also update on Etsy. If set to NO, then only quantity and price will update on Etsy.
- Update imported products on Etsy while Update on Prestashop – If you set this field and “Update Full Product detail” as YES, then if any updates to an imported product in the Prestashop will also update on Etsy automatically. If the admin has set Update Full product detail as NO then only price and quantity of a product will update Etsy.
- Update Exported Products on Etsy While update on Prestashop – If you set this field and “Update Full Product detail” as YES, then if any updates to an exported product in the Prestashop will also update on Etsy automatically. If you set “Update Full Product detail” to NO, then only price and quantity will update on Etsy.
CRON
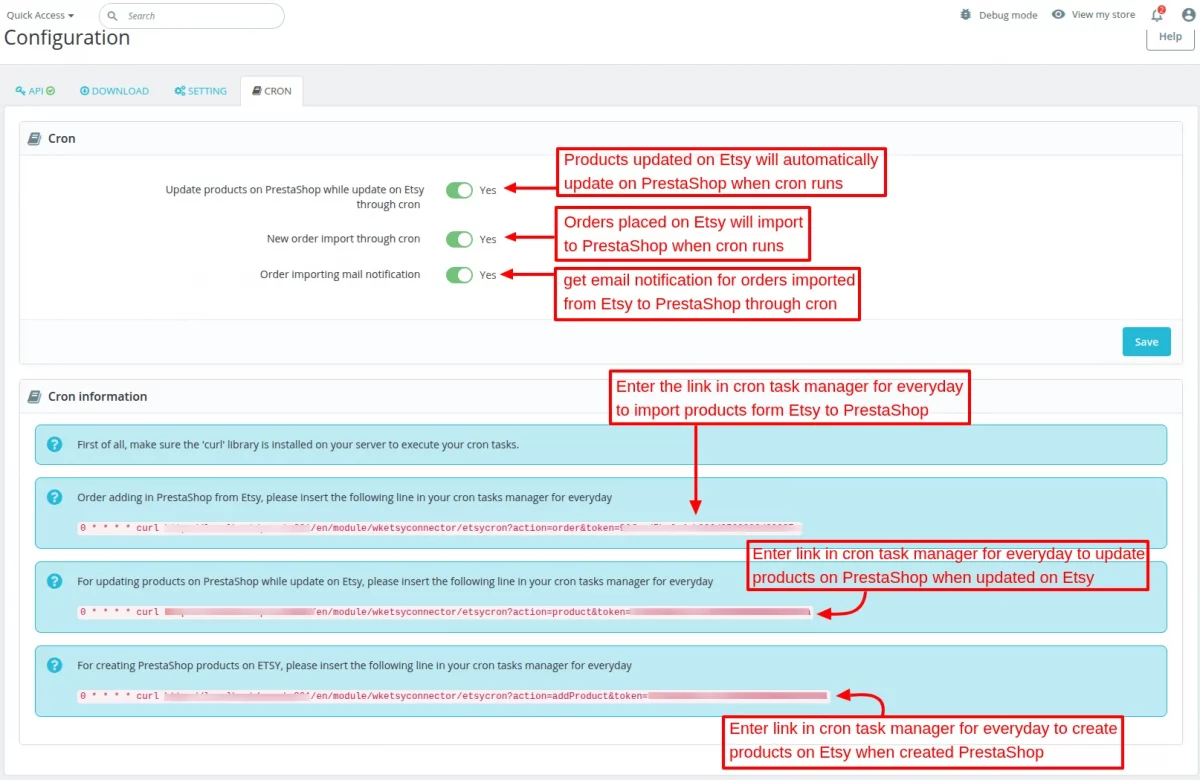
Update Products on Prestashop while update on Etsy through Cron- Enable the option to update the updated Etsy products on Prestashop on running the cron.
New Order import through cron– Enable this option to import all the Etsy orders to Prestashop on running the cron.
Order importing mail notification– Enable to get the mail notificiation when all orders import from Etsy to Prestashop through cron.
Category Mapping

Admin can map a Prestashop category to the Etsy Category by clicking on Map Category button.
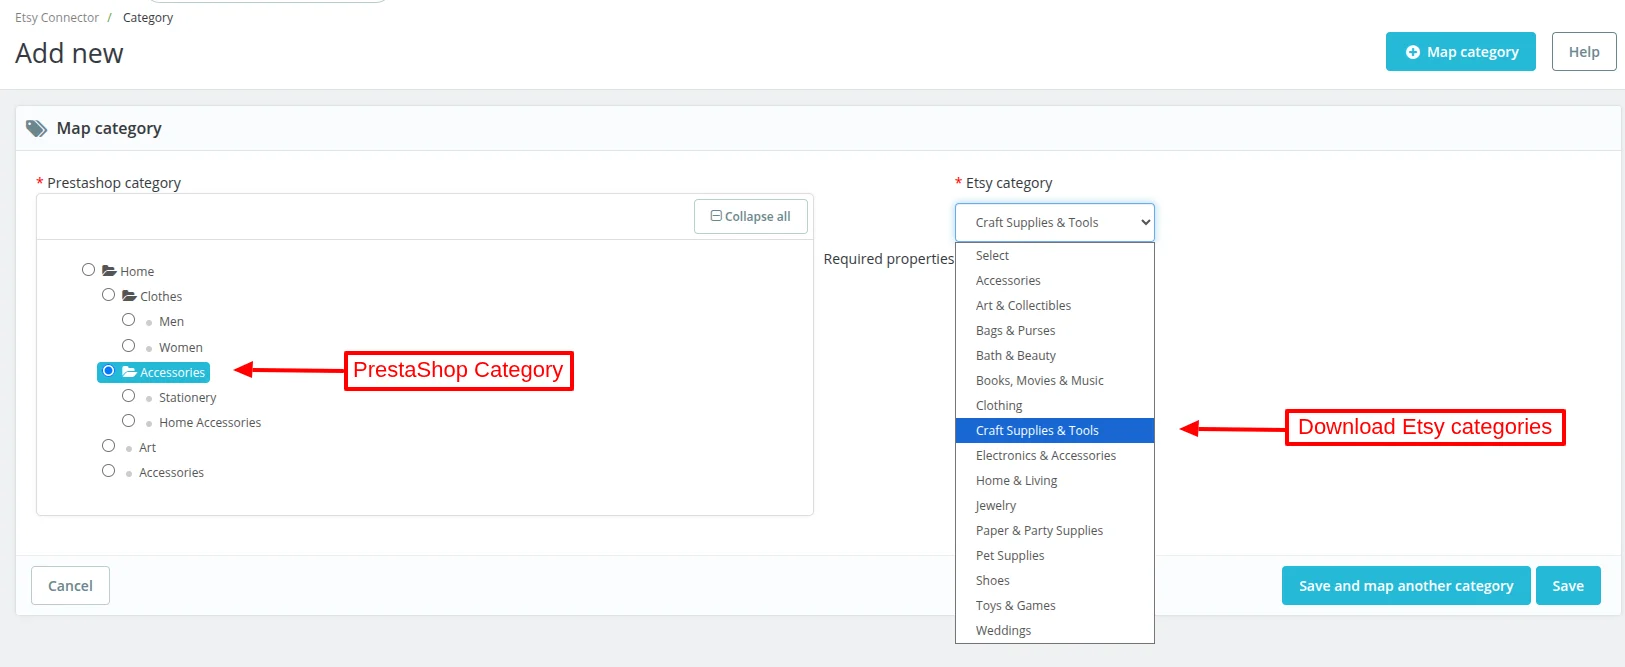
First of all, admin has to select a Prestashop category which he wants to map to the Etsy category and then selct Etsy category.
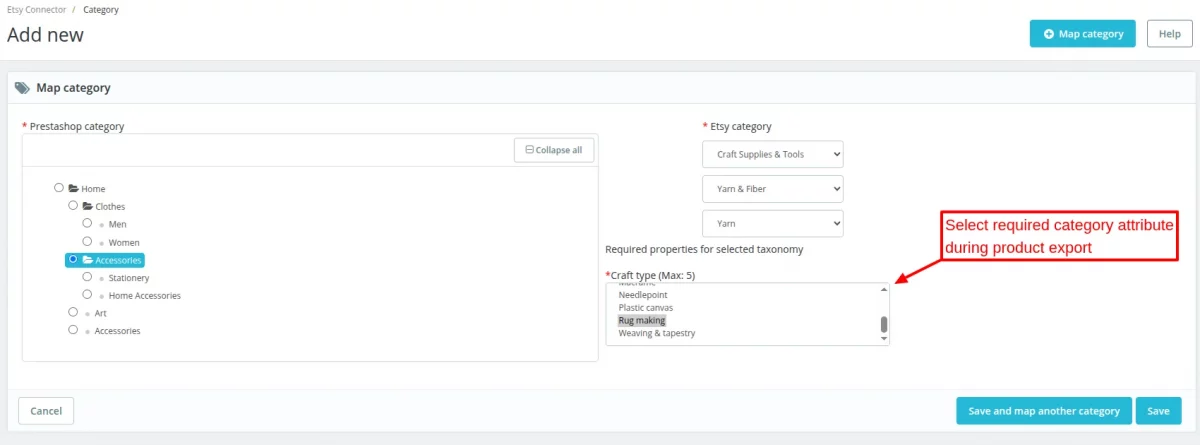
Admin can select the required category attributes for the selected category and then click on save.

Admin can also edit an already mapped category.

Shipping Profile
To manage Etsy shipping profile, go to Etsy Connector then Etsy Shipping Profile.

Click on Add shipping profile to add a new shipping profile.

Enter the shipping profile name, origin, processing time and set the fixed shipping costs. You can also set fixed shipping cost for each additional item ordered.
After entering all these details, if he clicks on Save and sync with Etsy then this shipping profile will synchronize to his Etsy account.
Import Shipping Template

Once the shipping templates have been synchronized successfully, admin can view it under Etsy Shipping Profile.

Sync Products

Import products from Etsy
Admin can import the products from Etsy by clicking on Import Products from Etsy button.

Sync Products from Etsy
Select Etsy Product Status
In Etsy, there are 4 types of product status:
- Active
- Draft
- Deactive
- Expire
First of all, the admin has to select the status of a product which he wants to import from Etsy to Prestashop site.
1. Import Only New Etsy Marketplace Products– Admin can import all the new products from Etsy to Prestashop site by clicking on Import Only New Etsy Marketplace Products.
2. Import or Update Etsy Marketplace Products– In case the products which are imported from Etsy to Prestashop site have already been synchronized before, then the imported products will get updated.
3. Import or Update Etsy Marketplace Product by ID– Admin can import the product from Etsy to Prestashop site by entering the Etsy marketplace product’s listing ID.

If admin has entered the listing ID of a product which has already been synchronized then in this case the imported product will get updated.
Export Products to Etsy
Admin can export the products from his Prestashop site to Etsy marketplace by clicking on Export Products to Etsy button.

Select action to export products
Admin can export all Prestashop products to Etsy or selected Prestashop products to Etsy.
If an admin selects All Prestashop products, then he will need to select the status of the products as Active. The reason behind this is that you can only export active products to Etsy.

After selecting the product status as Active product, admin has to click on Start Adding Products to Etsy button.
If the admin selects Selected Prestashop Products, then a list of Prestashop products will display on the screen.
Now an admin needs to select the products which he/she wants to export from the Prestashop site to Etsy.

After selecting the products, click on “Start Adding Products to Etsy” to export from Prestashop to the Etsy marketplace.
For exporting a product or products to the Etsy marketplace, the admin has to enter the product fields which are mandatory while adding a product to Etsy.
For this, please fill in all the mandatory fields to products which you want to export to the Etsy marketplace.
Check the screenshot below if you’re using Prestashop version lower than 9.1.0.

Check the screenshot below if you’re using Prestashop version equal to or above 9.1.0.
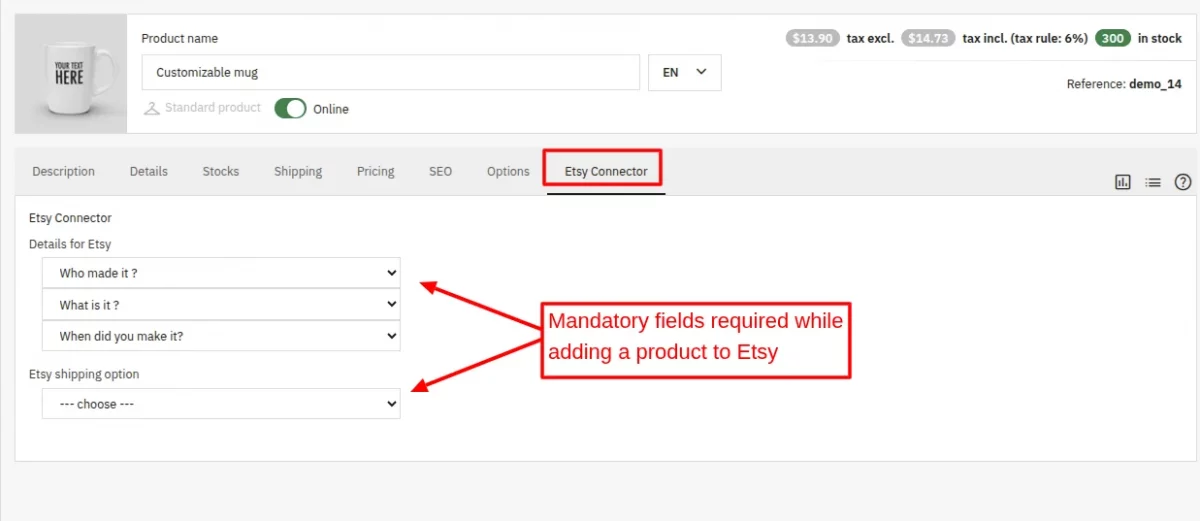
Enter the mandatory details of the product for Etsy & select Etsy shipping options to export products.
They are mandatory fields when it comes to exporting products from Prestashop to the Etsy marketplace.
Note: The module does not import or export virtual products as Etsy does not allow it via API.
Revise on Etsy
If admin wants to revise the product information or change the status of the product then he can do it by clicking on Revise on Etsy.

First of all, the admin needs to select the Etsy Product status and on the basis of status, select the products to revise on Etsy. After selecting the product, click on Revise product button.
- If the product is in a draft state and the admin wants to update the status from Draft to Active on Etsy then he has to renew the product which is chargeable.
- Suppose the product is in expire state and the admin want to update the status from Expire to Active on Etsy then he has to renew the product.
- If the product is in a sold-out state and the admin wants to update the status from Sold out to Active then he has to renew the product.
Sync Orders

Admin can import orders from Etsy marketplace to Prestashop site by clicking on Import Orders from Etsy button.

Sync Orders from Etsy
- Import Etsy Marketplace Orders
Admin can import Etsy marketplace orders either by Date or Order status.
- Order import by Date
If admin wants to import the order by date, he needs to enter From Date and To Date during which orders have been received on Etsy marketplace.

After entering date, click on FETCH button to import the orders from Etsy to Prestashop site.
- Order import by order status
Admin can also import the orders from Etsy marketplace to Prestashop site by order status.

Admin has to select the status of an Etsy order which he wants to import and click on FETCH.
Note: The orders in open, completed, unpaid and unshipped status will import to Prestashop.
2. Import Etsy Marketplace Order by Order Id
Admin can import orders from Etsy marketplace to Prestashop site by order or receipt id.

Admin has to enter the receipt id of an order which he wants to import and then click on IMPORT.
Etsy Customers

Admin can view Prestashop customer id, Customer’s name, email id, city, and country. Admin can also edit the details of customers by clicking on View button.
When the admin import the orders from Etsy, the details of the customer is available in the orders. Using the details of customer from the order, a customer automatically creates on the Prestashop.
So, this was all about Prestashop Etsy Connector Module. I hope this document will help you in checking the functionality of the module in a better way.
Also, do let us know about your views in the comments.
Support
For any kind of technical assistance or query, please raise a ticket or send us a mail at [email protected]
Also, please explore our Prestashop development services and a vast range of quality Prestashop addons.
Current Product Version - 4.3.1
Supported Framework Version - 9.x.x, 8.x.x, 1.7.x.x

Be the first to comment.