Prestashop Braintree Payment: Integrate your PrestaShop store with Braintree and offer your customers secure and flexible payment options with a smooth checkout experience.
Let your customers pay with a credit card, PayPal, or Google Pay while placing orders.
Assign Braintree subscription plans to products and allow customers to subscribe to the products they may need regularly.
- Accept payments via credit cards, PayPal, and Google Pay.
- Offer subscription on products.
- Easily manage the refunds.
- 3D secure authentication
- MultiShop Compatible.
Note:
- You must have PHP 7.2(or above) to use Braintree payment with 3D secure 2 on Prestashop.
- Prestashop Braintree Payment Gateway module is compatible with PSD2 SCA(Strong Customer Authentication).
- Prestashop Braintree Payment Gateway Version 1.6 is not compatible with PSD2 SCA as PHP 7.2 version is required for 3D secure and Prestashop Version 1.6 is not fully compatible with PHP 7.2.
Features of Prestashop Braintree Payment Gateway
- Accept online payments via Braintree, PayPal, and Google Pay on your store.
- Use the module in the sandbox or production mode.
- Create subscription plans from Braintree account and assign them to your products.
- Customers can subscribe to the products using Braintree payment gateway.
- View a list of all the transactions made via Braintree.
- Easily process the refunds from the back office.
- Customers can view and manage their subscriptions right from their accounts.
- View a list of customers who have subscribed to the products.
- Both admin and customers can cancel the subscription.
- Translations of the module are available in these languages – Arabic(ar), German(de), Spanish(es), French(fr), Italian(It), Japanese(ja), Dutch(nl), Portuguese (pt).
How to Install Prestashop Braintree Payment Gateway
- Firstly, go to the module manager in the back office and click on ‘upload a module’.
- After that, drag and drop the module file or select the file from the system.
- In this way, the module installation will be successful.


Module Configuration
After the successful installation of the module, the admin needs to configure it.

Under Configuration, the admin:
- Can select the mode in which he wants to use the module.
- Needs to specify the merchant ID and Braintree default merchant account ID he obtained from the Braintree account.
- Can allow the customers to pay with PayPal and Google Pay.
- Has to specify the private and public keys he got from the Braintree account.
- Needs to specify the merchant ID in case of product mode.
How to get API Keys
To get the API keys, the admin needs to have an account on https://www.braintreegateway.com/login.
For testing purpose, the admin requires the sandbox keys. For the live site, the admin requires production keys.

After logging in, go to my user under Account. Here, the admin will find the API keys.

Now, click on the View API Keys button.


Note: In sandbox mode, 3D Secure is automatically enabled for customers.
Whereas, 3D secure is disabled for production accounts. It is compatible with certain Braintree configurations in specific regions.
Contact Braintree to integrate 3D Secure with the production account.
Front End Workflow
After successfully configuring the module, an option to pay via Braintree gets available for the customers on the checkout page.

On selecting Pay by Braintree, a customer gets an option to pay via card, PayPal, or Google Pay for the order.

Card Payment
On selecting the card option, a customer needs to enter the card and expiry date to proceed with the payment. After specifying the card details, click on validate payment button.

Now, a customer has to enter the OTP received on phone to validate the card details.

Once the card details are validated, the customer can confirm the Payment to continue with the Checkout Process.

Payment method used for placing an order will display on the order confirmation page.

Pay Via PayPal

Click on PayPal checkout option to initiate payment via PayPal. On clicking the button, a customer redirects to the PayPal login page.
Here, a customer can enter the login credentials and proceed to pay for the order.

Pay Via Google Pay
Click on GPay option to initiate payment via Google Pay. On clicking the button, a customer redirects to the Google login page.
Here, a customer can enter the login credentials and proceed to pay for the order.

Recurring Workflow
For PrestaShop 9.1.0 and above
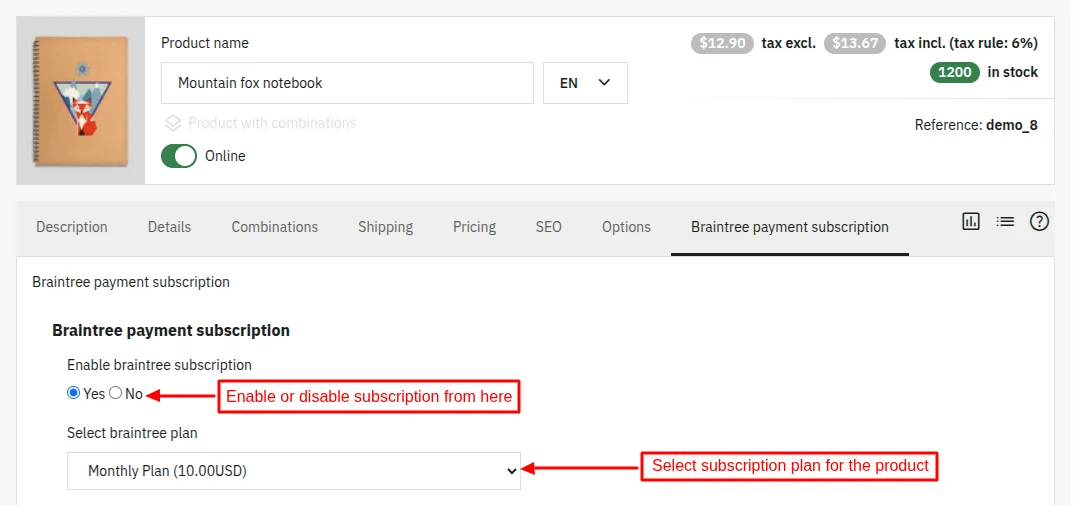
To assign a subscription plan to a product in the PrestaShop version 9.1.0 or above, go to the ‘Braintree payment subscription’ tab.
For PrestaShop below 9.1.0
To assign a subscription plan to a product in the PrestaShop version below 9.1.0, go to the modules tab.
Kindly note that the admin has to create the subscription plans from their Braintree account.


Once the admin has assigned a plan to a product, the customers can view the subscription details on the product page.

A label denoting the subscription product is displayed on the shopping cart page.

A customer can only purchase one quantity of the subscription product at once. If a customer tries adding more than one quantity, then a message will display as shown in the below screenshot.

Also, a customer cannot add a subscription product and regular product in a single cart.
To make the payment for subscription-based products, the customer needs to pay via Braintree Payment Method.
After placing an order, a customer can view the amount paid for the product and subscription amount on the order confirmation page.
The admin can also view the subscription details on the order details page.

Braintree Payments
After the installation of the module, two new tabs, Transaction and Customer Subscriptions get available in the back office.

Transactions
Under the tab, the admin can view a list of all the transactions done via Braintree Payment Gateway. Admin can view the transaction amount and currency used for the transaction.
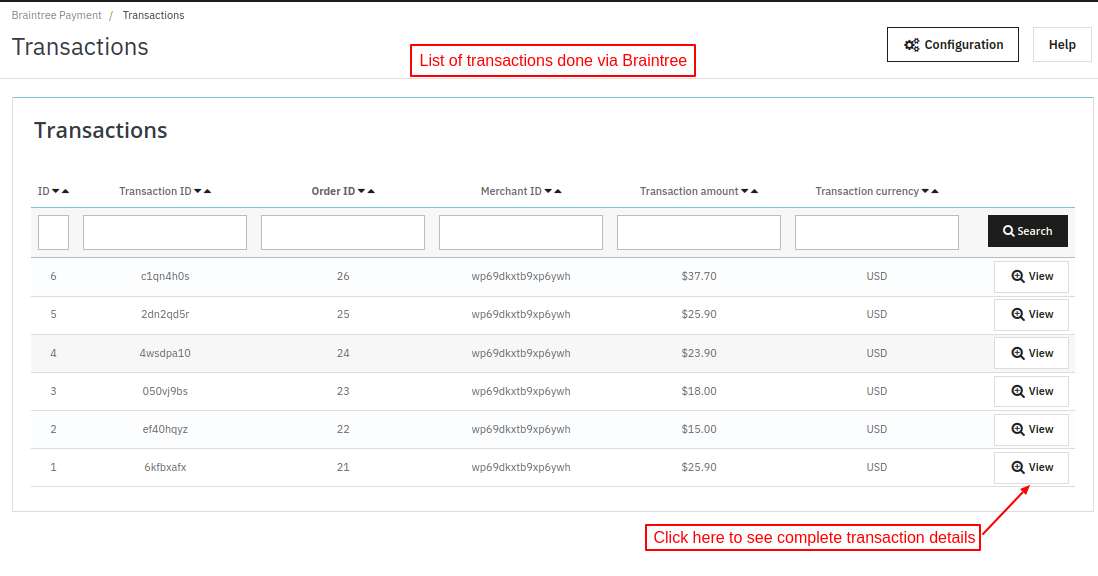
Click on the View button to see the complete transaction details.
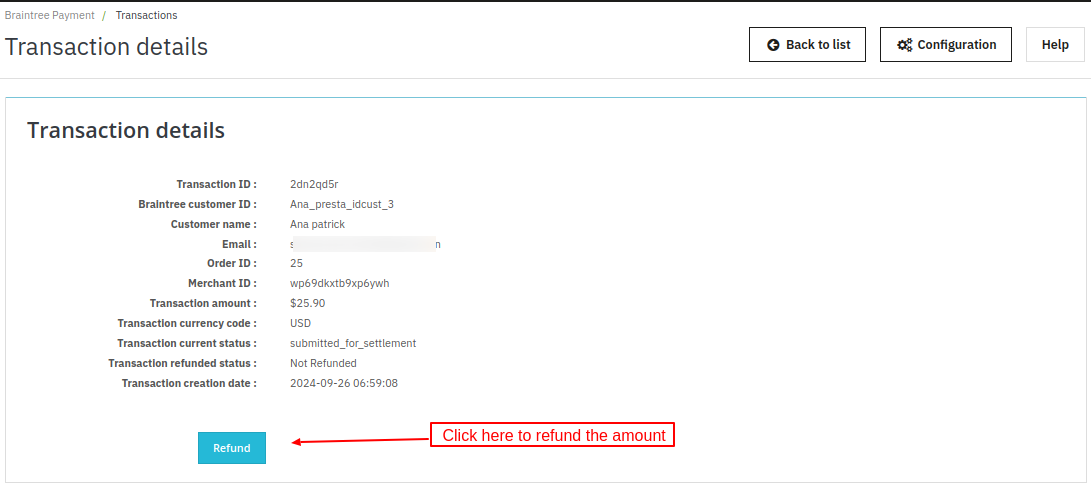
If the status is settled, then it means the amount is transferred to the admin account.
Now, if a customer initiates the refund request, then the admin can refund the amount by clicking on the refund button.
Note:- If a customer initiates the refund request and the status is submitted for settlement, then the admin can refund the amount by the void transaction.
This will change the status to “voided” and then Braintree will refund the amount to the customer.
Customer Subscriptions
Under this tab, the admin can view a list of all the customers and products subscribed by them. Also, the admin can see complete subscription details by clicking on the View button.

On the subscription details page, the admin can view the billing day, next bill amount, next billing date, etc.
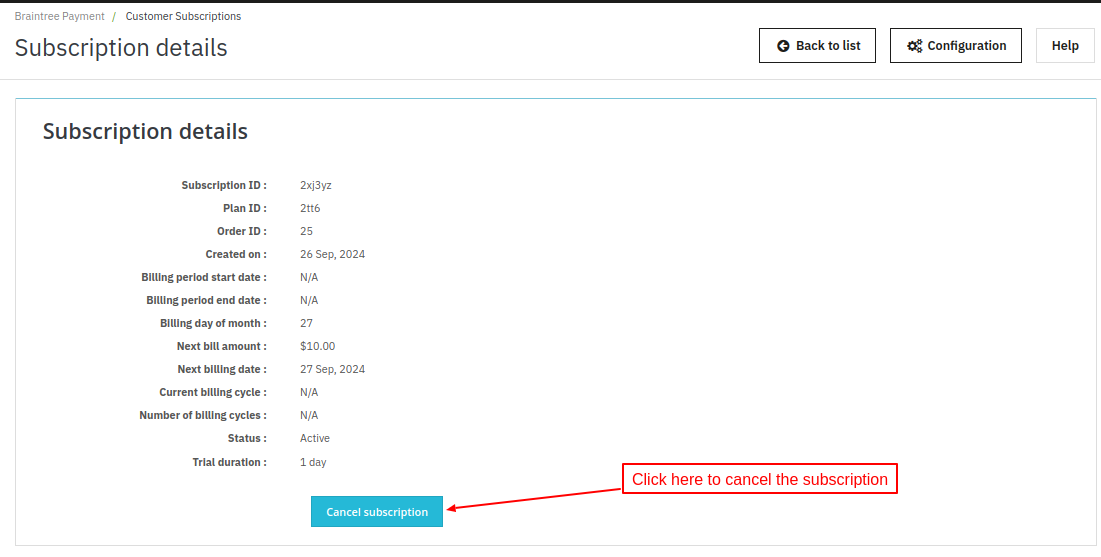
The admin can also cancel the subscription by clicking on the cancel subscription button.
Customer End
After the installation of the module, a new tab “My Braintree Subscription” gets available in the customers’ account. From here the customers can view a list of products subscribed by them.


A customer can view the first billing date and subscription status. Also, the customer can cancel the subscription by clicking on the Cancel subscription button.
Click on the view button to see the complete subscription details.

So, this was all about the Prestashop Braintree Payment Gateway module. I hope this document will help you in checking the functionality of the module in a better way.
And, do let us know about your views in the comments.
Support
For any kind of technical assistance or query, please raise a ticket or send us a mail at [email protected]
Also, please explore our Prestashop development services and vast range of quality Prestashop addons.
Current Product Version - 8.0.4
Supported Framework Version - 9.x.x, 8.x.x, 1.7.x.x

3 comments
For the same, please raise a ticket at webkul.uvdesk.com and we will assist you.
Regards,
Neha
No CVC field and PAYPAL blue button is visible