With Prestashop Adyen Payment Gateway, the admin can easily provide a new payment gateway named “Adyen” to their customers for standard as well as subscription based products.
Buyers can pay the order amount through this payment gateway and for the subscribed products too.
The collection of payments will occur directly from the customer’s account based on the subscription plan of the buyer.
Admin can even refund the product amount through the module if the buyer has requested the refund by any means.
NOTE
- Prestashop Adyen Payment Gateway module is compatible with PSD2 SCA(Strong Customer Authentication).
- Adyen is no longer processing transactions through Hosted Payment Pages (HPP).
Features of Prestashop Adyen Payment Gateway
- Online payment via Adyen Payment Gateway.
- Reliable, Secure, and Easy to use.
- Different payment methods are available for the customers to pay.
- Admin can configure the module for test purposes or for live mode.
- An admin has to provide the API keys as per the mode selected.
- Admin can view the list of orders placed through Adyen separately in a new tab named “Transactions”.
- Admin can also view the order detail by clicking on any of the orders from the list.
- An admin can refund either the full or partial amount to the buyer.
- Admin can specify the amount for a partial refund.
- The refunded amount will be updated on the Transaction detail page.
- Admin must use notification URL in his/her CA account for getting order as ‘Payment Accepted’.
- If the customer is using the 3D secure card, he/she needs to authenticate by entering the username and password.
- Module translations available in these languages – Arabic(ar), German(de), Spanish(es), French(fr), Italian(It), Japanese(ja), Dutch(nl), Portuguese (pt), Romanian (ro), Russian(ru).
Recurring Features
- Admin can create the Adyen plan and specify the plan name.
- Admin needs to specify the amount & the duration of the subscription plan
- As per the subscribed plan, the subscription amount will be deducted from the buyer’s account.
- Admin can assign plans to products in two ways i.e either from the edit product page or from the “Products” tab.
- An admin can view the list of subscribed customers.
- Admin can also cancel the subscription of any customer.
- Buyers can view the subscription details on the product page.
- Subscription is only possible through the Adyen payment gateway.
- Customers can view the list of subscriptions in a new tab named as “My Adyen Subscription”.
- The amount displayed in the cart is only the product amount. The subscription amount will be automatically deducted while paying through the Adyen gateway.
- The detail of the full payment made by “Adyen payment gateway” will display on the order confirmation page.
- Admin can view the subscription details on the buyer’s order detail page.
- Add chosen option for creating product subscription in the Back office.
Note: PrestaShop Adyen Payment Gateway module is compatible with catalog’s new product page.
Installation
- Firstly, go to Module Manager in the Back office and click on ‘upload a module’.
- Now, Drag and drop the module file or select the file from the system.
- In this way, the module installation will be successful.


Configuration
After successful installation, the admin has to configure the module. Admin will provide all the Adyen API details here. You can use the module either for test or live purposes.


Please note that Adyen is no longer processing transactions through Hosted Payment Pages (HPP).
In this way, admin can successfully configure the module.
Note :
Cron Setting –
For recurring payments according to plan, Admin has to set the CRON job for every day. Set the following URL to the CRON tab.
0 0 * * * curl http://www.sitename.com/module/psadyenpayment/wkadyenupdatedatabase?token=your_token
You have to replace the string “www.sitename.com” with your site link.
Note
Admin has to enter the webhook URL on the Adyen Payment site to generate the orders with the order status as “Payment Accepted”.
Otherwise, the order generates with the order status as “Awaiting Adyen Payment”.
Admin can add webhook URL by following the path written below : CA Account -> Developers -> Webhooks -> Webhook -> Add standard webhook
webhook URL – http://www.sitename.com/module/psadyenpayment/paymentnotification
*The webhook setting will work only on your Live site URL*


How to get API credentials
To get the APIs of Adyen Payment Gateway, the admin has to create an account on Adyen payment gateway.
Create live account from here https://docs.adyen.com/get-started-with-adyen#apply-for-your-live-account
Admin can login to their accounts from here-
For Test purpose– https://ca-test.adyen.com/ca/ca/login.shtml
For Live purpose- https://ca-live.adyen.com/ca/ca/login.shtml

After logging in, the admin can generate a username and password by navigating through Developers> API credentials.

Click on the “Create new credential” button on the API credentials page.

On clicking the Create new credential button, a popup appears on the page where the admin has to select the credential type and then click on create credential button.

On clicking the create credential button, a new page Configure API credential opens. The admin can view username under General settings and generate password under Server settings.

The admin can generate the server key from the same page. Simply, click on API key under Server Settings.

Under Client settings, the admin can generate the client key and add allowed origins.
Under Add allowed origins, you must add PrestaShop domain on which you want to allow web drop-in form.

Admin can create a new user account by clicking on the “Create new user” button on the Users page.


Live URL prefix

Get the prefix from your live Customer Area under Developers > API URLs > Prefix.
Note: URL prefix is mandatory for the live payments.
Back-end view
After the successful installation of the module, a new tab “Adyen” adds to the back office.

Transactions
Admin can view the list of all the transactions made through the Adyen payment gateway. Go to Adyen -> Transactions.

Plans
To manage the recurring payment method, the admin has to create various plans for subscriptions. Go to Adyen -> Plans.

Once the admin clicks on the Create Plan, a new page will open where the admin will have to enter the Plan details.


Products
After the creation of plans, admin has to assign Adyen subscription plans to products.


You can also assign a particular plan to a product from the edit product page.
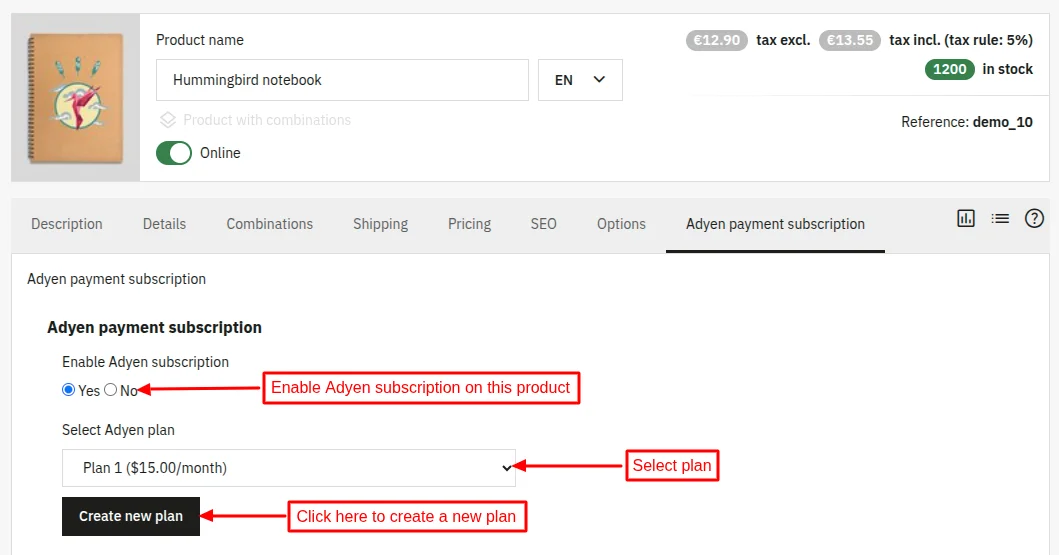
For PrestaShop 9.1.0 and above
To assign a subscription plan to a product in the PrestaShop version 9.1.0 or above, go to the ‘Adyen payment subscription’ tab.
For PrestaShop below 9.1.0
To assign a subscription plan to a product in the PrestaShop version below 9.1.0, go to the modules tab.

After clicking on the configure button, the following page will open. Here, select the plan and assign to this particular product. You can also create a new plan from here.

Subscriptions
Admin can view the list of those customers who have purchased the product with subscription plans.

Standard workflow
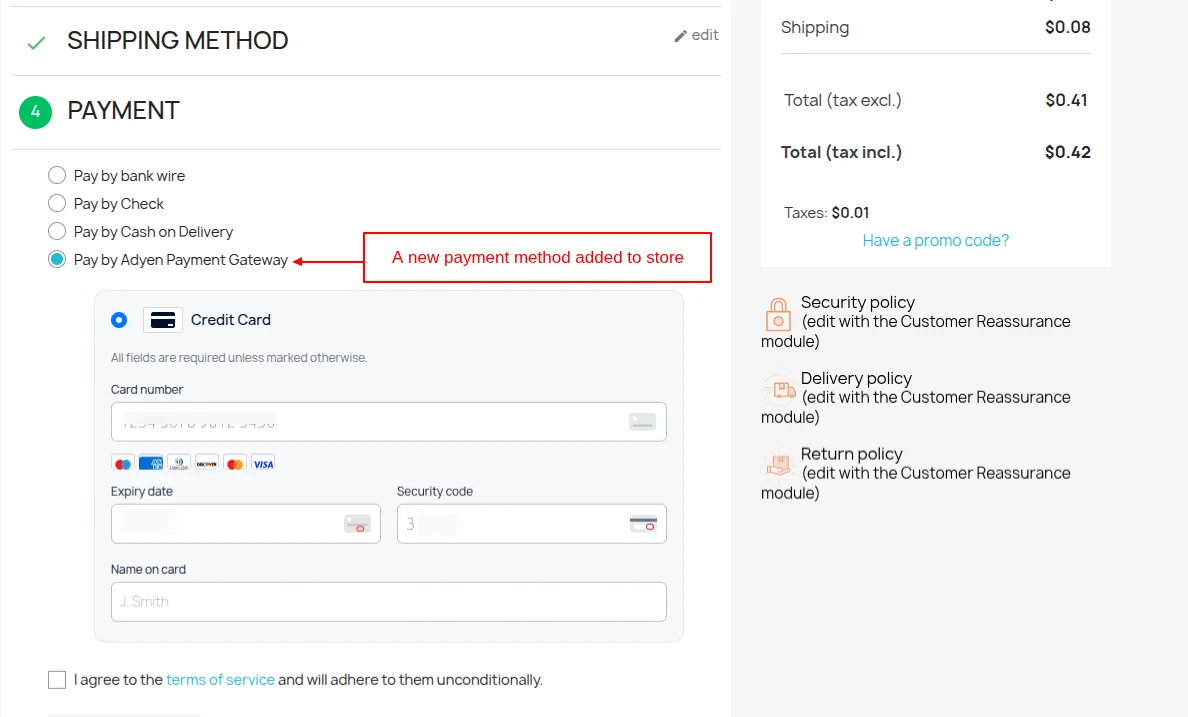
After the successful configuration of the module, the buyer can view the Adyen payment gateway to purchase in the store.

Order created

Admin can view the created orders in the back office under Orders tab. The status of the order is Payment Accepted since admin has set the notification URL in his/her CA account on Adyen Payment site.

If the payment via HPP is disabled, then the customer will not redirect to the Adyen Payment site. Instead, he/she can make the payment from the store itself using form generated by Adyen Web Drop-in.
To use Web Drop-in, it is must to have the client and server key.
Also note that in this case, customers can only make payments using their card details. Currently, other payment methods supported by Adyen are not available to use in the module when HPP is disabled.
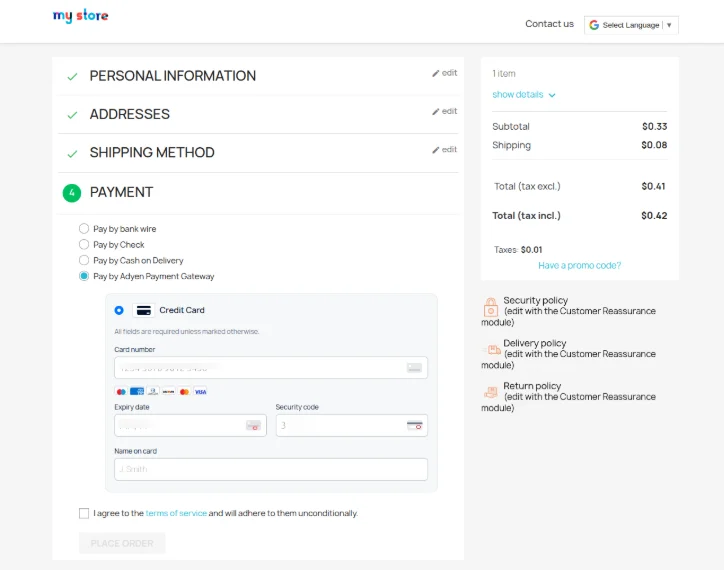
In this way, the customer can order using Adyen Payment Gateway.
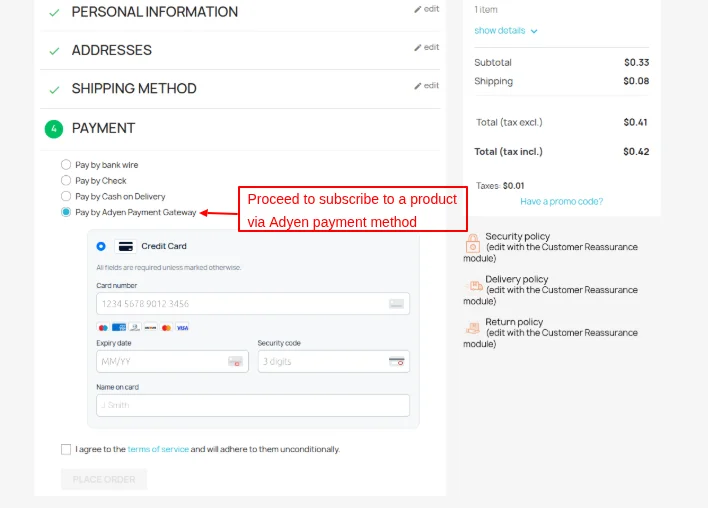
Recurring workflow
Once the admin adds the subscription plan to a product, then that product will be a subscription based product.


Order is created.

After the customer places an order, admin can view the detail of Adyen payment on the order detail page. Adyen Payment details on the order of subscription based product.

Subscriptions
In this section, admin can view the list of customers who have purchased the Adyen Subscription based products.
If required, admin can also cancel the subscription.

Transactions
In this section, admin can view the list of orders whose payment has been made through Adyen Payment gateway.

On clicking “View Details” admin can refund either full or partial product amount to buyer, if buyer has requested for the refund by any means.

Here, admin can also see all the details in the Adyen account.


In case if the payment of any order is pending from Adyen end then admin can manually mark that transaction as accepted from here.

Front-end view
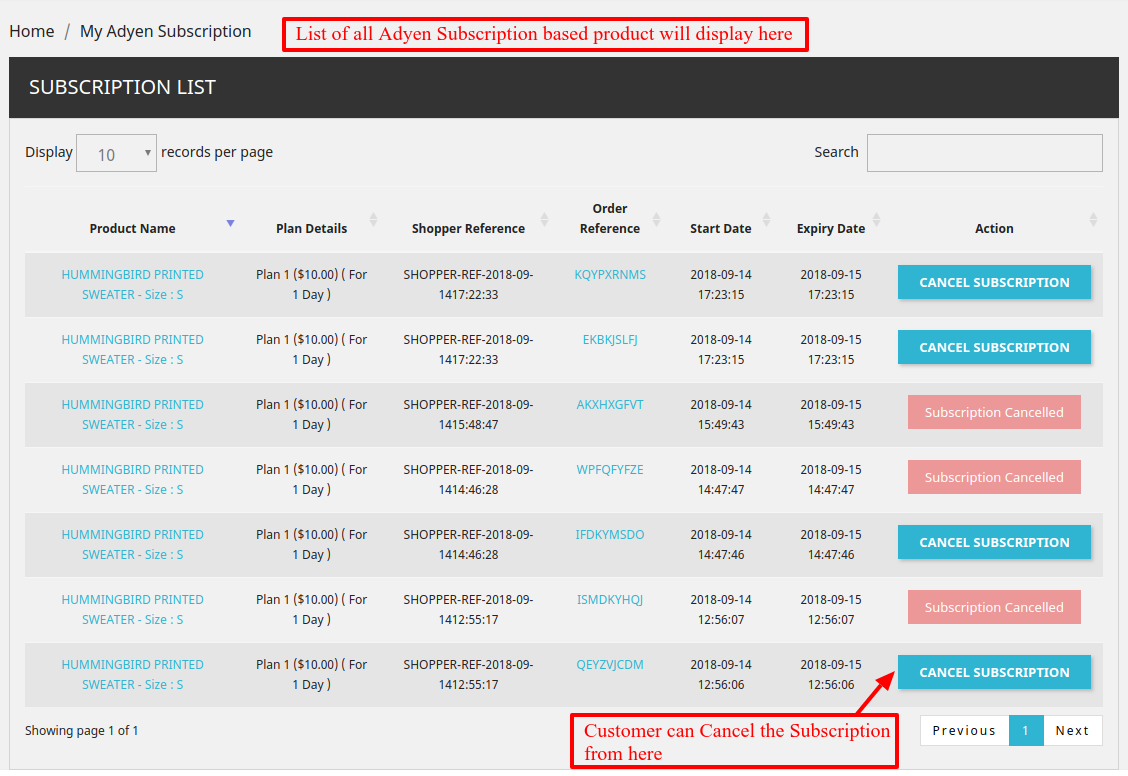
Buyer can view the list of their subscription in the new tab. Go to Your Account -> My Adyen Subscription

In this way, admin can successfully provide subscription based products to buyers.
Buyers can easily make the payment for the same and the amount will automatically deducted from their Adyen account regularly as per the plan.
Note
Payment Methods
To check which of the payment methods are available with the Adyen payment gateway, admin can go to Adyen account -> settings -> payment methods

If admin wants to add another payment methods with Adyen payment gateway, then they need to contact Adyen for the same.
This was all about Prestashop Adyen Payment Gateway Module. I hope this document will help you in checking the functionality of the module in a better way.
And, do let us know about your views in comments.
Support
For any kind of technical assistance or query, please raise a ticket or send us a mail at [email protected]
Also, please explore our Prestashop development services and vast range of quality Prestashop addons.
Current Product Version - 6.1.2
Supported Framework Version - 9.x.x, 8.x.x, 1.7.x.x

Be the first to comment.