PrestaShop Advanced Multi-Vendor Marketplace module allows the shop owners to convert their PrestaShop store into a full-fledged marketplace.
Sellers can easily register and list their products. Charge commission to the sellers on the products they sell.
A separate panel for the sellers from where they can manage products, orders, profile, transactions, brands, suppliers, and carriers.
Boost the shopping experience of your customers by providing them with a wide range of products from multiple vendors.
NOTE: PrestaShop Advanced Multi-Vendor Marketplace module is compatible with PrestaShop multi-store feature.
Key features of PrestaShop Advanced Multi-Vendor Marketplace
- Simple Vendor Registration: ‘Become a Seller’ option is given at the multiple positions on the store. On clicking this option, a seller request form appears on the page. In the form, a user needs to provide the details required to complete the registration.
- Flexible Commission: Set a global commission rate for all vendors or a separate commission rate for specific vendors.
- Seller Management: Easily view and manage the list of sellers from the back office. The store owner can approve, disapprove, or delete the seller.
- Profile Management: A separate section is available in the panel for sellers to manage their profiles. The sellers can add social links, shop banner, shop logo, address details of the shop, etc.
- Product Management: Sellers can add new products and once approved by the admin from the backend, they can sell their products on the marketplace. Allow sellers to add brands & suppliers and assign products to them. Add customization fields to products and let customers customize the products by adding the desired file and text. Create specific price by adding discount on products based on currency, country, customer groups, etc.
- Available Product Types: The extension lets sellers create standard, pack, and virtual product types.
- Order Management: Sellers can view order details, their earnings from a particular order, and update order status.
- Track Transactions: Sellers can view their earnings from all the transactions, withdrawal & due amount, and admin commission.
- Comprehensive Dashboard: A separate dashboard for the sellers to view daily, weekly, monthly sales, and recent orders.
- Vendor Reviews and Ratings: Allow customers to give ratings and reviews to the sellers. The store admin can enable the manual approval of the reviews or make it auto-approved. Ratings given by customers are displayed on the seller’s product and profile page.
- Email Notifications: Configure various events for which emails will be sent to the vendors.
Features of PrestaShop Advanced Multi-Vendor Marketplace
Seller Profile Management
- Enable the manual approval of the seller’s request as well as reviews.
- Allow sellers to activate or deactivate their shop.
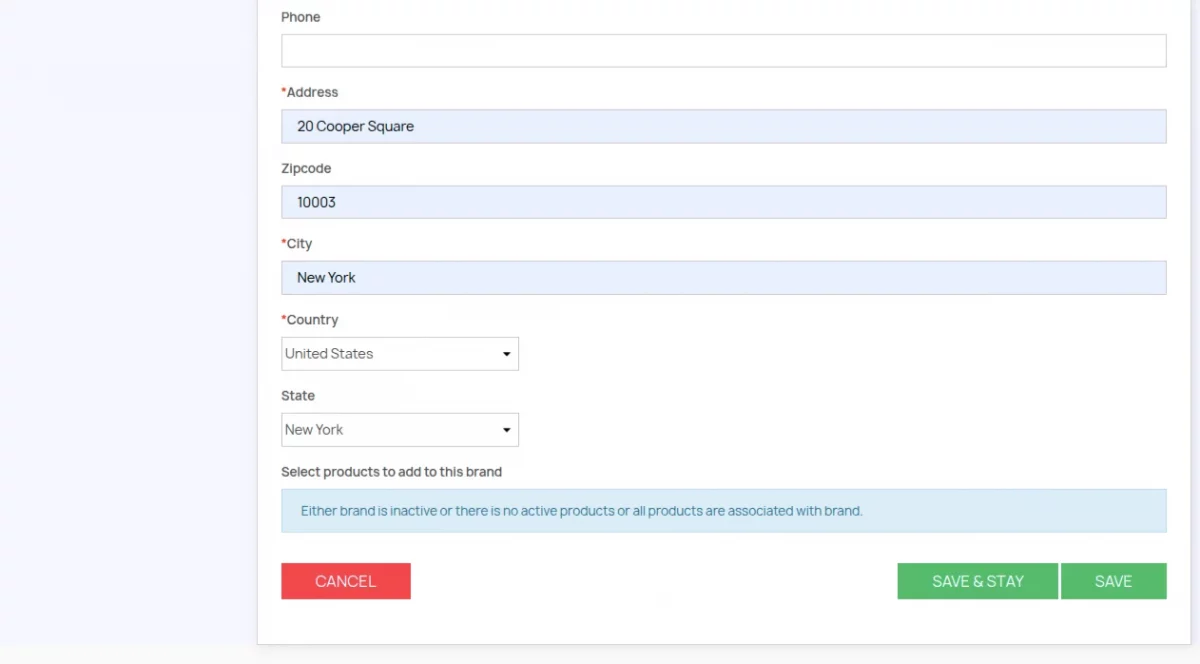
- Sellers can add their address and contact details like city, country, zip code, etc in their profiles.
- Allow sellers to add the fax number and tax identification number in their profile.
- Sellers can add and manage attributes/features and their values.
- Let sellers add social IDs like Facebook, Twitter, YouTube, and Instagram in their profile.
- Sellers can change the display settings as per the options provided by admin.
- The sellers can also contact the admin via email from the edit profile page.
Product Management
- Enable the manual approval of the sellers’ products.
- Allow sellers to activate or deactivate their products.
- Assign your products to the sellers.
- Add products on behalf of the seller.
- Assign multiple products to a single seller.
- Show admin commission to the seller on add/update product page.
- Sellers can apply tax rule and add SEO on their products.
- The sellers can select the visibility options and availability preferences for their products.
- Let sellers add reference code, EAN-13, JAN, UPC, and ISBN on their products.
- Allow sellers to create combinations for the products using admin added attributes and values.
- Sellers can apply the admin shipping methods, additional shipping costs, and add delivery time on their products.
- Allow sellers to add features on their products.
- Sellers can add minimum quantity, low stock level, cost price, and price per unit on their products.
- Enable sellers to display “On sale!” flag on their products.
- Sellers can duplicate their products.
- Duplicate product with zero or original product quantity.
- Specify the title to be added as a prefix in the duplicate product name.
- Sellers can add MPN, stock location, image caption, related products, and set page redirection on their products.
- Allow sellers to add pack, virtual, customizable, and attachment products.
- Sellers can add tags for their products.
- The sellers can create specific price rules for their products.
- Sellers can add and manage brands and suppliers.
- Sellers can preview the product from update product page by clicking on the ‘PREVIEW’ button.
- Enable the manual approval of sellers’ brands and suppliers.
- Enable or disable seller’s brands and suppliers.
- Select categories that will be applied to the sellers when they register.
- Enable sellers to export their products via CSV file.
Customer Settings
- Allow both registered customers as well as visitors to contact the seller from profile and shop page.
- Customers can give reviews to the sellers and view their ratings and reviews.
- Show most recent or helpful reviews first.
- Also, customers can give feedback on the seller’s review whether the review is helpful or not.
Commission Management
- Set a global commission that will be applicable to all the marketplace sellers.
- Set seller wise commission.
- Admin can choose to keep the whole tax amount, distribute tax to the seller, or distribute between him and the seller proportionally.
- Add commission and tax in terms of percentage, a fixed amount or Both (Percentage and Fixed Amount).
- Add seller-wise commission on shipping.
Payment Management
- Add payment modes using which you can transfer the seller’s amount.
- Seller can choose any payment mode provided by admin to receive payment.
Order Management & Transaction Details
- Sellers can add the tracking number and URL on their order.
- Allow sellers to update the tracking number on PrestaShop order tracking number.
- Show tracking details and tracking number in tracking url to customer.
- An admin can choose to update the tracking number on PrestaShop order’s tracking number if the order has products of the single seller.
- Display customer’s email address on seller order details page.
- Seller can view the total amount of the order & admin commission summary on the order details page.
- View list of orders of a particular seller from the back office.
- Admin can view seller details on orders page.
- View shipping amount earned by the sellers for specific orders.
- The sellers can view total orders received in a day, month or year on the dashboard.
- Sellers can view 5 recent orders received on the dashboard.
- View the total earnings of each seller separately.
- An admin also has the information of due and paid amount at their end.
- Admin can settle seller amount and manage the transaction details on marketplace from backend.
- Sellers can view their earnings and admin commission summary, currency wise in transactions section.
- Also, sellers can view their due amount & the amount settled by admin in transaction detail.
- Rollback seller transaction data if admin or seller changes the status of an order to canceled.
- Enable sellers to export their orders via CSV file.
- Export all sellers’ transaction data in a CSV file.
- Export the transaction details of a particular seller in a CSV file.
Carrier Settings
- Admin can set distribution from the carriers list whether shipping cost will go to admin, seller or both. He/she can distribute the shipping amount of seller products only.
- An admin can enable/disable shipping distribution settings from Backoffice approval settings.
- Admin can configure whether shipping will be distributed between admin & seller or not in case If admin product exists with any seller product in the same order and that order carrier distribution is set as Seller/Both.
- Allow sellers to add and manage shipping carriers.
- Allow sellers to add and manage impact prices on carriers.
- Enable the manual approval of seller shipping carriers or make it auto-approved.
- Configure default carriers that will be applicable for seller products if seller does not have any carriers.
General Configuration
- Allow/Disallow custom CSS for Marketplace.
- Configure the details to display on the seller’s shop and profile page.
- Set the background and text color of the marketplace page title at front end.
- Both admin and seller can view their earnings of payment accepted orders or confirmed orders on the transaction page.
- Enable the display of user-friendly URL.
- Specify the SEO friendly URL for the seller’s profile, shop, reviews, and login page.
- Show “Become a Seller” option on the navigation bar, footer bar, and bottom info bar.
- Allow sellers to update their order status.
- Select order statuses that will be available for sellers for changing their order status.
- Select order status to cancel order transactions.
Multi-Language
- Enable or disable the multi-language functionality.
- Sellers can select their default language.
- The sellers can add product details in different languages.
- Sellers can provide a unique shop name for their shop URL. This unique name will be the same in every language.
- Admin can also add seller details and product details in different languages.
Mail Configuration
- Email notification to the seller on approval or disapproval of the seller’s request.
- Mail to seller when their account gets deleted.
- Email to the seller on approval or disapproval of the seller’s product.
- Email to the seller when the admin assigns him a product.
- Mail to the sellers when their products get sold.
- Mail to seller when an admin deletes his product.
- Email to the admin when the seller adds a new product.
- Email to the admin on seller request creation.
- Get notification when seller adds a new brand or supplier.
- Email to sellers when they activate/deactivate brand or supplier.
- Mail to admin when seller adds a new shipping carrier.
- Email to seller when admin approve or disapprove his shipping carrier.
- Email to admin when product is auto deactivated upon updation by seller.
Seller Login Configuration
- Separate login page for the sellers.
- Mutliple theme options for seller login page to choose from.
- Display custom header/footer or default PrestaShop header/footer on seller panel.
- Set the header and body background color of seller login page.
- Set the meta title and description in multi-language.
- Customize the appearance of registration block by setting background and text color.
- Select the width and position of registration block.
- Set the custom title text to be displayed on the registration block.
- Add specific features of your marketplace to be displayed on seller login page.
- Set background and text color of feature block.
- Set the background and text color of terms & conditions block.
- Customize terms & conditions block by setting background and text color.
- Set the custom text to be displayed in terms & conditions block.
PrestaShop Advanced Multi-Vendor Marketplace Version 5.1.4 and above for PS 1.7.x.x is GDPR compliant.
Marketplace Change Log
To know the features added to the PrestaShop Advanced Multi-Vendor Marketplace module according to the versions launched till date & migrating details, please visit the link.
NOTE
- PrestaShop Advanced Multi-Vendor Marketplace module is now multi-shop compatible.
- Module translations available in these languages – Arabic(ar), Bulgarian (bg), Catalan(ca), German(de), Spanish(es), Finnish (fi), French(fr), Hungarian (hu), Italian(it), Japanese(ja), Dutch(nl), Polish(pl), Portuguese (pt), Romanian (ro), Russian(ru), Slovak(sk)
How to install the Prestashop Advanced Multi-Vendor Marketplace
- Firstly, go to the module manager in the back office and click on ‘upload a module’.
- After that, drag and drop the module file or select the file from the system.
- In this way, the module installation will be successful.


Prestashop Advanced Multi-Vendor Marketplace Configuration
After the successful installation of the module, the admin needs to configure it. The configuration consists of four sections:
- General Settings
- Approval Settings
- Seller Login Configuration
- Commission Settings
- Payment Modes
The marketplace flow will depend on these settings. Admin can configure these sections as per need one by one.
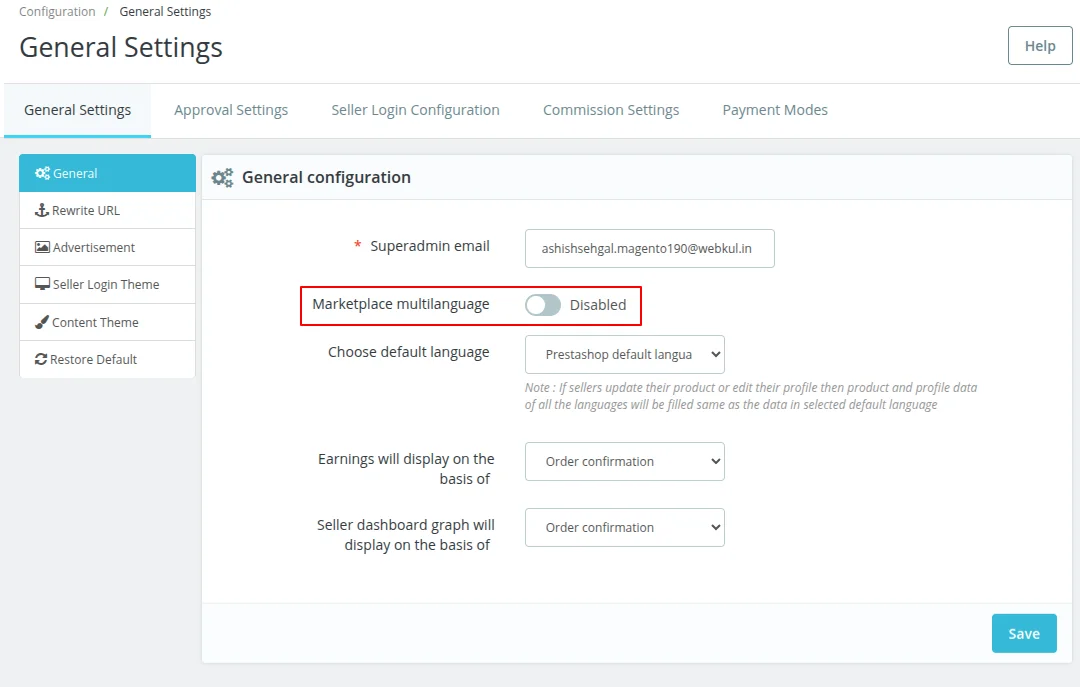
General Settings
General Configuration
Under the General Configuration, the admin can:
- Allow sellers to use multi-language in the marketplace.
- Select whether the earning will display on the basis of payment accepted orders or confirmed orders on the transaction page.
- Choose to display the payment accepted orders or confirmed orders on the seller dashboard graph.
Marketplace Multilanguage

This feature enables the sellers to add details such as profile information, product details, etc in the desired language.
If the admin disables multilanguage, then he has the option to select whether to manage the marketplace on basis of:
- Admin’s default language or
- Seller’s default language
Rewrite URL Settings

Admin can manage the URL for seller profile, shop, reviews, and login pages.
Advertisement Settings

Under the Advertisement Settings, the admin can select where he wants to show “Become a Seller” option. Admin can choose to display the option in the navigation, footer, or bottom info bar.
Front End View
As configured by the admin, “Become a Seller” option is available in the navigation, footer, and bottom info bar.


Seller Login Theme
Under this tab, the admin can:
- Choose to display seller request page in customer’s (who is not a seller yet) account .
- Choose theme for the seller login page.
There are three options available for theme and admin can choose the appropriate one for his store.

Also, the admin can customize the theme by clicking on “Edit active theme” button.
On clicking the button, the admin gets redirected to Seller Login Configuration tab where multiple options to customize the theme are provided.
Allow seller request page
If this option is enabled, then a customer (who is not a seller yet) will have access to the seller request page from customer’s account.

On clicking ‘become a seller’ tab, a customer gets redirected to the seller request page where he can register as a seller by filling the required details.

If “allow seller request page” field has been disabled, then on clicking “become a seller” tab, a user will be redirected to a seller login page where he can complete the seller registration process.

Seller Login Configuration
The options provided under “Seller Login Configuration” allows the admin to manage the view and content of the seller login page.

Header block configuration
On the top of seller configuration page, the admin can see the seller login theme he has selected and a “Click here to change theme” button is provided.
On clicking the button, the admin gets redirected to “Seller Login Theme” tab under General Settings and can change the seller login theme.
Reset theme configurations
On clicking this button, all the theme configurations will be reset to the default settings that were at the time of installation.

Under Header Block Configuration, the admin can:
- Set the background color of header and body of the seller login page.
- Upload the logo to be displayed on the seller login page.
- Set the meta title and description for the seller login page.
Seller Login Page

Registration Block Configuration

Under Registration block configuration, the admin can:
- Customize the registration block by setting background color, text color, width, and block position.
- Set the text and text color of title.
- Set the position and width of title block.
- Upload the banner image and set the position of banner block.

Please note that title block position is associated with registration block position and vice-versa.
Under Registration block configuration, the admin has set ‘title block position’ as 1 and ‘registration block position’ as 2.
This means the title block will appear first and registration block will appear after the title block on seller login page as shown in the above image.
Suppose the admin has set registration block position’ as 1 and ‘title block position’ as 2.

Content Block Configuration
Admin can change the position of the content i.e, features and terms & conditions on the seller login page.

Seller Login Page

Please note that ‘content block position’ is associated with ‘banner block position’ and vice-versa.
Under ‘Registration block configuration’, the admin has set banner block position as 1 and under ‘Content block configuration, content block position as 2.
This means the banner block will appear first and content block will appear after the banner block on seller login page as shown in the above image.
Suppose the admin has set content block position’ as 1 and ‘banner block position’ as 2.

Feature Block Configuration
Under Feature Block Configuration, the admin can:
- Enable or disable the display of feature block on the seller login page.
- Set the background and text color of feature block.
- Select the width and position of feature block.
- Set the custom text to display on seller login page.

Seller Login Page

Terms & conditions block configuration
Multiple options are provided to customize the terms & conditions block.
Admin can customize the appearance of terms & conditions block by setting block background & text color, width, and position. Set the custom text to be displayed in the block on the seller login page.

Seller Login Page

Please note that ‘feature block position’ is associated with ‘T&C block position’ and vice-versa.
Under ‘Feature block configuration’, the admin has set feature block position as 1 and under ‘Terms & conditions block configuration, T&C block position as 2.
This means the feature block will appear first and T&C block will appear after the feature block on seller login page as shown in the above image.
Suppose the admin has set T&C block position’ as 1 and ‘feature block position’ as 2.

Content Theme Settings
Under Content Theme Settings, the admin can:
- Choose to show custom header/footer or default PrestaShop header/footer on seller panel.
- Allow sellers to select language and currency in seller’s panel.
- Choose to use the customize CSS instead of Default Bootstrap.
- Set marketplace page title and background color.

Restore Default

Click on ‘Restore Default’ to reset the general settings.
This means if the admin has done any changes in the general settings, then the settings will be restored to default settings that were at the time of module installation.
Approval Settings
Seller Settings


Under Seller Settings, the admin can:
- Enable or disable the manual approval of seller registration request.
- Make it mandatory for sellers to agree to terms and conditions.
- Enable or disable the manual approval of seller reviews.
- Allow sellers to activate or deactivate their shop.
- Allow sellers to add address details, fax number, and tax identification number in their profile.
- Let sellers contact him via email on the edit profile page.
- Allow sellers to add, edit, and delete PrestaShop attributes/features and their values.
- Allow sellers to add Social Profile id’s.
- Let sellers manage their display settings using the options provided.
- Enable the display of seller details on seller’s shop and profile page.
- Configure the details to be displayed on seller’s shop and profile page.
Seller Registration
On clicking the option, the user gets redirected to the “Seller Login” page.
When a user visits the store for the first time, he needs to enter the basic details.

After entering the basic information, click on the “Get Started” button and enter shop details.

After entering the shop details, click on “Go To Dashboard” button.
As configured, the seller’s registration request needs to be approved manually by admin. Therefore, a message regarding this will display to the seller on the page.

A customer who is already registered on the store and wants to create a shop needs to enter the name, email, password, and click on “click here” link.

Now, enter the shop details and click on “Go To Dashboard” button.

The admin can view seller’s request under Seller Profile tab of the “Sellers” section.

Under Seller profile, the admin can:
- View a list of sellers who have registered on the marketplace.
- Approve or disapprove seller’s request.
- Preview seller’s profile.
- View and edit seller’s details.
- Delete the seller.


Once the admin has approved the seller’s request, he can login to his account and view different tabs to manage his marketplace shop.

As configured by the admin under Content Settings, customer header & footer will display in seller panel and seller can select language & currency.

If first option under ‘Content Settings’ is disabled, then default PrestaShop header footer will display in seller panel.


Back to shop icon

A ‘back to shop’ icon is available on the top-right position of the header. A seller gets redirected to the on the home page by clicking on this icon.

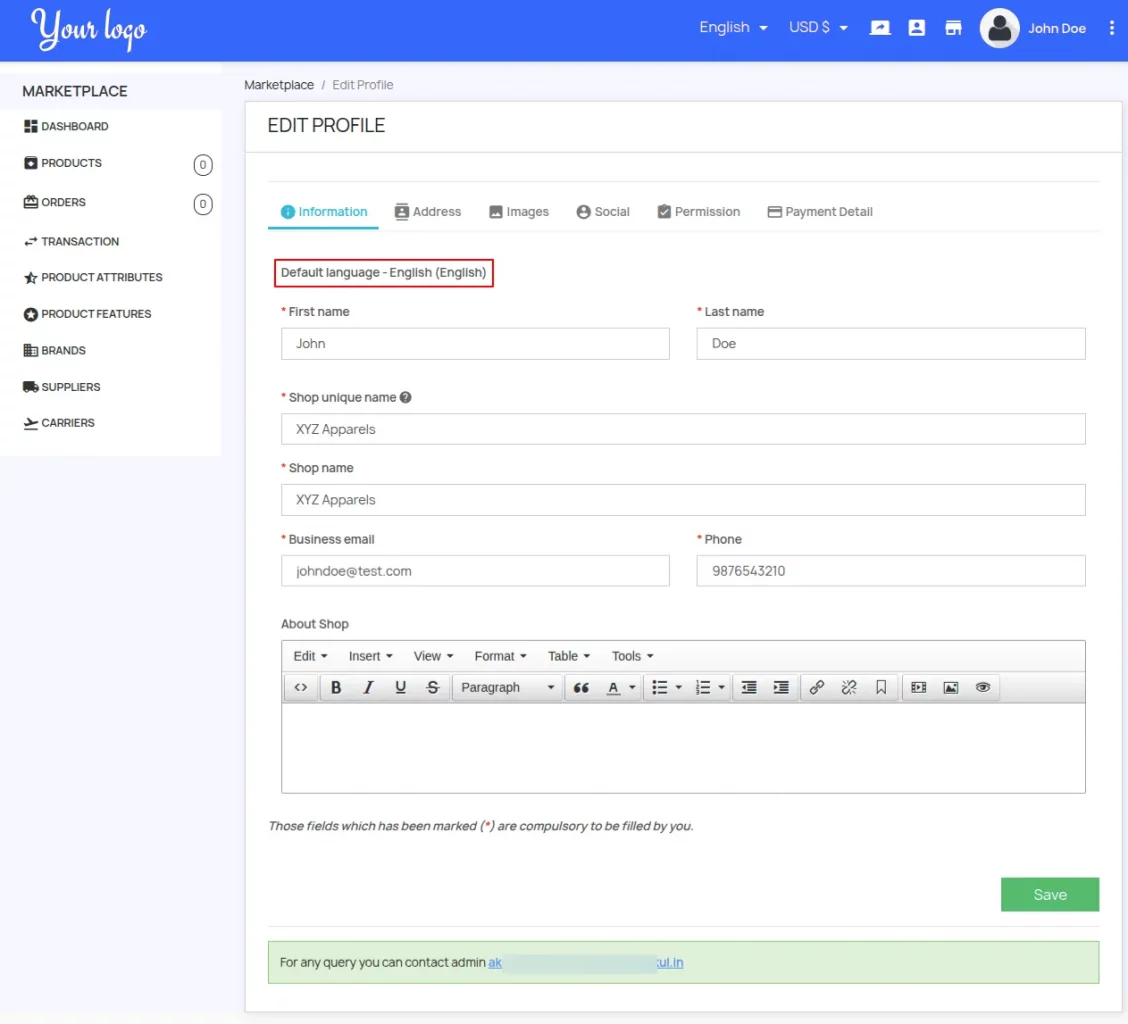
Seller Profile Management

Under the edit profile page, the seller can add all the details allowed by the admin.
Information

If marketplace multilanguage field is disabled, then only default language name will display on the edit profile page.
Add Address Details

Images

Add Social Profile User Ids

Permission

Payment Detail
The sellers can view payment modes added by the admin under the “Payment Details” tab.
Under Payment Details, the seller can select the payment mode and provide the details to receive payment from the admin for his orders.

Deactivate/Reactivate shop
If enabled by admin from the back office, then the seller can deactivate or reactivate his shop. A seller can deactivate his shop by clicking on the “Deactivate your Shop” button.

After deactivating the shop, the seller redirects to “My Account” page.

On clicking the “Seller Account” tab, the seller gets redirected to the login page where can see“Re-activate Your Shop” button. On clicking this button, a seller can reactivate his shop.

Add New Seller – Admin’s End
The admin can add a new seller by clicking on the “Add new seller” button on the seller profile page.


Deactivate Sellers
As configured from the back office, the admin needs to specify the reason for deactivating the seller.

Seller Product Approval Settings


Under Product Settings, the admin can:
- Enable manual approval of seller products or make them auto-approved.
- Choose whether a reason needs to be specified while deactivating the sellers’ products.
- Allow sellers to activate or deactivate their products.
- Enable manual approval of a product after it has been updated by a seller.
- Choose to display admin commission to the seller on add or update product and product details page.
- Enable sellers to apply tax rule and add SEO on their products.
- Allow sellers to select the visibility options and availability preferences for their products.
- Allow sellers to add EAN-13, JAN, UPC, and ISBN on products.
- Enable sellers to create combinations for products.
- Allow sellers to assign the admin added shipping methods and add delivery time on products.
- Let sellers add admin added features to their products.
- Enable sellers to add minimum quantity, low stock level, cost price, price per unit, MPN, stock location, and set page redirection on products.
- Allow sellers to display “on sale” flag on products.
- Enable sellers to add image caption and related products on products.
- Allow sellers to add customizable, attachment, pack, and virtual products.
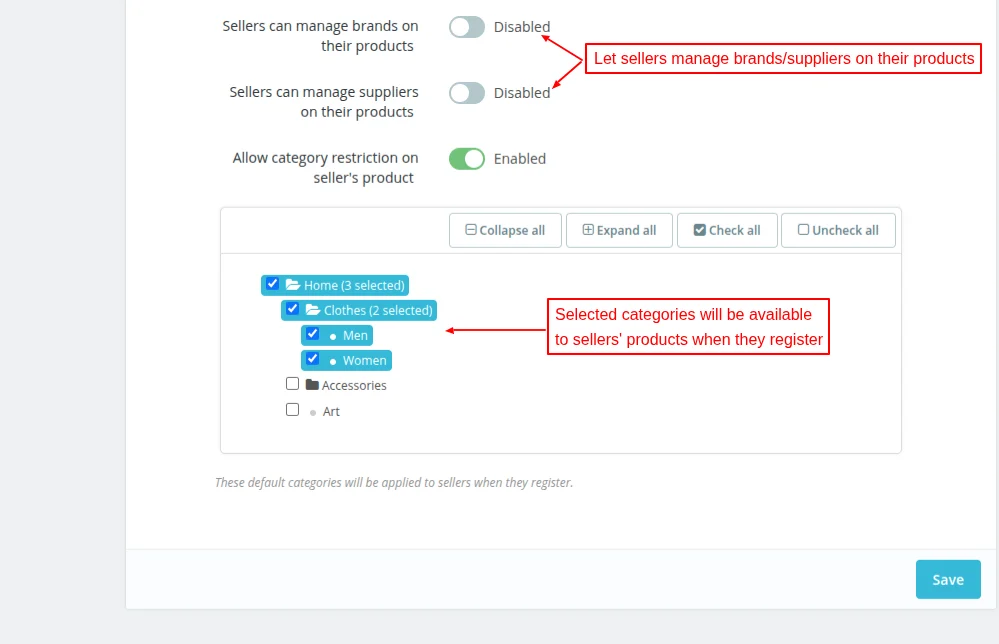
- Restrict categories for sellers’ products. Selected categories will be displayed to the seller.
If the admin has enabled the creation of combinations by the sellers and the PrestaShop Combination Activate/Deactivate module is installed.
Then, the admin can also allow the sellers to activate or deactivate their combinations.
Duplicate Product
The admin can allow the sellers to duplicate their products. Also, the admin can choose whether the duplicate product will create with zero quantity or original product quantity.
Manage Brands/Supplier on Products

If enabled, then the sellers can manage brands and suppliers on the products.
The sellers can assign admin brands and suppliers to their products. Also, the admin can enable or disable the manual approval of seller brands and suppliers.
Product Management – Seller’s End
After completing the profile, the seller can start adding the products.

If allowed by the admin, then the seller can add virtual and pack products.
Let’s understand the process of adding standard products first.

Information
If enabled by admin from the back office, then the seller can add the following details under the Information tab.
- Reference code
- Stock location
- Low stock level
- Cost price
- Price per unit
- Specific price for product
- Brands
- Related products
- Minimum quantity


As configured by the admin under product settings, only the selected categories are available to the seller to choos from.
Add Specific Price
This option allows the sellers to set discounts for customers belonging to different countries, groups, etc.

The seller can:
- Select the currencies, countries, and customer groups for which the discount will be applicable.
- Select the customer who can avail the discount.
- Set the date range for which the discount will be available.
- Set flat discounted rate of the product.
Once added, the seller can edit or delete it.

After adding the product information, the seller can view it under the Product tab.

As the admin has enabled the manual approval of the seller’s product. So, when a seller adds a product, it will be in a pending state until approved by the admin from the back office.

As soon as the admin approves the seller’s product, the status of the product changes from pending to approved.

Note: The seller can change the status of the newly added product only when the admin has approved the product.
Priority Management
Under “Priority Management”, the seller can set price calculation priorities. If a customer fits into multiple price rules, then the highest priority will be considered.
Related Product
After adding a few products, the seller can add the related products that will display on the product page. Once added, the seller can remove it by clicking on the cross.

Once the product has been approved by the admin, the seller can upload the product images and add other details.
Add Images
After adding the information, the seller can now add images to the product.

Click on the ‘PREVIEW’ button to preview the product.
The seller can also change the cover image and position of the images.

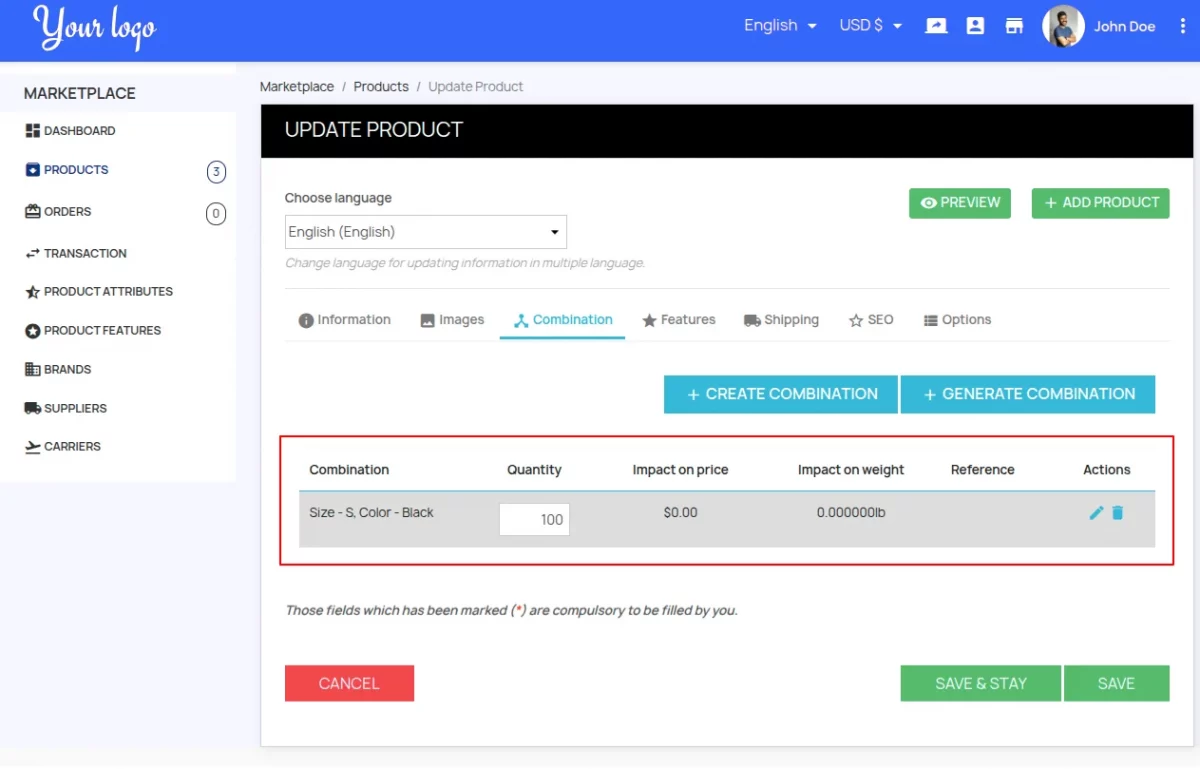
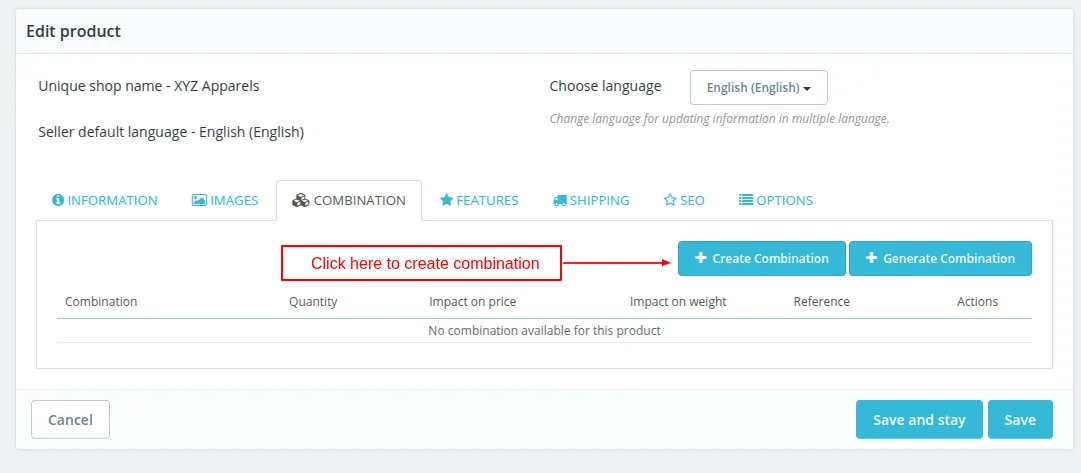
Combination
Under the Combination tab, click on create combination button.


On the Add Combination page, the seller can:
- Select attribute and predefined value for the attribute.
- Set quantity, minimum quantity, and low stock level.
- Define impact on price and weight.
- Set wholesale price and impact on price per unit.
- Specify reference, EAN, JAN, UPC, and ISBN for the combination.

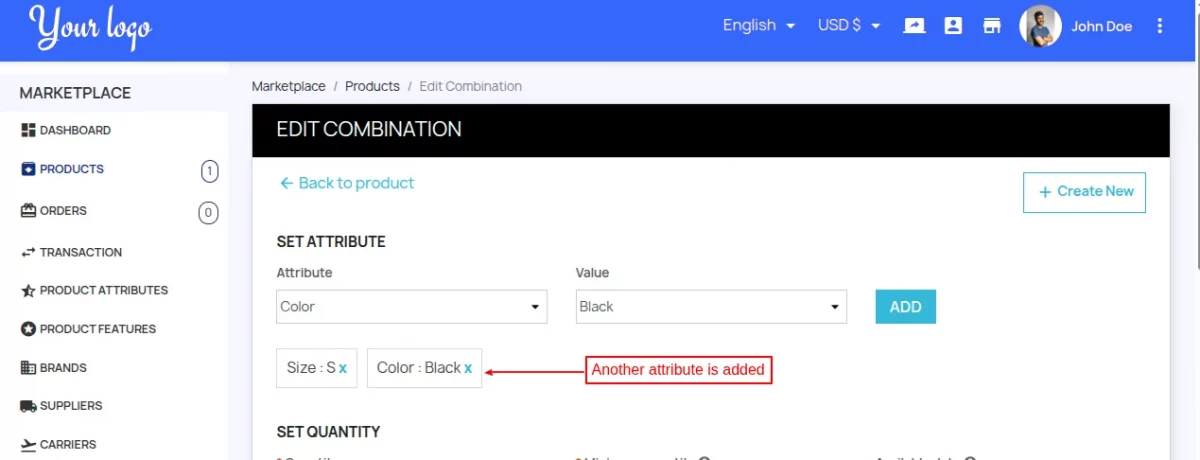
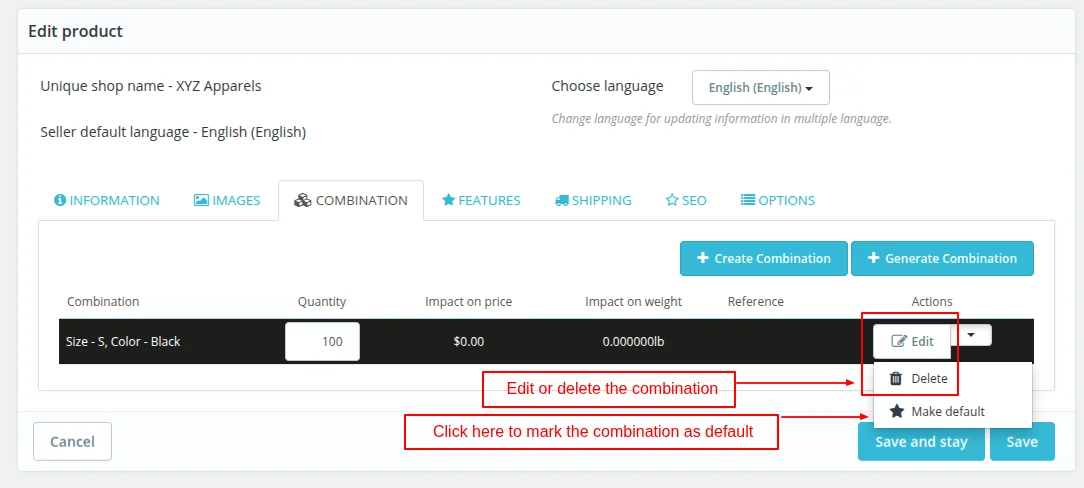
Click on save button to create combination.
Adding features to a product

Click on the “Add Feature” button.

Shipping
If enabled by admin from the back office, then the sellers can:
- Add admin shipping methods to the products.
- Apply additional shipping costs on their products.
- Add delivery time on their products.

Also, the sellers can add and manage shipping carriers if allowed by admin from the back office.
SEO
Under this tab, the seller can specify the meta title and description for the product.
Redirection page
This option lets the seller select the page where he would like to redirect the customers if the product is disabled.

Options
Under Options, the seller can:
- Add EAN, JAN, UPC, ISBN, and MPN for the product.
- Add tags and customization fields for the product.
- Select suppliers associated with the product.
- Create a new supplier.
- Attach files for the product.
- Select visibility options and availability preferences for the product.


Add Tags for product

When a user searches for a product and if the search matches the tags added to the product, the product will display.

Attached Files
The option lets the seller add the files that the customer can download directly from the product page.


After adding the product, the seller can view it under the product tab. Under this tab, the seller can:
- See the product preview by clicking on the product name.
- Activate or deactivate the products.
- Edit or delete the product.
- View product images.
- Duplicate the products.

Product Preview
Seller can preview the product by clicking on the ‘eye’ icon mentioned against each product on the products list.
Also, seller can preview the product by clicking on ‘PREVIEW’ button mentioned on the update product page.

On clicking the icon/button, the seller gets redirected to the product page.

Product Details
On clicking the product name, the product details page opens where the seller can view the product description, price, quantity, images, etc.

Duplicate Product
If enabled by the admin, a duplicate button gets available under the Product tab. The seller can duplicate the product by clicking on this button.


Export Product
Admin can allow the sellers to export the products using a CSV file. The sellers can select the date range during which the products were created and export them.
Also, the sellers can choose to export all the products at once.

Note: Only visible columns are exported without any selection i.e. product ID, name, price, quantity, status, and date.
Product Page
On the product page, the customer can view:
- Product price and description
- Discount available.
- Seller’s shop name
- Brand name
- Related products

Product Customization
After adding the image and text, when a customer saves customization, he can view the image and text on the product page.

A customer can view the customization information on the cart as well as the order details page.


Both seller and admin can view the customization information on the order details page.


Tags Based Product Search
When a user searches the product and the search matches the tags added to the product by a seller, then that product will display in the search results.


Product Attachments
Once the seller has added attachments for a product, a new tab alongside the description and product details tabs get available on the product page. A customer can download the attachment from here.

Add Virtual Product


On selecting the virtual product type, the following additional fields appear on the product page.
- Number of allowed downloads – In this field, the seller needs to set the number of downloads allowed per customer. Set 0 for unlimited downloads.
- Expiration Date – Set the expiry date for the file.
- Number of days – Here, the seller can set the number of days for which the file can be accessed by the customers.
Front End View

On the shopping cart page, it can be seen that the no shipping fee has been applied as it is a virtual product.
After completing an order, when the seller changes the order status to payment accepted, the customer can download the file from the order details page.

Add Pack Product

On selecting “Pack of existing products” option, the following options appear under the information tab.
- Add products to your pack – Here, the seller needs to type the initial letters of the product name and then select the product from the drop-down list.
- Quantity – In this field, the admin needs to specify the product quantity.
- Pack Quantities – Multiple options are provided to the seller to manage the pack quantities. The seller can choose to decrement pack, products in the pack, or both.

Front End View

Suppose a customer has ordered a pack product. The seller can view products of a pack on the order details page.

When a seller clicks on the “view pack content” button, a popup appears on the page where a seller can view products in the pack.

Seller’s Profile and Shop Page
On clicking the seller’s shop name on the product page, the customers get redirected to the seller’s shop page. Customers can view the seller’s contact details and products on the shop page.

A customer gets redirected to the seller’s profile page by clicking on the seller’s name.

Two icons are provided in the top-right position of the seller panel. Sellers can view their shop and profile by clicking on the respective icon.

Create Attributes
If enabled by admin from the back office, then the sellers can add and manage the attributes & their values.

On the create attribute page, the seller has to:
- Specify the attribute name and attribute public name.
- Select the attribute type.


Create Features
If enabled by the admin, then the sellers can add and manage features & their values.


Admin can disallow the sellers to create their own attributes and values. However, admin can allow sellers to add admin added features to their products.

Product Management – Admin End
Admin can view a list of all the products added by the sellers under the products tab.

Under Seller Product, the admin can:
- Add product on seller’s behalf.
- Enable or disable the seller’s product.
- Preview the seller’s product.
- Assign products to the sellers.
- Edit, delete, or duplicate the seller’s product.
Assign product to seller
Admin needs to select the seller and the products that he wants to assign to the seller.


Note – Admin:
- Can assign multiple products to one seller.
- Cannot assign multiple products to multiple sellers.
- Cannot assign the same product to multiple sellers.
Duplicate Seller Product
Click on the duplicate button to duplicate the seller’s product.

Deactivating Seller Products
When the admin deactivates the seller’s product, a popup appears on the page. In the popup, the admin needs to specify a reason for deactivating the product.

Adding Seller’s Product
The admin can add product on the seller’s behalf by clicking on the “Add new product” button.


After saving the product information, the admin can add images and more product details.


Create Combinations


After clicking the save button, the combination gets created and the admin can view it under the combinations tab.
Add Features


Shipping

SEO

Options


Add and Manage Brands
If enabled by the admin, then the seller can add their brands.

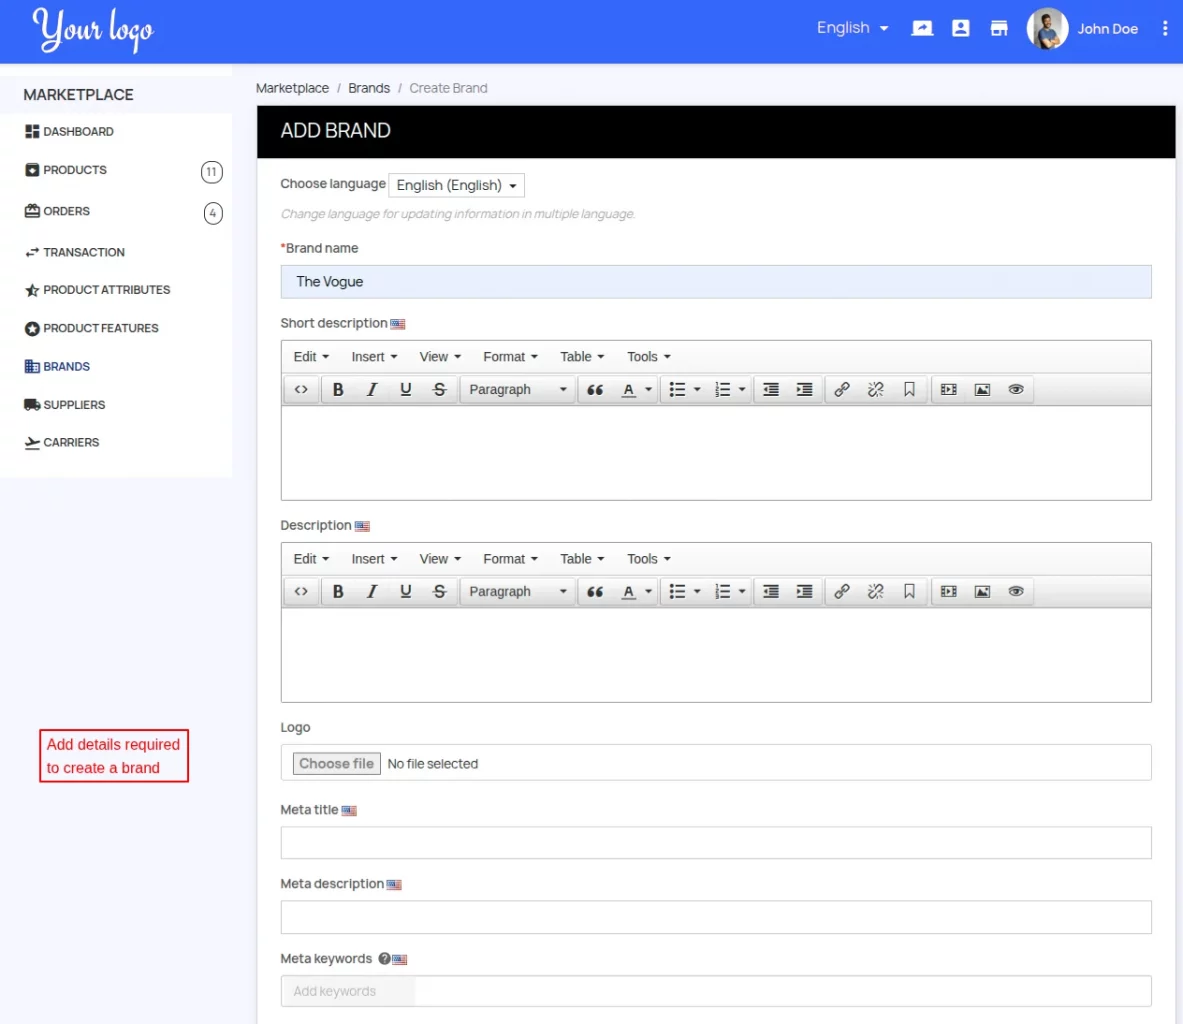
On clicking the “Add Brand” button, a form appears on the page where the seller has to specify the details about the brand.
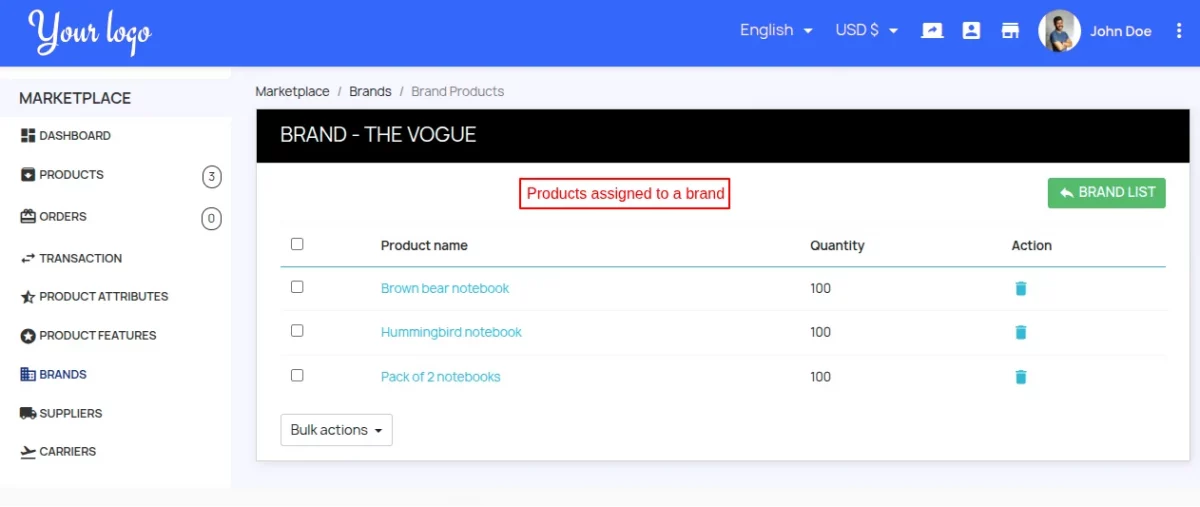
Once saved, the sellers can assign the products to the brand.


Once added, the seller can view it under the Brands tab.

A seller can view the products assigned to the brand by clicking on the brand name.
Admin can view a list of brands added by the sellers under the Brands tab.

Admin can add a brand on seller’s behalf by clicking on Add new brand button.

Once created, the admin can assign products to the brand.

Add and Manage Suppliers


Seller needs to fill in all the details of the Supplier on add new supplier page. Once added, the seller can assign the products to the supplier.

Once the seller has added the supplier, he can view it under the suppliers tab.

A seller can view the products assigned to the supplier by clicking on the supplier’s name.

Admin can view a list of all the suppliers added by the sellers under the Suppliers tab.

Admin can add a supplier on the seller’s behalf by clicking on “Add new supplier” button.

Once created, the admin can assign products to the supplier.

Carrier Settings

Under Carrier Settings, the admin can:
- Select default carriers for seller products. These carriers will be applied on seller’s products if no seller carrier is applied on products.
- Allow sellers to add and manage shipping carriers.
- Enable the manual approval of shipping carriers added by sellers or make it auto-approved.
- Allow sellers to manage impact price of carriers.
- Allow shipping distribution.
- Enable distribution of shipping between admin and seller.
Add and Manage Shipping Carrier – Seller’s End
If enabled by admin from the back office, then a tab “Carriers” get available in the seller panel. From this tab, the seller can add and manage shipping carriers.

Also, the seller can assign shipping methods to his products from the Products List page.
Once the admin has allowed sellers to manage the shipping carrier, the “ASSIGN SHIPPING” button gets available in products list page.

On clicking the button, a popup appears on the page where seller can select the carriers that he wants to assign to his products.

Add shipping carrier
Click on “Add Carrier” button to add a new shipping carrier.
General Settings
Under General Settings, the seller needs to enter carrier name, transit time, and speed grade.

After filling the required details, click on the “”Next” button.
Shipping locations and costs
Under shipping locations and costs, the seller can:
- Choose to add handling cost in shipping fees.
- Enable free shipping.
- Set the default shipping price as per zone.

Size, weight and group access
Under this tab, the seller can define the maximum dimension of the package that is managed by the shipping carrier and select the customer groups whose users can have access to this carrier.

After adding the shipping carrier, a seller can add the impact price according to place.

Note: Impact price will be added to the base price when a buyer buys the product.
Select zone, country, and state.

Now click on “add impact price” button. On clicking the button, a popup appears on the page where the seller can add impact price according to the range.

View all the impact prices added for multiple zones & multiple ranges.

Once the seller has added the shipping carrier, he can view it under Carriers.

If disallowed by admin from the “Carrier Settings”, then the sellers cannot view, add, or update impact prices.


In the above screenshot, it can b seen that option to view impact price is not available to seller as it has been disabled by the admin.
Set default carrier
Click on the “Set default carrier” button to set default shipping methods for products.

Note:- Seller can set multiple shipping methods as the default shipping method.

Note:- Seller can set multiple shipping methods as the default shipping method.

While adding or updating the product, the seller can view the shipping methods he has added under the Shipping tab.

Manage Carriers – Admin’s End
Admin can view a list of shipping methods added by the sellers under the “Carriers” tab.

Under Carriers, the admin can:
- Add shipping carrier for seller.
- View impact price added for added for carrier.
- Approve or disapprove shipping carrier.
- Edit or delete the shipping carrier.
Click on the “Add new” button to add a new shipping carrier for the seller.


Order Settings


Under the Order Settings, the admin can:
- Allow sellers to add tracking details on their orders and update the tracking number on PrestaShop order tracking number.
- Enable the display of the tracking number and URL to the customer on the order history page.
- Choose to show customer email in address on seller’s order details page and customer order mail to the seller.
- Allow sellers to change the order status for their products.
- Also select the order statuses that will be available to the sellers.
- Select order statuses to cancel order transactions.
Mail Settings

Admin can configure various actions for which email notifications will be sent to the sellers. Send email to the sellers when:
- Seller request gets approved or the seller is created by admin.
- Seller request gets disapproved.
- The seller account is deleted by admin.
- Seller’s product gets approved or disapproved.
- Product is assigned to seller by admin.
- Seller’s product gets sold.
- Admin activate/reactivate seller’s brand/supplier.
- Seller’s carrier is approved or disapproved.
Mail to admin or seller on product delete
The seller will receive an email if the admin deletes the product. If the seller deletes a product, then an email will go to the admin.
Restore default
Click on ‘Restore Default’ to reset the approval settings.
This means if the admin has done any changes in the approval settings, then the settings will be restored to default settings that were at the time of module installation.
Commission Settings
Under the commission settings, the admin can set the commission they want to charge on the sale of products.
Admin can set the commission in two ways:
- Seller Wise Commission – Charge separate commission from the individual sellers.
- Global Commission – This is the default commission that will apply to all the sellers on the marketplace.
The admin can set commission in terms of percentage, fixed amount, or both.

Seller wise commission
- Percentage Commission
Say admin sets a 20% commission for a seller. The admin will get the 20% of the product price as a commission from the seller.

- Fixed Amount Commission
Suppose admin assigns a fixed amount of $ 5 as commission for seller’s products. The admin will get the $ 5 if the product price is more than $ 5.
If the product’s price is less than $5, then the admin will get the product’s full price. And, the seller will get zero amount.

- Both (Percentage & Fixed Amount)
Here, let’s say the admin sets a commission rate of 20% & a fixed amount commission of $5. If a customer orders a product worth $40, then the admin will get $8+$5= $13 as a commission.

Once the admin has set the commission, he can view it under the “Seller Wise Commission” tab.

Seller End View

Global commission
The admin can set a global commission that will be applicable to the products of all the sellers. Please note the global commission will work only if the seller-wise commission is not set.
It simply means seller-wise commission has greater priority than global commission.
The admin can set global commission in terms of percentage, fixed amount, or both. Although explained above, let’s see them again.
Percentage-wise commission
The admin will get a set percentage of the product price as commission.

Seller End View

Fixed Amount
In this case, the admin can get a set amount of commission. If the commission amount is greater than the product price, then the admin will get the total product price as commission.

Both (Percentage & Fixed Amount)
Suppose the admin sets a commission rate of 20% & a fixed amount commission of $5. If a customer orders a product worth $40, then the admin will get $8+$5= $13 as a commission.

Tax distribution
The admin can also decide who will get the product tax. Also, they can choose to distribute this product tax between themselves and the seller.
If the tax distribution is set to either seller or admin. Then it becomes very easy and the tax will go to either admin or the seller as per the settings.
And if the commission is set to percentage and distribution is between seller and admin for tax. Then, in this case, the tax will also distribute as per the set percentage.
Let’s say the percentage commission of the admin is 10% and the seller is getting 90%. And, tax on the product is $10. Then the admin will give only $1 as tax & seller will give $9.
But in case, if the commission is set to fixed or both. Then, the admin will need to specify the amount of tax separately i.e.
The fixed amount of commission on product tax. please refer to the screenshot:

Manage Admin Commission on Shipping
The admin can set the seller-wise commission on shipping.
Suppose, the admin sets a 10% commission rate on shipping, and the shipping charge on any order is $10. Then, in this case, the admin will get $1 as a commission on shipping.
Apart from this, the admin can also set a global commission on shipping applicable to every seller.

Click on the ” Add admin commission on shipping” button to add commission on shipping for a specific seller.

Note: This particular commission setting will work only if “shipping distribution between seller & admin both” is on.
Order Management
Sellers can view a list all the orders received in the “Orders” tab.

If allowed by the admin, then the sellers can export the orders using a CSV file. The sellers can select the date range during which the orders were received and export them.
Also, the sellers can choose to export all the orders at once.
Note: Only visible columns are exported without any selection i.e. order ID , reference, customer, amount, payment status, payment method, and date.

When a seller clicks on order, the “order details” page gets open. On the order details page, the seller can:
- View product, customer, and shipping details
- View commission summary
- Update order status
- Add tracking details to an order.

Tracking Detail
The sellers can add the tracking number and URL for the order on the order details page. Also, they can send these details via mail to the customer.
If allowed by the admin, then the tracking number and URL will display to the customer on the order history page.
Note: In case, if an order has a product of a single seller, then the tracking number will be updated on the PrestaShop order too(if allowed from configuration settings).
Whereas, if the order contains the product of multiple sellers, then the tracking number will not be updated on the PrestaShop order.

Once submitted, an option to send the tracking details to the customer via email gets available on the order details page.

Once added, the customers can view the tracking details on the order details page.

If enabled, customer’s email id will show on seller order details page.


The admin can view a list of orders received by the sellers under Orders.

Under Seller Orders, the admin can view:
- Seller details like name, shop name, and email.
- Orders received by a particular seller.
- Seller’s shipping

The admin can see complete order details by clicking on the View button.
When the admin clicks on the “View” button, a popup appears on the page where the admin can view order details such as product name, seller amount, seller tax, admin commission, and admin tax.


The admin can also see the seller’s shipping by clicking on the “view shipping” button.

Seller Dashboard
On the dashboard, the seller can view:
- Sales generated (daily, monthly, or yearly)
- Total orders received in a day, month, or year.
- Recent orders
The admin can choose to display the payment accepted orders or confirmed orders on the seller dashboard graph.


Payment Modes
In the marketplace, all the payments made by the customers go to admin, and then they can transfer the amount to the seller.
In this case, it is necessary for the admin to have seller account details saved so they can transfer the amount into the seller’s account.


Manage Transactions
A seller can view the transaction summary and list of transactions under the transaction tab.

When a seller clicks on the ‘eye’ icon, a popup appears on the page where the seller can view order summary.

When a seller clicks on the ‘eye’ icon, a popup appears on the page where the seller can view order summary.

If a seller changes the status of an order to “canceled” then a new entry for the canceled order will create and there will be a rollback of the transaction.

Admin can view a list of seller transactions under the transactions tab. The summary of total earnings and seller wise transactions can be viewed under this tab.

Admin can view the list of the transactions of all the marketplace sellers by clicking on the “View Transaction” button under ‘Total earning’.

The admin can export all sellers’ transaction data by clicking on the ‘Export’ button under “All Seller Transactions”.
Seller Transactions
Admin can view a list of all the transactions of a particular seller by clicking on “View transaction” under ‘Seller Transactions’.

The admin can export the transaction details of a particular seller by clicking on ‘Export’ button under ‘Seller Transaction History’.
View transaction details
When the admin clicks on the “View Detail” button, a popup appears on the page where the admin can view the order summary.

Seller Settlement
On clicking the settle button, a popup appears on the page where the admin needs to specify the payment mode, transaction ID, and the amount he wants to transfer to the seller.

Once the admin has paid to the seller, it will reflect under Transactions tab in seller’s panel.

Shipping Distribution Cases
The admin can choose to distribute shipping to the seller, him, or both. To do so, please make sure that the shipping distribution between seller & admin is active in the approval settings.
Go to Shipping -> Carriers -> Select the shipping method -> Shipping distribute to -> Set the value(seller/admin/Both).

Shipping distribute to admin
In this case, the whole price of shipping will go to the admin. It will go to admin only, even if the product is of seller.
Shipping distribute to seller
If it’s set to distribute the shipping to the seller. Then the whole shipping amount will go to the seller.
However, there are the following cases in the case of distribution of shipping to the seller.
Case 1
- The customer ordered a seller’s product “Men’s White T-shirt”.
- Shipping method “Express Delivery” is selected.
Now at the carriers page in the back office, the admin has set “shipping distribute to Seller” on Shipping.

Admin end

Seller End

Suppose, at the carriers page in the back office, the admin has set “shipping distribute to admin” on shipping. In this case, full shipping charges will go to the admin.

Case 2
- A customer ordered from 2 different sellers.
- Shipping method of admin i.e. “My light carrier” is selected.
Now at the carriers page in the back-office, admin has set “shipping distribute to Seller” on admin shipping. Now we will check if shipping is set according to total price or total weight.
When shipping is set according to total price
Then following a ratio based on the price of seller 1 and seller 2 products, shipping charges will be distributed between sellers as follows:
Shipping to seller 1: ((seller 1 product price/total price of both the seller product)*total shipping)
=((19.12/34.12)*7)
=0.560*7
=3.92
Shipping to seller 2: ((seller 2 product price/total price of both the seller product)*total shipping)
=((15/34.12)*7)
=0.439*7
=3.073

If a customer has ordered from 2 different sellers. “Demo product (8 kg)” from seller 1 and “demo product (6 kg)” from seller 2.


When shipping is set according to total weight
Then following a ratio based on weight of seller 1 and seller 2 product, shipping charges will be distribute between sellers as follows:
Shipping to seller 1: ((‘Steve Jones’ product weight/total weight of both the seller product)*total shipping)
=((8/14)*9)
=0.571 * 9
=5.139
Shipping to seller 2: ((‘John Doe’ product weight/total weight of both the seller product)*total shipping)
=((6/14)*9)
=0.428 * 9
=3.852

Case 3
Please note that this case is only applicable when the distribution of shipping between admin & seller is enabled from the configuration settings.
- A Customer ordered a product of the seller and a product of the admin.
- Admin shipping method “My light carrier” is applied to the product.
Now at the carriers page in back office, admin has set “both” on admin shipping.
And “distribute shipping between seller and admin both” under the approval settings is Enabled.
Then following a ratio based on price of admin’s and seller’s product, shipping charges will be distributed between seller and admin as follows:
Shipping to admin: ((admin product price/total price of admin and seller’s product)*total shipping)
=((60/79.12)*5
=0.758*5
3.79
Shipping to seller: ((seller product price/total price of admin and seller’s product)*total shipping)
=((19.12/79.12)*5)
=0.241*5
=1.205

Now at the carriers page in the back office, admin has set “shipping distribute to Seller” on admin shipping.
And approval setting “distribute shipping between seller and admin both” under configuration is disabled.
Then in this case, full shipping charges will go to the seller.

Now at the carriers page in the back office, admin has set “shipping distribute to admin” on admin shipping.
And approval setting “distribute shipping between seller and admin both” under configuration is Enabled.
Result of which the entire shipping will go to the admin.
Note: Admin can also view the shipping for every seller separately under the “Manage seller order” page.


Customer Settings

Only registered customers can contact with seller
If enabled, then the visitors need to be logged in for contacting a seller from the profile and shop page.
When a visitor tries to contact the seller from either profile or shop page, then a popup appears from where a visitor can log in.

If disabled, then a visitor can contact the seller on the profile and shop page.
When a visitor clicks on the “contact seller” a popup appears on the page where the visitor has to enter the email id, subject, and the query he wants to ask from the seller.

Customer can write a review or view seller rating and review
With this option, the admin can allow the customers to give reviews and view ratings & reviews on the seller’s profile page. Also, the customers can view ratings on the product page.
Display review in order
This option lets admin select the criteria according to which the reviews will display on the seller’s profile page. The admin can choose to show the most recent reviews or the most helpful reviews.
Number of reviews on seller profile page
In this field, the admin needs to specify the number of reviews to show on the seller’s profile page and after that, the view button will display.
Customer can give feedback on seller review
If enabled, then the customer can give feedback on the seller’s review whether the review is helpful or not.
Reviews Management
Customers can give reviews to the sellers, view ratings & reviews on the seller’s profile page. To give a review the customer has to click on the “write a review” button.

On clicking the button, a popup appears on the page where a customer can give ratings and reviews.

After the submission of a review by the customer, its status depends on whether the admin has enabled the manual approval of reviews.
If enabled, then the review will be displayed in the pending state.

The admin can see all the reviews given by the customers under the seller reviews tab.

Under the Seller Reviews tab, the admin can:
- View average rating of a particular seller and total reviews given to a seller.
- See pending reviews of a seller.
- View reviews submitted by customers.
- Delete the reviews.
The admin can see the reviews submitted by the customers by clicking on the View button.

Customers can also give feedback on the seller’s review whether the review is helpful or not.


Seller Ratings – Product Page
Review Display Order
The order in which the seller reviews will display depends on the settings configured by the admin. Either the “most recent reviews” or “most helpful reviews” will display as configured by the admin.


Multi Shop Compatibility
PrestaShop Advanced Multi-Vendor Marketplace module version 5.4.0/3.4.0 and above is compatible with multi-store feature of PrestaShop.
Seller List

Seller Product
The list of products offered by every seller from each shop is also available at the admin’s end.

Store wise payment modes available for the customer to make payment is available to the admin.

There are some cases that you need to understand if you are using the module in multi-shop mode.
Consider you have a shop group in which the “Share Customers” option is active. And, this shop group contains two shops i.e., Shop 1 & Shop 2.
Now, there are some things about customers & sellers that will work in the following manner.
To understand the cases better, let’s just assume there is a customer named customer A.
- Now, If customer A registers on Shop 1 then he/she will be able to login to Shop 2 too.
- The same customer A now registers as a seller on Shop 1 then he/she will also be registered on Shop 2 automatically.
For reference, let’s name customer A who registered as a seller as seller A.
- Now, the product added by seller A on Shop 1 will also be visible on Shop 2 too. However, seller A will be able to edit the product details on that shop only where he/she added the product. In this case, editing will be available on Shop 1 not on Shop 2.
GDPR Compliance
General Data Protection Regulation (GDPR ) has applied to all the Organization in all over the world. It is effective from May 25th’ 2018 by European Union Regulations.
With the help of this law, customers can view/update/delete their data from the website, whenever they want.
To make the Advanced Marketplace GDPR compliance you need to install the “Official GDPR Compliance” module which is free for PrestaShop 1.7.
Note– PrestaShop is GDPR compliant from version 1.7.3.3 and above.
In the Advanced Marketplace module, GDPR is applicable on the seller registration form.

After the integration of the GDPR module, sellers can check their personal data from “GDPR – Personal Data” tab.

So, this was all about the PrestaShop Advanced Multi-Vendor Marketplace module. I hope this document will help you in checking the functionality of the module in a better way.
Also, do let us know about your views in the comments.
Support
For any kind of technical assistance or query, please raise a ticket at http://webkul.uvdesk.com or send us a mail at [email protected]
Also, please explore our PrestaShop development services & vast range of featureful PrestaShop Addons.
Marketplace Addons
In order to enhance the functionality of the marketplace module, we also have various add-ons for it. To know more about those addons, visit the link.
Current Product Version - 7.0.5
Supported Framework Version - 9.x.x, 8.x.x, 1.7.x.x

18 comments
We have created a ticket on your behalf and our team will connect with you soon regarding your queries.
Thanks and Regards,
Team Webkul
Thanks
Hi,
Greetings of the day.
We will have to customize this in our module as per your requirements. For more details, please connect with us on our support channel or you can also email us at [email protected]
Regards,
Team Webkul
Greetings of the day!
As we can see you have already created a ticket for the same, and we have responded to you as well. Please check and you can further communicate on the ticket itself.
Best Regards.
You can give access to third party to use our marketplace database with the help this module : https://store.webkul.com/Prestashop-Marketplace-Web-Service-API.html
For more details on the same please raise a ticket at our support ticket system- https://webkul.com/ticket/ or you can email us at [email protected]
Thanks & Regards
Thank you for showing interest in our module.
Currently, there is no option to create a global product in Advanced Marketplace module but we have Extention of this module that is Prestashop Marketplace Seller Price Comparison in which you can get this feature please check out the module.
As for the theme, whichever theme you will use it should follow the below parameters-
For Prestashop 1.6 platform – Our module is compatible with all the standard Prestashop themes. The theme must be developed on the basic Prestashop standards(bootstrap).
For Prestashop 1.7 platform – Our module is compatible with any theme compatible to Prestashop1.7 version. It is mandatory that the theme must be made on the Starter theme.
If you have any query then you can raise a ticket at our support ticket system- https://webkul.com/ticket/ or you can mail on [email protected]
Thanks & Regards,
Team Webkul
Thank you for showing interest in our module.
As the Prestashop is an open source platform and yes, All our modules have open source code that is code for every module is readily available once you purchase the module.
If you have any query then you can raise a ticket at our support ticket system- https://webkul.com/ticket/ or you can mail on [email protected]
Thanks & Regards,
Team Webkul
You can raise a ticket at our support ticket system here – https://webkul.com/ticket/ and we will send you the updated version of the module.
Thanks & Regards,
Team Webkul
You can raise a ticket at our support ticket system here – https://webkul.com/ticket/ and we will send you the updated version of the module.
Thanks & Regards,
Team Webkul