Introduction
Pimcore Connector for Magento 2: The extension allows to connect Pimcore platform with Magento 2 store for product information management. With the help of this integration, you can export – products, categories, attributes, images, and other types of catalog data from Pimcore to Magento 2.
Pimcore is an award-winning open-source software for customer experience management, product information management (PIM/MDM), digital asset management (DAM) and eCommerce. With Magento 2 Pimcore integration, all the digital media assets, product information, and catalog data can be easily managed from one instance.

According to the survey, Pimcore is used by more than 80,000 companies in 56 countries. Pimcore provides features like Data Modeling, Data Management, Data Integration & Delivery, and Data Quality & Semantics.
Pimcore provides the self API-Driven service based Architecture for connecting to the third party software such as ERP, CRM, and eCommerce Channels.
Features
- Connect multiple Magento 2 instances by providing credentials.
- Export simple, configurable, virtual products to Magento 2
- Categories export to Magento 2
- Export attributes and attribute options to Magento 2
- Export complete attribute sets to Magento 2
- Send locale wise data for multiple store views
- Create/export custom-type attributes and images data to Magento 2
Magento 2 API integration
For creating the Magento 2 credentials, you have to log in to your Magento 2 admin panel. You have to navigate ‘System>Integrations>Add New Integration’. In the ‘Name’ field, add any unique name for identification and enter admin panel password in ‘Your Password’. Please leave rest of the field as blank and continue to next step.
Select APIs for Integration After providing the Integration Info, go to the API section and select the following resources and click Save.
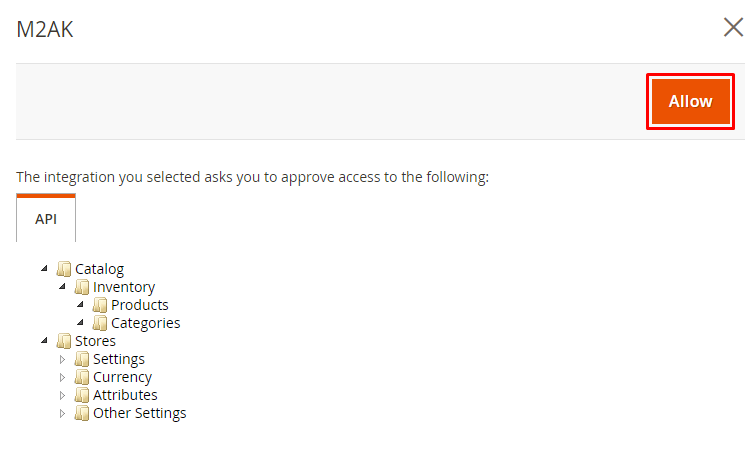
- Catalog, Inventory, Products, Categories
- Stores, Settings, Currency, Attributes, Other Settings
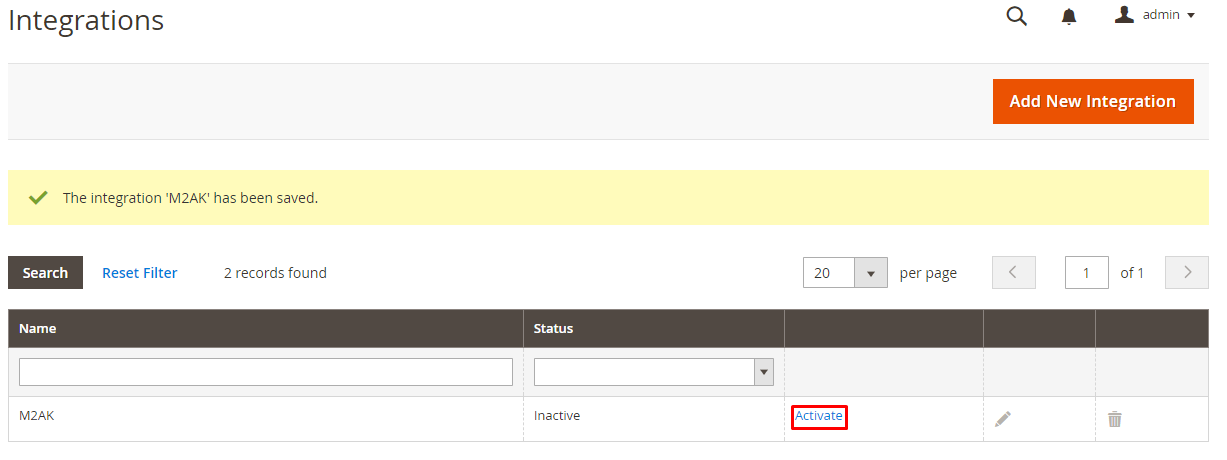
Once the API is created, you will see the integration in the list, click Activate.
The following pop-up window will appear, click Allow button.
The API credentials will be generated as follows. Then, you need to copy Consumer Key, Consumer Secret, Access Token, and Access Token Secret and paste them in Pimcore configuration.
Installing the Module
Please follow these steps for installing the Pimcore Magento2 module in Pimcore:
1 – Download the zip file of our Pimcore Magento2 module and upload the src file in the Pimcore project root directory.
![]()
2 – After uploading the zip file, you have to go your Pimcore dashboard and click on the Tools icon on the left side of the screen. You have to navigate Tools -> Extensions -> Webkul Pimcore Magento2 Connector.
![]()
3 – After clicking on the “+” icon and install the connector, you can see the installed connector in the extension list.

4 – You can see the installed connector icon on the left panel of Pimcore. After clicking on Pimcore Magento2 connector icon, you can see the setup option.

Setup Credential in Pimcore
For setup credential in Pimcore, You have to install the Pimcore Magento2 connector. You will see the Magento2 connector icon on the left of the screen.

For setup new credential in Pimcore, you have to right-click on the All Credential folder and click on the add_credential.

Here you will see a pop-up window where you have to enter the credential name.

After it, you have to enter the credentials. You have to enter these details.
- Host Name
- Access Token

Store View Mapping
After saving the credential, You can see the store view mapping. Here you can select your store views where you want to export the data.

Categories Mapping
Here you can map the categories of your Magento 2 store with the Pimcore. All your Magento 2 store root categories will visible after saving the credentials.

Category Properties Mapping:
You can map the Pimcore categories properties mapping with Magento2 categories properties. For it, you have to map the Pimcore categories attributes code with the Magento2 attributes code.

Product properties Mapping:
For the successful sync the product between the Pimcore and Magento2, you have to map the Pimcore product attribute code with Magento2 product attribute code.

You can see the next tab Export panel. After it, you can export the attributes, attribute sets, categories, and products. You can see three options here. With these options, you can export all the product attributes, attribute sets, categories, and products.
- Export categories
- Attributes, options, and attribute sets export
- Export products

You can click on these options to export the products.
Create Product in Pimcore
For creating the product in Pimcore PIM, you have to navigate Perspective -> Default.

After clicking on the Default, you can see the four option there.
Product Attributes – A product attribute is the characteristics of the product that gives more information about the products. In Pimcore, you can create these types of attributes.
Categories – You can create single or multiple categories for the products.
Products – You can create simple and variant products in Pimcore.
Assets – In Pimcore, you can store all your product assets and use them for the other products.
You can create a category and assign a product in this category. For creating categories, right click on the home button and click on the Create Folder.

For creating products, right click on the folder and click on the Add objects -> Product Folder -> Product.

When you will create a product, product information page will open. Here you have to enter all the product details.

After it, you can enter other product details like color, images, and videos of the product.

After entering all the details, you can click on the save and submit button.
Export product to Magento 2
For export the product from Pimcore to Magento 2, you can choose the export profile. You can choose an individual product or all the product. You have to click on the product folder.

Here you can select the products. Here you can select single or multiple products. After it, click on the export profile.

All the active Magento 2 credential will be visible here with the drop-down menu. Here you can select the credential where you want to export the product from Pimcore.

After it, you have to click on the Ok button. You can see the export results.

Magento 2 Store
After the successful export of the product from Pimcore to Magento 2, you have to log in to your Magento 2 store admin panel. You have to navigate Catalog -> Products.

You can also see the products in Magento 2 Store customer end.

Support
For any issues related to this module, please create a support ticket at- https://webkul.uvdesk.com/en/customer/create-ticket Also, for any pre-sales queries or customization discussion, please drop an email to [email protected]
Current Product Version - 1.1.0
Supported Framework Version - Magento 2.0.x, 2.1.x, 2.2.x,2.3.x Pimcore 5.5.x, 5.6.x


Be the first to comment.