Introduction
OpenCart Web To Print: Using this extension, the customers will be able to customize and design their selected products at the storefront. If you are selling out personalized products like Signatures, stationary, etc. then this extension is the best one for you and your customers as there are many options to customize the product. The customers will be able to choose from the predefined templates wherein the customer can change/alter the image, text, and layout within the template.
Features
- Fully canvas based product customizer.
- Admin can add images for adding images to the product template.
- Admin can add colors to the text, shape editor on canvas.
- Admin can edit the product template and add some initial design for the customizer.
- Admin can create multiple templates for a single product like for front design, back design etc.
- The customer can edit the template in the front-end.
- The customer can use different editors for customizing the design like an image editor, text editor, shape editor.
- The customer can search images using pixabay while designing.
- Customized template image will be generated, and shown in the cart and other places as the product image.
- The customer can add to cart the customized product.
- After successful purchase customer can download the images from order.
- Admin can see and download the customized image template for the order in the order information.
Installation
Extract the contents of the received zip folder on your system according to your Opencart version. The extracted folder has admin, catalog, image, ocmod, and wtp folders. Now, upload the admin, catalog, image and wtp directories into the Opencart root directory as shown below in the snapshot.

Once you have uploaded the folders, login to admin and then from the catalog section go to Extensions> Extension Installer and upload the XML file. The XML file is in the ocmod folder under module directory. In the ocmod folder, select the Opencart version that you are using and under it, you will find wtp.ocmod.xml file.

After uploading the XML file go to the Extensions > Modification and click on refresh field.

After that in Admin panel go to System -> Users -> User Groups and edit ‘Administrator’ and choose to select all for both Access and Modify Permission for the permission that you want to provide and save it.

Admin Configuration
Admin can configure the module with the help of the following navigation- Extension>Extension, here admin needs to choose Extension Type as Module. In the module list, admin can find Web To Print module.

By clicking the edit button admin will go to Web To Print module configuration.

Here admin will,
- Status- Set the module to enable, in order to use the module.
- Auto Save Time- This is the time by which the template will be automatically saved if the customer or admin have not click on save.
- Allowed Option- The admin can select the allowed options among Text, Image and Other(like shape), which customer can use while customizing the template.
- Search Online For Customer- This is used for customer front so that customers can search for various templates online.
- Pixabay API key- The admin can enter the API key of Pixabay account here and can even get API key by clicking on ‘How to get the api key?‘
- Text box limit- The limit of character in the text box for the template.
- Allowed image extension(s)-The extension for images which can be uploaded to the template.
- Allowed image filesize- The size of the image file that can be added to the template.
- Design Approval Text- The message for final approval for the template design which needs to check by the customer after final design customization.
- Finalize check list-The checklist of the template which specifies the things to be checked in the design template.
How Can The Admin Add Template?
The admin can add a template which can be used by customers if required, the admin can by clicking the Web To Print Tab.

The template can be either edited or added.If admin adds a new template, then on clicking Plus Sign.Admin will be lead to Web to Print Template page-

Here admin will enter,
- Template Name-The name of the template which admin wishes to give.
- Code- The code of the template made by admin.
- Then click on Start button to create a template.
Here, in Step 1 the Admin can enter the dimensions of the Canvas, that is, where the template is posted.

In step 2, on what all sides the do admin wishes to add the template.

Now in step 3, the admin can add the image and the name of the side.

Now, the admin can enter Template on a canvas, where he can select-
- Text- The content in text format which can be provided on the canvas.
- Image- The image which can be included on the canvas.For images, the admin can either use User Image which is available in advance or can search for images Online from Search Online.
- Shape- If the admin wishes to include any sort of shape to the canvas, could be selected from here.
Assignment of Template To Product
The admin can assign Templates to the product by editing the product page you can find a tab –Web To Print.

Here admin can find various templates attached to the product.
Customer Front
The customer has the option to customize a product according to his/her need. For this, he/she needs to navigate the product for which the Customization is possible(or the ‘Customize this design’ button is visible)

The customer can select a product which needs to be customized.
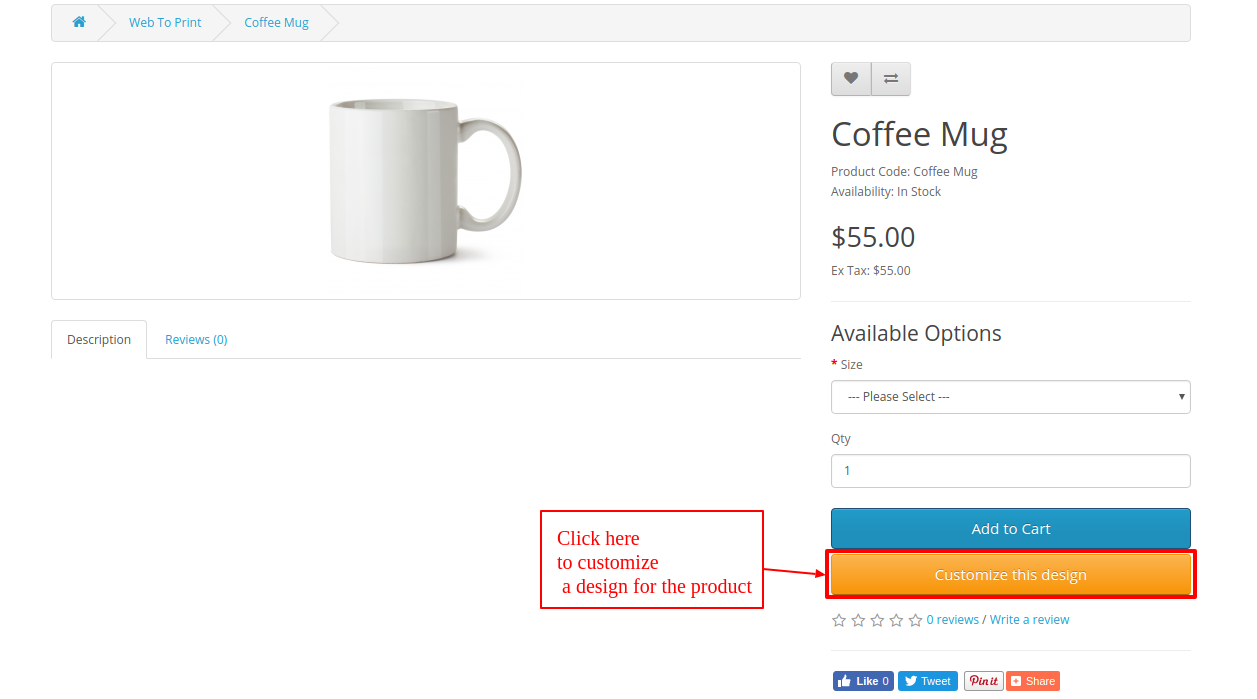
After this customer can click on Customize this design to create a design of his/her choice.

Click on Add new custom design or customer can choose template given by admin for the product.

Here, the customer can add the template code and click on Next button.

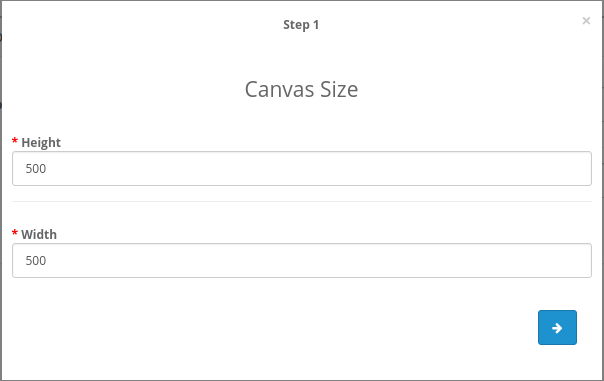
In Step 1, the customer will add details of the canvas according to dimensions of width height.

Now in Step 2, the customer can add the number of sides for customization that is on what all sides these customizations will be reflected.

Finally, here in Step 3 the customer can Add the image and Side name and click on next.
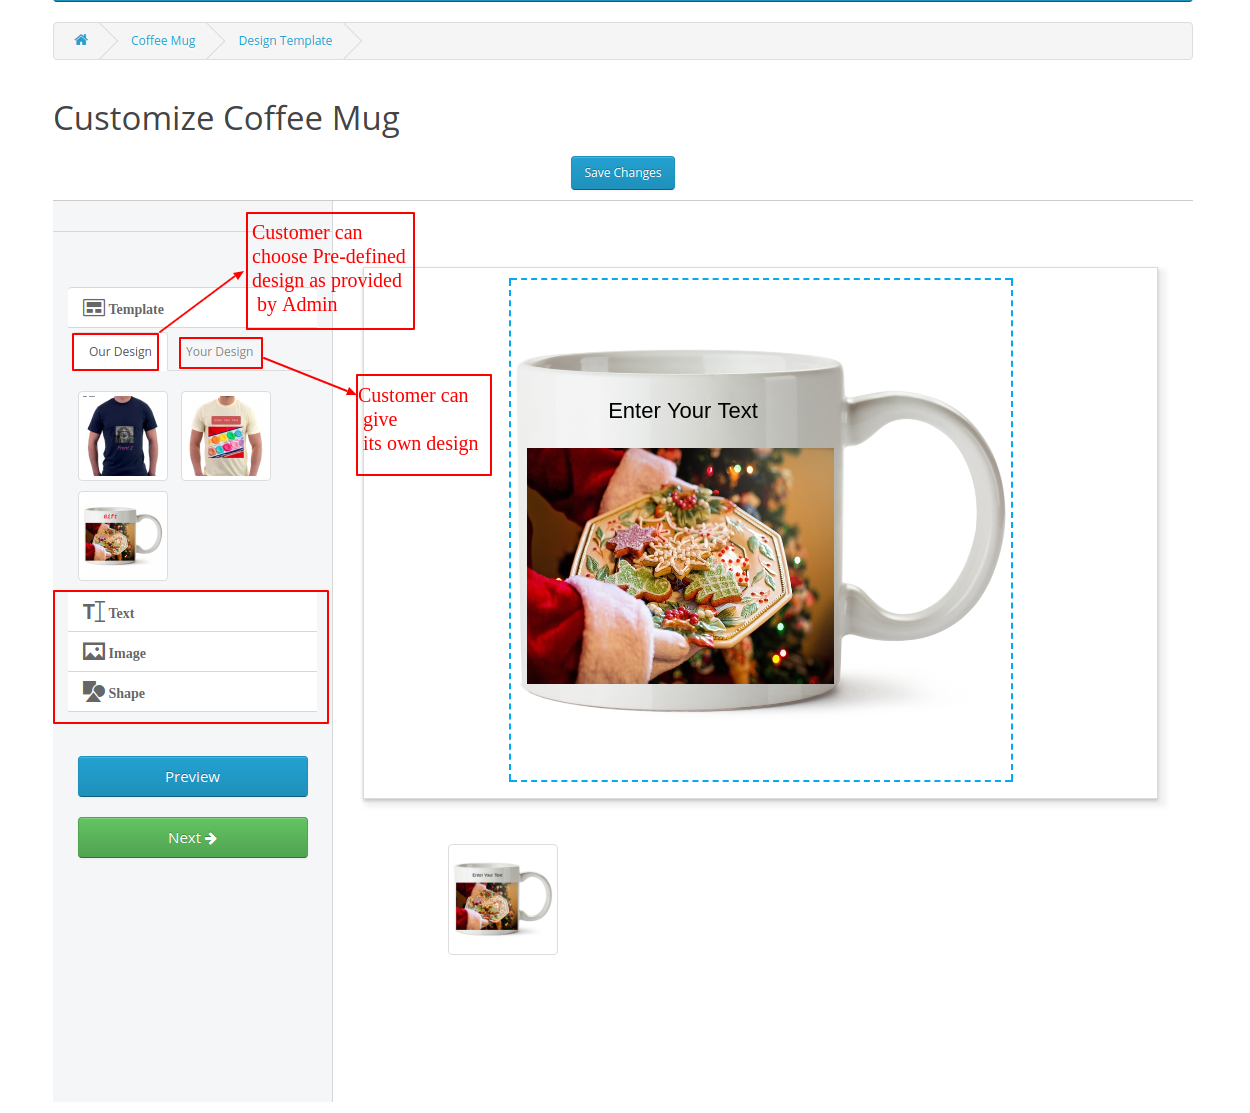
From here. the customer can choose between the Predefined design given by admin in Our Design or can give its own design from Your Design.

If The customer selects Your Design then can add Image, Text or Shapes to the template. From Preview button can see the preview of the design, then click on Save Change to save the template and finally click on Next.

On Review Your Design, the customer needs to give approval for the final design and a review checklist as mentioned by admin can also be seen. Then needs to click on Next.

Now, the customer can see the customized design of the product on the product page which he/she can add to cart and Proceed to checkout.
Customer Orders
Customers can view the .zip file of the customized product, in the orders, like this;

The order contains the small customized image of the product along with the .zip file of the product which contains the image of the product design as desired by the customer.
For any query or suggestions/customization requests get back to us at [email protected] or raise a ticket at webkul.uvdesk.com
Current Product Version - 3.0.0.2
Supported Framework Version - 3.x.x.x

Be the first to comment.