With the Opencart Point of Sale Custom Receipt module, the admin can create custom receipts for POS for each outlet. This will allow the admin to design multiple POS sales receipt and assign them to different POS outlet.
Admin will have option to add or update the logo, add information on the header and footer, assign outlet, cashier name, and font style of print in the customs receipt.
Please Note:
- Opencart Point of Sale Custom Receipt module is an add-on of Opencart POS. So, you need to install Opencart POS module first.
- A single POS outlet can have only one custom receipt.
Features
- The admin can create multiple sales receipts layout
- Enable/disable the status of the custom sales receipts layouts.
- Edit or delete the custom receipts layouts as per the choice.
- Can preview the receipts layout for the quick view.
- Assign receipts to the outlet as per their need.
- Customize the receipt by adding the custom store logo and extra information.
- Define the content for the header and footer section of the receipt.
- A single custom receipt can be assigned to multiple POS Outlets
Installation
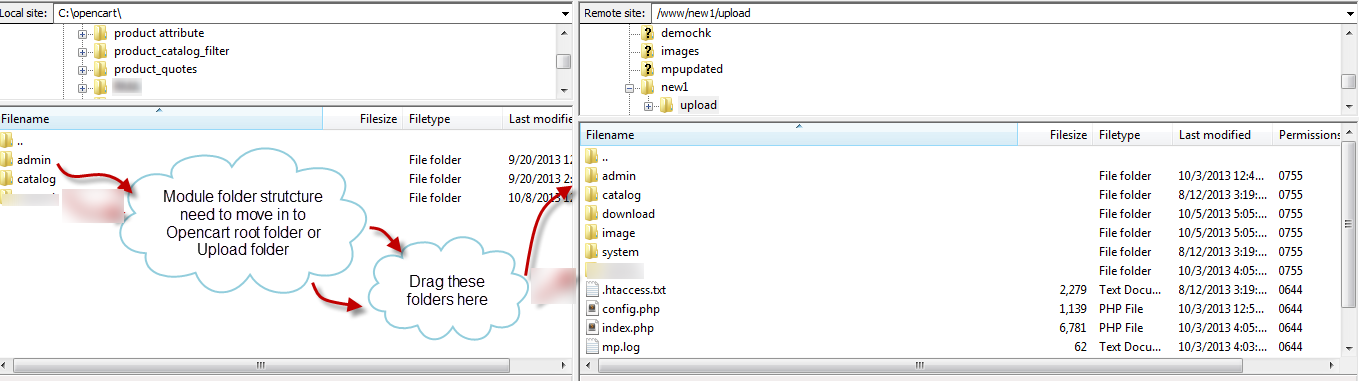
Installation of the Opencart POS Custom Receipt module is very simple. You just need to move Admin and Catalog folder into the Opencart root.
You can also install the Opencart POS Custom Receipt module by uploading the wkpos_receipt.ocmod.zip file through Extension>Extension Installer.

After uploading the file go to the Extensions > Modification and click on refresh field.
 After that in Admin panel go to System -> Users -> Usergroup and edit ‘Administrator’ and choose select all for both Access and Modify Permission and save it.

Admin Configuration
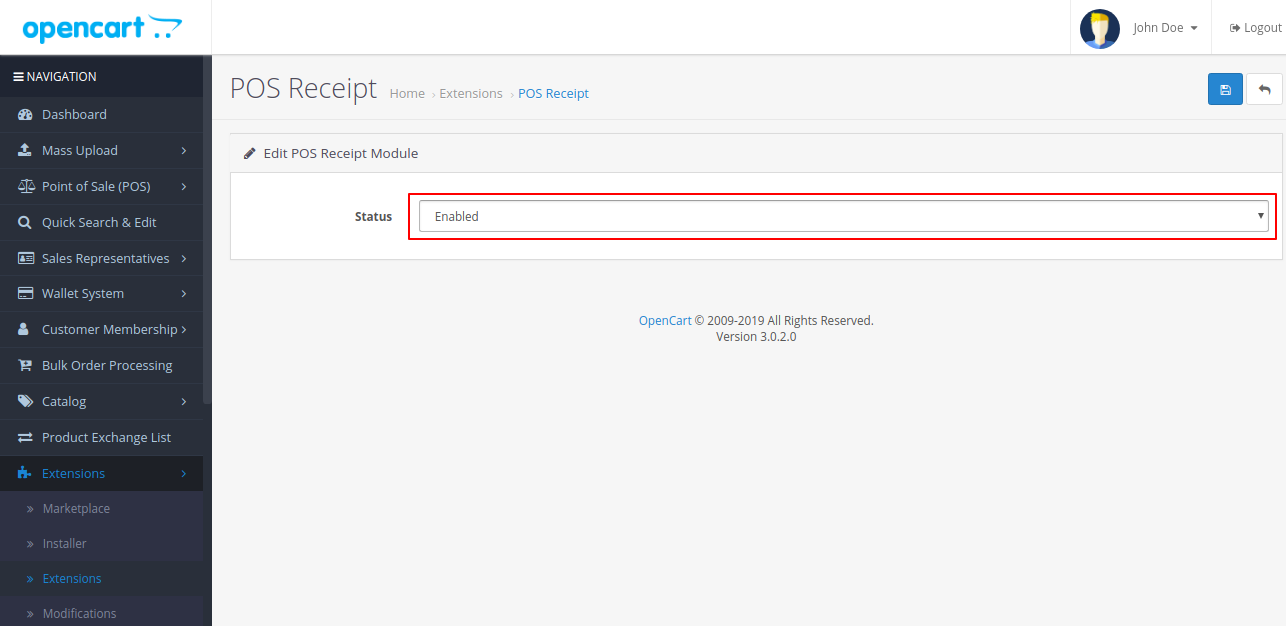
After the module is installed successfully, the admin can navigate to Extensions>Modules>POS Receipt as shown in the image below.

The admin can edit the module by clicking on the Edit Button. On clicking the edit button, the admin can enable/disable the module as shown in the image below.
POS Receipt
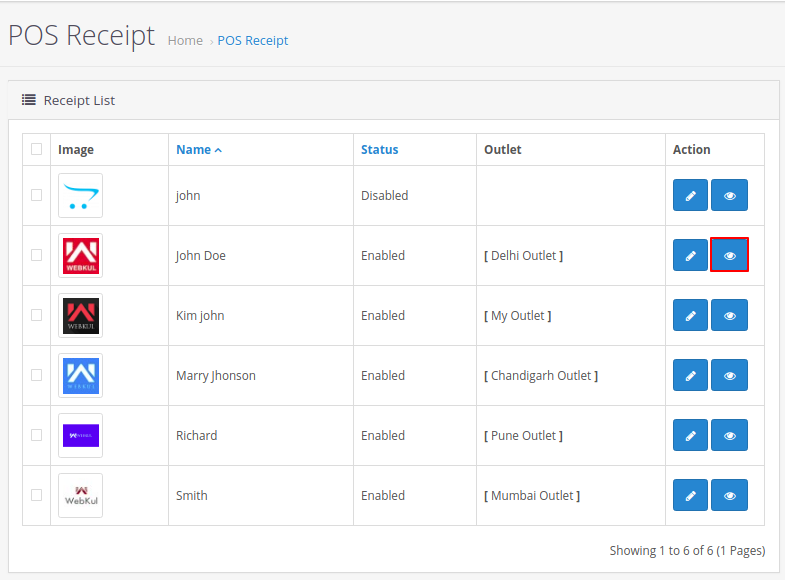
If the POS Custom Receipt module is enabled, the admin will be able to generate custom receipts for various outlets by navigating to Point of Sales(POS)>POS Receipt as shown in the image below.

The admin can view the list of receipts that are created. The admin can filter the receipts based on their name and their status.
The admin can either create new receipts by clicking on the plus button or can edit the existing one. On clicking the plus button, the admin can create the new custom receipts.
In the General section, the admin can edit the following options as mentioned below.
Status: The admin can enable/disable the customs receipt for the POS.
Enter the Name: The admin can set any custom name to the POS receipt.
Paper Size: The admin can set the paper size of the customs receipt like A4, Thermal, and Mini Thermal.
Font Weight for Print: Select the font for the text as Normal or Bold.
Show Store Name: Set the store name to be displayed or not.
Show Store Address: Choose whether to display the store address or not.
Show Order Date: Enable/disable to show the order date on the receipt.
Show Order Time: The order time can be shown on the receipt by setting the order time as “Yes”.
Show Order Note: The order note can also be shown/hidden in the POS receipts.
Show Cashier Name: Enable/disable to show the cashier name on the receipt.
Show Customer Name: The Customer name can be shown/hidden in the POS receipt.
Show Shipping Mode: Show/hide the shipping mode in the POS receipt.
Show Payment Mode: Show/hide the payment mode in the POS receipts.

In the Receipt Logo section, the admin can configure the store logo and can edit the following options as mentioned in the image below.

Show Store Logo: The admin can enable/disable the store logo to be displayed in the customs receipt.
Store Logo: The admin can change the store logo by either uploading the new one from the system or changing from the listed images.
Extra Information: If required, the admin can enter the extra information. This information will be displayed just under the address in the POS receipts. The admin can use this section to add the TIN number, Store number or any other information that the admin want to show in the receipt.
In the Receipt Content section, the admin can add the header and the footer of the customs receipt and even enable/disable the same as shown in the image below.

The admin can Assign the Outlets to the customs receipts. If required, the admin can even assign multiple outlets to one single receipt.
Note: The admin cannot assign multiple custom receipts to single POS Outlet. On adding the POS outlet which is already assigned to a receipt, the admin will find that the POS outlet will get removed from the previous receipt and will get added to the new one.

Receipt Preview
After configuring the POS receipt, the admin can preview the POS receipt by clicking on the preview as shown in the image below.
After clicking on the Preview Button, the admin can view the customs receipt as shown in the image below.

POS Front End
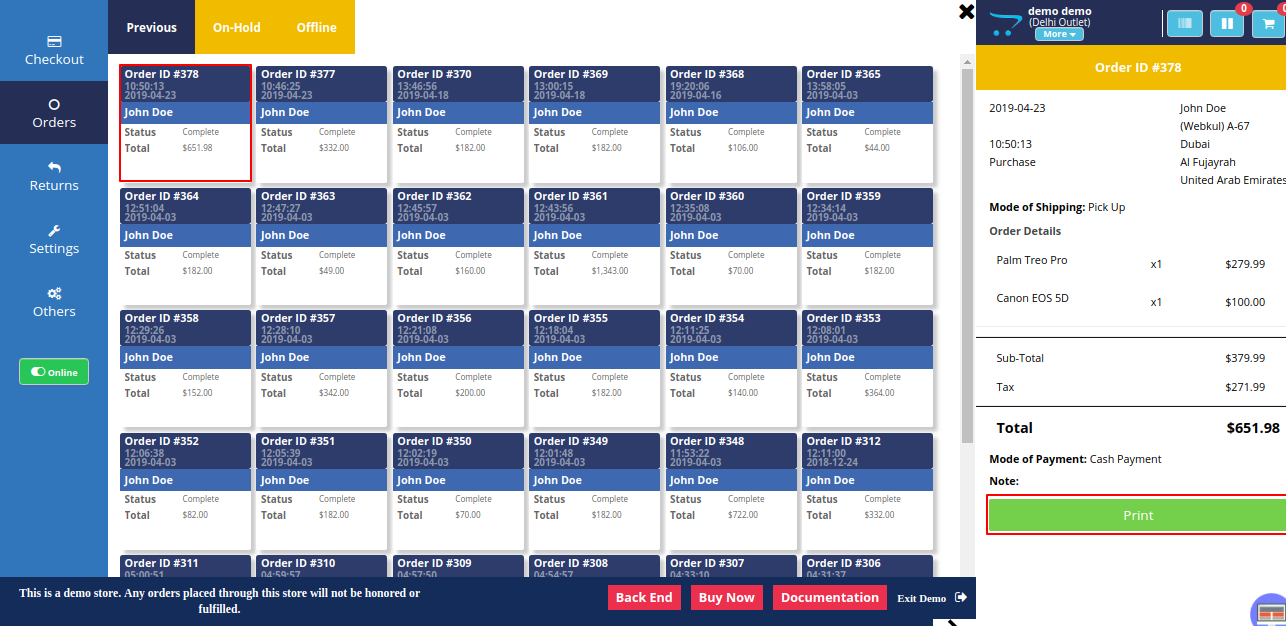
On the POS front end, after the POS agent places the order. The POS custom receipts can be printed by clicking on the Print Invoice button as shown in the image below.
 The POS sales agent can also print the receipt by navigating to Order>Selecting the order>Print as shown in the image below.
That’s all for Opencart Point of Sale Custom Receipt extension. Further if you are still having any issue please feel free to add a ticket at https://webkul.uvdesk.com/
Current Product Version - 1.1.0.0
Supported Framework Version - 3.x.x.x

Be the first to comment.