OpenCart Marketplace Multi-Step Vendor Signup: The trend of filling in long forms has passed out of sight with the introduction of multi-step forms, cutting short the lengthy registration process for website users.
The Opencart Marketplace Multi-Step Vendor Signup module allows the admin to develop plain and simple, multi-step registration forms for the sellers.
This eases the form filling procedure as the sellers will not have to go through several pages and visit those strenuous fields which they need to fill in.
The admin simply configures the number of steps of a registration form and even allows uploading file extensions for sellers.
For every step or page of a registration form, the admin adds the attributes or fields which the sellers need to fill in.
On submitting the registration form, the seller receives a mail including the OTP. The seller needs to enter the OTP and verify it.
Just a plain sailing registration form can get good fortune for your website by converting the visitors into leads.
Note: This module is a Marketplace add-on, therefore, you must install Webkul OpenCart Multi-Vendor Marketplace.
Check the plugin workflow at the storefront and the setup overview –
Note:
1. This module supports all templates and themes including the Journal theme.
2. Opencart Marketplace Multi-Step Vendor Signup module supports the Multi-Store feature of default Opencart.
Features
- The admin can create easy to go, multi-step registration forms and their attributes.
- The admin sets the number of steps or pages of the registration form (maximum 5).
- File Extensions which the sellers can upload are chosen by the admin.
- Email Verification is enabled by the admin.
- In the frontend, the sellers need to add the necessary details to register themselves.
- Before submitting the form, the sellers receive the OTP on emails for verification purpose.
Installation
Firstly, extract the downloaded zip file. After that, open the correct Opencart Version Folder.
According to Opencart Version installed in your system. Then, upload admin, catalog, image, and system to the Opencart root directory.

Refresh Modifications
The user can navigate through Extensions > Modifications. Now click the Refresh button as visible in below screenshot.
Edit User Groups
After that, go to System > Users > Usergroups. And then edit ‘Administrator’. Click Select All for both Access Permission and Modify Permission and Save it.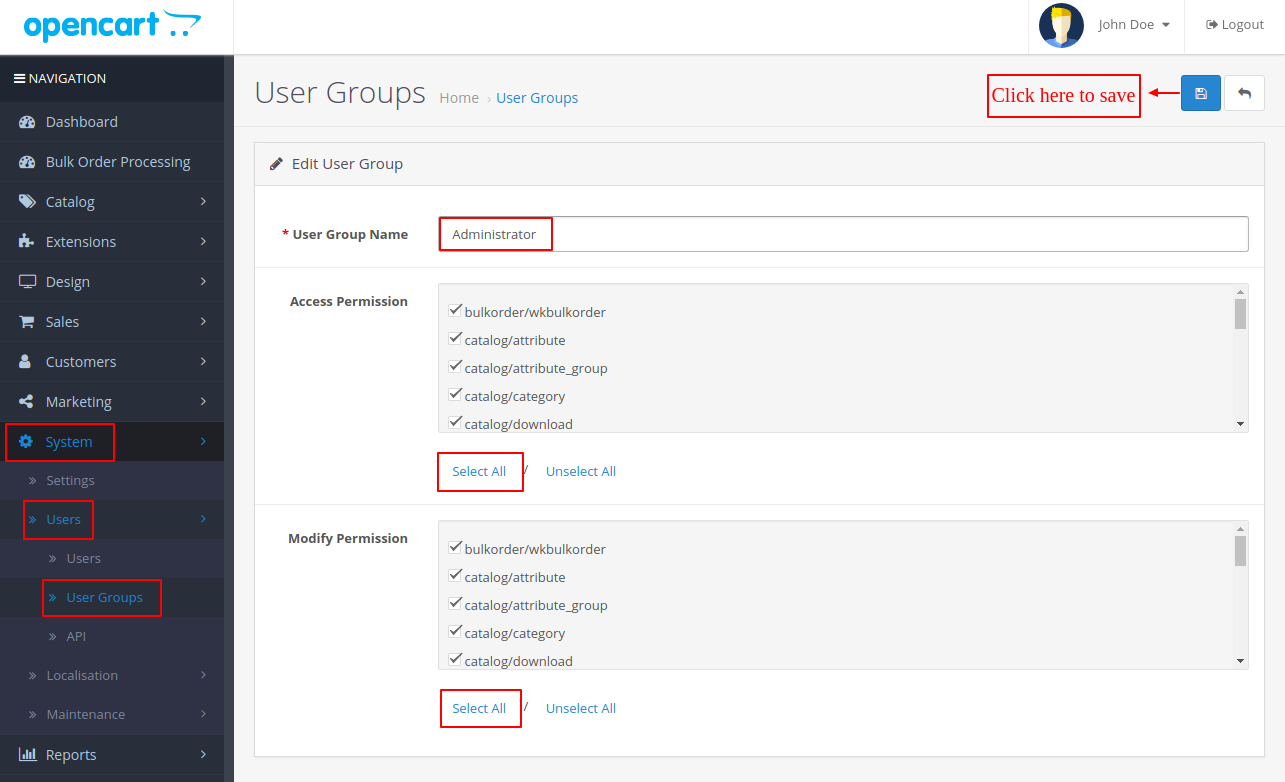
Install
Similarly, navigate to Extensions > Extensions > Modules. Find OpenCart Marketplace Multi-Step Vendor Signup from the list. Click the Install button as visible in the screenshot below.

Admin Configurations
On installing the OpenCart Marketplace Multi-Step Vendor Signup successfully, the admin needs to navigate through Extensions > Extensions > Modules. Now find Marketplace Multip-Step Vendor Signup.
Thereafter, the admin needs to Edit the Marketplace Multip-Step Vendor Signup for configuring the settings of the module.
After that, the admin configures the details present under the General tab as follows:
Status: The admin can enable or disable the status of the module.
Allowed No. of Steps: The admin defines the number of steps required for the registration process (the admin can define maximum 5 steps).
Allowed File Extensions: The admin specifies the file extensions such as pdf, doc, zip, jpg, png.
Email Verification: The admin may enable it for email verification before a new user registers.
Group List: Adding New Groups
Once the admin configures the settings under the General tab, the admin will find Marketplace Multip-Step Vendor Signup, under the Marketplace menu option as shown in the image below.
The submenu options- Group List and the Group Attribute options are present under Marketplace Multip-Step Vendor Signup.
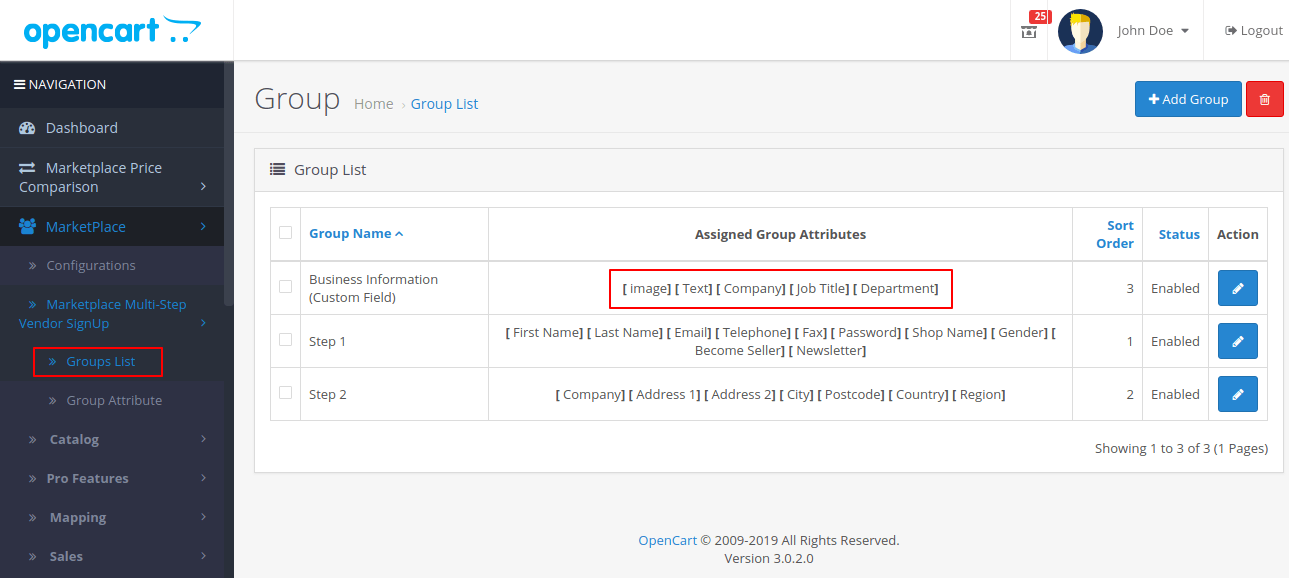
Therefore, on clicking the Group List menu option, the Group page opens up, under which the admin can add a New Group and assign attributes to the Group which the admin creates. 
Adding a New Group
The admin can add a new group by clicking the Add Group tab present in the Group page as shown in the image above.
On clicking the Add Group tab under Group List, the admin will have to configure the Category Name, Sort Order, and the Status of the group.
The admin configures the New Group Fields as under:
Category Name: The admin needs to add the name of the Category (for the registration form, such as Business Information).
Sort Order: The admin defines the sort order for the category.
Status: The admin can enable/disable the status of a category. 
On a new Group creation (such as, Business Information (Custom Field)), a success message- “You have modified Group” displays, as shown in the image below.
Creating Group Attribute(s)
To create attributes for the New Group, the admin can navigate through Group Attributes menu option as shown in the image below.
Therefore, the admin needs to click on the Add Group Attributes tab to create new group attributes.

On clicking the Add Group Attributes tab, the Group Attribute Add page opens up, under which the admin has to configure the fields like Group Attribute Name, Type, Value, Validation, etc.
After that, the admin configures the Group Attribute fields as under:
Group Attribute Name: The admin needs to add the name of the attribute.
Type: The admin selects a type for the group attribute.
Value: The admin defines a value for the Type chosen.
Validation: This field use the Regex on which the attributes are based. Click here to know more about Regex.
Required: The admin enables the Required tab.
Status: The admin can enable or disable the attribute.
Sort Order: The sort order for the attribute.
Select Group: The admin can cho ose a group for the attribute. 
Finally, as the admin saves the attribute details, a success message- “You have modified Group Attribute” shall display as shown in the image below. 
The attributes which the admin creates will display against the group which the admin creates (Business Information (Custom Field)) under Group List menu option as shown below.
Frontend
Likewise, in the frontend, the seller or customers can sign up and register themselves by filling in the registration form as shown in the image below.
Firstly, the sellers/ customers need to fill in Account Details (Step 1) such as First Name, Last Name, Email, Telephone, Password details etc, on the given registration form.
Therefore, to switch to the next page of the registration form, the sellers/ customers need to click on Next button. 
On the second page (Step 2) of the registration form, the sellers/ customers need to add the details such as Company, Address 1, Address 2, City, Pincode, etc.
Likewise, the sellers/ customers can visit the next page of the registration form, by clicking on the Next button.
The sellers/ customers can also view the preceding page by clicking on the Previous button. 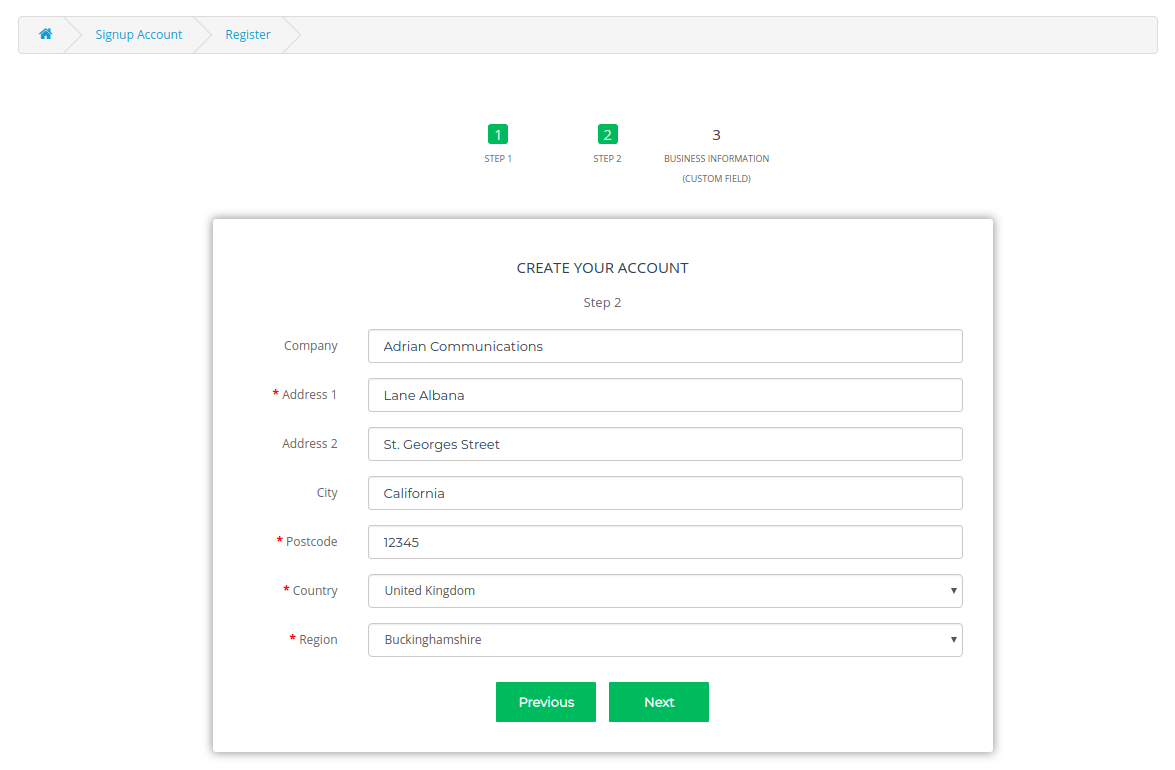
As the sellers/ customers click on the Next button, it redirects to the Business Information page as shown in the image below.
The last step/ page of the Registration Form includes the Privacy Policy checkbox.
The sellers/ customers need to check before Submitting the registration form.

On submitting the registration form, the seller/ customer shall receive a mail. The mail includes the OTP details as shown in the image below.

The sellers/ customers will add the OTP before submitting the registration form and click on the Verify OTP Code as shown in the image below.

The seller/ customer receives a account creation notification when the account is created.  Seller Profile
After successfully registering, the profile details for the registered user will be available under My Account > My Profile.
On navigating to My Profile tab, the seller can view the following fields:
- Profile Details,
- Payment Mode,
- MP MSV Custom Fields, and
- Achievement tabs under Account Information, as shown in the image below.

Above all, Under the MP MSV Custom Fields tab, the seller can add the details such as Company, Job Title, Department, Image, and Text.
In addition, the Image field allows the sellers to upload the files. Moreover,The seller can also download the same file by clicking the download button. 
That’s all for the OpenCart Marketplace Multi-Step Vendor Signup. If you still face any issue, feel free to add a ticket at webkul.uvdesk.com and let us know your views to make the module better.
Current Product Version - 2.1.1.0
Supported Framework Version - 3.x.x.x

Be the first to comment.