Introduction
User Manual of Kitchen POS System for OpenCart: The admin can customise the background image as well as the dimensions (background image size) for the POS panel’s login page using the Kitchen Point Of Sale System. This POS system also allows the administrator to change the colour of the POS panel layout as need. Pos agents will also benefit from the addition of an opening amount cash drawer. Now, using this POS system, the pos agent can even split the customer’s payment if the customer wants to pay some cash and the rest with a card.
Note: For the User Manual of POS System for OpenCart, kindly refer to the OpenCart Point of Sale (POS) module.
A Check a brief overview of the pos terminal –
Check a brief overview of the initial configuration settings –
The check a brief overview of the outlet creation and other options –
Features of Kitchen POS System for OpenCart
- The colour of the Kitchen POS panel layout can be customise by the administrator.
- The background image for the Kitchen POS panel login page can be customise by the administrator.
- The background image for the Kitchen POS login screen can be customise in size by an administrator.
- The Kitchen POS agents have access to a cash drawer with an opening amount.
- If a customer wants to pay with a card for part of the transaction and the remainder with cash, POS agents can split the payment.
- The inventory and sales may be readily manage by the administrator.
- More users can be add to the Kitchen POS system by the administrator.
- Search for products by entering the Product Name, Model, SKU, or Barcode into the search box.
- Product Quantity can be change by entering it in the card details section.
- Enable and disable the user’s online/offline mode.
- The agent can directly add the custom product that is not in stock to the cart (A service or a product not available in the current inventory, etc.).
- When you add a product to your cart, the price changes based on the weight you provide.
- Any product that has already been add to the cart can receive a custom pricing update.
- There are two sorts of payment methods supported: cash payment and custom payment.
- The agent can enquire about the low stock levels.
- Returns are simple for the agent.
- Supports the feature of home delivery.
- If the customer requests that the order be deliver to their home, the salesperson might charge the customer for home delivery fees.
- When making a purchase, the customer can use their credit balance.
- With this one module, the admin can manage both the offline and online store inventory.
- Using the admin panel, automatically generate barcodes for the goods.
- After printing the barcodes, attach them to your merchandise.
- It can even renew barcodes before mass-producing them.
- A barcode can also be used by the Kitchen POS agent to add the product to the basket.
- The data of the customers can be manage by the administrator.
- At the time of checkout, the salesperson can now even regulate the product weight.
- Customers might choose to have the product deliver at a later time.
- The sales representative and the store owner can review daily and monthly information based on the customer, payment method, and sales.
- The product description, sales report, and sales chart are all found in the Kitchen POS Report area.
- Overall Sales and Total Payment in Credit (if a credit card is used) are include in the report.
- Admin-level price parameters for increasing or reducing the pos product
- The OpenCart product display in the Kitchen POS terminal can be enable or disable.
- The multi-store configuration can also be manage by the admin.
Installation
The Opencart POS System plugin is extremely easy to set up. All you have to do now is transfer or upload the admin, catalog, image, System, kitchenpos, ocmod, system/library, manifest.json, and pos_sw.js into the OpenCart root folder.

After you’ve transfer the folders, use the extension installer to upload the XML file wkpos.ocmod.xml from the ocmod folder.
Note –
- For version 3.x.x.x, you have to upload the ocmod module file– kitchenpos.ocmod.zip
. - For version 2.3.x.x, you have to upload ocmod– kitchenpos.ocmod.xml
.
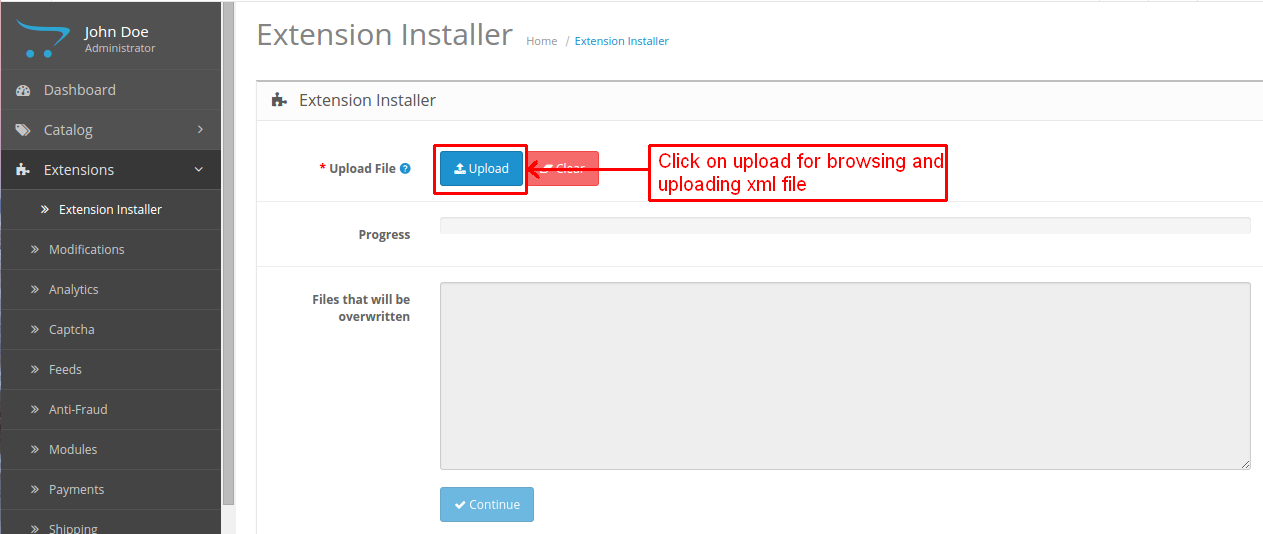
After you’ve upload the file, go to Extensions > Modification and refresh the field.

User group
After that, go to System -> Users -> Usergroup in the Admin panel, modify ‘Administrator,’ select all for both Access and Modify Permission, and save it.

So, under Extension > Module, you may install and uninstall the module, as well as edit it.

Module Configuration of Kitchen POS System for OpenCart
After the POS system module has been successfully install, the admin will see the POS system tab, where he or she can administer the POS system.
Under the Extensions tab, the admin can configure the module by going to Extensions> Modules > Point of Sale (KPOS) System.

The POS System’s status can be readily changed by the administrator. In addition, as illustrated in the above screenshot, the admin can select the store from the Stores field.
General Settings
The admin will manage the following fields in General Settings:
Store Region / State:For the Kitchen POS system, the admin will choose the region/state.
Heading on Login:The main heading for the login page will be entered by the administrator.
Sub-Heading on Login: The admin will enter the secondary heading of the login page.
Login background image: The admin will upload the login background image.
Login background image size: The admin will enter the background image size.
No. of popular products: At the POS, the admin will input the maximum number of products that will be presented in the popular product section.
Quantity for low stock warning:To display the low stock notice, the administrator will input the maximum number of products.
Show whole product quantity online:This field has two options: Yes or No.
Yes:If the field is set to yes, the online store will be allot the entire amount. This means that a buyer can place an online order for the entire quantity accessible at the online store.
No:In this situation, the administrator will manually assign some quantity to Kitchen POS and the remainder to the web store. For example, if the admin has 100 units of product 1 and assigns 80 units to POS of outlet 1, the online store will only have 20 units available.
Show products with zero quantity in POS panel:
Yes: In this situation, the zero-quantity products will appear with other products on the Kitchen POS panel.
No: The products with zero quantity will not be visible on the Kitchen POS panel in this situation.
Send order e-mail to sales agent: The admin will set this to Yes if the order email will be sent to the sales agent; otherwise, it will be set to No if the order email will not be share with the sales agent.
Customer Settings
The admin can add a guest customer to the Kitchen POS System in Customer Setting so that if someone wishes to check out as a guest, the admin can use this information by default under the guest checkout transaction.

Payment Setting
The admin can set the status of cash, card, and customer credit under Payment Setting. The admin can also change the status of all orders, including cash, card, and customer credit.
For the Kitchen POS System, you may even define the title name of cash, card, and customer credit.
The Discount Status, Coupon Status, and Tax Status can also be enable or disable by the administrator.

Shipping Details
The admin can manage the Kitchen POS system’s shipment details in the Shipping Details area.

The administrator has select Home Delivery as the delivery method.
Status: Customers can choose whether to have their orders deliver to their homes or not.
Title: This is the title that will appear on the front end for the home delivery option.
Maximum Charge: Set the maximum amount that salespeople can charge the customer for home delivery fees.
Customize Receipt
The admin can change the receipt according to their needs in Customize Receipt.

The receipt’s paper size and font-weight type can also be customise by the administrator.
Paper Size:

Font Weight for Printing:

Barcode Setting
The admin can change the barcode size and whether the barcode should be print with or without the product name under Barcode Setting.
We can also choose between horizontal and vertical barcode images.

The admin can –
Create a barcode By specifying barcode generating parameters such as productId, SKU, EAN, and UPC.
Set the number of barcodes to generate in each slot while creating the bulk barcode.
PWA Manifest & POS Layout Color
In PWA Manifest & POS Layout Color the settings for the PWA and the POS colour layout will be implement by the admin.

Here the admin could define-
Application
- Name- The administrator can give the programme any name they choose to represent it with.
The administrator, on the other hand, could represent the application’s name in multiple languages. This is determine by the default language settings in Opencart.
- Short Name- When the application’s shortcut is create, this name is visible.
- Icon- The application launcher icon is add here.
- Splash Background Colour- The color of the splash screen(application introductory screen) is set from here.
- Application header color- Admin can select application header color.
POS-
- Top Panel Background-Color-The left panel’s background colour will be determine by the sales representative.
- Top Panel Color-The colour of the pos top panel can be change by the administrator.
- Login screen heading- The admin can set screen heading.
- Button color- Admin can set colour of the button.
- Button text color- The admin will state the color of the button text.
Price Setting
The admin can choose whether to increase the price of POS products in a fixed or % value, and this option applies to all POS products.

The admin can –
Enable the price-setting option by enabling the feature, or disable it if necessary.
Choose whether the price will be fixed or based on a percentage.
Set the pricing operation to be performed, which is to raise or lower the product price.
Enter the appropriate amount based on the option select in the preceding steps: fixed, which sets the enter amount to a fixed amount, or percentage, which sets the enter number as a % of the product price.
By selecting the proper option, you can enable or disable the products that have been disable from appearing in the POS terminal.
For more details on the disable/enable product visibility option check the index – POS enable/Disable Product.
How to Add/Manage Users & User Outlet
Admin will click on the KPOS > Users, two tabs for Users and User Outlets may be visible to the admin.

The administrator must first create a User Outlet for the user.
When you select the User Outlet tab, you will be taken to the User Outlet page, where you can view and update existing user outlets.
You can also create a new user outlet for the users (sales agent).
POS Outlets
If the administrator has multiple physical stores and wishes to assign sales agents to each one, you can build an outlet for each one.
So that the administrator can allocate sales agents to outlets and manage inventories for different outlets.

When you click the Add New button, you’ll be sent to the Add Outlet page, where you can create a user outlet for your users.

After that, to add products to the newly create outlet, simply edit it and look for the Manage Products tab adjacent to the General tab, as seen in the screenshot below.
The admin can see all of the products mention here, and then assign them to this outlet by enabling them and setting the outlet product quantity for the ones that are enable.
If the admin uses the Allocate all items to this outlet button, he or she can assign all of the products to the outlet at once.
The product’s POS state can be select by the administrator.
The POS (outlet) quantity for the product can be enter by the administrator.
If we choose unit price, we can then add the goods to the cart based on its weight.
How To Manage/Add Users
Under the Point of Sale (KPOS), when you will click on the Users >POS Users tab then you will be taken to the Users page where one can see the existing users’ list and can update the existing users.
Also, the new user to the POS System may add.

When the Add New button is click, the user for the POS System is add to the Add User (Sales Agent) page.

Inventory/Product Management for POS
The inventory for the POS system can be simply manage. Under Point of Sale (KPOS) > POS Products, the admin can see all of the POS system’s products.

After that, the admin can use the numerous filter options to filter the POS products. Admin can even use the barcode Id to filter the products.
The admin can simply scan the barcode to generate the barcode Id.
The admin will receive the barcode Id after scanning the barcode, which it can use to filter the products as illustrate in the figure below –

POS Product Details
Admin can view the POS product details like –
- Product Image: Admin can see the product image for the POS system.
- Product Name: Product name for the POS system.
- Model: Admin can see the unique product ID for the POS system.
- Barcode: Admin can view the barcode of the product then it can print with the Action tab.
- Price: The pricing for the POS system that the administrator set when the product was upload.
- Total Quantity: The total product quantity of the product.
- Status: The status of your Opencart online store.
- Assigned POS Quantity: Admin can view the assign product quantity for the POS system.
- Action: The administrator can print a product’s barcode. The admin can regenerate the barcode after it has been generate, as seen above.
- Mass Generate Barcodes: The admin can generate the product barcodes in mass.
- Mass Print Barcodes: Select the products, then click the Mass Print Barcodes button, enter the number of barcode slips for each product, and print the product barcode in bulk.

Barcodes will be generate in bulk for the select products, and the admin will be able to print the barcodes as need.

Note:
- If the UPC/SKU/EAN chosen isn’t found in a product, the barcode will be generate with the product ID.
- When you change or update the barcode parameters, always regenerate the barcode instead of refreshing it.
POS Reports
The POS reports can be view by the admin by going to Point Of Sale (POS)>POS Reports. The admin will be able to view the product as well as the sales data from this page.
1. Product Report:
The admin will find information about the product here, such as the outlet to which it is assign, its Model number, the quantity of the product available, the Sold-Out number, the Available quantity, and the Supplier’s name.
You may also filter down the product list by selecting a certain Outlet or Supplier.

2. Sale Report:
The admin will get information about the sales that have occur in the POS system here.
When an order is successfully placing, it appears here with the sales data, which include the following: Outlet Name, Customer Name, Total Amount of Purchase Made by Customer, Order Date, Payment Method select, Order Status, and POS User assign to the order.
The sales report can be populated by the admin using a variety of filters, including as- Outlet name, POS User, Customer, Payment Method, Between Dates, and the Order Mode.

3. Sales Chart
Kitchen POS System for OpenCart allows the Opencart KPOS admin to view the order chart by month in this part. We’ve also include in the ability to see data by day, allowing the store owner to access data for a certain day.
The data is modulating here according to the Outlet and Report Date Filters.

- Report data- This is data wise data that contains information like-
- First Id- The first order identification number of that date.
- Last Id- The identification number of the last order place on that day.
- Number Order- However, this tells the numerical data of the total order place that day.
- Product Sold- This gives details of the number of products sold on that day.
Total –
The overall monetary sales worth of that day’s sales.
- Values Returned—the total amount return to customers as a refund on that particular day.
- Product Returned- The total number of items return.
- Discount Value- The amount of a discount given to customers on goods purchases.
- Overall Sales Value – The difference between the Total Sales Value and the Total Returned Value is the Overall Sales Value.
- Payment in Credit from Sales – This is the entire credit amount collect from credit card customers.
The chart present here depicts statistics from the current month.

- Total customer data in a pie chart.
- Payment Mode again in the pie chart to know the most demand one.

- Monthly sales value division for total sales calculation on a monthly basis. The bar chart, on the other hand, depicts this.
POS Return Management
The administrator has access to the returns filed on behalf of consumers by the agent. To do so, go to Point of Sale (KPOS) -> POS Returns, as seen in the image below.

The administrator can-
Take a look at the entire list of returns.
Filter the results by using the top-level filters.
Click the Edit button to manage the returns.
The return details are displayed after clicking the Edit button, as seen below.

History
Moreover, Admin can check the order and return details in the General section. The admin can also add history notes to the History section, as illustrated below.
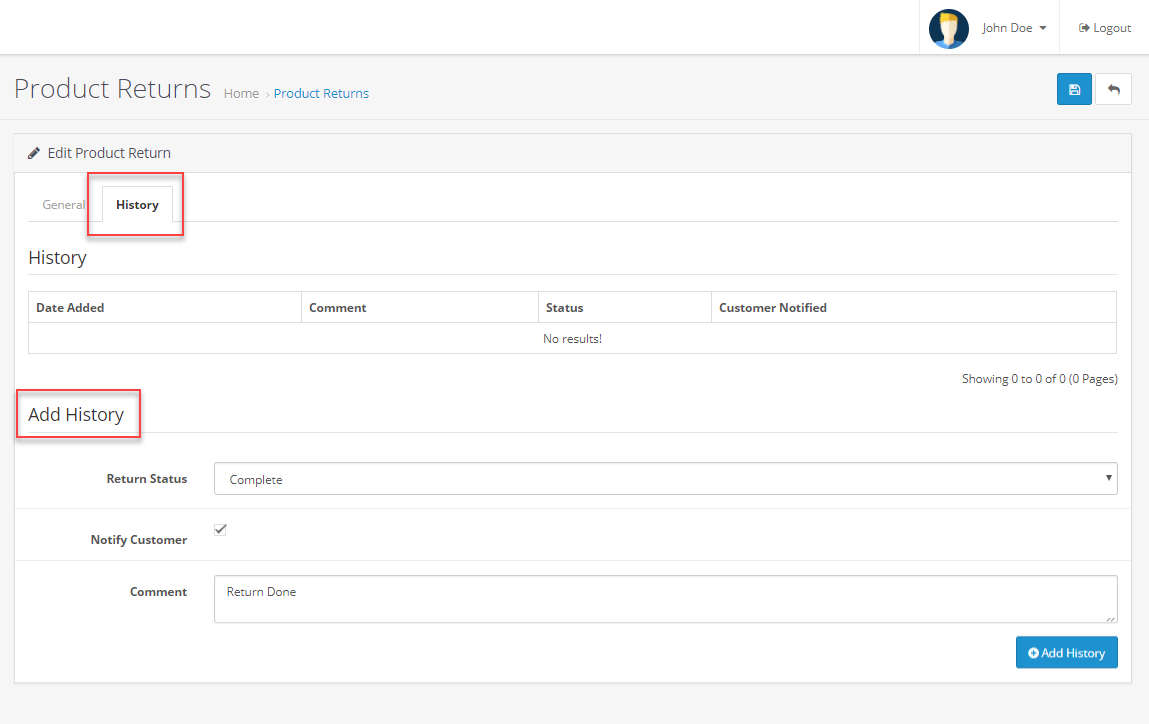
Moreover, An admin manages the return status, can alert the customer about the return status, and can even add a comment for future reference. Then, successfully save history.

POS Order Management
The POS system’s Orders may be readily managed by the administrator. Under Point of Sale (KPOS) System > POS Orders, the admin can examine or update all of the POS system’s orders details.
The business owner can use the numerous filter options to filter the POS products. As may be seen in the image below.

Moreover, Admin has access to all order details and can make changes to the order.
The POS Orders Page will provide details such as:
Order ID – Each order has its own unique order ID.
A transaction ID will have one of two statuses: either an Online Order or a unique number.
- The Transaction ID with Online Order status – When the POS system is connect to the internet, an order is generate (Online Mode)
- Transaction ID with a unique number – When the POS system was not connect to the internet, the order was generate (Offline Mode). The transaction ID status will change to Online Order once the POS user has synced all of the offline orders.
- Status – It will display the order’s current status. For example – Complete.
- Total – It will show the total transaction amount.
- Date Add – Add when the product was add to the cart.
- Date Modified –The date on which the order was complete.
- Action –The admin has two options for viewing and editing the order data.
Supply Management (Admin Management) of Kitchen POS System for OpenCart
The Admin can configure the details of the suppliers and control the items of the suppliers in the Supply Management area.
This section will have a distinct supplier’s information and a separate supplier’s product information so that the admin is aware of the product in the event of a low stock scenario.
Also, the admin can see which products are fulfill by specific providers in the store.

By clicking the Add New Supplier button, the Admin can also add a new supplier. When the administrator clicks the “Add New” button, he or she will be taken to the “Add Supplier” page.

Further, The admin can view all of the supply requests that have been generate against a specific supplier in POS Supply Requests.

POS Credit Balance
The credit balance can also be add to the customer account by the admin. This credit balance can be used by the customer when making a transaction.
Moreover, To do so, the admin will go to the customer list, as illustrate below.

Moreover, The admin will choose a customer from the list to whom the credit balance will be transfer. This takes the user to the customer information page.

The admin can – in the POS Credit section.
Description: Add a detailed remark for future reference.
Enter the amount to be credited in the Credit Amount field.
Finally, press the Add Credits button to complete the credit balance transfer.

Note – After installing Kitchen POS your Kitchen POS URL will be like – yourwebsite.com/kitchenpos
POS System (Frontend) POS User Management of Kitchen POS System for OpenCart
Using the Username and Password set by Admin, the user can quickly log in to the POS System (frontend).

The POS user (sales agent) will be redirect to the POS System (frontend) after a successful login, where they can examine all of the categories, products, and check out panels.
Cash drawer: A cash drawer can connect to your printer to open after printing the sales receipt. The cash drawer connects to the receipt printer with the interchangeable cable provid. It can be placed on a counter and can support a monitor, receipt printer, or another point-of-sale device (sold separately).

Moreover, The POS user can also manage account details and see a list of orders (a list of orders which is generate by the sales agents).

All products with a high selling rate or the most often purchase items/products will be include in the Popular Category.
The four symbols (Warning, Question mark, Information, and Star) contain information on the products in question.
Warning: This item is currently out of stock, and you will not be able to add it to your cart.
Question Mark – A product that can be customise.
Star – Offers/discounts are indicate by a star.
Information – It displays product details such as name, price, and quantity remaining.
Weight- This is the product’s weight, which can be enter in the popup that comes when you click the product.

As indicate in the above image, the customer must add the weight of the product select in the pop-up.
The admin can examine the Order history, cash drawer, refresh product list, and so forth, as shown in the image below.

Add to Cart
Similarly, when you hit the Add to Cart button, the product will be add to your cart along with an update price based on the product’s weight.

The admin can add quantity by clicking on the down-hand side Quantity, entering the number, and clicking Go.

Add to Cart using Barcode
In some situations, the POS agent’s scanning device may fail, in which case the agent can enter the code online using the Opencart point of sale panel. As seen in the image below, the agent will select the Barcode Scan option:

If the product has any custom options, the agent will choose the right ones, as seen in the image below:

The POS agent will then select the Add to Cart option. The product will be added to the cart in a split second.

Moreover, The product can then be added to the cart by scanning the barcode.
Fullscreen
In addition, the POS frontend could transform into fullscreen for the sales agent to visualize the products much easier.

Orders History
The user can view all orders sold by the relevant agencies in the Kitchen POS System for OpenCart.

In the Orders History panel, the user can see all of the orders that the corresponding agent has sold.

By selecting the Print tab, the Sales Agent (POS user) can view the order information and print the receipt for that specific order.
Offline Mode
The Kitchen POS System for Opencart includes the most valuable and unique feature: your sales agent, cashier, and other employees can work on the Kitchen POS system even when they are not connect to the internet.
And In offline mode, they can use all of the Kitchen POS’s functions and features. They are able to perform all transactions without using the internet.
Furthermore, this functionality will also help you if your store is locate in a region with inadequate online connectivity or no internet at all.

Moreover, they can view all of their offline transactions or orders in the Order History > Offline section. Customers’ names, transaction ids, and dates can all be used to filter orders. As may be seen in the image below.

Hence, you or your cashier or sales representatives can sync all of the offline orders to the online Opencart Store if you or they have an internet connection or are in online mode.
Order on Hold
The Sales Agent can place the cart on hold and see both the current cart and the cart that has been put on hold here.
Furthermore, he can easily move on to the next transaction/order without having to delete the unfinished order/hold order.

And when a sales agent places an order on hold, he or she might add a note explaining why the purchase is being held.

Moreover, under Order History > Hold Order, the Sales Agent can see all of the hold orders.

Hence, when a sales agent clicks on a hold order, the order is forward to the cart, where the sales agent can inspect the order details and proceed to checkout.
Cash Drawer
The sales agents verify the cash quantity in his Cash Drawer when they sign in. After checking, the amount is submit for the first time right after signing in.
The credit amount is the amount taken from the customer by the agent against the order’s due amount.
The Debit amount is the amount of money returned to the customer as a change.
The net amount add to the cash drawer after debit and credit is the balance.
The starting amount in the cash drawer is known as the opening balance.
After a set of work hours, the cash drawer’s closing balance is calculate.
You may see the opening balance by clicking on Cash Drawer, as shown below:

Refresh Product list
This keeps the product list current because any updates made by the admin in the backend are reflect in the frontend.

Refresh Category list
This option allows the category list to be refresh.
Any changes made by the admin in the back-end will be reflect in the front-end.

Returns
Customers can also return their orders if they so desire. Customers’ returns will be filed by the agent on their behalf. As shown in the image below, the agent will click the Return Order button.

Settings
In the user Setting Panel, the user can access and change his or her account information, as well as change his or her password.

The sales person can also change the POS system’s language and currency.

Note: If you set the “Select Language” option under the options at the POS terminal, the module will additionally support RTL (Right to Left) languages.
The language that has been chosen is English.

Similarly, the POS Terminal reflects the same.

Now, go to the POS terminal settings and choose Arabic as the language.

The select language, Arabic, will be display on the POS terminal.

Easy Product Search
The user can quickly search for any products using the product search tool by inputting the product’s keyword. The product from the search result can also be add to the cart.
Use the search function to find the product name, SKU, and barcode.
Search By:
Name-
 SKU-
SKU-

Barcode-
Adding A Custom Product To The POS Cart
Adding Custom Products To The POS Cart Is Just Like Adding Any Other Product.
A guarantee for a product, a service, or a product that isn’t yet available in stores but has been introduce are all examples of custom products.
Simply tap the “Add” button, as shown in the screenshot below, to add a custom product.

Add –
You Will See A Pop-Up After Clicking The “Add” Button Above, Where You Must Set The Product-Information.
- Name
- Cost
- Quantity

After you’ve enter all of your information. To add the custom product to the cart, simply click the “Add” button on the pop-up.
After adding a custom product to the POS cart, you can view it, remove it, and increase or decrease the quantity of the product in the cart.

If you want to change the price of a product that has already been add to the cart, simply tap on the price of the product in the POS cart.
After tapping the price, a pop-up window will appear, allowing you to change the price or set a custom price for the select product before pressing the Apply button. This Will Change/Update The Price Successfully.

After that, the POS user must select a customer by clicking on the Select Customer Tab. The POS user can choose the customer here.
Customer Selection
If the customer has previously register, the POS user can search for the customer by name, mobile number, or phone number.

If the customer hasn’t been add or register yet, the POS user can do so and go to Checkout.
Add customer
Then, by clicking on the Add Customer button, a pop-up window for Customer Details will appear. To save/register the customer, the POS user must fill in all required details.

Using the discount tab, the sales agent can give a discount on the Total Amount of the Cart after selecting the customer.
The sales agent can offer discounts as a Fix Amount or a Percent (per cent) Value of the Total, or he or she can combine both discount techniques on the Total.

Also, if the buyers have a coupon code that you have provide. In this instance, the sales representative can also apply the coupon code and provide a discount based on the coupon value.

Empty cart
The customer can empty the cart by clicking on Empty cart as seen in the image below:

The cart will be empty for the other orders as per the below image:

Proceed to Pay
In Kitchen POS System for OpenCart, when the POS user (Sales Agent) will click on the Pay tab. Then a checkout panel will be open where the POS user can select the payment method and can accept the payment for the particular order or the user can also hold the order and can complete it later.
The complete payment can be made in a single go using either cash, card and split payment option available.

If the customer doesn’t have enough cash or money on the card, the remaining part of the payment can be made using customer credit.
From here you can choose any kind of payment method. In the split payment option, you can split the payment.

Deliver order
The customer can also deliver the order on a future date, for this, the customer will select the delivery date for the field name Deliver order in future date as shown in the image below:

The completes payment can even be made using customer credit.

Click on continue to complete the order.
Hence now, the cart will be empty for the other orders.
Requests
In the Requests section of the POS, the sales agent will find three options – Low Stock Products, Request, and Request History.
 Low Stock Products Section
In Low Stock Products Section, the sales agent can view all the products which have low quantities in the stock. The low stock quantity that you can set from the admin backend panel.

In the Request Section, the sales agent can create a request to the supplier to fulfil the stock.
The sales agent can generate a request with product quantity that the POS user needs to fulfil the stock with the product details.
And the sales agent also can choose the supplier to fulfil the request. The POS user can create multiple requests at a time.

In the Request History section, the sales agent can all the requests that the POS user has create against the supplier to fulfil the stock.
And he can also check the request date, request details, and the status of the request.

Reports
Furthermore, under the POS panel, the customer can also check the daily report under the Reports tab in the POS panel. The POS user can enter the date then click on the Filter button to view the reports as shown in the image below:

End Of Day report –
The POS user can check the following details of the End Of Day report:
- Report ID: The POS user will check the report ID, which is unique for the daily reports.
- Outlet Name: The POS user will check the store outlet for which the report is generate.
- First Order ID: This will be the order ID for the first order of the day.
- Last Order ID: This will be the order ID for the last order of the day.
- Number Order: The total number of orders complete for that date
- Product Sold: The total number of products sold in the store for that date
- Total Values
- Sales Value: Here, the POS user will check the total sales value for the day.
- Returned Value: Under this, the POS user will check the total amount return to the customer.
- Product Returned: Under this, the POS user will check the total number of products return to the customer.
- Discount Value: The POS user will check the discount avail by the customers for that date.
- Overall Sales: It is the difference between the Total sales Value and the Total Return value.
- Total Sales in Credit from Sales: It’s the total sales made using the credit cards over the POS terminal.
Graphical View
The Pie charts visible in the above image shows the following details:
- Current month total order by customer: This will show the percentage of orders place by specific customers for a complete month.
- Payment Done By: This will show the percentage of the payment modes use by the customers to place the order on a monthly basis. It can be cash, card, and credit payment.
Further, the customer can also check the monthly sales generate and most product sales for the store in the bar graph as shown in the image below:

Moreover, that’s all for Kitchen POS System for OpenCart. For any query or doubt, please add a ticket to the HelpDesk System.
Current Product Version - 1.0.0.1
Supported Framework Version - 3.x.x.x

Be the first to comment.