OpenCart Point of Sale System refers to a system where the merchant can create the order from the physical store using the POS then the order will generate in the Opencart.
The Basic feature of the POS system for Opencart is to create the order in front of the customer.
So that the customer can purchase the goods from a physical store as well as from the online eCommerce store.
With the help of this module, merchants can manage their inventory and customers. The most important thing is that they can easily manage their day-to-day transactions without any hassle.
This module is a powerful tool for managing sales and revenue. Admin can also set up the physical store along with the online Opencart store.
Note: For OpenCart Marketplace, kindly refer to the OpenCart Marketplace POS module.
Note: For Loyalty Point features, you must purchase the POS Loyalty Points for OpenCart module.
Check the walkthrough of the plugin in the video mentioned below.
Watch the below video tutorial to understand the module workflow:
Features
- Admin can easily manage the inventory and sales.
- The admin can create more users to operate the POS system.
- Admin can configure the default fields for creating a new customer.
- Products can be searched by typing in the Product Name, Model, SKU, or Barcode in the search box.
- Update Product Quantity through input in the card details section.
- Enable and Disable Online/Offline mode for the User.
- The agent can add the custom product that is not in the inventory into the cart directly(A service or a product not available in the current inventory, etc.).
- The agent can add a product’s name, product price, product quantity, and tax class for the custom product.
- The agent can select the customer group while adding the customer.
- On adding the product to the cart, its price gets updated as per the weight defined for the product.
- Custom price update for any product that is already added to the cart.
- The POS cart can drag and be adjustable according to visibility.
- Supports the following payment methods cash, card, UPI, cash+card, cash+UPI.
- The agent can request an update on the low stocks.
- The agent can also make easy returns.
- Supports home delivery feature.
Additional Features
- The salesperson can even charge the home delivery fees if the customer wants the order to deliver at home.
- The customer can use their credit balance while making a purchase.
- Admin can manage both the store inventory (offline & online) with this single module.
- Generate Barcodes for the products automatically via the admin panel.
- Print the barcodes then add the barcodes to your products.
- Set the barcode size from the backend.
- It can even regenerate and then mass-generate the barcodes.
- The POS agent can also add the product to the cart using a barcode.
- The Admin can also set the barcode for the product option.
- Admin can manage the customers’ data.
- The sales agent can now even manage the product weight at the time of checkout.
- Customers can also deliver the product on a future date.
- The sales agent and store owner can check the daily and monthly reports based on the customer, payment mode, and sales.
- The POS Report section contains the details of the product, Sales report, and Sales Chart.
- The report has the Overall Sales and the Total Payment in Credit(if the credit card is used) from Sales.
- Price settings at the admin’s end for increasing or decreasing the pos product’s price in bulk.
- Option to enable/disable the OpenCart product shown within the POS terminal.
- The admin can also manage the multi-store configuration.
- The POS is also accessible on mobile view.
Exclusive POS Features
- Real-time synchronization.
- Separate POS ORDER management.
- Employee management.
- Easy transaction process.
- The module supports RTL also.
- It also works in offline mode or in poor internet connection.
Please Note-
- The Opencart POS connects only to the Printer, and barcode reader, whereas it doesn’t connect directly with the cash drawer and then the card-swapping machine.
- POS requires a browser to work on it.
- You cannot add a new customer in Offline mode.
- A separate rate tax will be shown at the time the product is added to the cart.
POS Performance
The point of Sale (POS) system is used for transactions in retail stores, restaurants, hospitals, and almost everywhere these days where payment is involved.
It’s essential for the system to load and then update in real-time so that there is no lag in the process.
Many of our users queried as to how long the POS system will take to open on their system if they have x number of customers, y number of products, then z number of categories.
So below we mention some of the sample time durations that our team has tested to provide you with a brief idea about the time frame.
Note:
- Product load time after the pos page open(internal load data do not reflect in the UI) is not included in the above time frame.
- The following performance results are average of data testing at the variable network, system, and server speeds so there may be variation.

Installation
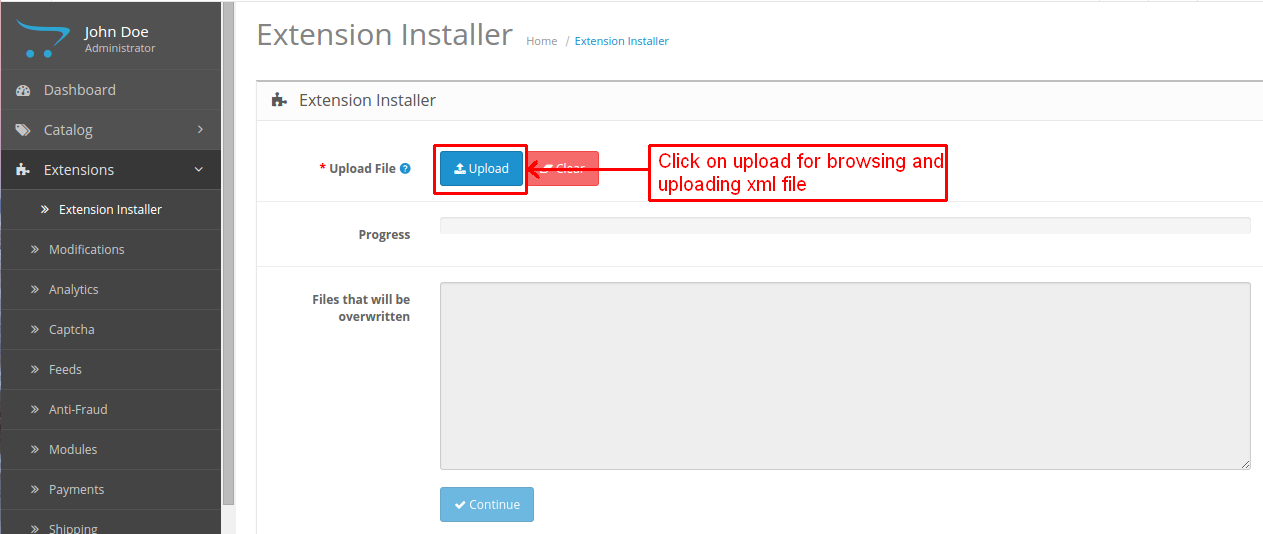
The installation of the Opencart POS System module is very simple. You just need to move or upload the admin, catalog, image, System,wkpos, and pos_sw.js folders into the OpenCart root folder.
After transferring the folders, use the extension installer for uploading the XML file- wkpos.ocmod.xml which you will find in the ocmod folder.
Note –
- For version 3.x.x.x, you have to upload the ocmod module file– pos.ocmod.zip.
- For version 2.3.x.x, you have to upload ocmod– wkpos.ocmod.xml.
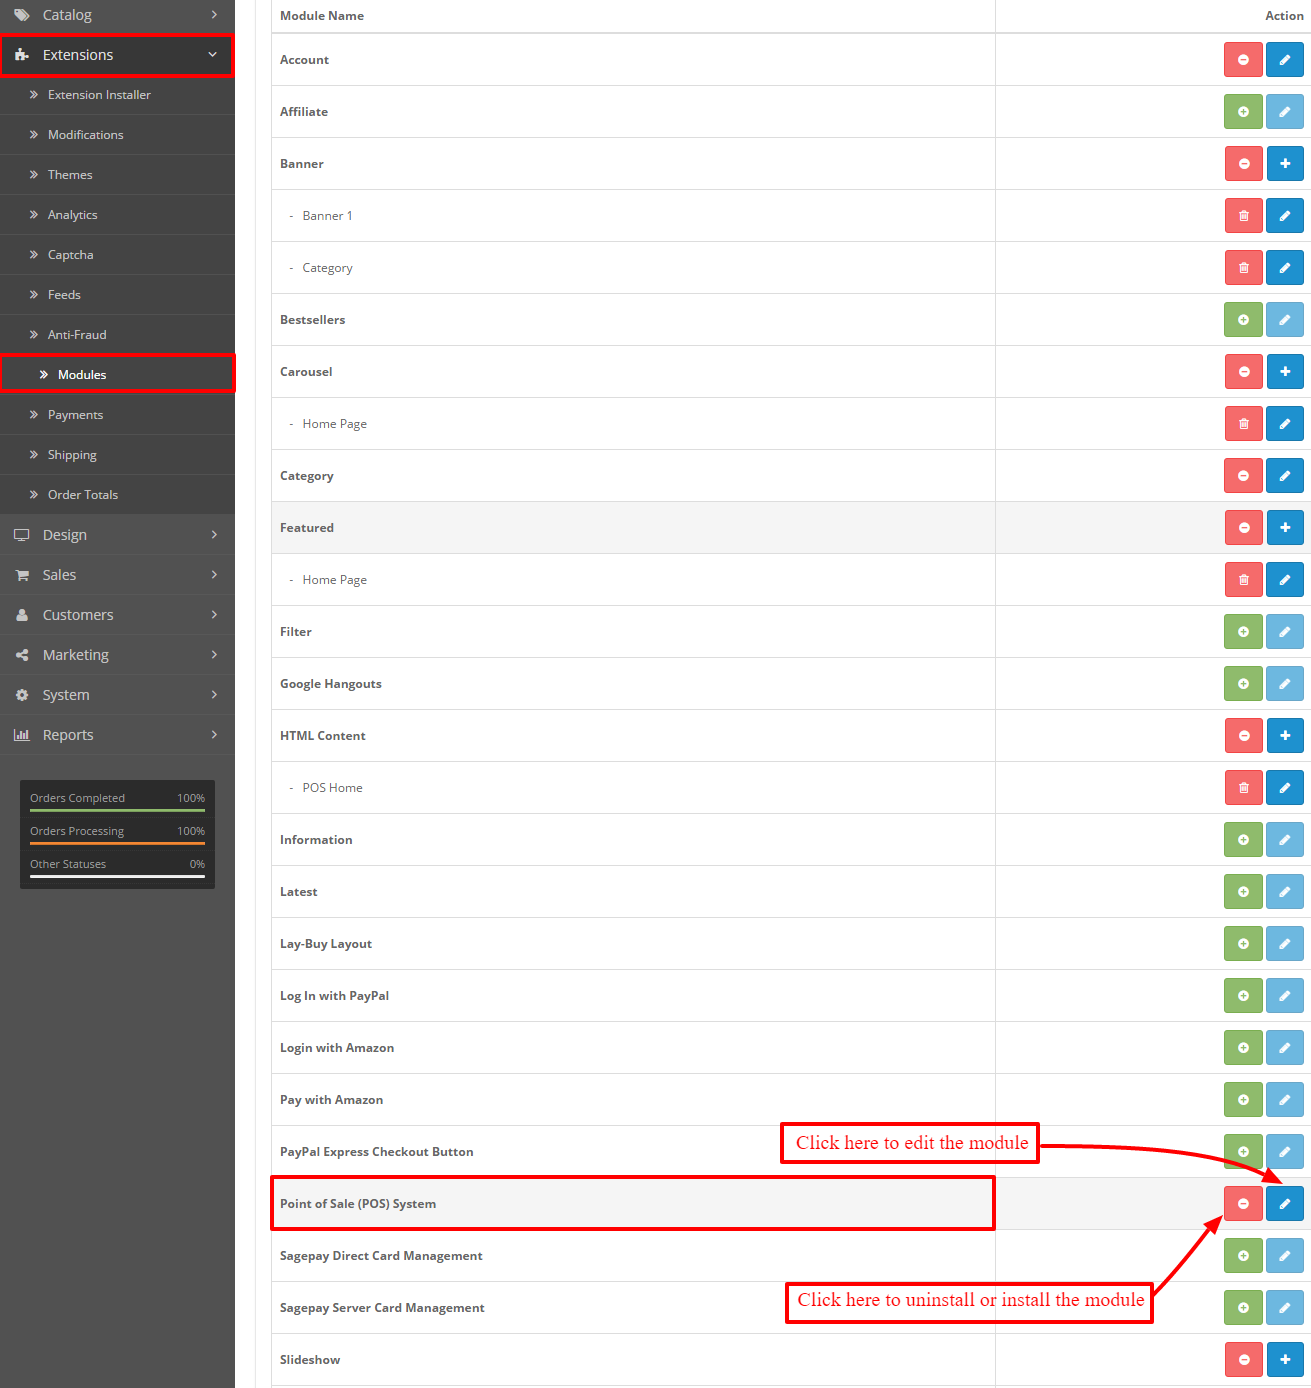
Post uploading the file go to Extensions > Modification then click on the refresh field.

User group
After that in the Admin panel go to System -> Users -> Usergroup then edit ‘Administrator’ then select to select all for both Access then Modify Permission after that save it.

So, post that under Extension > Module, you can install or uninstall the module and can edit the module.
Language Translation
This module also supports multiple languages. Please click here to know about the Opencart language installation and translation.
Module Configuration
After the successful installation of the POS system module admin will be able to view the POS system tab where the admin may manage the POS system.
Now, The admin can configure the module by navigating to Extensions> Modules > Point of Sale (POS) System under the Extensions tab.

The admin can easily change the status of the POS System. Also, the admin can select the store from the Stores field as shown in the above image.
General Setting
In General Setting, the admin will manage the following fields:
- Store Region / State: The admin will select the region/state for the POS system.
- Heading on Login: The admin will enter the main heading for the login page.
- Sub-Heading on Login: The admin will enter the secondary heading of the login page.
- POS Panel Setting: The admin can select the screen size for the POS cart screen, POS middle screen, and POS side panel.
- Login Content: The admin will enter the content that will be visible to the customers on the login page.

- No. of popular products: The admin will enter the maximum number of products visible under the popular product section at POS.
- Quantity for low stock warning: The admin will enter the maximum quantity of products to show the low stock warning.
- Show whole product quantity online: This field can be set as Yes or No.
- Yes: In case the field is set to yes, then the whole quantity will assign to the online store. That means the customer can order online for the whole available quantity from the online store.
- No: In this case, the admin will manually assign some quantity to POS and the remaining quantity will assign to the online store. E.g. If the admin has 100 units of product 1, then the admin assigns 80 units to POS of outlet 1 then only 20 units will be available to the online store.
- Show products with zero quantity in POS panel:
- Yes: In this case, the products with zero quantity will also be visible with other products at the POS panel.
- No: In this case, the products with zero quantity will not be visible at the POS panel.
- Send order e-mail to sales agent: The admin will set this to Yes in case the order email will send to the sales agent, otherwise set No for not sharing any order mail with the sales agent.
Customer Setting
In Customer Setting, the admin can add a guest customer to the POS System.
So that if someone wants to check out as a guest then the admin can use this information under the guest checkout transaction by default.
The admin can configure the customer fields, select the customer group, enable or disable the newsletter, set the default password for new customers.
The admin will have to set the default customer details and address.

Payment Setting
In Payment Setting, the admin can set the status of cash, card, UPI, and customer credit. The admin can also set the complete order status of cash, card, UPI, and customer credit.
And, can even define the title name of cash, card, UPI, and customer credit for the POS System.
Also, the admin can enable or disable the Discount Status, Coupon Status, and Tax Status.

Shipping Details
Under the Shipping Details section, the admin can manage the shipping details of the POS system.

Here, the admin set Home Delivery-
- Status: enable or disable the home delivery facility for the customers.
- Title: define the title for the home delivery feature which will be visible on the front-end.
- Maximum Charge: set the maximum home delivery fees limit for the salespersons who can charge from the customer.
Customize Receipt
In Customise Receipt, the admin can customize the receipt as per the requirements.

The admin can even set the paper size and font-weight type for the receipt.
Paper Size:

Font Weight for Printing:

You can check the receipt format in the below image.

Barcode Setting
In Barcode Setting, the admin can set barcode size, can set whether to print the barcode with or without the product name and can even set the barcode for product option.
Admin can also add barcode for available product options.
Also, we can select the barcode image type as either horizontal or vertical.

The admin can also –
- Generate Barcode By defining the barcode generation basis like productId, SKU, EAN, and UPC.
- Number Of Barcodes In Slot: Set the number of barcodes to generate in a slot while generating the mass barcode.
- Option Product Barcode: If the admin selects the barcode for product options as ‘yes’ then the product will directly get added to the cart with the product options by entering the barcode.
- Barcode Image Type: The admin can set the barcode image type as Horizontal or Vertical.
In PWA Manifest & POS Layout Color the admin will implement the settings for the PWA and color layout of the POS.

Here the admin could define-
Application
-
- Name- The admin can enter the name of the application as one wishes to represent the application.
However, the admin here could represent the name of the application in multiple languages. This depends on the Opencart default language settings.
-
- Short Name- This name is visible when the shortcut of the application is created.
- Icon- The application launcher icon is added here.
- Splash Background Colour- The color of the splash screen(application introductory screen) is set from here.
- POS-
- Left Panel Background-Color- The sales agent will set the background color of the left panel.
- Left Panel Text Color- The admin will state the color of the text in the left panel in correspondence to the background.
- Top Panel Background-Color- The admin will set the color of the background of the top panel.
Price Setting
Under here, the admin can set the option to increase the price of the pos products as fixed or in percentage value and applies to all of the POS products.

The admin can –
- Enable the price-setting option by enabling the feature else choose it as disabled as required.
- Select the Price Type to be applicable as a fixed or percentage one.
- Set the price operation to perform that is – to increase or decrease the product price.
- Enter the amount applicable as per the chosen option in the above steps, fixed set the entered amount as fixed or percentage sets the entered number as a percentage of the product price.
- Option to enable the products that have been disable to show up in the pos terminal or not by selecting the appropriate option.
- For more details on the disable/enable product visibility option check the index – POS enable/Disable Product.
How to Add/Manage Users & User Outlet
When Admin will click on the POS > Users, two tabs for Users and User Outlets may be visible to the admin.

First, the admin needs to create a User Outlet for the User.
When you click on the User Outlet tab then you will redirect to the User Outlet page where you can see the existing user outlets and can edit the existing user outlets.
Also, you can add a new user outlet for the users (sales agent).
POS Outlets
Suppose the admin is running more than one physical store and wants to assign the sales agent according to the different stores then you can create an outlet for a particular physical store.
So that admin can assign the sales agent according to the outlets and can manage inventory for different outlets.

When the Add New button is clicked, it redirects you to the Add Outlet page where one may add the user outlet for the users.

After this, to Add Products to the Created Outlet, just Edit the Outlet then you will find the Manage Products tab next to the General tab as shown below in the snapshot.
Here, the admin can see all of the products listed then it can assign the products to this outlet by enabling the products and setting the outlet product quantity for the products enabled.
If the admin may also assign all the products at once to the outlet via Assign all products to this outlet button.
Admin can select the POS status for the product.
Admin can enter the POS (outlet) quantity for the product.
If we select unit price then we can add the product to the cart according to weight.
How To Manage/Add Users
Under the Point of Sale (POS), when you will click on the Users >POS Users tab then you will redirect to the Users page where one can see the existing users’ list and can edit the existing users.
Also, the new user to the POS System may add.

When the Add New button is clicked, it redirects to the Add User (Sales Agent) page where the user for the POS System adds.

Inventory/Product Management for POS
You can easily manage the inventory for the POS system. The admin can also view all the products of the POS system under the Point of Sale (POS) > POS Products.

After that, the admin may filter the POS products by using the various filter options. Admin can even filter the product using the barcode ID.
To generate the barcode ID, the admin can simply scan the barcode.
After scanning the barcode, the admin will receive the barcode ID then it can be used to filter the product as shown in the image below –

POS Product Details
Admin can view the POS product details like –
- Product Image: Admin can view the product image for the POS system.
- Product Name: Product name for the POS system.
- Model: Admin can view the unique product ID for the POS system.
- Barcode: Admin can see the barcode of the product then it can print with the Action tab.
- Price: The price for the POS system which the admin has set at the time of the product upload.
- Total Quantity: The total product quantity of the product.
- Status: The status of your Opencart online store.
- Assigned POS Quantity: Admin can see the assigned product quantity for the POS system.
- Action: The admin can print the barcode of a particular product. Once the admin has generated the barcode, The admin can regenerate the barcode as shown above.
- Mass Generate Barcodes: The admin can generate the product barcodes in mass.
- Mass Print Barcodes: The admin can select the products and click on the Mass Print Barcodes button and then enter the number of barcode slips for each product then print the product barcode in mass.

Barcodes will generate in mass for the selected products which have options and for the simple products as well then the admin can print the barcodes accordingly.

Note:
- If the selected UPC/SKU/EAN is not available in a product then the barcode will generate with the product Id.
- Don’t refresh, always regenerate the barcode when you change/update the barcode settings.
POS Reports
The admin will be able to check the POS reports by navigating to Point Of Sale (POS)>POS Reports. Here, the admin will be able to check the product and the sales report.
1. Product Report:
Here, the admin will find the details related to the product like –
The outlet to which a particular product is assigned, it’s Model number, the quantity of the product available, Sold-Out number, Available quantity, and the Suppliers name.
You can also filter the product report by selecting a particular Outlet or Supplier name.

2. Sale Report:
Here, the admin will find the details related to the sales that have happened in the POS system.
When an order is placed successfully it is visible here with the details related to the sales which include –
Outlet Name, Customer Name, Total Amount of purchase made by the customer, Order Date, Payment Method selected, Order Status, then POS User assigned to the order.
The admin can populate the sales report using various filters like –
Outlet name, POS User, Customer, Payment Method, Between Dates, and the Order Mode.

3. Sales Chart
The admin of the Opencart POS can check the order chart in this section as per month. We have even added the functionality to check the data between any dates.
The store owner can see the data between any dates.
Herein the data is modulated as per Outlet and Report Date Filter.

- Report data– This is data-wise data that contains information like-
- First Id– The first order identification number of that date.
- Last Id– The identification number of the last order placed on that day.
- Number Order– However, this tells the numerical data of the total order placed that day.
- Product Sold– This gives details of the number of products sold on that day.
-
Total –
- Sales Value– The total monetary sales value of that day.
- Values Returned-The amount that was shared as a refund to the customers on that day.
- Product Returned– The number of products that got returned.
- Discount Value– The amount of discount granted to the customers for the sales of products.
- Overall Sales Value – It’s the difference between the Total Sales Value and the Total Returned Value.
- Payment In Credit from Sales – It’s the total credit amount received by customers paying via credit cards.
The chart depicted here shows the current month’s data-

- Total customer data in a pie chart.
- Payment Mode again in the pie chart to know the most demanded one.

- Monthly division of Sales Value for the total sales calculation as per month. However, this is depict as per the bar chart.
POS Return Management
The admin can view and manage the returns filed by the agent on behalf of customers. For this, navigate to Point of Sale (POS) -> POS Returns as per the below image.

Here, the admin can-
- View the complete list of the returns.
- Filter the returns using the filters displayed on the top.
- Manage the returns by clicking the Edit button.
Clicking on the Edit button will display the return details as shown below.

History
Under the General section, the admin can view the order and return details. And, under the History section, the admin can add history notes as shown below.
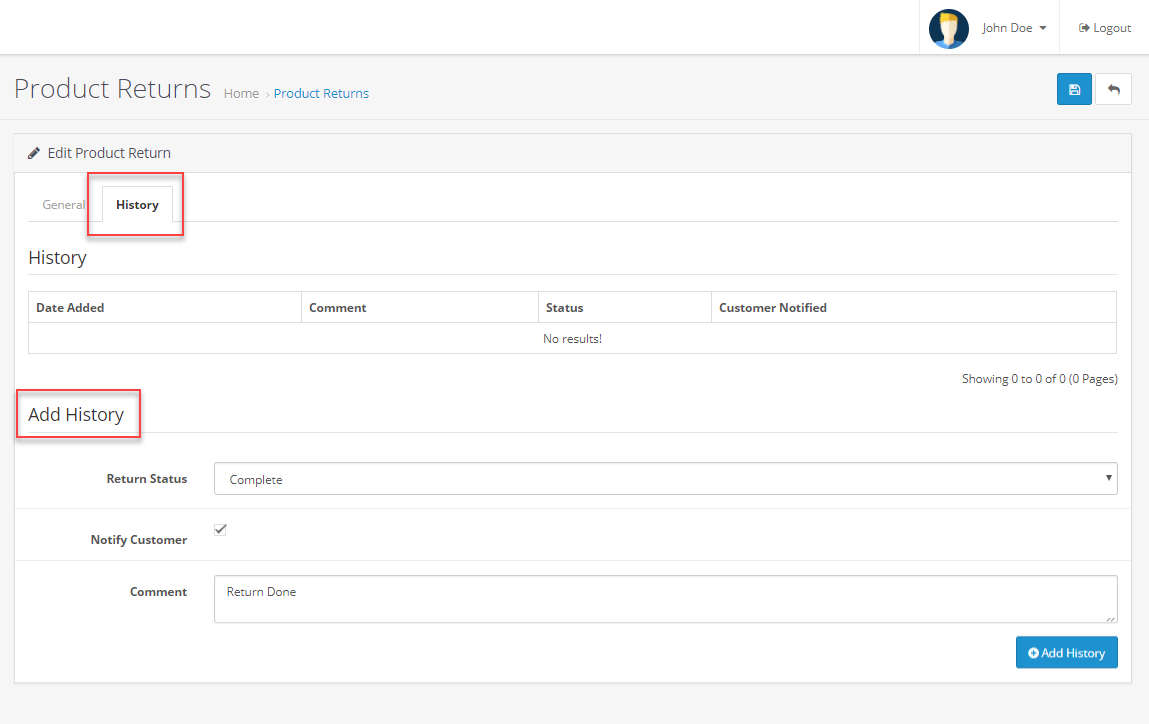
Here, the admin manages the return status, allows notifying the customer about the return status then can even add an additional note for reference. Then, save history successfully.

POS Order Management
Admin can easily manage the Orders of the POS system as well. The admin can view or edit all the order details of the POS system under the Point of Sale (POS) System > POS Orders.
The store owner may filter the POS products by using the various filter options. As you can see in the below image.

Admin can view all the order details and can edit the order.
The POS Orders Page will have information like –
Order ID – A unique order ID for each order.
Transaction ID – The transaction ID will have two types of status either Online Order or a unique number.
- The Transaction ID with Online Order status – The order is generated when the POS system is connected to the internet (Online Mode)
- Transaction ID with a unique number – The order is generated when the POS system was not connected to the internet (Offline Mode). When the POS user will sync all the offline orders then the transaction ID status will change into Online Order.
- Status – It will show the order status. For example – Complete.
- Total – It will display the total transaction amount.
- Date Added – Added when the product was added to the cart.
- Date Modified – The date when the order was completed.
- Action – There is two option in which the admin can view the order details and can edit the order details.
Supply Management (Admin Management)
In the Supply Management section, the Admin can set the details of the suppliers and manage the supplier’s products.
This section will have the separate supplier’s details and separate supplier’s product details so that admin can know about the product during the low stock situation.
Also, admin can know what are the products that are fulfilling from particular suppliers in the store.

The Admin can also Add New Supplier by clicking on the add new button. When the admin will click on the add new button then the admin will redirect to the Add Supplier page.

In POS Supply Requests, the admin can view all the supply requests that the admin has generated against the particular supplier.

POS Credit Balance
Admin can also add the credit balance to the customer account. The customer can use this credit balance while making a purchase.
For this, the admin will navigate to the customer list as shown below.

Here, the admin will select the customer from the list to whom the admin wants to transfer the credit balance. This will navigate the user to the customer details page.

Under the POS Credit section, the admin can –
- Description: Add a descriptive note for reference.
- Credit Amount: enter the amount to be credited.
Then lastly, hit the Add Credits button to transfer the credit balance successfully.

Note – After installing POS your POS URL will be like – yourwebsite.com/wkpos
POS System (Frontend) POS User Management
The user can easily log in to the POS System (frontend) by using the Username and Password which is created by Admin.
After the successful Log in, the POS user (sales agent) will be redirected to the POS system (frontend) where the POS user can view all the categories, products, and check-out panels.
Also, the POS user can manage the account information and can view the orders list (a list of orders which is generated by the sales agents).

Popular Category will have all products that have a high selling rate or most purchased items/products.
The 4 symbols (Warning, Question mark, Information, and Star) have the details about the particular products.
- Warning – The product is out of stock and you can’t add that product to the cart.
- Question Mark – Product with custom options.
- Star – The product has offers/discounts.
- Information – It shows the product information like name, price, and quantity left of the product.
- Weight- This represents the weight of the product which could be entered in the popup which appears on clicking the product.

The customer must add the weight of the product chosen in the pop up as shown in the above image.
Add to Cart
Likewise, on tapping the Add to Cart button, the product will add to the cart along with the updated price as per the weight of the product.
For instance, the weight of the product is 500gms then it bears a price of $100. The customer can choose to add 1000gms of that product and on adding it to the cart its price gets updated to $200.

A receipt for the same can be generated as under. It will display the details such as weight, quantity, price then the amount of the product purchased.

Receipt for Cash+Card Payment
If the payment is made by choosing the “cash+card” option, the receipt will display the payment mode as “Card Payment + Cash Payment.”

Receipt for Cash+UPI Payment
If the payment is made by choosing the “cash+UPI” option, the receipt will display the payment mode as “Cash Payment + UPI Payment.”

OpenCart Product Disable at POS Terminal – Workflow
For example, the admin has disabled a product(Cheese Sandwich) from the product listing page.

And under the configuration of the plugin for the Price Setting tab,

the admin has the option for Disable Product Show at POS as – Enabled then in this case, the product will be visible in the pos terminal even when it is already disabled by the admin.

To hide the disabled product within the pos terminal the admin needs to set the option – Disable Product Show at POS as Disabled and then the product will be disabled from the pos terminal as well.

Price Setting
The admin can increase or decrease the price of all the products within the pos terminal.
The admin can choose to increase or decrease the pos product price and can set the increase or decrease as a fixed or percentage value.

Now, we have set the price increase as 20 and it’s fixed for all the products so check the first image without an increase.

The next image displays the product price increase as set by the admin from the price settings.

Add to Cart using Barcode
In some cases, the scanning device used by the POS agent may stop working, so in such conditions, the agent can enter the code online using the Opencart point of Sale panel.
The agent will click on the Barcode Scan option as shown in the image below:

After that, a popup will appear with the text field to enter the Barcode. The agent will enter the barcode and press Enter to proceed.

If the product has some custom options then the agent will select the appropriate options for the same as shown in the image below:

After that, the POS agent will click on the Add to Cart button. Just in a second, the product will get added to the cart with the available product options.

So like this, the product can be added to the cart with their options using the barcode.
Fullscreen
In addition, the POS frontend could transform into fullscreen for the sales agent to visualize the products much easier.

Draggable Cart
The POS agent can drag the cart width and adjust it according to the visibility so that it will be easy to view the cart details.

Orders
In the Orders panel, the user can see all the orders which have been sold by the corresponding agent.
 The Sales Agent (POS user) can view the order details then it can print the receipt of that particular order by clicking on the Print tab.
Also, they can filter the order details by entering the customer name, phone number, order id, or date.
In the below image, we can see that order details filter by date:

Returns
The customers can even return their orders if want to. For this, the agent will file the returns on behalf of customers. The agent will click the Return Order button as per the below image.

Now, Clicking the Return Order button will display a pop up to enter the order id.

Now, the sales agent will enter the order Id then click the desired order that appears in the suggestions list. This will display the order details as per the below image.

Here, the sales agent will select the products and then click the Return Order button to make a return.
Clicking the Return Order button will navigate the sales agent to the “Return Order” page as per the below image.

Here, the sales agent will-
- Reason for Return: Define the reason for returning the product.
- Product is opened: Specify whether the product is opened or not by the customer.
- Return Action: Select the action for return.
- Faulty or other details: Add the additional note or details for reference.

After filing the return successfully, a success message will display as per the below image.

The sales agent can even view the complete list of the returns made. For this, simply click the Returns menu option shown below.

Select the return order from the list and the respective return details will get displayed on the extreme right-hand side.
And, here also we can filter the order by customer name, phone number, order id, or date. As per the below image:

Settings
In the user Setting Panel, the user can view or change his/her account information and also can change the password.

Also, the sales agent can change the language and currency for the POS system.

Note: The module supports RTL(Right to Left) languages also if you set the “Select Language” option under the settings at the POS terminal.
Below the language selected is English.

And the same reflected within the POS Terminal.

Now, after selecting the Arabic language under POS terminal settings,

The POS terminal will be displayed using the selected language that is Arabic.

Easy Product Search
From the product search feature, the user can easily search for any products by entering the keyword of a particular product. The user also can add to the cart the product from the search result.
Use search for the product name, model, SKU, and Barcode as well.
Search By:
Name-

Model-

SKU-

Barcode-

Check-out Panel (Shopping Cart)
The user can add to cart the product and can select the customer for the particular order.

The sales-person can even charge the home delivery fees If the customer wants the order to deliver at home by checking the checkbox of the Home Delivery field then enter the fees.
Adding a Custom Product to the POS Cart
Adding custom products to the cart is as easy as adding a normal product to the POS cart.
A custom product can be something like a warranty for a product, a service, or a product that is not in the physical store but that’s launched.
To add a custom product just tap on the “Add” button as shown below in the snapshot.

Add –
After clicking the “Add” button above, you will see a pop-up wherein you have to set the Product-
-
- Name
- Cost
- Quantity
- Tax Class

After entering the info. for the custom product, just click the “Add” button on the pop-up to add the product to the cart.
Once the custom product gets added to the POS cart you can see the product, remove the product, and increase or decrease the product quantity in the POS cart.

If you want to change the price for a product that is already added to the cart, you just need to tap on the product’s price when it’s in the POS cart.

After tapping the price, a pop-up will appear wherein you can change the price/ set the custom price of the selected product then hit the Apply button. This will successfully change/update the price.

After that, when the POS user needs to click on the Select Customer tab. Here POS User can select the customer.
Customer Selection-
If the customer is already registered then the POS user can search the customer through the customer’s name or mobile or telephone number.
 If If the customer is not registered yet then the POS user can add/register the new customer and can proceed to Checkout.
Add customer
Then clicking on the Add Customer, a pop-up will be opened for Customer Details. The POS user needs to fill in all the required details to save/register the customer.

After selecting the customer, the sales agent can give a discount on the Total Amount of the Cart by using the discount tab.
Note: The POS agent can add a new customer according to the desired customer fields. In the below screenshot, a customer will be added by First name, Last name, and telephone number:

The sales agent can give the discount offers as a Fixed Amount or Percent (%) Value of the Total or can apply both the discount methods together on the Total.

Also, If the customers have any coupon code provided by you. In this case, the sales agent also can apply the coupon code and can offer the discount as per coupon value.

Checkout
When the POS user (Sales Agent) clicks on the Proceed to Checkout tab.
Then a checkout panel will be opened where the POS user can select the payment method and accept the payment for the particular order or the user can also hold the order and complete it later.
The complete payment can be made in a single go using either cash, card, UPI, cash+card, or cash+UPI payment option available.

If the customer doesn’t have enough cash or money in the card, the remaining part of the payment can be made using customer credit.
Deliver order
The customer can also deliver the order in a future date, for this the customer will select the delivery date for the field named Deliver order in future date as shown in the image below:

The complete payment can even be made using customer credit.

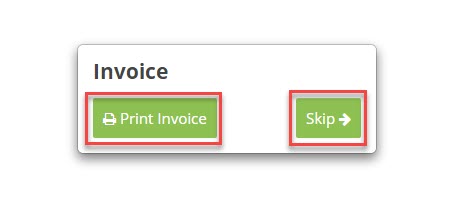
The POS user can add a note about the transaction. After accepting the payment, a pop-up screen will appear on the Invoice.
The sales agent can Print Invoice or can Skip this step to complete the checkout process.
Now, the cart will be empty for the other orders.
Select Customer Group
The POS user can select the customer group for the customers while adding a new customer.

On the basis of the group selection, the special price of the product will be reflected.
Here the price for the cheese sandwich is set at 100 for the default customer group and 200 for the second customer group.

The POS user added the customer Peter Doe in the default customer group, so the price of the sandwich is 100 USD.

The POS user added the customer Peterson Kevin in the second customer group, so the price of the sandwich is 200 USD.

Additional Payment Gateway
Apart from the Cash Payment, one can also make use of the Card Payment by making use of an external card swiping machine.
Also, the payment can be made through various methods, including UPI Payment, Cash+Card Payment, and Cash+UPI Payment.
Now, clicking the Proceed to Checkout tab brings a checkout panel. Where the POS user can select the payment method as card payment. In order to accept the payment for the particular order.

If the customer doesn’t have enough money in the card, the remaining part of the payment can be made using customer credit as shown below.
Card Payment
If the agent selects Card Payment then, the POS user has to enter the name of the card being swiped (as a record) for the payment then tap the “Accept Payment“.
After this, the agent will have to confirm a pop-up on the window as shown below.

After this, the agent can take out the printout or skip this step to proceed further.

Now, you can check the order by going to the “Orders” section of the POS system and here you can check the mode of payment with the selected card for making the payment.

These details will also be visible in the invoice.
Offline Mode
The POS System for Opencart provides the most valuable and unique feature so that your sales agent, cashier, etc. can work on the POS system in offline mode also.
They can use all the functions and features of the POS in the offline mode. They can complete all the transactions without the use of the internet.
This feature will also benefit you when you have your store in a poor internet connectivity area or no internet area.

They can view all the transactions or orders that they have made in offline mode in the Orders > Offline.
They can view orders by filter customer name, transaction id, and date. As you can see in the below image.

When you or cashier or sales agents have an internet connection or in online mode then you or they can sync all the offline orders to the online Opencart Store.
Order on Hold/ Multiple Cart System
The Sales Agent can put the cart on hold and can view both the current cart and cart on-hold here.
He can easily proceed to next the transactions/orders without deleting the uncompleted order/hold order.

When the sales agent will hold the order then can Add a Note to mention the reason for holding the order.

The Sales Agent can view all the hold orders under the Orders > Hold Order.

When the sales agent will click on any hold order then the hold order will be redirected to the cart and the sales agent can view the order details and can Proceed to Checkout.
Other
In the Other section of the POS, the sales agent will find three options – Low Stock Products, Request, and Request History.

Low Stock Products Section
In Low Stock Products Section, the sales agent can view all the products which have low quantities in the stock. The low stock quantity that you can set from the admin backend panel.

Moreover, the sales agent can create a request for the supplier to fulfill the stock In the Request Section.
The sales agent can generate a request with the product quantity that the POS user needs to fulfill the stock with the product details.
The sales agent also can choose the supplier to fulfill the request. The POS user can create multiple requests at a time.

Now, the sales agent can all the requests that the POS user has created against the supplier to fulfill the stock.
He can also check the requested date, request details, and the status of the request.

Reports
Under the POS panel, the customer can also check the daily report under the Reports tab in the POS panel.
The POS user can enter the start date and end date then click on the Filter button to view the reports as shown in the image below:

End Of Day report –
The POS user can check the following details of the End Of Day report:
- Report ID: The POS user will check the report ID, which is unique for the daily reports.
- Outlet Name: Here, the POS user will check the store outlet for which the report is generated.
- First Order ID: This will be the order ID for the first order of the day.
- Last Order ID: This will be the order ID for the last order of the day.
- Number Order: The total number of orders completed for that date
- Product Sold: The total number of products sold in the store for that date
- Total Values
- Sales Value: Here, the POS user will check the total sales value for the day.
- Returned Value: Under this, the POS user will check the total amount returned to the customer.
- Product Returned: Under this, the POS user will check the total number of products returned to the customer.
- Discount Value: The POS user will check the discount availed by the customers for that date.
- Overall Sales: It is the difference between the Total sales Value and the Total Returned value.
- Total Sales in Credit from Sales: It’s the total sales made using credit cards over the POS terminal.
Graphical View
The Pie charts visible in the above image shows the following details:
- Current month total order by customer: This will show the percentage of orders placed by specific customers for a complete month.
- Payment Done By: This will show the percentage of the payment modes used by the customers to place the order on a monthly basis. It can be cash, card, UPI, UPI+cash, UPI+card and credit payment.
Further, the customer can also check the monthly sales generated and most product sales for the store in the bar graph as shown in the image below:

POS and PWA
The sales agent can easily transform POS into a PWA. This will allow POS to be accessible and faster.
![]()
The sales agent can easily click on the “Plus Sign”, in order to add the POS to the homepage of the device.
POS on Mobile View
Moreover, the sales agent can also access the Point of Sale system from the mobile also. By simply processing the login. The view is shown in the mockups below:


Furthermore, for any queries or doubts please add a ticket to the HelpDesk System
Current Product Version - 4.5.0.0
Supported Framework Version - 3.x.x.x, 4.x.x.x

Thanks,
Nguyen