Using the OpenCart Connect you will be able to sync your Opencart Store – Customer, Product, and Order details with the QuickBooks.
Also, when a new user registers, you add a new product, or when an order is placed by customers all of this data is automatically synchronized with your QuickBooks account.
The admin is also able to import products & customers from QuickBooks to the OpenCart Store. Also, whenever a customer/product information is edited at OpenCart it is auto-updated at Quickbooks as well.
Features
- Admin can manually synchronize the OpenCart store – Customers, Products, and Orders with the QuickBooks.
- Auto-Sync New Customer Registration from the OpenCart Store to the QuickBooks.
- Newly Added Products will be Auto- Sync From the OpenCart Store to the QuickBooks.
- Auto-Sync Orders placed from the OpenCart Store to the QuickBooks.
- The Guest Order can also be synchronized from OpenCart to QuickBooks.
- Auto edit Customer information at QuickBooks when edited at OpenCart Store.
- Auto edit Product information at QuickBooks when edited at Opencart Store.
- Import Customers from QuickBooks to your OpenCart store.
- Import Products from QuickBooks to your OpenCart store.
- Batch processing in order to reduce the data sync time.
Installation
Customers will get a zip folder and they have to extract the contents of this zip folder on their system according to their Opencart version.
The extracted folder has – admin, catalog, ocmod, system, and wk_qbo folders. You need to transfer the admin, catalog, system and, wk_qbo folders into the Opencart root directory on the server as shown below.

Now, you will navigate to Extension Installer and upload the file wkqboc.ocmod.xml which you will find inside the ocmod folder.

Then navigate to ->Extensions->Modifications and click refresh on the top right-hand side as shown below.

After that, navigate to System -> Users -> User Group and edit the administrator and select all for “Access Permission” and “Modify Permission” as per the snapshot below.

Module Translation
As this Opencart Connect module supports multiple languages so this section will describe how to make the module work in different languages. Please check this link for language translation.
How To Get QuickBooks API Credentials –OAuth2
For OAuth2:-
Before you do module configuration, you will need to get the OAuth Consumer Key, OAuth Token Secret, and OAuth Consumer Secret. Please follow the link – https://developer.intuit.com/
- On the Intuit landing page, click on the Sign-up page to create a new account. Or, Sign In with your existing account. Now, enter the details required for registration and then click the “Create Account” option on the registration page.

2. After clicking the Create Account option your account will be created on QuickBooks and after that, you will see on the header an option of “My Apps” now Tap the option.

3. Now on next screen, you will see an option on the header to create the app, click the option Create app.

4. Now you will see a pop-up on your screen to create an app. Select the QuickBooks Online and Payments platform you want to develop.

5. Now after selecting the platform, give your app a name & select the scope of application as “Accounting” & click on create the app.

6. After creating the application you can find on the left-hand side of the application page the keys for the development mode & the production mode.
If you are using the application in the sandbox mode then you can make use of Development keys. If you are using the application in the Live mode then you can make use of the Production keys & configure the keys with your OpenCart website.

Select the desired mode & go to the “Keys” menu option to find your – Client ID and Client Secret. Copy these keys to the module configuration part in the admin panel while using the OAuth2.

Note:
1. However, the redirect URL can be added as – siteurl/index.php?route=account/validateoauth
https:/example.com/quickbooksconnect/oauth/oauth2

QuickBooks – Company Settings

After the above step, you will now navigate to Settings and select Company Settings option.


The section that comes up click on the Sale and then edit- the Sales from the content section as shown below in the snapshot.
Lastly, check the shipping check-box and click the save button. If this shipping option is disabled then the orders will not sync.
Configuration
Once you have performed the above steps you can now see the module under Extensions->Modules->Webkul QuickBook Online Connectorfrom here you can install and edit it.

Click the edit option to configure the module, this brings up another page as per the below screenshot.

Here the admin will –
- Enable or Disable the module.
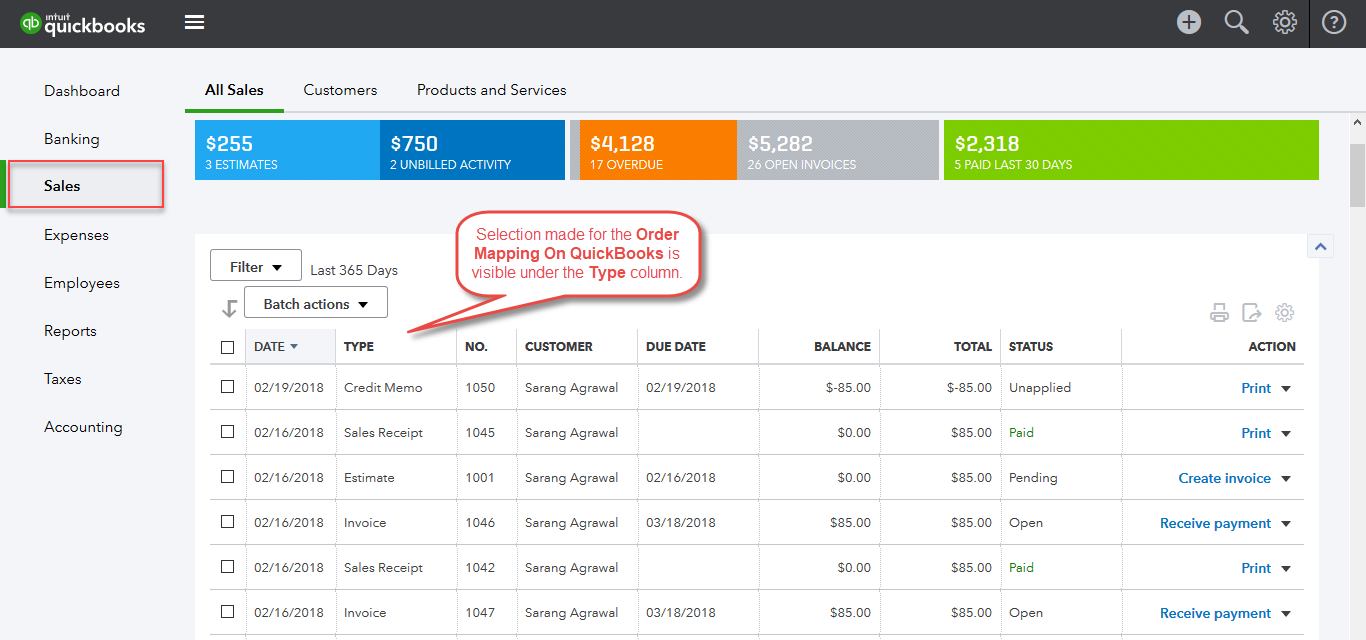
- Select Order Mapping on QuickBooks – Orders will be mapped on QuickBooks end with the selected transaction type(Sales receipt, Invoice, Estimate, and Credit Memo).
- Select the Mode as Sandbox(testing mode) or Development(Live mode) as required.
- Now choose the Authentication Mode as OAuth or OAuth2.
- Enter the Oauth Consumer
- key/Client ID.
- Secret/Client Secret.
- The Oauth Authentication
- Token/Access Token Key. – Automatically fetched once the connection is made.
- Secret/Refresh Token Key. – Automatically fetched once the connection is made
- Realm ID/Company ID. – Automatically fetched once the connection is made
- Set the Sync Slot number(It should be between 3 to 50. It’s used to set the number of records that will be synced at a time).
- Select the Categories for the Imported products from QuickBooks.
Lastly, save the configuration by clicking the Save button at the top right-hand corner.
Now click the option “Connect” for Authorizing Intuit to securely share your data.
After setting up the general settings the admin needs to save the configuration then tapping the option “Connect“, you will see a window pop up where you have to first select the company to set up with OpenCart & then click on next button.

Now on the next screen to authorize the OpenCart module with QuickBooks app. Click on Connect button to allow OpenCart Connect to view and update your QuickBooks Online data.

Now after clicking on the connect button you are successfully connected to the QuickBooks online.

You can see a disconnect button which means the connection is made between Opencart module and QuickBooks successfully.
How To Synchronize – Customers, Orders, and Products
Syncing Your OpenCart Customers To The QuickBooks
The Admin Will Navigate Under Dashboard -> Opencart Connect ->Customers. Here The Admin Has Two Option To Select From – All Customers Or Only Enabled Customers.
If the admin selects ‘All Customers’ then all of the customers of the Opencart will be synchronized to the QuickBooks otherwise ‘Only Enabled Customers’ will be synchronized.
To export the customers from Opencart to Quickbooks the admin will tap the – Export Customer button. Similarly, clicking the Import Customer button, the admin can import the customers from the QuickBooks to the Opencart Store.
Whenever any new customer registers himself at your Opencart store they will be automatically synchronized with the QuickBooks.
Here, the admin can also filter the customers using various filter options like -Opencart Customer Id, Customer Name, Quickbook Customer Id, email.

Syncing Your OpenCart Products To The QuickBooks
The admin will navigate under dashboard -> QuickBooks ->Products. Here the admin has two options to select from – All Products or Only Enabled Products.
If the store owner selects ‘All Products’ then all of the products of the Opencart will be synchronized to the QuickBooks otherwise ‘Only Enabled Products’ will be synchronized.
To export the products from Opencart to Quickbooks the admin will tap the – Export Product button. Similarly, clicking the Import Product button, the admin can import the products from the QuickBooks to the Opencart Store.
Thus, additionally, whenever the admin adds a new product to his Opencart Store it will automatically be synchronized with the QuickBooks.
Here, the admin can filter the products using various filter options like – Product Id, Name, Quickbook Product Id, and the Model.

Syncing Your OpenCart Orders To The QuickBooks
The admin will navigate under dashboard -> Opencart Connect ->Orders. Here the admin can easily synchronize the orders by simply tapping the “Export Orders” option. Henceforth, now all the Opencart store Orders will be synced with the QuickBooks.
Whenever a new order is placed on your Opencart store it will automatically be synchronized with the Quick Books. The admin can filter the Orders using the Order Id and the Quickbook Order Id.

Check The Synchronized Customers Details – QuickBooks End
Go to your QuickBooks account and navigate to the Sales section & select Customers tab to all the exported orders.

Now the admin can select teh customer can view its details.

Check The Synchronized Products & Services – QuickBooks End
Go to your QuickBooks account and navigate to the Sales section & select Product & Services tab.

The admin can edit the exported products and save it.

Check The Synchronized Orders – QuickBooks End
Go to your QuickBooks account and navigate to the Sales section & select invoices tab.

Synchronization of Guest Order
Whenever a Guest Customer places an order, the default customer gets created in the QuickBooks.
All the order details of a guest customer will be synchronized from OpenCart to the default customer in QuickBooks.
On clicking the Guest Customer’s Order, you can see the order details of the order including Guest Customer’s email id, billing address, shipping address, payment method, subtotal etc.
So, that’s all for Opencart Connect module still have any issue feel free to add a ticket and let us know your views to make the module better at webkul.uvdesk.com
Current Product Version - 3.1.1.1
Supported Framework Version - 2.x.x.x, 3.x.x.x

Be the first to comment.