Introduction
Opencart B2B Marketplace module converts your Opencart site into a complete Business to the Business marketplace with customer groups, separate seller product collection, and mass upload.
Also, It facilitates features like Requests for quotation, product question answers, and much more.
Both the admin and Sellers can upload products in bulk. In addition, Customers can send quote requests (RFQ) for existing as well as custom products of both the admin and the seller.
Also, the customers can ask/post questions for the particular product and receive their answer with like or dislike option. Customers can also post the answer to the questions.
The admin will provide the functionality to have a separate vendor sub-domain for the Opencart marketplace vendors.
And the separate vendor domain will work for – profile, category, compare, manufacturer, product, search, and special pages.
Also, using this module admin can create a customer group according to as per requirement.
Besides that, it allows the seller to create a sub-user under their supervision. All the sub-users will operate in the name of their administrator. Sub-users will not have their own identity.
Therefore, this module can create a platform where businesses can communicate and transact with other businesses along with various other important features.
Note:
1. This module supports all templates and themes including the Journal theme.
2. Opencart B2B Marketplace module supports the Multi-Store feature of default Opencart.
Watch the video to understand the extension workflow:-
Admin Panel Management-
Vendor Panel Management-
Features
- Admin can create user groups with some group rights according to their need.
- The seller can create a sub-user and see the group user list if they have “create user” right.
- If the customer has no rights to order the product, then they will send the product for review and the admin will approve that product after that customer can buy that particular product.
- The customers can post answers to the questions.
- Both the sellers as well as admin can upload products in bulk.
- The vendor can have their own sub-domain.
- Allows admin to add prefix with vendor’s sub-domain.
- The customers can send a quote request for both existing as well as custom products.
- Allows customers to send RFQ for both admin as well as seller’s products.
- The Seller can see the group user list.
- Also, the child group contains only their parent group rights.
- Admin can create and select emails as per templates for Marketplace.
- The seller can add Simple and Downloadable products.
- Admin can select the shipping method for the seller. For transferring the shipping amount to the seller’s account
- Catalog module configuration through admin.
- Admin can toggle the Account Menu sequence as per their need.
- Using relevant mail keywords mail template creation can take place by the admin.
- With transaction status, the seller will know whether the admin has paid to the seller or not.
- Admin can track the seller’s income, total order, total buyers, and the latest order using the dashboard field under the edit seller page.
- Seller will have own dashboard to manage orders.
Note – Google Map API feature is a paid service.
Installation
The Installation of the Opencart Marketplace B2B module is very simple. In the zip file, you will find 4 folders.
Which are OpenCart_2.0.x.x-to-2.1.x.x, OpenCart_2.2.x.x, OpenCart _2.3.x.x and OpenCart_3.x.x.x. You need to select the folder according to your OpenCart version.
In each folder, you can find 4 folders catalog, admin, ocmod and theme patch. You just need to move the admin and catalog folder into the Opencart root directory.
If you are using a custom theme like Journal then we provide a Journal theme patch (directory) in the module zip.
While installing the module, navigate through Theme Patch->Journal2 folder and you will get the “Catalog” folder.
Upload Catalog Folder:
Therefore, just upload the “Catalog” folder into your Opencart root directory for the proper functioning of the module with the Journal Theme.

Once you have uploaded the file then login to admin and from the catalog section go to Extensions> Extension installer and upload the XML file.
The XML file will be found in the module directory under the Ocmod folder.
For version 2.3.x.x you need to upload below ocmod files :
1. Marketplaceforseo.ocmod.xml
2. marketplace1.ocmod.xml
3. marketplace2.ocmod.xml
4. marketplace3.ocmod.xml
5. marketplace4.ocmod.xml
6. wk_mpmassupload.ocmod.xml
For version 3.x.x.x
You need to upload below ocmod files :
First File – Change-MP-Paths.ocmod.zip
Second File – marketplaceb2b.ocmod.zip
Third File – marketplaceb2b2.ocmod.zip
Fourth File – marketplaceb2b3.ocmod.zip
Fifth File – marketplaceb2b4.ocmod.zip

After uploading the file go to the Extensions > Modification and click on the refresh field.

Hence, after that in Admin panel go to System -> Users -> Usergroup and edit ‘Administrator’ and choose to select all for both Access and Modify Permission and save it.

Admin Configuration
Here, Post-installation the admin configures the module by following the navigation as- Extension>Extension>Modules.
Under the modules, the admin can go to Marketplace B2B and click on the edit button. The admin will even select the Marketplace store in this section.
General Settings

- Admin/Default Mail: Admin / Default mail will use to send the emails if the admin wants privacy for your store. Admin can receive all notification on this Email-Id.
- Upload Default Image: The Admin will define here the default image. If sellers don’t upload their image on the profile or other places then this image will be used.
- Seller at Registration Page: By setting this field as enable will make ‘Become a Seller’ option visible at the customer registration page.
- Customer Group at Registration page: Enabling this option will make the customer group visible on the customer registration page.
- Customer Group disable action: The Admin can disable the group member if this is set to disable.
- Approve Seller Automatic: Using this option admin doesn’t have to approve sellers manually. If Admin will enable this option, the customer will become the seller automatically.
- Approve Product Automatic: When enabled, the Seller products will approve automatically and vice versa.
- Approve Category Automatic: If the admin will enable this option, the categories related to Seller’s product will be approved automatically. Thus, allowing categories to be visible on seller’s to assign them to products.
- Approve Information Automatic: By enabling this, the admin needs not to enable the seller’s information page manually rather it gets approved automatically.
- Seller can edit/delete review: The admin can enable this to allow sellers to edit or delete their reviews.
- Customer Can Contact Sellers: This will allow the seller contact detail to be visible on the customer page.
- Seller Name In The Cart: The seller name will be visible as a suffix for every seller product if the corresponding field is set to ‘Enable’.
- Mail To Admin if Customer Contact Seller: If Enabled, the admin will receive mail when the customer will contact the seller.
- Separate Panel For Seller: If set Enabled then the vendors can choose their separate vendor panel. However, select Disabled to not allow the separate seller dashboard.
- Notification Filter: Here, the admin can easily select from the list of order status to filter out the notifications.
Commission Configuration
Here, Admin can set fixed + percentage-based commission, which will be charged from seller income for admin, according to products in orders and also edit the Category commission.

Here, the admin can choose the commission based on categories. So, if admin will select category wise commission then fixed and percentage commission both will be added to the commission.
- Seller Fixed Commission (Default)– This is the fixed amount of commission that will be applied to product sales.
- Commission Applied On Unit Price- If this field is enabled then the admin commission will be added on the product price.
- Calculate Commission On Tax- The admin sets this field to enable to allow the addition of tax to the commission price.
- Commission Worked On All Category- By ticking this field the admin will allow computation of commission on all the categories of the store.
- Category Commission Based On- Also, the admin can selectively choose the categories on the basis of which the commission will be computed.
- Select Commission Priority- Here the admin will drag and drop the various commission type to set the priority.
Products
Using this field admin can allow product fields, category commission, and product information. Hence, only selected product fields will show on the Seller profile.

Admin can also transfer the product to another seller using a single selection.
- Seller Product Store: Here the admin can specify the store name for the addition of products.
- Auto Generate Sku, Meta Description: If this field is set to ‘Enable’ then SKU will be the product’s model and meta description will be the product’s name.
This will be in the case when the seller doesn’t enter the data in these fields at the time of the addition of the product in the store.
- Low Stock Notification: The admin can enable the field to allow the notification mail to be sent to the seller in case of the stock of the product being low.
- The Low Stock Quantity: Admin can specify the minimum stock of the product, at which the above-stated mail will be sent to the seller. So, as to make the seller alert about the lower stock.
- Allowed Product Fields: The admin can check the fields in this section to allow the seller to add or edit any product data.
- The Allowed Product Tabs: Admin will select the tabs which will be enabled for the sellers.
- Product Category Required For Seller: By enabling this the admin will need to select the categories while editing/adding the product.
- Allowed Categories For All Seller: For here the admin will define the default category, which will be used at the time of product add/edit.
Allowed Image Number and Extension field-
Here, in Allowed No. of Images field, the admin specifies the maximum limit of the image that could be added to a product.
However, in the Allowed Image Extensions field the admin specifies the allowed image extension for the product images.
- Max Image Size For Seller To Upload: The admin will mention the maximum number of images the seller can upload.
- Allowed Download Extensions: Admin will mention here all the allowed extension for the downloadable product.
- Max Downloadable File Size- This is the maximum file size which seller will upload which adding downloadable products.
- Admin Receive Email After Product Add: The admin can enable this field to receive mail on the addition of the product by the seller.
- Disapprove On Edit: If the admin enables this field, then the product gets disabled from the store whenever the sellers edit the product. However, for this product approval must be disabled.
- Seller Delete Product From Store: The admin will enable the field to allow the deletion of the product from the store if the seller deletes the product from the respective store.
- Product Delete After Seller Delete: Admin can enable this to allow the deletion of the seller’s product if the seller is deleted from the store.
- Also, Product Shows After Seller Disable: Enabling this field will allow the seller’s product to be visible. Despite making the seller disable on the store.
- Seller Can Buy Their Product: This will allow the seller to purchase their own product when set to enable.
Order
The order tab will allow the management of marketplace orders by stating the settings in the admin configuration. Thus, allowing the seller to manage order, the status of the order and other details.

Allow Seller To Manage Orders: Enabling this the seller will now be able to view and manage their orders.
Else, the admin will first approve the order after that only the seller will view and manage the order.
Seller can change Order Status: Also, Enabling this field will allow the seller to modify the status of the order.
Mail to Seller On Product Purchase: The admin will enable this field to allow the seller to receive mail in case the customer purchases their product.
Notify Admin when Order Status Is Changed By Seller: Admin can enable this field to receive a notification whenever the seller modifies the order status.
Order Status For Sellers: This field will allow the admin to select order status which the seller can select for their orders.
The Order Status Sequence: Also, this field will store the sequence of various order status which the admin has chosen above.
Complete Order Status: This will allow the admin to set order status for the identification of complete order.
Cancel Order Status: Also, this will allow the admin to set order status for identification of order cancellation.
Shipping Method For Seller:
Here, the admin will select the shipping method for which the shipping amount will be transferred to the seller’s account.
Note- If a customer chooses a shipping method except for the marketplace custom shipping method.
Moreover, if the customer cart is having more than one seller’s product then the shipping cost will go to the admin only.
Else in case of a single product, the cost goes to the seller’s account only. However, if the customer selects the marketplace custom shipping method then shipping cost goes directly to the seller.
Minimum Cart Value For Checkout: The admin will define in this section the minimum amount in the customer cart required for the checkout.
Product Quantity Restriction: In this field, the admin defines the maximum product quantity that a customer can purchase for each product.
SEO Settings
Using this Option you can manually Add SEF URLs for Site URLs. Select the URL link and also type its SEF keyword. For all this, the admin needs to first enable Use SEO Keywords For Marketplace.

Here, the admin can-
- Select Route- Specify the path to reach a page.
- SEO Keyword for Store Page- Specify the keyword to search the page on the store.
Product SEF Settings
Under this field, admin can do product SEF settings. Like what do you want to show with product name, how SEF should be displayed etc.

- Seller’s Details: Admin can select from the drop-down which they want to display with the SEF settings. Like seller name, company name, screen name.
- Display Format: Under this field, admin can select from drop-down, how SEF should be displayed.
- Default Name: The default name will be used as the seller’s info if the seller’s info doesn’t exist as per the above selection (seller’s details, display format).
- Make Product Name As SEF: The product name will be used if the SEO keyword is not found for the product.
- Add Extension: From this field, the admin can add the extension with the SEO URL. Don’t use .tpl extension.
Sell
Admin can manage the Sell page and display information to the customer in the form of tabs.
If the admin can enable Seller’s list and product list, on that case Seller and product list will be visible on the Sell page.

Sell Tab
In this section, the admin can define the CMS pages appearing on Marketplace Page.

Profile Settings
This option allows the admin to manage the seller’s profile in this tab.

- Allowed Profile Fields- The admin can select fields related to the seller’s profile in this section which the seller will add/edit.
- Allowed Public Profile Fields- The admin needs to select the seller profile field in this section which will be visible to the customer in the front end.
- Customer Can See Seller’s Email ID- The admin will enable this field to make the seller’s email ID visible to the customer.
- Customer Can See Seller’s Telephone Number- The admin will enable this field to make the seller’s contact number visible to the customer.
- Make A seller Review On Only Order Purchase- The admin will enable this to receive the review about the seller from the actual buyers.
- Hide Seller Information- This field will hide the seller information from the front end if the admin enables this field.
Catalog Module Configuration
Admin can configure the catalog setting under this field.
Account-
The admin can select the options which they want to show at the front end Account Menu and toggle the Account Menu sequence.
- Allowed Account Menu- The admin can select those options which will be visible in the front end under the Account menu.
- Account Menu Sequence- The admin will define the order of the menu in this field.

Products-

The admin will define in this section the information related to the product wherein;
- Name Display- Here the admin will set the information that will be visible on the front end.
- Show Seller’s Products- The seller’s product will be visible on the product page by enabling this field.
- Display Image– Admin will set the image which will be displayed with the module.
- Seller’s Information At Product Page By Module- When it is enabled, the seller’s information will be shown through the marketplace module (for this you have to set marketplace module on the product page) otherwise seller’s information shows above the Add to cart button.
Here, the Admin can set mail for the different condition which will occur in Marketplace and also create mail template using mail keywords.
Admin has to add relevant mail keywords in creating mail messages.
Also, this mail keyword is more useful when the customer will use the marketplace add-ons. The customer can create template-based mail by creating mail keywords from here.

PayPal Configuration
Here, the admin needs to enter its PayPal Account information for Mass Pay-Out to work.
The admin will click on Paypal and then enter all the required details of PayPal account information.

How to get the credentials for the PayPal section:
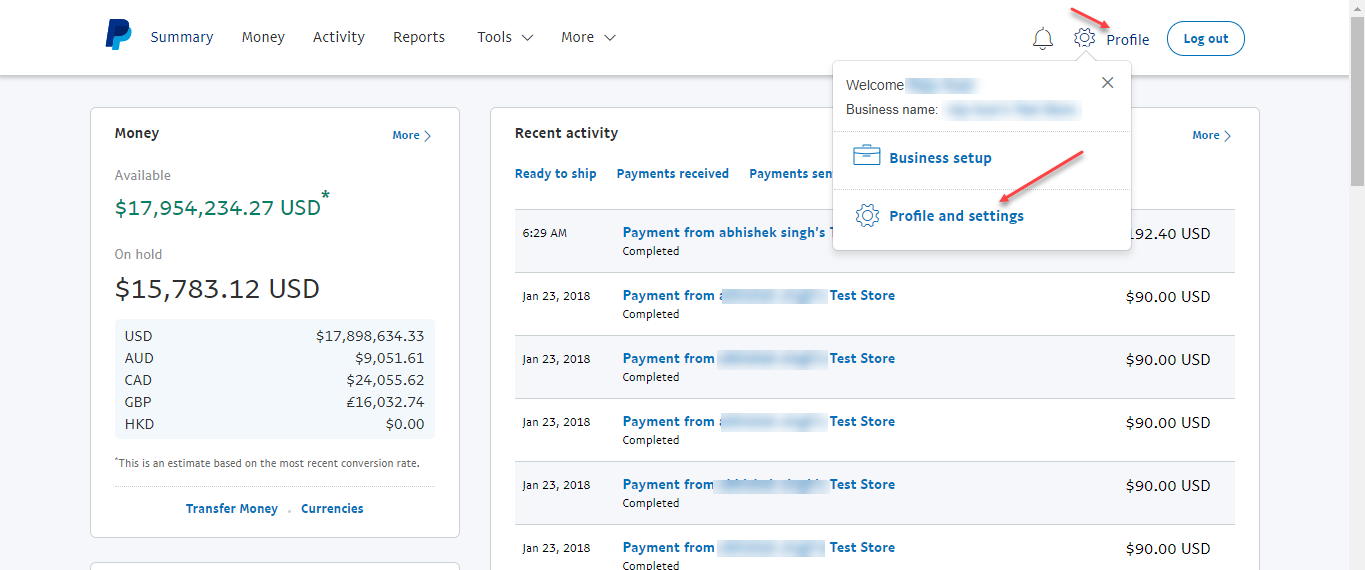
Step 1: Log in to the PayPal Sandbox at www.sandbox.paypal.com using a Sandbox Business Account. In the Profile menu on the top right, click Profile and Settings.
Step 2: Now, from the left menu click My Selling Tools. Under the Selling online section, click the Update link for the API access item.

Step 3: Clicking the Update link will open another page. Here, Under the Option 1 – PayPal API select the point number second -“Set up PayPal API credentials and permissions“.

Step 4: Now, the page that comes up, under Custom Checkout select – Manage API Credentials as shown below in the snapshot.

Step 5: After clicking Manage API Credentials, now you will be redirected to the View or Remove API Signature page. Here, you will find all the required credentials as shown below.

RFQ Configuration
The admin allows the customers to send the RFQ(Request for Quotation) to the marketplace sellers. Each marketplace seller will be able to view and manage the RFQ from their end.

Here, the admin will be able to set below configuration–
- Status: To enable the RFQ feature, set the Status as Enabled else select Disabled.
- Minimum Quantity for the Quotation: This is basically the minimum quantity of quotations, the customer can quote from the website frontend.
As a result, the customer will not be able to send the RFQ lower than the value specified here. - Auto Approve Request For Quote: Select Disabled if the admin’s approval is required for the customers to send the RFQs to sellers else select Enabled for directly sending the RFQs to the sellers.
RFQ Admin Panel
After the configuration of the module, the admin will navigate to the admin panel to check the backend functionality of the module.
Here, in the admin panel, there are two sections in the RFQ section under B2B Marketplace as listed below:
- All Requested Quotes
- Manage Requested Quotes
Manage Requested Quotes
Under this section, the admin can manage all the quotes for which customers have requested. The admin can view each of the requested quotes.
If the admin has disabled the auto-approve the request for quotes in the configuration then the admin can click on view quote and assign the quote request to any of the sellers as shown below.

All Requested Quotes
Here, the admin will be able to see all the quotes for which the customer has requested. The admin can click on view to know the status of the quotes.
The status of quotes requested can be as Open, Answered, Resolved, and Closed. The admin can even respond to the quotes and can also send messages to the customers regarding the quotes.

Product Question Answer

Here, the admin can configure:
- Status: To allow the customers to ask questions for the products, set status as Enabled else set status as Disabled.
- Show at Profile page: Set Enabled to show product question-answer option at seller’s profile page else set Disabled.
- Google reCAPTCHA site key: Enter google reCaptcha site key.
- The Google reCAPTCHA Secret key: Here the admin will enter google reCaptcha secret key.
The admin can visit the link to know how to get the google reCAPTCHA credentials. - Provide number for pagination start: Enter the number of questions after which the admin needs to start the pagination.
- Show Question By: Select the sequence in which the admin wants to show questions. The admin can select either Newer to Older or Older to Newer.
- Also, Show question placed date: If set YES then the date on which question will place will also be visible along with the question on front-end else if set NO, date will not be visible.
Other Product Question Answer Settings:
- Show the author information who has placed question: When set YES, the author’s information will also be visible along with the question else when set NO, the author’s information will not be visible on the front-end.
- Login required to place question: If set YES then the customer needs to log-in to place the question else if set NO, the customer can place a question without log-in into the website.
- Auto approve question: When set YES then admin’s approval will not be required to place question else when set as NO, admin’s approval will be required to place the question.
- Show Answer By: Select the sequence in which the admin wants to show the answer. The admin can select either Newer to Older or Older to Newer.
- Show answer placed date: If set YES then the date on which answer is placed will also be visible along with the answer on the front-end else if set NO, date will not be visible.
- Show the author information who has answered: When set YES, the author’s information will also be visible along with the answer else when set NO, the author’s information will not be visible.
Additional Fields
- Login required to place the answer of any question: If set YES then the customer needs to log-in to place the answer else if set NO, the customer can place the answer without log-in into the website.
- Auto approve answer: When set YES then admin’s approval will not be required to place an answer else when set as NO, admin’s approval will be required to place the answer.
- To Mail admin when the question is put up: The Admin will receive mail when a question is put up for any product.
- Mail to admin when the answer is placed: The admin will get mail when an answer is placed for any product.
- To Mail the customer when he/she put up a question: Mail will be sent to the customer when the question is placed for any product.
- Mail to the customer when his/her question is answered: The customer will get mail when an answer is placed for any product.
- To Mail seller when the question is put up: Mail will be sent to the seller when the question is placed for any product.
- Mail to seller when an answer is placed: The seller will get mail when an answer is placed for any product.
Marketplace Question Answer Admin Panel
Here, the Admin can see Questions and manage those questions under B2B Marketplace > Question Answers.
Admin can approve or disapprove the particular question using the thumbs up (green) and thumbs down (red) buttons.

Also, the admin can click on “see answers” and can answer for that particular question. The admin can also see the likes in the answers.

The admin can also click the like tab to display the customer names who have liked the answer.
Vendor Domain

Here, the admin will have to configure below settings to provide the separate vendor sub-domain for the Opencart marketplace vendors.
- Status: The admin can set the status as Enabled to provide vendor subdomain functionality to the marketplace partners.
- Shop URL Prefix: Set the Shop URL Prefix(Only Characters, Numbers, and Underscore are allowed). The default prefix is Shop.
Whatever prefix is entered that will be added in the URL for the seller profile page. - Display Seller’s Product: If Enabled then the current vendor’s products will be displayed on the vendor domain else all products will be displayed.
Note: Some Server configuration is required, where you need to map your domain name to *.domain.
For example: example.com to *.example.com.
Marketplace Mass Upload

Here both the admin and sellers can upload their products in bulk using CSV, XML, and XLS files through the below configurations:
- Marketplace Mass Upload Status: Set status as Enabled to use mass upload feature else set Disabled.
- Keyword: When the keyword is Enabled then,
1. If the product is being updated then the SEO will contain SEO+Product Id.
2. Also, If a new product is being added then SEO will contain the provided SEO and random four characters.
3. If the keyword is disabled then the product will be skipped and error will be shown for that product. - Seller Allowed Upload File types: Select all the File types(XML, CSV, XLS, ZIP) in which the sellers will be allowed to upload products.
- The Seller Allowed Backup File types: Here, the admin can select the file types( XML, CSV, XLS) which will be used by the seller as backup files. The allowed file types can be downloaded by the seller to keep backup.
Marketplace Partners
The admin can manage all the customers like approve and disapprove them. In addition, the admin can monitor the Partner’s profile by adding/viewing/editing it.
Also, the admin can view the latest order, payment details, add more products to the partner.

Here, the admin can easily fetch the seller’s information by using Customer name, Email-id, Group, status and customer type.
Dashboard
Using Dashboard admin can track the seller’s income, total order, total buyers, and the latest order.

Marketplace Commission
Under this section, the admin can set-up the commission on the various categories. The admin can set the commission as fixed or percentage or both as required.

The admin can add, edit and delete the commission rules for categories as well as sub-categories. To add a new commission rule for a category tap, the admin can click on the Add commission button.

After adding the commissions to the categories, click on save.
Marketplace Products
Admin can add, manage or edit the Seller’s product and also filter the product using seller name, product name, quantity, price, model, and status.

Marketplace Seller Categories
Here, all the categories of sellers will be visible to the admin. The admin can approve and edit categories.

Marketplace Categories
Here, the admin can edit, delete, add or assign categories to the sellers. Also, the admin can apply a filter based on the seller name and category.

Category Attribute Manager
Here, the admin can edit, delete, add or assign attributes to the categories. Also, the admin can apply a filter based on category and attributes.

Marketplace Orders
Under this section, the admin can see all the orders made for marketplace products. The admin can view orders and decline the access from the seller to manage the order.
When clicked on view order, the admin can change order status for each product, add tracking number and add comments for the product.

Marketplace Income
Admin can find the seller’s income under Marketplace Income and also pay to the Seller.
Thus, here the admin can see total sale by each seller, commission, admin amount, remaining amount to pay and the grand total of each amount.
Also, there is a filter option by which admin can filter the income details.

After clicking on the Pay button below page will open. Admin can add transactions for Sellers to maintain records.
Also, the Payable amount will vary according to selected Order status and transaction status. However, for now, all the transactions settles.

Marketplace Transactions
Under the transactions section, the admin will be able to check the transactions of all the marketplace sellers to maintain a record.

Also, the admin can filter transactions on the basis of the transaction ID, seller name, date added, transaction amount, and comment.
Marketplace Shipping
Admin can view the Seller’s Shipping information and also filter the shipping details using the customer name, shipping country, weight and many more.

Marketplace Mails
Admin can select and define the template emails for Marketplace. Likewise-
- Customer request for SellerShip – Mail to Admin / Customer.
- The Customer seller request approval – Here, Mail to customer.
- Seller product
- Adds notification – Mail to Admin / Seller.
- approval – Also, Mail to Seller.
- sold – Mail to Seller with the order.
- Customer contact seller – Also, Mail to Seller / Admin.
- Seller contact admin – Mail to Admin.

Seller Review
Here, the admin can add, edit and delete the seller’s reviews. The admin can also filter reviews on the basis of seller name, status, customer, and date added.

Seller Review Field
Here, the admin can create, delete multiple fields for reviewing the seller. The admin can add all fields for which sellers can rate for example price, value, etc.
Also, the admin can filter the created fields on the basis of field and status.

Notifications
Here, the admin will receive all the notifications related to orders, products, and sellers. In the order section, admin will be able to see all notifications according to the status of the order.
In products, the admin will be able to see all notifications related to products and in the seller section, the admin will be able to see notifications regarding seller reviews.

Information
Under this section, the admin can check the information of sellers.
When any seller adds the information under their own account panel, only then that seller gets listed here and the admin can check and edit the seller’s information.

Custom Fields
Here, the admin will be able to add and delete the custom fields. The admin can add more information fields to the product page for the customers.
The admin can also filter custom fields on the basis of the option name, seller name and field type.

Customer Group
Here, the admin can add, or delete a number of customer groups. The admin can give some access permission to each created customer groups.
Also, the admin can filter customer groups on the basis of customer group name, group rights and status of customer groups. Later these customer groups can assign to the sellers as well as customers.

Layouts
The admin can easily show seller information on the product page as well as respective seller products. For this setting, you have to navigate to Systems -> Design -> Layouts.

Here the admin can configure the layouts settings:
- Select the specific Module
- Can select among the different positions on the page i.e Content Top, Content Bottom, Column Right, Column Left
- Set the order.
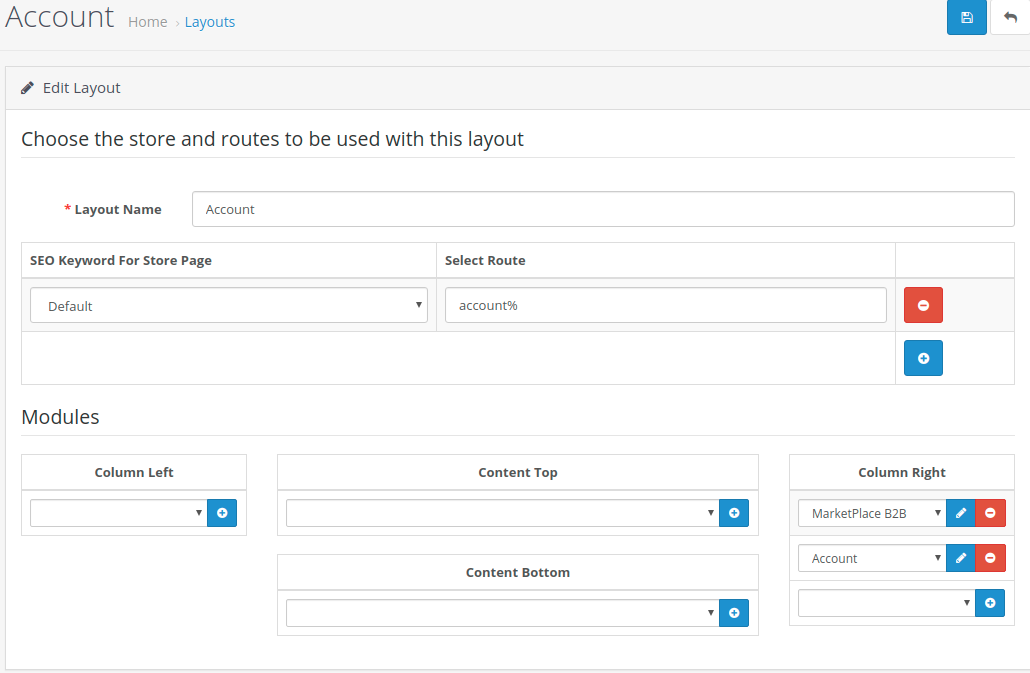
Here, the admin can even manage product layout.

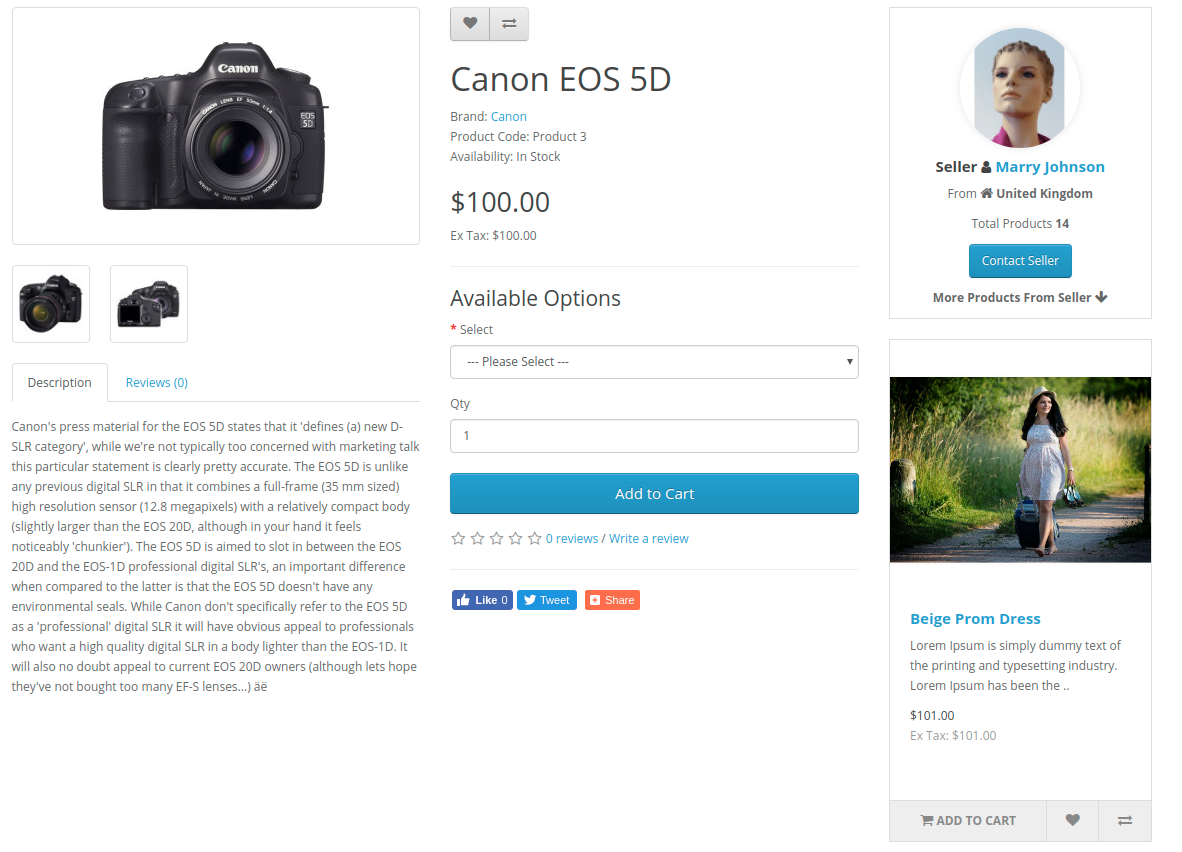
Therefore in the frontend on the product page, seller information is on the right side as per layout configuration. Moreover, the seller can see the related products of the respective seller.
Request for Quotation
The customers can send the RFQ(Request for Quotation) to the marketplace sellers. Every marketplace sellers can view and manage the RFQ from their end.
Also, the admin will be able to enable or disable the approval of RFQ’s from the backend. The customer can send a quotation request for both existing and custom products.
RFQ for Existing Products
To send a request for a quotation to a supplier, the customer needs to click on the” Request Quote ” option for that particular product on the product page.

Clicking on the Request Quote will redirect the customers to the Request quote form and the customer will need to provide detailed information regarding the quotation.
After entering all the details the customer needs to click on Request for quote.

Once the request submits, the customer redirects to the My Requested Quotes page as below:

After submitting the request by the customer, the supplier can check the request by going to the All Requested Quotes under Marketplace Quotations.
Marketplace Quotations

Then the supplier can either send a message or send a quote regarding the quotation sent by the customer. The supplier will click on the Message to communicate with the customer.

The supplier can then navigate to All Quoted Products under Marketplace Quotation as shown in the image below:

When the supplier clicks on view quotation under action, the below form will be visible to the supplier where the supplier can even Add a new quote, Approve last Quote and Reject Request.
Here if the supplier accepts the quotation, the request will move to Resolve and if the quotation rejects then the request will move to Close.

When the supplier will click on Approve Last Quote and will move to All Quoted products, then Add Product option will be visible under Resolved.

When the supplier will click on Add product, he will be able to view “You have successfully created a product for this quote!”.
Then the customer will able to add that product to the cart by navigating through the resolved request under My Requested quote.

After clicking on “Add to Cart“, the product with the request quote quantity will add to cart.
Then the customer can checkout for that requested product quantity and purchase the product at the cost approved in the quote.
RFQ for Custom Products
Custom products are those products that do not list on the website currently. The customer can request quotes for custom products also.
Also, the customer can send a quote for custom products by clicking on Request for quote. The customer can enter all the details given in the request for quote form and click on request for quote.

The customer will first select the categories, enter custom product details and then click on add product.

Once the product is added then the customer can enter the quote details and click on Request for Quote. The customer can also reset the quote request.
Buying Leads
When the customer quotes for the custom product, the Supplier can see all requests in Available Buying Leads under the “Buying Leads” option.

The supplier can even message and send his quote to the customer.
Here, the supplier will enter Quote Quantity, Quote Price Per Quantity, provide Sample information – price, availability, unit, shipping time, and some note for the customer.

After the quote is sent by the supplier, the customer can check the same through My Requested Quotes.

After clicking on view, the customer can see the quote request in Open and can click on respond. Once clicked on Respond the customer can send a message, Approve or Reject the quote.

After the quote is approved by the customer, the request will be shown at supplier’s end as resolved in Quoted Buying Leads in the Buying leads section. The Supplier can then click on Add product.

When clicked on Add product, a message will appear “You have successfully created a product for this quote!“.
Now the customer can add this product to the cart by clicking on Add to Cart in the Resolved section under My Requested Quotes.

After clicking on Add to cart, the product will be added to the cart and the customer will checkout for the Quoted product the same as the default checkout process works.
Product Question Answer
Implementing Product Question Answer in the B2B Marketplace module will allow the customers to ask/post questions for the particular product and receive their answer with like or dislike option.
Using this Seller can also approve or disapprove any particular question and answer. There is no need to approve the seller’s answer from the admin side.
Also, There can be multiple answers to a question. The customers can also answer the questions.

You can click on the link to know more about the Marketplace Product Question Answer.
Vendor Sub-Domain
Providing Vendor Sub-domain functionality on Opencart B2B Marketplace will allow the admin to provide the functionality to have a separate vendor sub-domain for the Opencart marketplace vendors.
The separate vendor sub-domain will work for profile, category, compare, manufacturer, product, search, and special pages.
This means that the customer can access these pages via the vendor profile page under the seller sub-domain as shown in the below image:

To know more Check Marketplace Vendor Sub-Domain.
Marketplace Product Mass Upload
Using Mass upload in Opencart B2B Marketplace will allow both the admin and seller to upload their products in bulk using CSV, XML and XLS files.
Also, the admin can upload products on the seller’s store too. The admin can even update Bulk products using the XML, XLS, and CSV file types(in zip format only).
The sellers can upload mass products in one go by going through Add Mass Products.

Further, to know more regarding the complete functionality, check Marketplace Product Mass Upload.
Customer Group
Opencart B2B Marketplace module allows the admin to create customer groups. These customer groups can create sub customer groups.
This B2B marketplace module is right dependent. That is the Group user will able to do things based on their rights.
Also, the child group doesn’t have more than the parent group right. Let’s understand it using below flow chart.

Flowchart Explanation
In the above flow chart, the admin has created two customer groups named as “Supplier” and “Distributor”.
These customer groups (Supplier, Distributor) has two sub customer group which is named as “Sub-supplier” and “Sub distributer”.
All customer groups and sub customer groups are connected to the admin. Here Supplier and Distributor are parent group and Sub Supplier and Sub Distributors are their child.
So Sub Supplier doesn’t contain rights more than Supplier. The maximum rights of the child group are equal to the total rights of the parent group.
Using Marketplace Customer Group, admin can create a new Customer group and also edit existing groups.
Hence, by clicking on the Customer Group tab, admin can find the customer group list with their right.

So, after clicking on Add new tab, the below page will open. From here admin can create a new group.

Parent Group
With check this option, admin can create a parent group. If this option is not checked then a text box will open where the admin has to select the parent group.
Also, the child group doesn’t have more rights than the parent group. Child group contains only their parent group rights. Refer to the below screenshot for the same.

Group Rights
- Can Order– Using this right customer group member can do the order for any product.
- View Group Order– With the help of this right, group members will able to see all group orders.
- Also, Can Create User– Using this right, a group member can create users.
- Can Apply Discount– Also, Using this right, the seller can apply a discount on their products.
- Add/Edit Products– With the help of this right, a group member can add/edit the products.
- Product List Access– By checking this right, a group member can access the product list.
- Profile Access-Using this right, the user can access the profile.
- Status- The status is set to enable to allow the creation of customer groups.
If “Customer Group Disable Action” disable by the admin, then admin can disable the group member.
However, here the admin can even edit the existing customer groups.
B2B Marketplace Customer/Seller Login
To Become a Multi-User customer is very easy.
If Customer Group at Registration Page is set to enable from the admin side then one can become a multi-user customer by selecting the customer group from the dropdown.

Marketplace Seller Panel Management
If the admin approves the seller then the marketplace block will display in the account section of the user as per the images.
The seller can create Users and see the list of users if they have “Create User” rights.

Also, the normal customer can find three new fields in B2B Marketplace if they have “create user” rights.
With these fields, the customer can create a new user, can see the user list and if the customer has no rights to order the product.
Then they will send the product for review and the group admin will approve that product after that sub-user/customer can buy that particular product.
Create a user, User list, and Review product tab will appear only if the customer has “Create User” right. Customer groups and sub customer groups will able to do work based on their rights.

Flowchart Explanation
From the above flow chart, you can understand that admin can assign rights to their customer groups (supplier). These suppliers can create sub customer groups (sub-supplier).
The child group(sub-supplier) doesn’t have more than the parent group(supplier) right.
If customer groups or sub customer has the right to add the product, only then they can add the product. Else they will unable to add products.
Marketplace Profile View
After entering all details into account registration field, Profile looks like this.
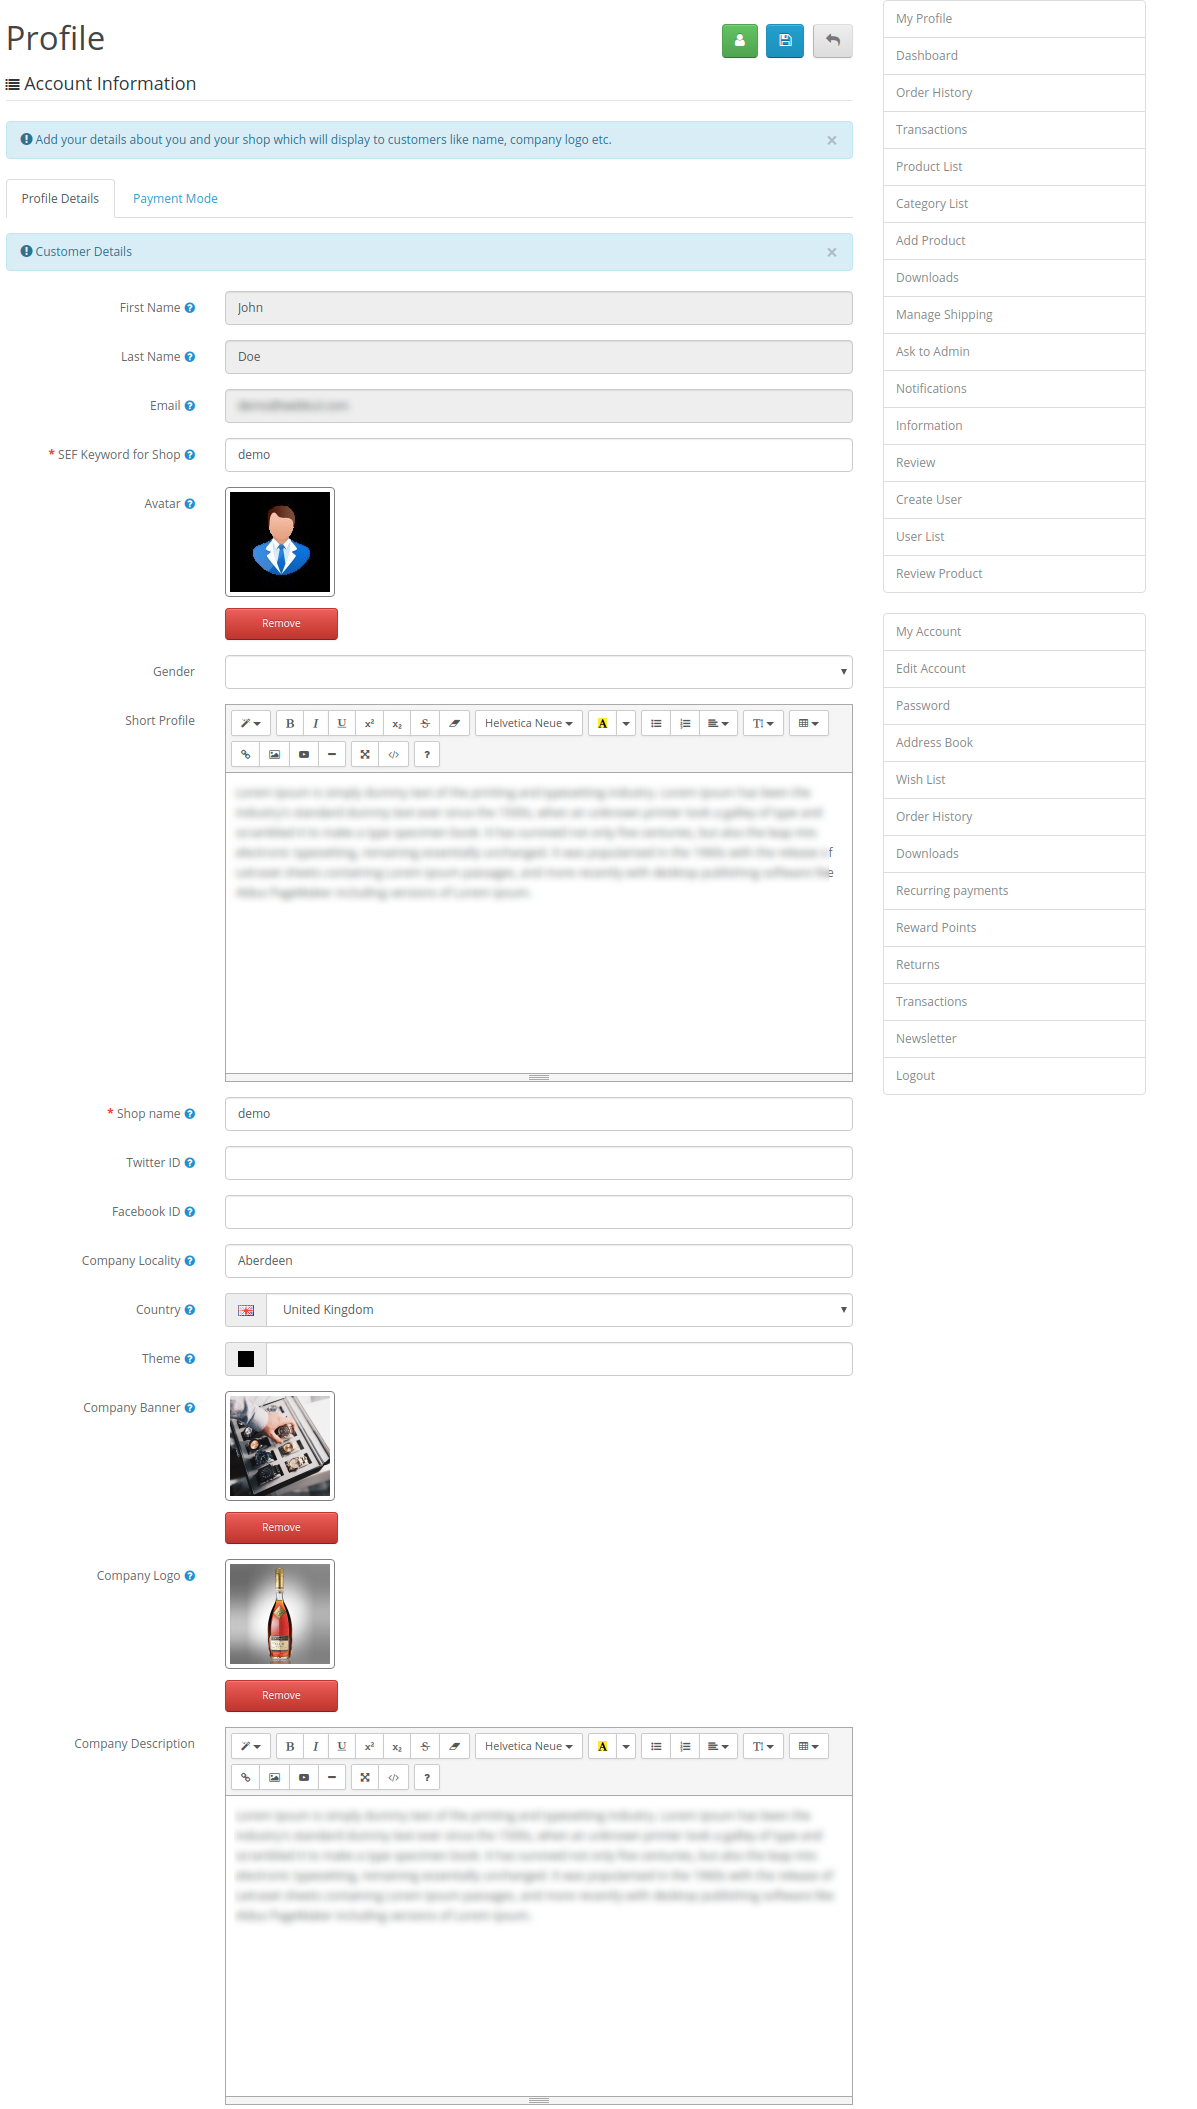
Payment Mode under payment details seller can add their bank account or PayPal id.

After entering all the information you will get an amazing page for your shop as below.

My Dashboard
Using seller dashboard seller can track his Total Orders, Sales, Buyers, world map with total sales matrix. The seller can also track the latest orders.

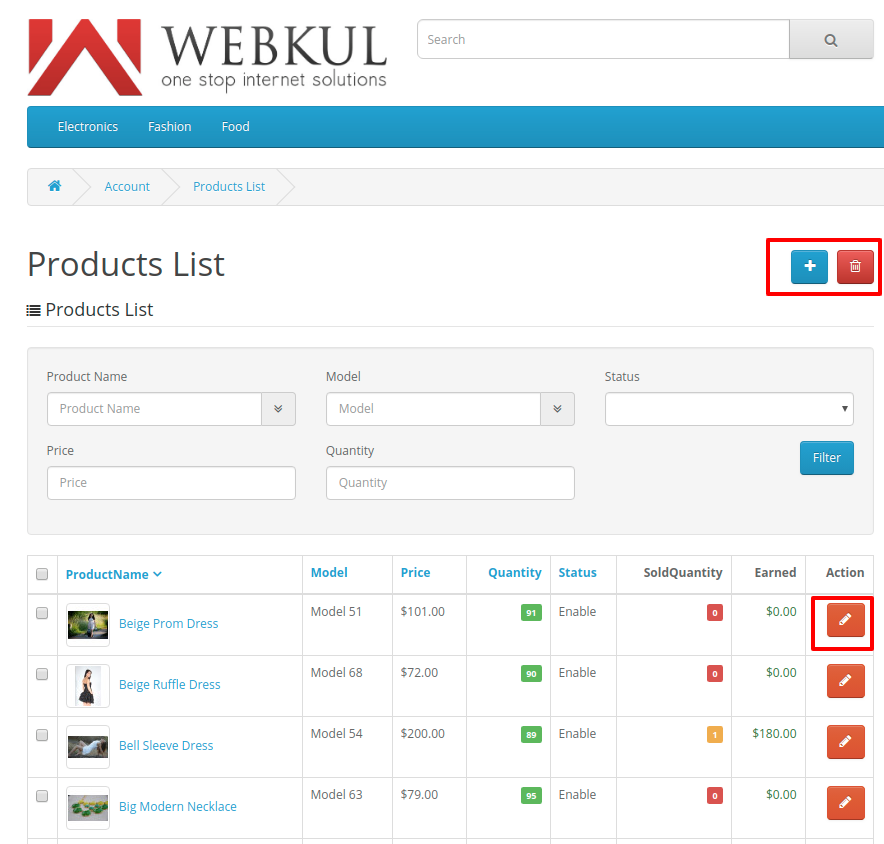
Product List
Using this menu sellers can manage their product like they can add, edit, delete their products, and also track their product information as per the screenshot.

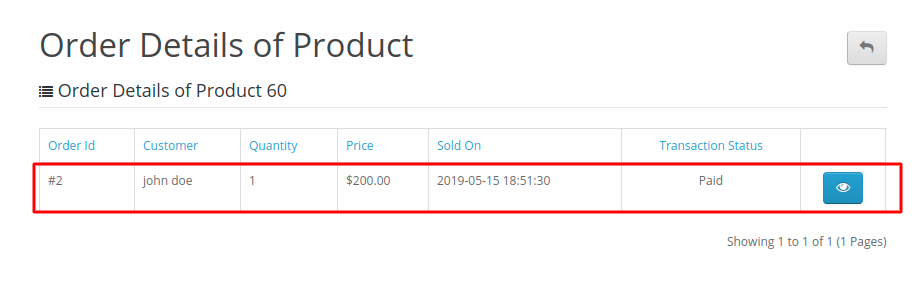
The Seller can view Order Details of the Product by clicking the sold quantity. The seller can also find the Transaction Status.
Add Product
The Seller can add the products with all details enable by admin.

Downloads
The seller can add their Downloadable items using this field. Downloadable products can be Delete and edit using Marketplace Downloads.

After clicking on the Insert option below page will be open. From here, the seller can upload the downloadable item.

Order History
Using this link sellers can see their products order history. There is also a filter option by which the seller can view the order history of the individual customer.

After clicking on the action field, the whole Order information will appear.
Also, the buyer can add comments to this order and to the admin and print the Seller order invoice. With transaction status, the buyer will know whether the seller has been paid by the admin or not.

After clicking on the Print Invoice below page will be open.

Transaction
The seller can see their transaction in this field.

Manage Shipping
The seller can insert and update shipping data using this module just add CSV file with updated Price and can also add the flat rate for Shipping for your buyers.
Also, these shipping details will be used at the time of the Marketplace Custom Shipping Method.

Ask Admin
The seller can ask any question or doubt to the admin like this way.

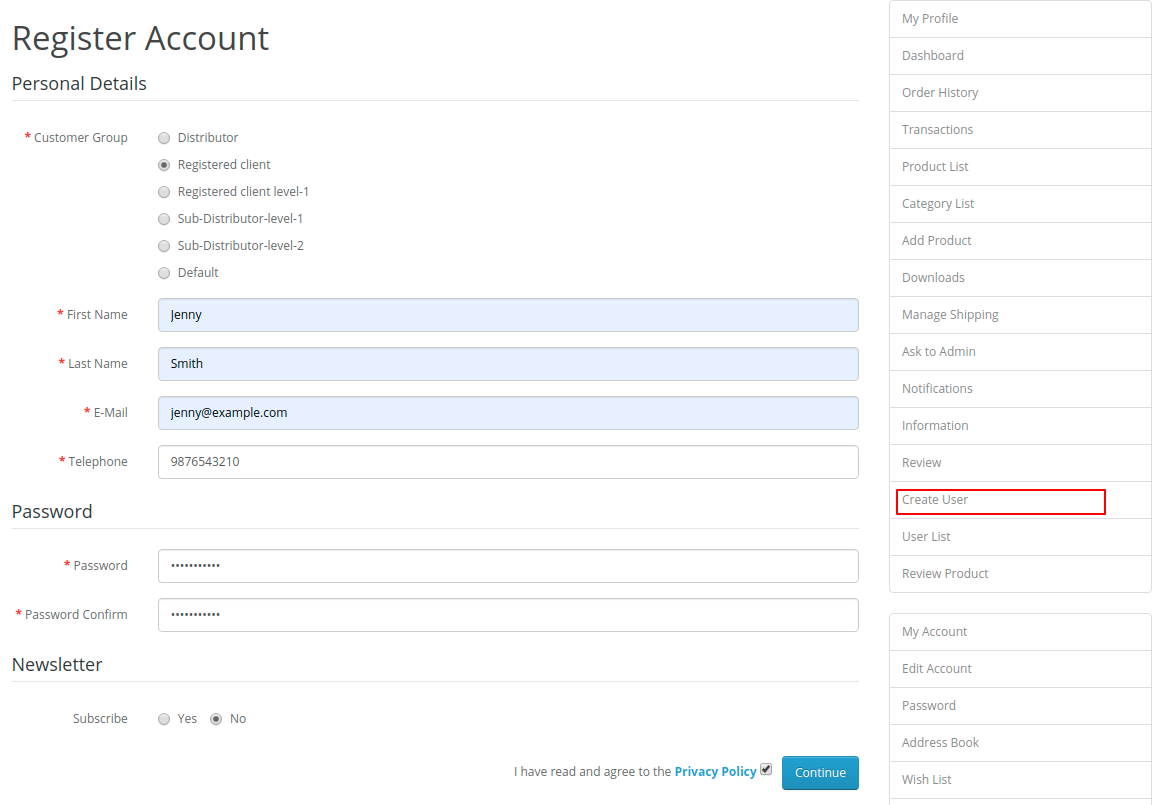
Create User
The seller or normal customer can create the user by simply selecting the customer group from the drop-down in the Registration form.
User List
Under the User List section, the seller or customer can see the list of Group users if they have “Create User right”.
Thus, there is also an option for insert new user, edit the existing user and disable the user from the particular group. Hence, the child group has only its parent group rights.

Sub customer groups will able to do work based on their rights. If Sub customer has the right to add the product, only then they can add the product. Else they will unable to add products.
Thus, in the below screenshot sub-user has the right to view all orders, add the product, product list so this sub-user cannot create a user, access the profile. S
o, the group admin of this sub-user is not a seller, so this sub-user will unable to add products and can not see the product list.
Also, the B2B marketplace is right dependent. However, if any group member has only the rights of “product list” so they will be unable to add or edit the product.
Review Product
This field is responsible, if the customer has no rights to order the product,
then they will send the product for review and the group admin will approve that product after that customer can buy that particular product.
Thus, if the customer has no rights to create order then at the time of checkout they will redirect to the below page.

On submission of review, the customer will see a message as below-

Now the seller can view the list of Review orders in the ‘Review Product’ section. Wherein the seller can click on the “Action” button, a pop-up window will open.
From here the user can select the product for approving the order.

After this, the customer can normally checkout with the Product from the front-end. This B2B Marketplace module is right dependent.
Also, that means Group users will able to do things based on their rights.
For any query or doubt Please add a ticket at https://webkul.uvdesk.com
Current Product Version - 3.6.0.4
Supported Framework Version - 2.x.x.x, 3.x.x.x

It seems that your above article is written 5 years back and product that i have purchased does not have resemblance to screenshot given here. like user list and create user etc from menu on right side.
Please explain.