OroCommerce is an enterprise B2B eCommerce platform overwhelmed with the standard set of B2B functionality, which addresses all B2B, B2C, and B2X business models. It offers out-of-the-box B2B functionality such as:
- Price quote feature
- Configure-Price-Quote (CPQ) processes
- Custom workflow
- Content Management System(CMS)
- SEO Management
- Quotes & Orders
- Multiple price lists options
- Showcasing buyer-specific catalogs
- and many more B2B capabilities.
The master catalog is essential in Orocommerce, which manages a big tree structure to show products in your store under categories to sort them in.
A different set of group products within categories lets the customer search and compare relevant products in an optimized manner.
In general, a product category is a section of a web catalog where a set of products resides.
For example: Assume you have created a category “Lighting Products” and may wish to display several types of lighting solutions such as headlamps, light bulbs, flashlights and other lighting solutions in this category.
You can easily assign those products to the corresponding category, moreover, you can create a subcategory in it.
While adding a corresponding product or set of products, you will need the product category’s name. So it would be a great step to make a category first before adding products.
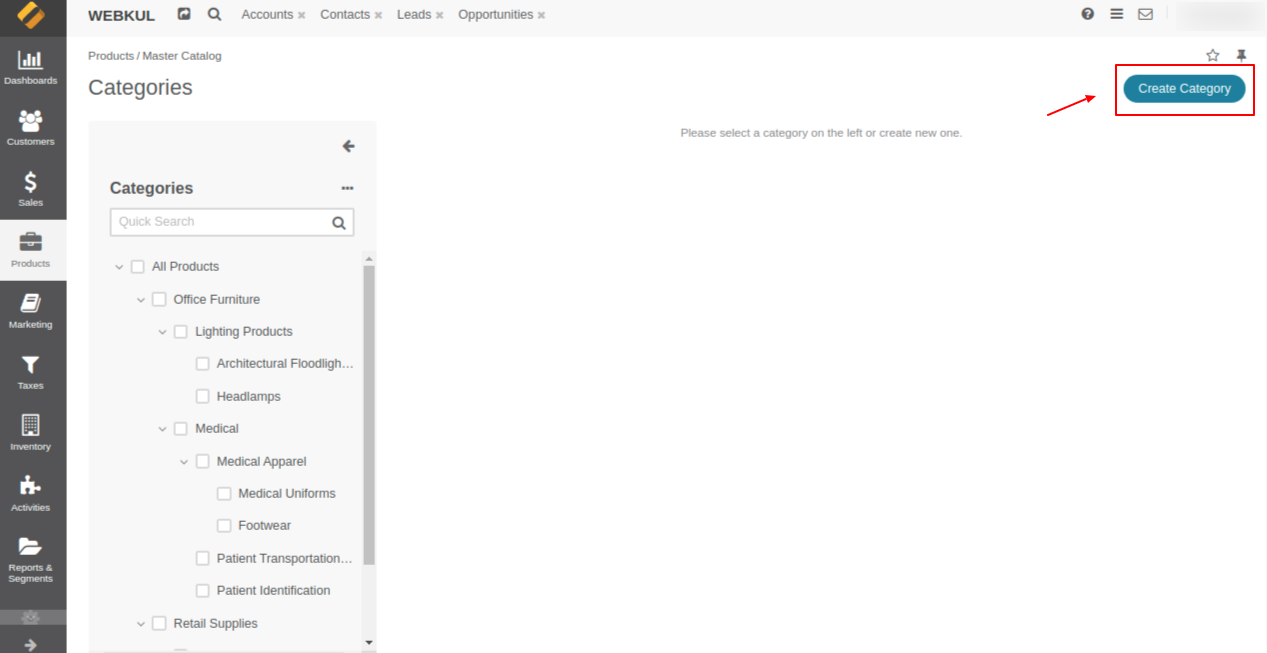
However, in the OroCommerce application by default, all the categories will you create actually are the subcategories of “All Products”.
You can customize it and create a new one by navigating through Products –> Master Catalog –> Create Category.
Creation of Master Catalog Categories
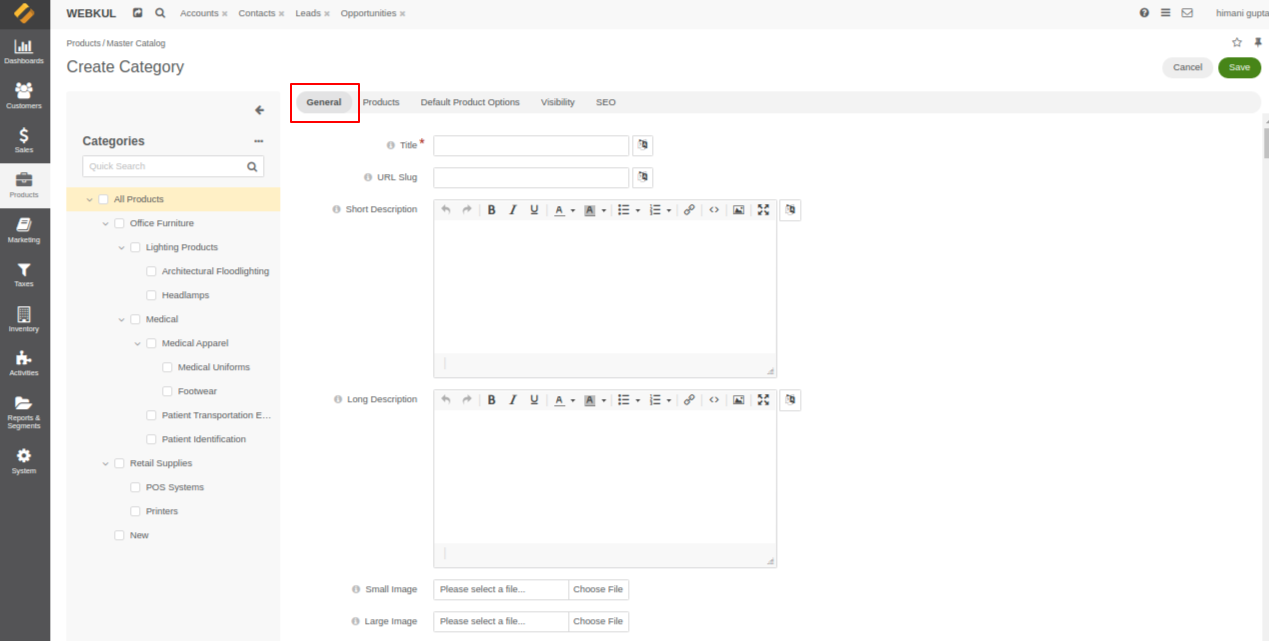
Once you will click on the create category button it will take you to the category configuration page. Each new category created by the admin in OroCommerce contains as following steps:
Step 1: Configure the General Settings
In the general information settings, you will get the below settings to add a category in OroCommerce do the following:
Title: Enter the title name for the category, this title will display on the Orocommerce front page to manage the web catalog. Moreover, you can also use the translations icon in order to get spelling for different languages.
URL Slug: It’s important in search engine optimization, by default it will auto-generate based on the title name but you can modify it if necessary.
Short Description: Write a short description of your product category.
Long Description: Write a long description of your product category.
Small Image: Select the image which shows the category on the storefront. This small image will display on the front of the main category section.
Large Image: Large product category image will display when you’ll click on the category, you can select the image by clicking on choose file.
Step 2: Link Products
In this section, the store owner can assign related products in this category. To assign the product in the category you need to click on the checkbox for respective products.
In addition, it provides the filter option to choose and find the necessary product faster.
Note: A product can only reside in one category of the master catalog.

Step 3: Default Product Options
This mod will allow setting default product options from the admin panel. The admin can configure the default product option for each category. Configure the following settings:
Unit of quantity: In a unit of the quantity field, use the dropdown to set the unit of quantity at the category level. It contains each, hour, item, kilogram, piece, set, and Parent Category.
Example: A single product can be sold in a unit of measure such as a piece, and each or item other product may be sold in a unit of sets.
The seller can choose the unit of quantity accordingly. The unit of quantity is displayed on the product details page on the front end.
Precision: Enter the quantity in the Precision field that a user may order or add to the shopping list.
Managed Inventory: Simply uncheck the Use checkbox to open this field for editing and selecting. Select Yes if required to manage inventory for the product in the category else select No. By default Manage inventory is selected as “Parent Category”.
Highlight Low Inventory: This option indicated to wholesale buyers that there might not be enough products left in stock for their purchase.
Inventory threshold: Enter the minimum quantity of products to be considered in stock. In addition, you can select a category level either as a parent category or system configuration.
- Parent Category: Inherits the value from the parent category.
- System Config: Inherits the value from the system configuration.
Example: When items are sold in Kg, you may need to define how many kgs are required in a package, in order for the package considered in stock.
Low Inventory Threshold: Enter the minimum stock level in this field, it will display a trigger warning message if reached the defined level.
Decrement Inventory: In the decrement inventory section, use the dropdown to select decrement inventory upon the order or defined by the workflow.
You can select “On order submission“ whether the inventory level should be updated when the order is placed for the particular quantity of the product units.
Backorders: When backorders select “Yes” buyers can order product quantity when the product may not available in the stock or the inventory is low.
Note: If the decrement inventory has set “On order submission” and Backorders selected as “Yes” then product quantity may display in negatives.
Minimum Quantity to order: Enter a number that buyers must purchase as a minimum. You can restrict the customer to buy a minimum number of product.
Example: If you may only want to sell a product if customers buy a product that is more than fifty then you need to define the minimum quantity to order as fifty.
Maximum Quantity to order: Enter the maximum quantity of the order that customers can purchase for the order.
Is upcoming: This will indicate to buyers that the product in this category is not available in stock currently. It might available later.
Moreover, you can choose the availability date & time when the product will be available in stock. To do this first you need to click on the checkbox to enable the field.
Then, select “Yes” in order to set the available date & time.

Step 4: Category Visibility
The seller can enable category visibility for all customers, specific customers or even customer groups.
Visibility to all: Use the drop-down in order to select the visibility levels for all customers such as parent category, config, hidden or visible.
- Parent Category: Inherits the value from the parent category for the selected customer group.
- Hidden: Select hidden, if you want to hide the category from the storefront.
- Config: If you will select config, then it inherits the value from the category visibility to customers in the system configuration.
- Visible: Select visible, if you want to show the category in the storefront.
This would be a default category visibility setting for the selected category.

Visibility to Customer group: Select the option either hidden or visible for the corresponding customer group in order to the visible selected category.

Visibility to Customer: This option helps the seller to define the product visibility either showing or hiding the corresponding category from the customer in the storefront.

Step 5: SEO
Here, you can enter the SEO details of your product category such as Meta title, Meta description, and Meta keywords.
Meta Title: Enter the meta title for the product, it helps the user index the page on the search engine result page (SERP).
Meta Description: Write the description of the product should contain 100-160 characters. This description shows summarizes a page’s content over the search result page.
Meta Keywords: In this field, enter the meta keywords for the product typically used to define the page description.

Once you’ll define the category completely, lastly click on the save button to save the configuration.

You can also create a sub-category of a category. For it, you have to click on the category for which you want to create a sub-category. Then, you need to click on Create Subcategory button from the top highlighted below:

Here, you need to fill in the required information similar to what we have performed while creating the main category.
After configuring the subcategory, you can see a sub-category is added to your main category. You can make the chain of categories and sub-categories as you need.
Support
If you have any queries feel free to reach us at [email protected] or create a support ticket. Also, check out OroCommerce extensions to add more features and functionalities into your B2B commerce platform.

Be the first to comment.