Also we have available Magento 2 push notification extension.
Features of Magento Push Notification
-
Web Push Notification module is very easy to configure and set up.
-
Compatible with Mozilla firefox and Google chrome desktop browsers.
-
It works with the SSL (Secure Sockets Layer) certificate websites.
-
There is no monthly subscription fee required to send the notifications.
-
Add any number of subscribed users, there is no limitation
-
The admin can create, edit and delete notification templates from the back-end.
-
The sellers can create, edit and delete notification templates from the front-end.
-
Remove any subscribed user from the list if it doesn’t want to receive any further notifications.
-
Add a custom icon and redirect URL link with the web push notification.
-
Send notifications to either all or selected subscribed users.
-
Use the search option to find any specific template, subscribed users from the lists.
-
The admin can manage all the subscribed users of the store from the backend.
-
Web Push Notification supports many languages translation.
Magento Push Notification Installation Process
Extract the downloaded zip file and copy app, js, and skin folder to the root directory of the magento.

After copying the folders, you need to flush the cache storage from magento back-end. Navigate through System -> Cache management and click Select All. Then click Flush Cache Storage button as shown below:

Module Language Translation
Web Push Notification supports many languages translation. After the module installation, you need to unzip the folder and click on src folder. Inside that folder, you will find app folder.
Click on the app folder and you will get locale. and inside that, you will find the language folder in the English language as en_US.
Now follow the same path and open the locale folder where you have installed the Magento. Go inside the locale folder and create a new folder. Name with the language for which you want to translate your module content.
Now edit the language CSV file and then upload it to your server inside the locale folder.

Before uploading the CSV file, open and edit it with the translated keywords.
Creating Firebase Project Credentials
In order to use this module, you need to have Firebase Project Credentials. Please visit this link and create a new project with your Gmail account.

1. After opening Firebase website, please click CREATE NEW PROJECT button as shown in the above screenshot.
2. A small pop-up window will appear with the name of Create a project, here you have to enter your Project Name and then select your Country/Region.
3. After completing the details click CREATE PROJECT button.

4. After creating your new project click Settings menu icon and select Project Settings option. Please view below screenshot. A new Settings page will open.

5. After entering the Settings page, click CLOUD MESSAGING tab. From here you will find your Project Credentials, copy and save your Server Key and Sender ID.
You need to enter these credentials in the next step of Magento configuration.

Admin Management
Seller Management
After logging in to the seller account. There will be two new menu options available for each seller i.e. – Registered Users and Notification Templates in My Account section. Please refer from the below screenshot.

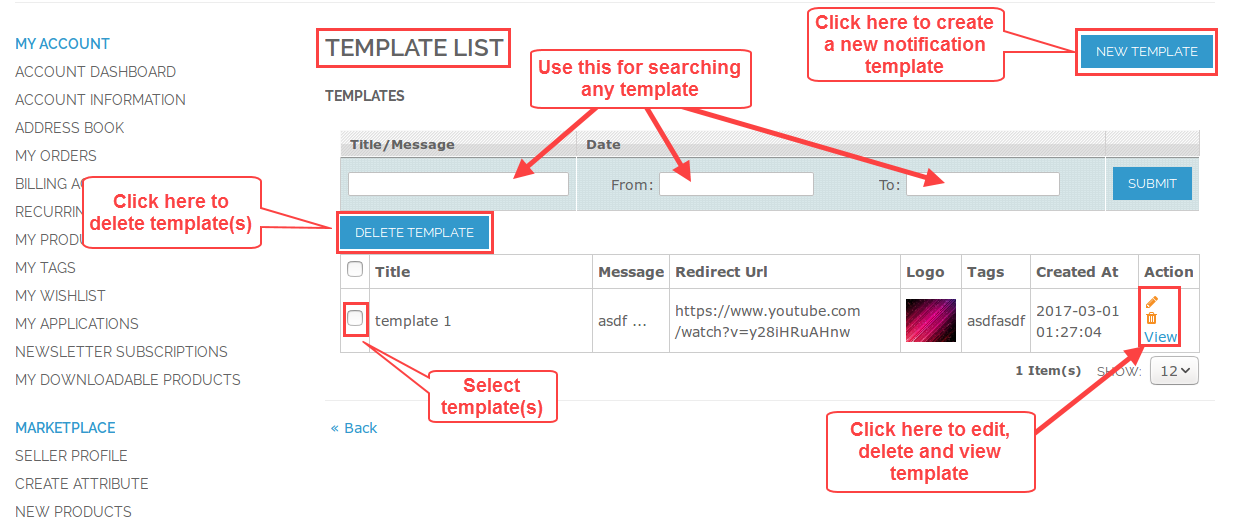
To manage notification templates click Notification Templates option. Here the seller will find all the list of templates created. It can view template information – Title, Message, Redirect Url, Tags, Logo. And Created date & time.
To create a new template message simply click on New Template button.
For editing or deleting an existing template click edit or delete icon under Action column.
The seller can also search for its templates by entering the title or message and dates in the search field and click Submit.
After clicking the New Template button, the seller will see the Add New Template page. Here the seller has to fill in the information and click Save button. Please refer from the screenshot below:
Template Information:
Title – This will be your title of your notification message.
Message – This is where you have to enter the content/body of your message.
Redirect URL – Enter the web page link for the message.
Tags – Add tags to your messages for searching and filtering them from the list.
Logo – The seller can upload any supported image file for the logo.

After clicking the Registered Users menu option, the seller will see a page where it will show information about all the subscribed users. The seller can send a web push notification message from here. There is also a search option on top, where the seller can find users according to the browser and subscribed date.

To send a push notification message. Navigate to Registered Users menu option. Then select the users using checkbox menu option. To select all users click the top checkbox. After that, select any one of the templates using the drop-down menu. Click Send Notification button.
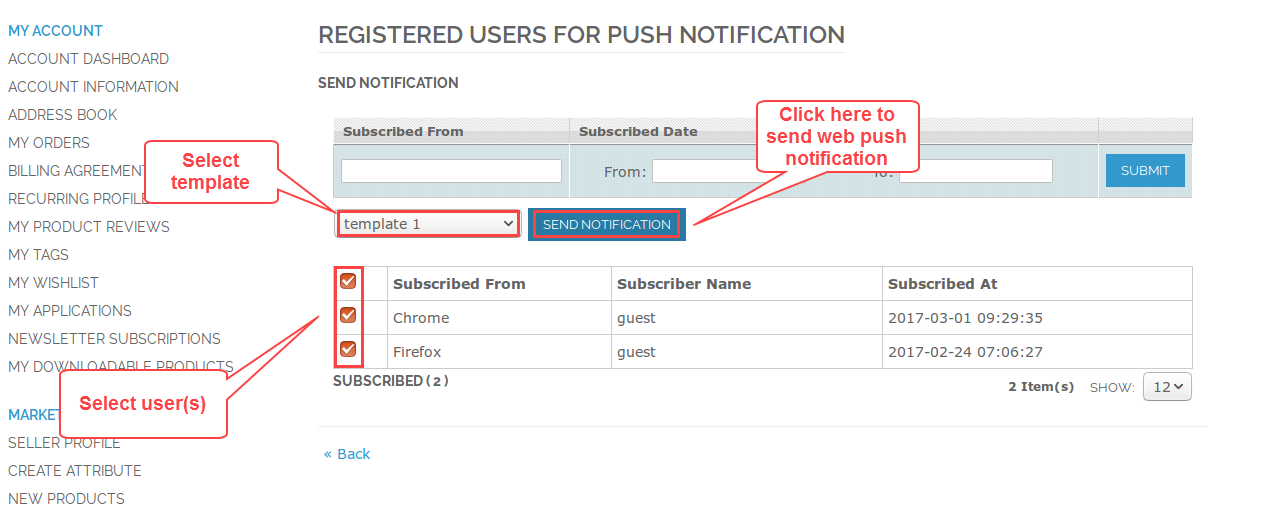
A final confirmation message will appear, click OK button to send the notification message. Please see the below screenshot:

User Front-End View
After installing Web Push Notification module in Magento. The users of the website will get a pop-up message on top of their browser window.
The pop-up message will ask users whether to show notifications from your website or not. The users will have to click the Allow button for receiving web push notifications.

Sample Web Push Notification
Please see below screenshot to see how your web push notification message will appear on the front-end. Title, Logo, and Message elements are visible to the subscribed users.
Please note: – If a seller or the admin select all the users and sends a web push notification message. All the registered users of the website will see that message.

Thank you for reading this blog. If you have any further query or require more information about Magento Push Notification module please feel free to reach http://webkul.uvdesk.com/
Current Product Version - 1.0.0
Supported Framework Version - 2.0.x.x, 2.1.x.x, 2.2.x.x

Be the first to comment.