The Marketplace Mass PayPal Payment for Magento 2 will allow the admin to easily make the sellers payouts using the mass PayPal payment option.
The admin can at a time make the payout to a maximum of 500 sellers. This extension will surely help the admin to make the payouts easier and quicker.
Note: As this module is an add-on of Webkul’s Marketplace module, you need to install the Magento 2 Multi Vendor Module first to make use of this extension.
If the details are not correct, then the seller will not receive the money sent by the admin.
Features of Marketplace Mass PayPal Payment
- Easy Saving PayPal Detail by admin in the module.
- The admin can do a Mass PayPal payment to the sellers.
- Quick Payment transfer upto 500 Seller in single Attempt.
- The admin can also add the payment note while making the payment to the sellers.
- Mass payment history check by admin.
- The admin can cancel the unclaimed payment made.
- The sellers can save their PayPal details under their own account panel.
- The sellers can view the complete transaction information.
Installation of Marketplace Mass PayPal Payment
Customers will get a zip folder and they have to extract the contents of this zip folder on their system.
Thus, the extracted folder has an src folder, inside the src folder you have the app folder.
Hence, you need to transfer this app folder into the Magento 2 root directory on the server as shown below.

Thus, after the successful installation, you have to run these commands in the Magento 2 root directory.
First command- composer require paypal/rest-api-sdk-php:*

Second command- php bin/magento setup:upgrade

Third Command – php bin/magento setup:di:compile

Fourth Command – php bin/magento setup:static-content:deploy

After running the commands, you have to flush the cache from the Magento admin panel by navigating through ->System->Cache management as shown below in the snapshot.
Admin Configuration
Henceafter the successful installation of the module, the admin will navigate to Stores ->Configuration ->Webkul->Marketplace->Seller Mass Payment Configuration.

Here the admin will configure the Seller Mass Payment by –
- Selecting the Sandbox mode as Yes(Testing Mode) or No(Production Mode).
- Typing in the Merchant PayPal Id(Which will be used to send the payout to the sellers).
- Entering the Client ID and Secret ID.
(You will receive the Client ID and Secret ID via your PayPal account).
If you already have a PayPal business account then follow the steps below to get your API’s, else click https://www.paypal.com/be/webapps/mpp/account-selection to first create a new business account with PayPal.
First Step: Go to this link – https://developer.paypal.com/ and on the web page click the Log into Dashboard button.

Second Step : Now enter your PayPal credentials and then click the Login button as per the below snapshot.

Third Step : After Login into the account, a merchant has to create an App by clicking on Create App under My Apps & Credentials.

Fourth Step: After clicking on Create App, a merchant has to enter App Name and email Id of account.

After entering App Name and account’s email id and clicking on Create App, the merchant’s Client ID and Secret ID gets generated.

Once the Client ID and Secret ID gets generated, a merchant has to click on payouts and then save.

Fifth Step:
Once the Client ID and Secret ID gets generated then the admin have to enter these details in backend configuration of the module by navigating to
Stores ->Configuration ->Webkul->Marketplace->Seller Mass Payment Configuration.
Seller Configuration
After admin configure the module, the seller will get two menu options under the “Marketplace block” as shown below in the snapshot.
The sellers need to input their correct PayPal details to receive the payment from the admin via Mass PayPal payment.
Thus, after filling the required fields, click the save button to save the configuration. Also, if the seller will enter the wrong details then the PayPal details will not be saved.

Under this menu option, the seller will find all of his Payouts that are made by the admin.
Here the seller can see the Transaction date (when the payout has been made), Transaction Id, Comment Message, the Transaction amount, and a link to view the transaction information.
Henceforth, after clicking the “View” link, the seller will be able to view the complete transaction information as shown below in the snapshot.

Here the seller will find the transaction information like – Transaction Type (Selected by the admin), Method Selected (admin selected method), Comment Message (from the Admin), and the transaction order Information (Having the Ordered items and their details).
Workflow of Marketplace Mass PayPal Payment
To make the mass seller payout the admin has to navigate through Marketplace Management->Manage Sellers.
Thus, here the admin has to select the sellers for making the mass PayPal payment.
After clicking on “Manage Sellers” menu option, the admin will find a list of all the marketplace sellers.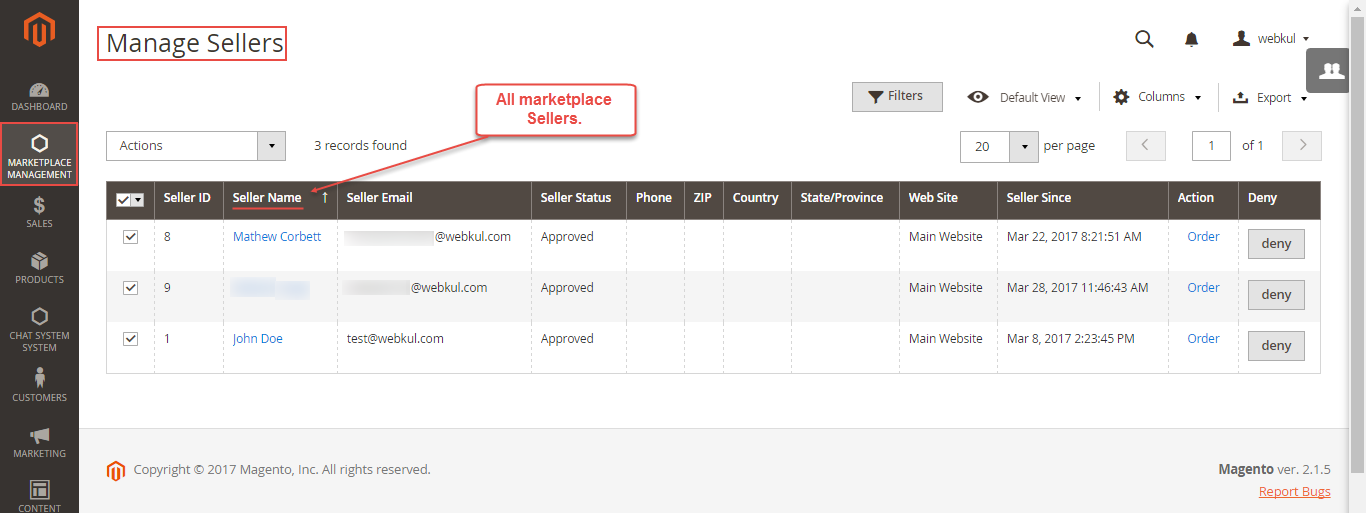
To make a mass PayPal payment to the sellers, select all the sellers and from the drop down select the PayPal mass payment option as shown below in the snapshot.

Clicking the “PayPal Mass Payment” option will bring up a pop-up window where the admin will find all the sellers selected. Now clicking the “Pay” button will make the sellers payout automatically.

After this, you will see a confirmation message that the “payment has been done successfully for the sellers” as shown below in the snapshot.

Note: The admin cannot make the next batch payment until and unless the seller status of the last Batch payment doesn’t change to “Success”.
Once the payment has been completed, the admin can check the seller’s status by navigating through Marketplace Management->Mass Payment History as per the below image.

From here, the admin can check payment details such as Payment Batch Id, Batch Status, and Sender Batch Id, Created On, And Action.

Note: The admin has to set up a cron, after which the seller status will get updated.
On Clicking View Payments, the admin can check Transaction ID, Payout Items ID, Transaction Status, and Payment Note etc.

UNCLAIMED TRANSACTION:
If the receiver is unconfirmed, then the Transaction Status will be Unclaimed.

The admin will click on the Cancel Payment button to cancel the unclaimed payment made.

After canceling the unclaimed payment, the admin will get the success message as per the image.

The admin can check to whom he has made the payments by navigating to Marketplace Management-> Sellers Transaction. Here the admin can see a list of all the sellers to whom he has made the payout as shown below.
Seller End
On the seller’s end, to check the payout made by the admin navigate to “My Transaction list” menu option under the “Marketplace block” as shown below in the snapshot.
After clicking on the “View” link you can see the completed transaction information as shown below.
Support
That’s all for the Magento 2 Marketplace Mass PayPal Payment. Still, have any issues please raise a ticket at our HelpDesk System or get back to us at [email protected].
You may also browse other Magento 2 marketplace addons and our quality Magento 2 extensions.
Current Product Version - 5.0.0
Supported Framework Version - Magento 2.0.x, 2.1.x, 2.2.x,2.3.x, 2.4.x

Be the first to comment.