Introduction
Magento 2 Xero Connector allows the store owner to export orders, and invoices to their Xero account. Xero is accounting software that helps small and medium-size businesses to manage their data.
The admin can export Magento Order/Invoice on Xero with products, customer, payment and tax information. This module also facilitates store owner with auto invoice creation on Xero when order placed or invoice create on Magento end.
The admin can bulk export the store order to their Xero account. Also, they can bulk export the invoices. The store owner can see all the mapped invoices and customers from the back-end.
Video Tutorial of Magento 2 Xero Connector
Watch the below video tutorial to understand the extension workflow:
Feature List
- The admin can synchronize all the invoices and orders to their Xero account.
- Automatic synchronization of the order on several events.
- Automatic synchronization events are Order place, Invoice creates, and Order complete.
- All the information related to the invoice gets synced such as customer, products, payment and tax information.
- Enter the Client Id and secret to connect with the Xero account.
- The admin can set the different default status of Invoices on Xero.
- The admin can set the default status as Draft, submitted, and authorized.
- Admin can view the list of customers whose orders or invoices are exported on Xero.
- The admin can view all the mapped invoices.
- Bulk export the orders to the Xero account.
- Bulk export the invoices to the Xero account.
- The admin can view the Xero invoice number and Xero customer number.
Module Installation – Magento 2 Xero Connector
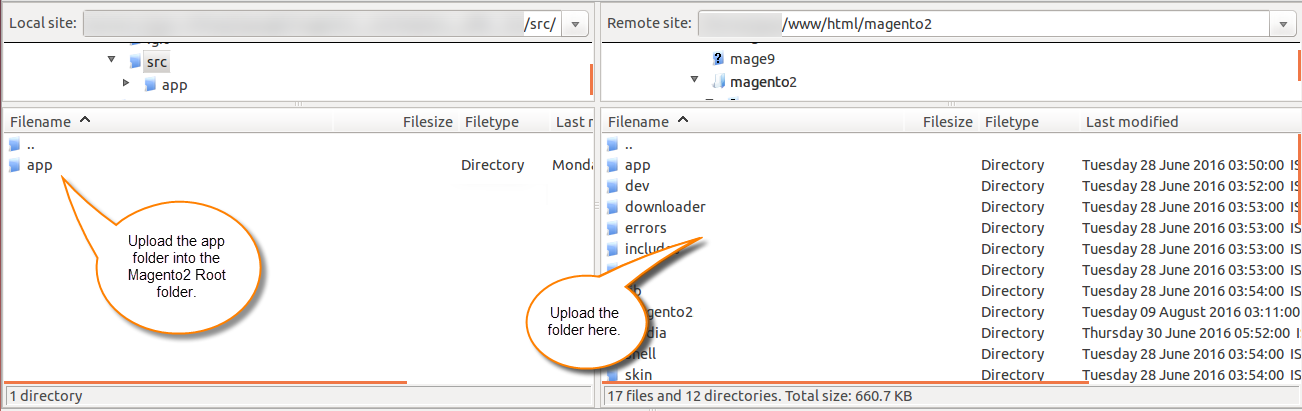
Customers will get a zip folder. Then they have to extract the contents of this zip folder on their system. The extracted folder has an src folder, inside the src folder you have the app folder.
You need to transfer this app folder into the Magento2 root directory on the server as shown below:
After that, you have to run these commands in the Magento2 root directory.
First Command –
composer require xeroapi/xero-php-oauth2
Second Command –
php bin/magento setup:upgrade
Third Command –
php bin/magento setup:di:compile
Forth Command –
php bin/magento setup:static-content:deploy
After running the commands, you have to flush the cache from the Magento admin panel by navigating through System > Cache management as shown below:

Thus, this is all about the procedure of the installation of the module.
Language Translation
For translating the module language, navigate through src/app/code/Webkul/XeroConnect/i18n and edit the en_US.csv file.
Thereafter, rename the CSV as “en_SA.csv” and translate all right side content after the comma in the Arabic language. After editing the CSV, save it.
Then upload it to the path src/app/code/Webkul/XeroConnect/i18n where the Magento2 is installed on the server.
The module gets translated into the Arabic Language. It supports both RTL and LTR languages.

How the get client Id and client secret?
For the Client Id and the Client Secret key, the admin needs to login to the Xero developer account.

After that, they need to click on the My Apps tab and then click on the New app button.

On clicking the New app button a pop up will appear and the admin needs to fill it.
- Enter the name of the App.
- Enter the URL of the company or the application.
- The admin can also give the URL of the Privacy policy.
- They need to enter the company URL as OAuth2.0 redirect URL follows with /xeroconnect/oauth/index
- The admin can also add another OAuth2.0 redirect URL if any.
- They need to read and agree to the Xero Developer Platform Terms and Conditions.
- After that, need to click on the Create app button.
Then, the admin can have the Client id and can click on the Generate a Secret link to generate the Client secret.
For the reference, check the below snapshot:

Once the admin clicks on the Generate a Secret link, a Client secret generates as per below image:

Once they have done will copying the Client id and the Client secret, they can click on the Save button to update the app.
How to create an organization on Xero?
For creating the organization on Xero, the admin needs to login to login.xero.com.
After that, they need to click on the current organization name (in Top-left corner) and then select change organization option as per below image:

After clicking on the change organization tab, the admin needs navigate towards Add a new organization:

Now, the admin needs to fill the required information in the form:

- Need to enter the name of the organization.
- Select the organization country and the time zone.
- Enter the currency which the organization use.
- Enter what the organization does.
- Select the financial year-end date.
- Select the previous accounting software.
After entering all the details the admin can click on the Buy Now button to proceed further. Also, they can take the trial by clicking on the Start trial button.
Thus, in this way, the admin can create the organization on Xero.
How to add currency to Xero Account?
The admin can add multiple currencies which are added to their store on the Xero account.
For that, they need to click on the current organization name (in Top-left corner) and then select the settings option as per below image:

After going to the Organisation settings, the admin needs to click on the Currencies option as per below image:

After that, they can see the existing currencies of the organization and also can add a new one.
For adding a new currency, the admin needs to click on the Add Currency button as per below image:

Afterward, they need to select the currency from the Select a Currency drop-down list. For the reference, check the below snapshot:

Once the admin selects the currency, then they need to click on the Add Currency button.
Now the selected currency is added to the Xero Account.

Module Configuration
After the successful installation of the Magento 2 Xero Connector module, the admin needs to configure the module.
For that, they need to navigate through, Store > Configuration > Magento 2 Xero Connect or through Xero Connect > Configuration.

Xero General Settings:
- The admin can enable the Magento 2 Xero Connector module from here.
- Enter the client id and the client’s secret.
- After entering the client id and secret, the admin can authenticate it after saving the configuration.
Once the admin click on the Authenticate button, a popup will appear as shown below:

Here, the admin needs to click on the Allow Access button. After that, they need to select the organization.

Once, the admin selects the organization and click on the Connect button, the authentication is completed.
Also, a popup will appear with the message that the Xero account is successfully authorized. To continue, the admin needs to click on the OK button.

Also, for disconnecting, the admin needs to click on the Disconnect button as shown below:

Default Configuration:
Default Status of Invoice On Xero – The admin can decide the default status of the invoice which will be exported on the Xero.
The status is: DRAFT, SUBMITTED, and, AUTHORISED
Auto Order’s Export To Xero as Invoice – If this option is enabled then the orders will automatically be exported to Xero as an invoice else the admin needs to export the orders.
Order Export Event – Form here, the admin can decide the event when the order will automatically be exported to the Xero.
The events are:
- Order Place: When the order is placed on the store, then it gets automatically exported to Xero with DRAFT status.
- Invoice Create: When the invoice is generated, then the order is automatically exported to Xero with paid status.
- Order Complete: When both the shipment and invoice are generated, then the order is automatically exported to Xero with paid status.
For the reference, please check the below image:

Invoice Amount Paid to – Here, the admin can select the account for which the invoice amount is Paid. This filed is dependent on the AUTHORISED default status of the invoice on Xero.
Accounts for inventory:
Income Account – Select the type of income account from the drop-down list.
Expense Account – Form here, Select the type of expense account from the drop-down list.
How to bulk export the order?
For bulk exporting the orders on the Xero account, the admin needs to navigate through Sales > Orders.
After that, they need to select the orders and then select the Export on Xero option from the Action drop-down.
Check the below snapshot for the reference:

After the admin clicks on the Export on Xero option, the orders start’s getting exporting.

Once the Orders successfully exported, it displays Finished Execution as per below snapshot:

How to bulk export the invoice?
For bulk exporting the invoices on the Xero account, the admin needs to navigate through Sales > Invoices.
After that, they need to select the invoices and then select the Export on Xero option from the Action drop-down.

After the admin clicks on the Export on Xero option, the invoice start’s getting exporting.

Once the Invoices successfully exported, it displays Finished Execution as per below snapshot:

Map Invoice
The admin can view the list of all the orders and invoices which are mapped with the Xero account from the back-end.
So for viewing the list of the orders and invoices, the admin needs to navigate through Xero Connect > Map Invoice as per below:

Here, the admin can see the Xero Invoice Number, Customer E-mail, etc. and also can view the orders and the invoices.
Mapped Customer
The admin can see the list of the customers whose order or invoice is mapped with the Xero account.
So, to see the list of the customers, the admin needs to navigate through Xero Connect > Mapped Customer as per below image:

Here, the admin can see the Xero Customer Number of every customer. Also, they can view customer details.
Exported Invoices on Xero
The admin can log in to their Xero Account to see all the exported orders and invoices. After login, the admin needs to click on the Business tab and then on the invoice.
For the reference, please check the below snapshot:

Here the admin can see all the list of the exported orders and invoices with their id, status, name of the customer, etc.
Also, the admin can check the Draft, Awaiting Payment, Awaiting Approval invoice separately by clicking on their tabs.
The admin can view the invoice by clicking on that as per below snapshot:

Here, the admin can see the information related to the invoice such as Products, it’s Description, Quantity, Price, Discount percentage, Tax Rate, Total, etc.
The admin can also edit the customer details on the invoice. For the reference, check the below snapshot:

Support
Thus, that’s all for the Xero Connector for Magento 2. If you face any issue, feel free to add a ticket at our HelpDesk system.
Current Product Version - 4.0.3
Supported Framework Version - Magento 2.0.x, 2.1.x, 2.2.x,2.3.x, 2.4.x

Be the first to comment.