Using the Magento 2 Marketplace Blog Manager module, the admin can enable the marketplace sellers to add blogs and share their views or opinions about the various topics that are relevant to the store. The post can be related to product reviews, shopping tips, shopping experiences, etc.
The module provides a functionality where marketplace sellers can publish a blog post on the store which will be visible to the customers. The customers can share their views and opinions on the seller blog using the comments section.
The admin can manage the vendor blog posts and blog comments from the back-end panel.
Note: This module is an add-on of Magento 2 Marketplace Module. To use this module you must have installed Webkul Magento 2 Multi Vendor Module first.
Features of Magento 2 Vendor Blog Manager
- The admin can enable or disable the module whenever required.
- Admin can set the limit of words to be displayed on a particular blog on List view page of blogs.
- The seller can add any number of blog categories.
- Even the sellers can add comments to their blog.
- The seller can add an unlimited number of blogs for their products.
- A separate page to view the particular seller blogs.
- The sellers can view customer comments added to their blog.
- Proper blog management like add/edit/delete from seller’s account.
- The logged in customers can add comments to the seller blogs.
- Admin can set the character limit of the blog comment
- Guest users can view the blog and can add comments as well.
- The admin can fully manage the blogs and its comments by approving/un-approving or by deleting them.
- The Magento 2 Vendor Blog manager is now compatible with GraphQL.
- This extension is compatible with Hyva Theme.
Installation of Magento 2 Vendor Blog Manager
Customers will get a zip folder and they have to extract the contents of this zip folder on their system. The extracted folder has an src folder, inside the src folder you have the app folder.
Further, you need to transfer this app folder into the Magento 2 root directory on the server as shown below.

After the successful installation, you have to run these commands in the Magento 2 root directory.
First command –
php bin/magento setup:upgrade
Second Command –
php bin/magento setup:di:compile
Third Command –
php bin/magento setup:static-content:deploy
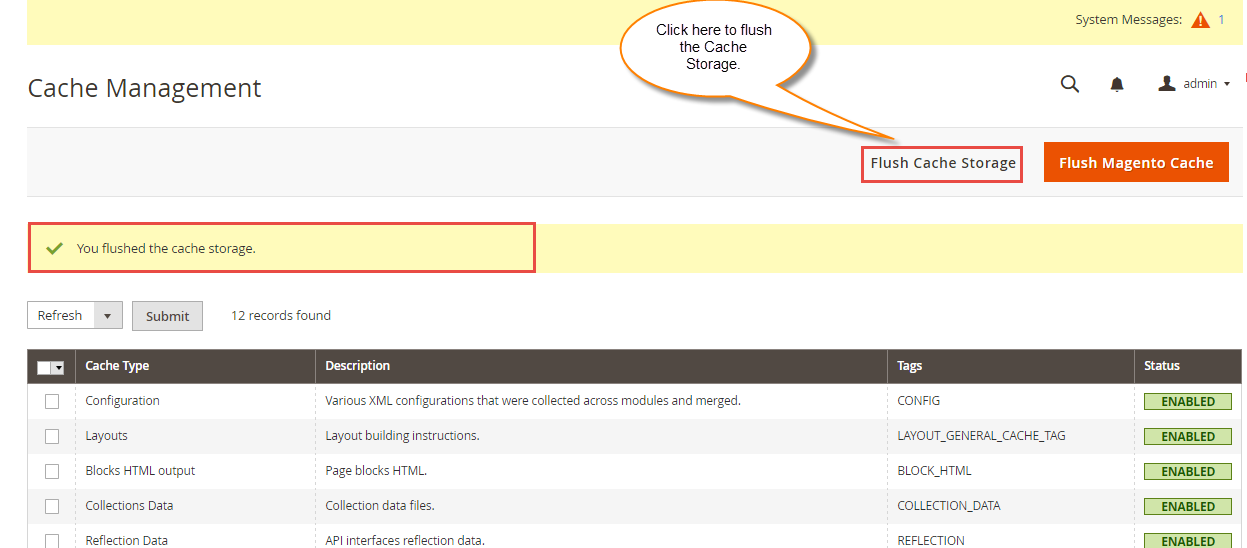
After running the commands, you have to flush the cache from Magento admin panel by navigating through System > Cache management as shown below.
Configuration For Multi-lingual Support
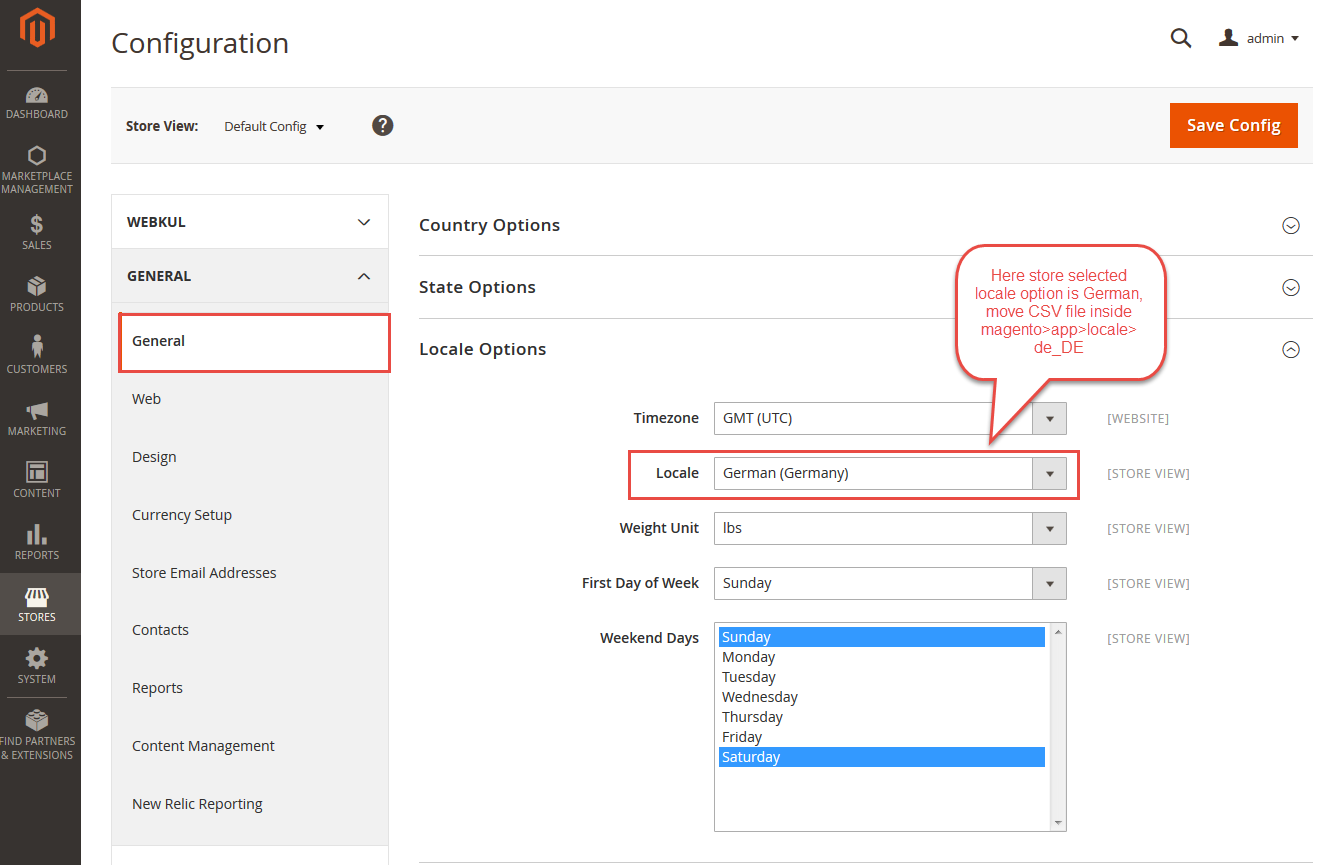
For the multilingual support, the admin will navigate through Store > Configuration > General > Locale Options and select the locale as German (the language into which admin want to translate his store content).
Translation
If a user wants to translate their module from English to German then they need to follow the path app/code/Webkul/MpBlog/i18n in their unzipped Magento 2 Blog folder and will get a CSV file with name “en_US.csv”.
Meanwhile, they will rename that CSV as “de_DE.csv” and translate all right side content after the comma in the German language. After editing the CSV, save it and then upload it to the path app/code/Webkul/MpBlog/i18n where they have installed Magento 2 on the server. The module will get translated into the German Language. It supports both RTL and LTR languages.


The user can edit the CSV like the image below.
Module Configuration of Magento 2 Vendor Blog Manager
After the module installation, the admin will configure the module settings. For this, the admin will navigate to Stores > Configuration > Webkul > Marketplace Blog as per the below image.

After that, the admin will-
Blog Settings
- Enable Blog Manager: enable the module by selecting “yes” else select “no” to disable the module.
- Set Display Character Limit: define the character limit of the blog content as per which the blog content will be displayed on the blog list page.
- Comments Approval Required: enable or disable the comments approval requirement.
- Blogs Approval Required: enable or disable the blog approval requirement.
- Allowed comment character limit: define the character limit of the blog comment as per which the blog comment will be displayed on the blog page.
Manage Blog Email Settings
- New Blog Approval template: set email template for the mail notification to the admin whenever the new blog is created by the seller.
- Blog Notification Template: set an email template for the mail notification to the seller whenever the admin approves the seller’s blog.
- Comment Notification Template: set an email template for the mail notification to the seller whenever the customer adds a new comment on the seller’s blog.
- Comment Approval Request template: set an email template for the mail notification to the admin whenever the customer adds a new comment on the seller blog.
- Comment Approval Template: set an email template for the mail notification to the user whenever the admin approves the customer comments.
- Disable Blog Template: enable or disable Blog Notification email.
NOTE: Create the mail templates by navigating to the Marketing -> Email Templates.
Seller-End – Magento 2 Vendor Blog Manager
Once the admin has enabled the module from the backend, the seller will be able to see a menu option “Manage Blog” along with the other sub-menu options as per the below image-
- Add New
- Add Category
- View Post

Add Category:
Clicking on “Add Category” option will navigate the seller to the category list page as per the below image.

Here, the admin can:
- View the list of categories created under the section “Blog Category List”.
- Edit the categories by clicking the edit icon.
- Delete the categories by clicking the delete icon.
- Add new categories under the section “Category Details”. Enter the category name and set the status to enable followed by hitting save button.
Add New:
Clicking on “Add New” option will navigate the seller to the Add New Post page as per the below image.

Here, the admin will:
- Category: select the category for the blog.
- Title: enter the blog title.
- Meta Keywords: enter the meta keywords of the blog.
- Meta Description: enter the meta description of the blog.
- Content: type the blog content and even add images to the blog.
- Tag: enter blog tags.
And proceed further hitting the Save button. This will navigate the seller to the blog list page and gets the success message as per the below image.
View Post:
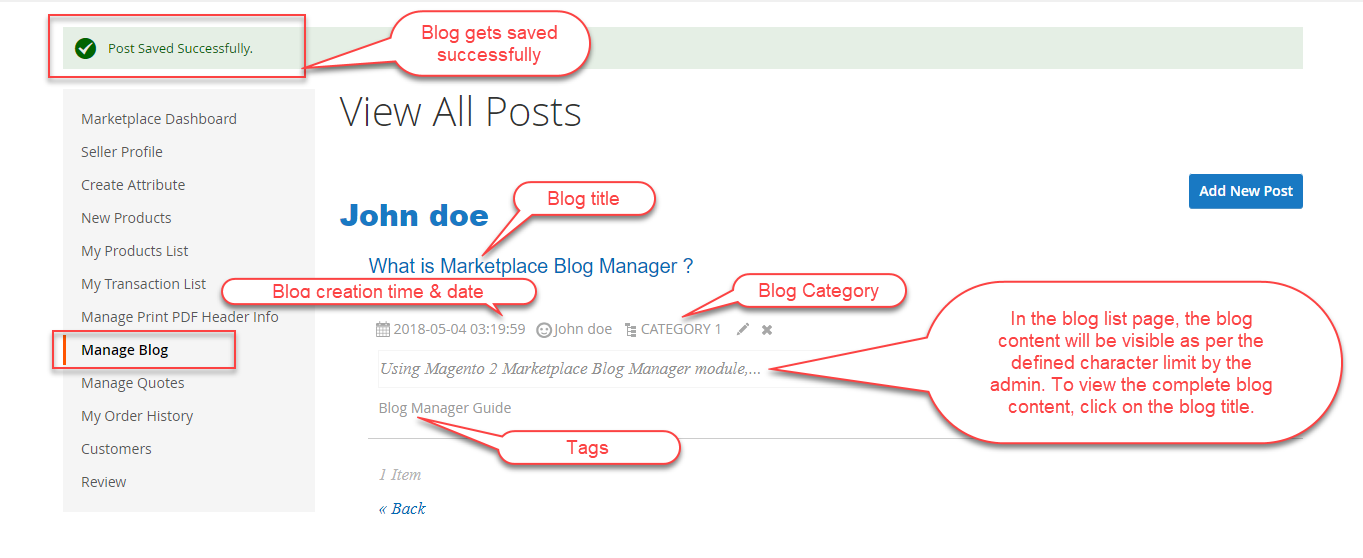
Clicking on “View Post” option will navigate the seller to the View All Posts page as per the below image.

Here, the seller can view the complete list of blogs. To view the complete blog, the seller will click on the blog Title.
Front-End – Magento 2 Vendor Blog Manager
On the home page, the customer can view all seller’s blogs by clicking on ” View Blog” under header and footer section as shown below image –

On the product page, the customers can view the “View Post” link as per the below image.

Note: “View Post” link will only be visible if the admin has set the “Display Seller Profile” field to Yes in the backend.

Clicking on this link will navigate the customers to blog list page of that seller.

Here, the customers can view the complete list of the posts of that seller and will click on the blog title to view the complete blog.

Here, the users can view the complete blog details and can even add their comments on the blog post.

Upon the successful post of the comment, the customer can view their comments.
Guest Users
The guest users can view the complete blog and also can post their comments on the blog. They can view the comments of other customers.
To add the comments, the guest user needs to enter the name, email ID, and comments as per the below image – 
Comments – Seller End
The seller can view the customer comments added to their blogs as per the below image.

By navigating to the particular blog posts, the seller can view all the comments of the customers. Even the seller can add comments to their blog posts.
Manage Blog – Admin End
To manage the blogs, the admin will have “Manage Blog” menu option as per the below image.

Clicking on “Manage Blog” option will navigate the admin to the Blog List page as per the below image.

Here, the admin can
- View the complete list of the seller blogs.
- Review the content of the blogs.
- Approve or disapprove the seller blog from the Action drop-down list.
- Delete the seller blogs from the Action drop-down list.
- View the blog comments by clicking on the View Comments link.
- By clicking on the edit button redirects to the Edit Blog page
Clicking on the Edit Blog link will navigate the admin comment list page as per the below image.

Here, the admin can:
- Changed the blog status, Approve to Disapprove
- Title: Edit the blog title.
- Meta Keywords: edit the meta keywords of the blog.
- Meta Description: enter the meta description of the blog.
- Content: Type the blog content and even add images to the blog.
- Tag: edit blog tags.
Manage Comment – Admin End
To manage the comments, the admin will have “Manage comment” menu option as per the below image.
Here, the admin can
- View the complete list of the seller’s Comments
- Approve or disapprove the seller’s comment from the Action drop-down list.
- Delete the seller blogs from the Action drop-down list.
- Edit the blog comment by clicking on the edit link.
Clicking on the edit link will navigate to the admin Edit Comment page as per the below image.

- Here admin can change the status to Approved/Disapproved
- Comment- The admin can edit the comment
Support
That’s all for the Magento 2 Marketplace Blog Manager module. Still have any issue, feel free to add a ticket and let us know your views at our HelpDesk System. You may also browse other Magento 2 marketplace addons and our quality Magento 2 extensions.
Current Product Version - 5.0.2-p2
Supported Framework Version - Magento 2.0.x, 2.1.x, 2.2.x,2.3.x, 2.4.x

Your blog was absolutely fantastic! Large amount of great information which is often attractive some and the other way.