Stock Photo Multi Vendor module for Magento 2 facilitates the admin and the sellers to create stock photos or as well as licensed images.
Thus, This module for Magento 2 facilitates the admin and the sellers of the site to create stock photos or licensed images.
However, An online business entrepreneur must focus on engaging with the customers as it is the most critical aspect of any online business.
It is essential to practice effective marketing strategies in order to drive more and more customers to the store.
One of the most sought after marketing strategy is showcasing the products and services through an image or small attractive texts related to the brand which is known as a watermark.
A watermark is an image (a company’s logo) or a text (e.g. a name of a company) that is configured on any part of an image, which is used for branding purposes.
Thus, It is an essential aspect in increasing the search engine ranking thereby increasing the traffic to a store.
Furthermore, Watermarks are an interesting way out to lure more and more customers to the store.
Note:
- Before installing the module, the PHP ImageMagick library must be installed and enabled.
- This extension is an add-on to the Multi-Vendor Marketplace. And to make use of this extension, you must have first installed Webkul’s Magento 2 Multi Vendor Module.
If you want to add the functionality of removing Image Backgrounds, you can check Magento 2 Image Background Removal.
Watch the video below to know more about stock photos and the module workflow:
Features
- The Admin can enable/disable the iStock module for sellers.
- The watermark type may be chosen as Text or Image by the admin.
- Admin can set configurations for both the image and text watermark types.
- Admin sets the resolutions for the image and as well as text watermarks.
- The seller can use default image types and resolutions.
- The seller can add custom image types as well.
- Sellers can set configurations for both the image and as well as text watermark types.
- For i Stock sample images, the images or text watermark is allowed.
- The watermark text can be set as Transparent or as well as Solid color.
- The sellers and admin from the given dropdown list can choose any position for the watermark.
Installation
Customers will get a zip folder and then they have to extract the contents of this zip folder on their system. The extracted folder has an src folder, inside the src folder you have the app folder.
You need to transfer this app folder into the Magento 2 root directory on the server as shown below.

After the successful installation, you have to run these commands in the Magento 2 root directory.
First command – php bin/magento setup:upgrade

Second command – php bin/magento setup:di:compile

Third Command – php bin/magento setup:static-content:deploy

After running the commands, you have to flush the cache from the Magento admin panel by navigating through->System->Cache management as shown below.
Thus, the module installation completes.
Language Translation
For translating the module language, please go to app/code/Webkul/MarketplaceiStock/i18n and edit the en_US.csv file.
Now they will rename that CSV as “en_SA.csv” and translate all right side content after the comma in the Arabic language. After editing the CSV, save it.
And upload it to the path app/code/Webkul/MarketplaceiStock/i18n where they have install Magento 2 on the server.
The module will get translated into the Arabic Language. It supports both RTL and LTR languages.
Thus, in this way the language translation of the module completes.
Configuration Settings (Admin- End): Stock Photo Product
On successfully installing the Magento 2 Stock Photo Marketplace, the admin can set the configurations by navigating through Stores > Configuration > Marketplace > iStock Product Configuration tab. 
iStock Product Configuration
The admin can set the configurations as follows:
- Allow Sellers to Create iStock Product: If chosen as Yes, then only the Manage iStock Product tab shall be visible to the sellers in the frontend.
- Add Default Image Sizes: The admin set the resolutions for different variations.
- Watermark Type: The admin may choose to add the watermark type as Text or Image.
- Watermark Position: The admin sets the position of the watermark from the given list. If the admin selects the position as Tile, then the watermark shall be visible on the complete image.
- Watermark Opacity: The transparency level of the watermark is set by the admin.
While setting the configurations, the admin may choose to set the Watermark Type as Text or Image and set specific configurations for each of the options.
For instance, in the image below, the admin chooses the Watermark Type as Text. Therefore, the admin will have to set the Text configurations for the Watermark Type – Text.
The admin sets the Text Configurations as follows:
- Watermark Text: The admin sets the text which shall display as the watermark.
- Watermark Type: The admin may set the Watermark Type as Solid Color or as well as Transparent.
- Text Color: The color for the watermark is set by the admin.
- Watermark Text Resolution: The admin sets the resolution of the watermark text.
- Font Size: A font size for the watermark is set by the admin.
- Preview: You can see the text and font size given by the admin by clicking the preview.

Preview shows as per the below image:
 On choosing the Watermark Type as Image, the admin will have to set the Image Configurations as shown in the image below.
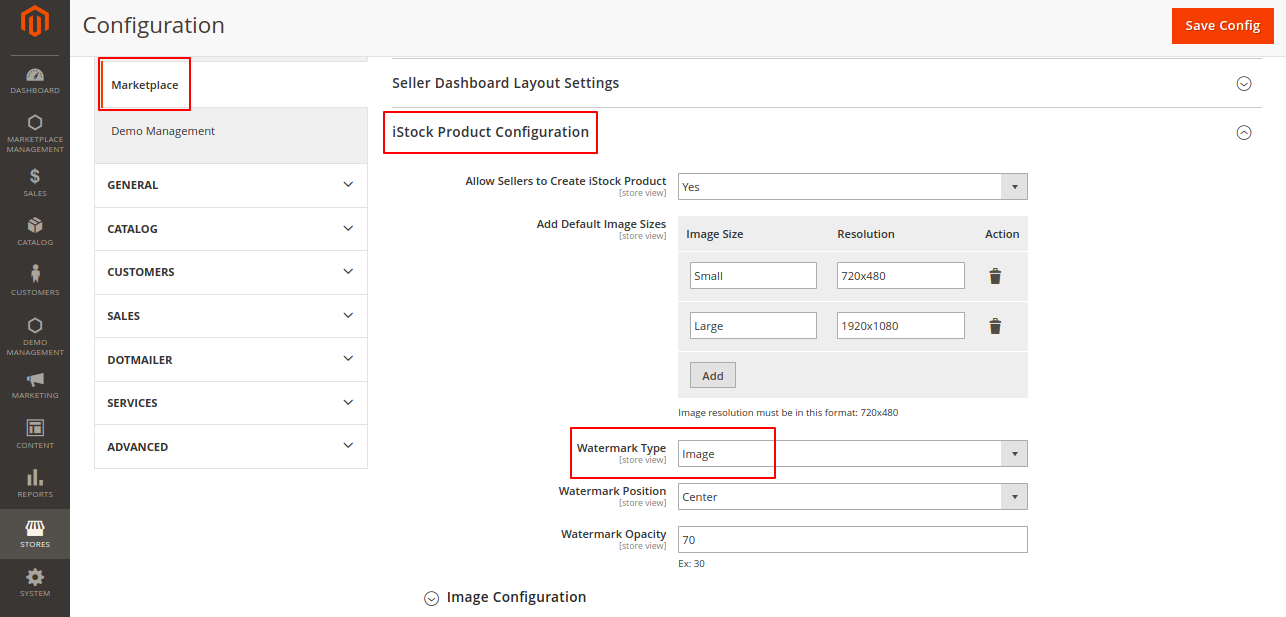
The admin will set the Image Configurations as under:
- Watermark Image: The admin may choose the image associated with the watermark.
- Image Width: The width of the watermark image is define by the admin.
- Image Height: The admin sets the height of the watermark image.

However, the module configuration settings from the admin-end completes.
Product Creation (Admin-End)
By navigation through “Downloadable Media Type” admin can add the istock product on the front store.
Now, the admin can add the details of the products:

However, admin can add downloadable information of the product.

Configuration Settings (Seller-End)- Stock Photo Product
The sellers as well can set the Watermark Configurations for Text and as well as Image in the frontend for their products.
As the seller logs in to the frontend, in the My Account page, the Manage iStock Product option is visible under which the seller can set the Watermark configurations and the Create iStock Product.
Note:
The Manage iStock Product option shall be visible only if the admin enables it from the admin panel. 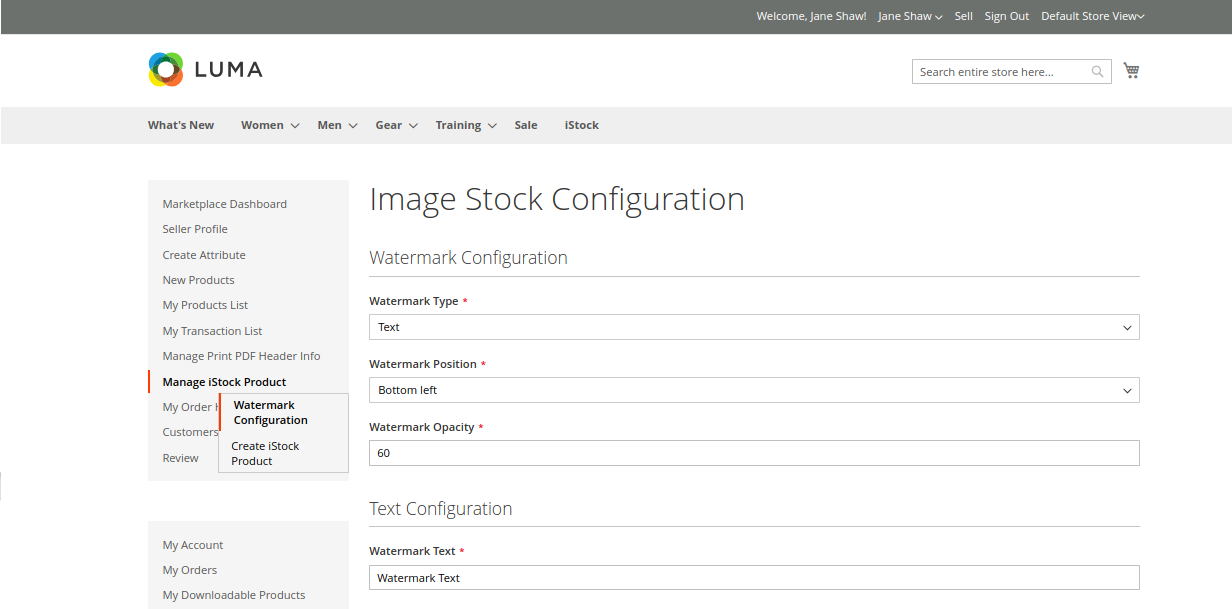
Thus , the seller will have to choose the Watermark Configuration option under the Manage iStock Product.
Image Stock Configuration
The “Image Stock Configuration” page shall open up as shown in the image below.
The seller can set the Watermark configuration for the following fields:
- Type: The seller may choose Watermark type as Text or Image.
- Position: Choose a position of the watermark from the given dropdown list.
- Opacity: The seller sets the opacity of the watermark.
If a seller chooses the Watermark Type as Text, the Text Configuration need to be set for the Watermark as shown in the image below.
- Text: The seller adds a text which displays as a watermark in the frontend.
- Text Resolution: The seller can set a resolution for the watermark text.
- Font size: A font size of the watermark is set by the seller.
- Text Type: The seller may set the watermark text type as Solid Color or as well as Transparent.
- Text Color: A color for the watermark text is set by the admin.

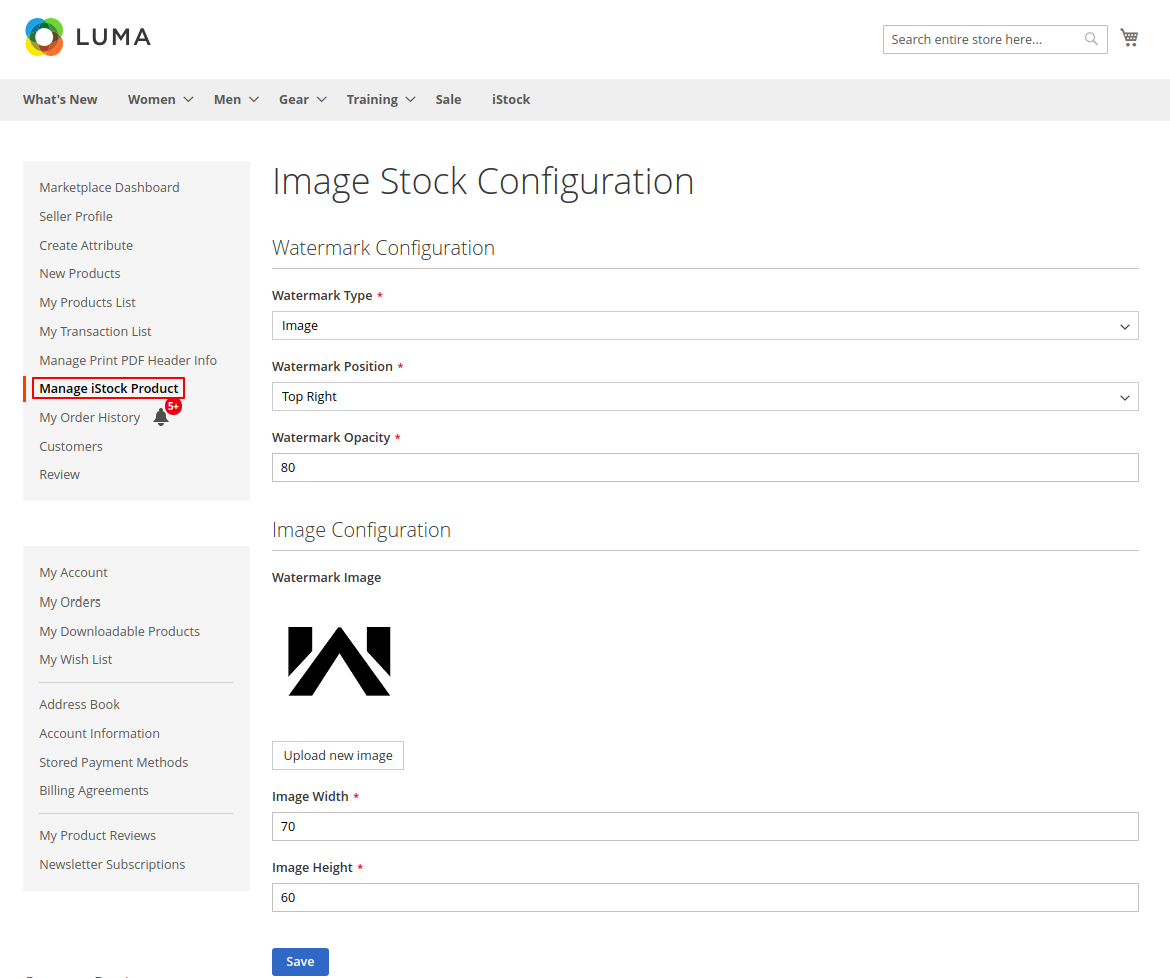
A seller may even choose the Watermark Type as Image. Thereafter, the seller needs to set the Image Configuration as shown in the image below.
- Watermark Type: The seller may upload a watermark type as image.
- Watermark Position: From the given dropdown list, the seller may choose a watermark position.
- Opacity: The intecreatednsity of the watermark visibility.
- Image Width: The seller may set a width of the watermark image.
- Image Height: The height of the watermark image is set by the seller.
The seller can even create a new istock product by navigating through Manage iStock Product > Create iStock Product, as shown in the image below.
Thus, the seller will configure the Attribute Set by choosing an option from the dropdown list.
For instance, in the image below, the seller has chosen to select the Attribute Set as Downloadable Media Type.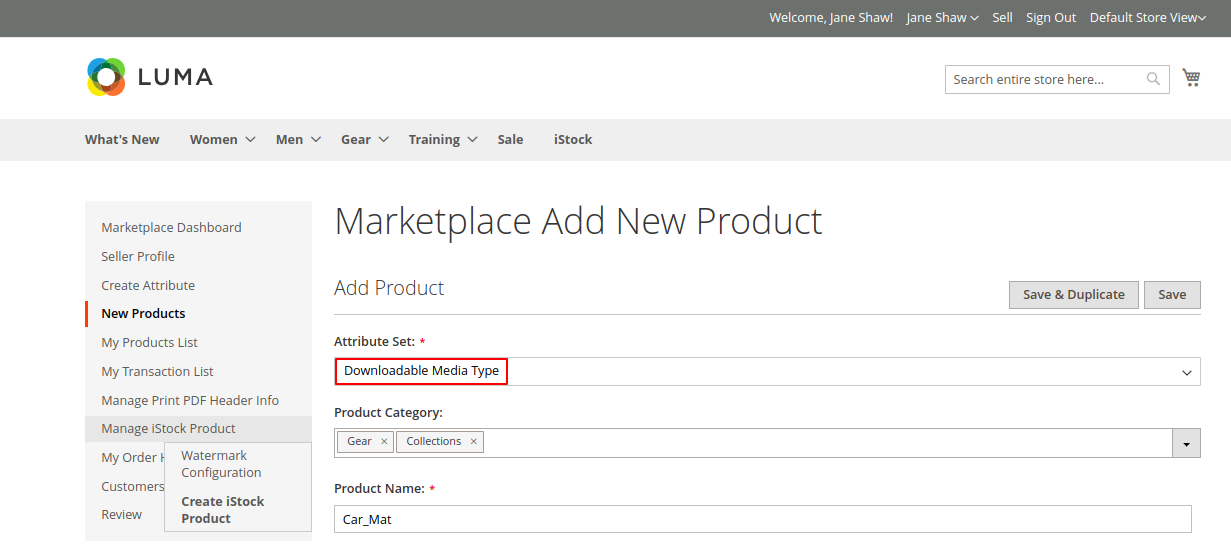
Note:
Whichever option under Attribute Set ID the admin choose under the Seller Product’s Settings, in the admin panel, shall display in the frontend in the Attribute Set, as shown.
Use Admin Default Configuration
While the seller creates the iStock Product, the seller needs to add the Downloadable Information as shown in the image below.
The seller can choose to “Use Admin Default Configuration”.
If chosen, the Title and Resolution shall automatically set as shown in the image below as it is set by the admin while setting watermark configurations.
However, seller needs to set the price, attach an image, and allow Maximum or Unlimited Downloads for the downloadable product.
The seller will have to add a sample image for which the seller adds the Title and Attach an Image File on which the watermark image set by the seller shall display. The sellers even add resolutions for the images when not choosing to add the admin’s configured resolutions as shown in the image below.
Furthermore, the seller needs to add the Title, Resolutions, Price, Attach an Image, and configure the Maximum Downloads allowed.
While attaching the images, the “Resize image with the given resolution” will checked This help resize the image which is being uploaded.

Thus, the module configuration settings from the seller-end completes.
Stock Photo Product for Customers
Exhibiting your products’ or brand in the form of an image can be beneficial as customers find visuals and as well as images more attractive above any other marketing strategy.
Through Magento 2 Stock Photo Marketplace, the customers can purchase a downloadable product which displays a watermark as shown in the image below. 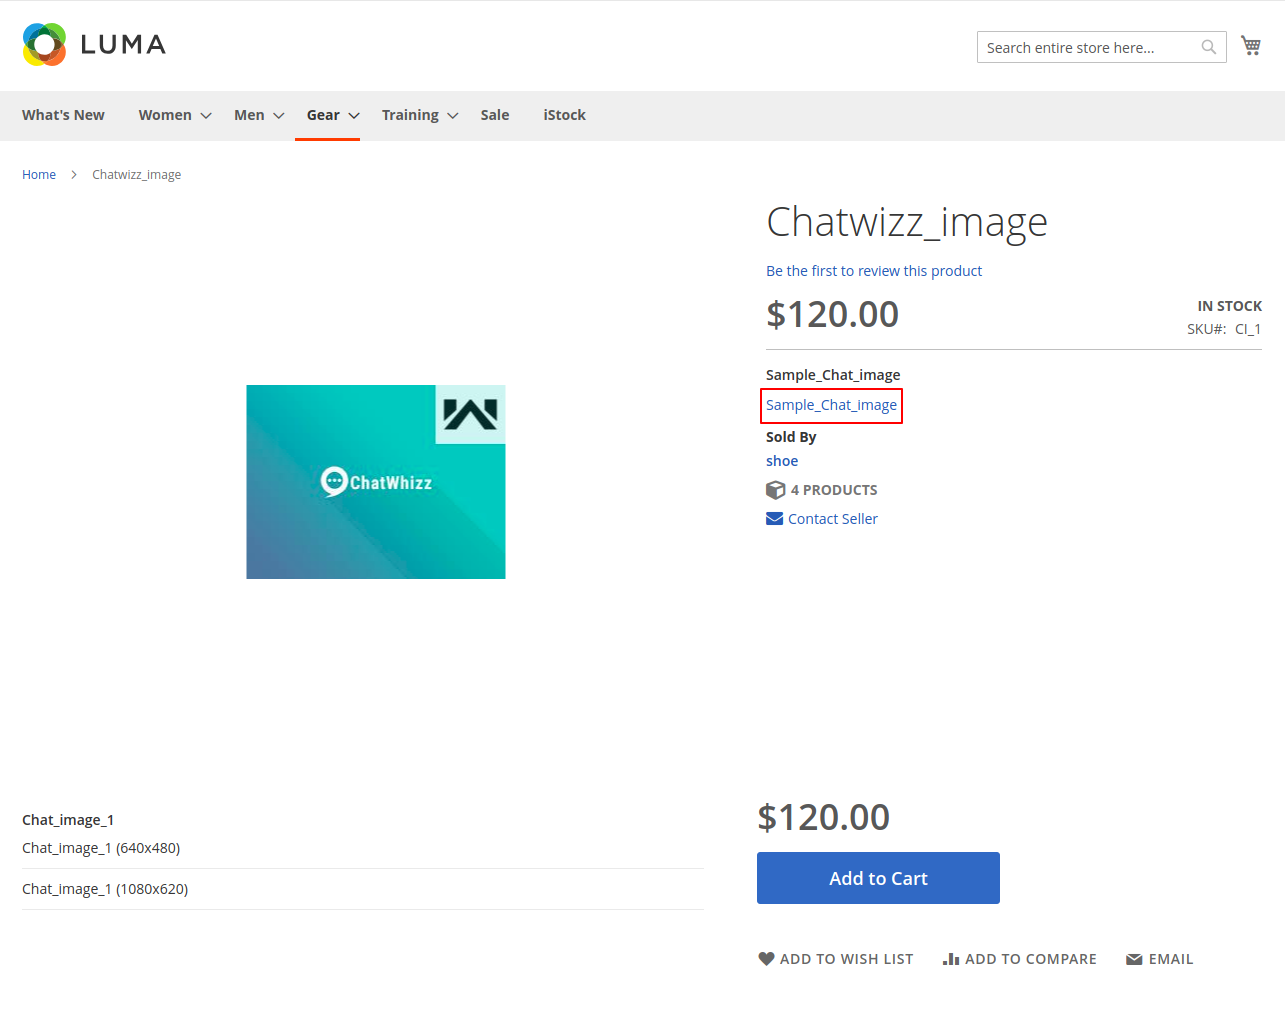 The customer can make a purchase by adding the product in the cart. They need to sign in before buying a downloadable product as shown below.
By simply entering the login credentials the customers can sign in and proceed to checkout.
Furthermore, The customers can even create a new account for the checkout process.
Once the customer places the order, the admin, in the admin panel will be generating the invoice which shall “Complete” the status of the order as shown in the image below.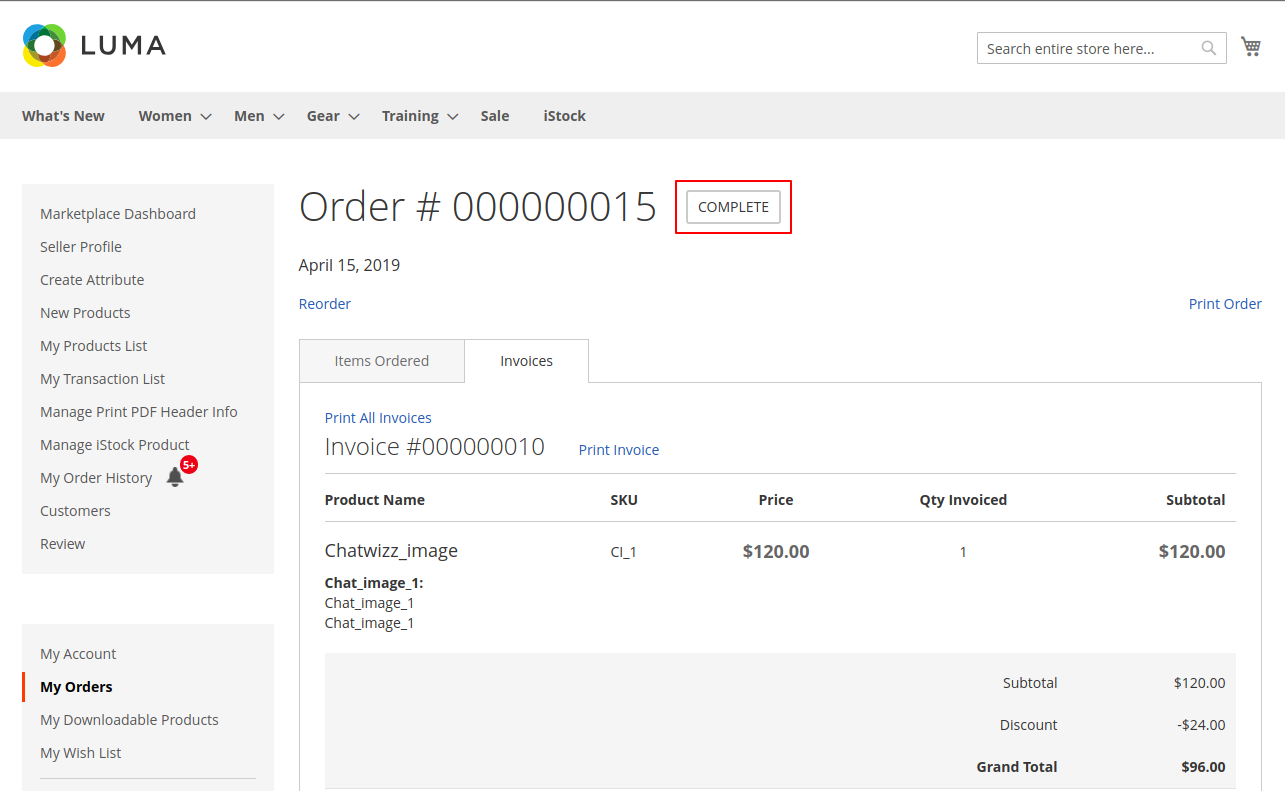
In the My Account page, under My Downloadable Products tab, the customers can find the list of downloadable products purchased as shown in the image below.
After purchasing, the customers can simply download the image.
However, The customers can download the images without the watemark as shown in the image below.

Support
That’s all for the Magento 2 Stock Photo Marketplace extension. If you still have any issues, feel free to add a ticket and let us know your views on our Webkul Support System.
Current Product Version - 3.0.0
Supported Framework Version - Magento 2.0.x, 2.1.x, 2.2.x,2.3.x, 2.4.x

Be the first to comment.