Magento 2 Multi Merchant Buy Button module enables the admin and the marketplace sellers to sell products on other websites (cms or custom websites) like Joomla, OpenCart, WordPress (blogging website), etc. This module will extend the visibility of the seller’s products.
The seller can create a buy button for a single product as well as a collection of products. The sellers just need to copy a line of code from their Magento seller account and paste it on any website.
The customers will get a full-featured shopping cart which let the customer checkout from any website easily.
Note:
- This module is a marketplace add-on. So, Magento 2 Marketplace Module module must be installed.
- Other websites must be javascript supported.
To get more clear idea on the module, kindly review the video below-
Features
- The admin can create the buy button for single products and the collection of products.
- The admin can even create the buy button for single or multiple products of the sellers.
- The sellers can create the buy button for their single products and collection of products.
- The module supports simple, configurable, and virtual products.
- All types of custom options are supported.
- The admin and the seller can customize the view (font color, button background color, radius) of the buy button.
- The admin and the seller can change all the static text on the buy button for each buy button.
- Buy Button comes with its own cart (add, remove, update all operations supported).
- Checkout will be done by default magento 2 checkout in a popup window.
- The generated code can be easily embedded on any website (CMS or Custom Websites).
- The admin can upload the default product picture from the admin panel.
- The extension is compatible with the Hyva Theme.
NOTE – If a product will not have any image then a broken image will not display (while creating the Buy Button for the collection). Now, it will display the image, uploaded by the admin from the admin configuration.
Installation – Multi Merchant Buy Button
Customers will get a zip folder and they have to extract the contents of this zip folder on their system. The extracted folder has an src folder, inside the src folder you have the app folder. You need to transfer this app folder into the Magento 2 root directory on the server as shown below.

After the successful installation, you have to run these commands in the Magento 2 root directory.
First command – php bin/magento setup:upgrade

Second Command – php bin/magento setup:di:compile

Third Command – php bin/magento setup:static-content:deploy

After running the commands, you have to flush the cache from the Magento admin panel by navigating through->System->Cache management as shown below.

Multi-Lingual Configuration
For Multilingual support, please navigate to Store>Configuration>General >Locale Options. And select your desired language from the Locale option.

Language Translation – MultiMerchant Buy Button
For module translation, navigate to the following path in your system app/code/Webkul/MpBuyButton/en_US.csv. Open the file named en_US.CSV for editing as shown in the below screenshot.

Then replace the words after the comma(,) on the right in the file with your translated words.
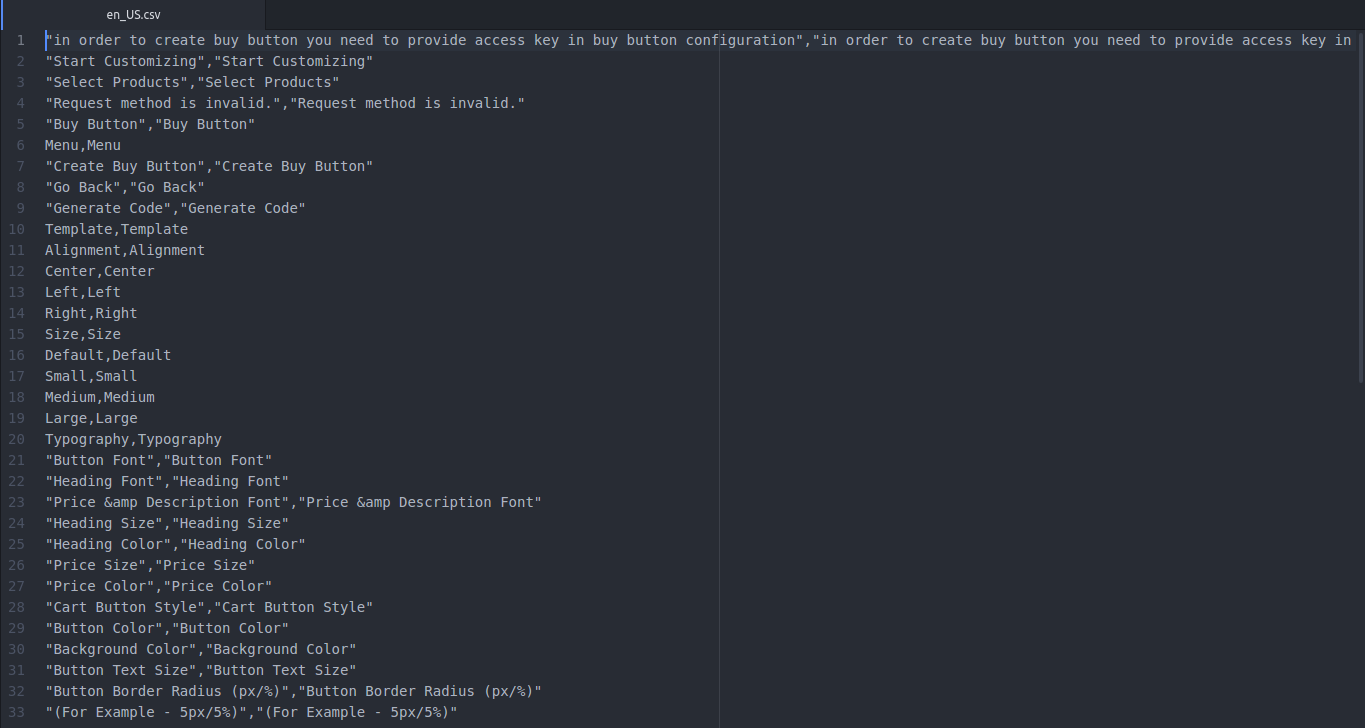
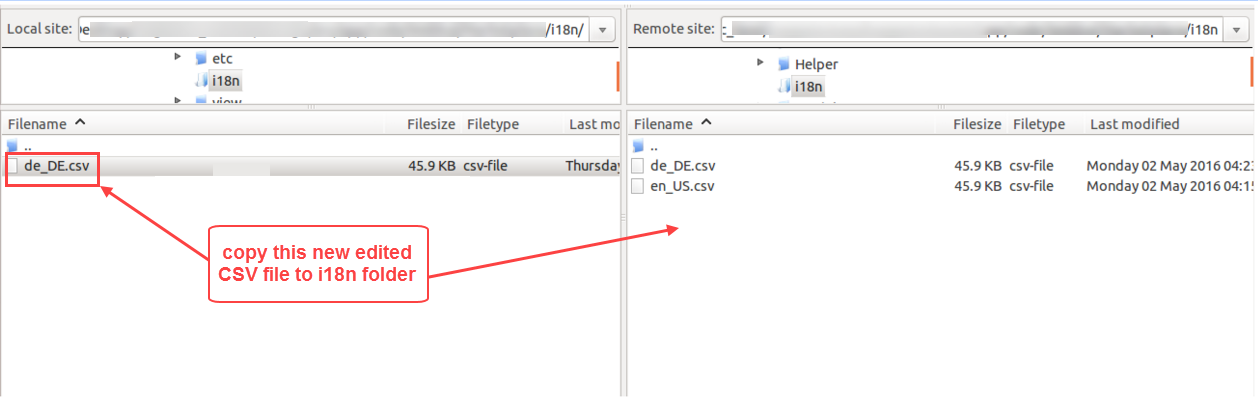
After editing and translating the CSV file, you need to save the translated file name according to your region language and country code such as – de_DE.CSV. Followed by uploading the translated file to the same folder from where you have obtained it. Now your module translation is complete.
Module Configuration
After the installation, the admin will configure the module settings. For this, the admin will navigate to Stores -> Configuration -> Webkul ->Marketplace Buy Button as shown below.

Here, the admin will:
- Access Key – Enter Access Key as per the requirement. This configured key will be there in the “Buy” button code which will be used to give access to the buy button javascript.

- Enable for Sellers – Select Yes to enable the module for the marketplace sellers. Else, select No.
Create Multi Merchant Buy Button – Admin End
Now, the admin will create the “Buy” button. For this, the admin will navigate to Buy Button -> Create Buy Button as shown below.

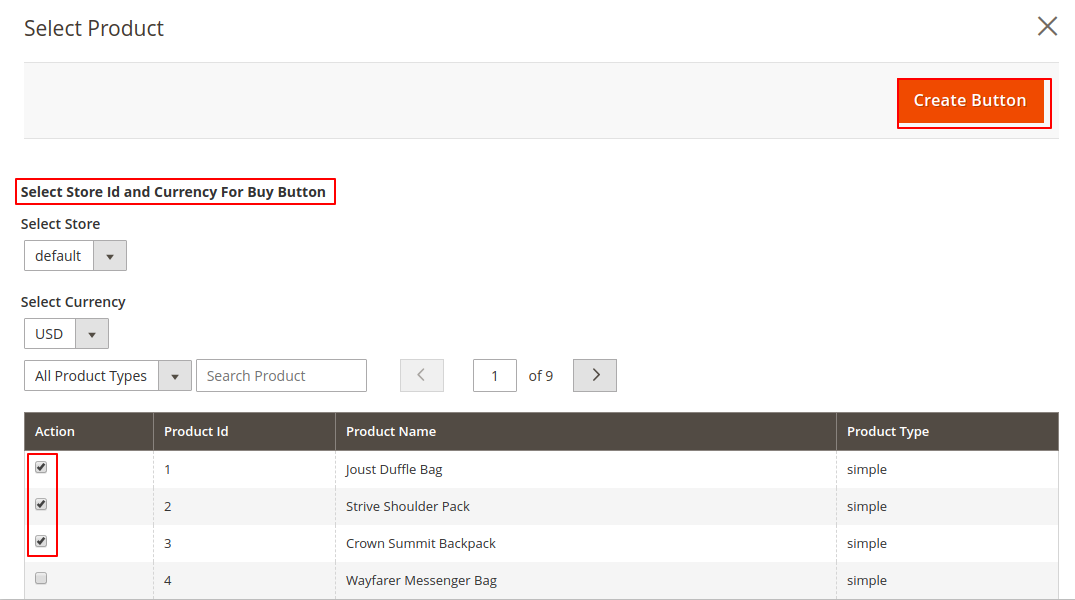
Clicking the Create Buy Button will navigate the admin to the Select Product page.

Here, the admin will either select the:
- Select Product – Create the buy button for the single product of the admin.
- Seller Product – Create the buy button for the single or multiple products of the seller.
- Collection Product – Create the buy button for the many products.
Create Buy Button For Single Product:
After selecting the Single product option, the admin will get a pop-up slider as shown below.

Here, the admin will select the Store, Currency, and product. The admin can search products by name and can filter by the product types.
After this, click on Create Button which will navigate the admin to the Start Customizing page.

Here, the admin can customize the Buy button like-
- Template – Select any template for Buy button layouts.
Template 1
 Template 2
 Template 3
Note-Template option is available only for a single product. - Alignment – Choose three alignments(Left, Centre, and Right) of the buy button layout.
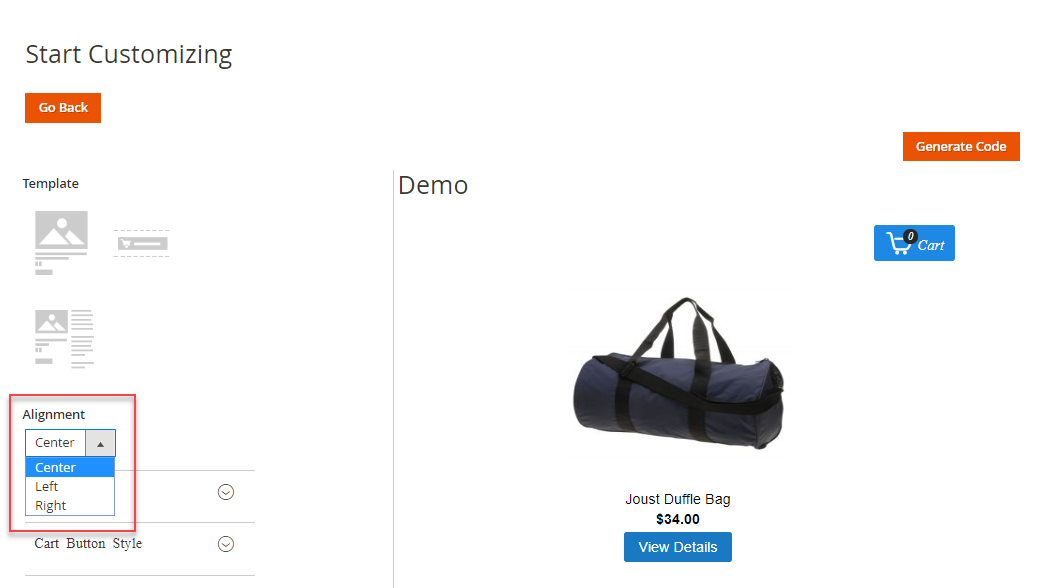
- Typography – Choose Button Font, Heading Font, Price & description Font, Heading Size, Heading Color, Price Size, and Price Color.

- Cart Button Style – Change Button Text Color, Button Background Color, Button Text Size, Button Border Radius, Button Text, and View Button Text.

- Shopping Cart – Choose Cart Heading, Text for Total, Item in Cart Text, Add to Cat Button Text, Button Color, and Background Color.

Generate Code
After the customization, the admin will generate a code by clicking on the Generate Code button and a pop-up will appear.

The admin will copy this code and paste into the source code of any website. like – Joomla, OpenCart, WordPress etc. Then, all the functionality will be embedded on that website.

Create Buy Button For Single or Multiple Products Of The Seller:
For creating the Buy Button for a single or multiple products of the seller, the admin can click on the Select Seller Products as shown in the image below –

Now, the admin can select the single or multiple products of the seller as shown in the image below and then click on the create button –

Here, the admin can select the Store, Currency, and Single or Multiple Products. The admin can also search the products by the name and can filter by the product types.
After this, click on Create Button which will navigate the admin to the Start Customizing buy button page. Here, the admin can follow the same steps to customize the buy button as describe in the Create buy button for the single product section.
Create Buy Button For Collection:
After selecting the Select Collection option, the admin will get a pop-up slider as shown below.
Here, the admin will select the Store, Currency, and Multiple Products. The admin can search product by the name and can filter by the product types.
After this, click on Create Button which will navigate the admin to the Start Customizing page.

Here, the admin can customize the Buy button using the option – Alignment, Size, Typography, Cart Button Style, and Shopping Cart.
Generate Code
After the customization, the admin will generate a code by clicking the Generate Code button. Then, copy that code and paste into the source code of any website. like – Joomla, OpenCart, WordPress etc.
Create Buy Button – Seller End
For creating the buy button, the seller will navigate to Buy Button -> Create Buy Button. Clicking the Create Buy Button will navigate the seller to the Select Product page as shown below.

Here, the seller will either select the:
- Select Product – Create the buy button for the single product.
- Collection Product – Create the buy button for the many products.
Create Buy Button For Single Product:
After selecting the Single product option, the seller will get a pop-up slider as shown below.

Here, the seller will select the Store, Currency, and a product. The seller can search product by the name and can filter by the product types.
After this, click on Create Button which will navigate the seller to the Start Customizing page.

Here, the admin can customize the Buy button using the options – Template, Alignment, Typography, Cart Button Style, and Shopping Cart.
Generate Code
After the customization, the admin will generate a code by clicking the Generate Code button. Then, copy that code and paste into the source code of any website. like – Joomla, OpenCart, WordPress etc.
Create Buy Button For Collection:
After selecting the Select Collection option, the seller will get a pop-up slider as shown below.

Here, the seller will select the Store, Currency, and Multiple Products. The seller can search products by name and can filter by product type.
After this, click on Create Button which will navigate the seller to the Start Customizing page.

Here, the admin can customize the Buy button using the option – Alignment, Size, Typography, Cart Button Style, and Shopping Cart.
Generate Code
After the customization, the admin will generate a code by clicking the Generate Code button. Then, copy that code and paste into the source code of any website. like – Joomla, OpenCart, WordPress, etc.
Customer View – Multi Merchant Buy Button
The customers can add a Simple product, virtual product, and configurable product to their shopping cart on other websites using the Multi Merchant Buy Button. 

Note:
- Add all types of custom options which will be displayed on other websites as well.
- The customers can choose options for the configurable product.
Checkout
After adding the products to the shopping cart, the customer will proceed to checkout. For this, the customer will click on the Cart icon and will get the “Proceed to Checkout ” button as shown below.

After clicking on “Proceed to Checkout“, the customer will get a Default Magento 2 Checkout pop-up window. In the window, the customers can sign up or sig in and put their shipping address.
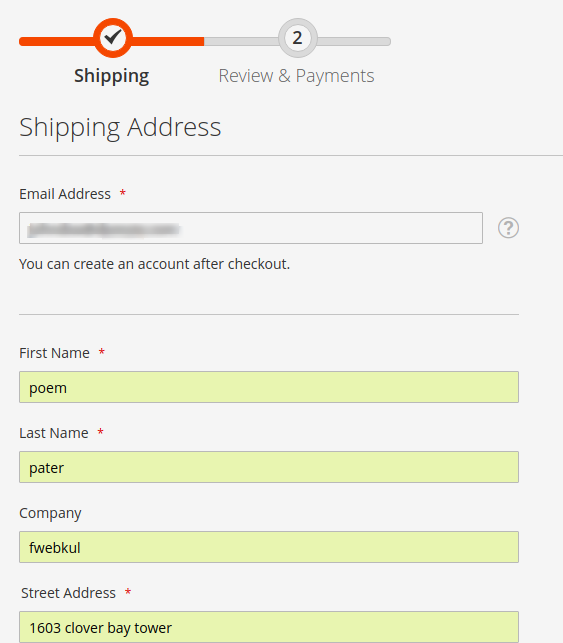
The customer will choose a shipping method and proceed to the Next.

After choosing the shipping method, the customer will select the payment method.
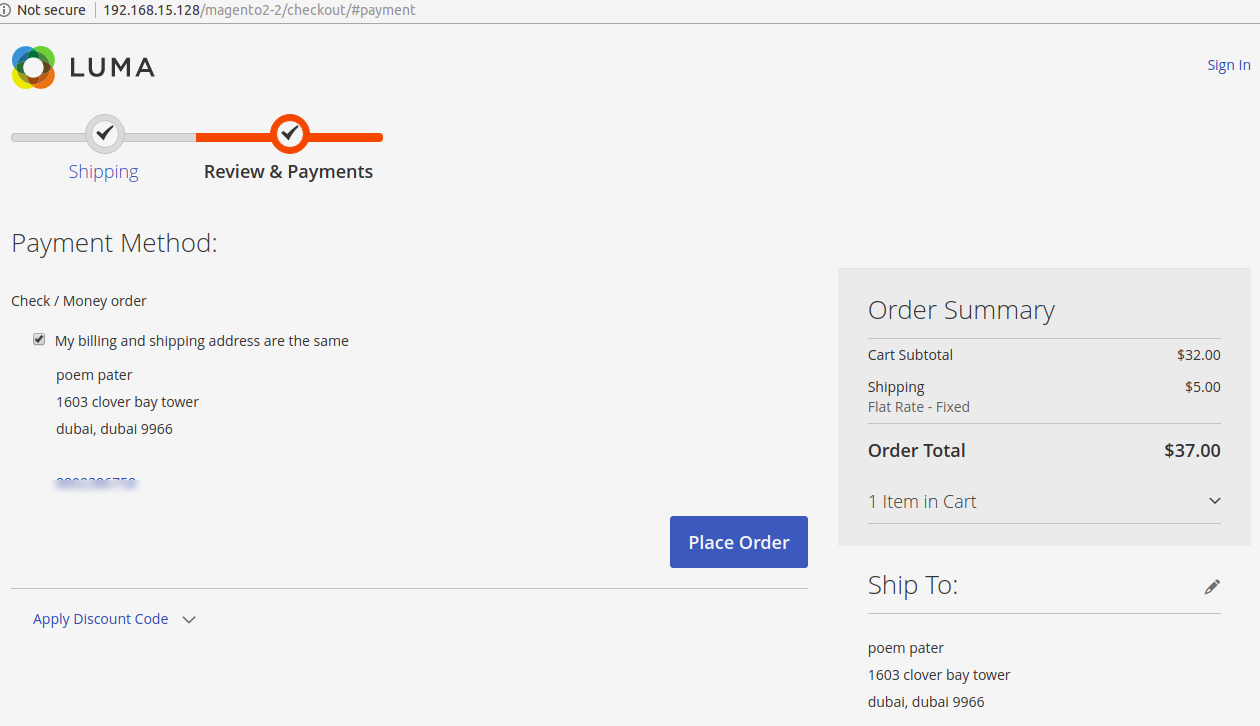
And, finally place the order successfully by clicking the “Place the Order” button.

Responsive
The Buy button-cart is responsive for all kinds of screen sizes and can adjust itself with the Mobile screen, Tablet screen, and Desktop screen.

That’s all for the Magento 2 Multi Merchant Buy Button extension. If you still have any issue, feel free to add a ticket and let us know your views at http://webkul.uvdesk.com/
Current Product Version - 5.0.2-p1
Supported Framework Version - Magento 2.0.x, 2.1.x, 2.2.x,2.3.x, 2.4.x

Be the first to comment.