Magento 2 Reward Points extension allows the admin to reward customers with points.
The admin can allocate reward points to the customers according to their-
- Purchases (product wise/category wise/cart amount wise) or
- Activities (registration/product reviews) they perform in the web store.
Thus, the customers can redeem their points at checkout. Magento 2 Reward Points modules is also compatible with Adobe Commerce Cloud edition.
Check the mentioned below video for getting to know the workflow of the module:
Features of Adobe Commerce Reward points
- The admin can enable or disable the module.
- Admin will manage reward points for customer activities.
- Admin will add/manage shopping cart rules.
- Admin can add/manage reward points for all or certain products/categories.
- The Admin can credit/debit reward points to a customer.
- Quick export of the reports in CSV & XML by the admin.
- The admin can create a reward for the attribute as well.
- The admin can create a reward for the time interval as well for the product and category.
- Reward points for the customers for their purchases, posting a new product review, and registering on their web store.
- Admin can track the reward points transaction history of all the customers.
- Customers can redeem their points at the checkout page for their new orders.
- Customers can track their reward points via their accounts and email notifications.
- Admin can set reward points for customers on their birthdays.
- Notify customers on the point of expiration in advance.
- The customer can sort reward points.
- The search or filter facility is also present for the Rewards.
- The customer can view the reward point that they will receive on the purchase of a product at the time of checkout.
- At the time of checkout, the customer can also view the reward points to purchase the product.
- Magento 2 Reward Points extension also supports GraphQL API.
- Admin can allow users to redeem reward points based on order totals or product pricing.
- Admin can specify the number of days for reward points credit after a reward points event on a made order.
- Added support for store-wise reward assignments.
- Admin may choose whether reward points can be redeemed using a discount code or not.
- Adobe Commerce reward points extension is compatible with the Hyva Theme.
- The admin can select the reward points type as fixed or percent for the cart rule type.
- The admin can also add the above condition for the reward cart rule.
- The admin can bulk upload reward transactions via CSV.
Installation – Magento 2 Reward Points
Customers will get a zip folder and they have to extract the contents of this zip folder on their system. The extracted folder has an src folder, inside the src folder you have the app folder. You need to transfer this app folder into the Magento2 root directory on the server as shown below.

After the successful installation, you have to run these commands in the Magento2 root directory.
First Command –
php bin/magento setup:upgrade
Second Command –
php bin/magento setup:di:compile
Third Command –
php bin/magento setup:static-content:deploy
Fourth Command
php bin/magento indexer:reindex
Fifth Command
php bin/magento cache:flush
After running the commands, you have to flush the cache from the Adobe Commerce admin panel by navigating through->System->Cache management as shown below.

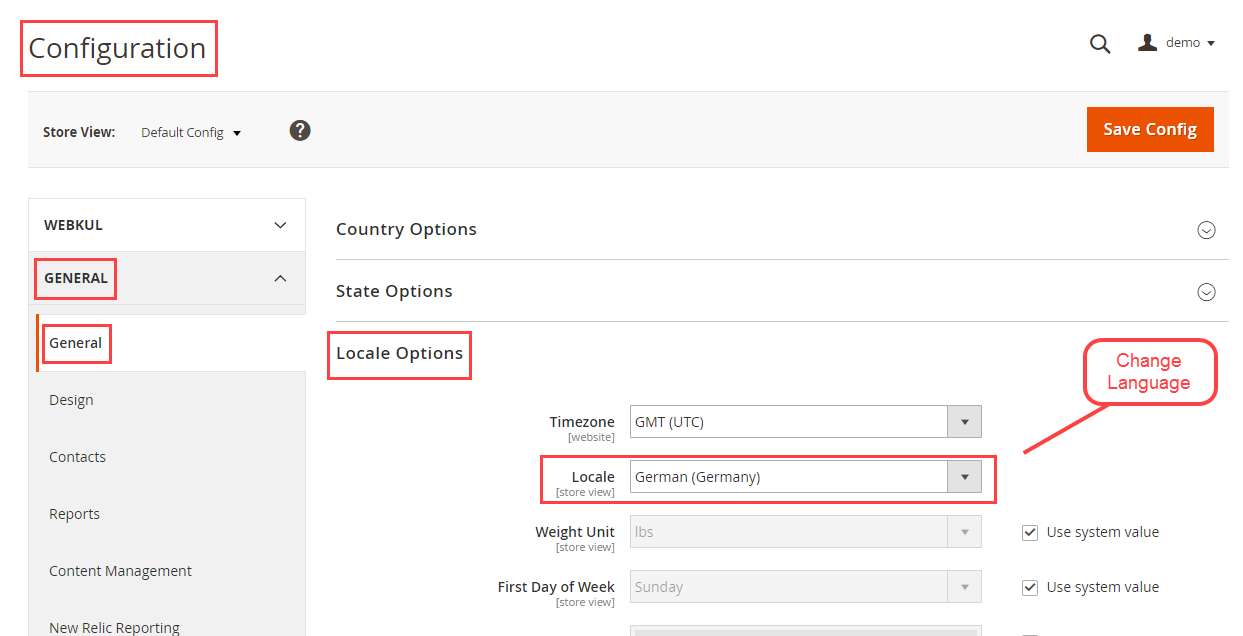
Multi-Lingual Configuration
For Multilingual support, please navigate to Store>Configuration>General >Locale Options. And select your desired language from the Locale option.
Language Translation
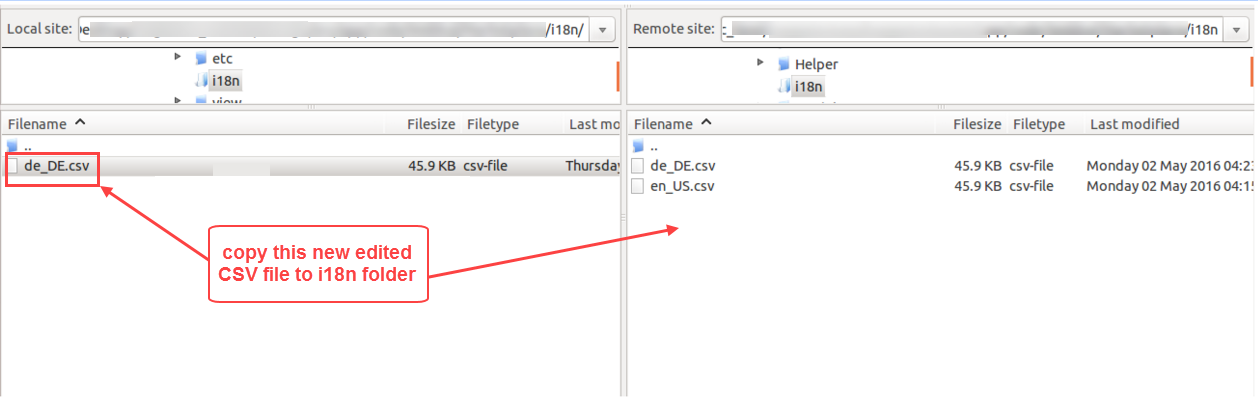
For module translation, navigate to the following path in your system app/code/Webkul/RewardSystem/i18n/en_US.csv.
Open the file named en_US.CSV for editing as shown in the below screenshot.

Then replace the words after the comma(,) on the right in the file with your translated words.

After editing and translating the CSV file, you need to save the translated file name according to your region language and country code such as – de_DE.CSV. Now, upload the translated file to the same folder from where you did download it. Now your module translation is complete.
Configuration of Magento 2 Reward Points
After the successful installation, the admin can configure the module by navigating to Stores>Configuration>Webkul>Reward system.

Here the admin can:
- Enable Reward System Module: Enable/disable the “Magento 2 Reward System” module by selecting either “Yes” or “No”.
- 1 Reward Point Value is Equals to: Set the value of one reward point in terms of money for the customer.
- Maximum Reward Points Can Assign to a Customer: Set the maximum limit for allocating the reward points to the customer.
- Maximum Reward points can be used by a Customer: Set the reward points limit for the customers which they can use at a time.
- Allow Reward Points on Registration: Enable/disable the reward points allocation to the customer while registering.
- Reward Points on Registration: Set the reward points allocated to a customer for registering themselves.

- Allow Reward Points on Product Review: Enable/disable the reward points allocation to the customer for submitting the product reviews.
- Reward Points on Product Review: Set the reward points allocated to a customer for submitting the product reviews.
- Order Placed Reward Points Applied When: set the order event at which the reward point for the order will apply.
- Reward pints credit after days: Reward points for orders placed will be credited after the specified number of days (Invoice Created, Order Complete, and Shipment Generated).
- Order Placed Reward Points Calculation Based on: Set the Cart/Product/Category as the basis for the reward points calculation for the order placed from the drop-down list.
- Rewards Applied product’s Quantity wise: Reward points will be applied based on the product’s quantity if you choose “yes”.
Customer Birthday

- Allow Reward Points on Customer Birthdays: Customers can get reward points on their birthdays.
- Configure Reward Points on Birthday day(s): Reward Points are credited to the customer after/before days of the customer’s birthday. If you want to credit the reward before the birthday then write days with a (-) sign. For eg: -3 or if you want to credit a reward after a birthday then only write a number of days for eg: 3 or if you want to credit on the day of the birthday then write zero (0).
- Reward Points on Birthday: Set the reward points for the customer’s birthday.
- Reward Points expire after days: Set the reward points expiration the day after the birth.
Send notification before points expire (in days): Set the notification days before expiring reward points.
Allow Reward Points Redeem With Discount Code: Select yes if you want the customer to redeem reward points with the discount code, otherwise select no.
Reward Points Redeem On: Choose the reward points to redeem on the order total or product price.
Reward Point Reports
Admin can see the reports of all the reward points that have been issued to the customers. For this the admin has to click on Reports> Rewards Point Reports from the admin panel.

Manage Email Settings
Reward Transaction Template – From here admin can select the transaction template for Reward.
Reward Expiry Email Template – From here admin can select the transaction template for Reward Expiry.
NOTE – “Rewards Applied Product’s quantity Wise” option becomes visible when the “Order Placed Reward Points Calculation Based on” option is set to “Product Based”.
Also, If the “Rewards Applied Product’s quantity Wise” option is set to “Yes” then the reward will apply to the product’s quantity-wise else not if selected “No”.

Reward Points Loyalty Program
Now the customer can get points for their loyalty to the store. As the admin can set the reward point to the customer for the below conditions:
- At the time of registration of new customers.
- When the customer makes some purchases from the store.
- On the customer’s birthday date.
- On referring some another via social media

Registration Reward Points
This module allows the customers to easily avail of the registration reward points if “Allow Reward Points on Registration” is set to “Yes” by the admin. For this, if the customers are guest users, first they need to get register themselves on the website.

Also, a customer can view allocated reward points for registration by clicking on the “Reward Points” once they are logged in to their accounts as per the image.
The customers will be notified of their registration reward points on their registered email id which they would have provided while registering themselves.
Additionally, the customer can even filter out the rewards as per Type, Point and Status.
The customer can sort the order of the reward points in this section.


NOTE: The already registered users will get the following display page when clicking on the “Reward Points” once they are logged in to their accounts.
The customers can view their birthday reward points by clicking on the “Reward Points” after logging in.
Furthermore, the customers will be notified of their reward points on their email id.


NOTE: The users will get the following display page when clicking on the “Reward Points” once they are logged in to their accounts. “Reward Points” credit to the customer after/before days of the customer’s birthday.
The customer can get a notification regarding the expiration of reward points.

NOTE: The user can see their reward points expiration day after the birthday or even they will notify as well.
The customers can also view their referral reports in the Referral Program section. They can send invitations to their friends from send invite button by entering their email addresses.
The users can copy the referral links and share the referrals via social media also.

How can Customers use their Reward Points?
This module enables customers to earn Reward Points by:
- Registration on the web store site.
- Submitting/posting product reviews( approved by admin required)
- Specific product purchase.
- Customer’s total purchase.
- Specific product category purchase.
Customers can easily use their allocated Reward Points while placing an order. For this, the customers will navigate to the checkout page as per the image.

Here, customers can use their reward points if they want to. Under the “Reward Points” section the customers can also enter the rewards points they want to use while placing an order.
And before applying their reward points, the customers can check the amount equivalent to their entered reward points value.
Then, the entered amount will be deducted from the cart’s total amount.

However, the entered reward points value should be less than or equal to the reward point limit set by the admin. If not then the customer will get an error message.
NOTE:
- For every debit and credit of Reward Points, the customer will get an email notification on their registered email id.
- Customers can check their reward points by clicking on the “Reward Points” through their accounts.
Product-Based Reward Points Calculation
The admin can set the product-based reward points calculation if the “Order Placed Reward Points Calculation Based on” option is set to “Product-based” while configuring the module by the admin.
Admin Management
For this, the admin will navigate to Reward System>Manage Reward Points on the Product

To manage the reward points based on Product, the admin will follow:
- Select one or more than one products for which the admin wants to update the reward points.
- Enter Points: Enter the reward points.
- Reward Point Status: Enable/Disable the reward points for the selected product.
- Proceed by clicking on the “Update Points” button.
Customer Frontend
However, the customer can view the reward points required on both the product and cart pages.
The customer can view the reward that will be required on the purchase of the product.

The reward points will also display in the mini shopping cart as per the screenshot below.

Furthermore, customers can get reward points on the basis of the product they carry in their cart while checkout.

Here the customer can view the reward points that they will accrue while they purchase the product. However, the customer can view the number of reward points deducted from their purchase.
Herein, if the customer can purchase the product even if the reward balance is low.
For example, as shown below the customer had 50 rewards. Thus, 50 rewards were deducted and the rest amount was paid via other payment methods.

Note:
If the admin has set the “Rewards Applied Product’s Quantity Wise” option to “Yes” then the reward will be applied product quantity-wise.
For example, if the customer has purchased 2 quantities of P1 product and the reward point per quantity for product P1 is set to 25 reward points by the admin. Then, the customer will get 2 x 25=50 reward points.

Otherwise, if the admin has set the “Rewards Applied Product’s quantity Wise” option to “No” then the reward will not be applied to the product’s quantity wise.
Whatever quantity of a product the customers will purchase, reward points will be credited only for the single quantity of a product.
For example, if the customer has purchased 2 or can say 10 quantities of product P1. The reward point per quantity for product P1 is set to 25 reward points by the admin. Then, the customer will get 1 x 25=25 reward points only.
Reward Point On Product For Specific Time
The admin can set the Reward Points for a specific time. Here, the admin can also set the reward points, start time, and end time of the rewards that will be applicable. The admin can set this reward on the products and categories.

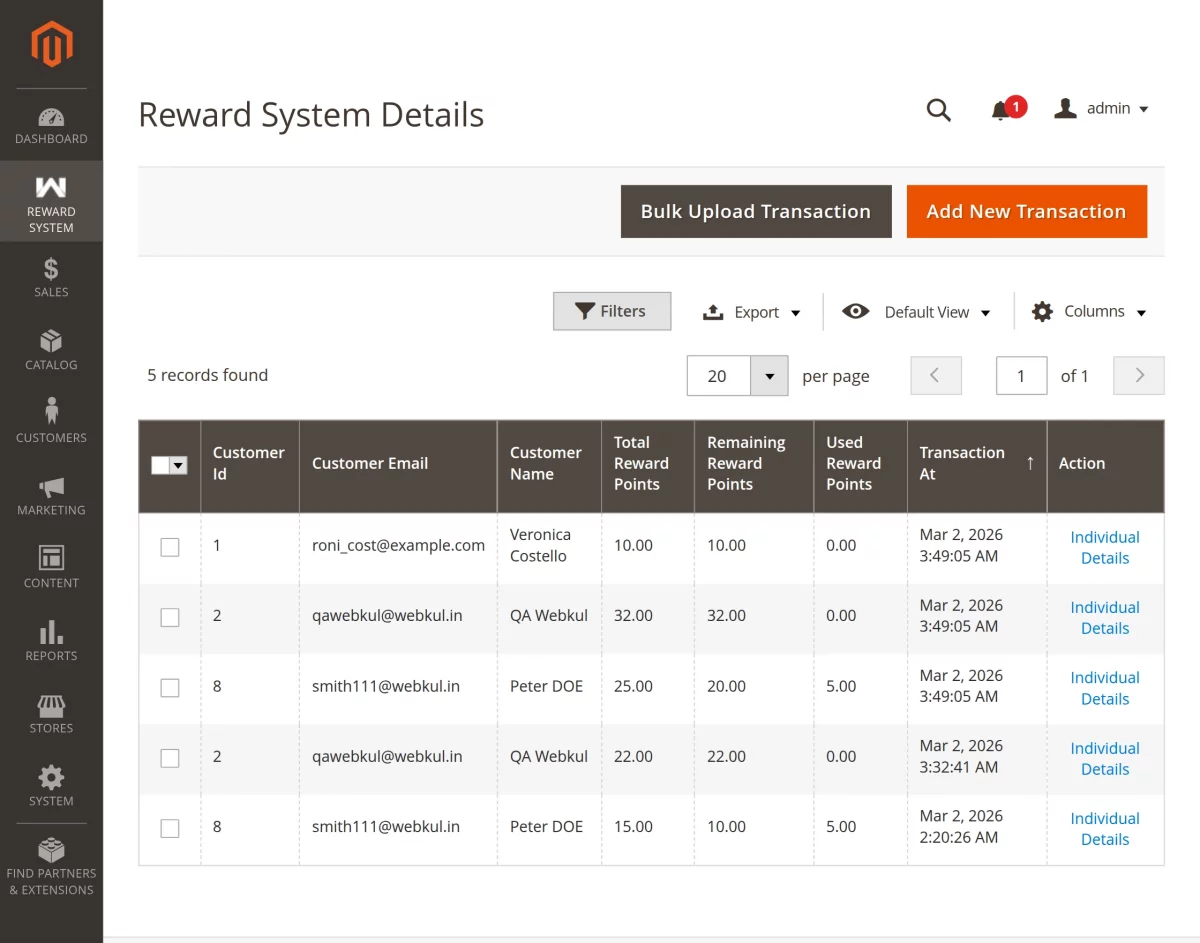
Reward System Details
Here, the admin can see the details of the rewards based on Customer Id, Customer Name, Total Reward Point, Remaining Reward Points, Used Reward Points, Transaction At, and Action.
The admin can also see the Individual Details of the customer’s credit and debit rewards points. Also, the admin can check the Transaction date and time with the order note.
EXPORT REPORTS IN CSV & XML
The admin can export the report of the rewards. This report can be exported in CSV and Excel XML files. To export the file the admin can navigate to-
Reward System> Reward System Details

Here, the admin can select the customer id for which the admin wants to export the details of the rewards and then click on Export to download the file.
The admin can also select multiple customer IDs to export the reward details of every customer at a time.

Cart-based Reward Points Calculation
The admin can set the cart-based reward points calculation if the “Order Placed Reward Points Calculation Based on” option is set to “Cart Based” while configuring the module by the admin.
Admin Management of Magento 2 Reward points
For this, the admin will navigate to Reward System>Manage Reward Points on Cart as per the below image.

Here, the admin can:
- Edit existing cart rule details by clicking on the “Edit” link.
- Delete/Update the cart rule from the “Actions” drop-down list.
- Add a new cart rule by clicking on the “Add New Cart Rule”.
When the admin clicks on the “Add New Cart Rule” button, he will navigate to the “Add New Cart, Rule Page”.

Here, the admin can:
- Reward Point Type: The admin can select the reward point type from here as fixed or percent accordingly the customer will get the reward points.
- Reward Point: Set the reward points that will be allocated to the customers when their cart amount meets the defined amount range of the particular cart rule.
- Amount from and above: The admin can click on the check box to enable the above condition on reward points.
- Amount From: Set the lower cart amount range.
- Amount To: Set the upper cart amount range.
- Start From Date: Set the date for the cart rule to be active.
- End Date: Set the date for the cart rule to get inactive.
- Rules Status: Enable/disable the cart rule by selecting either “Yes” or “No”.
NOTE:
There should be no overlapping in the amount range set for the cart rules. For example, if one cart rule is set to a 10.00 – 500.00 amount range. Then, the next cart rule amount range should start from 501.00 or above.
Customer End of Magento 2 Reward points
The customers can get the reward points based on their cart amount. For this, the customer’s cart total amount should meet the defined cart rule amount of the admin.

Reward points will be credited to the customer’s account after the successful order is placed. If the customer’s cart total amount after purchase meets any of the defined cart rules by the admin.
For which the customers get notified via email. Also, they can check it by clicking on the “Reward Points” option in their accounts.

Manage Reward Points on Attribute
The admin can manage the reward points on the basis of the Attributes. To manage the reward points based on the attribute. The admin can configure the rewards based on an attribute from the Store> Configuration> Reward system> Order Placed Reward Points Calculation Based On> Attribute-Based

Now, the admin can navigate to Reward System> Manage Reward Points on Attribute

Here, the admin can manage/ add a new rule for the reward points on the basis of the attributes as shown in the image below-

Here, the admin can enter the reward points for the customers, select the attribute from the options list, enable them from the rule status and click on the save attribute rule.
Cron Functionality of Magento 2 Reward Points:
To configure the cron functionality in the module admin needs to configure it from Stores> Configuration > Advance > System > Cron configuration for the group.

After configuration, the admin needs to run two commands for the cron functionality.
First Command –
php bin/magento cron:install
Second Command –
php bin/magento cron:run
Customer End of Magento 2 Reward points
Now, when a customer will purchase an item and the admin has set that product under the reward attribute. Once the admin generates the invoice, the reward will add to the customer’s rewards point after


The customer can see the reward point on the product catalog and also can see the received rewards points on that product from the My Reward Points.

Category-based Reward Points Calculation
The admin can set the category-based reward points calculation if the “Order Placed Reward Points Calculation Based on” option is set to “Category-Based” while configuring the module by the admin.
Admin Management
For this, the admin will navigate to Reward System>Manage Reward Points on Category as per the below image.

To manage the reward points based on category, the admin will follow:
- Select one or more than one category for which the admin wants to update the Reward points.
- Enter Points: Enter the reward points.
- Reward Point Status: Enable/Disable the reward points for the selected category.
- Proceed by clicking on the “Update Points” button.
Customer End of Magento 2 Reward points
Customers can get reward points on the basis of the product category they carry in their cart while checkout.

However, the reward points will be allocated to the customers after the successful order is placed. For which the customers get notified via email. Also, they can check it by clicking on the “Reward Points” option in their accounts.

NOTE: WHEN A SINGLE PRODUCT BELONGS TO MULTIPLE CATEGORIES
If the customer’s cart carries a product P1 which belongs to more than one category say C1 and C2.

And, the reward points are set as 5 for category C1 and 10 for category C2 by the admin.
Then, the reward points for the category with the highest reward points value will credit to the customer’s account ie; 10 reward points for category C2.

Reward Point On Category For Specific Time-
The admin can manage the rewards Point On Category for Specific Time. The admin can set the Reward Points, Start Time, and End Time for the Category.

Customer Frontend
For this, the customers need to navigate to the product page for which they want to submit the product reviews.

Under the “Review” section, the customer can fill in the product review details and can submit it by clicking on the “Submit Review” button.
Once the admin approves the product reviews, customers can check their reward points for product reviews. For which the customers get notified via email.
Additionally, they can check it by clicking on the “Reward Points” option in their accounts.

Admin Management
To credit the reward points to the customers, the admin needs to approve their product reviews. For which the admin, will navigate to Marketing>Reviews. This will redirect the admin to the “Reviews” list page.

Here, the admin can:
- Select multiple reviews.
- Delete selected reviews by selecting the “Delete” option from the “Actions” drop-down list.
- Update the status of the selected reviews by selecting the “Update status” option from the “Actions” drop-down list. This will display the “Status” option beside the “Actions” drop-down list. From here, the admin can update the status of the reviews by selecting the “Approved/Not approved/Pending” options from the “Status” drop-down list. Proceed by clicking on the “Submit” button.
- Add a new review by clicking on the “New Review” button.
- Edit the selected reviews by clicking on the “Edit” link.
Tracking Reward Points
This module enables the feature of tracking the reward points with the complete details of credit and debit reward points of every customer. The admin as well as the customers can track the reward points.
Tracking – Admin End
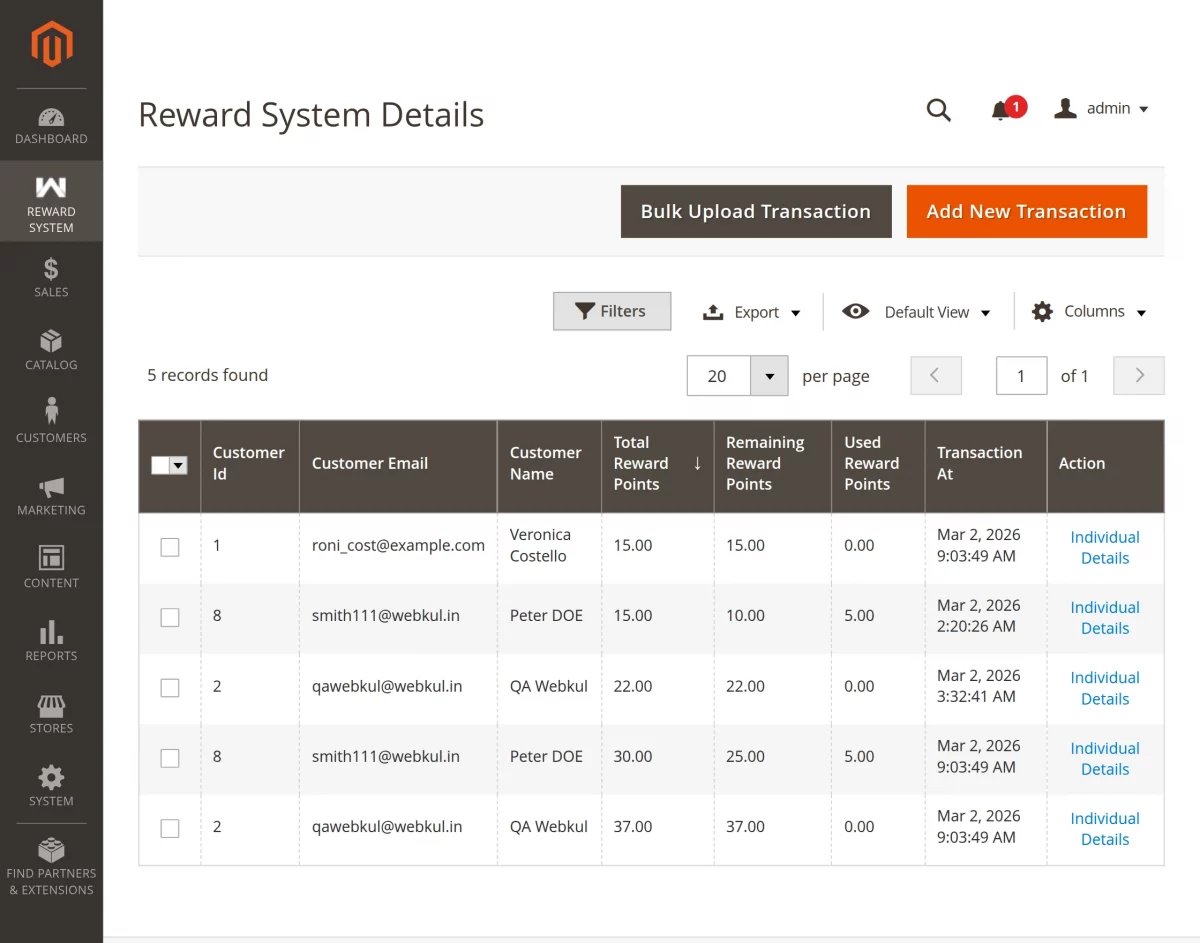
The admin can track the reward points of every customer by navigating to Reward System>Reward System Details. This will navigate the admin to the “Reward System Details” page.

The “Reward System Details” page will display the customer list along with reward points details. The admin can click on the “Individual Details” link against any customer to view the complete reward points details.
This will display the complete reward points details for every credit and debit of reward points.

Credit/ Debit Rewards-
Here, the admin also has an option where the admin can credit or debit the reward points to a customer. To credit or debit the reward point to a customer the admin can click on the Add New Transaction button.

The admin needs to fill in the details to credit or debit the reward points. The admin can select Prefered Action as Credit or Debit, enter the Reward Points, and add a note message.

Now, the admin can click on the Add Selected Customers, to add the customers for whom the admin wants to credit or debit the rewards.

Now, the customers will add to the transaction list and the admin can click on Save Transaction.

Thus, the credit points will add to the customer’s account. The customer can see the reward details from the My Rewards Point.

Tracking – Customer End
The customer can track their reward points along with the complete details of every credit and debit of reward points.“Reward Points” Menu Option
For this, the customer can click on the “Reward Points” option in their accounts.

Here, the customers can check for every debit and credit detail of Reward Points.“My Orders” Menu Option
By navigating to “My Orders” the customers can view the complete details of their Debited reward points. The customers will redirect to the “My Orders” page as per the image.
Here, they can click on the “View Order” link against any order for which they want to see the reward points details which have got debt.

Furthermore, the customers can click on the “Items Ordered” or “Invoice” tab to check the complete details of their reward points. And check the debited point from their account.

NOTE: For every debit and credit of Reward Points, the customers will get an email notification on their registered email id.
Manage Reward Points Redeem Rule:
Admins may manage reward points and redeem rules based on product price.

To create new reedem rules, click on the add new reedem rules button and then enter the details shown in the below image.

You have the option to select the product price from and to, or from and above.

Bulk Upload Reward – Admin End :
CSV Bulk Upload Reward Transaction feature for Admin to upload multiple reward transactions at once. This makes the process faster, easier, and more efficient.
Step 1: Go to Reward System
From the left admin panel, click on Reward System to open the reward management menu.
Step 2: Open Reward System Details
Select Reward System Details to view all customer reward transactions and management options.

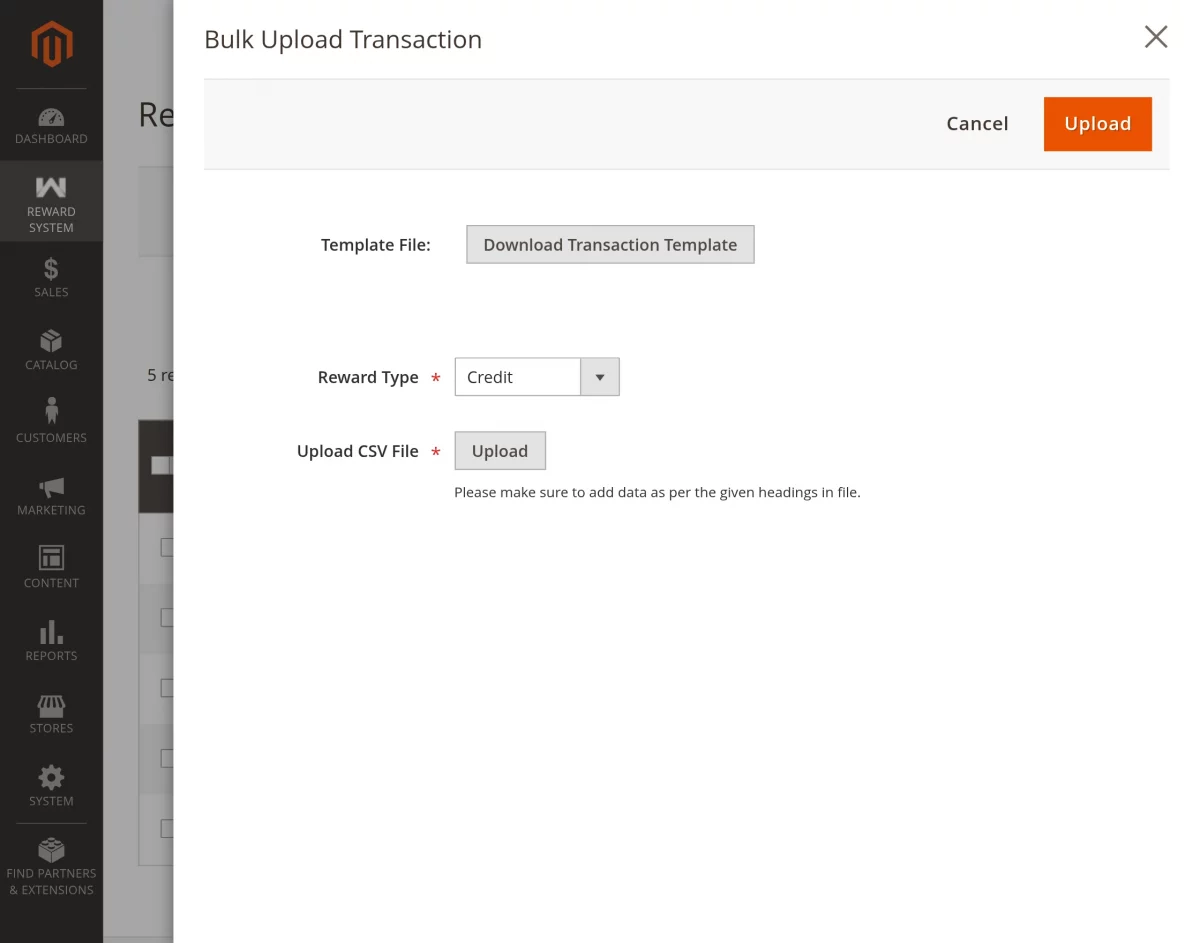
Step 3: Click on Bulk Upload Transaction
On the Reward System Details page, click Bulk Upload Transaction to open the bulk upload popup.
Download the template (if needed), choose the reward type(credit, Debit, or expired), upload your CSV file, and click Upload to process the transactions.
The CSV file has been uploaded successfully, and bulk reward transactions have been processed.
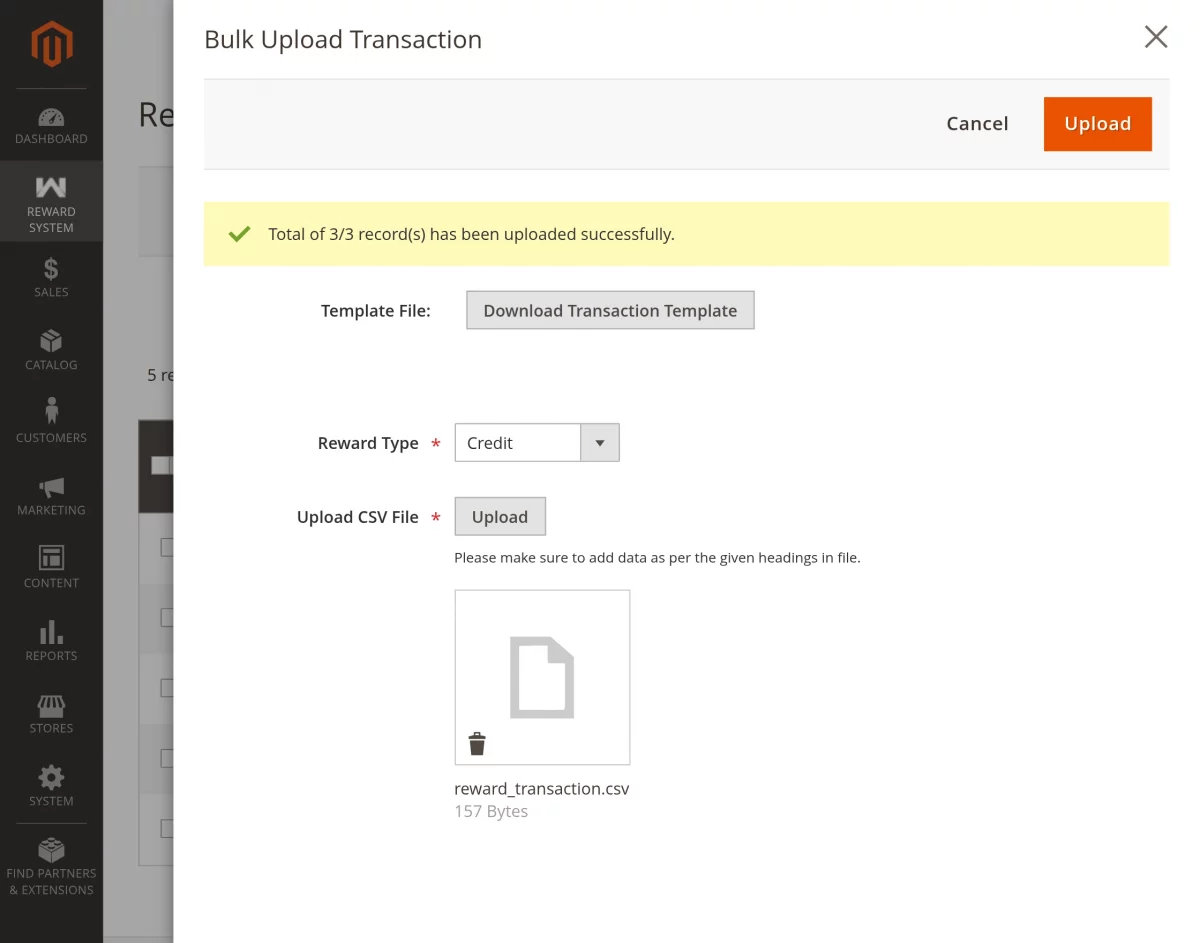
All reward points are now updated in the system as per the uploaded data.
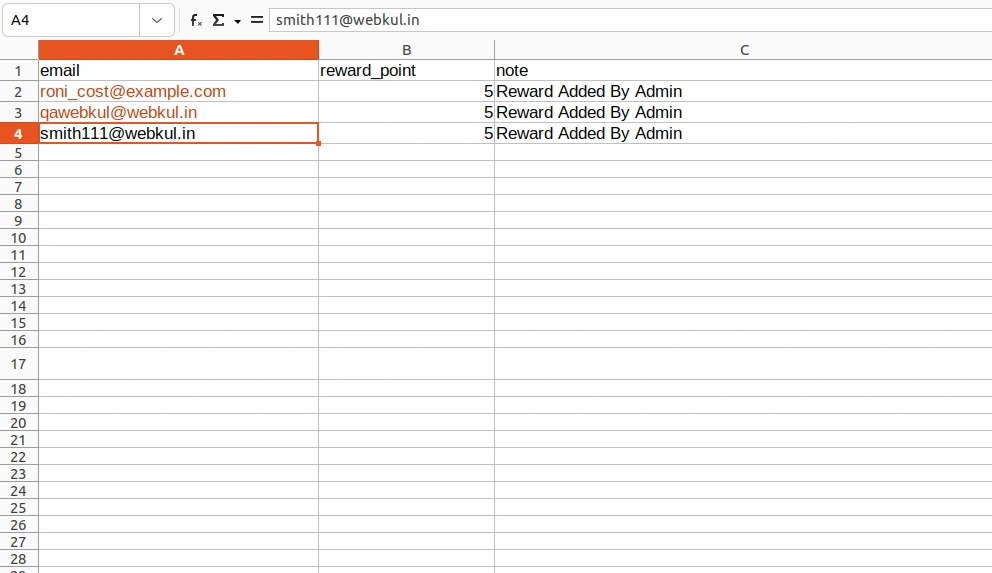
Here is an example for the Magento2 Reward System, Bulk upload file.
That’s all for the Magento (Adobe Commerce) 2 Reward Points for any queries or doubts reach out to us at [email protected]. You can also raise a ticket at our HelpDesk system webkul.uvdesk.com
Current Product Version - 4.1.4
Supported Framework Version - Magento 2.0.x, 2.1.x, 2.2.x,2.3.x, 2.4.x

Be the first to comment.