Magento 2 Advanced Booking Reservation extension will create dynamic booking and reservations like Appointment, Event, Rental, Hotel, and Restaurant Booking.
This will convert the store into a dynamic event-driven site. This plugin introduces a new product type, Booking Products.
Thus, this will allow the store owner to sell booking services as a product.
This product type lets the admin manage all necessary details of the Booking product like date available, slot period, stock value and price settings, and much more.
Check a brief overview of the plugin – wherein we have showed how the customer can view the booking products at the storefront, place the order, and the cancellation process.
And how the admin can place the orders on behalf of the customers, and the process of creating the booking products.
Check a brief overview of the Table booking product –
Check a brief overview of the Event booking product type –
Watch the below video tutorial to learn how to setup extension and create a rental booking product:
Watch the below video tutorial to know how to create an appointment booking product:
Check the overview of the default booking type –
Check the overview of the hotel booking product type –
Features- Adobe Commerce Rental Extension
- Dynamic Booking product creation for Booking and reservation.
- Admin can add Booking products like Appointment, Event, Rental, Hotel, and Restaurant Booking.
- Calendar Events in Email feature.
- The Admin can Approve/Disapprove Q&A’s from the Hotel Product Page.
- Can configure the mail template for contact to the admin regarding Booking Product.
- Can set the location name of the Booking product.
- Enable to show the map of the location of the Appointment, Event, Rental, Hotel, and Restaurant Booking.
- Booking products can have custom options.
- Dynamic time settings like create multiple time slots and also set the time span of the slots.
- Can set the break time between the slots.
- Can set the minutes to prevent the booking before the start time of the slot.
- Days/Slot-based quantity can be configured.
- Customers can book a booking product.
- Customers can cancel a booking product.
- Can include Holiday(s) for Appointment, Table, Rents(Hourly) & Default (Many bookings in One Day) type Booking products.
- Brilliant UI and UX for event display and booking.
- Built on top of the Magento MVC and ORM system.
- The admin can also place orders from the admin panel.
- Support iCalendar.
- The extension is fully compatible with the Hyva Theme.
- GraphQL has been implemented for the extension.
Installation of Adobe Commerce Cloud Rental Extension
The installation is quite simple just like the standard Magento 2 extensions.
Customers will get a zip folder and they have to extract the contents of this zip folder on their system.
The extracted folder has an src folder, inside the src folder you have the app folder.
You need to transfer this app folder into the Magento2 root directory on the server as shown below.

After the successful installation, you have to run these commands in the Adobe Commerce root directory.
First command-
php bin/magento setup:upgrade
Second Command –
php bin/magento setup:di:compile
Third Command –
php bin/magento setup:static-content:deploy
After running the commands, you have to flush the cache from the Adobe Commerce Cloud admin panel by navigating through->System->Cache management as shown below.

This Adobe Commerce Rental Extension needs to be uninstalled and reinstalled in the following way.
#Uninstallation
Note: After the uninstallation, all data of the module will be deleted from the instance. It will completely uninstall the Magento 2 Rental Extension.
Please follow the steps for uninstallation-
1. Run Following Command via terminal
i- php bin/magento advancedbookingsystem:disable
ii- php bin/magento setup:di:compile
iii- php bin/magento setup:static-content:deploy
2. Flush the cache and reindex all.
#Reinstallation
If this Adobe Commerce Cloud Rental Extension has been uninstalled by using the upper #Uninstallation process then Please follow the steps for reinstallation-
1. Run Following Command via terminal
i- php bin/magento module:enable Webkul_AdvancedBookingSystem
ii- php bin/magento setup:upgrade
iii- php bin/magento setup:di:compile
iv- php bin/magento setup:static-content:deploy
2. Flush the cache and reindex all.
Multi-Lingual Configuration
For Multilingual support, please navigate to Store>Configuration>General >Locale Options. And select your desired language from the Locale option.
Language Translation – Adobe Commerce Rental Extension
If you need to do the Magento 2 Rental Extension translation, please navigate to the following path in your system app/code/Webkul/AdvancedBookingSystem/i18n.
Open the file named en_US.CSV for editing as shown in the below screenshot.

Once you have opened the file for editing. Replace the words after the†comma(,)†on the right with your translated words.

After editing and translating the CSV file, you need to save the translated file name according to your region language and country code such as – de_DE.CSV.
Then upload the translated file to the same folder from where you have obtained it. Now your Adobe Commerce Cloud Rental Extension translation is complete.

Adobe Commerce Rental Extension Configuration
After the installation, the admin can configure the module settings by navigating to the Stores -> Configurations -> Webkul -> Advanced Booking System as per the below image.

Here, the admin will configure the two settings below –
Settings:
- Google API Key: Enable the Google API key for the “Search nearby” map to work Properly.
Please click here to generate the key. And have to select these APIs of Google –
- Admin approval required for questions: You can set this option to Yes or No as required.
If set to Yes, then the admin approval is required before the questions are made visible on the product page.
Advanced Booking System Transactional Emails:
- Contact to Admin Regarding Booking Product Template: Configure the mail template for contact to the admin regarding Booking Product.
- Customer asked a Question Regarding Hotel Booking Product Template: Configure the mail template for contact to the admin regarding Hotel booking product.
- Customer created cancellation request for booking product: Select the respective email template for this option so that the admin receives email notification when a customer makes a cancellation for the booking product.

Booking Cancellation Options:
Furthermore, Admin needs to fill some more informations here.

- Allow Booking Cancellations- Here, admin needs to set whether to provide this feature to customer or not.
- Display Cancellation Info at Product Page – Here, admin needs to set if this cancellation info will be visible or not in product page.
- Cancellation Charge in %- If admin wants to set any cancellation charge it can be set here.
- Allow Cancellation before Booking Start in(minutes)- Here, admin can set if there is any timeline to set till when customer can apply cancellation on any order.
Add Booking Product
Now the Admin have to navigate to Advanced Bookings System in the dashboard where it will be visible like this.

View Bookings Order – Here the admin will be able to see all the details of the booking orders and manage them.
View Bookings Products – Here the admin will be able to see and edit all the booking products.
View Questions – Here admin will be able to see and manage all the questions added for the specific bookings.
View Calendar – Here admin will be able to see and edit all of the bookings in the calendar.
Cancellation Request – Here admin will be able to see all of the cancellation request from the customer and take prior action on the same.
Manage Holidays – Here admin will be able to manage, add/edit Holiday(s) according to their preferences.
To Add New Booking Products
Now, to create the Booking Product, the admin needs to navigate through Advanced Bookings System>View Bookings Product and then click on Add new bookings simply select the Booking type as per the choice.
Moreover, there is another way also of creating a Booking product.
The admin will navigate through Menu item Products -> Catalog -> and then click the Add Product drop-down on the right top hand side.
Henceforth, here you will find the Booking Product option, click it to create a booking product as shown below in the screenshot.

Thus, this will navigate the admin to the New Product page as per the below image.

To Add New Holiday
To create a new Holiday, the admin needs to navigate through Advanced Bookings System>Manage Holidays and then click on Add New Holiday.

Now, simply enter the Holiday Name as per the preference along with Date Type which are Single Day or Date Range. After filling out the details, Click on Save Holiday.

Admin End – Appointment Booking
The admin can create an Appointment booking product as shown below in the screenshot.

So, on the New Product page, the admin will select the Appointment Booking Product type.

After entering the basic details, the admin will enter the Booking information of the product.
Additionally, it can enable the cancellation function for customers.
CONTACT INFORMATION:
- Location: Set the location name.
- Show Map with Location: Enable to show the map of the location.
- Show Contact Button to: Select to whom the admin wants to display the “Contact Us” link – “Everyone” or only the “Logged in Customer”.
BOOKING INFORMATION:
- Slot Duration(mins): Set the time span of a slot.
- Break Time b/w Slots(mins): Set the break time between the slots.
- Prevent Scheduling(mins): Set the minutes to prevent the booking before the start time of the slot.
- Available Every Week: Enable this to configure the time slots for all the days of the week.
Else disable this if don’t want to configure the time slots for all the days of the week.
- Same Slot for All Day: Enable this to configure the same slot for all the days.
 Else disable this if you want to set the different slots for each day.
The admin can set the different-different time slots (slot span) and slots quantity for each day. 
- Slot has Quantity: Enable this to configure the per slot stock value. Else disable this if you want to configure the same stock value for all the slots.

SLOT INFORMATION:
Under this, the admin will configure the slot time span. And, define each slot quantity if Slot has quantity option is set to Yes.
Now click on the save button on the top and we are done configuring the product.
Henceforth for more details, you can check our video tutorial here.
Frontend – Appointment Booking
On the Product Page, you can select the Book Now option to Book the reservation.

Here, the customer will:
- Select the date from the calendar for which they want to book the slot.
- Select the slot for the selected date and set the quantity.
- Then click on the “Book Now” button.
Thus, tapping the Book Now button will add the slot to the cart. A success message will display for the same.
Henceforth, click the Proceed to Checkout button to block the added slots by making a purchase.

Thus, the customer will select the dersiable payment method on the checkout page. Inorder accomplish the puchase the customer will click on Place Order.
 Henceforth now the customer will see all the orders placed in the My Order Section.
The time slot gets disable if it is completely fill as per the image.
Admin End – Event Booking
The admin can create an Event booking product as shown below in the screenshot.

On the New Product page, the admin will select the Event Booking Product type.

After entering the basic details, the admin will enter the Booking information of the product –
VENUE DETAILS:
- Location: Set the location name.
- Show Map with Location: Enable to show the map of the location.
- Show Contact Button to: Select to whom the admin wants to display the “Contact Us” link – “Everyone” or only the “Logged in Customer”.
TICKET AND QUANTITY:
- Event Date: Set the Start Date and End date.
- Event Map/Chart Available: Upload the Map image of the location of the Event.
- Price Charged Per: Configure tickets charge basis like whether the admin wants to charge the fee according to “Per Ticket”, “Per Person” or “Per Seat” etc.
- Multiple Tickets: Enable this if you want to create multiple types of tickets. Else, disable this if you want to create only a single kind of ticket.
 Now click on the save button on the top and we are done configuring the product.
Frontend – Event Booking
On the Product Page, you can select the Buy Tickets option to Book the tickets.

Here, the customer will:
- Select the ticket which the customer wants to buy.
- View the ticket amount calculation as per the ticket type and its quantity selected.
- Then click on the “Buy Tickets” button.
Tapping the Buy Tickets button will add the tickets to the cart and you will see a success message for the same.
Now, click the Proceed to Checkout button to block the added tickets by making a purchase.

The customer will select the payment method at the checkout page and will tap the Place Order button to complete the purchase.

After the order is place, the customer will be able to see the order details under My Orders section.

The customer will get an error message when trying to purchase the tickets which is Out of stock.

Admin End – Rental Booking
The admin can create a Rental booking product as shown below in the screenshot.

On the New Product page, the admin will select the Rental Booking Product type.

After entering the basic details, the admin will enter the Booking information of the product –
VENUE DETAILS:
- Location: Set the location name.
- Show Map with Location: Enable to show the map of the location.
- Show Contact Button to: Select to whom the admin wants to display the “Contact Us” link – “Everyone” or only the “Logged in Customer”.
RENTING INFORMATION:
- Available Qty to Rent: Set the quantity available to rent.
- Renting Type: Select the rent type as Hourly Basis, Daily Basis or both.

- Daily Price: If you have configured the “Renting Type” as Daily Basis or the Both. Then set the per day rent. Else, if configured the “Renting Type” as “Hourly Basis”. Then, the “Daily Price” field gets disappear.

- Available Always: Enable this to configure the time slots for all the days of the week.
Else disable this if you don’t want to configure the time slots for all the days of the week.

- Available From: If you have disabled the “Available Always” option then set the Start Date and End date.
- Hourly Price: If you have configured the “Renting Type” as Hourly Basis or the Both. Then, set the per hour rent.
Else, if configured the “Renting Type” as “Daily Basis”. Then, “Hourly Price” field gets disappears.
HOURLY RENTING INFORMATION
This section will appear if you have configured the “Renting Type” as Hourly Basis or the Both.
- Prevent Scheduling(Mins): Set the minutes to prevent the booking before the start time of the slot.
- Same Hours for All Days: Enable this to configure the same time slots for all the days of the week.
Else disable this if you want to set the different slots for each day. The admin can set the different-different time slots (slot span).
- Hours has Quantity: Enable this to configure the per slot stock value. Else disable this if you want to configure the same stock value for all the slots.
After this, the admin will configure the slot time span and its quantity as per the choice. And then click on the save button on the top and we are done configuring the product.
Frontend – Rental Booking
On the Product Page, you can select the Rent Now option to Book the reservation.

Here, the customer will:
- Choose the Rent option either Daily Basis or Hourly Basis.
DAILY BASIS:
When chooses the rent option as the Daily Basis, then the customer needs to select the dates as per the days the customer wants to hire the item.

HOURLY BASIS:
When chooses the rent option as the Hourly Basis, then the customer needs to select the date, time slot and the hours as per the duration the customer wants to hire the item.

- Select the quantity.
- Then click on the “Rent Now” button.
Now, click the Proceed to Checkout button to make the booking.

Thus, the customer will select the payment method at the checkout page. Henceforth will click the Place Order button to complete the purchase.

After the order is place, the customer will be able to see the order details under the My Orders section.

However, the customer will get an error message when trying to hire the item which is Out of stock.

Admin End – Hotel Booking
The admin can create a Hotel booking product as shown below in the screenshot.

On the New Product page, the admin will select the Hotel Booking Product type.
The admin first needs to create the configurations so that those will be visible as options in the drop-down lists of Room type and Hotel type.

After entering the basic details, the admin will enter the Booking Information of the product –

HOTEL LOCATION:
- Address Information: Set the address of the hotel which will be visible at the frontend to the customers.
- Show map with Location: Enable to show the map of the location.
- Show contact button to: Select to whom the admin wants to display the “Contact Us” link – “Everyone” or only the “Logged in Customer”.
BOOKING INFORMATION:
- Show Near By: Enable to show the map of the nearby location.
- Price Charged Per: Configure the charge basis like night or day.
- Enable ask a Question: At the front-end allow the customers to ask questions or queries they will have.
- Amenities: Select the facilities as per the room type.
And then click on the save button on the top and we are done configuring the product
Note: The admin can view all the queries asked by the customers on the product edit page.

And can also revert to the customer queries as per the below image.

On the frontend, the admin can view the questions along with the Write an Answer button. The admin will click on this button write the answer and then submit it.
View Questions
Under this section, the admin will be able to check all the questions that have been asked from the Hotel booking product page at the front end.

The admin can delete, enable or disable the status of the questions using the actions drop-down menu option.

To view the questions for a particular product, tap the View Answers link. And this brings up the section with all the answers for the particular product. Here, the admin can delete the answers as well.

Front End – Hotel Booking
On the Product Page, you can select the Book Now option to Book the reservation.
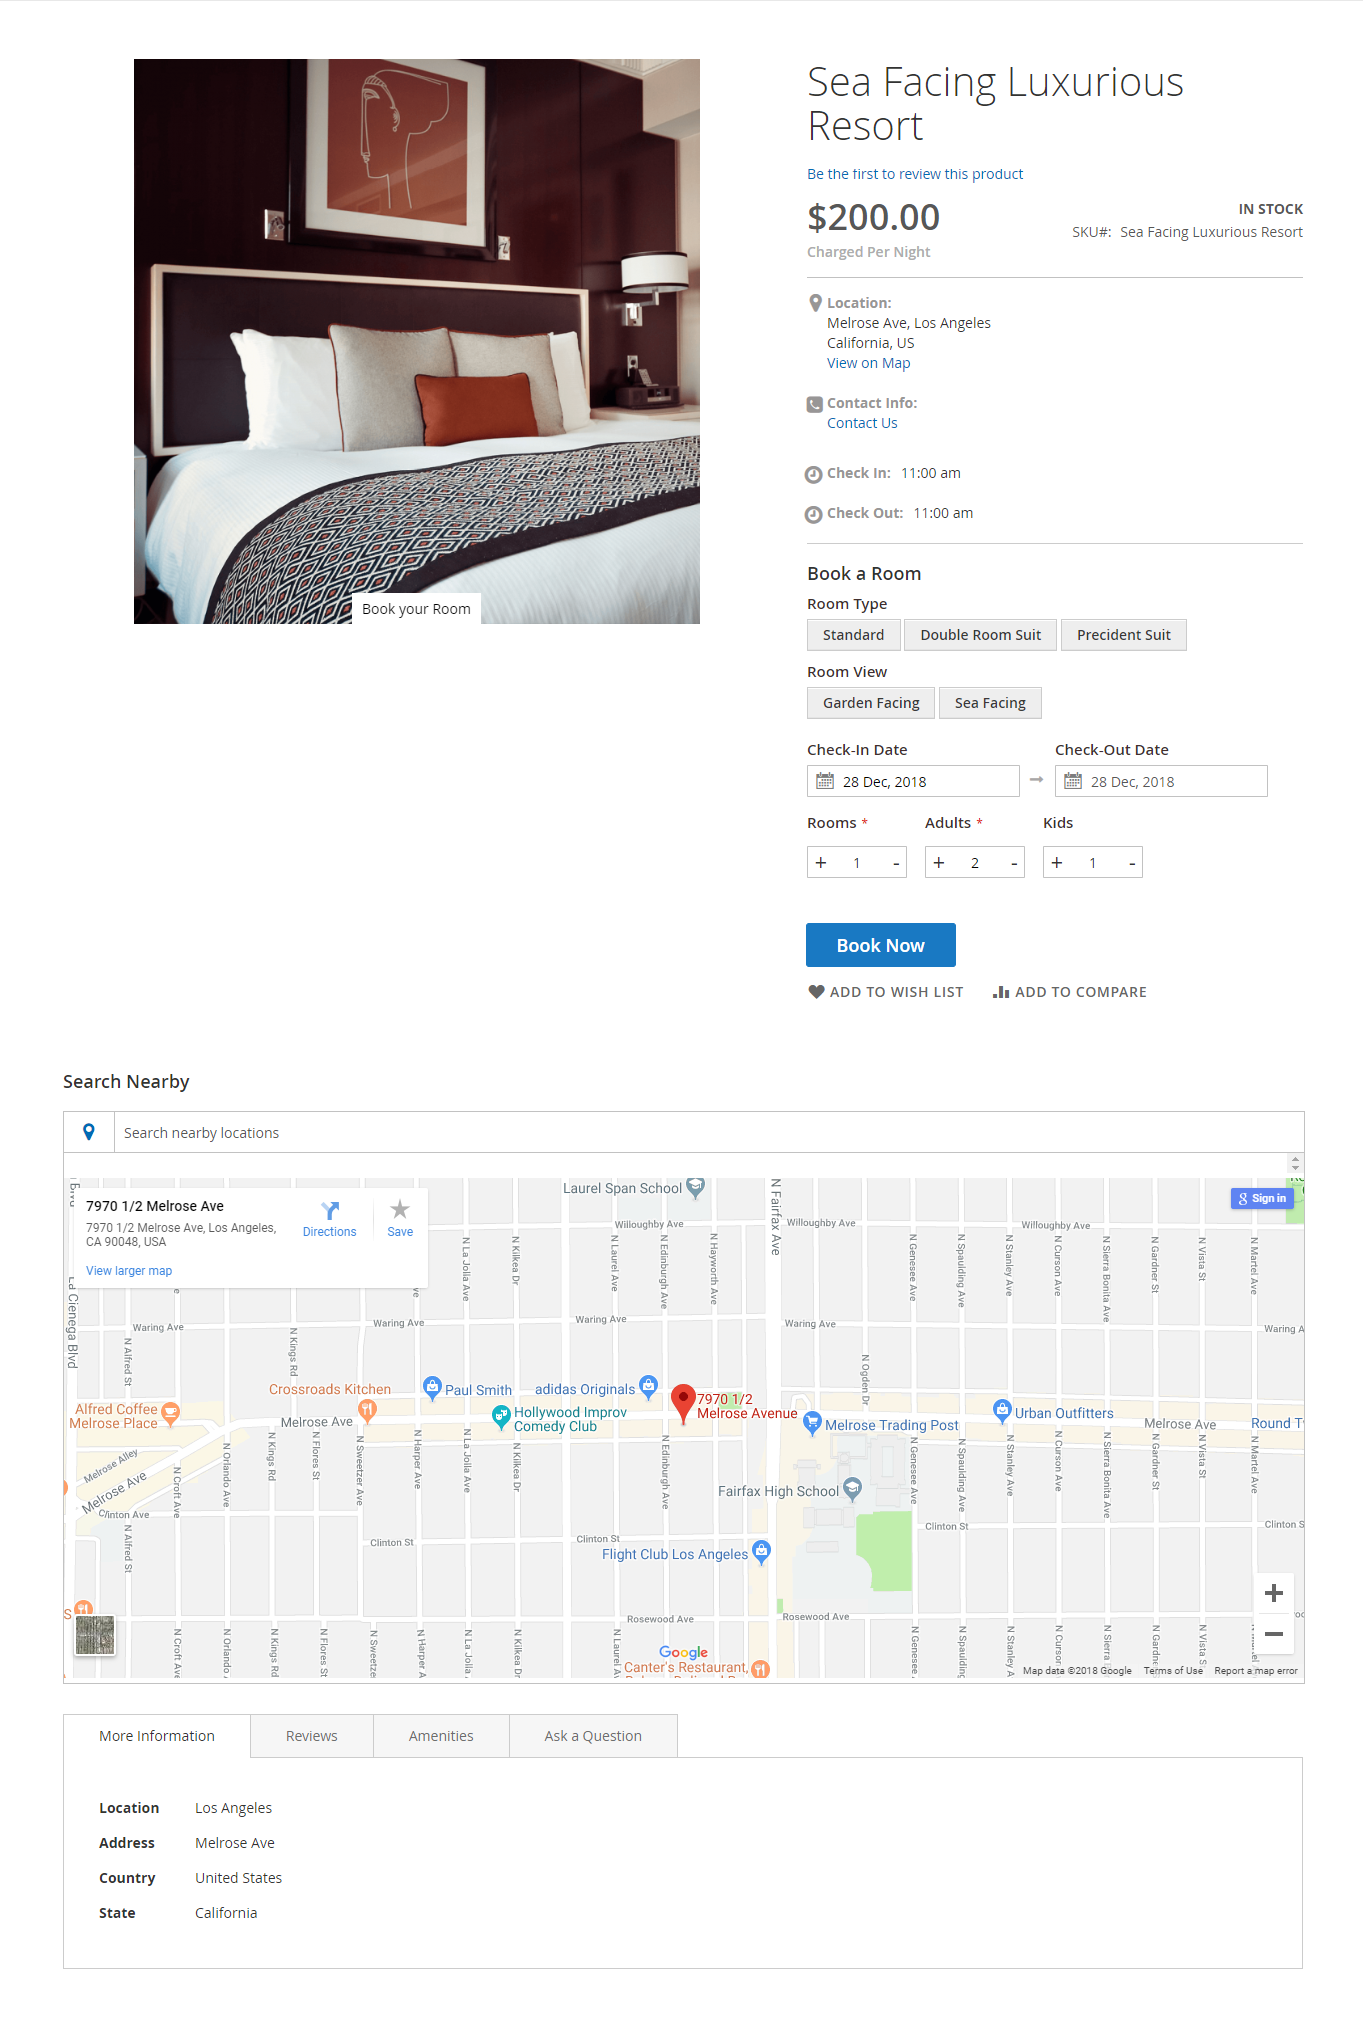
Here, the customer will:
- Choose the Room type and Hotel view.
- Select the Check-in and Check-out date.
- Set the quantities of Rooms required, Adults and kids.
- Then click on the “Book Now” button.
The customer can search the nearby places and can also view the amenities offered by the admin.

The customer can even ask queries. Click on the “Ask a Question” tab to ask your queries as per the below image.

If the Admin adds the Breakfast & Dinner Option in the Current Variation Part in the Product Configuration It will show as given below.

Now, click the Proceed to Checkout button to make the booking.

The customer will select the payment method at the checkout page and will tap the Place Order button to complete the purchase.

After the order is placed, the customer will be able to see the order details under the My Orders section.

The customer will get an error message when trying to book the item which is Out of stock.

Admin End – Table Booking
The admin can create a Table booking product as shown below in the screenshot.

On the New Product page, the admin will select the Table Booking Product type.

After entering the basic details, the admin will enter the Booking information of the product –
CONTACT INFORMATION:
- Address Information: Set the location name.
- Show map with Location: Enable to show the map of the location.
- Show the contact button to Select to whom the admin wants to display the “Contact Us” link – “Everyone” or only the “Logged in Customer”.
BOOKING INFORMATION:
- Charged Per: Configure the charge basis like per table, guest, plate etc
- Number Of Guests: Set the charges per quantity like set the charges for per guest.
- Maximum Guests Capacity: Set the maximum number of guests the table can be booked for.
- Slot Duration(mins): Set the time span of a slot.
- Break Time b/w slots(mins): Set the break time between the slots.
- Prevent Scheduling(mins): Set the minutes to prevent the booking before the start time of the slot.
- Same slot for All Day: Enable this to configure the same slot for all the days. Else disable this if you want to set the different slots for each day.
Configure the time slots for each day if you want to have different slots for each day. Now click on the save button on the top and we are done configuring the product.
Front End – Table Booking
On the Product Page, you can select the Book Now option to Book the reservation.
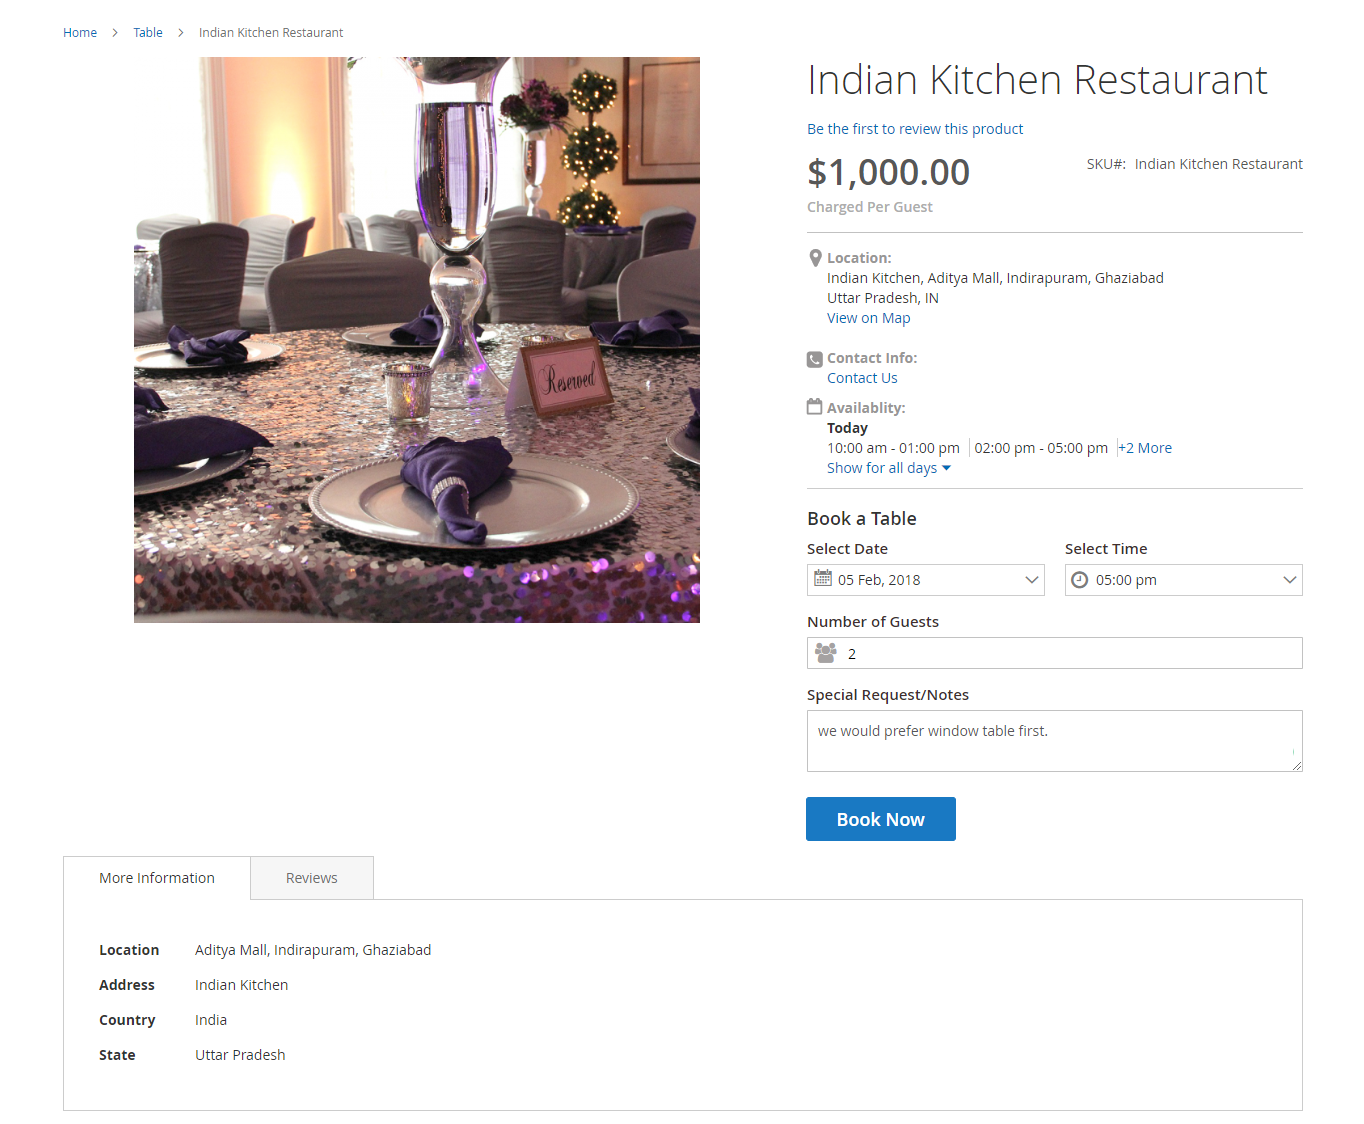
Here, the customer will:
- Select the date and time.
- Set the number of guests.
- Add a message for the admin.
- Then click on the “Book Now” button.
Now, click the Proceed to Checkout button to make the booking.

The customer will select the payment method at the checkout page and will tap the Place Order button to complete the purchase.

After the order is placed, the customer will be able to see the order details under the My Orders section.

The customer will get an error message when trying to book the table which is not available.
Default Booking Product
Many Bookings In a Day:
The admin can also create a default Booking product type – Many Bookings In a Day. Select the Booking Product option, click it to create a new booking product as shown below in the screenshot.
After you click the Booking Product option above, the Add Product page will open where you can configure the booking product.

Now after filling in the information for the booking product, you will select the booking Information type as Many Bookings In a Day and configure its Booking details.
FRONTEND:
On the Product Page, the customer can select the Book Now option to Book the reservation.
After clicking on the Book Now button you will see a popup. Here, you need to first select the date for which you want the booking.
After that, you will select the required slot and enter the number of slots required for the selected date. Now, tap the Book Now button to add the selected slot to the cart.

Tapping the Book Now button will add the slot to the cart and you will see a success message for the same.
Available slots are underlined with green color, unavailable with a yellow color, and completely booked are underlined with red underline.
One Booking for Many Days:
The admin can also create a default Booking product type – One Booking for Many days. Select the Booking Product option, and click it to create a new booking product as shown below in the screenshot.

After you click the Booking Product option above, the Add Product page will open where you can configure the booking product as shown below in the screenshot.

Now after filling in the information for the booking product, you will select the booking Information type as One Bookings For Many Days and configure its Booking details.
FRONTEND:
On the Product Page, you can select the Book Now option to Book the reservation.
After clicking on the Book Now button you will see a popup. Here, you need to first select the date for which you want the booking.
Thus, after that, you will select the required slot and enter the number of slots required for the selected date. Now, tap the Book Now button to add the selected slot to the cart.

Tapping the Book Now button will add the slot to the cart and you will see a success message for the same.
Available slots are underlined with a green color, unavailable with a yellow color, and completely booked are underlined with a red underline.
Adobe Commerce Rental Extension – Email Events
Email functionality is the most convenient and liable way of notifying customers about their booking events that occurred in the Adobe Commerce Cloud store via email.
When the invoice has to be generated at that time the admin has to select “Email Copy of Invoice” and the customer will receive an email attachment having the booking details.
The customer will accept the invitation message.

The customer can add the booking details to the Google Calendar or any other by first downloading the attached file in the mail.
Then, the customer can navigate to the Google Calendar setting icon and select the Import Export menu. After this, import the downloaded file.

After the above step, you can find the booking details within the calendar.

Note: The email events functionality will work for all booking types – Appointment, Event, Rental, Hotel, Restaurant, and Default Booking as well.
Manage Orders in Adobe Commerce Magento 2 Rental Extension
The admin can also manage the orders of the Booking Products. For this, the admin will navigate to Advanced Booking product -> View Bookings Orders.

Here the admin can view the complete list of the orders placed for the Booking product.

Click on the View link to view the order details and to manage the orders.
Admin end -Cancel Order
The admin can provide cancellation booking product requests by enabling the cancellation available button.

Admin can also view cancellation requests by clicking on the cancellation request button as shown in the screenshot.
When the admin clicks on the cancellation Requests button the admin can view all the cancellation requests.

When the admin clicks on view in the action column then the process cancellation page will appear.
Henceforth, by clicking on the process cancellation button admin can approve the cancellation request.

Front end Cancellation request
When admin will enable cancellation booking then the customer can see booking cancellation available as shown in the screenshot.

Thus, once the customer places an order and post invoice generation the customer can request for cancellation.
Henceforth by following the navigation as My Account->My Orders -> View order.

So, the customer can see complete order details by clicking View Order.

Hence, on clicking the cancel booking button customer will see- all information regarding booking charges appear as shown in the screenshot.
When the customer clicks on the cancel booking button all information regarding booking charges will appear as shown in the screenshot.

When the customer clicks on cancel booking then cancellation request will be sent to admin.

Thus, whenever the admin approves the cancellation Request then customer then the refund invoice will be generated as shown in the screenshot below.

Booking Product With Custom Option
The customer can now get more power by getting the facility to purchase products with custom options.
Thus, the admin can configure such a product by navigating to Advanced Booking System>View Booking Products>Add New Booking.
Likewise in the below option, we have a Doctor’s Appointment. Wherein the admin has given the facility to the customer to select from multiple departments.

Thus, the customer in the front end can view such products as below.

Admin End Booking Orders
The admin can also place orders from the admin panel as shown in the below image.
Go to Customer >Edit >Create Order

It will redirect you to the new page, here just select the stores.

After that as here, the order is created in the default store view, below are the options that you need to select and tap on the add selected products option given on the right side.

Afterward, adding the products, configure the addition product according to the order requirement.

After adding the product, select the action ie moving to the shipping cart.

After that, add account information as well as address information and click on the submit order as shown in the given below snapshot.

Now, finally, a pop-up message comes up for the successful order creation, as shown below

iCalendar Support –
This module already supports the iCalendar feature. It allows the customers to save the booking event to their calendar. When a customer book the products, the customer receives the booking details via email.
It includes the .ics file in the email that can be used to store and save the booking event to the calendar.
It is supported by most of the software like email reader and calendar application. Moreover, it is used and supported by many other products like Google Calendar, Apple Calendar, etc.

That’s all for the Magento 2 Advanced Booking and Reservation extension.
Still, have any issues, feel free to add a ticket and let us know your views to make the plugin better at webkul.uvdesk.com.
Current Product Version - 5.0.5
Supported Framework Version - Magento 2.0.x, 2.1.x, 2.2.x,2.3.x, 2.4.x

Be the first to comment.