Magento 2 Product Repricer module facilitates the admin to compare the price of the product of their website to another eCommerce website.
Nowadays user compares the price of the product and then purchase it so it’s difficult to get the customers sometimes.
With the help of the repricer module, the admin can compare the price and reduce their website’s product amount.
They can also create multiple competitor websites for comparing products. Admin needs to use the CSS HTML code to compare the price with another website.
Note:
- This module only works with the Simple Product Type.
- The module will not work on websites with re-captcha or security that prevents it from scraping website pages
Check a brief overview of the plugin –
Features
- The admin can create multiple competitor websites (stores).
- The price comparison is based on special schemas for parsing prices in the HTML code of product pages.
- Parsing of competitors’ websites (manual launch).
- Support of several types of prices, discounts, promotional activities, and product availability from competitors.
- Admin can delete the competitors in bulk mode.
- The changed price will reflect on the customer’s end.
- One price rule will applicable while updating the price of the module.
- The admin can download the competitor product’s HTML code.
- XPath and CSS selectors use to retrieve prices from the competitor site.
- The admin can set the cron configuration for price changes according to the competitor’s website.
Install Extension from Webkul Store
#1 Download Module
Firstly, you need to log in to Webkul Store, go to My Account>My Purchased Products section, verify and then download and extract the contents of this zip folder on the system.
#2 Upload Folder
Once the module zip is extracted, follow path src>app and then copy the app folder into the Adobe Commerce Cloud root directory on the server as shown below:

#3 Run Commands
After uploading the module folder, you need to run the following commands in the Magento 2 root directory:
- composer require symfony/dom-crawler
php bin/magento setup:upgradephp bin/magento setup:di:compilephp bin/magento setup:static-content:deployphp bin/magento indexer:reindexphp bin/magento cache:flush
Admin Configuration
The admin will navigate through to the admin’s panel and click on the Webkul Repricer tab. Where admin can add the competitors.

Once the admin clicks on the competitors tab a new page will open where they can add the competitors from different websites.

Add Competitors

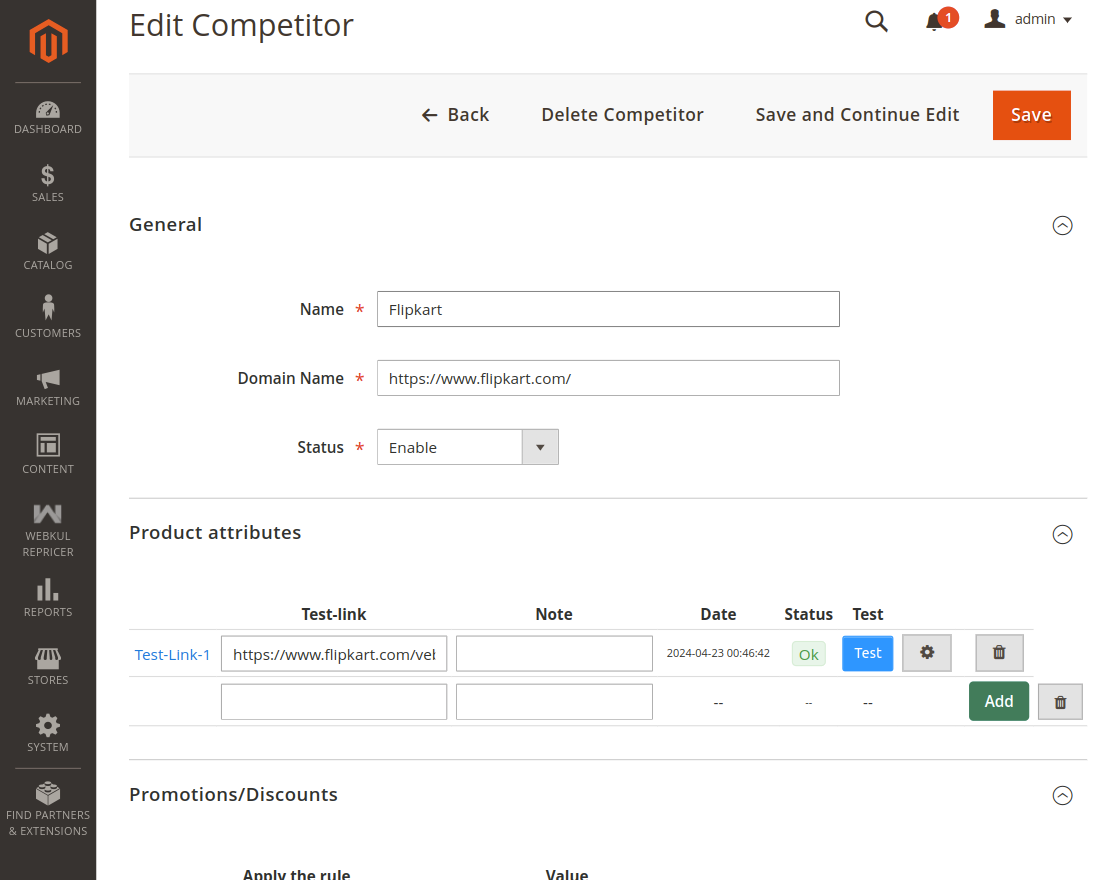
When the admin clicks on add button a new page will open where they need to fill in some competitor’s details.
Name: Name of the competitor’s site.
Domain Name: Domain name of the competitor.
Status: Enable/Disable the competitors.
After all the necessary details once they hit on the save icon few options will open to complete the process.

Here, the admin will enter the competitor’s product link in the product attribute tab and then click on the save button.
Example: Here, we added a t-shirt link from Flipkart in the product attribute section. The admin needs to use the link which is showing in the search bar to the test link tab.

Once the link is added, the admin needs to save the details so the product will add as a competitor.
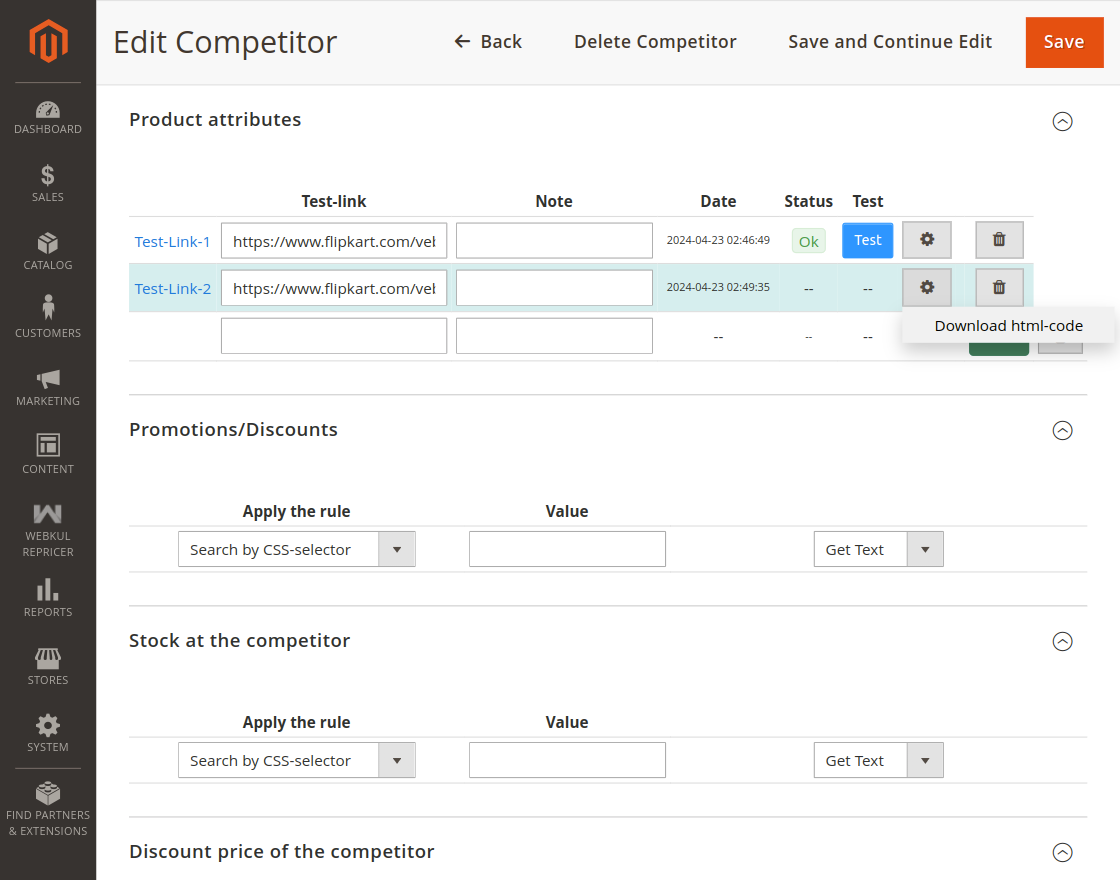
Once the link is added, the admin needs to download the HTML code after that product will be available for testing.
Also, the admin can add different links and CSS selector and Xpath selector values to get a different value.
Furthermore, the admin can add multiple details or choose anyone to compare the price. here they can add stock at the competitor, discount price, sales price, and the full price of the competitor.
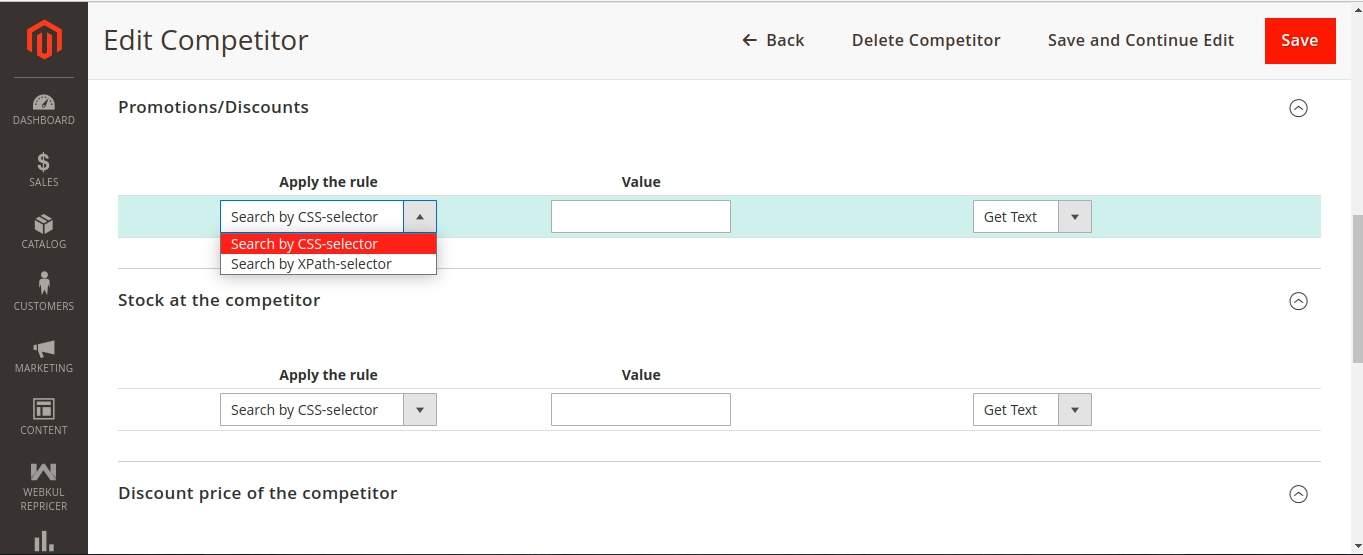
These values will add from the rival site in two forms whether its text format or direct value. And the search rule applies to the CSS selector and Xpath selector values.
Get Text: The text value is retrieved for text content.
Get Value: It is used for retrieving the attribute value from the HTML tag.
Example: we have added here the full price of the product via CSS selector value.
How to get the CSS selector value?
The admin will open the competitor’s website and select the product which they have entered for price comparison. Then inspect the price value and copy it and then paste it into the required field.

Once the admin clicks on copy selector, a link will be copied and need to be pasted into the value tab then click on the save button.
How to get the Xpath Selector value?
The admin will open the competitor’s website and select the product which they have entered for price comparison. Then inspect the price value and copy it and then paste it into the required field.

Once the admin clicks on copy Xpath, a link will be copied and need to be pasted into the value tab then click on the save button.
Note: If a user knows HTML then they can write a custom CSS selector or Xpath selector to retrieve the price.
The admin can check the parse result of the competitor’s product when they click on the test button. So the admin can see the details in the popup.
In this popup, they can check the full price of the competitor, and if admin adds the rest of the details like sales price, discount price, stock, and promotions.

Furthermore, the admin can download the HTML code from the download HTML code button in the product attribute tab.
Product Price Comparison Configuration
Once the competitor’s product is added admin needs to edit their own website’s product details from the product section.

One tab is available in the edit section with the name of the dynamic repricer. The admin needs to add the competitor first which was added previously.
Here, the admin click on add competitor button, and a popup will open. Where admin chooses the pre-added competitors, enters their product link, and status as enable/disable.

Once the competitor is added, Parse the competitor in the edit product section, and the admin will enter the product details as per the competitor’s product details.
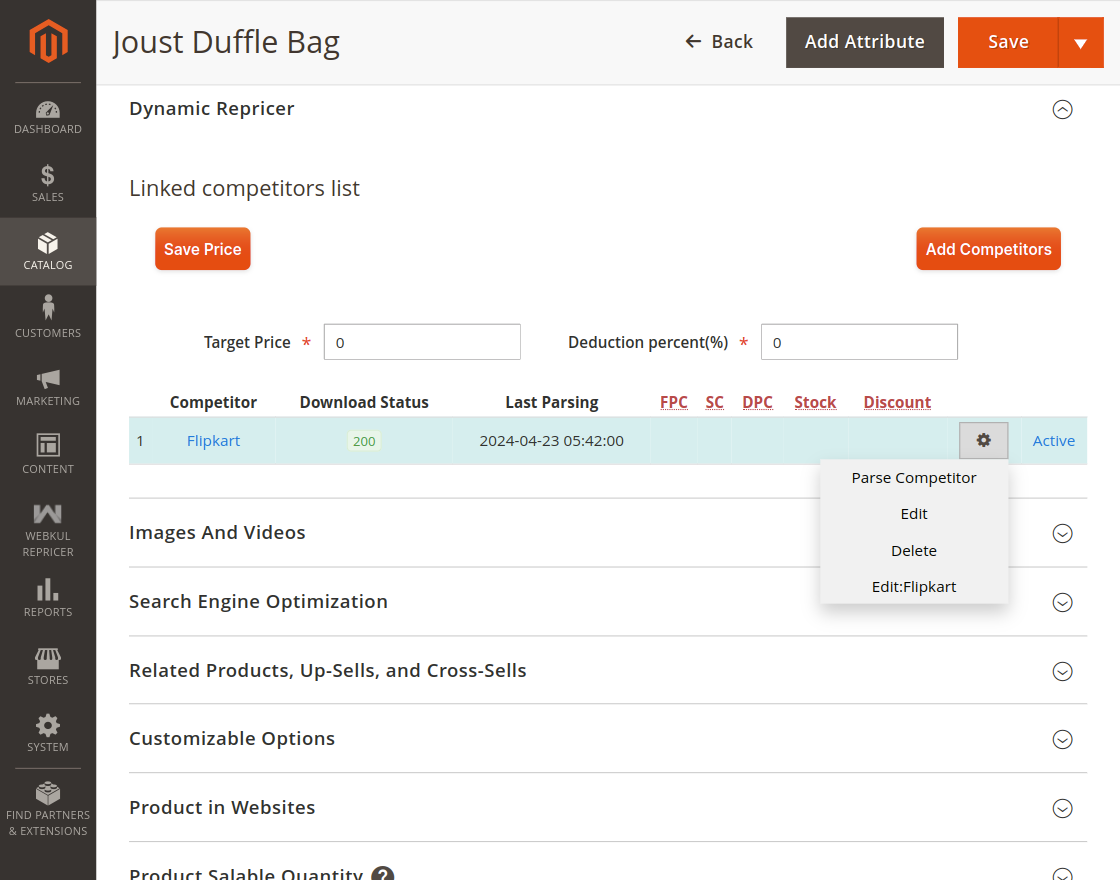
After parsing the competitor details will show in the competitor list. The admin can check the last parsing date and time, FPC, SC, DPC, Stock, and Discount amount in the list.
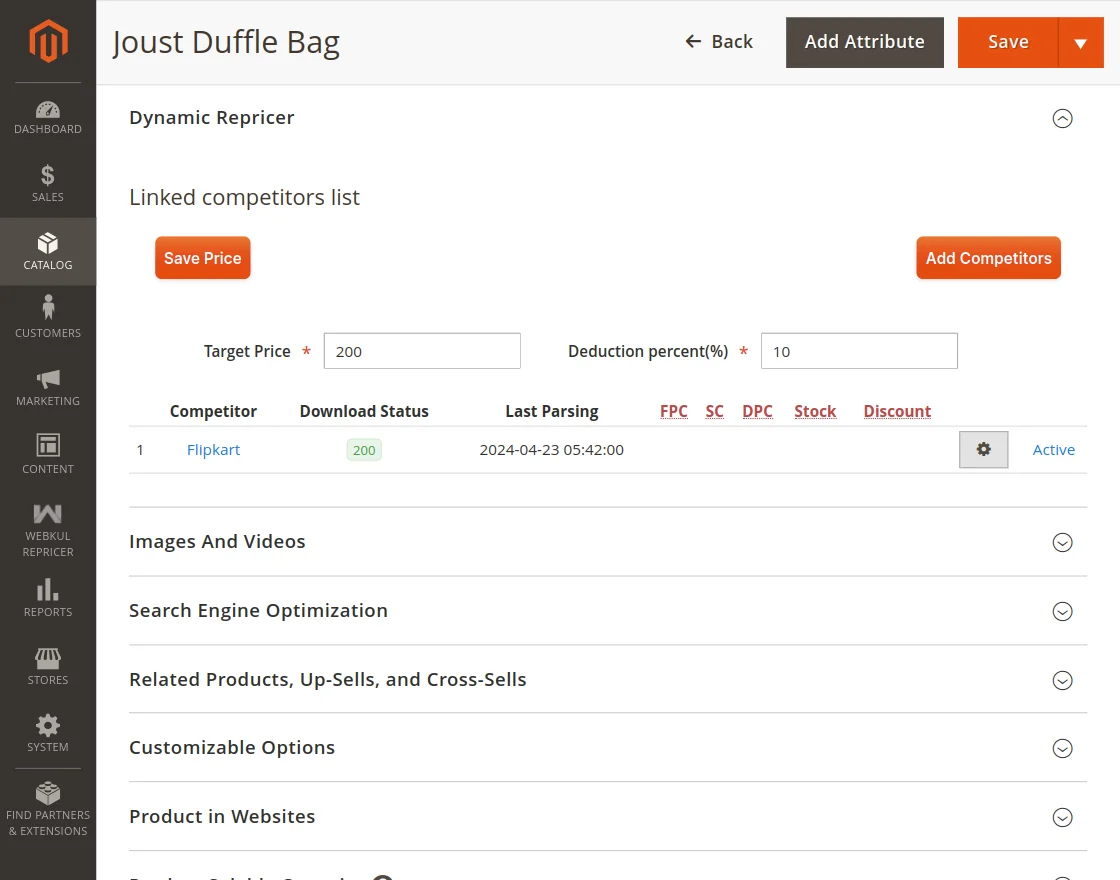
Now, the admin will enter the comparison price rule so accordingly value will change on the customer’s end.
As per the above image, the admin needs to enter the target price and deduction percentage so a price rule will apply and the price will change.
Target Price: Target price is the minimum price of the admin’s product means after calculation price shouldn’t decrease from the targeted price.
Deduction Percentage: Basically deduction percentage is the deduction value of the admin’s product base price but it will add in the difference amount first then the total percentage will apply to the base amount.
Example: As per the below image base price of the product is 2000.

To understand this check the calculation below:
Example
Admin website’s product base price: 2000$
Competitors’ website product price: 999$
Difference between both pricing: 1001$
Percent-wise difference: 50.05%
The percentage added by the admin: 10% addition on difference percentage
Total: (50.05%+10%) – 60.05% of the base price of the admin’s product
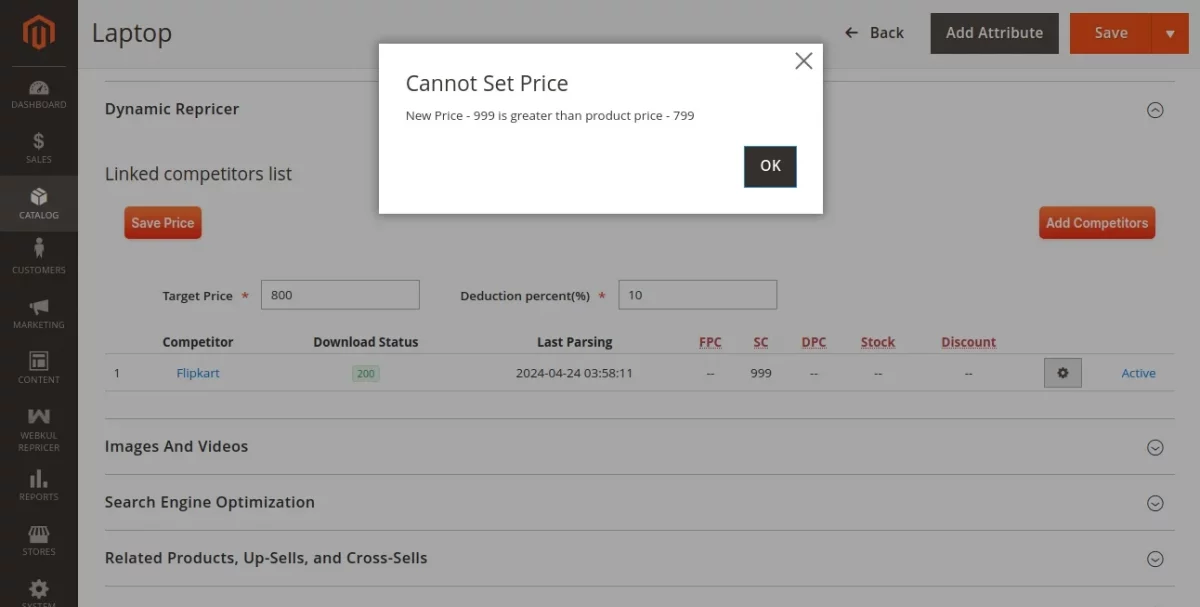
To get the reduced value 60.05% of 2000 is equal to 1201. This amount will deduct from the base price so the remaining price is 799. Once the admin saves the price rule the changes will reflect on the customer’s panel.

If the admin wants to increase the target price let’s suppose 800.

After changing the amount once they hit on the save price a popup will arise with an error message as per the below image.
Note: If we have value in FPC, SC, and DPC then the admin product price will compare with the lowest price among these three.
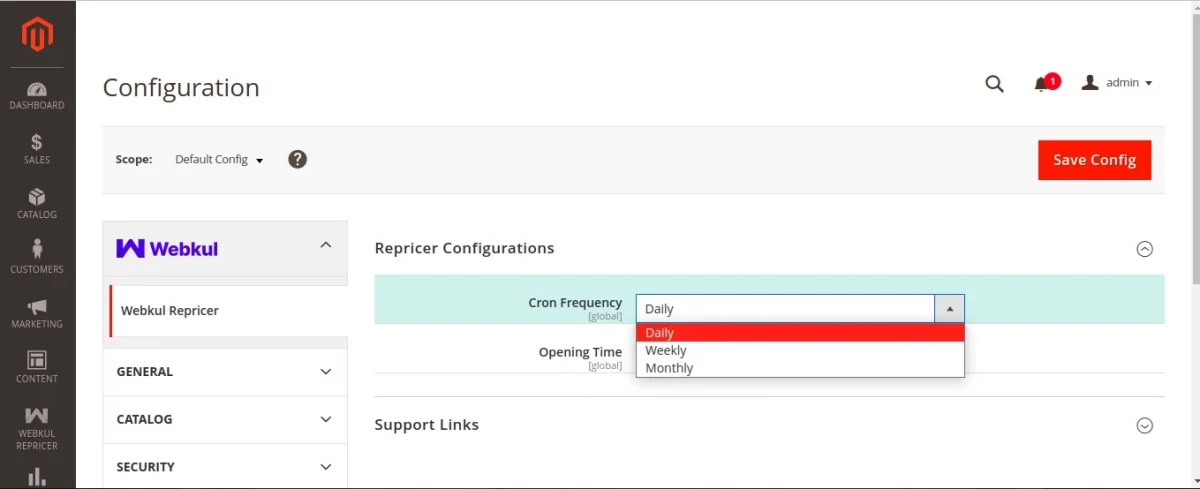
Cron Functionality
The admin can set the corn job to update the product pricing as per the rival site.

The corn frequency can be added on a daily, weekly, and monthly basis.
Overall the Magento 2 Product Repricer helps the admin to compare the price and change them accordingly.
You can also check our complete Magento 2 extensions.
That is all about the Magento 2 Product Repricer. If you have any queries regarding the plugin, please contact us at Webkul Support System.
Current Product Version - 5.0.2-p2
Supported Framework Version - 2.0.x , 2.1.x , 2.2.x , 2.3.x , 2.4.x

Be the first to comment.