Magento 2 Multi-Vendor User Account allows the sellers to create sub-accounts for themselves. The seller can select various permissions for sub-account users. such as view products, manage profile, manage products, etc.
These permissions help the seller to divide the roles and responsibilities with the other sub-account users. For eg: A seller can add agents/users to view orders and products only while another can manage the seller profile.
Important Note: This module is an add-on of the Adobe Commerce Marketplace Module. To use this module you must have installed Webkul’s Magento 2 Multi Vendor Module first.
Watch the video tutorial below to understand extension workflow:
Features
- Admin can enable/disable the “Manage sub-accounts” for the sellers.
- The admin and the sellers can create multiple sub-accounts.
- Admin/seller can delete/edit existing sub-accounts.
- Both, the admin and the seller can assign specific roles to the sub-account users.
- Sub-account users can access only assigned functionalities by the admin/seller.
- Sub account can also manage to add another sub-accounts.
- Allow the sub-account users to perform the actions on the web store according to their allowed permissions.
- Helps admin/seller to distribute their roles and responsibilities to the other sub-account users.
- Support multiple languages and translations.
- The source code is 100% customizable.
- Also supported by the Hyva theme, which is a popular theme for Magento 2 stores.
- Use GraphQL API that only serves the data that you requested.
Installation
Customers will get a zip folder and they have to extract the contents of this zip folder on their system. The extracted folder has an src folder, inside the src folder you have the app folder.
Further, the admin needs to transfer this app folder into the Adobe Commerce root directory on the server as shown below.

After the successful installation, you have to run these commands in the Adobe Commerce Cloud root directory:
php bin/magento setup: upgrade
php bin/magento setup:di: compile
php bin/magento setup:static-content: deploy
php bin/magento indexer:reindex
php bin/magento cache:flush
Configuration of Multi-Lingual
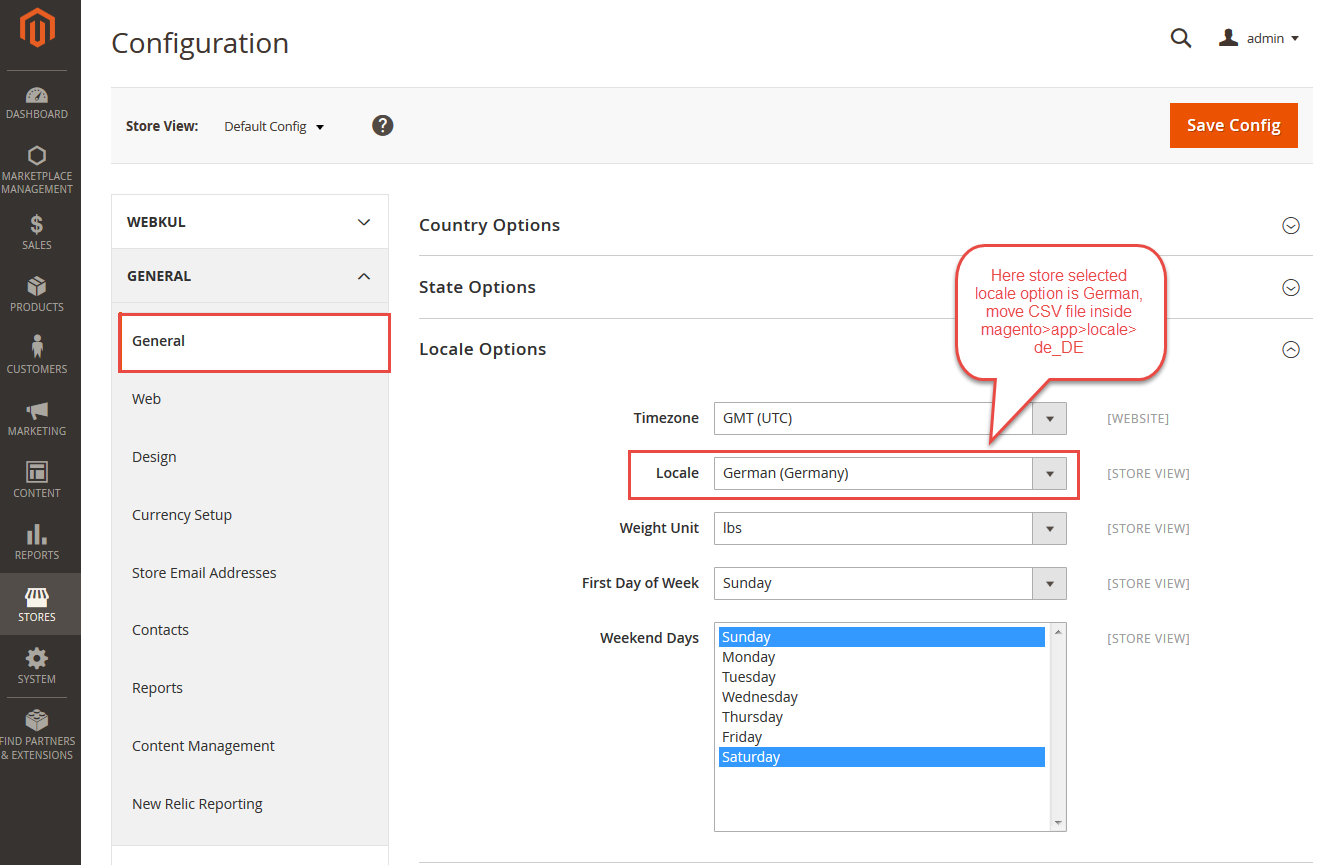
For the multilingual support, the admin will navigate through Store->Configuration->General ->Locale Options and select the locale as German (the language into which the admin wants to translate his store content).
Language Translation
If you need to do the module translation, please navigate the following path in your system. app/code/Webkul/SellerSubAccount/i18n. Open the file named en_US.CSV for editing as shown in the below screenshot.

Once you have opened the file for editing. Replace the words after the comma (,) on the right with your translated words.
After editing the CSV file, save it and then upload it to the same folder. Now your module translation is complete.

Module Configuration
After the installation of Adobe Commerce Cloud Multi-Vendor User Account Marketplace, the admin can either enable or disable the “Allow Seller to Manage Sub-Accounts” by selecting “Yes” or “No”.
For this, the admin will navigate to Stores>Configuration>Seller Sub Account Settings.

General settings
- Allow Sellers To Manage Sub-Accounts: The admin will select Yes to Enable the feature of sub-accounts for the sellers.
The sub-users can also check the Customer List and Review list of the seller.
Sub Account Permission
- Select sub seller Account Permission List: Under this, the admin will select the activities that the sellers are allowed to perform. The admin can grant permission for any number of activities from the available list.
Seller Management
The sellers can manage the Adobe Commerce Multi-Vendor User Account Marketplace by navigating to My Account>Manage Sub Accounts. Sellers will be redirected to the Manage Sub Accounts page which displays the sub-account users list as per the below image.

Here, the sellers can:
- Edit sub-account details by clicking on the Edit link.
- Delete the sub-accounts from the Actions drop-down list.
- Add new sub-accounts by clicking on the Add New Sub Account.
Note: The Manage Sub-Accounts option in the seller panel will only be visible when the admin sets the Allow Seller to Manage Sub-Accounts option as Yes else not.
By navigating to Manage Sub Accounts>Add New Sub Accounts the sellers can add new sub-accounts as per the below image.

Here, the seller will:
- Enter the First and Last name of the sub-account holder.
- The email address of the sub-account holder on which invitation request for the sub-account will be sent.
- Allowed Permissions: the seller can grant multiple roles to the sub-account.
- Active: the seller can either enable/disable the sub-account by selecting ‘Yes’ or ‘No’.
Allowed Permissions
The admin/ Seller can grant multiple access permissions of the web store to the sub-account. The Allowed Permissions option includes many permissions to access the functionalities of the web store.

These are:
- View Dashboard – Sub-account users can view the marketplace dashboard showing sales by location, latest reviews, ratings, orders, lifetime sales, total payout, remaining amount, top-selling product, and top-selling category.
The sub-account user can also ask a question to the admin.
- Manage Profile – Edit the seller profile information such as social links, contact number, upload banner, company logo, shop title, country, shop URL, shipping policy, refund policy, etc.
- Create Configurable Product Attribute – The sub-account users can create product attributes for the configurable products of the sellers.
- View Products – Permission to view and search the seller products list. Also, the sub-account user can see the quantity – confirmed, pending, sold, and view the earned amount.
- Manage Products – The sub-account user can add a new product for the seller. To allow the sub-account users to edit or delete the existing products of the seller, the seller needs to give ‘View Products’ permission also.
- Manage Transactions – The sub-account user can view the payment transactions related to the seller payments.
- Order pdf header information Management – Edit the order pdf header information that appears on invoices, orders, credit memo, packaging slip.
- Manage Orders – Permission to manage the orders. The seller sub-account user can create a shipment, add the tracking number, send tracking information to the customer, cancel the order, create an invoice, credit memo.
- My Customer List – This permission is available in the Seller Separate Dashboard view only. Here, the sub-account user can view the customer list of the seller with name, email, contact no., gender, address, base total, and order total.
- My Review List – This permission is available in the Seller Separate Dashboard view. With this permission, the sub-account user can view all the product reviews and seller reviews.
- Earnings: The sub-users can also check the total earnings of the store if permitted by the seller.
- Manage Sub-Account: The seller can enable the sub-account to create further sub-accounts.
Manage Sub-Accounts
The seller’s main account can enable the option while adding the sub-account. With this feature, the sub-accounts are able to create another sub-account.
- The sub-accounts will only see the sub-accounts created by themselves.
- The permission for the sub-account will be to only edit or delete the sub-account created by themselves.
- The main seller account will be able to see all the sub-accounts either created by the main account or sub-account and can delete or edit all the sub-accounts.
Note: Sub-account does not have permission to manage the subaccounts which are created by the main account.
Sub Account User Frontend
When a new sub-account is created, the user receives an email as visible below.

When the users click on the link in the mail, they will be redirected to a page where they can set their passwords.
After setting the passwords the users can log in to their accounts. Once the users logged in to their accounts, their accounts will display. Under account, only those web store functionalities which have been assigned by the sellers.

Now, the account users can manage the store as per the assigned roles and responsibilities by the seller by navigating to these functionalities.
Separate Vendor Panel View Permissions
Dashboard
Here, the sub-account user can view their dashboard.

Transactions
Here, the sub-account user can view all the Transaction details and also can make a Withdrawal.

Settings
Here, the sub-account user can edit their profile information:

Admin Management
The admin can also manage the sub-accounts of sellers by navigating to Marketplace Management>Manage Seller. Here, the admin can view the sub-accounts of a particular seller. For that, they need to click on the “Manage” link under the “Sub Accounts” column in the list.

The admin will be redirected to the Seller Sub Account page when clicks on the “Manage” link against any particular seller. This page will display the list of sub-accounts of that particular seller.

Here, the admin can:
- Delete the sub-accounts by selecting the delete option from the “Actions” drop-down list.
- Edit the sub-accounts by clicking on the “Edit” link.
- Add new sub-accounts by clicking on the “Add New Sub Account” button.
Add New Sub Account
The admin can add/create the new sub-accounts by navigating to Marketplace Management>Manage Sellers> SubAccounts-Manage>Add New Sub Account. The following page will open:

The admin will:
- Enter the sub-account user’s First and the Last name.
- Enter the sub-account user’s Email id.
- Allowed Account Permissions: the admin can grant multiple roles to the sub-account.
- Active: the seller can either enable/disable the sub-account by selecting ‘Yes’ or ‘No’.
Manage Sub-Account Users
All the sub-account users can be seen in the customer list by navigating to Customers>All Customers. This will redirect the admin to the customer list page where the sub-account user will be under the Sub-Account group.

Here, the admin can:
-
View the group type of each customer under the “Group” column.
-
Edit the sub-account customer details by clicking on the “Edit” link under the “Action” column.
The admin will be redirected to the following page when clicking on the “Edit” link against any customer as per the image.

Thus, that’s all for the Magento 2 Multi-Vendor User Account Marketplace. Still, have any issues please Email us at [email protected] else you can generate a ticket at our HelpDesk System. You may also browse other Adobe Commerce marketplace addons and our quality Magento 2 extensions.
Current Product Version - 5.0.4
Supported Framework Version - Magento 2.0.x, 2.1.x, 2.2.x,2.3.x, 2.4.x

4 comments
Can you please elaborate on your query as it is not much clear. You can email us at [email protected] with your complete query and we will get back to you accordingly.
Thank You
Webkul Team