Magento 2 Multi Step Vendor Signup module allows the admin to create a multi‑step registration form for sellers.
In default Magento, there are regular single‑page forms for registration. But these days, multi‑step registration forms are more successful than those long, static forms.
Further, this will make it easier for the marketplace sellers to fill up the large registration forms by breaking them into multiple sections.
Moreover, the seller just follows these steps, fills in the details, and registers. This module provides step-wise navigation for filling in the information.
Also, the admin can create customizable vendor registration forms for the marketplace by adding custom attributes to these multiple steps.
It supports multiple input types like text, number, radio button, drop-down, multi-select, image upload, file upload, etc.
Please Note – This module is a marketplace add-on, so you must have installed Webkul Magento 2 Marketplace Module.
Check a brief overview of the plugin –
Features
- The admin can create a multi-step vendor registration form.
- Admin can create multiple steps or stages for the vendor registration form.
- The admin can create multiple custom attributes for the form.
- Admin can add multiple attributes to a group.
- The module supports different input types for form fields – text area, text field, date, yes/no, multiple select, drop-down, media image and file.
- Ability to set the allowed extensions for uploading images and files.
- Ability to show vendor form attributes on the registration page and profile page.
- The admin can either display or hide the vendor registration form attributes on the seller profile.
- The module displays a progress bar to guide the progress status of the form completion.
- Proceed and Back button for easy navigation between the multiple steps.
- The sellers can update the attribute values from their end.
- Customers also can view the seller information on the vendor’s profile page.
- The admin can update the vendor registration attributes.
- The source code is 100% open for customization.
- The module supports multi-lingual translation.
- GraphQL has been implemented in the extension.
- The extension is compatible with the Hyva Theme.
Installation
The installation is quite simple just like the standard Magento 2 extensions.
Firstly, customers will get a zip folder and they have to extract the contents of this zip folder on their system.
The extracted folder has an src folder, inside the src folder you have the app folder.
You need to transfer this app folder into the Magento 2 (Adobe Commerce) root directory on the server as shown below.

After the successful installation, you have to run these commands in the Magento 2 root directory.
php bin/magento setup: upgrade
php bin/magento setup:di: compile
php bin/magento setup:static-content: deploy
php bin/magento indexer:reindex
php bin/magento cache:flush
Multi-Lingual Configuration
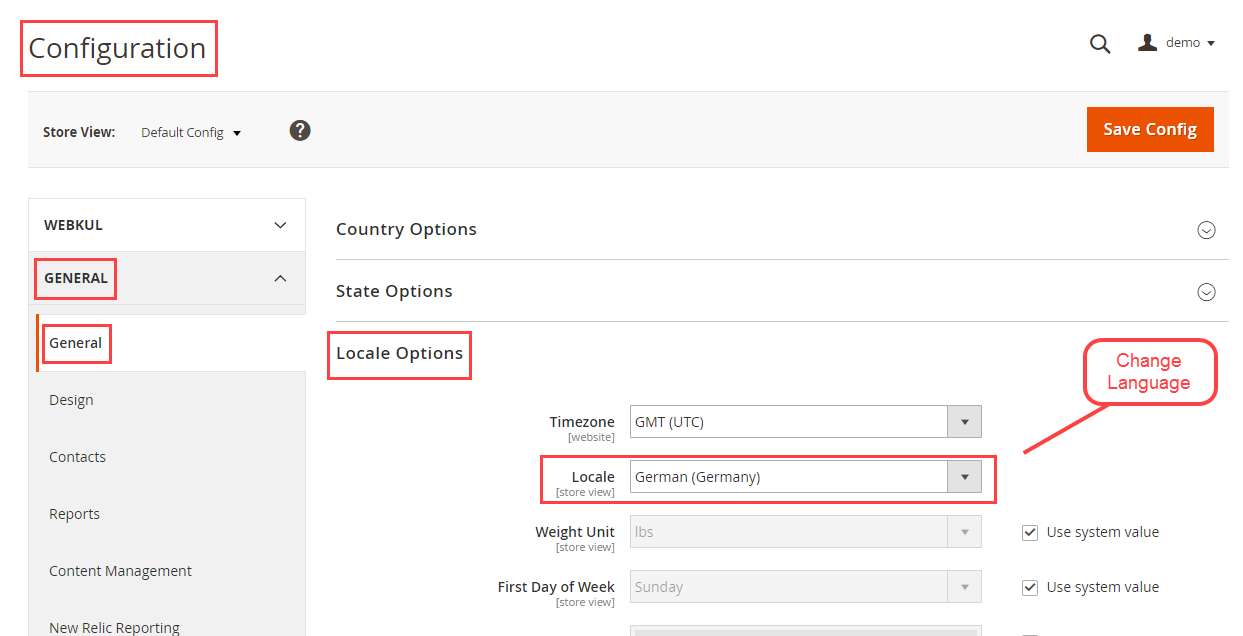
Further, for Multilingual support, please navigate to Store>Configuration>General >Locale Options. And select your desired language from the Locale option.
Language Translation
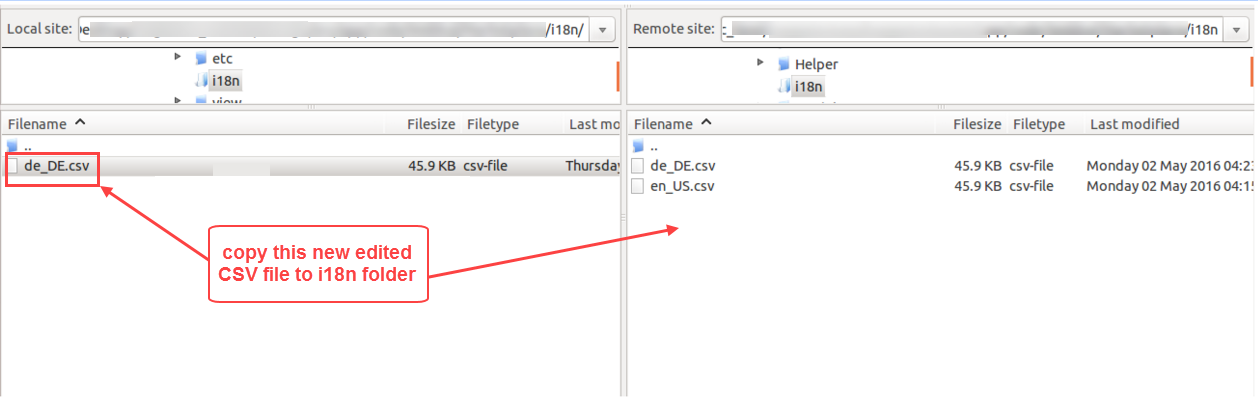
Further, for module translation, navigate to the following path in your system app/code/Webkul/MpVendorRegistration/i18n/en_US.csv.
Open the file named en_US.CSV for editing as shown in the below screenshot.

Further, replace the words after the comma(,) on the right in the file with your translated words.

After editing and translating the CSV file, you need to save the translated file name according to your region language and country code such as – de_DE.CSV.
Moreover, followed by uploading the translated file to the same folder from where you have obtained it. Now your module translation is complete.
Module Configuration
After the module installation, the admin will configure the module settings by navigating to the Stores -> Configuration -> Webkul -> Multi Step Vendor Registration as per the below image.
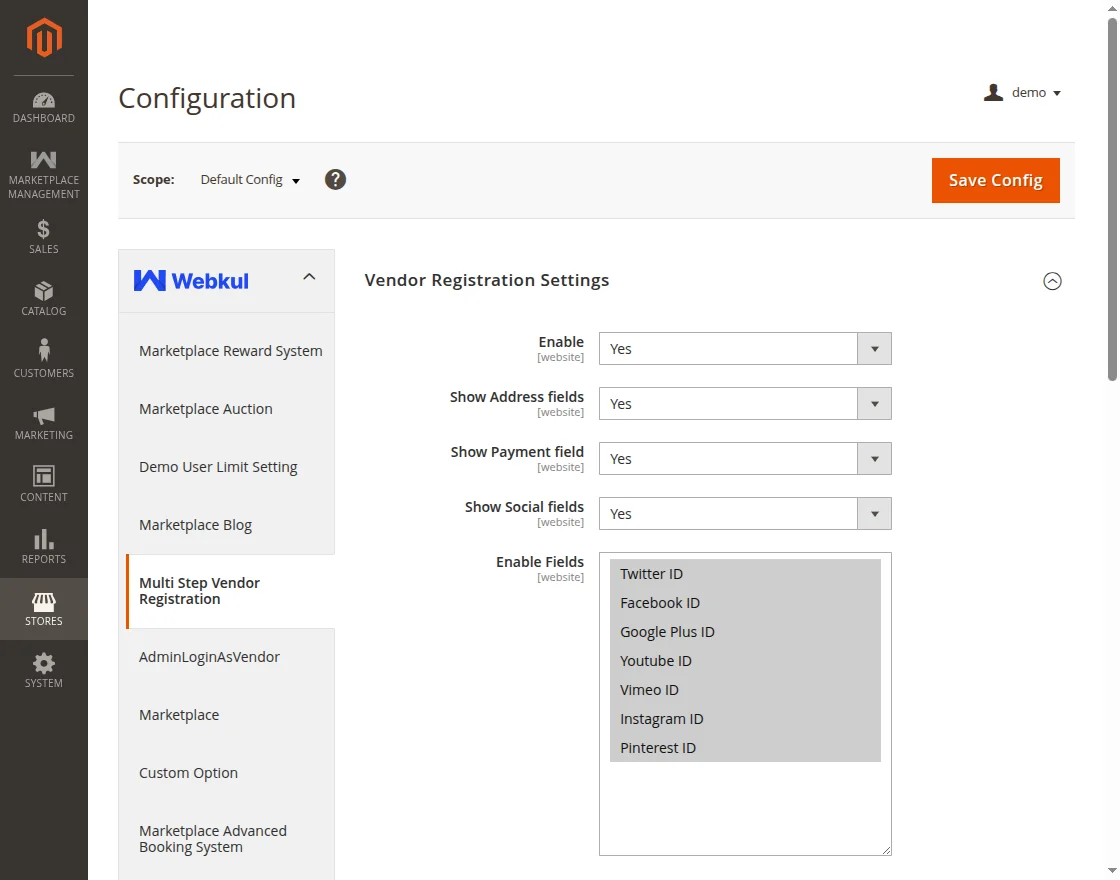
Here, the admin will:
- Enable: Set Yes to enable the module. Else set No to disable the module.
- Show Address Fields: Set Yes to display the address fields. Else set No to hide the address fields.
- Show Payment fields: If enabled then the vendors will be able to add their bank account information to receive the payments.

- Show Social Fields: If enabled then the vendors will be able to add their social account details on the multi-step registration page. The admin can choose which social fields to show and which to make as required.

- Allowed Image Extension: define the allowed extensions for uploading the images.
- Allowed File Extension: define the allowed extensions for uploading the files.
Moreover, the admin will set the number of lines required for the street address at the front-end multi-step vendor registration form.
For this, navigate to the Stores -> Configuration -> Customers -> Customer Configuration.

Here, the admin will:
- Number of Lines in a Street Address: set the number of lines for the street address required by the vendors for entering the address in the multi-step vendor registration form.
Vendor Registration Manager
After installing and configuring the module, the admin will have a Vendor Registration Manager menu section to manage the multi-step vendor registration form.

Meanwhile, under the Vendor Registration Manager menu section, the admin will have two submenu options-
- Group – Here, the admin defines the multiple steps for the vendor registration form.
- Attribute – Here, the admin will define the custom attributes and add them to the “Vendor Registration Groups” as per the choice.
Vendor Registration Group
In this section, the admin will create advanced registration forms by creating the groups. Each group will represent a step of the “Multi-Step Vendor Registration” form.

The default group can’t be deleted. Clicking the Vendor Registration Group menu option will navigate the admin to the Manage Vendor Registration Group page as per the below image.
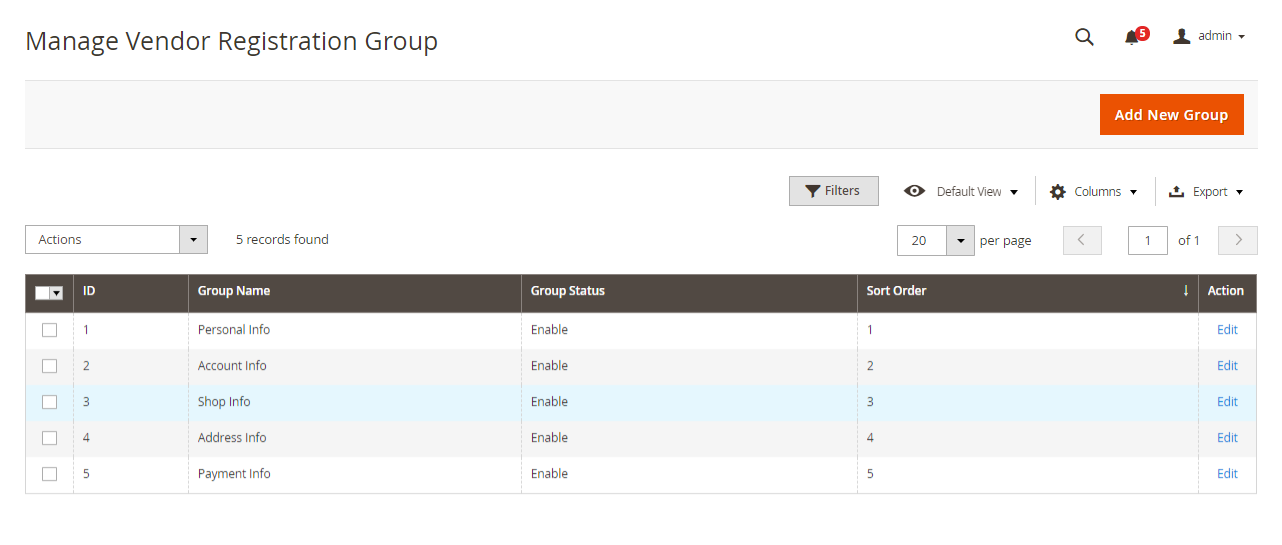
Here, the admin can-
- View the complete list of the existing groups.
- Edit the details of the groups by clicking the Edit link.
- Delete the groups by clicking the Delete tab from the Action drop-down list.
- Enable or Disable the group status by selecting the Group Status from the Action drop-down list.
- Add the new groups by clicking the Add New Group button.
Further, for adding the new groups, the admin will click the Add New Group button which will redirect the admin to the New Group page as per the below image.

Here, the admin will-
- Group Name: Define the group name which will represent the group type.
- Sort Order: Set the sequence number of the group in the vendor registration form.
- Status: Set Yes to enable the group. Else set No to disable the group.
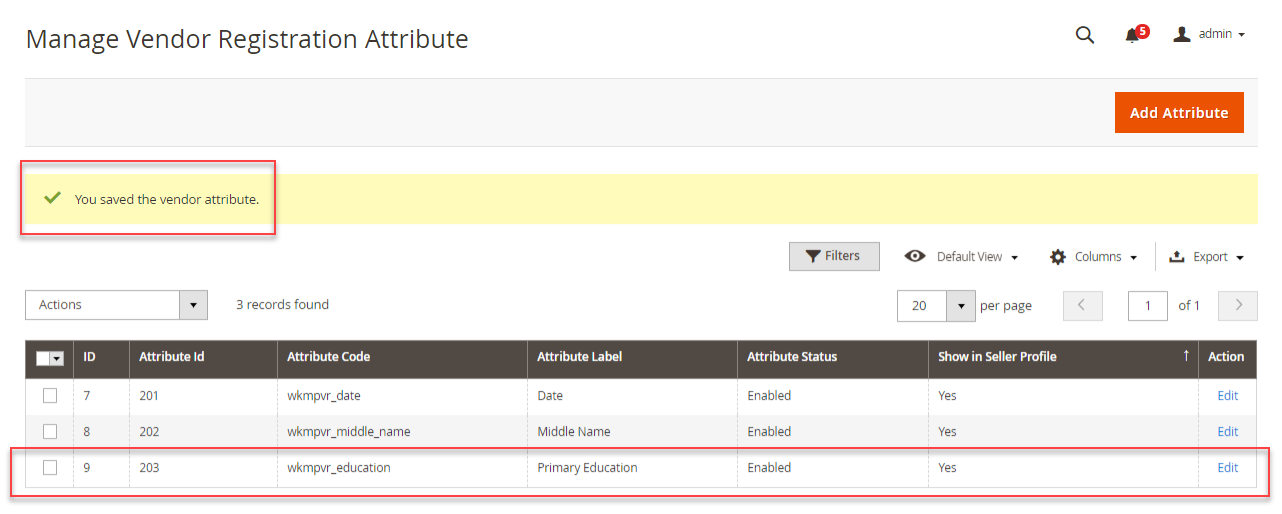
And lastly, hit the Save Group button to save the group successfully.

Vendor Registration Attribute
In this section, the admin will define the custom attributes and assign them to the groups as per the choice.

Thereby, clicking the Vendor Registration Attribute menu option will navigate the admin to the Manage Vendor Registration Attribute page as per the below image.
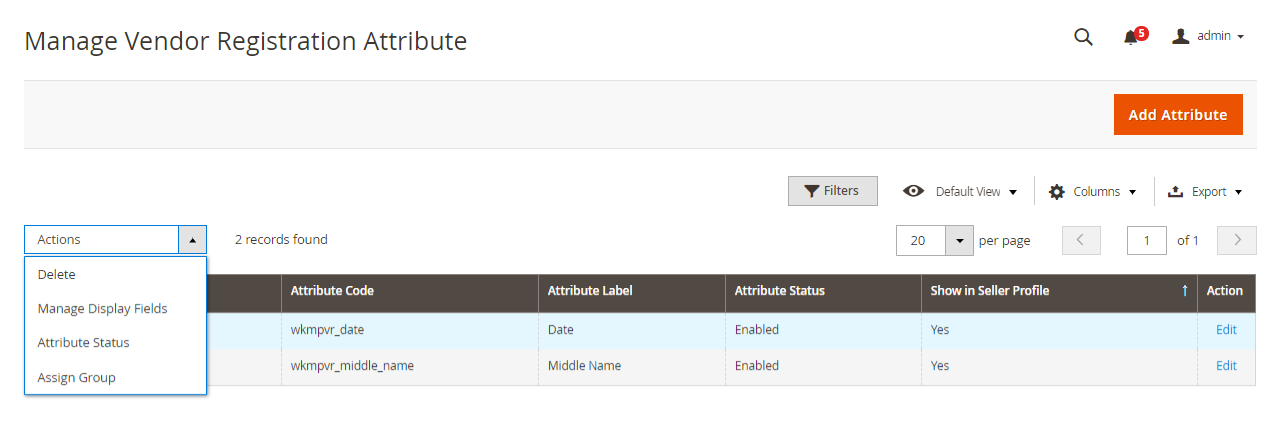
Here, the admin can-
- View the complete list of the existing custom attributes.
- Edit the details of the attributes by clicking the Edit link.
- Delete the attributes by clicking the Delete tab from the Action drop-down list.
- Display or Hide the attributes on the seller profile by selecting the Manage Display Fields tab from the Action drop-down list.
- Enable or Disable the attribute status by selecting the Attribute Status from the Action drop-down list.
- Add the attributes to the groups by selecting the Assign Group tab from the Action drop-down list.
- Add the new attributes by clicking the Add Attribute button.
Further, for adding the new attributes, the admin will click the Add Attribute button which will redirect the admin to the New Attribute page as per the below image.

PROPERTIES:
Here, the admin will-
- Default label: Enter the attribute name which will be displayed as the default label for the Attribute created.
- Attribute Code: Enter the attribute code which must be unique. Space cannot be used in this field and the first character should be a letter.
- Frontend Input Type: Set the input type for the kind of data the attribute will store. What’s set here determines how data entry for this attribute will take place.
- Values Required: Set Yes if you want the attribute value a mandatory one. Else select No.
- Input Validation: Set the validation type for the custom registration field in Magento 2. For example, if validation is set to letters, you will only be able to enter letters. An error will occur if you try to put numbers in this field.
- Input Field Sort Order: Set the order for attributes. This will determine in which order or sequence each attribute will be listed in the registration form.
- Assign Group: Assign the Attribute to any of the available groups.
MANAGE LABELS:
Here, the admin will manage labels for the store views as shown below.

And lastly, hit the Save Group button to save the attribute successfully.
Input Type Supported
The module supports the following input types for custom attributes-
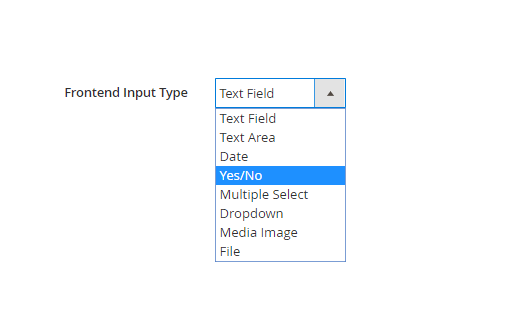
- Text Field: This input type is used to enter a single editable line of text.
- Text Area: This input type is used for a multi-line area for displaying text.
- Date: This enables the user to enter a date either using a text box or using a date picker interface.
- Yes/No: This will allow the yes/no input selection type.
- Multiple Select: This input type is used to select more than one option in the list.
- Drop-Down: This input type is used to select only one option in the list.
- Media Image: This enables to upload of the images of allowed extensions.
- File: This enables to upload of the files of allowed extensions.
Front-End
At the front-end, there will be a Vendor Registration link at the bottom of the page as per the below image.

Clicking the Vendor Registration link will navigate the user to the Multi-Step Vendor SignUp page.

In the Multi-Step Vendor SignUp:
- The groups will be displayed as steps at the top.
- And the assigned attributes to each group will also be displayed.
- The seller can also view the Proceed button at the extreme right at the bottom of the page to move ahead. But the sellers will navigate to the next step when they will complete all the attribute details defined for the step.

The vendors will provide the step-wise details to complete the registration process.
These multi-steps are the simplest way to fill up a large registration form more conveniently.
The module displays a progress bar to guide the progress status of the form completion.
And a previous button to navigate back.

After completing the registration form, there will be a Done button to submit the response successfully.

Clicking the Click Here link will navigate the seller to the seller account dashboard directly.
Seller Profile Page – Seller End
The seller can even view the custom vendor attributes in the Marketplace Edit Seller Profile Page and can also update these attributes.


Seller Profile Page – Customer End
The customer also can view the seller information on the vendor’s profile page as shown below.
This view is as per the seller profile layout settings set as layout 1 in the marketplace configuration.

In the case of Layout 2, the customers can see the vendor attributes as per the snapshot below.

View Vendor Attributes – Admin Backend
The admin can view the attributes for the vendors in the admin backend. To do so, navigate through Marketplace Management->Edit the respective seller->Vendor Attribute Fields.

Support
That is all for the Magento 2 (Adobe Commerce)Multi-Step Vendor Signup module. Still, have any issues feel free to add a ticket to our HelpDesk System.
Explore the Adobe Commerce Cloud development services by Webkul. You may also browse other Magento 2 marketplace add-ons and our quality Magento 2 extensions.
Current Product Version - 5.0.3
Supported Framework Version - Magento 2.0.x, 2.1.x, 2.2.x,2.3.x, 2.4.x

Be the first to comment.